Free Pattern
Be sure to sign up for my email newsletter to get a free quilt pattern!
Jolly Jelly Roll Quilt Wrap Up
Here are all of the previous bog posts, if you are just now joining us:
Remember, you can click on any picture to enlarge it. Now, onto the binding!
I use the same techniques to attach the binding to all my quilts, whether finishing by hand or machine.
Step 1 – Square Up the Quilt
Use a large square ruler to trim up all four corners of your quilt. The square will help you achieve a nice straight 90 degree corner. Trim up all four of the sides with a longer ruler.
Step 2 – Measure the Quilt Perimeter and Cut Enough Binding Strips
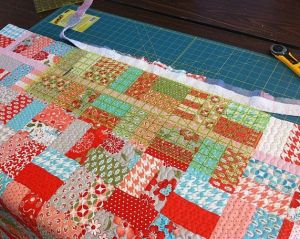
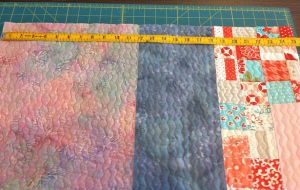
Measure the perimeter of your quilt so you know how many strips to cut. Lay it out on your cutting mat or use a measuring tape. I folded my quilt in half to make it easier to measure. Divide your perimeter by 40 inches (the useable length of one strip).
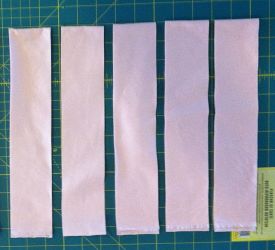
Round up to the nearest number of strips and cut them 2 1/4″ wide. I cut 5 strips for my quilt.
Step 3 – Make Continuous Binding
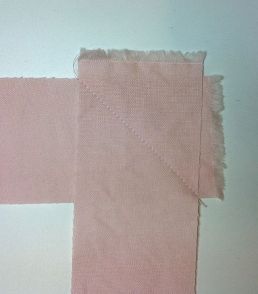
This method is called double-fold straight grain binding. Sew all of your strips together to make one continuous piece. Miter the strips by sewing on an angle to distribute the bulk of the seam. If you are using a solid fabric, be sure to sew them all together on the same side!
Trim 1/4 inch seams to the right of your sewing line and press open.
With a small square ruler, cut off one end of your binding on a 45 degree angle. Make sure your binding strips have not been folded or pressed yet. Once the end is cut, then press your binding in half along the entire length, with wrong sides touching and right sides out.

 Watch your seams if using solid fabric!
Step 4 – Attaching the Binding to the Quilt
Begin sewing your binding to the quilt with a walking foot, leaving a tail of about 6-8 inches unsewn. Be sure to start on the side of your quilt, not at a corner and sew the binding to the front of the quilt. The folded side of your strips will be to your left. The open sides will be to your right. Use a quarter inch seam allowance and match your thread to your binding fabric.
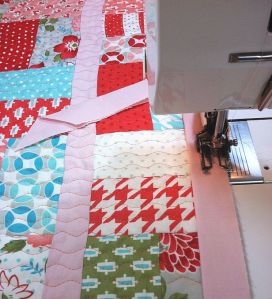
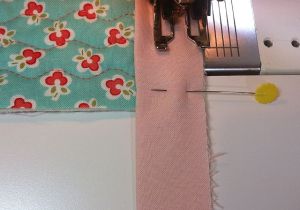 When you reach a corner, stop sewing 1/4 inch away from the end. Mark it with a drawn line or a light pencil mark if needed. Sew off the side.
Rotate the quilt and flip the binding strip up so that it is even with the side of the quilt. Then, flip it back down, forming a “pinch” of fabric at the corner. This will be the fullness that will flip around to the back creating a nice mitered corner on the front.


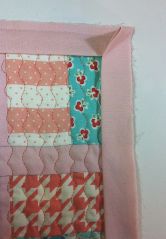 Repeat this technique for all four corners of the quilt. When you are nearly finished sewing the binding onto the front side, make sure to leave another tail of about 6-8 inches of binding so you can join the beginning and ending binding pieces.
 Next, you will trim and join the ends so they fit together exactly.
If you have a lot of excess binding, you can trim some off.
Open up both binding ends and nestle your beginning binding piece (the angled cut end) on top of the ending piece so that it is flat and smooth. Mark an angle on the ending piece where the beginning piece rests on it – should be a 45 degree angle. Cut 1/2 inch away from this marked line. This will take into account the seam allowances for both pieces. Make sure your binding is not twisted and that both angled cuts are parallel to each other.

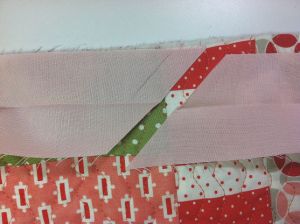 Join the two ends by offsetting them slightly to create little tiny tips at each end. Where my pin is pointing, sew from the crevice of one triangle tip to the other, with 1/4 inch seam. Trim off the triangle tips, and press the seam open. It should be a perfect fit!

 Finger press the rest of the binding closed and complete your stitching on the front side.
Step 5 – Finishing the Binding with Decorative Machine Stitching
 The key to a really nice binding, whether finished by hand or machine, is to make sure it lies flat all the way around the quilt and that the corners are secure.
Once the binding is sewn to the front, simply fold it over to the back to stitch. I like to use pins with Pinmoor anchors for safety to keep everything in place. Fold over the corners to create a nice miter and pin.
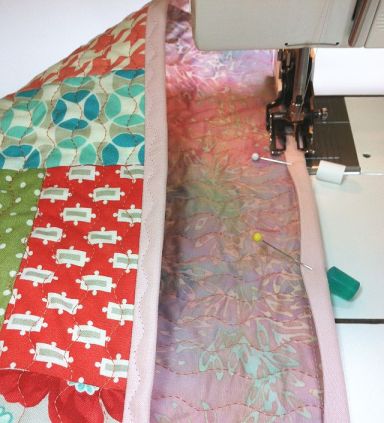 I used the same decorative serpentine stitch for the binding that I used for the quilting.
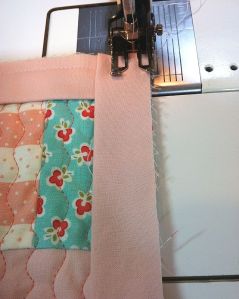
You will notice I am actually stitching by machine from the back side of the quilt. This seems to give me the best results and I can control how wide the stitching is so it shows up nicely on the front.
You can see where I’ve already stitched some of the binding.
On the back, be sure to cover the line of straight stitching that was used to sew on the binding from the front side.
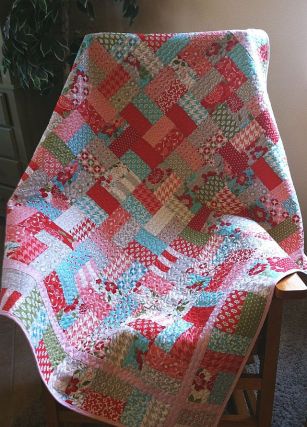
The binding is just as beautiful on the backside as it is on the front. Another finished quilt!
Sharing is Caring
I’d love to see your version! Please share your work in progress in my facebook group: Quilt With Christa . 🙂



Reblogged this on daphnedawn and commented:
A great tutorial which has answered so many questions I’ve had on binding a quilt.
I loved this tutorial for doing the binding with pictures for clarity. The way you joined the final ends together is what I’m going to try next. I have tried a number of ways which I seen online and it seems I always have difficulty getting it quite the length it needs to be to properly fit the quilt. Your method just makes so much more sense than some of what I’ve been doing. I also loved the serpentine stitching you used on the binding. Do you do any extra hand stitching to join the two sides of the mitered corners?
Oops, and I forgot to ask you…..what are those pins that you used during the quilting process?
I have plenty of Jelly Rolls, and while I love doing the “race” quilts, it will be fun to try something new. Your instructions and pictures are very clear, and seem easy to follow. I love that curved stitch you used for the quilting, and I am hoping that my Bernina has something like it. What stitch number did you use, and did you do anything special with it – make it longer or wider?
Thank you for such clear instructions, I have a jelly roll quilt ready for quilting and was stuck for ideas, I love what you have done with yours so I am going to give this ago. I have been practicing machine binding on pot holders, but love the way you used the wavy stitching on the binding so I have decided to give that a go as well. Thank you for sharing.
Really enjoyed your tutorial. Thank you.
Thanks so much for the directions and inspiration – I was a few blocks into a tedious pattern using a jelly roll – and your simpler and just as pretty pattern is perfect. Instead of dreading this quilt top – I will now enjoy it, following your fun pictures and upbeat words. 🙂
wonderful instructions, clear, concise, and the pictures help tell every bit of the story! I can’t wait to start this as my second quilting but first larger quilt project ! I hope to do the math and make it a little larger though… thank you so much from a beginner quilter but 45 year sewer!
do you suggest adding rows or sashing between every other row to make it bigger?
I LOVE this quilt and your clear instructions! Can’t wait to sew this quilt! Many thanks!!
I love this quilt…can you tell me the stitch settings you used for quilting? Thank you for the detailed tutorials.
I selected my serpentine stitch and selected a width and length of 3.
Thank you 🙂
Is that 3.0 or something else? Thank you.
Also, how do you get the scallop of the stitch so smooth and its shape is not compromised rounding the corner? There has to be a trick to that! Thank you!
I practiced on scraps first to test my length and width. And then it just comes from practice by doing it for awhile.
Good luck!
Just finished this quilt. Turned out beautiful. Would send pic if I knew email address. Thanks for the pattern and help.
You can email your pics to christa@christaquilts.com. You can also upload them to my flickr group: http://www.flickr.com/groups/christasquiltalong/
This is an excellent tutorial. I like your binding method, using the decorative stitch.
This was a great tutorial, thanks! Now I know how to use the lovely mod black and white jelly roll I couldn’t resist!
Great Pamela! Be sure to share pictures of your progress on my flickr group, too: http://www.flickr.com/groups/christasquiltalong/
Love how you did your binding! Thanks for linking up to WIP Wednesday.
I love machine binding for charity projects. It’s so much faster and you can add that decorative stitch. Great tutorial and nice pictures.
Thank you for a great QAL Christa! We’ve been out of town visiting my daughter in Portland so I’m a bit behind. I can’t wait to see the next one.
Gotta get back to work on this quilt!
I love how you make the instructions easy to follow. It’s a beautiful quilt =]
This is by far the very BEST tutorial on quilt binding I have ever seen!!!!
I’ve been collecting/reading/viewing tutorials for bindings ….okay I admit….I get bored easily if I do only one way of doing anything…I crave variety, part of being an artist I suppose.
And I LOVE your decorative stitching on the binding…fun!!!
Thanks for sharing!!!!!
Thanks for all the lovely clear instructions to make this quilt.