We are continuing to make great progress on settling into our new home. Most of the big stuff has been moved, except for my sewing room. But this week, I started designing how I want it to look, and I had someone from Ikea come and measure the space so we can plan out a very functional working studio. Here are a rough floor-plan so far:
Sewing Room Floorplan

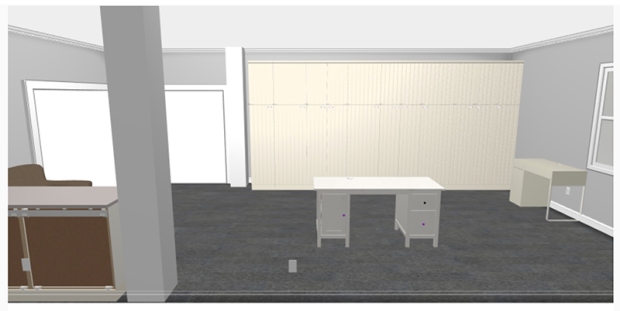
I basically have two areas – a big open loft and a small corner nook. (The lines in the upper left corner represent open hallways so that’s not actually part of the space.) My plan is to have wall-to-wall cabinets on one wall (#’s 1-8) and the opposite blank wall will be for my design wall. The lower left (#’s 9-11) will be base cabinets with a smooth surface on top for cutting, and I want to add a cozy chair for hand sewing.
The rectangles in the center and the right side wall represent rough placement of my sewing table and computer desk. I never had a work desk in my old studio so I’m excited for the change.
Here’s the rough rendering of the space in 3-D (with the left rectangle and clear rectangle representing room openings):
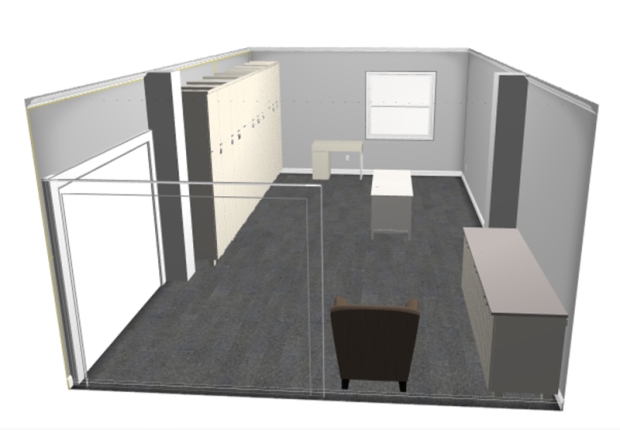
For so long, most of my furniture has been a mis-match of hand-me downs and ugly plastic storage bins. I’m sooo excited that in the new studio, everything will be behind closed doors in nice, pretty built-in cabinets.
Designing my space is like designing a quilt – I need to see what it will look like before I start!
Here are the accessories I’ve picked out so far – off white cabinet fronts with interesting texture, silver handles, and a gray counter top.

Things may change as I finalize the design this weekend, but hopefully everything will be ready by the end of February. Fortunately I’m in a lull with my quilting until the end of March, when new sample fabrics start arriving for spring quilt market. (More about that later!) So hopefully that will give me the time and headspace I need to get it all set up how I want.
Free Shipping on All Orders over $25!!
So let’s celebrate another weekly milestone with a sale!! From now through next Tuesday, when you spend at least $25 from my designer shop at Shop.ChristaQuilts.com you’ll get Free Shipping!!
You must use code MOVE7 in the coupon box at checkout to get the deal. So stock up on some of your faves guilt-free (and that means less stuff for me to put on my shelves, LOL!!!)

One of my earlier sketches as I was planning things out.
And now, I’ll pretend like I’m sitting in my cozy chair in one corner of my studio, enjoying some relaxing hand binding in a clean, organized and finished home… stay tuned for the next update!!

Looking good Christa! I’m working on a new studio space too, but vastly different as it’s in a 1920’s building so there’s lots of what the landlord called “character and layers.” Mine will also give me a classroom space, so I have plenty of room, but I’d kill to have an Ikea close enough to get some help! Thank goodness I can order from them if I want to.
I think it looks great, very Zen. I would add a good, bright, lamp next to the comfy chair.
Thanks! It’s been fun to design. I’m just barely getting started so it will be fun to add additional accessories once the major pieces have been installed 😉 Christa Watson Instagram @christaquilts website/blog: ChristaQuilts.com
You might want to move your cozy chair closer to a window :-). Where is your ironing station going to be located? Congrats on all the new space!
The ironing board and my big board will be stored in the cabinets. Then I’ll pull it out and set it up next to the window when needed. The chair will fit perfectly in the nook and make it suer cozy 🙂
Christa Watson Instagram @christaquilts website/blog: ChristaQuilts.com Click here to join my facebook group: Quilt with Christa
Thank you for sharing your redo. Personally I totally enjoy having working access to at least three sides of my cutting table. I’d be extremely handicapped having it against a wall, especially in a corner. Just saying. Happy for you.
Not to worry – I’ve tested it out against the wall and it works great. For me the bigger concern is having enough space to roll out bolts of fabric for cutting yardage. The nice thing about customizing it is getting to put a wider counter top so there’s plenty of room for cutting. I also have a small turnable mat which I’ll use when I need to make awkward cuts I can’t reach. 🙂
Hi,
Very nice room. I have a few thoughts about your high closets. Why nog make them all the same size? If you want to change the bins you have inside, they probably won’t fit in the closet nextdoor. You will have less flexibility with closets of different measurements.
The other thing is the table in the middle of the room. I would suggest at least putting it on wheels with breaks so you can move it out of the way if needed. Last week I build myself a movable cutting table from IKEA furniture and that would look awesome in your room. I found the idea at IKEA-hack and a few bloggers use the idea too.
Good luck!
Thanks for the fun suggestions! The cabinets will all be the same height but the widths will vary so that I can maximize the space in the room. They come in standard sizes so it was a fun puzzle figuring out the math to get them all to fit, LOL! I need a couple of narrower cabinets to store my ironing board and other things in, too. My sewing table is on casters which is nice. I’ll move it out of the way when I need to take photography on my design wall. 🙂
You’ve put so much thought, care, and skill
Into this wonderful creative space! With the spacious closed cabinets, lots of storage, lights, and outlets, you’re going to be in your well deserved creative heaven. Good luck to you and your family, and thanks for sharing this with us.