Make a Quilt from Start to Finish: Register for my Week-long Workshop this June!

This June 3-8 I have the great pleasure of returning to John. C. Campbell Folkschool in Brasstown, NC to teach my popular start-to-finish quilting class: Modern Quilting 101. This is the only in-person class I teach that guides you through every step of the quilt making process from cutting to binding.

John Campbell Folk School

Registration Open Now

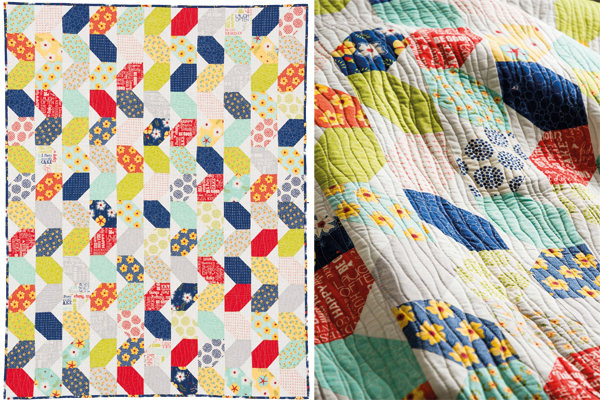
Click here to register for my class : Modern Quilting 101 – Stepping Stones.
Class dates are June 3-8, 2018

Class sizes are extremely limited. With only 12 students per instructor, you get plenty of hands on help and special attention from me. Whether this is your first quilt, or your 40th, you’ll have a fantastic time and will finish a complete quilt by the end of the week!

Stepping Stones quilt pattern by Christa Watson of Christa Quilts

Click here to purchase a print copy of Stepping Stones quilt pattern.
Click here to purchase a downloadable PDF copy of Stepping Stones quilt pattern.

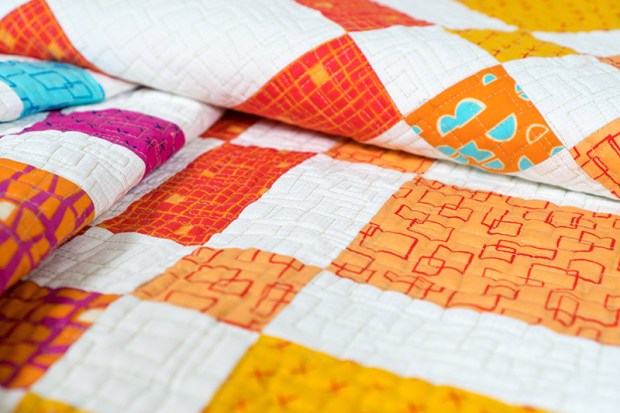
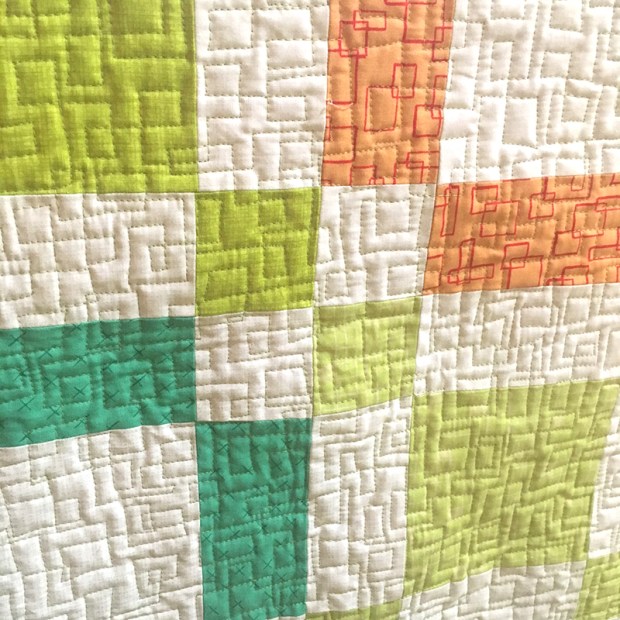
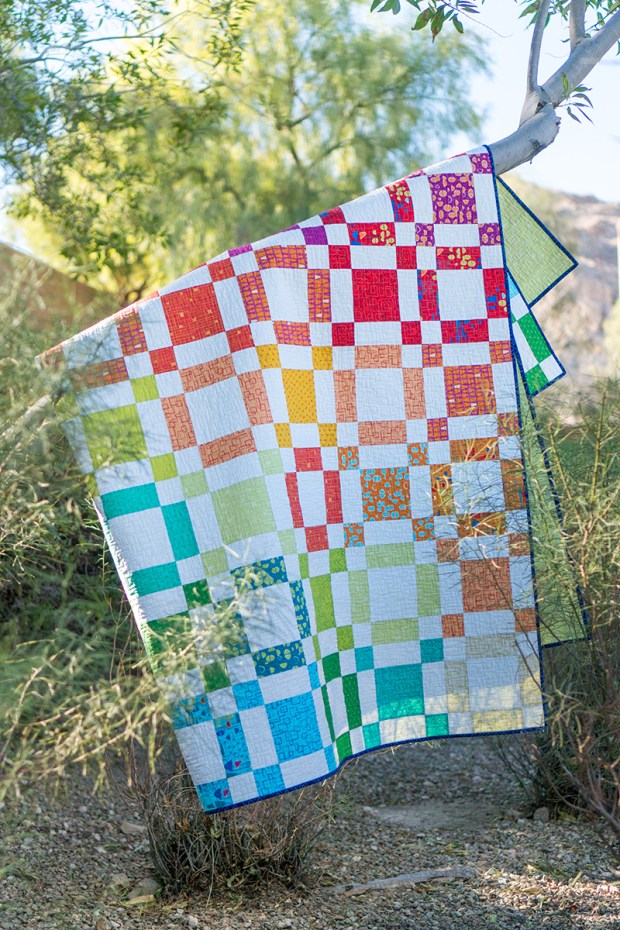
Each year at the Folkschool, I’ve focused on a different pattern. This summer’s group will be making my Stepping Stones quilt pattern seen here. The best part about being the teacher is getting to see the beautiful quilts my students make. Although they are all working through the same pattern, they turn out so unique, based on the fabrics and quilting each person chooses.

Stepping Stones Quilt Pattern by Christa Watson of Christa Quilts

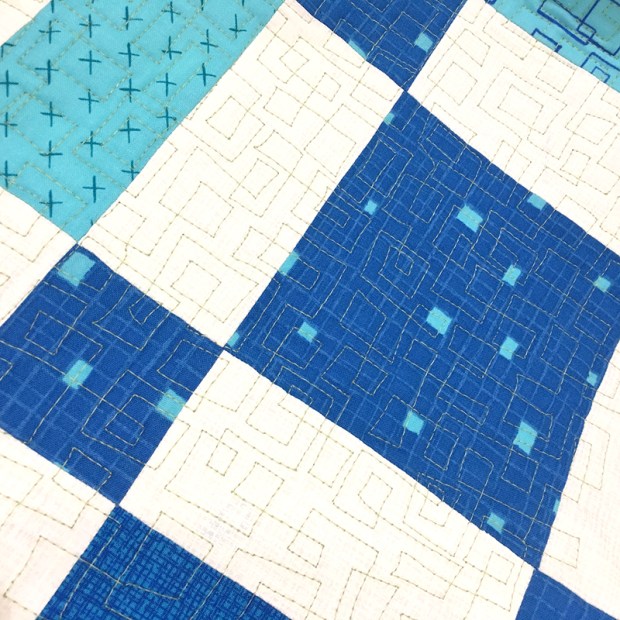
I quilted a simple geometric free-motion design for my quilt. I’ll teach several options in class!

This is the most intense but satisfying class I teach. Think of it as an intimate week-long retreat with me where I’ll share all of my secrets and guide you every step of the way! Students have several housing options and I have to say, the food they serve is the best southern cooking I’ve had. Seriously, you could come JUST for the food!!

Quilt Photography

Jason putting his photography skills to use on a photo shoot in the desert near our home.

Jason came with me last year and took a photography class while I taught quilting. He now does all of the photography for my quilt patterns and he learned so many valuable skills while he was there. He’s excited to return for another photography class while I teach again this summer.

The kids are flying back east with us, too and they’ll get to visit with nearby family, while we’re there so it will be a fun trip for all of us!

Folkschool Fiber Studio

This is the fiber studio where our classes take place. There’s tons of room for everyone!

The previous time I taught (in 2016), students made my Charming Chevrons quilt pattern. They were able to make the quilt in different sizes, according to their needs, and they all turned out beautifully! By the end of the week, we were all BQF’s (best quilting friends) and it’s been so great seeing their continued quilting success!

Charming Chevrons class

Click here to read more about the previous group’s  class!

Click here to purchase Charming Chevrons Quilt Pattern.

In 2015, Students made quilts using my Modern Logs Quilt Pattern. This was my first time teaching at the Folkschool, and it’s such a magical experience that it was easy to say yes when they asked me to return.

Modern Logs class at John C. Campbell Folkschool

Click here to read more about the class of 2015.

Click here to purchase Modern Logs Quilt Pattern.

I can’t wait to return this summer and I hope you’ll join me. At last check, there were a few spaces left, but I’m sure they will go fast. So don’t delay, register soon so you can get your travel plans in place.

Students arrive on Sunday and class instruction runs Monday-through Friday with an end of the week show and share by all students Friday afternoon. Compared to other similar events, the prices they charge at the Folkschool for this week-long experience are quite a bargain because it’s a not-for profit institution interested in preserving the folk-art tradtion and educating others in a non-competitive environment.

Machine Quilting Boxes on Stepping Stones

I hope to see you in my workshop this summer!

Important Folk School Links:

Save

Save

Save

Save

Save

Save

Save

My Newest Craftsy Class – Startup Project: Starry Path Quilt

It’s here – it’s here! The launch of my third Craftsy class – whoo whoo! Just after I made the sneak peak announcement earlier this week, the class went live! So today I’d like to introduce you to Startup Project: Starry Path Quilt.

craftsy Class Starry Path Quilt

Click here to preview my class Startup Project: Starry Path Quilt

In this nearly 3 hour long class, I teach how to make this stunning quilt I designed featuring two different types of star blocks and three different types of triangles.

It was created as a followup class to my comprehensive start-to-finish class, Startup Library: Quilting. But of course, anyone can enroll and make this stunning quilt:

Starry Path Quilt by Christa Watson

Click here to get the Starry Path Quilt Kit, while supplies last

The class comes with the complete pattern to make the Starry Path Quilt above, and there’s even an optional kit. I chose to make it from basic blenders in a cool color scheme of lime, green aqua, blue and turquoise. I paired it up with a solid gray background for maximum impact. I’m really pleased with how well the design turned out and I loved taking my time to be as accurate as possible.

And, because you all know I loooove machine quilting, I threw in a bonus lesson on how to quilt elongated swirls. Isn’t it just fully of yummy texture??

Swirls quilting on Starry Path Quilt by Christa Watson

The class materials include step-by-step drawing lessons showing how to form the basic swirl design, plus a page for you to print off and practice drawing your own quilting plan. (It’s a nod to the technique I first introduced in my machine quilting class, The Quilter’s Path.)

The exclusive Starry Path pattern is easy to follow along as you watch the class, and I’ve sprinkled in as many helpful hints as I can to ensure your success with this quilt!

Starry Path Quilt with Christa Watson on Craftsy

I can’t help fondling my quilts, LOL!!

In Startup Project: Starry Path Quilt, I share my best tips and tricks for accurate cutting and piecing so that you can get stunning results, every time. My top tips for piecing any quilt?? Slow down when you are sewing, maintain an accurate 1/4″ seam and use lots of pins to get those intersections to line up precisely.

Starry Path Quilt in Progress

The best thing about my Craftsy classes is that unlike my live classes, you actually get to watch me sew and quilt. That way you can and see where I place my hands, and how I manipulate the fabric. With the magic of filming to speed things up, it’s actually fun to watch!

Starry Path Class Overview

Here’s a breakdown of what’s covered in each section and length of each lesson. The total class runs for just under 3 hours, and if you’ve ever heard me speak, you know that I can cover a lot of info in a short amount of time. So you really get more “bang” for your buck with my classes!!

Boundless Fabric from Craftsy
1. Getting Started (32 min)
Meet Christa and go over everything you’ll need for your project, the Starry Path quilt. Then she shares tips for cutting both yardage and fat quarters. Plus, see how to check and correct your seam allowance early on. This way, your blocks will be the correct size.
Sawtooth Star Block Piecing
2. Sawtooth Star Block (39 min)
Piece the classic flying geese unit four at a time! Christa shows you how to mark, sew, press and cut, and add simple squares to create the Sawtooth Star block. She helps you chain piece a few blocks at a time to speed up your stitching, and shows you how to use webbing to keep your blocks together as you go.

Christa Starry Path Quilt

3. Garden Path Block (30 min)
Learn how to cut and sew with the popular Tri-Recs specialty ruler that you can use in many other quilts. Find out how to properly cut and line up the pieces, add simple four-patches and solid units for a beautiful block, and save time by chain-piecing it.
Garden Path Block
4. Pieced Border (30 Min)
Follow along as Christa guides you to create the colorful pieced border that surrounds the Starry Path Quilt. See how to pair half-square triangles to form this hourglass unit, also known as the quarter-square triangle. Then batch-assemble the border strips.

Christa Sewing

5. Quilt Top Assembly (23 Min)
Now you’re ready to put your quilt blocks together! Here, discover a technique called webbing that will keep your blocks in order as you assemble the inner quilt top into rows. From there, sew the rows together, then add the solid and pieced borders.
Machine Quilting Swirls with Christa Watson
6. Machine Quilting Swirls (20 Min)
Wrap up class by finishing your basted Starry Path quilt with an all-over free-motion design. Christa discusses thread choices, then shares the benefits of making small samples to practice your designs. Afterwards, get her tips on maneuvering this quilt on your home machine as you add the final touches.

Starry Path Quilt by Christa Watson

I had so much fun making this quilt and I’m sure you will too! The best part about enrolling in my class is that you have my help and support 24/7. Got a question about the class or want to share your progress? Use the interactive class platform to share with me and fellow students. It’s like a virtual classroom with me at your side!!

Click here to enroll in Startup Project: Starry Path Quilt

Click here to get the Starry Path Quilt Kit

Elongated Swirls quilting by Christa Watson

I can’t wait to “see” you in class!

Join Craftsy Unlimited for All You Can Watch Classes (Including Mine!)

You guys – I’m so excited! It’s almost time for the launch of my brand new Craftsy class!! But before it goes “live” I invite you to join Craftsy’s new subscription service “Craftsy Unlimited.”

craftsy unlimited

Click here to start a free trial of Craftsy Unlimited and watch all my classes for free!!

How is this different from regular Craftsy – you say?? Rather than paying a one time fee to own the class, Craftsy Unlimited is a monthly streaming service, similar to Netflix, Hulu, etc. but on your computer. With Craftsy Unlimited, you don’t own the class, but you have access to the entire library and class materials of thousands of classes 24/7 as long as you are a member.

The coolest thing is that you can actually combine both services if you want to – join Craftsy Unlimited to check out classes you may be interested in, but aren’t quite ready to commit to a purchase. Later, you can permanently purchase any classes you know you’ll want to keep forever.

Starry Path Quilt Blocks

Sneak peek of my brand new class, coming really soon!!

For instructors, we get compensated slightly differently for either model, but Craftsy Unlimited is a great way to support your favorite teachers. The more you watch our classes on Craftsy Unlimited, the more we get paid!! So even if you own my other classes already, you can view them in Craftsy Unlimited and it’s sort of like giving me a little bonus each time you watch. 🙂

Speaking of which, if you decide to join Craftsy Unlimited, be sure to check out my current classes:

The Quilter's Path by Christa Watson

The Quilter’s Path is like taking one of my in-person workshops. I teach you how to make a quilting plan and give you tons of ideas for both walking foot quilting and free-motion designs. Plus, you get to see how I actually “scrunch and smoosh” a real quilt under the machine. But the best part is you can pause, rewind, and watch your favorite parts over and over again!

Startup Library Craftsy Class by Christa Watson

Startup Library Quilting is great for beginners who want to learn to make a quilt from start to finish. I cover all the basics – choosing fabrics, reading a quilt pattern, rotary cutting, piecing, basting, machine quilting – walking foot & free-motion –  AND binding! It’s the whole shebang right from the comfort of your home!!

Craftsy Quilting Class taught by Christa Watson

Screen shot from my newest class, coming soon!!

Click here to start a free trial of Craftsy Unlimited and watch all my classes for free!!

In the new class, I focus a lot on accurate cutting and piecing, plus there’s a bit of machine quilting at the end. So watch for the new reveal soon!

Improv Squares Finish with Machine Quilting Details

Now that I’ve been blogging again on a regular basis, I’ve realized I haven’t shared about some quilts I made from Modern Marks. And since I’ll soon be starting on quilts from my next line of fabric, I want to make sure I’ve documented my recent finishes!

Improv Squares by Christa Watson, made from Modern Marks

I recently shared a spray basting tutorial for Improv Squares, but here are some beauty shots of the finished quilt, taken in the desert behind our home in Las Vegas.

The inspiration for Improv Squares was a broken wooden fence that I drove by several years ago. I snapped a picture of the fence and kept it in my phone for a long time, until I was ready to do something with it.

Improv Squares Inspiration

The holes in the fence made an interesting pattern that I though would be fun to do something with. I also wanted to further explore the concept of “Structured Improv” – a technique I’ve been playing around with for several years now.

Improv Squares by Christa Watson

The improv part is that you sew a bunch of fabric together randomly. The structured part is that all of the block units are a similar shape  – rectangles. All of the blocks finish the same size so they can be placed randomly in the design, yet no two are the same.

Machine Quilting Tips

Aurifil Vareigated thread

When I’m working with busy prints and I want the fabric to be the star of the show, I’ll try to choose a thread that blends in. Because Modern Marks is so colorful and I wanted to use all of the prints in this quilt, I chose a variegated thread that would add fun layer of texture to the busy prints

My favorite variegated thread is 50 weight Aurifil #3817 Marrakech. It’s fun to see the color changes while I’m quilting, and I love quirkiness that it gives the quilt! It also seems to match any rainbow-colored quilt I make!

Machine Quilting Jagged Stipple

Because I was in a hurry to get this quilt finished, I quilted an allover/edge to edge design on a rather large scale. The quilting is still very dense, but by quilting larger shapes, I was able to cover more area very quickly.

I used one of my favorite designs – a  geometric, jagged stipple rather than a smooth curvy stipple. I was able to complete the quilting on this throw size quilt in an afternoon, rather than several days whenever I do more intricate custom quilting.

Jagged stipple quilting

I love this texture so much, it inspired one of the fabric prints in my second fabric line!
More about that later…….stay tuned!!

Incidentally, whenever I teach machine quilting, I always have the students practice quilting both angular shapes, and curved designs. Some people find it easier to quilt one vesus another, so it’s a good exercise to try and see which type of design you prefer!

As you can see in the detail picture below, the jagged motif gives some interesting texture to the quilt, without overpowering the overall design.

Allover jagged stipple

Improv squares is now available as a pattern, either as a printed version, or a PDF download.
If you make one, I’d love to see it! After all, the fun of designing quilts for others to make is seeing the variety!

Improv Squares quilt

Share your progress wtih me on social media with the hashtage #improvsquaresquilt. You can also share images of any projects you make from my books, patterns or fabric in my ChristaQuilts Facebook group.

Click here to get the Imrpov Squares Quilt Pattern – printed version shipped to you.

Click here to get  the Improv Squares Quilt Pattern – instant PDF download.

Improv Squares Quilt Pattern using Modern Marks Fabric

Improv Squares STATS:

  • Finished Size: 66″ x 80″
  • Fabric: Modern Marks by Christa Watson for Benartex
  • Batting: Hobbs 100% Cotton
  • Thread: Aurifil 50 weight cotton #3817 Marrakech
  • Machine Quilting Design: Jagged Stipple
  • Completed: October, 2017

Improv Squares quilt

My Pattern Writing Process and Sneak Peeks of Upcoming Quilt Patterns

In an effort to share more of what I’m working on in real time – and to answer to the question – how do I get it all done?? – I’m excited to let you know what I’ve been working on the last few weeks. I’m currently writing and editing the next round of quilt patterns that will be released along with my next fabric line, and I couldn’t be more excited!!

Pattern Writing in Process

I’ve been posing the question to my friends and social media followers, asking if they’d like me to share real time updates, or wait until everything is polished and ready for purchase. I got a resounding “share now!” as the answer which made me sooo happy! I have a hard time suppressing my excitement for what I’m currently working on and I feel like I can be more genuine when I’m sharing in real time.

I also just got word that my fabric samples should arrive some time in the next week or two so I can actually start sewing the designs you see above. I’m also excited to collaborate with my friend Heather Black on one of them because she has the most amazing design sense!!

Pearl Pendants by Heather Black and Christa Watson

Pearl Pendants pattern coming soon – click here to preorder.

So here’s a bit of my pattern writing process for those that are curious. First, I design the patterns in EQ8, using digital swatches of the fabrics I plan to use. Next, I write the instructions while I’m waiting for the fabrics to arrive.

While editing the patterns, I use digital images as placeholders for the pattern covers until the quilts are made and can be photographed. Then it’s very easy to swap out the digital images with the photography, without altering the pattern layout. I send the rough draft of the pattern to my graphic designer to lay out and make everything look pretty, and then a technical editor checks all the math to make sure I haven’t missed anything.

Sparkling Stars front Cover

Sparkling Stars pattern coming soon – click here to preorder.

Once the fabric arrives, I make the quilts following my own instructions so that I can pattern test and see if there are any steps I missed. While I’m making the quilts, digital images of the covers are sent off to the distributors (companies who sell patterns on a mass-scale to quilt shops) so they can get them in their system in time for shops to pre-order.

Once the quilts are finished, they are photographed and cover images swapped out with the real ones, and I do once last round of editing to make sure everything looks right. Then patterns are sent off to the printer for physical copies, and PDF downloads are uploaded to my Craftsy shop for sale.

Surplus Strips Quilt Pattern by Christa Watson

Surplus Strips pattern coming soon – click here to preorder.

As you can imagine, the timing is critical to make sure everything happens in the right order. My process is probably a bit different than pattern designers who aren’t working with a specific fabric line. But I like the challenge of making all the parts fit together.

You can see sneak peeks of the fabric line in the quilt pattern covers above, but I’ll be happy to tell you more about the fabric when my samples arrive in the next few weeks. Quilt shops will be able to order it later this spring, usually around quilt market in May – and I’ll be there in person showing off these quilts and more “in the cloth.” Then the fabric will arrive in shops around mid summer – sometime in June or July. I can’t wait!!

Spray Basting Tutorial – Using a Table

Recently I shared a tutorial on spray basting using a design wall. Today’s tutorial shows how to modify the spray basting process using a table instead. Note that my pictures are all taken outside but once the quilt layers have been sprayed outdoors,  you can assemble the quilt inside using any size table.

Improv Squares Quilt Using Modern Marks

Step 1 – Spray the back side of the backing and quilt top

Be sure to spray the layers outside, or in a well ventilated area. If you have sensitivity to chemicals, I recommend wearing a dust mask. I use 505 basting spray and a large sheet to protect the surface I’m spraying on.

I’m using a lightweight folding plastic table, so it’s easy to move. I just store it out of the way in the garage when I’m not using it.

Spray Basting

The table you are using doesn’t have to be bigger than the quilt. When I’m spraying, I cover the center section of the quilt first, and then the sides. For this step, you don’t even need a table; you can lay out a sheet or dropcloth on the ground or wherever you have room.

I used a small park near my home so that I’d have plenty of room, and also nice scenery for photography!

Hold the can an arm’s length away and spray evenly and generously. Make sure to get good coverage on the quilt. To ensure the can is spraying consistently and doesn’t get clogged, spray a few squirts on your dropcloth before applying it to the quilt.

Spray Baste

Although I pressed the top and backing separately before I began, you can see some fold lines on both layers. But not to worry – this gets pressed out at the end. If you spray the top and backing separately, it uses less spray than spraying the batting, and it’s easier to manage.

Once both layers have been sprayed, you can fold them up and bring them inside to finish the assembly process (or stay outside and set the layers aside like I’m showing here.) The layers will be sticky, but not stuck, and you don’t have to assemble them right away – the adhesive doesn’t dry out.

Remove the drop cloth or sheet from the table and then lay out the backing wrong side up.

Spray Baste

Step 2 – Add the batting

I like to fold the batting in half long ways so that I can put the fold line roughly in the center of the backing. You can see in the picture below that it’s not exactly even and that’s ok. As long as the batting and backing are bigger than the quilt top, you’ll have some wiggle room so that you don’t have to line things up perfectly.

In fact, my batting is actually a little longer than the backing so it’s easy enough to trim away the excess. Working on a table is great because it won’t hurt your back like the floor can.

Spray Baste

Open up the batting so you have coverage on all sides. Even if the sides hang down to the ground – that’s okay. The excess will get trimmed away.

Spend time smoothing out the backing. You can lift and reposition it if needed. Work out any wrinkles or bubbles, using your hands and a long acrylic ruler.

I’m using Hobbs cotton batting for this quilt. I like natural fiber battings because they cling to the fabric and they aren’t slippery. (Polyester has a tendency to slip while you are shoving the quilt through the machine which can cause puckers.)

Spray Baste

Once you smooth out the center section, adjust the layers so that you can smooth out the sides, too. Take your time here to really get it nice and flat. Smoothing out the layers also smashes them together so that they stick together better and don’t shift.

You can also iron your batting before you baste to get it nice and flat. I use a spray bottle and a dry iron. With cotton batting, you can put the iron directly on the batting. With more delicate battings like wool, you can cover the area you press with a piece of fabric. Be sure to use a dry iron so that it doesn’t shrink up the batting.

Spray Baste

Step 3 – Add the Quilt Top

Add the top in the same way that you added the batting – get it roughly in the center and make sure there’s coverage all the way around the edges. You can see it’s still a bit wrinkly from handling and moving it around. That’s okay – you’ll iron it again at the end.

Spray Baste

Trim away the excess batting and backing so you’ll have less bulk to deal with. If you have a super large quilt that touches the ground, you can always place two tables side by side to give you more room to work.

I use specialty batting scissors – they cut through the layers like butter, and trimming goes super fast! I only leave about an inch or two on all sides when I trim. That way it’s less likely that I’ll flip the quilt under itself and accidentally quilt through the extra layers!!

Spray Baste

Step 4 – Smooth Out the Layers

Smoothing out each layer as you add it is such a critical step. When your quilt sandwich is flat and smooth, it makes the machine quilting process so much easier! The reason I love using basting spray is that every inch of the quilt is stuck to every other inch. This prevents shifting of the quilt and greatly reduces the chances that you’ll get a tuck or pucker while quilting.

Spray Baste

Use the long ruler again to smooth out the center of the quilt. You can also use it to help line up the pieced seams and nudge things back into place if needed. It’s almost like pre-blocking the quilt before you quilt it.

Spray Baste

Once you’ve smoothed out the center, you can work on the edges. Roll up the excess so that it doesn’t drag on the ground as you shift the quilt around.

It usually takes me a good 20 minutes to smooth out each layer of the quilt, but it’s time well spent!

Spray Baste

Step 5 – Press the Basted Quilt on Both Sides

The secret to good spray basting is to press the quilt once it’s layered. The heat of the iron sets the glue and it smooshes the quilt together so it’s nice and flat. I press the back side first, working out any excess bubbles or wrinkles. Then I flip it over and press the front.

I use a big board which fits on top of my ironing board, giving me more room to work.

Spray Baste

I’ve developed this basting method over the last few years and I can honestly say it makes a huge difference in how my quilts turn out. Just remember, you are putting a lot of wear and tear on the quilt when you scrunch and smoosh it through the opening of your machine. But with this method, nothing shifts and it’s easy to just focus on one area of the quilt at a time.

Feel free to pin and share this tutorial with your friends. My goal is to get more people quilting their own quilts while enjoying the process from start to finish!

Your Chance to win a Rainbow Taffy Quilt Kit + Machine Quilting Tips

April Update!! My Quilt Won the Championship!!
Thanks for all your Votes!!

I know it’s a little silly to get all excited about a fun promotional contest, but it really means a lot to me that so many of you have picked Rainbow Taffy as your favorite free pattern from Benartex so far. Today is the last round of voting to determine the final fan favorite, and one lucky voter will take home a kit of the winning quilt! Will it be Rainbow Taffy?? See below for details:

Benartex March Madness Voting

Final matchup: Rainbow Taffy from Modern Marks versus Violette from Gloaming

Click here to cast your vote for Rainbow Taffy on Benartex’ blog: Sew In Love with Fabric.
Click here to vote a second time in their Sew Interesting Facebook group.

You can also vote over on their Instagram account @benartex_fabrics.

Well, it all comes down to today and the final matchup between my pattern and my friend Shelley Cavanna’s. I met Shelley last fall when her booth was near mine in the Contempo section of Benartex at Quilt Market. She, too was debuting her first line of fabric and we got to know each other as we chatted on the floor for 3 days. So I will be happy no matter which of us wins!

Shelley Cavanna and Christa Watson at Benartex

Half the fun of attending quilt market is getting to meet new designer friends!!

Rainbow Taffy Quilting Tips

Here’s a tip for choosing thread: if you want your quilting to blend in, choose a thin, 50 weight thread in a color that is slightly lighter than the prints in the quilt. I chose a lime green Aurifil which actually acted as a neutral. It didn’t stand out too much on the white fabric and it added bit of sparkle to this colorful quilt!

Lime Green Aurifil Thread

Here’s another tip: the more quilting you add, the more the quilting design recedes into the background and becomes a textural element, rather than a focal point point motif. And rather than thinking you are quilting your quilt to death, you are really quilting the life into it by adding an extra layer of design!

Boxes quilting Detail

I quilted Rainbow Taffy using one of my favorite modern free motion motifs, “Boxes.”

In fact, I love this design so much, I included it as one of the prints in the line, seen in orange below. I thought it would be so “meta” to quilt boxes on boxes, LOL!!

Boxes print from Modern Marks

Here’s my tip for quilting an allover, or edge-to-edge design: start on one side of the quilt, and meander your way around the quilt, block by block. Allover designs are perfect for quilting a quilt in a hurry, since you don’t really have to worry about quilting different designs in different areas of the quilt.

Scrunch and Smoosh

I work my way from right to left across the quilt, rotating in the middle when it gets bulky.
To deal with the bulk – scrunch and smoosh it out of the way as you go.

Allover designs are also fantastic to hide any less than perfect seams. If they don’t match up perfectly, you can obscure this fact by adding a layer of texture right on top of the quilt.

Also, if there’s any fullness in your quilt, or it doesn’t lay quite flat, dense allover quilting can draw up some of that excess, and you can use your fingers to smooth out and problem areas while you quilt – just be careful that they don’t get in the way of the needle!

Machine Quilting Texture

See how that lime green thread blends in?? I love it!!

If you happen to run out of thread while you are quilting, you can just back up about 1/2 an inch and quilt a little bit on top of your previous quilting. Stitching on top will help secure the threads, and on a buys quilt, it’s hardly noticeable.

Rainbow Taffy by Christa Watson

One other tip – try not to play “bobbin chicken!” If you have a low bobbin indicator on your machine, try to stitch off the end of the quilt and put in a fresh bobbin. If you are quilting with cotton thread, you can always use that bit of leftover thread when piecing your next scrappy quilt!

Vote For Your Chance to Win a Rainbow Taffy Quilt Kit

Rainbow Taffy Quilt by Christa Watson. Made from Modern Marks.

To wrap up March Madness, Benartex is generously offering one lucky voter a chance to win a kit of the winning quilt! Voting closes Monday, April 2 at Noon EDT.

So head over to the Benartex blog now to cast your vote. The winner will be selected at random. You can also submit a bonus vote in their Facebook Group and Instagram @benartex_fabrics.

I sure loved making this quilt and I know you will, too. Click here to get the free pattern.
Good luck and thanks for playing!!

Vote for your Favorite “Final Four” and Stock up on Free Quilt Patterns from Benartex

Ok so I’m not much of a sports fan, but I am just a tiny bit competitive, LOL!! Benartex has been hosting a fun March Madness matchup to determine this year’s favorite free pattern. They started with 50, then voting narrowed it down to the Sweet Sixteen, the Elite Eight and now the Final Four. I’m pleased that my pattern, Rainbow Taffy has made it all the way so far and I’m keeping my fingers crossed that with your help, it will be voted #1 fan favorite!!

Rainbow Taffy by Christa Watson made from Modern Marks

Today is the semi final match and voting runs through 11:59 AM EDT tomorrow. Then voting for then final matchup starts at noon Eastern time on Friday. So if you want to join in the fun with me, here’s what you can do:

Click here to vote for Rainbow Taffy by leaving a comment on the Benartex Blog.
Click here to join the Benartex group on Facebook and vote again in their group poll.

There are some free fabric prizes to be won, and of course everyone who participates is a winner with access to dozens and dozens of fabulous free patterns!

Free Pattern Rainbow Taffy

Click here to get the free Rainbow Taffy Quilt Pattern + a Bonus Modern Marks Pattern
Click here to access the entire free pattern library from Benartex

QuiltCon 2018 – It Was Amazing!

I just finished a whirlwind 3 weeks of fun travel – to QuiltCon in California, Craftsy in Colorado and teaching in Oregon. Now that it’s taken me a week to recover from my adventures I’m finally ready to share my QuiltCon experience with you. It was, in a word, Amazing!!

So far, I’ve been to every QuiltCon since it began in 2013, and I’ve been super lucky to get at least one quilt juried into the show each year. (This year I had two – see below.) I was fortunate to be invited to teach at two of the shows so far (2016 & 2017) and QuiltCon is one show I’ll continue to attend each year because it’s just THAT awesome!!

Christa and Laurie from Modern Quilts Unlimited

Color Weave was one of my quilts juried into QuiltCon for 2018. It’s made from 3 colors of precut strips with simple pieced blocks. The color placement creates a woven illusion.

Here I’m hamming it up with Modern Quilts Unlimited editor, Laurie Baker. It was fun to have my quilt Color Weave hang and get judged in the show. The pattern is from issue 21 of MQU. (You can even click here to download a bonus tutorial on how I did the quilting for this quilt.)

Judges comments for this quilt:

  • Woven illusion is successful
  • Treatment of pattern at top and left give breathing space and add interest
  • Quilting compliments patchwork perfectly

Color Weave Straight Line Quilting Detail

Quilting detail of Color Weave – it was all done with straight lines using my walking foot. I used the piecing structure as a guideline for the quilting and varied the width of the lines using the edge of my foot and randomly changing my needle position.

This year at QuiltCon, it was kind of nice to have a break from teaching so that I could actually see the show, meet up with friends, and spend time networking with many of my quilting industry partners (like Hobbs, BERNINA, & Aurifil) along with the various shops who carry my books, patterns, and fabric).

Quilting Demo with Hobbs Batting
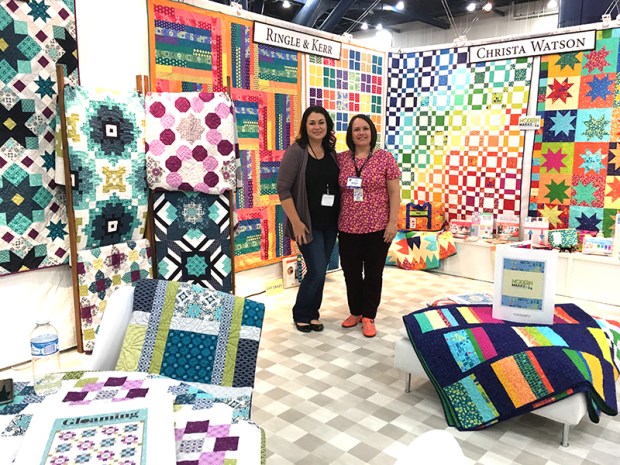
I had a great time sharing machine quilting tips and tricks with folks who stopped by the Hobbs batting booth on the first day of the show on Friday. I talked the entire hour I was in their booth, so it was hard to get a picture of me without a funny expression on my face!

Spools Quilt from Piece and Quilt with Precuts

I loaned my “Spools” quilt from Piece and Quilt with Precuts to Hobbs for a few weeks so  they could use it to display in their booth at several quilt shows in which they are a vendor, including QuiltCon. Letting companies borrow my quilts for promotion is a win-win for both of us: they get to decorate their booths with colorful quilts, and my quilts get seen by a wider audience.

In Town Quilter's Booth at QuiltCon 2018

Above, clockwise: Squiggles from Piece and Quilt with Precuts, mini samples of patterns by Sylvia Schaefer of Flying Parrot Quilts, and a hand pieced, hand quilted block showing how Modern Marks plays well with other fabrics.

In-Town Quilters hosted me for a book signing in their booth on Friday of the show and I was pleased to see such a nice display of quilts and minis using Modern Marks fabric. It still makes me giddy when I see my fabric paired up with other designers’ patterns!!

I also did events for BERNINA and Modern Quilts Unlimited magazine on Saturday, but because I was so busy chatting – I forgot to take pictures. Needless to say, it fills my bucket when I get to chat with other quilters who love modern quilts as much as I do!

HST Remix quilt at QuiltCon 2018

HST Remix was my other quilt that was juried into QuiltCon 2018. It was hanging in the overflow room which had great architecture and beautiful chandeliers.

Judges comments for this quilt:

  • Fabric choices render pattern well
  • Quilting patterns fill spaces well
  • Area of gray in middle is really interesting element but feels slightly disproportionate

I actually appreciate the comments that offer constructive criticism even more than the positive ones, because that’s how I learn more about modern design. I’m still a fledgling student in this area and love learning all I can about what makes a successful modern quilt! In fact, each year I attend QuiltCon, it confirms my love for modern quilts and I’m always thinking about how to push myself to create more modern designs.

Quilting on HST Remix

Quilting on HST Remix – this one is big enough that it now fits on our bed!

I’ve been attending QuiltCon since the beginning, and one thing that struck me this year was the variety of modern styles. I think quilters are really branching out, taking risks with their designs and doing a lot more experimenting. There were a good mix of solids and prints, bright and more muted tones, machine and handwork.

And I was pleased to see a lot more interesting free-motion quilting. Don’t get me wrong – I love geometric straight line quilting as much as anyone. But I’m glad to see that more quilters are embracing “modern free-motion” (perhaps after attending my classes and lectures for the last 2 years and realizing it’s ok to quilt swirls and feathers on their modern quilts?? LOL!!). I was also impressed with the quality of the workmanship.

QuiltCon Hashtag

To view most of the quilts that were at QuiltCon, be sure to check out the hashtag #QuiltCon on Instragram – or click here. Those little squares in the collage above mean that there were multiple images shared in the same post – tons of amazing eye candy!

To be sure, QuiltCon places more of an emphasis on design and originality than workmanship and I think that’s totally fine. I attend and teach at a lot of shows and while they are all unique, most other shows emphasize workmanship over original design. Again – nothing wrong with that either, it’s just a different point of view.

When QuiltCon first opened, I was worried that many quilters would be intimidated to enter because they had less quilting experience or couldn’t afford to pay for expensive professional long arm services to bling up their quilts.

But I was comforted by the fact that at that first show, and each show since, more and more quilters are actually doing all of their own work, from start to finish. It has been fun to see many of these newer quilters gain confidence and experience in their work, and just five years later you can see that their efforts have paid off.

QultCon 2018 hashtag

Search #QuiltCon2018 on Instagram for even more fabulous inspiration!

One last thing to share: I served on the judging committee for QuiltCon – a volunteer position I’ve helped with over the last few years. No, I had nothing to do with this year’s judging or jurying. I just helped rewrite some of the policies so they’d be easy to understand for all who enter. One big change we made for 2018 was limiting the number of acceptances for any one person to 5 quilts and I think that was a great decision because created a more dynamic show that seemed fair to everyone.

I hope you enjoyed reading about my experience this year I and I truly hope you get a chance to attend in the future, if you haven’t already. QuiltCon will be in Nashville, Tennessee in 2019 and then back in Austin, Texas in 2020, where it all began. You can bet I’ll be there again for sure!!

Click here to view all of the winners from QuiltCon 2018.

PS – Are You Following My Blog?

If you’d like to get an email each time I publish a new post, be sure to enter your email address in the box on the right-hand side bar. If you are viewing from a mobile device, you’ll need to scroll way, way, way down to the end of the page to see it.

Finished Quilt – Squiggles Made from Modern Marks Fabric

At long last, I’m excited to show you the finished version of Squiggles, made from my first fabric line with Benartex, Modern Marks that released late last year.

Squiggles by Christa Watson

Squiggles version made from Modern Marks with black background

You may remember that the original version, shown below was made from precut squares with a cream background and overlapping wavy line quilting using a walking foot. The step-by-step instructions for both piecing and machine quilting this version are included in my third book, Piece and Quilt with Precuts.

Squiggles Quilt from Piece and Quilt with Precuts

Squiggles, original version from Piece and Quilt with Precuts

When I got my fabric samples last year, this was the first (of many) quilts that I wanted to remake using my fabric. It just goes to show how different a quilt can look using the same pattern, but different fabrics.

Squiggles Quilt Top

I love the bold bright colors against the black!

With the updated version I really wanted the modern fabrics to pop, which is why I paired them with the deep black. I think it gives the quilt a more contemporary/modern vibe which I really like.

Aurifil Thread Squiggles

Choosing thread color was the hardest part of this quilt! I knew that any colorful thread would work, but I opted to go with the bolder Turquoise Aurifil to really give it some punch.

Quilting Random Crosshatch

Although I love to piece, machine quilting is still my favorite part of the process. I absolutely loved adding an extra layer of texture to this quilt using random crosshatch quilting, which is really just quilting parallel straight lines in random intervals across the quilt in both directions.

Machine Quilting Squiggles

Here are some pretty “scenic” shots, taken in the desert behind our house. My husband Jason really enjoys doing photography and capturing photos in interesting spots.

Squiggles Quilting Detail

I love how the bright colors contrast with the softer, muted desert background.

Squiggles in the Desert

This is my favorite picture: showing the Las Vegas skyline behind the quilt:

Squiggles by Christa Watson

Squiggles Finished Quilt Stats

Click here for a list of shops that carry Modern Marks fabric.