This week for 99 Machine Quilting Designs we are learning to quilt Triangle Texture, a design that’s great for modern OR traditional quilts! Watch below and let me know what you think!
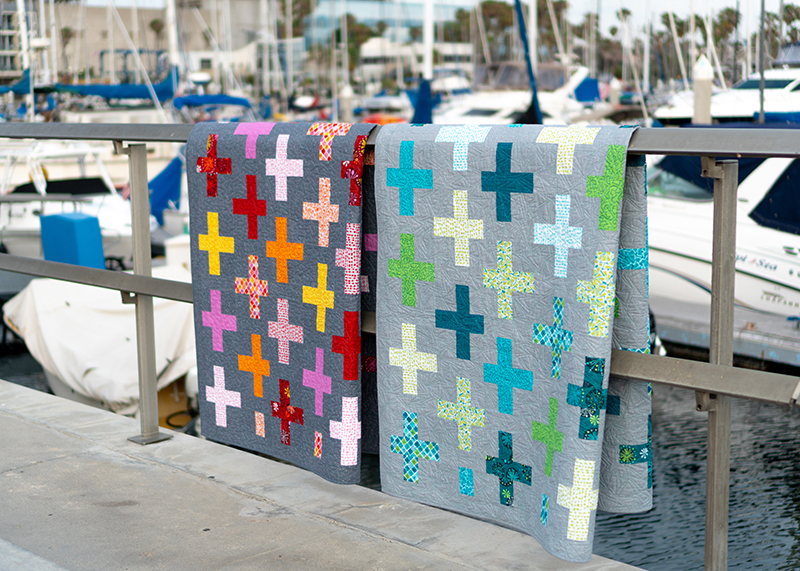
Get the Surplus Strips Quilt Pattern or Kit I recently combined 2 motifs – boxes and triangles on the gray version of my Surplus Strips quilt! You can now grab the kit to make this quilt with the gray or white background, or grab the pattern and choose your own colors. It’s fun to make and fun to quilt!
If you’d like to choose your own adventure, grab the Surplus Strips quilt pattern and then rummage through your stash for the perfect colors to make it your own. It’s the perfect design for using up leftover (surplus) precut strips!!
Below are 2 versions I made a few years ago and it looks great no matter what!
I’ve been working on a remake of my popular Color Weave quilt. I realized that I don’t create a ton of new patterns each year and I really like remaking some of my classics! It’s been super fun to create it from my current fabric collection, Dazzle Dots (#9 if you are counting). Originally I made this quilt using my Abstract Garden fabric line (#3) which is shown on the pattern cover below. Don’t they look similar?
I spray baste all of my quilts, so I took the opportunity of creating a step-by-step video tutorial showing how I did this on my Color Weave quilt. Click the image below to watch:
For a limited Time, you can grab a complete Color Weave quilt kit if you’d like to make one exactly like me, using Dazzle Dots. Or you can grab the Color Weave quilt pattern and choose your own fabrics for a different look. You can make this quilt from pre-cut strips, fat quarters, or even scraps. The hard part is trying to make just one!!
In my quest to explore the concept of geometric abstraction, I felt compelled to take a perfectly interesting quilt top and cut holes in it, then inset some circles.
It’s been very liberating to play with color, line & shape, without the need for my design to represent anything concrete. It’s a risky move for sure, but I just couldn’t move forward until I explored this idea.
Below are a few in progress pics while I was inserting the circles. It’s not a tutorial, but it was more of a journal exercise to write down my thoughts while making this top because it was bold and risky move for moe to even attempt to do something like this, LOL!!
First I started by making a sample circle. This obviously was not going to go in the quilt and I just grabbed some scraps I had lying around to test the technique (ahem… you may see more of these fabrics shown in the circle a bit later this year… just saying!!). I pinned it to the sewn top to see if the scale looked right.
The basic idea is to cut your focus circle 1/2″ larger than your finished size. Then cut a circle into the background that’s 1/2″ smaller than your finished size.
I wanted 12″ finished circles so I drew out 12 1/2″ and 11 1/2″ circles using EQ8 and printed them out on paper, then taped them together. I know there are templates and rulers for this, but since this is all one big experiment I just used the supplies I had on hand.
The hole in the peach background was cut 11 1/2″. The lilac circle was cut 12 1/2″.
By creasing both units you can match up the 4 quadrants and then sew with the background fabric on top. The hardest part is pinning the circle to the background. I used a million pins! There are tons of tutorials on youtube, google, pinterest etc. showing how to insert a circle into a block, using lots of different methods like using freezer paper, glue, etc, but I just went old school with pins.
It’s also super important to heavily press the back and front until it lies flat. With the successful test block complete, I was ready to dive in and start adding circles to my quilt.
I created a bunch of low volume improv units – way more than I needed, but I set aside any leftovers knowing I could probably use them up in some way on the back.
These are actually the wrong side of a bunch of low volume prints from my various collections. I really like the softer effect this gives to the fabric.
I traced out the circle shape onto the pieced background fabric, then very very carefully cut a circle with a super small rotary cutter. I made 3 circles like this with subtle shading. One was all light grays and whites (below), one had the light grays and just a little color (not pictured); the third was all light colors (above).
I pinned the circles roughly in place where I wanted them on the top; but then I needed to trace the smaller 11 1/2″ circle size using a paper template (NOT the 12 1/2″ cut unit), so that I could account for the seam allowances. Now the scary part – cutting holes in the quilt top!
This was a bit scary, but I wanted to take a risk and really explore this idea. The whole time I kept reminding myself it’s just fabric – I can get more!!! I only cut and sewed one hole at a time just in case anything went awry.
Oh no!! There’s a hole in my quilt top, LOL!! By the way there are no tutorials I know of showing how to insert a circle into a whole top, so I just sort of winged it and hoped for the best! I treated the whole top as the background or concave unit and folded it so that the circle was folded in half both ways, first horizontally and then vertically.
I used pins to mark the midpoints of the circle in 4 places. I’ll do the same for the inset circle so that I can match up the pins and they act as my registration marks for proper placement.
Can you see my crease lines? I’ll match up the background pins to circle pins.
Then it was just a matter of subdividing each quadrant evenly and adding more pins to distribute the bulk. I actually looked into the idea of using a freezer paper method as the circle template and sewing on the paper, but it looked way too complicated.
Even though this method used a ton of pins, it made more sense to my brain. Basically I’m sewing wrong sides together and matching up a concave (background) curve with a convex (inset circle) curve. The actual sewing just uses a straight stitch, sewing in a line, but very slowly.
Dealing with the bulk doesn’t bother me because I’m so used to moving a large quilt when I’m domestic machine quilting. It gave me similar happy vibes like that. 🙂
I wasn’t sure about this after I put in one circle, although I was pleased that the technique worked. But by the time I added the 2nd circle I knew it was going to be ok. So if at first you aren’t sure – just keep going!! More than anything I wanted to try out a technique that’s been on my bucket list for years (perhaps decades).
When adding the inset circles I didn’t overthink it. I let the orientation of the circles be random and I’m really pleased with how it turned out.
Thinking ahead to basting and quilting, I’m planning to use a Hobbs Silk batting to quilt it. I like the drape and texture this adds to the quilt. I took a picture of the finished top with the batting I plan to use so I don’t forget!
I have big plans to use up all the leftovers on the back, so stay tuned for the next step! The nice thing about sewing without a deadline is that I can make this quilt on my own time frame. Let me know what you think about my experiment so far. I’m loving inset circles and will definitely do them more in the future!
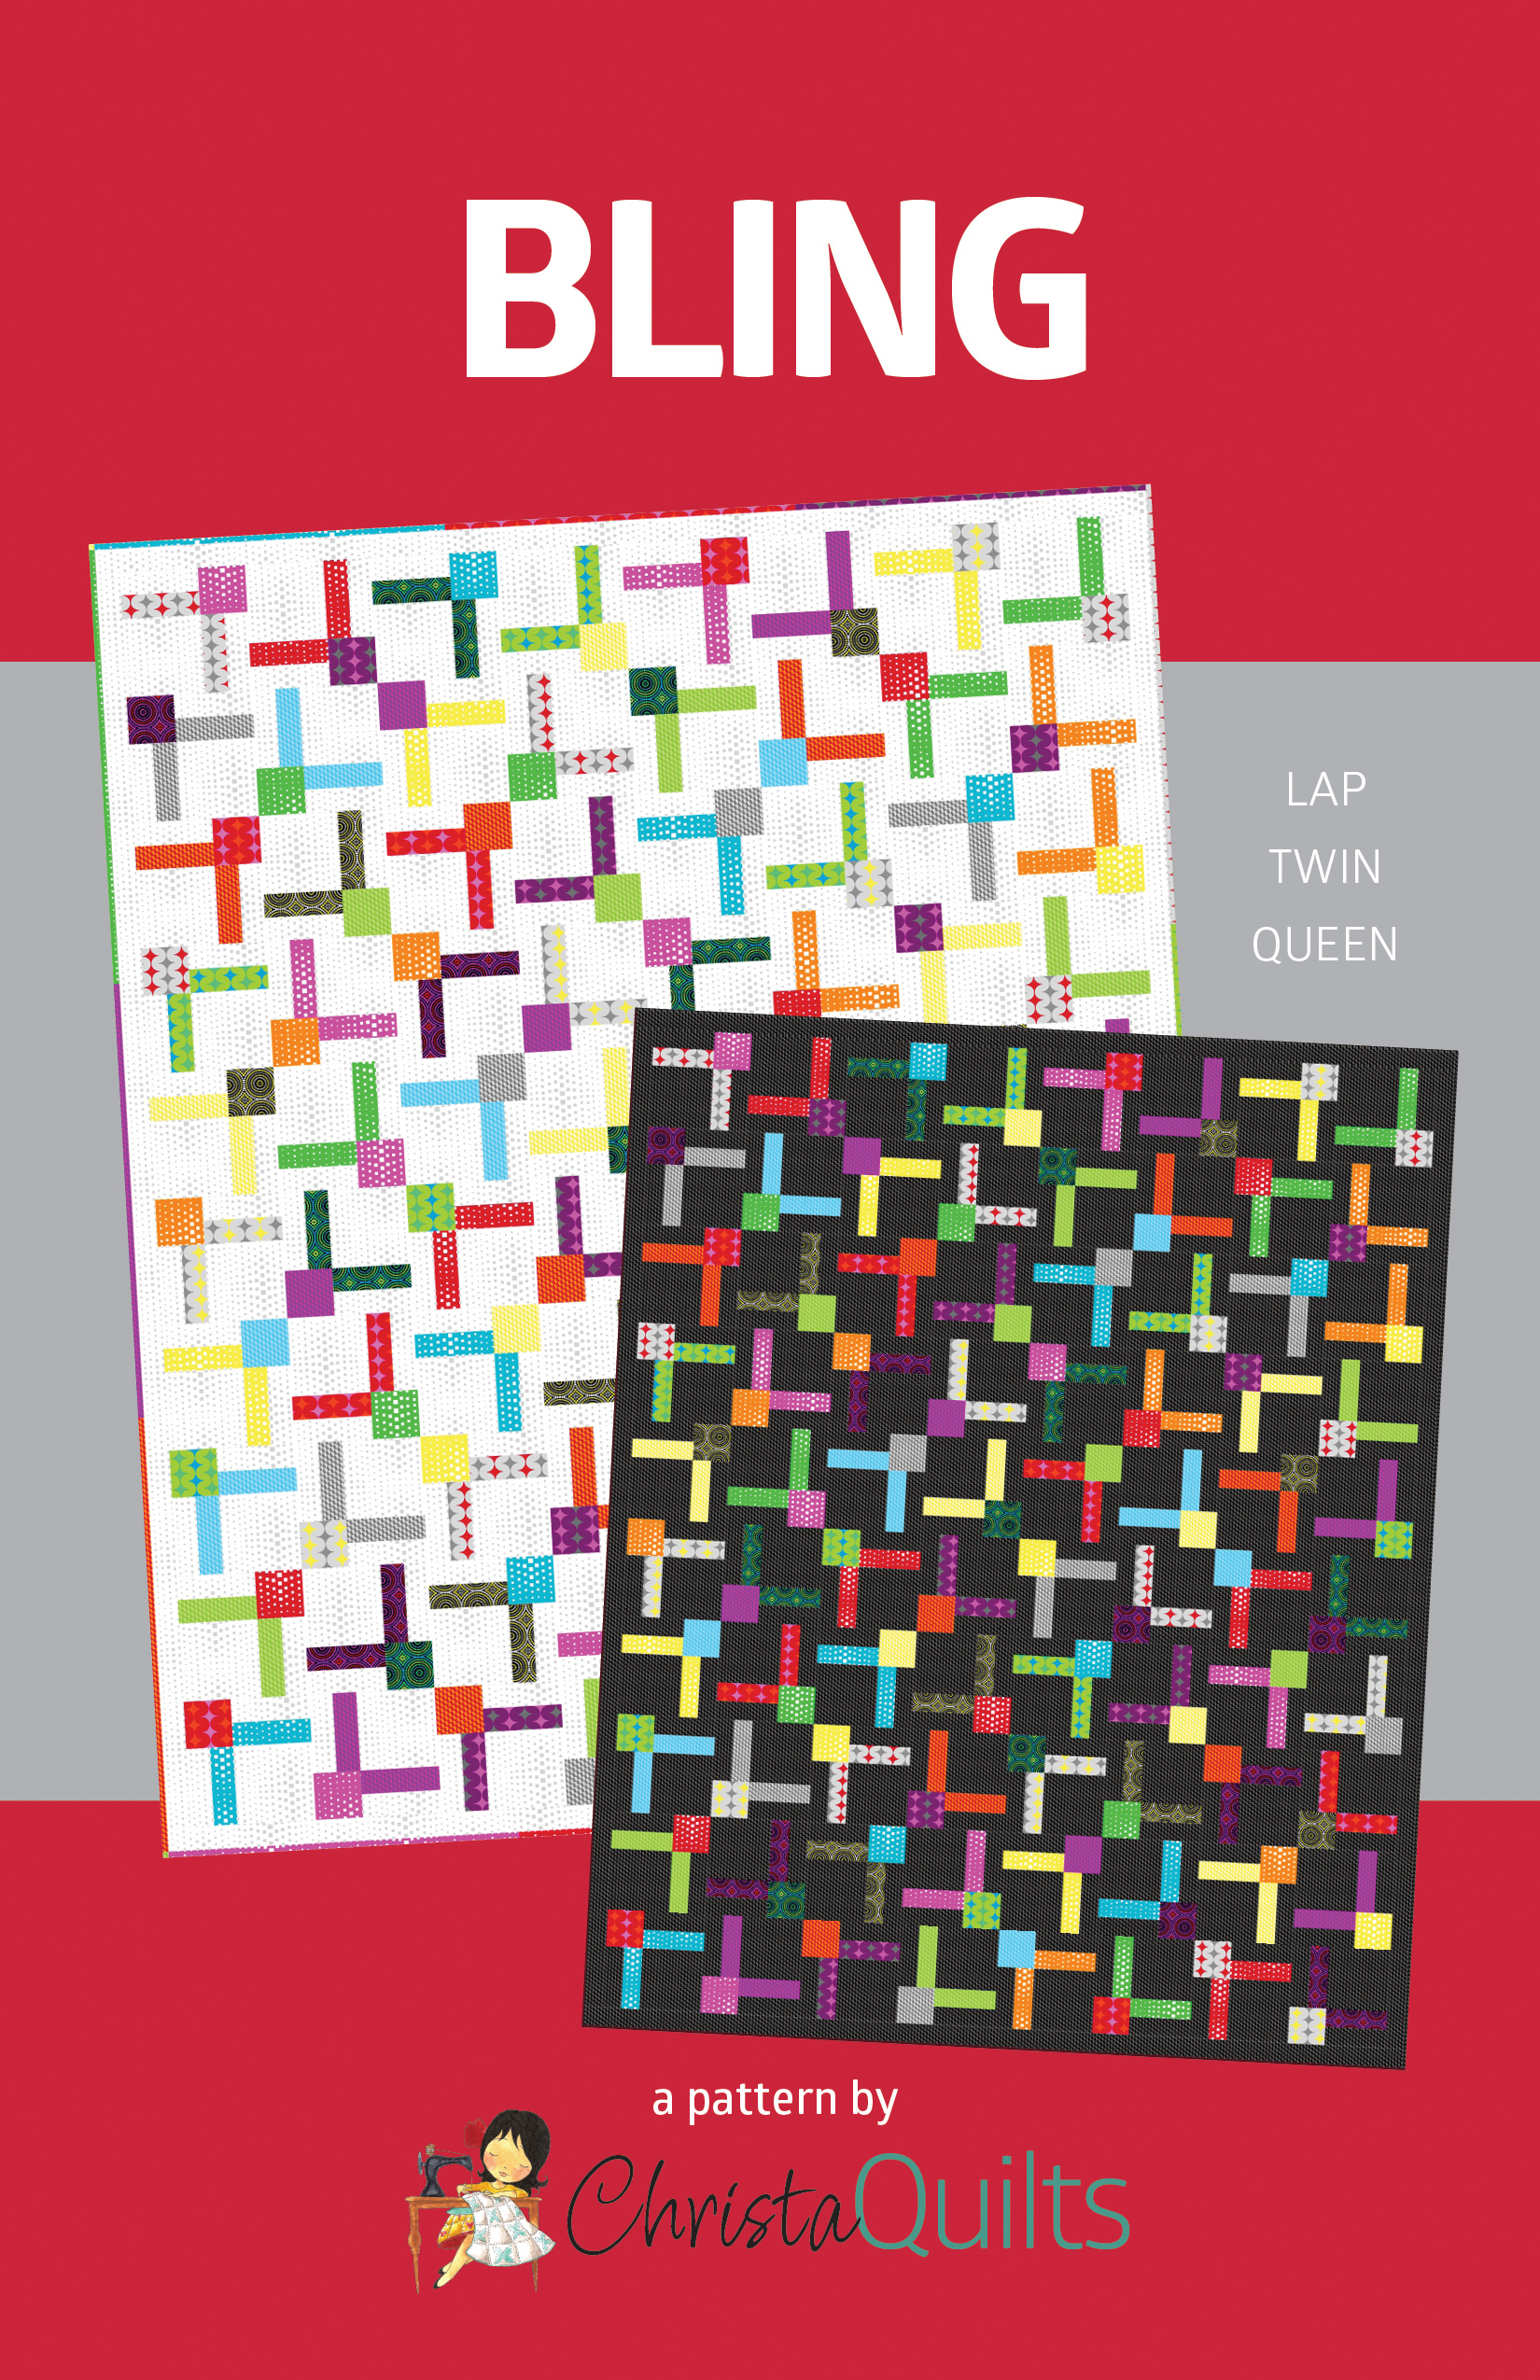
I was recently unpacking from my latest quilty travels and as I was putting my quilts away, I realized I’ve made 5 different versions of the same quilt. How does that even happen?? LOL!! So today I thought it would be fun to share all of them together in one post, plus a few more bonus ideas!!
The original version of Bling shown above was created for a magazine and originally came in one size only. I made it to showcase an earlier fabric line that’s now out of print and wanted to quilt it fairly quickly with a simple wavy walking foot grid design.
As I was designing this quilt I started playing around with different layouts and fabric placement. I love the version below which I call “Trinket Boxes.” I haven’t made it….yet, but it’s still on my “to make” list one day!!
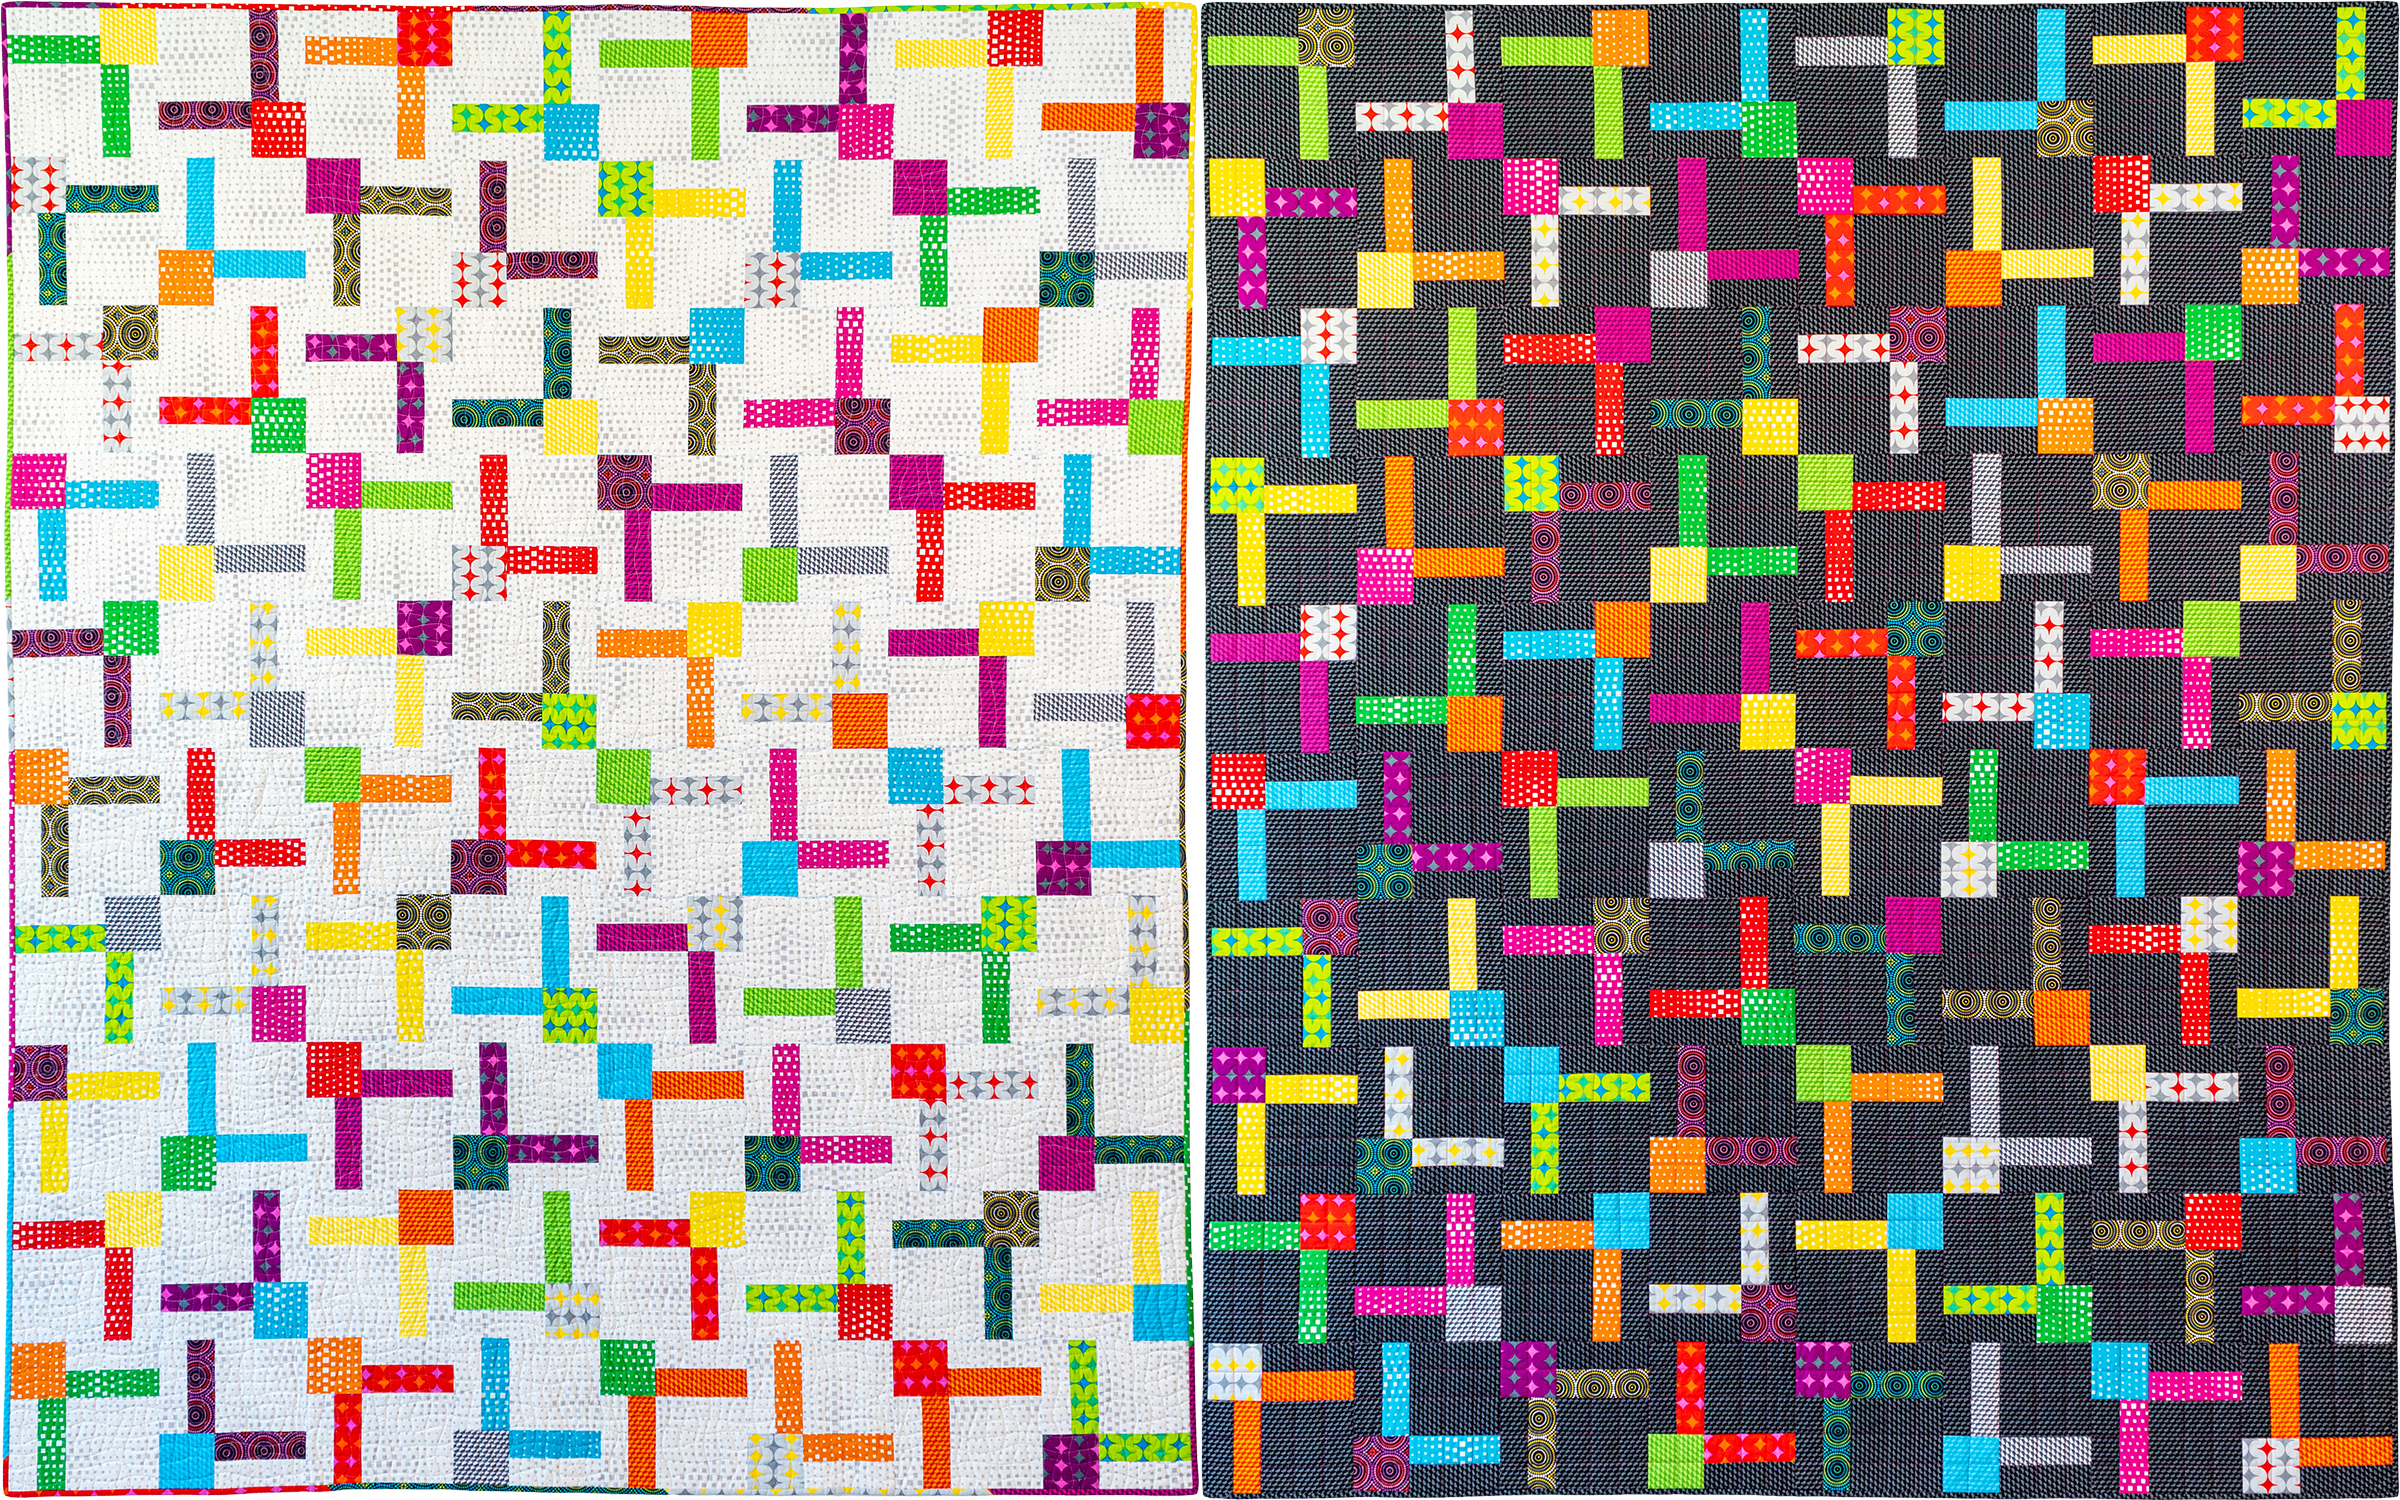
Once the pattern rights reverted back to me, I created a version of my Bling pattern that now includes multiple sizes. This time I made two more versions of Bling to showcase another colorful fabric collection I had designed. I wanted to demonstrate how the same bright fabrics can pop against either a very dark OR very light background as shown below:
With the release of the stand-alone quilt pattern, I also include a few alternate layout ideas. I love how the same design can look so different, just by rotating all the blocks! All of the images below are included in the current version of this pattern.
I was really intrigued by the Hashtags layout above. Next, I wanted to explore how it could look if the colors were a little more unified rather than completely random. So when it was time to release my Black, White & Bright collection, I made a 4th version where all of the hashtags were made from the same fabric in each block. I also went scrappy in for the backgrounds, too.
When people see this version, they can’t believe it’s the exact same pattern!!
Finally, I made a 5th version of Bling to showcase my Stitchy fabric collection. I kept the look of the scrappy backgrounds and even made a video showing how I machine quilted it with fun decorative machine stitches. Click the image below to watch the video:
After making all these quilts, I’m still not tired of this design!!
While supplies last, I have kits available to make the Black White & Bright Hashtags version above, or either of the bright pastel Stitchy versions below.
Stitchy is my fabric collection from Benartex that features 5 different geometric prints in 5 different colorways ranging from light to dark. I usually like to keep my fabric lines to about 20-25 prints so they don’t break the bank and that’s been working really great so far.
I went with a “sewing & sharing” theme on this collection with fun names like Hashtags, Stitches, Sunny Day, Crossweave, and Threaded Lines. While supplies last, you can grab half yard bundles of any of the five colorways shown below: pink, orange, lime, turquoise and grey.
Stitchy fabrics are also available individually by the yard, or you can grab a fat quarter bundle of the entire group. Which colorway is *your* favorite??
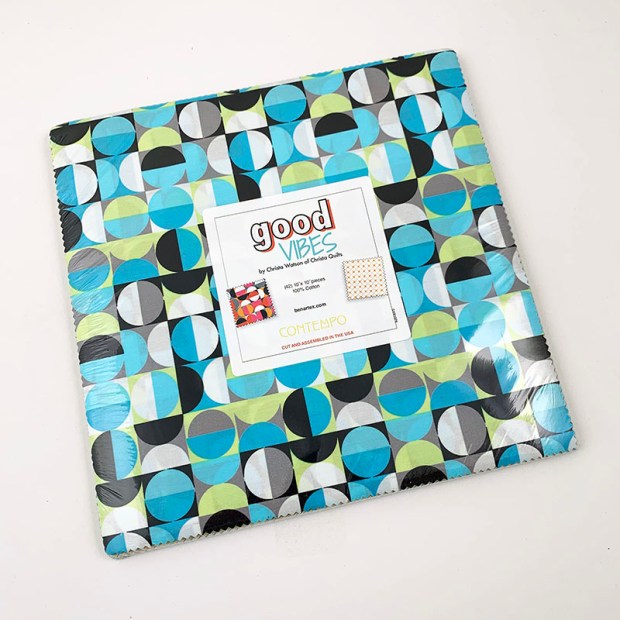
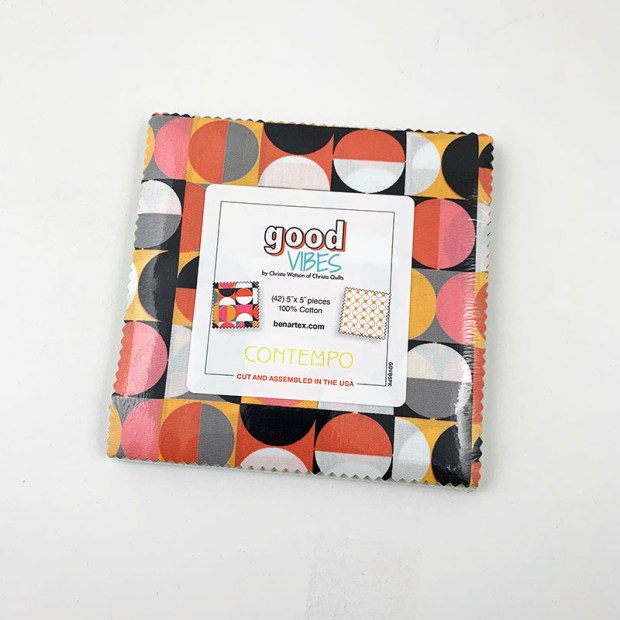
Design challenge alert!! I’ve partnered with Electric Quilt and Benartex, LLC. to bring you a fun design contest. Download swatches of my Good Vibes fabric, design an original quilt using EQ, and enter to win a bundle of my fabric. This is a great way to stretch your creativity and you don’t even have to make the quilt.
You DO have to use Electric Quilt to enter this contest, but you DO NOT have to make the quilt! 2 lucky winners will each win a Bundle of my Good Vibes fabric.
The exciting part about this design challenge is that I get to pick one of the winners! My friends over at Benartex will pick the other. I’ve done this contest for most of my fabric lines so far and I just LOVE seeing what you all create!!
I’ve invited Nancy to come on the blog to tell you more about this fabulous quilt in her own words…..
From Nancy Messuri:
I am honored Christa gave me the opportunity to guest blog as I am a huge fan all her fabric lines, books, and easygoing teaching style, so I was very excited when she asked me to guest post, as there is lots to share about this quilt!
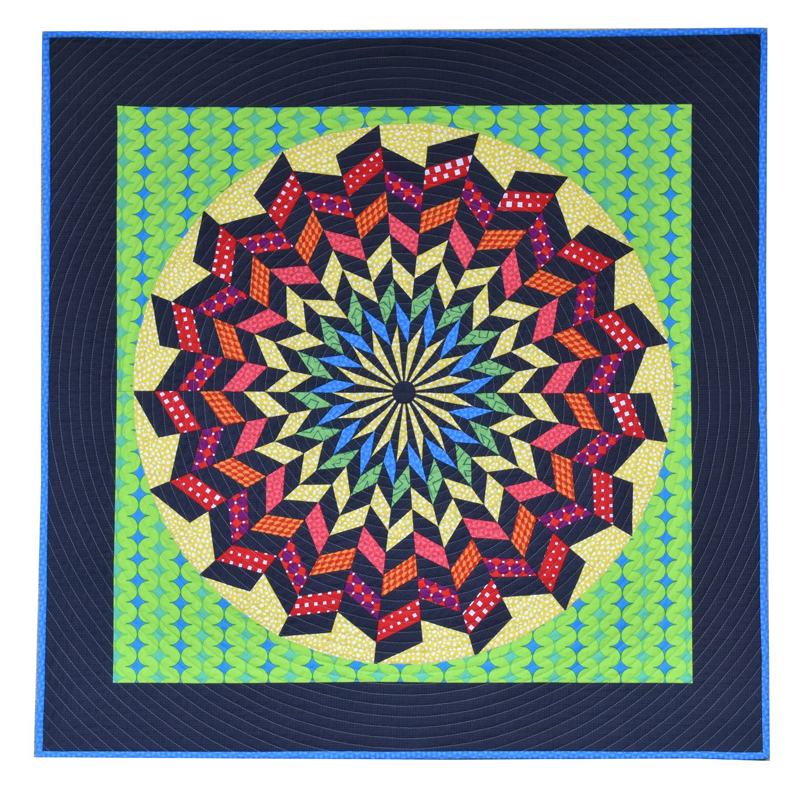
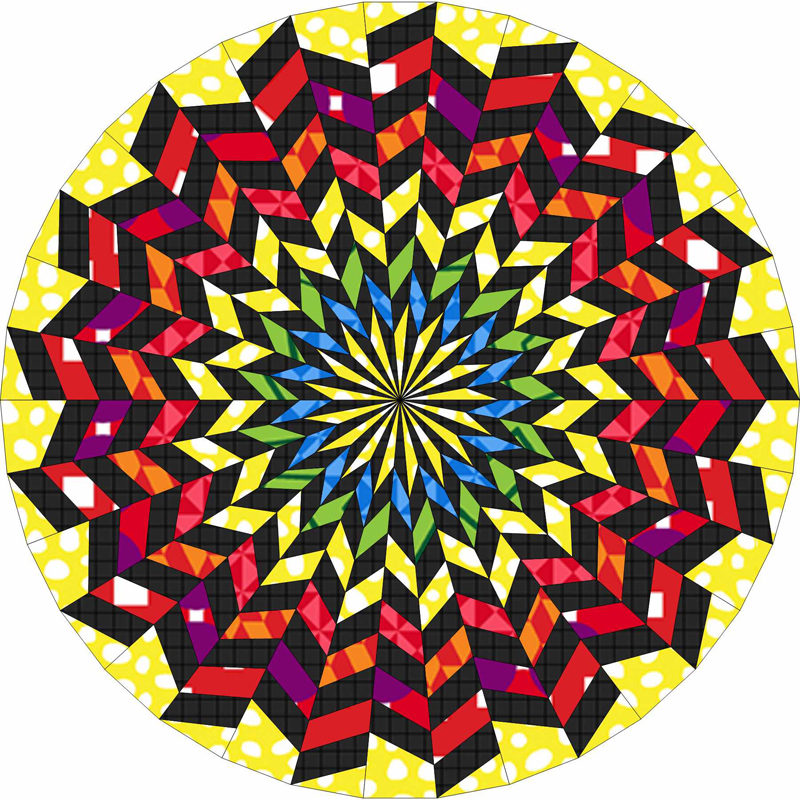
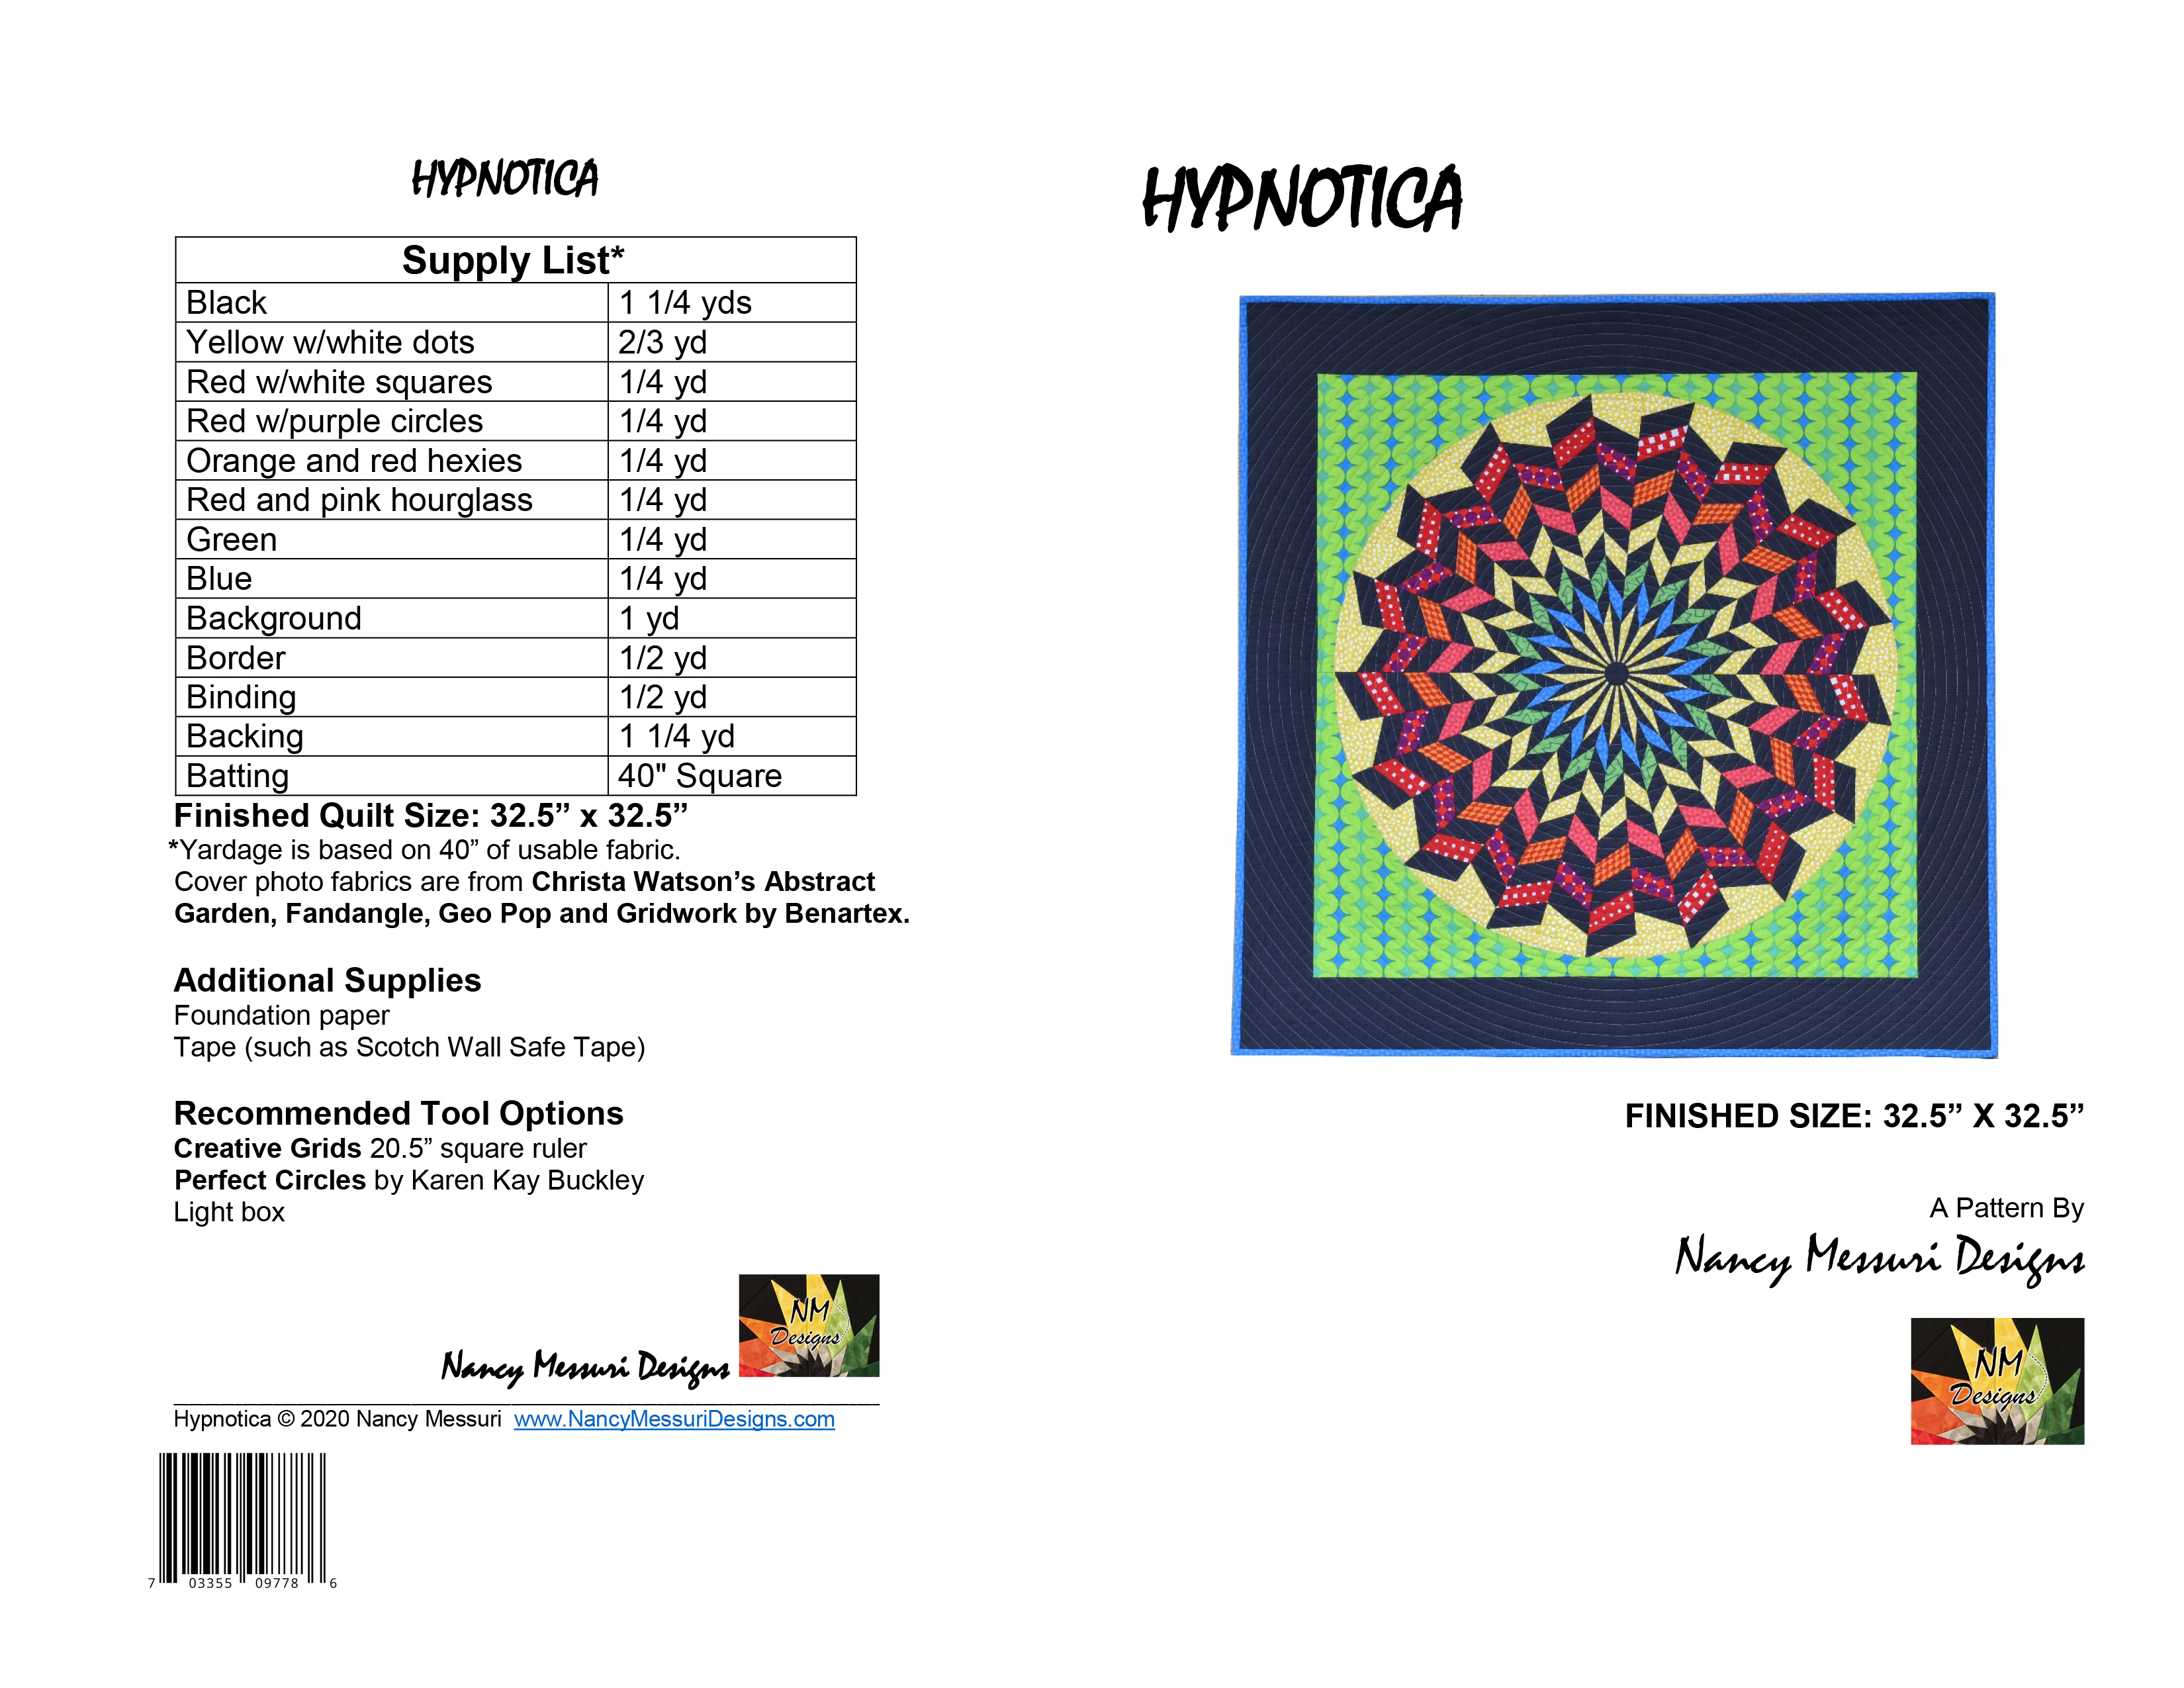
Hypnotica started off as a study in black and white and I had no intention of making it into a quilt. It was simply a personal design challenge in Electric Quilt 8 (EQ8). After playing with some initial coloring though, I found the design quite interesting. I saw it had potential to be very striking. My geometric quilt designs often mesh with Christa’s sense of line and color, so I placed a few of her fabrics into my design. And wow, did it ever come to life!
I started thinking about possibly piecing Hypnotica, but the fact that all 34 wedges meet at the center point was daunting. However, I continued playing with fabric placements in EQ8 using Christa’s fabrics. When I found a grouping that really stood out I decided I had to give this quilt a try.
Construction of the quilt center was actually easier than I expected it to be. The entire circle is made up of only two different wedges which alternate around the quilt. I printed patterns for the foundation paper pieced wedges from EQ8, then did a few test runs of sewing patches into wedges and sewing wedges together.
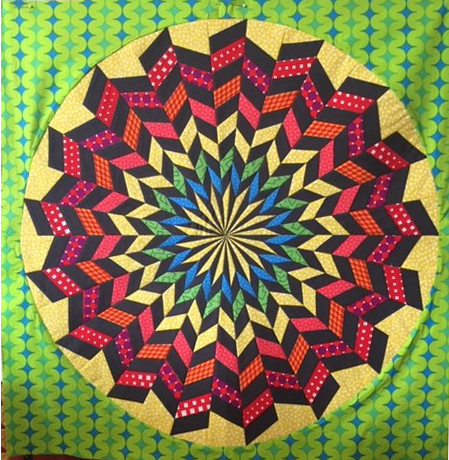
After I felt confident with the tests, I was ready to use Christa’s beautiful fabrics and pieced together the two semi-circles. I quickly learned not to sew too fast over multiple layers of fabric as wedges were added; especially when nearing the center of the quilt. Hypnotica is definitely a “slow and steady wins the race” kind of quilt!
The two background pieces are sewn to each semi-circle before sewing the two halves of the circle together. If you are new to curved piecing, this is an easy curve to start with as the seam is sewn in a long, gentle curve. A few test runs of curved piecing with scrap fabric can give lots of confidence!
The moment of truth arrived; matching up all the points of the two halves while dealing with all the layers meeting up at the center point. I listened to my own advice and sewed very slowly and I am happy to say I nailed it on the first try! (There may have been a happy dance or two after that.) At that point, I knew a pattern had to be created for Hypnotica.Click the image above to enlarge. Click here to order Hypnotica Quilt Pattern.
I would love to see your interpretations of Hypnotica on my Facebook page, Nancy Messuri Designs! The pattern is available on my website, NancyMessuriDesigns.com. There are new patterns in the works, so I hope you pop in from time to time. Or better yet, sign up for updates so you won’t miss a thing!
Thanks so much Nancy for sharing your beautiful quilt!! Now I can’t wait to see what she creates next. 🙂
It’s a new month, so let’s have a fabric sale!! As our minds turn toward cooler temps and we start thinking about new snuggly projects to sew, I want to make that easier for you! So I’ve reduced the price on all of my Abstract Garden fabrics by the yard, while supplies last. Stock up on these bright, cheerful fabrics for borders, backings and more. And the best part is – there’s no coupon required!
Here’s another deal that’s automatically applied to your order – just pay $5 shipping to the US, no matter how much you buy. International orders are also discounted by $5 and any excess shipping charges will be promptly refunded.
So stock up now on Fandangle fabrics, my other collection that’s currently on sale for less than $10 bucks a yard and be sure to keep in touch to let me know what you are making!!
Why you are shopping, be sure to check out my entire sale section for great prices on my books, my Aurifil thread collections, and a few of my patterns on sale. My hope is to inspire you with lots of fun projects to make without breaking the bank!
Have you been enjoying following along to make Bling? Scroll to the end for links to the entire quilt along. This week we will be binding our Bling to finish it up!
Roundup of binding tutorials
Because I pretty much bind my quilts all the same way (either by hand or machine), I have a LOT of binding tutorials that I’ve shared over the years. So here are 3 for you to try – use whichever method you like best!
When I first began my binding adventures, I cut my strips 2 1/4″ wide. However, that meant that if I attached my binding with 1/4″ seams, it would be bigger on the back than the front. So over the last couple of years, I’ve started cutting my strips 2″ wide and that gives me a more even finish on both sides.
To avoid ending up with a seam in the corner, I will roughly “walk” my binding around the quilt and if any seams fall in the corners, I will adjust the whole binding by and inch or two before I start sewing. If worse comes to worse and I STILL get a seam on the corner, I’ll simply cut off part of the binding and sew a new seam to move it!
Homework
Finish quilting and binding your version of Bling and share it in my ChristaQuilts Facebook Group. I can’t wait to see your fabulous finish!
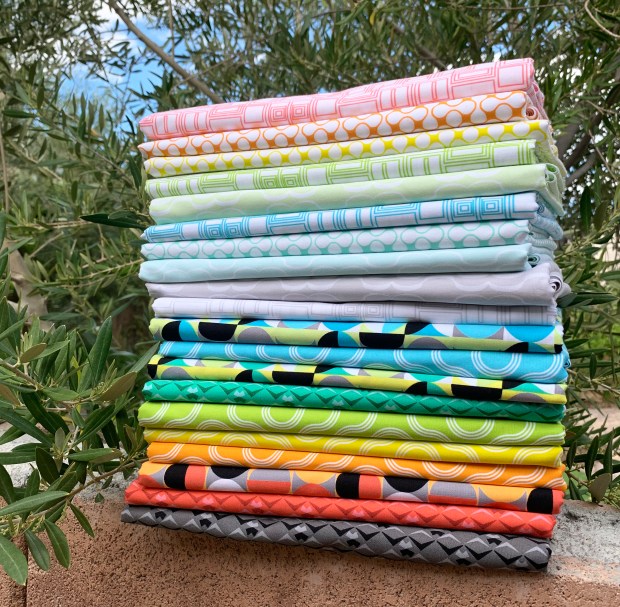
I always recommend finding my fabrics at your favorite independent quilt shop first. With lots of fabric and stores out there, the best way to get your favorite shop to carry my fabrics is to ask them to do so – they LOVE listening to their customers!
But if you aren’t able to visit your favorite shop during this crazy time, I do also sell all of my fabrics in my online shop too – and I’m happy to ship anywhere in the world.
Of course my personal favorite precut to work with is the fat quarter bundle. I love working with fat quarters because I think they are the most versatile. I can cut them down into any size or shape and it’s usually enough fabric of each print for most of the quilts I like to make.
I used 2 fat quarter bundles to make my newest Modern Logs quilt – more info about that coming soon!!
Jelly rolls, strip-pies, roll ups, or whatever you call them are a definite favorite among quilters. There are so many great patterns out there for them, including my free Puzzle box pattern that is made from 2 of these beauties! The best thing I love about colorful precut strips is using the leftovers to make a scrappy binding. I love it when nothing goes to waste!
My fabric company likes to call these 10x10s because that’s exactly what they are. They include the exact same fabrics as the charm pack shown below, but in a larger size. I love the 10″ squares because they can be cut into 2 1/2″ strips or 5″ squares and the math places nicely with the other precuts. I’m excited to be remaking my Charming Chevrons pattern using these squares. It’s a larger quilt, with less work!
You can make a baby quilt in a day by sewing one set of charm squares in a 6×7 layout. If you’d like to make a larger quilt, be sure to check out my Charming Chevrons pattern in the lap or throw size. It’s a match made in heaven!
I’m thrilled that these fabrics are now out in the world and getting a good reception. If you make something using them, please let me know. You can use the hashtag #goodvibesfabric so I can see what you are working on. It’ll definitely make my day!!!