New to my blog? Be sure to add your email in the box on the right side bar (or scroll to the bottom if reading on a mobile device) so you never miss a new post!
Sea of Squares
Sea of Squares is the 4th in my series of do-it-yourself quilts where I will take you through all of the steps of making a quilt from fabric selection to cutting, piecing, basting, machine quilting and binding. If you follow along with me you will have a completed quilt in no time!
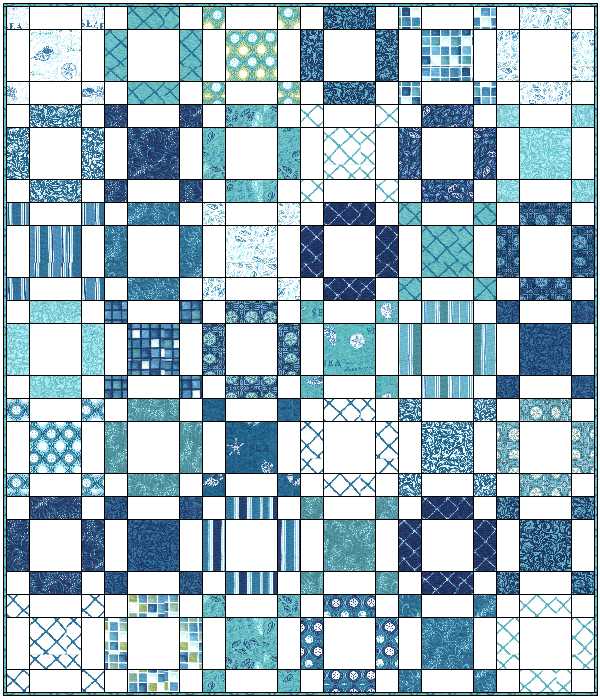
About This Quilt – Finished Size Approximately 51.5″ x 60″
I designed this quilt in EQ7 and downloaded fabric images from Moda to color it.
I named it “Sea of Squares” because I wanted to make a simple quilt pattern from nothing but charm squares. I used Deb Strain’s Seascapes in calming shades of blue from teal to navy to aqua, with Bella Solids in white for the background. This monochromatic color-scheme calls to mind the tranquility of the sea with the occasional whitecap of a breaking wave.


Supply List
Important! If you’d like to pick your own charms, make sure that each pack contains at least 42 – 5 inch squares. Not all manufacturers are consistent with their charms.
Each block consists of 4 charms (2 light/2 dark) so cut or purchase additional charms as needed for a bigger size. You may also use layer cakes if you want to super-size it!
Fabric
- 2 of the same charm packs in darks or prints – 84 charms total (seascape blues)
- 2 of the same charm packs in lights or solids – 84 charms total (solid white)
- 1/2 yard for the binding (one of the blues in the picture above)
- 3.5 yards for backing split into 2 equal pieces if using all the same fabric. If you prefer a scrappy backing like I do, collect assorted chunks and scraps to total this amount.
- Batting piece measuring at least 60″ x 70″
Supplies
- Basic sewing equipment in good working order
- Rotary cutter with a fresh blade, ruler and mat
- Brand new sewing machine needles
- Neutral cotton thread for piecing
- Decorative thread to match fabrics for quilting
- Walking foot for straight line quilting
- Optional – pinmoors and pins for easy basting
- Optional – machingers gloves for smooth quilting
Quilt-Along Schedule – Links are Active at the Completion of Each Step:
- Week 1 – Supply List (today’s blog post above)
- Week 2 – Sorting and Cutting the Charms
- Week 3 – Sewing the Blocks
- Week 4 – Completing the Quilt Top
- Week 5 – Piecing the Backing
- Week 6 – Basting
- Week 7 – Machine Quilting
- Week 8 – Optional Extra Quilting
- Week 9 – Machine Binding to Finish
I plan on posting each week on Wednesday or Thursday depending on how my “homework” goes that week. Even though I will be sticking to the above schedule, feel free to work at your own pace.
By the way, this quilt uses the exact same fabric requirements as my previous Charming Chevrons quilt – so you can do either one, or both, depending on your mood!
Sharing is Caring
Please share your work in progress in my facebook group: Quilt With Christa . 🙂


