I really enjoyed quilting it densely with combination of designs that are easy to do with a walking foot: decorative stitches combined with wavy lines. Don’t you love all this yummy texture?
To see how I accomplished this, plus a completely different design that I did on the navy version, click below to watch my latest video tutorial over on my Christa Quilts YouTube channel:
The Ticker Tape pattern includes 4 sizes. I made the Turquoise version in the Double Size and the Navy version in the Lap size. Which color background would *YOU* choose??
A recent social media prompt had me thinking about all of the fun pieced backings I’ve made over the years. Whether for thrift or artistry, I find it a really fun thing to do. I thought I’d gather up a few of the images and match them up to their fronts. Don’t tell anyone – but sometimes I like the backing as much (or more) as the fronts!
Swanky Spirals Back & Front
I made Swanky Spirals from fat quarters + the dark grey backround of my Dazzle Dots fabric. Although the focus was meant to be the front of the quilt, I sure had fun sewing together all the smaller leftover scraps to create a secondary composition on the back. I combined leftovers with other chunks of Dazzle Dots from a few other projects to create this improvisationally pieced backing. Isn’t it fun??
Bling (Hashtags) Back and Front
This is about the 4th version I’ve made of my Bling Quilt – using a different layout than I’ve chosen before. It was really fun to use show case the contrast of colors in my Black, White & Bright fabric collection. Here’s a tip when making a pieced backing: place your smaller pieced areas away from the edges of the quilt, since those will get trimmed off the most.
Modern Logs Back and Front
Modern Logs is another one of my quilt patterns that I’ve made several times. I always enjoy seeing how the same quilt looks in different fabrics. For this pieced back, I used up the leftover “logs” in the center section, along with with bigger chunks of my Good Vibes fabric. I combined those with a few random leftover pieces from other collections for a fun pop of color.
Surplus Strips in 2 Colorways + Pieced Backing
Sometimes it’s fun to use up leftover blocks on the back, like I did for the warm colored version of my Surplus Strips quilt. Although these fabrics are long out of print, you can still get a similar look using your favorite jelly roll strips and coordinating fabrics.
Gathering up these image for this blog post has inspired me to make even more pieced backings. After all, I think it’s fun to have a 2-sided quilt, don’t you?
Want to Make Something Similar?
The patterns to make the fronts of all these quilts are available in my Etsy shop. I also included my favorite method for piecing quilt backs in my latest book called How Do I Quilt It? You can also check out my website at shop.ChristaQuilts.com to see which fabrics and kits are still in print. Thanks for reading and happy quilting!
I’m excited to announce that I’ll be teaching at PIQF this summer in northern California. This is one of those shows that I’ve had my eyes on for quite awhile. They’ve invited me to come teach several times in the past when the show used to be held in the fall, but the timing never worked out. Now that it’s being held at a new time in the summer, the stars magically aligned and I’m excited to attend!
Click play below to watch a short summary of what I’ll be teaching.
In addition to teaching a full schedule of machine quilting workshops, I’ll also be one of the judges of the show. Although it’s not my main focus, I do occasionally judge a few shows when invited, and consider it a special honor. There’s nothing like getting up close and personal with hundreds of amazing quilts to make me appreciate the amazing artistry in this industry.
If you plan to attend this show, please let me know. I’d love to see you there!
This past weekend I was able to take a really fun trip to California and hang out with Alex Anderson and Ricky Tims for a day! They invited me to be a guest on The Quilt Show – an internet TV show they’ve been producing since 2007. Full disclosure: I was a guest on an earlier episode back in 2018 so it was fun to return!
I thought it would be fun to share a few behind the scenes pics that we took while filming. I shared some of my best tips and tricks for domestic machine quilting. It’s my favorite subject to talk about, of course!! The episode will be out later this year so stay tuned!
In other news, I’ve restocked several of my popular kits made from my Dazzle Dots fabrics. Take a look below. I have bonus video tutorials for many of them over on my YouTube channel and I’m adding new ones each week!
Churn Chain is a fun pattern designed by my friend Nicole Moore of Sew Much Moore. She’s hosting a quilt along to make her pattern during the months of March-April, 2024 and she asked me to put together kits for it. You can grab a kit and join in any time. Click here for QAL info to join the fun!
Fancy Gifts was an exclusive pattern included in the Winter 2024 edition of the fat quarterly magazine. I was able to procure enough copies to offer about a dozen kits that include the pattern + all the fabric you need to make the quilt top including binding.
I love making the same quilt more than once. Not only do I love seeing what it looks like using different fabrics, but it’s also a great excuse for me to try out different quilting plans. Terrace Tiles shown above is literally the easiest pattern + kit that I offer. It’s a quick and easy weekend make, perfect for a last minute gift.
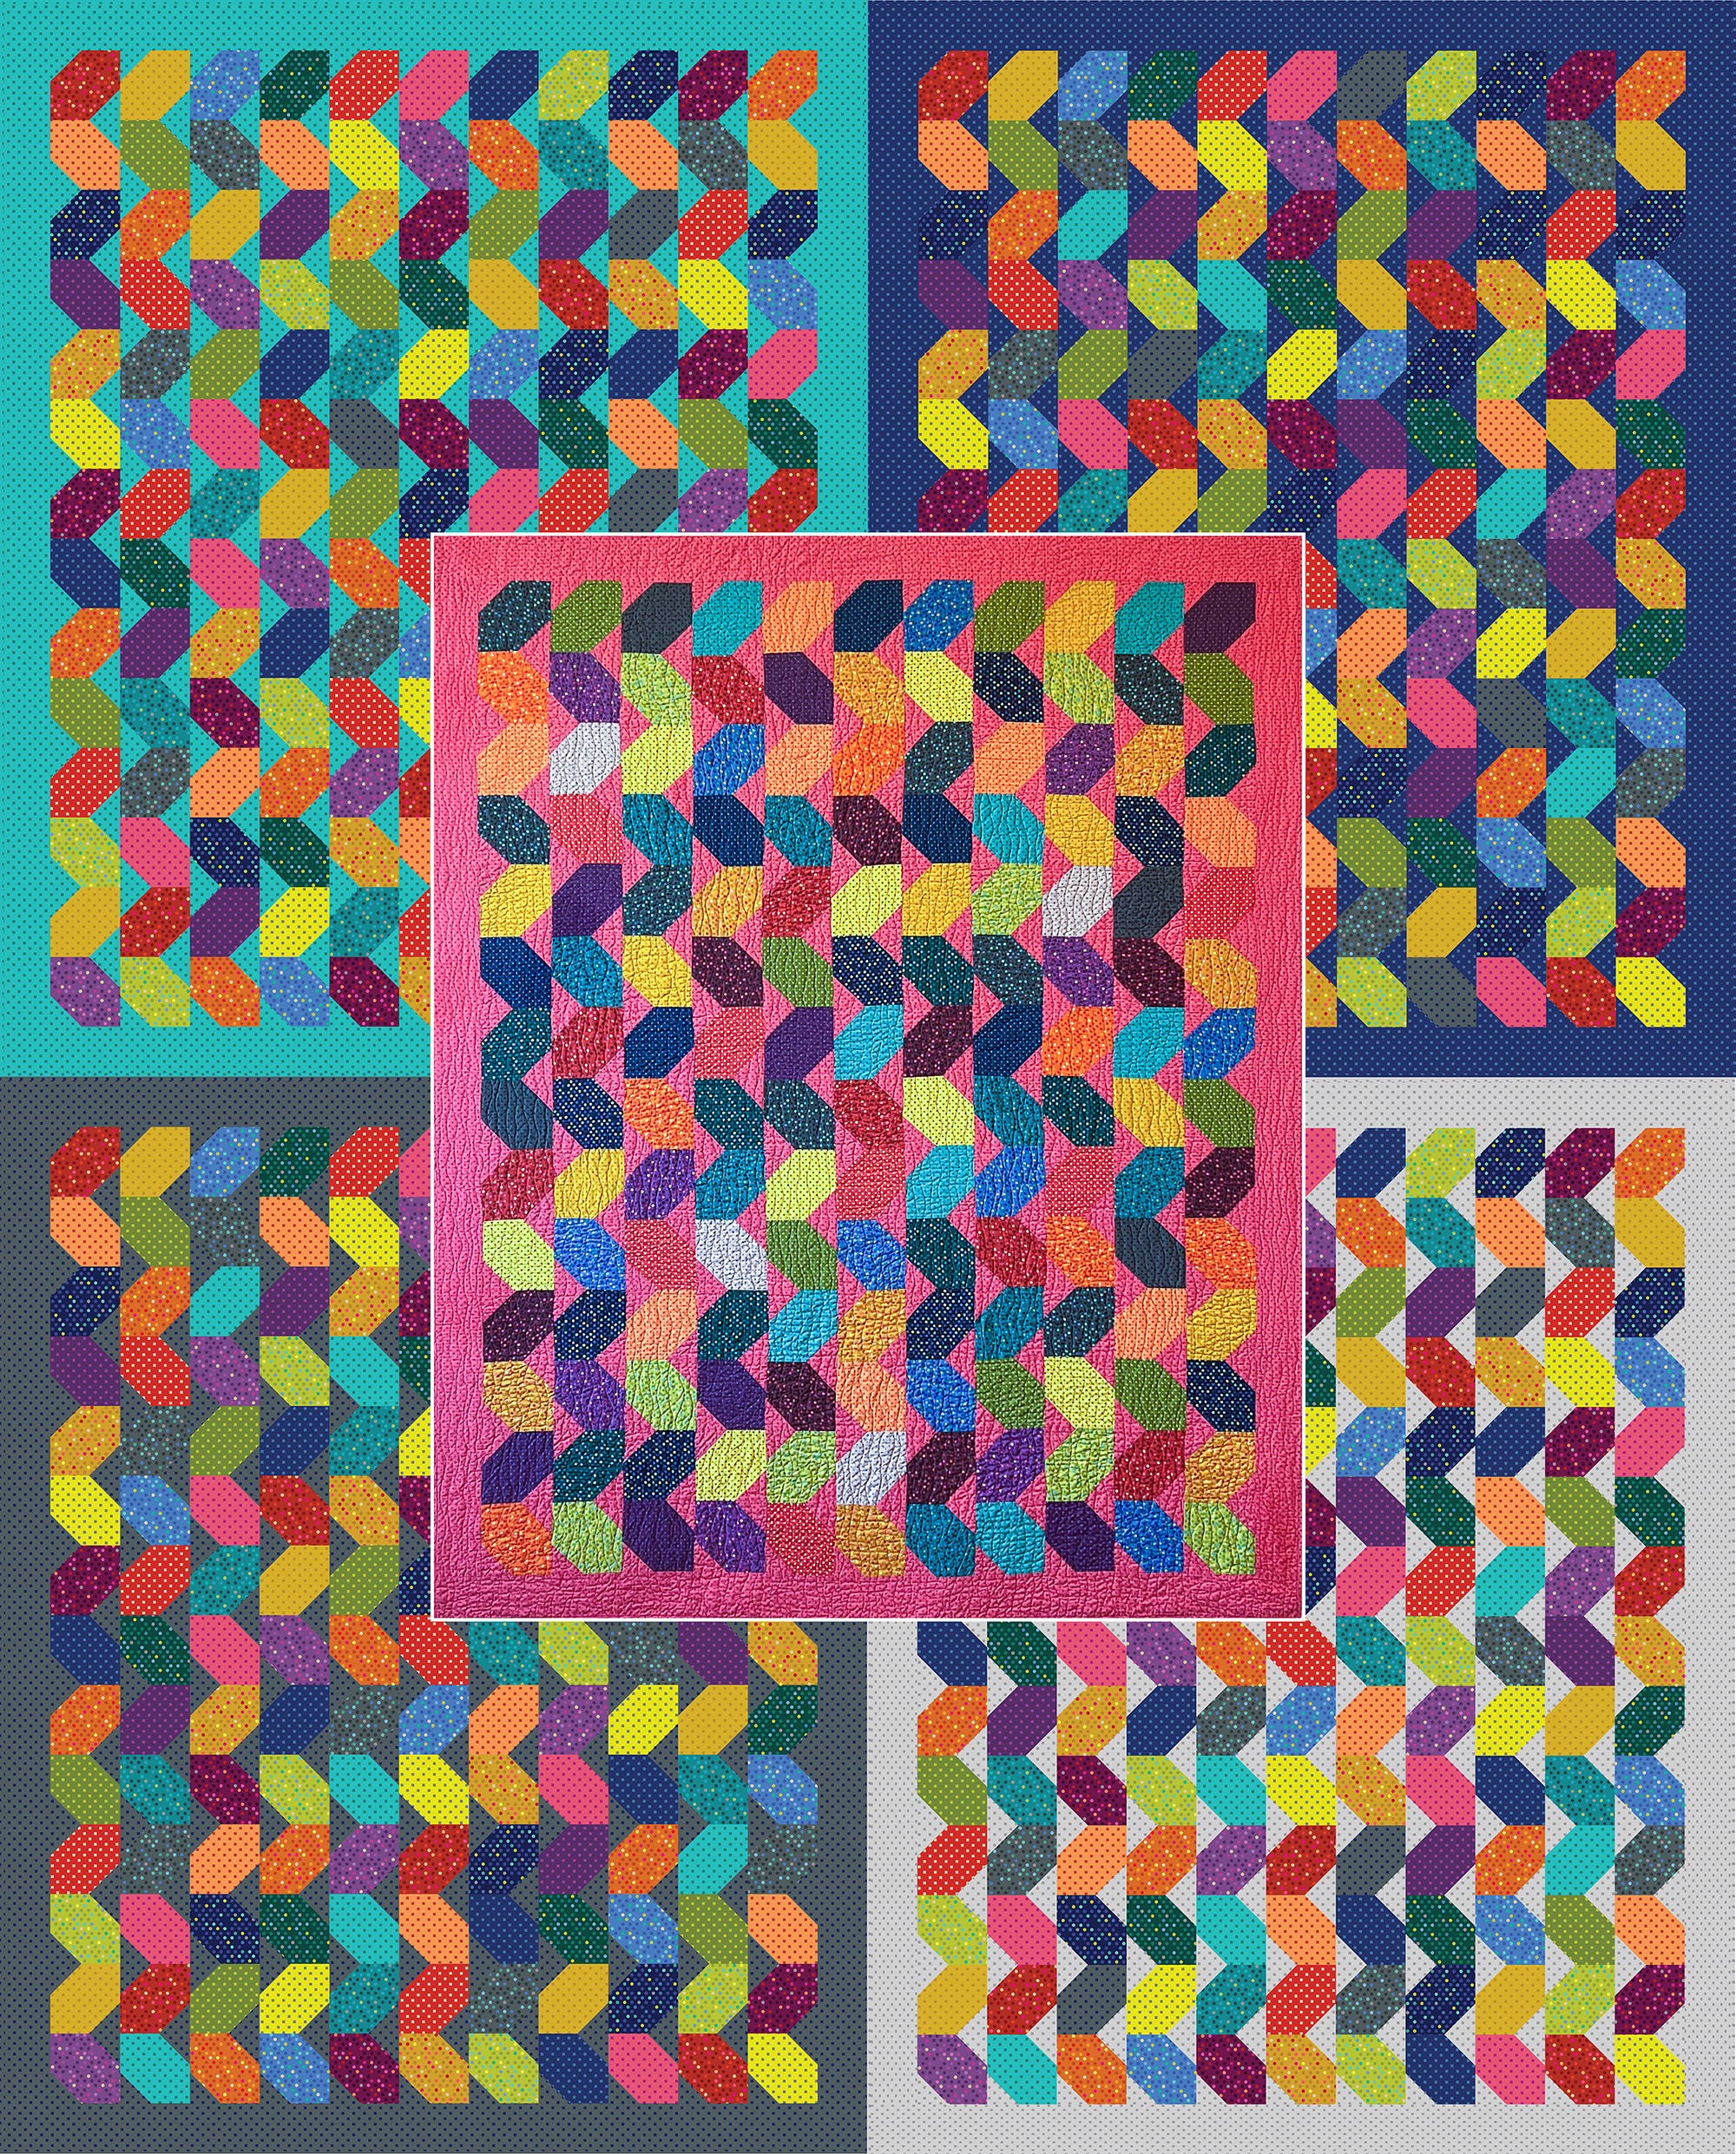
I love offering a free quilt pattern with each fabric collection I design, usually made from precuts. Although I only made one version of this quilt (with the pink background), it sure was fun to explore all the different options. Which one would YOU make??
Now that I’ve been back from QuiltCon for over a week I’ve had time to process my thoughts, feelings and pics and vids from the show. I’ve compiled them into a 30 minute video below. Click the image to play the video and check out my fave 100 quilts from the show!
Now I’m curious – did you get a chance to attend this years’ show – or any prior QuiltCons for that matter? I’d love to know your thoughts and opinions, too!
Next year it will be in Phoenix, Arizona and I can’t wait. I’m not teaching because I want to have plenty of time to enjoy the show as an attendee. It’s the only show I attend, even when I’m NOT teaching. It’s just that good!
Weather you are quilting along with me making your version of Ticker Tape, or any other quilt for that matter, basting is an important part of the machine quilting process. Take a look at the video below to see how I spray basted 2 of my earlier quilts, both made from my Black, White & Bright fabric from Benartex.
I used this same technique for my larger Ticker Tape quilt shown on my design wall below. Now it’s time to quilt it!
Here’s a bonus tip when basting: trim up the edges of the quilt, so there’s only about an inch or 2 of batting and backing sticking out. That will reduce the bulk under the machine, but more importantly, it will prevent the edges from getting folded under your machine while quilting! I use my batting shears to cut batting from the bolt and trim it up around the quilt.
In Other News… I’m Heading to Paducah this Spring!
I’m still processing all of the amazingness that was QuiltCon 2024, but one thing is for certain. My favorite thing to do is teach others how to successfully quilt on their home machines. The excitement of my students when they “Get It” is unlike any other feeling I’ve seen.
If you missed the QuiltCon fun, the next place you’ll find me out and about is teaching at AQS quilt week in Paducah, KY from April 24-27, 2024. Here’s a short teaser video I made talking more about it.
As of this writing, 2 of my 5 classes have sold out, but there are a few spots left in 3 of them, plus my lecture. I will be lecturing and teaching from my latest books and I can’t wait. I’ve never been to this show before (although my Facets Quilt won a ribbon at the show a few years ago – read more about that here.)
If you plan to attend, please let me know. I’d love to see you there!
Hi everyone! I’m a little behind on posting due to my amazing trip to QuiltCon 2024 (more on that later)!! But I’m excited to share my latest video tutorial featuring my Fancy Gifts quilt. I’m showing how to combine 3 fun free-motion designs to create a new edge-to edge design that that goes with the theme of the quilt. Take a look by clicking play below to watch:
Lucky attendees of QuiltCon who received a swag bag got a copy of the quilt pattern + Dazzle Dots swatches to make this quilt. However, I want everyone to feel lucky, especially since I *am* from Las Vegas!!
I was able to secure a few extra copies of the Fat Quarterly magazine in which my quilt appears, so I’m able to offer a limited number of kits which include the pattern + everything you need to make the quilt top and binding.
Now I’ve got to unpack from my trip, go through all my photos and videos that I took from the show and put them all together into a travel-log video for you all – so stay tuned!!
Just a quick reminder for all of those making Ticker Tape along with me: remember to work at your own pace – you are never “behind” because the quilt along posts will stay up indefinitely! Here’s the reveal of my turquoise version – I love a good “quilt top drop!” Click the image below to play the short video:
So this week’s “homework” is to join all of the blocks into rows and assemble the quilt top. You’ll be using the leftover squares to make a fun pieced border which frames the design nicely.
Here are some bonus tips that should help as you sew your quilt top together:
Lay Out Your Quilt Blocks On a Large Surface
This can be a design wall, the bed, or even the floor! But laying them out and then taking a picture of the order will help speed up the row assembly.
Press as You Go
I can’t over emphasize the importance of pressing. Whether you press your seams open like I do, or to the side, if you press every single seam as you go, it will help your quilt top lie flat and everything will go together much more smoothly. I use a hot dry iron with no steam. I press each unit in the block, then each block, and then reach row as I sew it together.
Pins are Your Friends!
Because I press my seams open, my seams don’t nest. So instead, I use a generous amount of pins to get my seams to line up perfectly. The trick is to pin perpendicular to the seam and place those pins on either side of the seam rather than in the middle so it won’t wiggle open. Take a look at this short video demo below. Click the image to start the video:
Enjoy the View
I actually finished sewing the Turquoise version of the quilt top while on a recent beach vacay. It was chilly outside but I had a great view from inside. I love taking my singer Featherweight with me on sewing vacation!
Make it Any Size You Want
The nice thing about my quilt patterns is that I offer them in multiple sizes and it’s also pretty simple to customize your size by adding or reducing blocks, rows and borders. I loved this quilt so much I’m making 2 versions of it. Here are a couple in progress images of the smaller Navy version which I made as Lap sized.
Stock up on Dazzle Dots!
As of this writing, I was able to cut out several more Ticker Tape quilt kits in all 4 colors I offer. You can also stock up on your favorite Dazzle Dots fabrics for the backing, and some folks have grabbed an extra yard or 2 to make it a little bigger. But you know what – no matter which fabrics and colors you choose, or what size you make, it’s going to look great!
Looking ahead to next week it will be time to baste – so stay tuned for more quilt along fun!! Remember, you can share your progress and get extra help anytime in my Facebook group.
Will you be attending QuiltCon this year? It takes place in Raleigh, NC February 22-25. It’s my favorite show of the year! Although my workshops are completely full, you’ll be able to attend my lectures if you are there. I’m also doing a few meet ‘n greets with different vendors on the show floor.
To kick things off, I’ll be hanging out in BERNINA World of Sewing booth #211 just after the show opens on Thursday, from 10:30-11:30 am. These guys are also sponsoring the BERNINA room that I’ll be teaching in all weekend so I’ll get to know them quite well over the course of the show!
Thursday afternoon I’ll be teaching a sold out free-motion quilting workshop. Then on Friday, I’ll be teaching 2 walking foot workshops which are also full, followed by 2 lectures on Saturday which have plenty of room since they are taking place in a large lecture hall that can hold hundreds of people.
My lectures and workshops will be based on my 2 latest books: 99 Machine Quilting Designs and How Do I Quilt It. If you don’t have those yet, you can click here to snag signed copies of my books.
Just after my first lecture on Saturday morning, I’ll be heading over to my new friend Deborah’s booth #501: Fish Museum and Circus from 10:30-11:30 AM. She’s known for her whimsical ceramic pincushions which always sell out at every show. We met at quilt market last fall and became fast friends!! She’ll host several fun designers events during the show, so that should be lots of fun!!
Finally, after my sold out walking foot workshop on Sunday, at 1 PM I’ll head over to the Threaded Lines Quilt Shop booth #321 for a book signing and chat. I can’t wait!!
I’ve attended each and every QuiltCon since the first one in 2013 and I love making new friends and catching up with my quilting buddies. Please let me know if I’ll see you there!
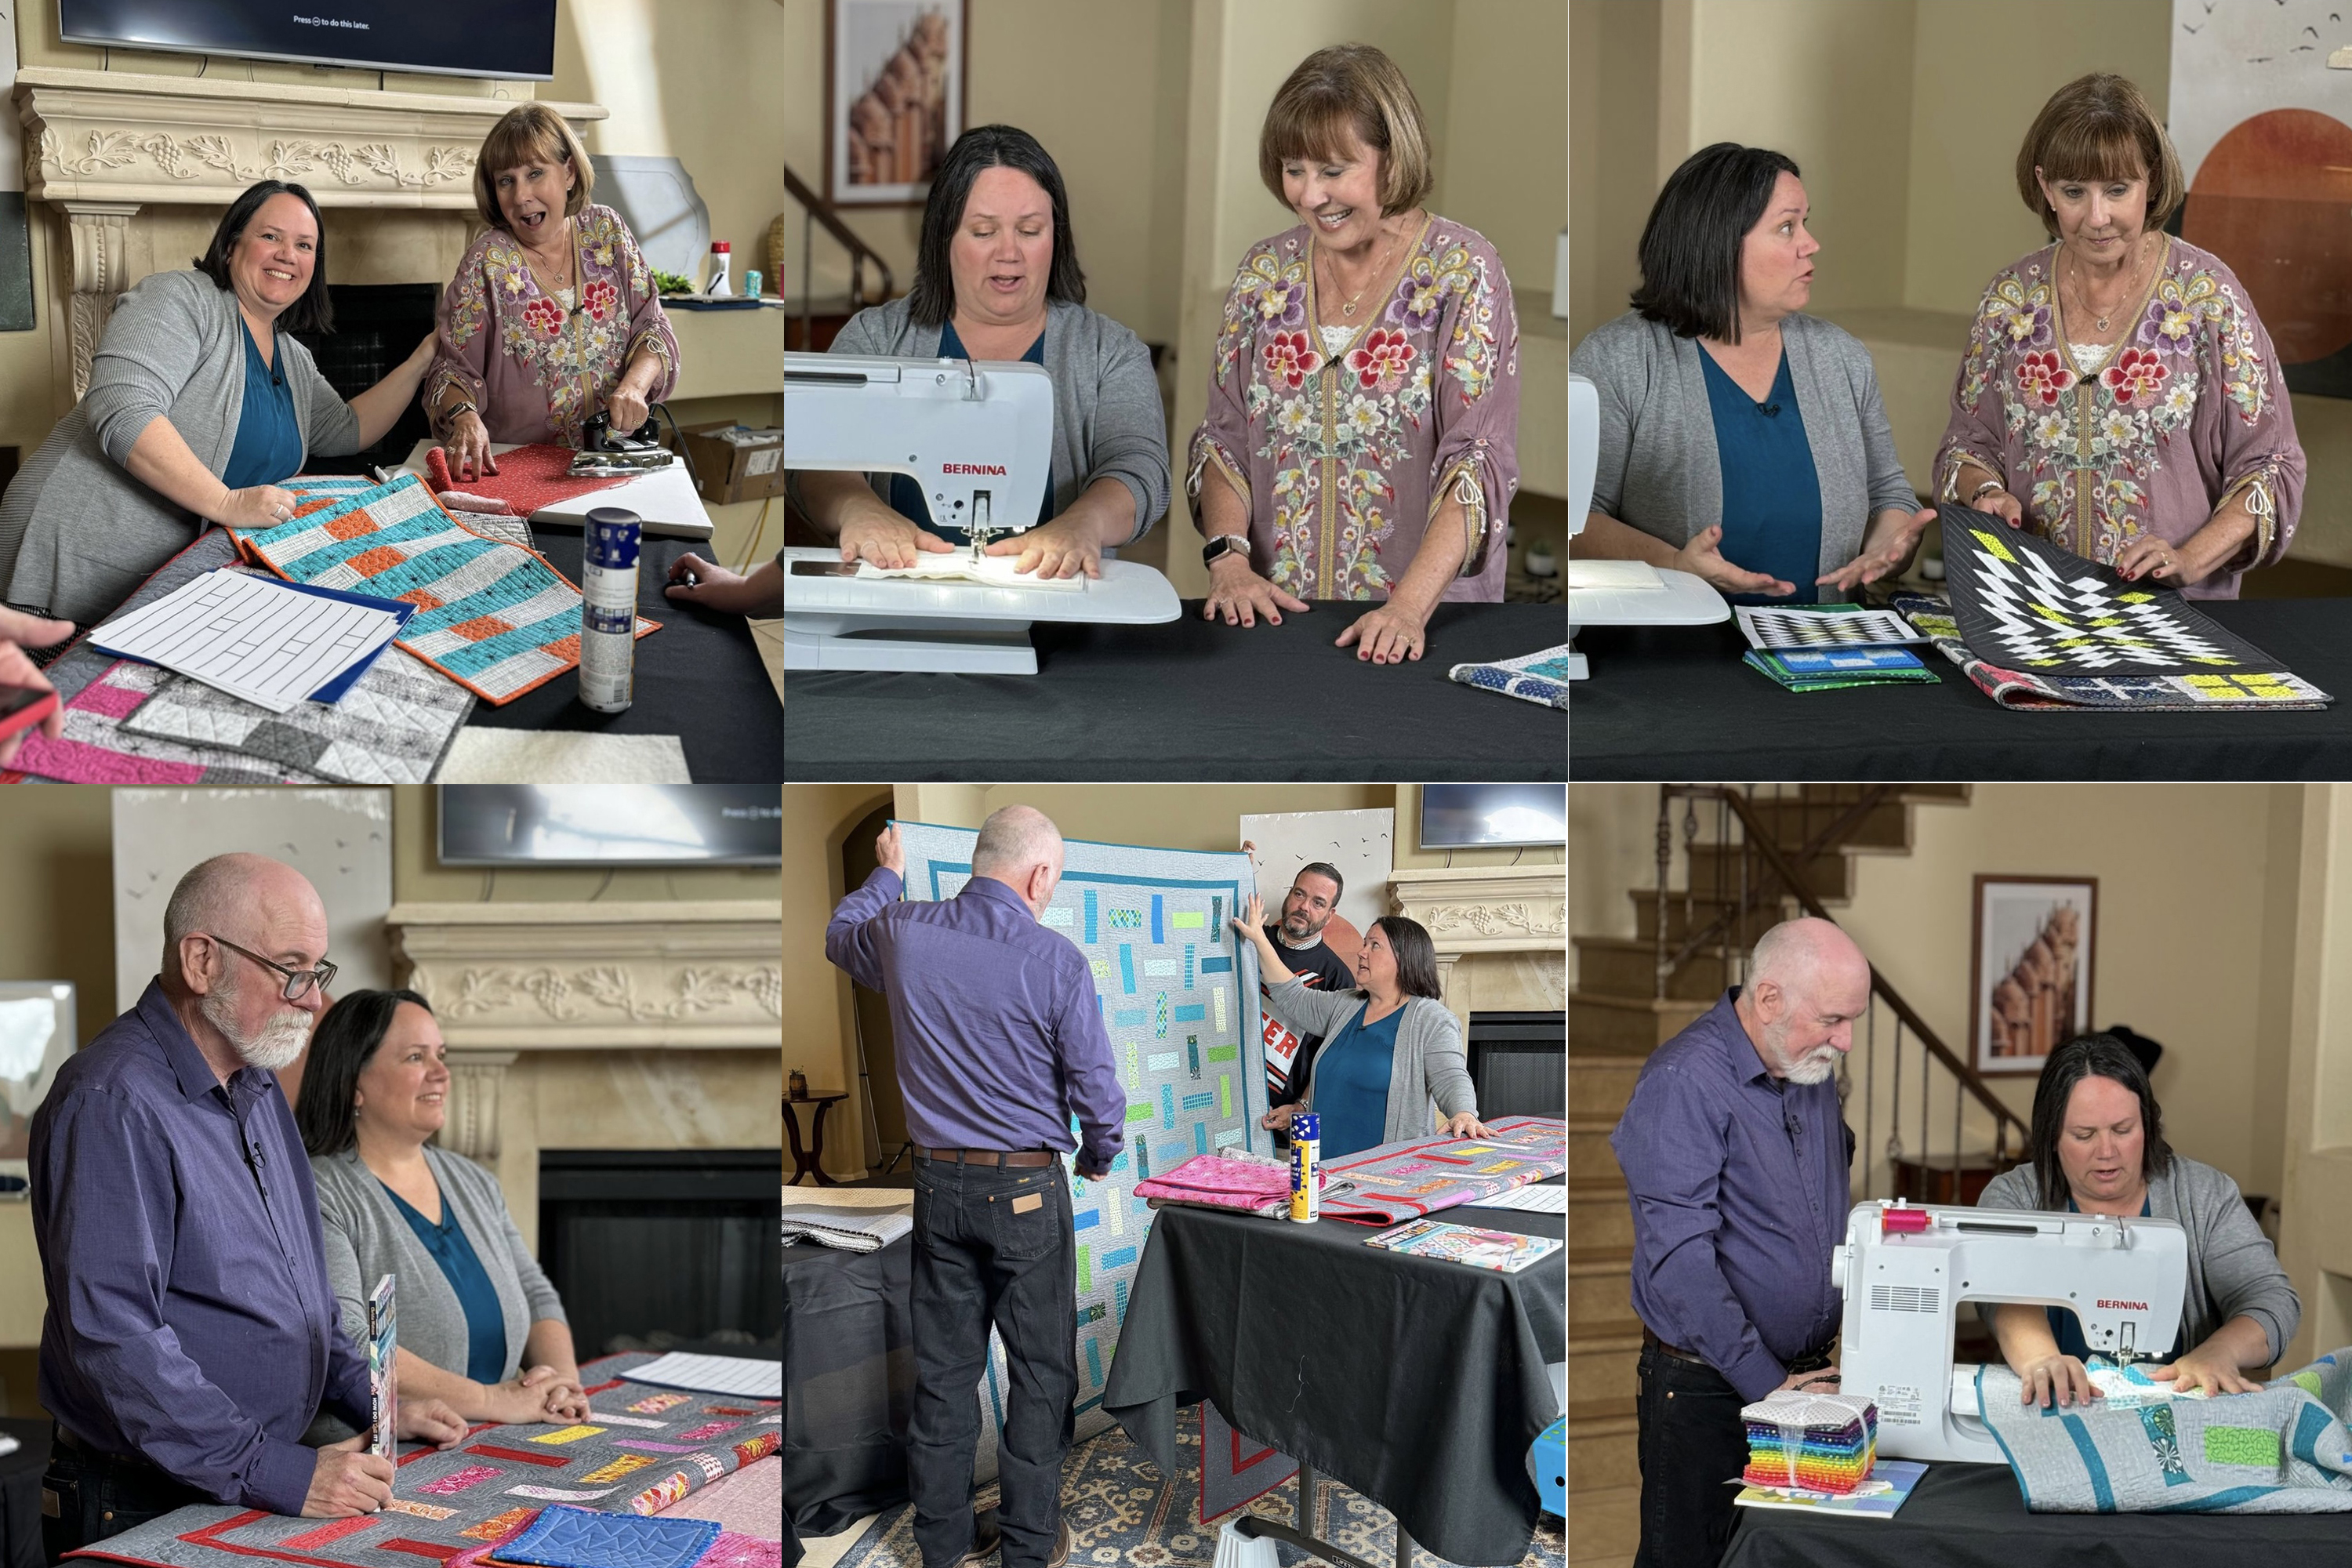
Have you ever wanted to add custom quilting texture to your quilts but were afraid to mess up your quilt? Well, with this week’s video I’m taking the fear out of free motion by breaking down my custom quilting process step by step. I’m featuring 2 different versions of Charming Chevrons, but you can apply these techniques to any quilt in your UFO pile! Click play below to watch:
Here’s my custom quilting process in an nutshell: first, stitch in the ditch in key areas of your quilt to anchor or secure the quilt. This is usually quilting an outline around the main block areas in between each row. Then, quilt one design in the background areas, and a different design in the blocks. It really is that simple!
Here are a couple of detailed images below. Both versions of Charming Chevrons are quilted using my “divide and conquer” technique, but the designs – aka quilting motifs – are completely different.
My secret is to utilize walking foot style quilting to create separation between the different design elements of the quilt. That allows your eye to move across the quilt taking in all the gorgeous texture!
Get the Optional Charming Chevrons Kits
Fun fact: I designed my Good Vibes fabric collection to include half lights/half darks. This is so that I could utilize all of the fabrics in the collection to create sparkle and contrast in my quilts. My philosophy is why use just 1 background fabric when 20 will do?? While supplies last I’m offering kits to make both versions of Charming Chevrons.
The smaller version is made from 5″ squares while the larger version is made from 10″ squares. I used 2 different binding fabrics (peach and blue) to make the original versions, but sadly those are now out of print. So for the kits, I included the lime green Gumballs print for binding which is just as much fun!!
Now I’m curious to know – have you ever made a quilt completely from precuts?