Christa’s Quilt Along 5.4 – Hugs ‘n Kisses X and O Blocks

Hugs 'N Kisses

Hugs ‘N Kisses 48″ x 64″

Welcome to part 4 of my Hugs ‘n Kisses Quilt Along!

For anyone just joining me, Hugs ‘n Kisses Quilt Kits are available for purchase while supplies last.

Thanks to all of you who have shared your quilt along pictures on my flickr group so far. It’s been “sew” fun to see your progress!

Scroll to the end of the post for  the quilt along schedule.

It took me a total of 2 hours to sew all my blocks.


Did you finish your bow ties from last week? If not, that’s ok. I added an extra week to my schedule to give everyone a chance to catch up. That means less homework this week!

Bow Ties

140 Bow Ties is a lot!

Step 1 – Sewing the Half-Blocks (1 Hour)

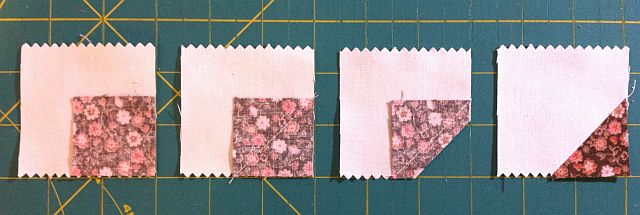
It takes 4 bow tie units to complete one X or O block. Sew two bow ties together to complete half of the block. Repeat for the other half of the block.

Half Blocks

At this point you can decide whether you want it to be an X or an O. Chain piece all of your pairs of bowties until you have a total of 70 “half-units”.

Partial Blocks

For an X block, join the halves with the print squares in the middle forming an X. For an O block, join the halves with the background squares touching to form an O. I pressed all of my seams open so that it did not matter which way I rotated the units.

Step 2 – Completing the X and O Blocks (1 Hour)

Sew a total of 18 X blocks and 17 O blocks. You should have a total of 35 blocks.

X O Blocks

For a fun design aesthetic you could try to make the X blocks from mostly medium/dark fabrics and the O blocks from mostly light/medium fabrics. It’s up to you!

I am making my quilt from all X’s so I have sewn a total of 35 X blocks

All X's

Alternate Block Design

If you would like to go with an alternate layout such as waves, mix up your bow ties so that each one is different and sew all block units like this:

Waves Block 1Waves Block 2Waves Block 3


Play around with your bow ties and see what other designs you can come up with!
On the left is a sketch of what my quilt will look like. On the right is an alternate layout.

All X's

All X’s

Random Waves

Random Waves


If you have any questions about this week’s homework, please be sure to join my flickr discussion or email me directly at christa@christaquilts.com.

Quilt Along Schedule – Links will go to each active post when published.


Button, Button – Who’s got my button? Giveaway will award 2 winners!

Grab a Quilt Along Button and Enter to Win My Giveaway!

<div align="center"><a href="http://christasquiltalong.com" title="Christa's Quilt Along" target="_blank"><img src="https://christaquilts.com/wp-content/uploads/2013/03/christas-quilt-along-175-2.png" alt="Christa's Quilt Along" style="border:none;" /></a></div>

Here’s how to enter:

  • Add my Christa’s Quilt Along button to your blog. Copy the button link above.
  • Leave me a comment with your blog address so I (and others) can check out your blog.

To make this giveaway extra special – I’m sweetening the pot. Since I know that bribery goes a long way, I will award 2 winners at random this week.

Each will receive a $15 gift certificate good for anything in my store.

ChristaQuilts.com

If you don’t have a blog, that’s ok – you can still enter. Save the picture and add it to your photostream on flickr to help spread the word about my quilt along. Then leave me a comment with your flickr id so I can check out your other pictures.

Or, if you don’t use flickr (please do – it’s really easy and fun!), you can instead email at least one friend and tell them about the quilt along.

Remember, sharing is caring… and winning!

So good luck and happy blogging and flickering! (Is that a word……??)

Click here to visit Christa’s Quilt Along flickr group.

Click here for the start of my current quilt along: Hugs ‘n Kisses.

Hugs 'N Kisses

Hugs ‘n Kisses Quilt Along

Giveaway will run through Tuesday, March 26th at 9 PM Eastern (6 PM Pacific). The winner will be announced on my quilt along post the next day, Wednesday March 27th.

Christa’s Soapbox – Why I Prewash My Fabrics

This was a very difficult post to write and I debated about even talking about it. But since I promised on my blog to show my failures as well as my successes, I need to get up on my soap box and implore you to pre-wash your fabrics whenever possible.

Here is my ruined quilt that just devastated me (but I am getting over it after lots of crying!) Do you see the distinct outline of blue? That is from the back bleeding to the front!!

Ruined Quilt

After countless hours of sewing and machine quilting this puppy, I decided I wanted to block it. Since one of my quilting goals is to enter more competitions, I have been learning about starching, blocking, burying my thread tails, and all of the other “little” details one does to make a quilt really stand out.

Because I had used precut squares for both the front and back of the quilt, I did not prewash them. I didn’t have problems when soaking the top with a spray bottle to erase all of my blue marked quilting lines. But then I submerged the quilt in my bathtub to completely soak it so that it was ready to block (lay out smooth on a flat surface to dry into place).

Bathtub Soak

The next day after it started drying, I noticed blue ink seeping through the top and I about had a heart attack. Apparently dye from one of the large blue squares from the pieced backing soaked through to the top. I kept waiting for it to dry thinking I was only seeing shadowing. But no, it really did bleed through to the front. Now, the weird thing is that this exact same piece of fabric is also on the front of the quilt and it did not bleed.

Laying Flat to Dry

In this picture you can see the pieced backing squares showing through to the front. When it dried you couldn’t see them anywhere except in one very distinct spot where the fabric bled.

So I’m not sure if it was just a fluke, or if somehow the water reacted with the wool batting in a weird way or if it was just my day to have bad quilting luck. I really don’t know. But no matter what – I’ve learned a few things with this quilt.

1. Always, always prewash as much as possible. I will be experimenting at some point on how to wash precuts since they are more delicate. If anyone has tips on how to do this please let me know!

2. Even when using precuts that are not washed, I will always use a shout color catcher in the wash from now on. Subsequent quilts I have made from precuts have not had this problem. In fact, I generally throw in 2-3 color catcher sheets to the wash  just for good measure.

Shout Color Catcher

3. Pieced backings are ok but just make sure they are lighter than the majority of the fabrics in the top – not a good idea with all of that white fabric.

4. After all, it is just a quilt and there will always be another one. This has been the hardest lesson to learn. I will move on and there will be more amazing quilts. But this did break my heart.

Finished QuiltYou can still see some of the shadowing where the darker fabrics show through the top. But there is a distinct light blue patch on the front where it’s fabric bleeding, not shadowing.

Oh well, at least it still hangs nice and flat – so blocking does work! 🙂 Maybe I will dye the whole thing light blue some day. I can always keep it as a sample of what NOT to do!

Sew and Tell – Baby French Roses 2 and National Quilting Day

For National Quilting Month, Worldwide Quilting Day and just plain old weekend fun, I’m working on my applique quilt below. I hope to get the top completed this weekend. I also finished sewing all the the blocks for my Hugs ‘n Kisses Quilt Along.

There’s nothing better than a nice quiet day of sewing!

In my recent blog post about slowing down and enjoying the process, someone made the comment that we all need to stop and smell the roses. So far, I am savoring every delicious step of making my pretty rose buds quilt! You can read about French Roses #1 here.

French Rose Buds Pieces

French Rose Buds Pieces

I’m calling it Baby French Roses since it’s the baby sized version of the original French Roses pattern. I was on a roll this week and finished all of the rose blocks using soft edge applique techniques. This method is contemporary and quick, allowing me to enjoy the process. I stitched down all 4 blocks of one color per day, over 3 days, and never felt rushed.

Stitching the Leaves

Stitching the Leaves

First Petal

First Petal

Using the knee-lift on my Bernina was especially helpful so I could leave my hands free to turn the blocks as needed, sometimes after just one or two stitches. I also like to use an open toe foot so I can see exactly where I’m going.

Pre-wound Bobbins

Pre-wound Bobbins

I matched my threads to the fabric colors and paid attention to details like pulling the loose threads to the back of the blocks and tying them off.

That way you can’t see my starts and stops on the front of the blocks.

I used an assortment of pre-wound bobbin thread colors to match. It didn’t take much thread to applique each block.

Trimming the Roses

Trimming the Roses

I trimmed the excess fabric underneath each rose patch as I went so there would not be too much bulk underneath each flower. Using curved tip scissors helped me avoid poking through the top fabric while I cut.

20130315_french_rose_block_single

I really like how the flowers have texture, each made from 4 layers of the same solid fabric in pastels. They will fray up nicely when I wash the finished quilt.  Now it’s time to play around with block placement. I’ll blog again next week when I finish the top.

French Rose Buds

French Rose Buds

If you’d like to make a quilt like mine, I have a few more French Rose Buds kits left. Or you can purchase the French Roses pattern (original or baby size) and make it your own. 🙂

Applique Rose Blocks

Applique Rose Blocks

To read my post about starting this project last week click here.

My goal is to make every day a Quilting Day!

Christa’s Quilt Along 5.3 – Hugs and Kisses Bow Tie Blocks

Hugs 'N Kisses

Hugs ‘N Kisses 48″ x 64″

Welcome to part 3 of my Hugs ‘n Kisses Quilt Along!

This week we will cut our strips into pieces and sew the bow tie units that make up the hugs and kisses blocks. Today’s post is pretty lengthy but I want to remind you to work at your own pace. Making this quilt is not a race; rather it is about enjoying the process.

I timed each step as I completed it to give you an idea of how long it will take to sew (total of 9 hours).  Rather than try to hurry and finish it all at once, I completed 1-2 steps per day so I never felt rushed.

Before cutting into segments, I starched my strips.

I also replaced a few jelly roll strips with a couple from my stash. (That’s because I borrowed them to make a previous Valentine’s Table Runner last month, LOL!!)

Hugs 'n Kisses Strips

Kissing Booth Jelly Roll Plus Stash Strips

Optional Step 1 – Starching the Strips (1 Hour, 15 Minutes)

I sprayed a light mist on the backside, let it soak in, then gently pressed from the front. Take care not to stretch your skinny strips out of alignment. It’s not mandatory, but I do get better results by starching. You can read my previous post about using starch here.

Starch BackPress Front


If you decide to starch your background strips, take care that you don’t scorch them. I would suggest testing on a piece of white fabric first to make sure you don’t get any yellowing or flaking of the starch. Here’s a hint – cut some of your starched strips into units while you are waiting for other starched strips to dry in between pressing.

If you select any one of the layouts from last week’s post you can cut all of your fabrics according to the chart below. But feel free to modify your design further if it pleases you.

Step 2 – Cutting the Print Strips into Segments (2 Hours)

From each of 35 print jelly roll strips (2 .5″ x 42″), cut:

  • 8 – 2.5″ squares (2o inches so far)
  • 8 – 1.5″ squares (32 inches so far)
  • 1 – 2.5″ x 4.5″ brick (37 inches total)
Cut Squares

Cut Squares

Be sure to cut off the selvedges first and stack up to 4 layers of strips for cutting efficiency. Just remember – measure twice, cut once! I found it easiest to cut the 2.5″ squares, then the brick, then trim the rest of the strip down to 1.5″ before cutting the smaller squares.

You should have one stack of squares (8 large, 8 small) for every complete X or O block.

From 3 print jelly roll strips, cut:

  • a total of 19 more 2.5″ x 4.5″ bricks
Border Brick Units

Border Brick Units

You should have a total of 54 bricks that measure 2.5″ x 4.5″. Stack all of your bricks together and set aside for now. Keep your squares above sorted by color.

Step 3 – Cutting the Solid Background Strips (30 Minutes)

From 18 solid background strips (2 .5″ x 42″):

  • Cut a total of 280 – 2.5″ squares. Yes, this is a lot of background squares.
  • You need 8 squares per large block and will be making 35 blocks total.
  • You can get 16 – 2.5″ squares per strip.
Background Strip

Cut 4 stacks of squares per background strip.

Background Squares

280 Background Squares

Here’s a hint: fold one of your background strips into 4 layers so that it is at least 10 inches wide.

Cut one background strip at a time into 4 stacks of 4 squares each.

Continue cutting until you have a total of 280 squares. You will use a total 17.5 strips exactly for the squares.

Set aside 6 extra full strips for borders = 24 background strips total.


Step 4 – Sew and Trim the Bow Tie Corners (1 Hour, 15 Minutes)

  1. Layer one smaller print square in the corner of one larger background square.
  2. Sew diagonally from corner to corner on the print square.
  3. Trim off the corner, leaving 1/4″ seam allowance.
  4. Press the print corner down to complete the square.
Bow Tie Corners

Bow Tie Corners

Chain Piecing

Chain Piecing

Practice making one bow tie corner unit so you get the hang of it.

I didn’t worry about marking my sewing line since it was such a small square.

Assembly line sew all of your squares until you have a total of 280 pieced corners (8 of each fabric).

This is also called chain piecing. Sew all of the squares before cutting in between each one.


Step 5 – Press All the Pieced Squares (45 Minutes)

Taking care not to scorch your fabrics, press all 280 pieced squares with the fabric towards the dark side. At this point, they can all face the same direction.

Bow Tie Corners

Bow Tie Corners

Step 6 – Sewing the Bow Tie Blocks (3 Hours, 15 Minutes)

It takes 2 print squares and two pieced background squares per bow tie unit. For efficiency, you can turn the pieces all the same way and join them together assembly line style. Be sure to sew one test unit first so you know you are putting it together correctly.

Bow Tie Squares

Bow Tie Squares

Bow Tie Piecing

Bow Tie Piecing

Sew two half units together to complete one bow tie unit.

Bow Tie Units

Bow Tie Units

Pressing tips: I like to “finger” press each half of the bow tie unit with a  wooden seam roller. Then, after sewing the halves to complete the bow tie, I will press open with an iron.

Seam Roller Press

Seam Roller Press

Press Seams Open

Press Seams Open


Sew a total of 140 bow tie units, 4 of each color. You may have 8 bow ties of some colors if you have duplicate strips. Next week we will sew them into blocks.


If you have any questions about this week’s homework, please be sure to join my flickr discussion or email me directly at christa@christaquilts.com.

Quilt Along Schedule – Links will go to each active post when published.


Favorite Tools – Starch and a Big Board

I am finally learning to love starch! It took me awhile to warm up to the idea but I’ve used starch on my last few quilt projects and have been pretty happy with it. Once I learned how to spray starch on the back side of the fabric and let it soak in first before I pressed the fabric, I was much happier with my results.

My good friend Alyssa from Pile O’Fabric put together these two wonderful video tutorials on how to starch your fabrics, including blocks and cut pieces.

My vote for favorite brand? Niagra spray starch. It’s super cheap and I can get it by the bundle at Sam’s Club. I was surprised at how quickly I ran through my first bottle.

Along with starch, my other favorite item to share with you this week is a Big Board. I’m sorry that I don’t have a source for them. I’ve only seen them at quilt shows and through distributors. Unfortunately they are way too big and bulky for me to carry in my store. 😦

Big Board

Big Board

If you see one out and about in your travels, be sure to pick it up. I can iron 1/2 yard length of fabric without having to move it around. Yippee! It sits right on top of my regular ironing board and I love it. When I fold up my iron for storage, the board stands right next to it.

Updated

Hi all – be sure to read all of the comments that go along with this post. Many of my wonderful blog readers have added links showing where to get one or how to make one. Thank you all for sharing your knowledge!!!

Christa’s Sew and Tell – Baby French Roses #1

My sister just adopted this sweet baby girl a few weeks ago and you know what that means –
I get to make her a baby quilt! (That’s my daughter holding her new baby cousin.)

Jenna with cousin Katelyn

Jenna with cousin Katelyn

Ever since I put together some French Rose Buds quilt kits, I have been looking for an excuse to make one myself and now I get to! I created the kit completely from Kona Solids to give it a clean, fresh appeal. This quilt will go in the baby’s room.

French Rose Buds Kit

French Rose Buds Kit

The kit includes one of Heather French’s fabulous French Rose Buds patterns, a smaller version of her original French Roses. Read my French Roses Quilt blog posts here and here to see the variations I’ve made from the larger sized pattern.

French Rose Petals

Tracing and cutting the petals was fun!

I spent a glorious day cutting out all of the fabric for the quilt. I’m making mine slightly larger by increasing the width on a couple of the sashes. I may use some of the leftover scraps to extend the borders, too.

French Rose Buds Pieces

All Pieces Cut and Ready to Sew

The rose appliques are all cut and ready to stitch down.  I’ll be sure to blog about my work-in-progress. This is going to be fun!

French Rose Bud Blocks

French Rose Buds Blocks

Celebrate National Quilting Month with a Giveaway, Free Fabric, and a Sale!

Blog Hop Party with Give-AwaysTo celebrate National Quilting Month, I thought I would combine a few different promotions into one huge fabric fest!

First of all, I invite you to beat the Winter Blues by joining the Quilter’s Blog Hop Party hosted by Michele at The Quilting Gallery.


For a chance to win a $20 gift certificate to my store, either follow my blog, sign up for my shop email newsletter, or join my flickr group. For a bonus entry, do all 3!

ChristaQuilts

Then come back here and leave a message for me on THIS blog post saying you did, and maybe a kind word or two to make my day. 🙂

This contest is open to friends and fabric lovers all over the world. I offer free US shipping on all orders with no minimum purchase, with discounted international rates, too.

I will select one winner at random and post their name here on my blog. I’ll also notify them via email. Contest ends Thursday, March 14th at 9 PM Eastern Time (6 PM Pacific).

ChristaQuilts

When visiting my store, take advantage of my fabric clearance sale up to 50% off. Then use code NQD13 at checkout to save an extra 10% off your entire order now through National Quilting Day, March 17th.

Plus, when you spend $25 or more, be sure to add a free Christa’s Candy fat quarter to your cart. (My choice of fabrics.)

Give yourself an excuse to sew or quilt all month!

Updated 3/14 7:10 PM

Thank you for your entries! We have a winner. Congratulations to Susan G. from Pennsylvania who has won a $20 gift certificate to my store. Susan – I will email you directly. Happy shopping!

Quilting With Friends and Joining a Modern Guild

I finally did it! I joined my local modern guild – The Las Vegas Modern Quilt Guild. When I went to my first meeting last week, I knew right away that these were my “peeps!”

Las Vegas Modern Quilters

Cola and Regina with LVMQG Banner

Is this a fantastic banner or what? The president, Cola, had it printed from Spoonflower. Now the next step is to quilt it.

Bonnie & Camille Challenge

Bonnie & Camille Challenge

These gals have it all – show and tell, retreats, swaps, etc. They even had a challenge using Bonnie and Camille fabric where Camille herself came to judge. How cool is that?

Challenge Cake

Yum – Delicious Cake!

Camille Roskelley


After meeting so many great bloggers at QuiltCon, it is nice to know I can find more fun friends that also share my interests right here at home. 🙂

Christa’s Quilt Along 5.2 – Hugs ‘n Kisses Fabric Layout

Hugs 'N Kisses

Hugs ‘N Kisses 48″ x 64″

Welcome to part 2 of my Hugs ‘n Kisses Quilt Along! Today I will be discussing fabric selection and layout.

Hugs ‘n Kisses Quilt Kits are available if you’d rather not worry about fabric selection.

For a successful design, this quilt relies on contrast between the print fabrics and the solid background.

You could choose one of your favorite themed fabrics like solids, batiks, or a favorite color range, and pair them with either a totally light solid or a totally dark fabric for contrast.


That being said, what if we play around a little? You will notice my original version has a few light colored strips. What if you wanted a modern, low-volume quilt? Just blur the contrast between the prints and background to achieve this sort of look in the pink design below.

Low Volume Hugs 'n Kisses

Low Volume Hugs ‘n Kisses

Juvenile Hugs 'n Kisses

Juvenile Hugs ‘n Kisses


And if you want to make a more playful, juvenile quilt, you can choose a bright background solid that matches one of your print fabrics. You could also use several different background fabrics if you want to make it a bit more “scrappy.”

If you are working with a kit where all of the fabrics are already chosen, you can make it your own by changing the setting of the squares, also known as block layout.

Hugs 'n Kisses Bowties

Hugs ‘n Kisses Bowties

Hugs 'n Kisses Waves

Hugs ‘n Kisses Waves

The basic unit we will be constructing next week is the bow-tie block. You could lay out your entire quilt with the bow ties all going the same way to achieve a totally different look. Or how about zig-zags, all kisses, or all hugs? It’s up to you!

Hugs 'n Kisses All X's

Hugs ‘n Kisses all X’s

Hugs 'n Kisses All O's

Hugs ‘n Kisses All O’s


I even dare you to play around with the borders if you are so inclined. What if you swapped the border fabric for the binding fabric, i.e., a solid border and a scrappy binding instead? If you want to make a larger quilt, who is stopping you from cutting a few extra strips from your stash and mixing them in with the other blocks? You can always “borrow” the inner border strips to cut up into more block backgrounds, and replace them with something else.

I want you to look at the kits as a starting point and explore your creativity (but only if you want to – there are no hard and fast rules here)! Who knows, I might even change up my own quilt a bit when I get to that point. 🙂

Here is this week’s “homework” for those of you cutting your own strips:

  • Cut out 36 assorted 2.5″ print strips for your blocks and pieced borders
  • Cut 23 – 2.5″ solid strips for your background and inner borders
  • Set aside 1/2 yard of coordinating solid for the binding and be sure to prewash it.

If you have any questions about this week’s homework, please be sure to join my flickr discussion or email me directly at christa@christaquilts.com.

Quilt Along Schedule – Links will go to each active post when published.