Christa’s Quilt Along 4.5 – Sea of Squares Pieced Backing


Click here to sign up for more fun and free quilt alongs!!


Today I will show you two different ways to make a pieced quilt backing: (1) All from one fabric, or (2) from scraps and chunks. I have a little “cheater” disclaimer here. Since I am on vacation this week, I haven’t actually had time to sew my back together. Most of my tutorial pictures were designed in EQ7, but I’ll whip up my own back in no time when I return!

Step 1 – Measure Your Quilt Top

Sea of Squares Quilt Top

A good rule of thumb is to measure your quilt top and then add 4 inches around the perimeter on all four sides. This means you will take your quilt dimensions and add a total of 8 inches to each number. Let me demonstrate:

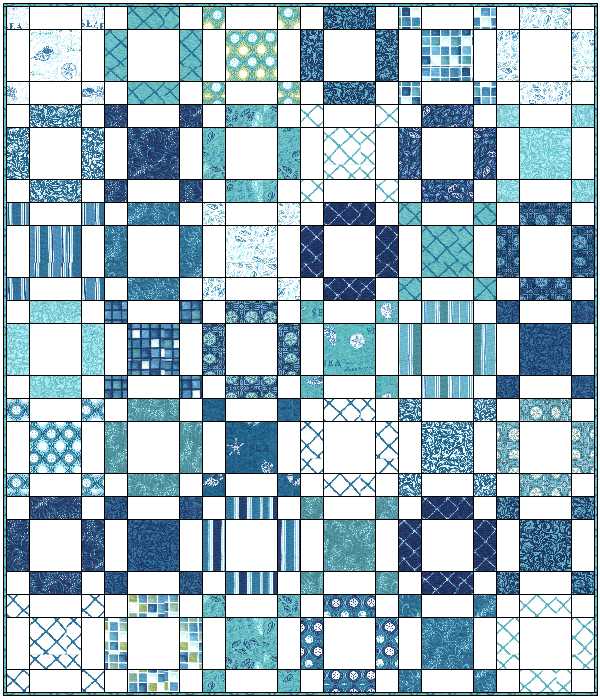
My quilt top measures 51″ x 62″ from raw edge to raw edge. I will add 8″ total giving me a needed back dimension of 59″ x 70″.

Step 2 – Calculate the Yardage Needed For One Fabric

The backing width I need is 59 inches as stated above. Rounding that up to the nearest 1/4 yard increment gives me 1.75 yards of fabric (or 63 inches). However, that will give me a length of just 44 inches from selvedge to selvedge (which I round down to 40 inches to account for seam allowances and trimmed edges). But  I need a total length of 70″.

Pieced Back 1 Fabric

Pieced Back 63″ x 80″

To solve this problem, I will need to double the amount of fabric purchased to 3.5 yards. This will allow me to use two 1.75 yard pieces and seam them together to get a total measurement of 63″ wide x 80″ long.

Step 3 – Calculate Pieced Sizes for a Scrappy Backing

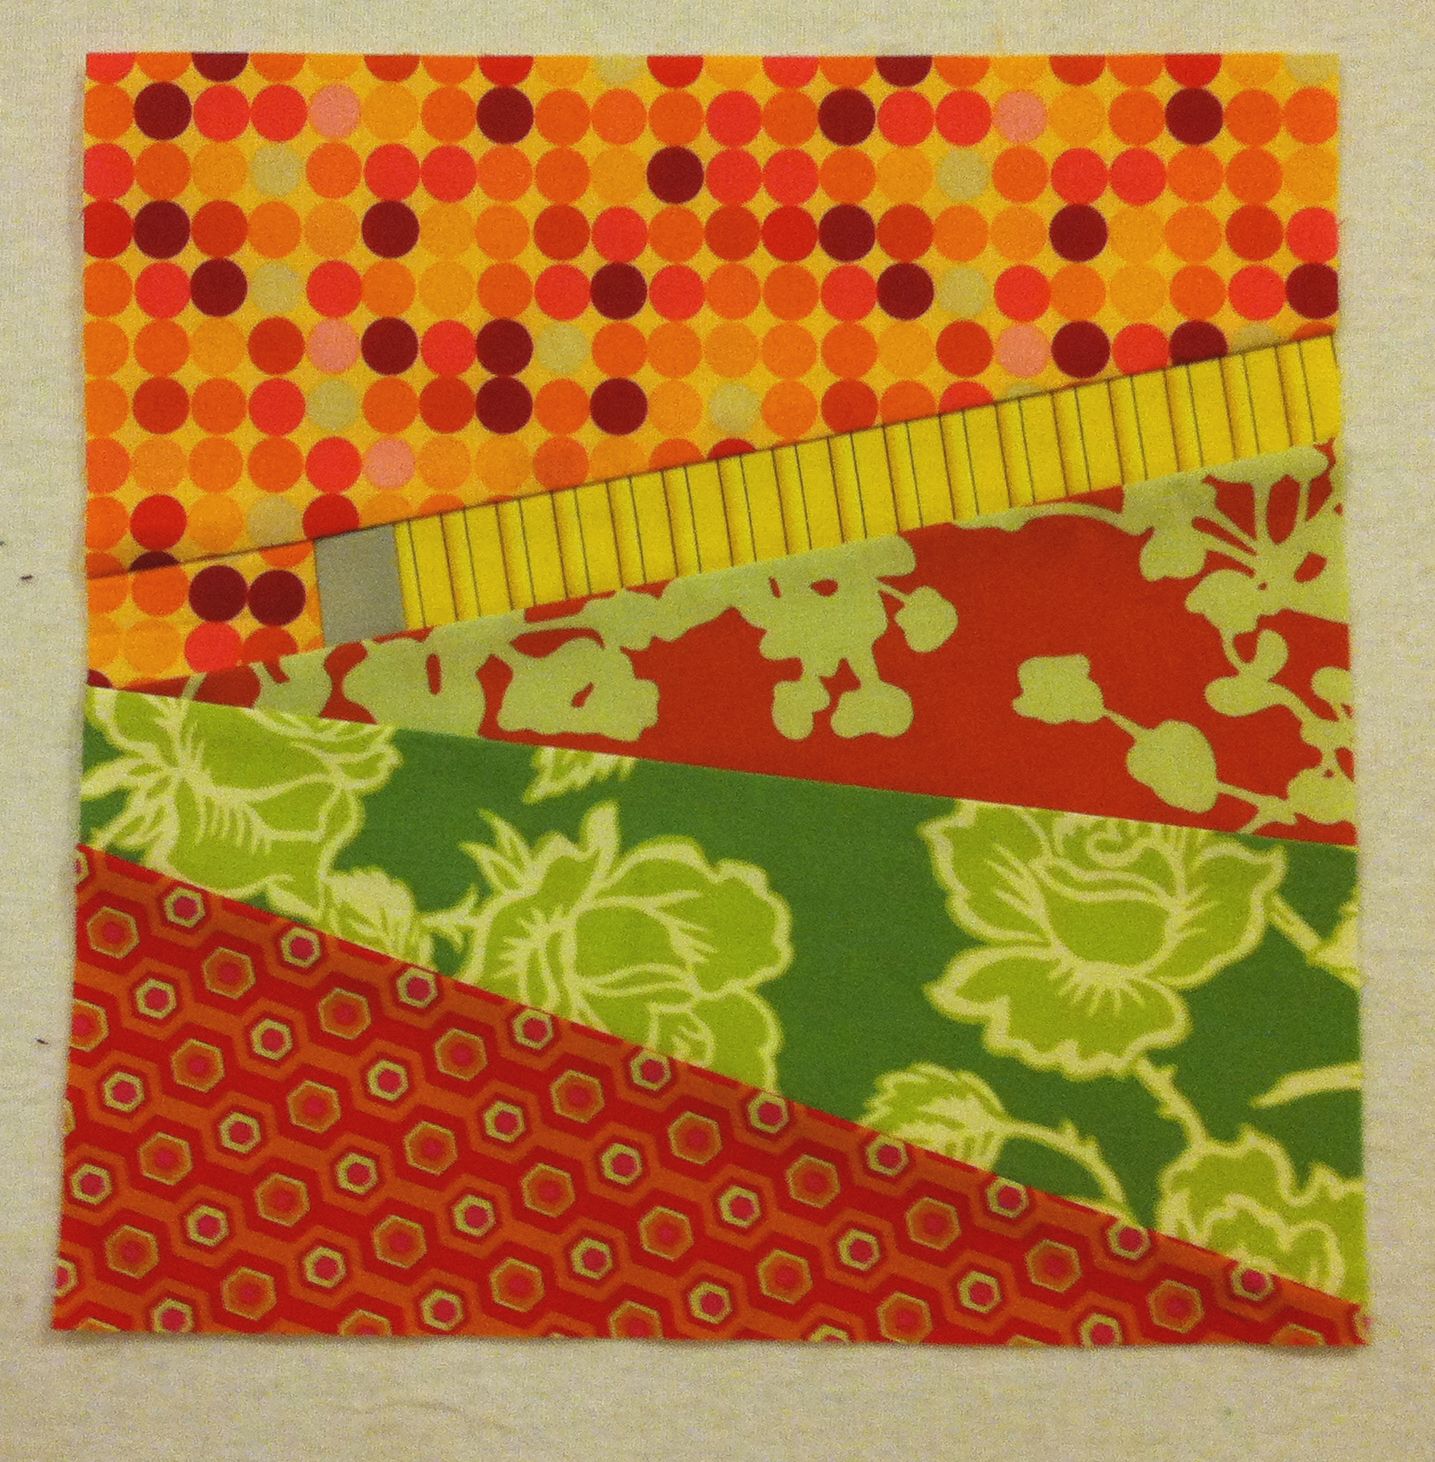
If you like an artistic backing like I do, take your diagram above and subdivide it into smaller chunks and random pieces. Use your creativity and fabrics from your stash as a guide. Here’s one hint – if you have a lot of white in your quilt top like mine, try to use lighter fabrics on the back so they don’t show through to the front.

I will “draw” a pieced backing measuring 60″ x 70″ (for easy math) and fill it in like a puzzle, adding random chunks wherever I choose. My diagram looks nice and straight but you can certainly use improve techniques with more wonky lines to achieve a similar effect.

Pieced Back

Just remember that the outer 4-5 inches will be cut off so do not place any smaller chunks near the edges. For my diagram above, I have selected 10 chunks of fabric. Let’s look and see how they would be sewn together:

  • Add chunks 1, 2 and 3 together, then chunk 4
  • Sew 5 & 6 together, then add to piece 1-4
  • Next, sew 7-8 into one unit and 9-10 into another unit
  • Piece both of these sections together
  • Then add the top piece (1-6) to the bottom piece (7-10)

I will press seam allowances open and use a liberal amount of starch to keep everything tidy.

If you would like to follow my diagram exactly, here is how large you would cut each piece:

Pieced Back

  1. 8.5″ x 32.5″
  2. 12.5″ x 32.5″
  3. 20.5″ x 10.5″
  4. 20.5″ x 42.5″
  5. 20.5″ x 10.5″
  6. 20.5″ x 32.5″
  7. 14.5″ x 28.5″
  8. 18.5″ x 28.5″
  9. 28.5″ x 14.5″
  10. 28.5″ x 14.5″

Quilt-Along ScheduleLinks are Active at the Completion of Each Step:

Sharing is Caring

Please share your work in progress in my facebook group: Quilt With Christa . 🙂

Vacation Postcard – Wish You Were Here!

This week the whole family is on vacation in Florida touring Universal Studios and Disney World. It’s a much-needed break from our regular routine and a chance to hang out with the extended family in a fun environment. (This was our surprise Christmas present from my husband’s parents that I blogged about last month).

On Saturday we spent the entire day at Universal’s Islands of Adventure.

The Spiderman ride was amazing with special 3 D Effects.

Spiderman 3D

Jason and his sister with the kids.

My son Ryan is a Spidey fan!

Spiderman RideThey recreated Jurassic park complete with a fantastic water ride gone wrong. Thank goodness we escaped from the T-Rex. It really felt like we were in the world of movies!

Jurassic ParkWe visited Seuss Landing, full of truffula trees and characters from all of the books.

Truffula Trees

Truffula Trees

Jason and I paused for a minute in front of this cute little store-front window. Hmm, maybe we could use this in a future advertisement for our Grinch fabric collection???

Dr. Seuss The GrinchBy far, our favorite area of the park was a re-creation of the Wizarding World of Harry Potter. (We are huge Harry Potter fans!) We visited Hogsmeade, downed some delicious Butter-beer and took a look at the famous Hogwarts Express.

Hogwarts Express

The kids were thrilled to visit Ollivander’s to buy their own magic wands, and Ryan was chosen to act out a special “wand-finding ceremony” of his own at the famous shop. The best ride ever was a tour and intense motion ride inside of Hogwarts castle (sadly, no pictures!)

Ollivanders Wand Shop

I was very pleased to see that the robe-maker’s sewing machine of choice was an antique singer featherweight. Because the individual robes were way out of our price-range (over $100 each!), my kids asked me if I could “quilt” them a Hogwarts robe. I had to patiently explain that quilt-making and clothing design are two entirely different things!

Singer Sewing MachineOur family motto is that “we work hard and we play hard.” Because I worked long and hard before we left,  all of my regularly scheduled blog posts are coming up later this week: my quilt-along tutorial, sew and tell, and my favorite quilt-links. Thanks for stopping by!

Christa’s Quilt Links – Finish Your Quilts with these fun Sew-Alongs

There are so many fun projects to work on that I could literally start a new project a day for an entire year.  Since there’s no way I would have time for that, I will share a few fun project ideas and inspiration that I found on some blogs instead. Join the fun below:

A Year of FinishesSewBitterSweetDesigns is hosting A Lovely Year of Finishes.

The way it works is that you pick one project per month that you know you can finish. You check in at the beginning, middle, and end of each month to show your progress.

Prizes will given each month as well as year-end prizes for those who finish. Sounds like a great way to set some goals!


Finish AlongSpeaking of setting goals to finish your  sewing projects this year, Leanne from She Can Quilt is hosting her own Finish-Along. Each quarter, you will have a chance to show pictures of projects you want to finish over the next 3 months. Those that finish are eligible to win prizes, too! The opening for the first quarter has already passed, but you many want to follow along anyway, so you can secure your spot to join up in April for Q2!


Project QuiltingIf a weekly finish is more your thing, be sure to check out Project Quilting‘s Weekly Challenges, hosted by Persimon Dreams.

There will be loads of inspiration, prizes, and of course, fun!


Express Your LoveLeah Day from the Free-Motion Quilting Project invites you to quilt-along with her Goddess Quilt series she is offering on her blog.

This talented quilter has so many ways for you to make this outstanding piece of art: order a pre-printed panel, outline-stitch on your machine, or practice your applique techniques.

You can Express Your Love in so many ways with quilts!


Row AlongIf a quilt-along is too much for you, how about a Row-Along?

Lori Holt from Bee in my Bonnet has been hosting a lovely set of tutorials for making a row quilt.

She’s on row 9 right now but you can hop on over to her blog to join the fun.  She has a flickr group, too!


And if you think all of the above is great, but you still want to add to your pile of UFO’s  Finished Quilts, you can start on your own version of a scrappy Trip Around the World. Unless you’ve been under a rock, I’m sure you’ve heard of it by now. This is the beauty of social media – someone has a fantastic idea and it goes viral!

Check out Bonnie Hunter’s Scrappy Trip Along Tutorial at Quiltville!


Christa’s Quilt Along 4.4 – Sea of Squares Quilt Top

This week it’s time to finish sewing the Sea of Squares quilt top. If you are just joining me, please scroll down to the end for links to each step of this do-it-yourself quilt tutorial. It took me a total of 2.5 hours to complete the steps shown below.

Step 1 – Quilt Layout (30 minutes)

Lay out all 42 of your blocks on a design wall or other large flat surface, or even the floor. Play around with your block arrangement until you find a pleasing composition. Take pictures of any arrangements you like as you “play.”

Sea of Squares Layout

Arrange your blocks in a 6 x 7 grid – 7 rows of 6 blocks each. Be sure to alternate between your X and O blocks and distribute your values and colors evenly.

Step 2 – Sewing the Rows (1 Hour)

For this quilt layout, it’s easiest to sew the top together in rows. I numbered them 1 through 7.  You can press all of the odd blocks in one direction, and all of the even rows in the opposite direction so that seams will nestle together when sewing.

If the darker fabric shows through the white, you may choose to press your seams open.

Stack of Blocks

For a speedy sewing tip, I stacked up all of my blocks into pairs of two next to my sewing machine. I  added a pin to the right had side to indicate this is the side I will be sewing.

Before sewing, I took a photo of my layout with camera’s phone. I referred to the layout as I sewed the rows together and was able to keep the blocks lined up in order. I continued joining the blocks together in order until I had 7 rows of sewn blocks.

7 Rows of Blocks

Since my design wall was too small for all of the rows, I used part of the floor, too!

Step 3 – Completing the Quilt Top (1 Hour)

2 Rows of Blocks3 Rows of BlocksFirst, sew the top two rows together.

Pin at all of the intersections (I like using flat-head flower pins).

Be sure to remove your pins just before you get to them so you don’t accidentally break a needle. (Ask me how I know?!)

Next, sew together rows 3-4 and 5-6 together in the same manner.

Row 7 will be on it’s own. Next, you can join each of these segments into larger “chunks”.

Join rows 1-4 and rows 5-7.

Add these two “chunks” together to complete the quilt top.

Give your top a final pressing and set aside. Or do what I do:  leave it up on your design wall for awhile to admire it until it’s time to baste and quilt!

Sea of Squares Quilt Top

I have decided to split apart the backing and basting into two separate tutorials so I can go more in-depth with each. Next week I will show how to sew a pieced quilt backing, either all from the same fabric, or from bits and pieces from your stash (my favorite). You need a total of 3 1/2 yards for the backing (perhaps a little more if piecing lots of chunks together).


Due to the popularity of this quilt kit, I have put together a limited number of kits in an alternate colorway. This one is called Apple Jacks and would be perfect for a little boy!

Apple Jacks

Quilt-Along ScheduleLinks are Active at the Completion of Each Step:

Be sure to post pictures of your progress on my flickr group: Christa’s Quilt Along.

Quilt Kits are available for a limited time.

Modern Love Mini Quilt Along #1

I have decided to create a mini quilt-along to express how I feel about quilting – pure love! Just in time for Valentine’s Day, I am going to make this table runner using machine applique techniques. You can follow along with me according to the schedule below:

Love Runner

Supply List for Love Quilt Runner, Finished Size Approximately 31″ x 12″

  • 1 Fat Quarter Cream Background
  • 1 Fat Quarter Red for Letters
  • 1 Fat Quarter Red for Small Sashing Squares
  • 1 Fat Quarter Pink/Red Check for Sashing
  • 1/3 Yard Pink for Outer Border (or 1 FQ if you don’t mind a pieced border)
  • 1 Fat Quarter Red for Binding
  • 1/2 Yard Fabric for Backing
  • 18″ x 36″ Piece of Batting
  • 1 Sheet of Fusible Web (at least 8 1/2″ x 11″)
  • Thread to match your applique letters fabric
  • Matching thread for machine quilting (cotton or polyester)
  • New Sewing Machine Needle

Although I will be using different fabrics than those shown above, I will use the same color-scheme of red and pink. You can do this in whatever colors you like!

And just to give you more options, I have made a couple other arrangements:

Love Wall QuiltLove Squared
Although I will be making just the table runner, the fabric requirements above will be enough to make any of the layouts shown here.

The Love square would also make a cute pillow.

Please join my ChristasQuiltAlong flickr group to share pictures of your work-in-progress!

Favorite Tools – Flickr!

I finally decided to jump on the Flickr bandwagon and I hope you will, too! I have created a Flickr group especially for my quilt-along tutorials, and the link for you to join is:

http://www.flickr.com/groups/christasquiltalong/

Jolly Jelly RollPink Baby BricksBlue Baby BricksCharming ChevronsSea of Squares


So before I go any further, I want to answer the question, what the heck is flickr all about? I’m answering because I’ve had this thought for several months now since I first heard of it.

Simply put, flickr is an interactive forum where you can post pictures, engage in discussions, and comment on other people’s photos and conversations. There are literally thousands of different groups on flickr, each moderated by the group’s creator.

My quilt-along group is a great supplement to my blog because you can post pictures of the quilts you are working on, ask me questions, and get input from anyone else in the group.

flickr

I have long lamented that I didn’t have a good way for you to share your WIP’s (works-in-progress) but now you can! And the best part is, you don’t even need a blog to participate – just a free flickr account.

My friend Alyssa from Pile O’ Fabric moderates a group on flickr for her Skillbuilder Block of the Month. She has put together 3 fantastic video tutorials showing how to create a flickr account and join some groups. Watch them and then be sure to join my group (and hers!)

The Finished Quilt That Wasn’t

I really thought this quilt was finished. But then I realized it wasn’t. So now it qualifies as my latest UFO. I enjoyed making this quilt and I like the quilting on it, but I don’t love it – it’s just not enough. After the last project I quilted the heck out of, I am starting to find my personal quilting style. It’s one that requires a lot of quilting. And I mean A LOT.

Baby Bricks in Blue

So I will add many more lines of quilting to this quilt. The original pass of straight line quilting only took about 2 hours to do and I was so happy to finish it so quickly. But now that it’s been sitting around for awhile it’s calling to me for more. So I will add more.

More QuiltingI decided to fill in the lines of quilting with more lines. I marked all of the original lines about 2 inches apart so I could quilt them neatly with my walking foot. Fortunately the “filler” lines do not need to be marked; I simply used the edge of my walking foot as a guide and can fit exactly 3 more rows of quilting in between each original line of stitching.

After about 2 more hours of quilting I’m about halfway done and I think it’s looking much better.  FYI, I used Superior King Tut cotton thread in a variegated blue (in top and bobbin – my stitches seem to balance out better when using the same weight on both sides).

Baby Bricks WIP

And now for the soapbox part of this post – it’s ok to make a quilt just because you want to. I have no idea what I will eventually do with this quilt. I may give it away. I may keep it as a teaching sample. I may turn it into a pattern. I originally made it as a tutorial and still have a few kits left with the same fabrics.

It was really nice to not have to rush off and send this quilt off somewhere as soon as (I thought) it was done. So that’s why I can “finish” it now – because there are no deadlines and it needs more quilting.

What I enjoy most about  this quilt is that quilting it makes me happy. There are lots more quilts out there that I have to make, just because I want to – with no end purpose in mind. And that’s OK. Really it is. How liberating!

Here is the same Baby Bricks quilt design a pink version. And yes, I think it needs more quilting, too…. Any suggestions??

Pink Baby Bricks

Christa’s Show and Tell – Sewing Every Day

One of the quilting goals I set for myself was to sew every day. To make this goal actually happen, I had to make sure it was realistic. In order to do that, I set a minimum time limit of just 10 minutes a day of sewing. I also broadened my definition of “sewing” to include designing quilts, reading quilt magazines and watching online quilting classes.

So far so good. Here is what I have been able to accomplish “sew” far this month:

I’ve signed up for  several Craftsy quilting classes. I just finished watching Elizabeth Hartman’s free “Creative Quilt Backs Class” and am currently viewing Cindy Needham’s “Design It, Quilt It” class. They are both excellent!

Creative Quilt BacksDesign It Quilt It


I pulled these lovely fabrics to participate in the Skillbuilder Block of the Month over at PileOFabrics.com. I decided to go with all Kona Solids for this quilt. I haven’t decided on my background fabric yet. I’ll probably choose a shade of Grey.

Skillbuilder Fabrics

I used the color wheel when choosing colors and went with an “accented analagous” color scheme. That means I chose red, orange and yellow which are next to each other on the color wheel, then threw in a bit of complementary teal just for fun. I can’t wait to get started!

Today, I paper-pieced this sewing themed block as part of Quiet Play’s And Sew On year-long block-of-the-month series. January’s block is called “Measure Twice” and is available as a free download this month.

Measure Twice

Measure Twice, Cut Once!

I also made this block designed by Amy Friend of During Quiet Time. I love the sewing theme so I may have to incorporate it into the same quilt!

Sewing Machine Block

Next, I designed this quilt in EQ7 which will be the basis for my next quilt-along as soon as the current one finishes. I found out how to download Moda’s fabric swatches directly into the design program so I can design quilts using the actual fabrics from the quilt. Very cool!

Hugs and Kisses

Hugs and Kisses

When I don’t feel up to sewing, or when I’m traveling, and bringing along sewing supplies is impractical,  I have a stack of quilting magazines that I am thoroughly enjoying reading.

My favorite magazines are Machine Quilting Unlimited, along with their brand new sister publication Modern Quilts Unlimited. I’ve also been a long-time subscriber of Quilter’s Newsletter, the best source of news for what’s hot and happening in the quilting world.

Machine Quilting UnlimtedModern Quilts UnlimitedQuilter's Newsletter


I think that’s a great start for January! How about you? How are you coming along with your quilting goals?

Christa’s Quilt Along 4.3 – Sea of Squares Blocks

New around here?

Click here to join my email newsletter for more free tutorials, inspiration, fabric deals and fun quilt alongs!

Today it’s time to sew all of the cut pieces and charms together to make our Sea of Squares blocks. We will sew a total of 21 “X” blocks and 21 “O” blocks. It took me 4.5 hours total.

X BlockO Block


Step 1 – Sewing the X blocks (2.5 Hours)

I like to chain piece as much as possible. This means sewing the pieces together in an assembly-line fashion without cutting your threads in between pieces until you are done.

Chain Piecing

Chain Piecing

Start with the middle section of the X block which is composed of one dark 5 inch charm and two white (light) 2.5 x 5 inch rectangles.  Use 1/4 inch seam allowances at all times.

To chain piece this section, sew 21 white rectangles to one side of all 21 dark charms. Then go back and add 21 white rectangles to the other side of all 21 charms.

Sew white rectangles to either side of charm square.

Sew white rectangles to either side of each charm square.

You should have a total of 21 completed “middle” sections. Finger press your seam allowances open or to the darker fabric. I like to use a wooden seam roller for this.

I prefer to use a seam roller whenever I can, especially when working with white fabric. I use the iron as little as possible to reduce the chances of scorching or distorting my fabrics. If you press nice and firmly with the seam roller, the seams will lie down nicely. Then I give the blocks a final pressing with an iron at the end.

Seam roll the back.

Seam roll the back.

Seam roll the front.

Seam roll the front.

After the middles are complete, sew all of the tops and bottoms. I like to sort all 4 of each smaller dark square together so it’s easier to stay organized and sew each as needed.

Small Dark Squares

Sew a small dark  2.5 inch square to either side of a light 2.5 x 5 inch rectangle. Repeat this for a total of 42 units (21 for the top and 21 for the bottom). Press toward the dark fabric.

X Block Units

X Block Units

Pinning at intersections, join the top part of your block to all of the middles. Be sure to take out your pins as you go so you don’t sew over them.

Pin Intersections

Add the bottoms to all of your blocks in the same manner and press seams open.

Finished X Block

Step 2 – Sewing the O Blocks (2 Hours)

The O blocks are sewn together in the same manner but with reversed fabric placement. It took me a little less time to sew them because I was in my groove!

Again, starting with the middles, add the same dark rectangle to either side of a white (light) charm. Repeat this for 21 middles.

O Block Middles

Moving on to the tops and bottoms of the O block, add one white square to the end of 42 dark rectangles. Then repeat for the other end of the rectangle until you have 42 sewn units.

O Block Units

Add a top and bottom unit to each side of your middle. Again, pin and chain piece all of the top units; then go back and chain piece all of the bottom units.

Chain Pieced O Blocks

Press all of the final seams open so that you can eliminate the shadowing of the darker fabric through the white background. Do this with an iron, but be careful not to scorch the fabric.

Press Blocks Open

You should have a total of 42 blocks, half X’s, and half O’s. They should all measure 9 inches from raw edge to raw edge. The finished size of these blocks will be 8.5 inches. If your blocks are larger or smaller, it’s ok. As long as they are all the same size the design will work.

Finished BlocksThat’s it for this lesson! Next week we will put them up on a design wall and “play” to find a pleasing arrangement.

Quilt-Along ScheduleLinks are Active at the Completion of Each Step:

Please email me pictures of your progress on this quilt or any of my previous tutorials! You can reach me at christa@christaquilts.com.

Quilt Kits for Sea of Squares and all of my other blog tutorials are available in my shop for a limited time.

Tuesday Tools – Wooden Seam Roller Giveaway Winner

From time to time I like to blog about some of my favorite quilting tools. Several months ago as part of my favorite tools series, I first mentioned using a wooden seam roller rather than finger pressing or ironing my seams. I was frustrated at the time because I couldn’t find a wholesale source for these so that I could sell them in my store.

Wooden Seam Roller

Wooden Seam Roller

Then I took a class from Deb Karasik who turned me onto the idea of using a wooden wallpaper roller as a pressing tool for paper piecing. Eureka! Not only does it do the job, but it is wider than my original tool which makes it easier to “seam press” regular blocks, too.

In fact, I will be showing how I used the wooden seam roller in my next DIY quilt tutorial tomorrow!  So now I’m happy to say I have these tools available in my shop. And I’m even happier to say that I’ve decided to give one away to one lucky blog reader.

To enter this giveaway, leave a comment on this post telling me what quilting project you are currently working on. You can even include a link to your blog  in your comments if you want to share a picture of it!

On Friday around 5 PM Pacific Time, I will randomly select one winner from all of the comments posted. I will update this blog at that time to announce the winner (and will also contact him or her separately via email.) So good luck this week and happy pressing!


Updated – We have a winner!!!

First of all I want to share how much fun it was to read about what everyone was working on. Thank you all for your wonderful comments – I do read them all!

Congratulations to Brooke who said “I’m working on a quilt using Sweetwater’s Notworthy…Simply Woven quilt tutorial from Moda Bake Shop.”

Enjoy your seam roller and let me know how you like it. 🙂