While we wait for my next quilt along to start, I thought I would share some “making of” blog posts. Think of them as process posts rather than full-on quilt alongs. Because I’m usually sewing on a deadline I have to make my quilts months ahead, but when my fabric and patterns are finally released into the world, my favorite part of the process is sharing behind the scenes of them being made.

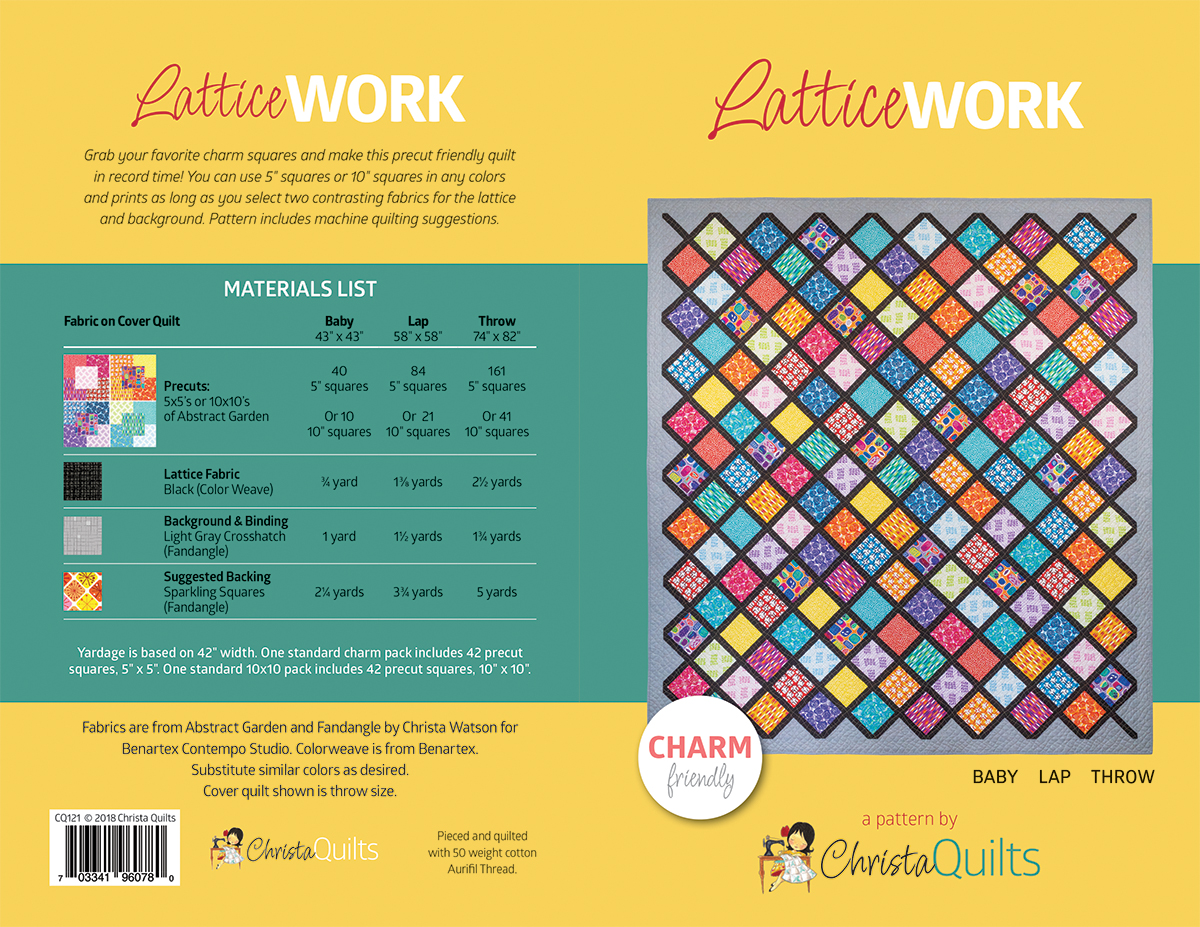
LatticeWork by Christa Watson, 74″ x 82″ made from Abstract Garden 5″ Squares + background
Click here to get the LatticeWork quilt kit (while supplies last)
So without further ado, I’d like to introduce you to LatticeWork, made from Charm Squares + contrasting background fabric. I made my version using my Abstract Garden fabric line, but of course it works well for any set of precut squares.
Cutting the Fabric
Because this quilt is mostly made from precut squares, there wasn’t much cutting. The pattern comes in 3 sizes and calls for 1, 2, or 4 standard size 5″ charm packs. I made the throw size above, from 4 Abstract Garden 5″ square packs, but you could also use precut 10″ squares and cut them down.
Or how fun would it be to mix and match precut packs, or create a custom bundle from your scrap pile? Anything goes with this quilt. As long as you have good contrast with the other 2 fabrics (black and grey in my version) it will look great!!

You can make this quilt quickly and easily from my quilt pattern. Click the links below to purchase it in your favorite format:
- Click here to get the digital PDF version of LatticeWork quilt pattern
- Click here to get the paper printed version of LatticeWork quilt pattern
Sewing the Rows
The only tricky part about this quilt is that you sew the rows with the black lattice and then cut off the extra to get nice straight edges. But I have easy to follow diagrams in the pattern so you won’t get lost. It’s very meditative for me to put up the pieces on my design wall and sew them together methodically. Here are a few in process shots of the top going together:

My design wall allows me to lay out the entire quilt while sewing!
Whenever I sew scrappy looking quilts, I don’t spend too much time arranging the fabrics. As long as I don’t have 2 of the same fabric next to each other, I’m good to go. Most of my quilts are bright and colorful anyway with at least 20 different fabrics, so I don’t over-think it.

Working with setting triangles isn’t tricky once you get the hang of it!
As you can see above, I don’t always lay out my quilts completely straight, but no biggie – it all sews together straight and that’s what matters!

Those extra black tips will get trimmed away before adding the floating border.
Here’s a tip when lining up lots of rows without intersecting seams: fold over each previous row until the sashing lines up. Then pin like crazy to keep it from shifting.

Make sure each lattice row lines up before sewing.
The last step before adding the final floating border is to trim up the corners and sides. Get the biggest acrylic rulers you can to help with this!

I forgot to get a picture of the finished quilt top before I basted it, but in part 2 I’ll share how I machine quilted it using one of my favorite fast and easy walking foot designs. Stay tuned!

- Click here to get the digital PDF version of LatticeWork quilt pattern
- Click here to get the paper printed version of LatticeWork quilt pattern
- Click here to get the LatticeWork quilt kit (while supplies last)
Part 2 – Machine Quilting will be available later this week so stay tuned!