Sew and Tell Baby French Roses #5 – Basting

I have been basting up a storm this week! I finished basting my Hugs ‘n Kisses Quilt Along as well as my French Rose Buds quilt. I am itching to start stitching both of them this weekend as soon as I get all of my other “quilty chores” done. 🙂

French Rose Buds Basted

Basting as you know is probably one of the least fun tasks of making a quilt. But whenever it’s time to baste, I set aside a whole day, put on some relaxing music and try to keep my distractions to a minimum. No, it doesn’t take me a whole day to baste (usually just an hour or two), but it does take a while to get in the mood to baste.

Bolt of Wool Batting

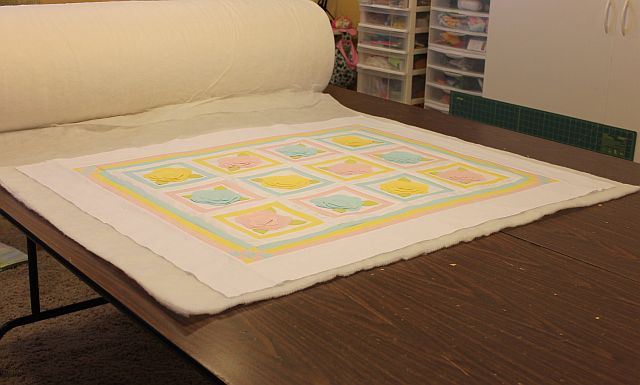
I start off by pulling down my big ol’ bolt of batting and laying the quilt on top of it so I know how much batting to cut. I leave a couple extra inches on all four sides which I will trim down later. My favorite batting to use is wool because it shows off the quilting and helps my quilts to hang flat nice and flat.

Binder ClipsPearl Bracelets backing


I use a couple of long banquet tables and random binder clips to secure my quilt backing. If the quilt doesn’t stretch across the whole table, I secure the loose ends with painter’s tape. I also starch my backing first as well as my quilt top.

Quilt Sandwich

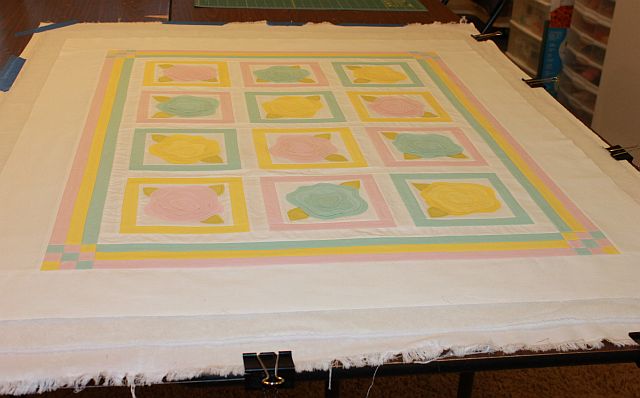
I love the soft look of the Kona pastels on the front of my Baby French Roses. So I chose a low-volume fabric to go on the back: Pearl Bracelets in Cotton Candy Pink.

I’ve tried several different ways to baste such as thread basting (no thanks), spray basting (too hard to ventilate properly) and using all sorts of gizmos to help close the safety pins (too clumsy to figure out).  I even used plastic pinmoors to cap off my straight pins and while they are terrific to take out, I’m not sure they hold as well as I’d like.

Safety Pin Basting

So I’m back to using plain jane regular old safety pins, and quite a lot of them! I do have the fancy schmancy quilter’s curved pins, but this week I was scrambling to find as many safety pins around the house as I could so I’d have enough to baste two quilts at the same time. I ended up using a variety of pins in my quilt and they all work just fine.

Here are a few tips I’ve learned from basting scores of quilt tops:

  1. When using a lot of white fabric on the front, use a clean white polyster or wool batting, or a bleached cotton batting or a blend. Regular cream cotton may have little flecks or seeds that will show through to the top of the quilt.
  2. Use a backing that will not show through (shadow) through to the front of your quilt.
  3. Take the time press both the quilt top and back of your quilt before basting – and don’t be afraid to use starch. The flatter your pieces, the easier it will be to baste and quilt.
  4. Use lots of pins! The more pins you have in your quilt, the less it will shift while quilting. Sad, but true. Ask me how I know!

French Roses kits are available in my store for a limited time. You can see my progress and read my previous post here.

Sew and Tell Baby French Roses #4 – FMQ Practice

I am moving right along on my French Rose Buds quilt. This week I practiced some free-motion quilting designs which I will finalize shortly. I decided to enter the quilt top into the weekly Quilting Gallery contest so I’d love for you to vote for it!

Vote here and you can be entered to win the Quilting Gallery’s weekly giveaway!

French Rose Buds Top

French Rose Buds Quilt Top 36″ x 43.5″

Before I jump right into quilting this puppy, I decided to take some time and plan out my quilting. Since this quilt is for my brand new niece, I want to make it extra special. I also think it’s a great quilt to show off some fun free-motion quilting texture.

Swirls Quilting

I started by drawing out some quilting designs on paper and then making up a few practice sandwiches to test it out. I’ve always wanted to try swirls ever since taking Angela Walters’ quilting negative space class at QuiltCon and on Craftsy. (Even though she quilts on a long-arm I was able to adapt her techniques to my domestic machine.)

Quilt DoodlingQuilting Audition

Next I tried starting sketching out possible designs directly onto the quilt top.

That didn’t give me enough of an idea so I pinned my quilted practice piece onto the quilt top for a better perspective. So far so good. Now I want to try swirls and pebbles.

Swirls and Pebbles

I really like this! I think combining two designs makes it more fun and whimsical. I stitched out a couple more practice sandwiches, cut them to size and pinned them to the top so I could see how they would really work in the quilt.

Quilting AuditionMy plan is to quilt each section in matching thread so all you see is the quilting texture, not the thread. Hopefully I will have time to baste and start quilting this weekend. I will post more of my progress next week.

By slowing down and only working on this quilt a little each week, I am able to get all of my other projects accomplished without feeling overwhelmed!

You can read about my previous Baby French Roses progress here.

A Little Modern Applique Quilt Inspiration

I thought it would be fun to share a few more quilts with you from QuiltCon. These are beautiful applique quilts that I just adored. Who says applique can’t be modern?

Squiders and Winks

Squiders and Winks by Janet McWorkman, Anchorage, Alaska
Quilted by Laurie Vandergriff

Apiary

Apiary by Casey York, Chesterfield, Missouri

Time Travel

Time Travel by Barb Forrister, Austin, Texas

Apeeling Rainbow

Apeeling Rainbow by Jen Eskridge, Helotes, Texas

From One Color to Another

From One Color to Another by Mary Langenberg, Overland Park, Kansas

Orange Trails

Orange Trails by Leila Gardunia, Huxley, Iowa

Dream a Little Dream

Dream a Little Dream by Angela Pingel, South Bend Indiana

Click here for pictures of all the QuiltCon 2013 Award Winning Quilts.

Sew and Tell Baby French Roses #3 – Top Done!

I am finally starting to feel like I’m having more personal time to sew. Perhaps I’m being more efficient, or maybe I’m just not getting distracted by things that waste my time.

Whatever the reason, I am loving it. I was able to finish up my French Rosebuds quilt top this week and I’m very pleased with how it turned out. French Roses kits are available using these exact same fabrics. You can see my progress and read my previous post here.

French Rose Buds Top

French Rose Buds Quilt Top 36″ x 43.5″

French Rose Buds Pattern

French Rose Buds Pattern

I changed a few things from the original French Rosebuds pattern to make it a little more sassy.

First of all, I chose pastel Kona Solids for a fresh, modern look. I also widened the frames and borders.

The pattern calls for the frames around each block to be the same color as the roses. I thought that by switching up the colors, it looks a little more lively.

Finally, I added small 9-patch blocks in the border corners to give it a little more pizzaz. This actually made the borders easier to sew, too.

Whenever you make a quilt from a pattern or a kit, you can still change it up and make it your own!


Seam Roller

During construction, I pressed all of my seams open.

My new favorite tool, a wooden seam roller came in handy for this task.

I rolled each seam first to open the seams.

Then I went back and pressed each seam with a hot dry iron from both the back and the front to keep them open and flat.

This nifty tool is really nothing more than a wooden wallpaper roller. I originally bought it for paper piecing but use it now for all of my “finger pressing.”


Now I am excited to baste this puppy and start quilting!

Rosebuds Detail I’m thinking I want to stitch a small filler around the roses and then quilt the white sashing with pebbles – sort of mimicking a path or stone wall surrounding the roses.

Then I think I’ll free-motion quilt some sort of floral motif in the outer borders. When I took Angela Walter‘s FMQ class at QuiltCon, she showed us how she quilts her free-form feathers and flowers. So I’ll practice on some scraps first and see what I can come up with.

Angela Walters at QuiltCon

Angela Walters at QuiltCon

Angela Walters' Flower Quilting

Angela Walters’ Flower Quilting

Now it’s back to work so I can earn a little more free time sewing this weekend!


Follow my blog with Bloglovin

Sew and Tell – Baby French Roses 2 and National Quilting Day

For National Quilting Month, Worldwide Quilting Day and just plain old weekend fun, I’m working on my applique quilt below. I hope to get the top completed this weekend. I also finished sewing all the the blocks for my Hugs ‘n Kisses Quilt Along.

There’s nothing better than a nice quiet day of sewing!

In my recent blog post about slowing down and enjoying the process, someone made the comment that we all need to stop and smell the roses. So far, I am savoring every delicious step of making my pretty rose buds quilt! You can read about French Roses #1 here.

French Rose Buds Pieces

French Rose Buds Pieces

I’m calling it Baby French Roses since it’s the baby sized version of the original French Roses pattern. I was on a roll this week and finished all of the rose blocks using soft edge applique techniques. This method is contemporary and quick, allowing me to enjoy the process. I stitched down all 4 blocks of one color per day, over 3 days, and never felt rushed.

Stitching the Leaves

Stitching the Leaves

First Petal

First Petal

Using the knee-lift on my Bernina was especially helpful so I could leave my hands free to turn the blocks as needed, sometimes after just one or two stitches. I also like to use an open toe foot so I can see exactly where I’m going.

Pre-wound Bobbins

Pre-wound Bobbins

I matched my threads to the fabric colors and paid attention to details like pulling the loose threads to the back of the blocks and tying them off.

That way you can’t see my starts and stops on the front of the blocks.

I used an assortment of pre-wound bobbin thread colors to match. It didn’t take much thread to applique each block.

Trimming the Roses

Trimming the Roses

I trimmed the excess fabric underneath each rose patch as I went so there would not be too much bulk underneath each flower. Using curved tip scissors helped me avoid poking through the top fabric while I cut.

20130315_french_rose_block_single

I really like how the flowers have texture, each made from 4 layers of the same solid fabric in pastels. They will fray up nicely when I wash the finished quilt.  Now it’s time to play around with block placement. I’ll blog again next week when I finish the top.

French Rose Buds

French Rose Buds

If you’d like to make a quilt like mine, I have a few more French Rose Buds kits left. Or you can purchase the French Roses pattern (original or baby size) and make it your own. 🙂

Applique Rose Blocks

Applique Rose Blocks

To read my post about starting this project last week click here.

My goal is to make every day a Quilting Day!