Piece and Quilt with Precuts Quilt 10: Arrows

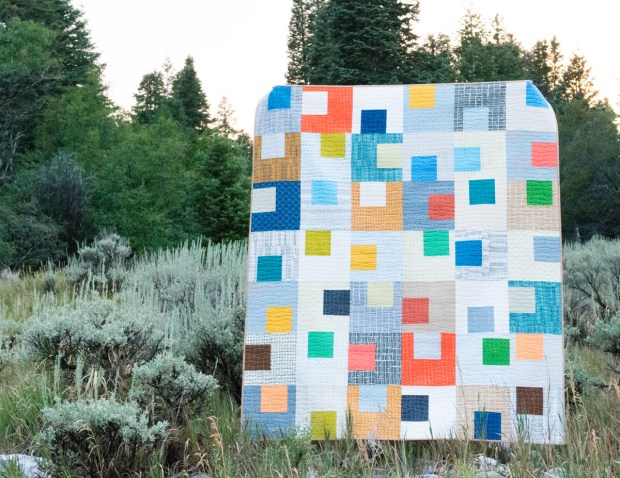
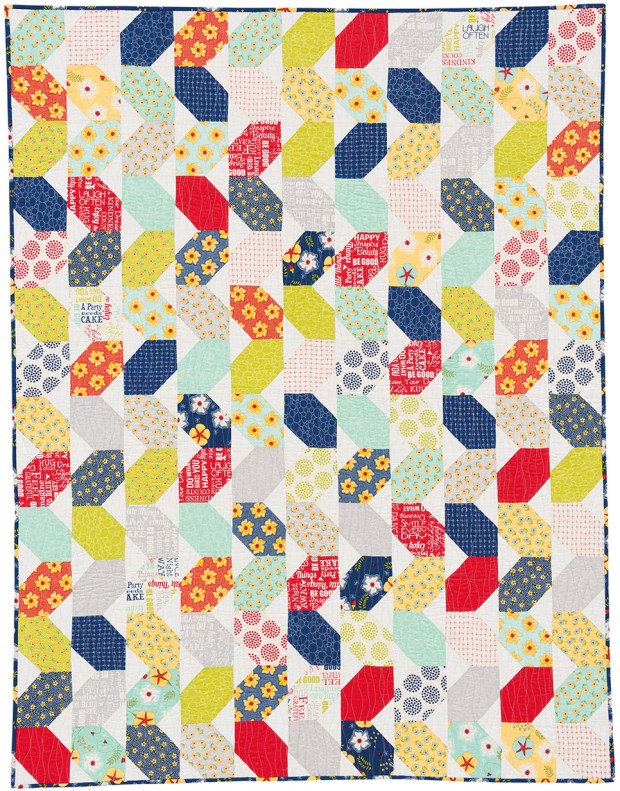
I’ve been having such a fabulous time sharing all the quilts from my new book Piece and Quilt with Precuts. In fact, once the blog hop ends, I’m going to be at a loss for what to do next! (But not for long I hope!) Take a look at Arrows, one of my favorite designs from the book, which just so happens to be on the cover!!

Arrows from Piece and Quilt with Precuts by Christa Watson

Arrows Photography courtesy of Martingale/That Patchwork Place and Brent Kane

Piece It

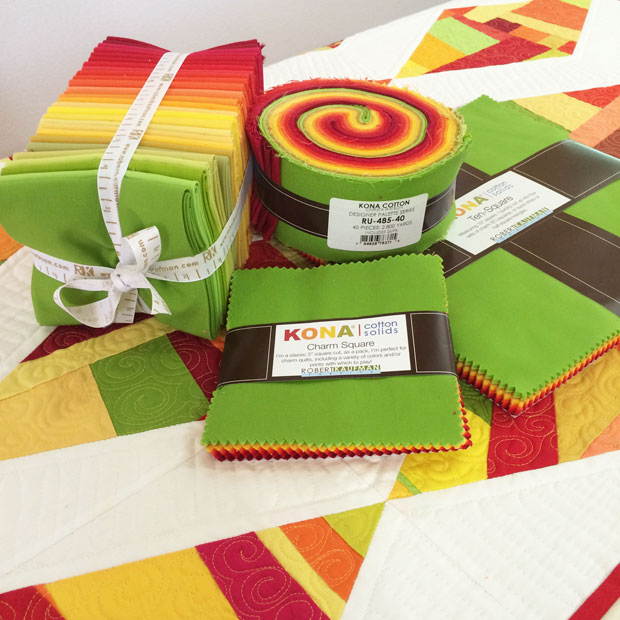
I had two goals when designing this quilt: I wanted to make it with a scrappy background, and I wanted to create a design that would use a fat eighth bundle for the focus design. While designing the quilt in EQ7, I also wanted to see what the quilt would look like if you decided to use just one fabric for the background, rather than going scrappy.

Check it out using a black background – doesn’t it make the colors pop?

Arrows Alternate Colorway designed in eq

Here’s what it would look like with a white print background and bright colors:

Arrows alternate colorway designed in eq7

As you can see, it’s such a versatile design! Whenever I make a quilt, I usually want to remake it using other fabrics because it ends up looking so different!

Quilt It

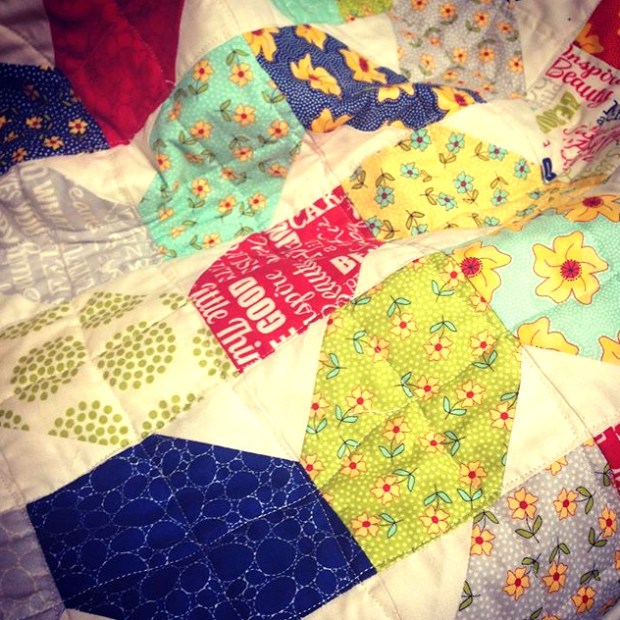
I actually designed Arrows just so that I’d have lots of negative space to quilt a dense free-motion design I named Arrowheads. I first taught this motif during a class at QuiltCon, and knew I had to use it in a real quilt!

Detail quilting of Arrows Quilt - design is called Arrowheads from Piece and Quilt with Precuts

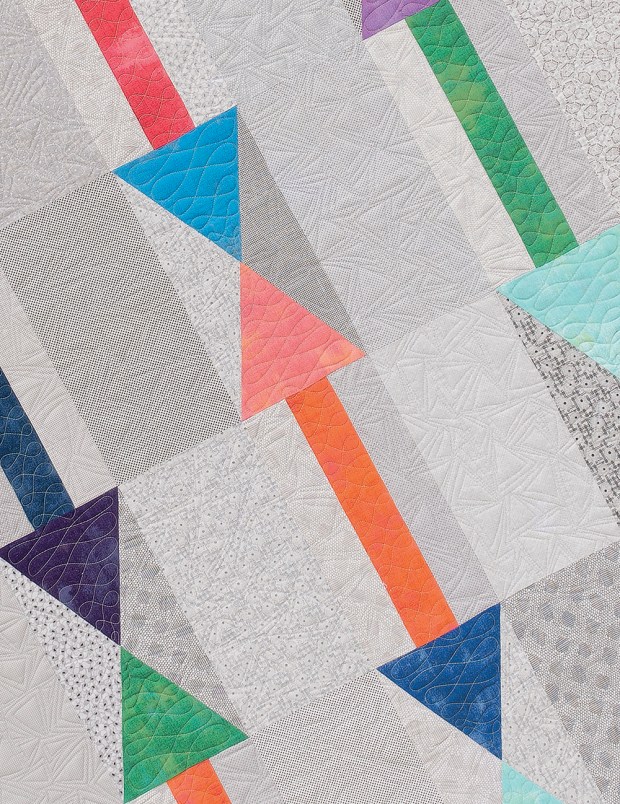
I quilted a contrasting design called “Cursive L’s” in the arrows blocks. It’s easy to create contrast in the quilting when one of the motifs is a curved design and the other is linear or geometric. Cursive L’s is one of my “go-to” designs because it’s easy to stretch or shrink to fill any space!

More Arrows inspiration

Take a look at two more ideas for how you can change up the fabrics. I’m sure this will get your creative juices flowing to make your own version! And don’t forget to visit each blog looking for more fun giveaways!!

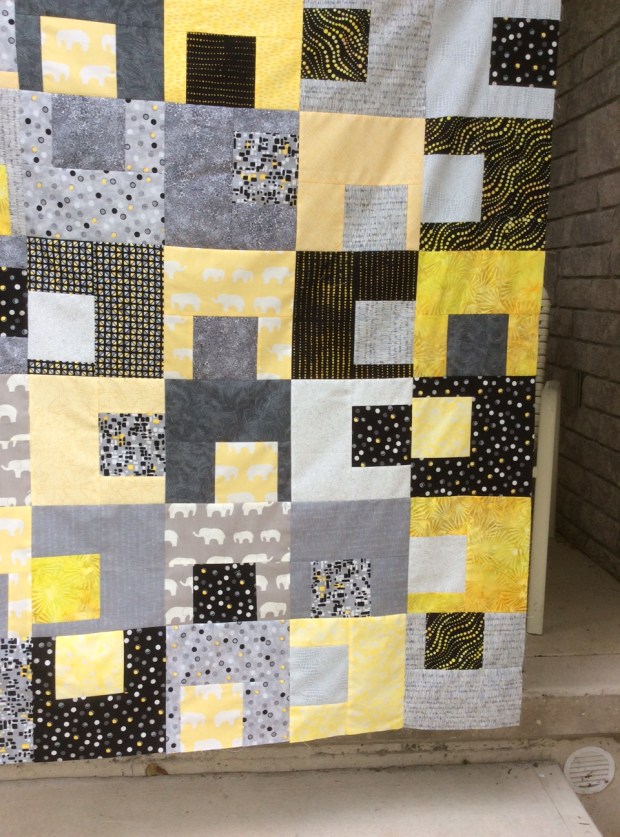
Lynn Kline: Monkey Needle

Arrows made by Lynn

For her version, Lynn used the same Arrowheads and Cursive L’s quilting as taught in the book. I also include a suggestion to echo quilt around the blocks to make the blocks pop even more, and I love how it looks on Lynn’s quilt!

Arrows made by Lynne Kline

Doesn’t Lynn’s version look great with the scrappy white background? Be sure and visit her blog to read more her progress and to find out which fabrics she chose. Plus she’s hosting 2 giveaways!!

Arrows quilting detail by Lynn

Look at all of that scrumptious quilting texture!! In her post, Lynn even mentions how long it took her to quilt – along with more gorgeous pics where you can really see the quilting. I know that if Lynn can do it – so can you!

Click here to read more about Lynn’s version of Arrows and enter her giveaways.

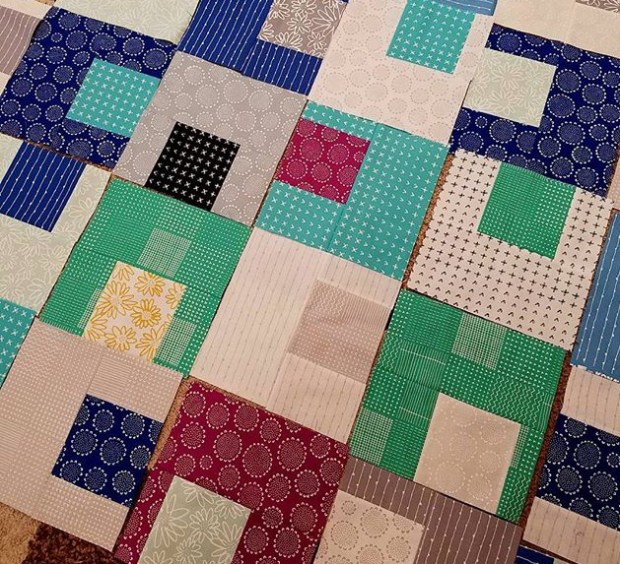
Kathy Bruckman: Kathy’s Kwilts and More

Kathy’s name should seem familiar since she was one of the first stops on the hop when she made Squiggles. After I shared the first quilt, Kathy made a coordinating Squiggles pillow from her leftovers of the first quilt!

Squiggles Pillow made by Kathy

Click here to read more about Kathy’s bonus pillow project.

She had so much fun making that first quilt that she wanted to make another one from the book. So pop on over to her blog to see her version of Arrows in progress.

Arrows in progress by Kathy

Don’t you love the crinkly goodness of a fresh batch of bright batik fabrics?
These will look so good once they are quilted up!

Today’s Gift: A Free PDF Pattern for all, plus Win The Set!

Christa Quilts Patterns

Just a few of the patterns I currently have available through Craftsy.

Although I currently have 6 patterns available in print, I offer a total of 10 PDF patterns in my Craftsy store, including one that’s totally free!! So pop on over there to get the freebie and check out the other 9. I’ll choose two winners at the end of the hop on Aug 31. Because these are delivered electronically, this giveaway is open to everyone around the world!

Click here to get the free Craftsy pattern and see the whole collection.

To enter, leave me a comment about your favorite way to quilt. Do you prefer walking foot, free-motion, or both? Or maybe you like to hand quilt, or even quilt “by check!” I’d love to know. 🙂

Piece and Quilt with Precuts by Christa Watson

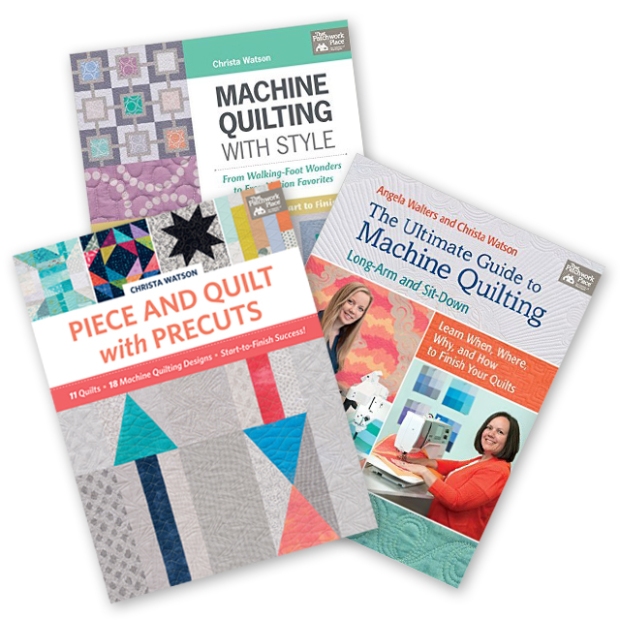
Click here to get your signed copy of Piece and Quilt with Precuts.

Click here to see all of the stops on the hop.

Update: Winner Selected and Comments Closed

Congrats to Pat T. and Lynn T. who have been contacted via email.

Save

Save

Save

Save

Save

Save

Save

Save

Save

Save

Save

Save

Save

Save

Save

Save

Save

Save

Piece and Quilt with Precuts Quilt 9: Kites

Ready for a whopper of a quilt?? The take a look at Kites. It’s the biggest quilt patterned in Piece and Quilt with Precuts, and yes, I totally quilted it on my regular sewing machine!! The key is to only handle a small area of the quilt under the machine at one time. Then “scrunch and smoosh” the rest of the quilt out of the way, however you can!!

Kites Quilt from Piece and Quilt with Precuts by Christa Watson

Kites Photography courtesy of Martingale/That Patchwork Place and Brent Kane

Piece It

Kites is so big because it’s made from 3 different sized squares: 10″, 5″ and 2 1/2″. They can be all from the same collection as shown in my version, or your can mix them up to create more of a scrappy looking quilt. The background is made from one jelly roll (2 1/2″ x 42″ strips) and layer cake (10″ x 10″ squares) of the same light colored fabric. So this quilt uses up a LOT of precuts!

The blocks look sort of like an abstract representation of Kites (hence the name), but in the book I’ve also included an alternate layout that makes the quilt look completely different!

Quilting on Kites from Piece and Quilt with Precuts

Detail of quilting from Piece and Quilt with Precuts

Quilt It

The machine quilting is a combination of walking foot and free-motion. It uses my super simple divide and conquer process in 3 steps:

  • Step 1 – stitch in the ditch around the blocks with a walking foot. This will help stabilize the quilt for additional quilting later. It also allows you to jump around the quilt however you like.
  • Step 2 – quilt “something” in the background. And I literally mean any design you like!
  • Step 3 – quilt another “something” in the blocks – any one you choose!

Quilting detail on Kites from Piece and Quilt with Precuts

Choose any two free-motion designs you like and quilt them together in this quilt.

My “somethings” for this quilt are a combination of packed flowers and double circles. As long as the two designs you choose have different densities, they’ll look great together!

More Kites inspiration

Check out the inspiring pics below and don’t feel like you have to make the same queen sized quilt that I did (unless of course you want to). This design is so versatile that it looks great in any size! Simply make fewer blocks for a smaller quilt.

Pam Cobb: The Stitch TV Show

If you haven’t yet discovered Pam’s YouTube show, along with her partner in crime Lynn, then you are in for a real treat! Not only do the gals from The Stitch TV Show serve up an entertaining online show twice a month, they are quite prolific pattern designers in their own right!

Closeup of Kites made by Pam Cobb of The Stitch

Check out this closeup of Pam’s beautiful quilting. I think her packed flowers look even better than mine!! Pop on over to The Stitch to see the size of her finished version, and for more about her process.

Oh, and did you know that Pam’s name is really an acronym for how she gets so much sewing done while working full time and taking care of a family? It stands for making  Progress in Achievable Moments so she can actually get things done. Now I’m jealous that I don’t have an acronym for my name!!

Rashida Khanbhai:  No. 3 Quilt Studio

Rashida's version of Kites

Check out this baby-sized version of Kites made by Rashida. Don’t you love the bright colors? I love how she went way back to the beginning of the book to choose one of the walking foot quilting designs to finish her quilt quickly. As I’ve said throughout the hop, you really can mix and match any of the quilting designs on any of the quilts!

Visit Rashida’s blog to read more about her progress and see more inspiring pics. She actually made the quilt twice with two slightly different quilting designs. Check it out to see the variations!

Jen Rosin: A Dream and a Stitch

Kite "flimsy" in progress

Jen agrees with me – the full size pattern is BIG!! I wanted to include at least one queen sized quilt in the book to give you plenty of options to choose from.

I think Jen did a fantastic job making this pretty quilt top. Here’s a peek of just a few of the fabrics she chose. Click here to visit Jen’s blog to see the full quilt top and her work in progress. I love seeing all of the variations!

Today’s Gift:
Win a Bundle of your Choice from The Precut STore!

The Precut Store

My better half, Jason, manages the other part of our business at ThePrecutStore.com. He gets to decide which precuts to carry and how many to buy for the shop, while I’m out traveling and teaching. It works well for our personalities: he loves to stay home and away from social media, while I love getting out in the quilty world and meeting so many of you!!

We carry nearly any precut you can think of along with Aurifil thread in nearly all the colors. In fact, the main catalyst for focusing on precuts in this book was to answer the question we get so often: “What can I make from precuts?”

Precuts

Just a few of the precuts we stock in our store.

The best thing about running our shop is that we do it via Amazon’s storefront. That means Prime customers get 2 day free shipping, and satisfaction is guaranteed!

Today, one lucky winner will win a precut bundle of your choice from anything we stock in our shop. To enter, take a look at The Precut Store and pick out your favorite bundle that you’d like to win (up to $39.99 value). Then leave me a comment on this post letting me know what it is. At the end of the hop, on the morning of Aug. 31st I’ll choose a winner and notify them via email! This giveaway is open to all, as long as international winners are okay with paying shipping.

Free motion quilting jagged stipple

Quilting tip: practice new designs on a scrap of fabric and batting first!

If you’ve been inspired to make any of the quilts from Piece and Quilt with Precuts, be sure and share pics of your progress in my Facebook Group: Quilt with Christa. I’d sure love to see them, and other group members would, too!

Update: Winner Selected and Comments Closed

Congrats to Linda S. Who has been contacted via email.

Save

Save

Save

Save

Save

Save

Save

Save

Save

Save

Save

Save

Save

Save

Save

Save

Save

Save

Save

Save

Save

Save

Piece and Quilt with Precuts Quilt 8: Windows

There are just a few more quilts to share before I’ve finished showing you all of the designs from Piece and Quilt with Precuts. Today, take a look at Windows, made from Tula Pink True Colors:

Windows from Piece and Quilt with Precuts by Christa WatsonWindows Photography courtesy of Martingale/That Patchwork Place and Brent Kane

Piece It

Windows is made from 2 1/2″ strips, 1 1/2″ strips and a lot of background fabric. It uses fewer 2 1/2″ strips, so here’s where a smaller bundle of your favorite prints can be used effectively. And of course it will look dramatically different just by changing up the fabrics. As long as you have a strong contrast between the window frames and the background, you’ll have success with this design!

I always have a hard time naming my quilts and thought of several possibilities for this one. If you rotate the quilt, the blocks look like elevator doors. You could even use the same two fabrics in each block to look like equal signs. I love it when there are so many ideas!!

Windows quilting detail

The book includes my “no-mark” method of machine quilting. It’s all about the texture!

Quilt It

I recommend using a blending 50 weight Aurifil cotton thread with simple quilting for busy fabrics and save the “fancy” quilting for areas of the quilt where it will show. With my detailed diagrams and quilting plan, you’ll be able to quilt  the blocks continuously, with only one start and stop for each row!

More Windows inspiration

Think about other ways you can make Windows – what if you reversed the colors, or made it from solids, or chose a scrappy background? Clink the links below for even more ideas and be on the lookout for some bonus giveaways!!

Suzy Webster – Webster Quilt

Detail of Windows quilting by Suzy

Check out this scrumptious quilting by Suzy Webster. I love how she chose a solid red so that the quilting really shows up in the background. And look how she used “switchbacks” in both the frames and the border. It’s one of my go-to designs that I first introduced in my first book Machine Quilting with Style.

Head over to Suzy’s blog to read more about the making of her quilt and to see her final reveal! She’s hanging her quilt in a place I’d never thought of before, but it sure looks great!

Katie Joy Church – Wild Prairie Studio

Windows quilt in progress

You’ll be jealous when you see Katie’s studio view as she worked on her version of Windows. She’s also thrown in a few inspiration images and other eye candy. You’ll be able to see how large the quilt is when you see it in progress on a bed in a cabin by the sea – which is just lovely!

Be sure to visit her blog too see how she plans to finish.

Terri Vanden Bosch – Meanderings Along Lizard Creek

Windows Table Runner

Look at this beautifully styled photo from Terri. It’s so easy to make the quilts in my book smaller or larger simply be sewing more or fewer blocks. Her soothing color palette is perfect for this pretty room.

Check out more about Terri’s quilt-making process plus more beautiful photos on her blog. She even told me her husband said it looked like “windows” before he even knew the name of the design!

Today’s Gift – Win Goodies from American Patchwork and Quilting

My friends over at American Patchwork and Quilting have been so supportive of my work! I’ve been in their magazines a few times and I’m always inspired by what they have to offer. Plus here’s a fun fact: I discovered modern quilting back in 2012 when I saw a modern quilt in one of the summer issues of American Patchwork and Quilting. I was so excited that I stopped everything to find out more about modern quilting and it totally changed my career path (for the better!!)

American Patchwork and Quilting Giveaway

Today, they are offering up a nice prize pack – a copy of Better Homes and Gardens’ Complete Guide to Quilting, 3 of their latest magazine issues (notice a familiar quilt on the cover of American Patchwork and Quilting? Yep – that’s mine), plus 4 adorable quilting charms (not pictured.)

Due to shipping costs, this one will be open to US residents only. To enter, leave a comment on this post telling me how many magazines you subscribe to. (If you want to answer honestly, that’s totally up to you. I promise I won’t judge, LOL!!)

All Peopl Quilt

More inspiration will be given to one lucky winner at the end of the hop!

Truthfully, I rarely make an quilts from magazine patterns since I’m usually designing my own, but I love flipping through their pages for color and layout inspiration. I especially love reading technique articles, plus what’s happening in the quilty world. I’ll choose a winner the morning of Aug 31, the last day of the hop!!

Books by Christa Watson

If you are just joining me on the hop, click here to see all of the blog hop stops.
Then click here to pick up your signed copy of any of my books.

Update: Winner Selected and Comments Closed

Congrats to Ann O. who has been contacted via email.

Save

Save

Save

Save

Save

Save

Save

Save

Save

Save

Save

Save

Save

Save

Save

Save

Save

Save

Save

Save

Save

Save

Save

Save

Piece and Quilt with Precuts Quilt 7: Twinkling Diamonds

Wow! We are over halfway through the blog hop and the inspiration keeps on coming! Even though I designed and made all of the quilts from Piece and Quilt with Precuts, there are so many that I want to remake after seeing the beautiful color combinations my friends are making!

Today’s featured quilt is Twinkling Diamonds, made from some beautiful Alison Glass fabric.

Twinkling Diamonds by Christa Watson from Piece and Quilt with PrecutsTwinkling Diamonds Photography courtesy of Martingale/That Patchwork Place and Brent Kane.

Piece It

Twinkling Diamonds is made from fat quarters of colorful prints and fat eights of contrasting light fabrics, plus a dark background. The method I use teaches you to trim off the edges to get the nice crisp diamond points and the best part is, all of the leftovers can get turned into the S.W.A.K quilt featured a bit earlier in the book. (Click here for the blog post about S.W.A.K.)

I chose bright saturated prints and a dark navy background it so that it looks like diamonds twinkling in the sky. However, this quilt would look just as great with a lighter background, and softer, less intense prints.

Twinkling Diamonds Detail quilting

I quilted the background using “jagged stipple” one of my favorite new motifs!

Quilt It

I know that all of that negative space can be a bit intimidating to quilt, but here’s my tip: choose an interesting free-motion design. and meander your way around the blocks to add some texture to the quilt.

Twinkling Diamonds from Piece and Quilt with Precuts

I quilted irregular wavy lines in the bright section of the blocks and “cursive L’s” in the white areas. Each quilt includes step by step instructions plus a detailed quilting plan so you can follow along and get the same look!

Twinkling Diamonds Detail

I quilted all of the quilts in the book using my Aurifil thread collection – it’s my favorite!

More Twinkling Diamonds inspiration

Check out more beautiful ways to make Twinkling Diamonds blocks, and be on the lookout for who’s including a giveaway on their stop!!

Anjeanette Klinder

Twinkling Diamonds table runner

Take a look at what Anjeanette decided to do for her version of Twinkling Diamonds. Don’t you love how she fussy cut the centers??

And who says you can’t mix hand and machine quilting in the same quilt! I think she did such a beautiful hob. Be sure to see more inspiring pics and read more about how she made it her own,  over on her blog.

Jessica Caldwell – Desert Bloom Quilting

Twinkling Diamonds Blocks and Aurifil Thread

Don’t you love Jessica’s stunning color combination? I love how orange can be a neutral – don’t you? She picked out a gorgeous selection of Aurifil threads that she plans to quilt with so I’ll be keeping an eye on her blog to see how it turns out!

Head over to her blog for more pretty in-progress pics!

Jessee Maloney: Art School Dropout

Jesse's Twinkling Diamonds Blocks

I’m a sucker for turquoise and gray, and I love how Jesse shows that either solids or prints will work for the diamond centers. Notice how she added extra fabric around each block? Pop on over to her blog to read more about what she plans to do with these beauties!!

Here’s a tip – if you are just getting started with machine quilting, just make a block or two and practice quilting it. Then turn that block into a pillow, wallhanging, or one block mini. It’s also a great way to give a hand made gift that won’t take too long to create!

Today’s Gift – Win My Aurifil Thread

Today’s giveaway is super exciting. If you’ve read my blog for any length of time, you’ll know how much I love piecing and quilting with Aurifil 50 weight cotton thread. I love being able to use one type of thread for everything I do, and then stocking up on ALL the colors!

It was fun to work with Aurifil on a thread collection that includes all of the basic colors I use. Together, we decided to include two groups in the collection – colors and neutrals. All of the quilts in the book were pieced and quilted using my Piece and Quilt Collection, and I included exactly which threads I used AND how much for each quilt in the book!

Piece and Quilt Collection Aurifil Thread by Christa Watson

Click here to see which threads are included in my Aurifil thread collection.

Two lucky winners will win my thread, generously sponsored by Aurifil – one winner for each thread kit. Pop on over to Aurifil’s blog to enter, and good luck!!!

Save

Save

Save

Save

Save

Save

Save

Save

Save

Save

Save

Save

Save

Save

Save

Save

Save

Save

Save

Save

Save

Save

Save

Save

Save

Piece and Quilt with Precuts Quilt 6: Dot ‘n’ Dash

Are you enjoying seeing the quilts from Piece and Quilt with Precuts so far? I don’t know about you, but I love all of the color options that everyone is sharing! If you are just now joining the hop, click here for the full schedule of bloggers so you don’t miss a thing!

Take a look at Dot ‘n’ Dash, my version of a modern jelly roll quilt!

Dot 'n' Dash by Christa Watson from Piece and Quilt with Precuts

Dot’n’Dash Photography courtesy of Martingale/That Patchwork Place and Brent Kane.

Piece It

This quilt is made from two sets of 2 1/2″ strips and I opted to use one Jelly Roll by Franny and Jane for Moda along with a nice contrasting gray background. Although my designs are a bit more on the modern side, hopefully by seeing them in other colorways you’ll be able to apply the techniques I teach to any quilt, no matter the style!

Quilt It

When quilting the majority of my quilts, I like to quilt two or more two different motifs to add interest to the quilt. I’ll usually try to combine a curvy motif with a linear one to create contrast within the quilting. Like all of the patterns in the book, Dot ‘n’ Dash includes a detailed quilting plan for you to follow so you can work your way across the quilt quickly and efficiently.

Dot 'n Dash quilting detail

Try combining two or more quilting designs for texture and contrast.

For the batting, I chose Hobbs Tuscany Wool. It’s light and soft, yet gives a bit more “poof” to the quilt which really helps the quilting stand out a bit more. Wool is one of my favorite battings for show quilts because it won’t show fold lines when it’s displayed vertically. I love it!

More Dot’N’Dash inspiration

You are in for a treat when you check out my friends’ finishes below. Be sure and visit their blogs for more details on the making of the quilts. And be on the lookout for additional giveaways when you visit!

Laura Piland – Slice of Pi Quilts

Laura Dot 'n Dash

The bold colors pop against the crisp white!

I love Laura’s fabric combo for this quilt. It’s fresh and bold and modern! The quilt calls for two full jelly rolls, but gives the option to use leftover strips in the binding. This means you can pick and choose just in case there are a couple of strips in your bundle that don’t contrast well enough in the background.

The patterns are so versatile and easy to follow that you can substitute other precuts as well. Laura actually made her quilt from a fat quarter bundle that she had on hand, and was able to quickly cut all the pieces she needed.

Pieced backing

Laura used her leftovers to create a beautiful pieced backing – I love it!

Pop on over to Laura’s blog to see gorgeous closeup pics of her quilting. She chose one of the designs in the walking foot section and you’ve got to see how she picked which threads to work with!

Can you believe she made this entire quilt in a weekend?? Be sure to read what she has to say about her quilt- making process. It will give you the confidence to tackle any quilt!

Cheryl Brickey – Meadow Mist Designs

Cheryl Brickey Dot n Dash from Piece and Quilt with Precuts

A simple stipple design can be an effective machine quilting choice!

Cheryl from Meadow Mist Designs was one of the original bloggers back in 2015 when I did a similar blog hop for my first book. (Click here to see those quilts for even more inspiration!) She was also my roomie at QuiltCon in 2015 and we’ve both come a long way since then. I’m sure you’ll be seeing more great things from her in the future!

Cheryl named her version of the quilt “Morse Code” which is awesome because I nearly named it that myself, LOL!! I love how Cheryl made her quilt a bit smaller and the fabric she chose give an improv vibe to the quilt. My hope is that you will take these designs and really make them your own! Visit Cheryl’s blog to see which Aurifil thread she quilted with (hint – it’s NOT white), and how she was able to achieve the improv look from ONE fabric!!

Jen Frost – Faith and Fabric

Dot 'n Dash by Jen Frost

Check out Jen’s version of Dot ‘n Dash using cheerful novelty prints! She chose a jelly roll from Me + My Sister for Moda, along with a jelly roll of white. She’s still contemplating which design and thread to quilt it with so pop on over to her blog to let her know what you think and see more pretty pics of this fabulous “flimsy” – (aka unquilted top)!

Today’s Gift – Win More batting from Hobbs

Since I used Hobb’s batting in two of the quilts from the book, they’ve been generous enough to provide two giveaways for the hop! Click here to enter their first giveaway being hosted on my blog.

Hobbs batting

Then head over to their blog to enter the second giveaway. It’s double the fun and double your chances to win! People always asking me what my favorite batting is and I have a few. I love Hobbs Tuscany cotton when I want a warm, cuddly, crinkly quilt. It will shrink up a bit when you wash it, giving that soft antique look that’s perfect for hiding any quilting “irregularities!”

Hobbs Wool Batting

For show quilts I love to use Tuscany wool because it will hang well and not show wrinkles. But lately I’ve been using the cotton/wool combo because it’s the best of both worlds!

Piece and Quilt with Precuts by Christa Watson

It’s so exciting to see my book popping up on store shelves. Be sure and drop by your favorite local quilt shop to pick up your copy. Or you can click here to get a signed copy from me!

Save

Save

Save

Save

Save

Save

Save

Save

Save

Save

Save

Save

Save

Save

Save

Save

Save

Save

Save

Save

Save

Save

Save

Save

Save

Save

Save

Save

Save

Piece and Quilt with Precuts Quilt 5: Starstruck

In my book, Piece and Quilt with Precuts, I teach how to quilt fun motifs using a walking foot, free-motion, or both! Today’s quilt, Starstruck is the first in the free-motion section. Just as in the previous walking foot section, the quilting designs build in complexity allowing you to gain confidence as you go!

Starstruck by Christa Watson from Piece and Quilt with Precuts

Starstruck Photography courtesy of Martingale/That Patchwork Place and Brent Kane.

Design It

All of the quilts in the book were designed using EQ7 software from The Electric Quilt Company. I’m the type of person who needs to have everything all planned out before I start cutting because I want to know what the final design will look like before I begin. I’ve tried designing on the fly as I create, but my brain just doesn’t work that way, LOL!! So take a look at what I was able to create in EQ7 before I made the quilt:

Starstruck Design in EQ7

Although I didn’t worry about putting the fabrics in the exact same position or rotating the stars the exact same way, I did use the same fabric swatches that were in the quilt. This allows me to really see if the design will work the way I want it to! Of course I could always go back into my EQ7 design and change it to match the finished quilt, but this was good enough for me!

Check out what the same design looks like when I switch out the fabrics for a more colorful palette! I love how easy it is to virtually recolor my quilts in EQ7. You may recognize this as my fabric collection that comes out this fall. Last week on my blog I shared my work in progress, and of course I’ll share the final finish once the fabric is available (in November.)

Starstruck using Modern Marks

The colors for Modern Marks are a little more vibrant on screen than they are in person.

Piece It

Starstruck is made from 24 fat quarters that can be separated into lights and darks like my neutrals version shown below. Or if you want it to be bright and cheerful like the one shown above, you can pair up fat quarters from your favorite colorful bundle to create contrast. Each fat quarter will make one center star, one background of another star, and part of the pieced border, so it’s fun to mix and match the prints!

Quilting Loops on Starstruck from Piece and Quilt with Precuts

An allover edge to edge design is the easiest way to practice free-motion quilting

Quilt It

When you want to learn a new free motion design, the best way to practice is on a real quilt. Start on one side of the quilt and meander your way across the quilt until you’ve covered every inch of it with your free-motion design. You’ll be a pro at that motif by the time you finish!

Machine quilting closeup on Starstruck

I chose Aurifil cotton 50 weight 2326 Sand for the machine quilting. It works well with neutrals.

I quilted a fun loop and star design on Starstruck but you could easily throw in other motifs like hearts, flowers and more. And if your stitches aren’t perfect, that’s ok. The best way to hide imperfect quilting is to surround it with more imperfect quilting, so all you see is the overall texture rather than the individual stitches.

More Starstruck inspiration

Isn’t it great to see the designs presented in different fabrics? Check out these three alternate versions below and be sure and visit each bloggers’ site for more about their process and more giveaways!!

Sherri Noel – Rebecca Mae Designs

Star Struck by Sherri Noel

Sherri Noel of Rebecca Mae Designs chose to go full color with a sprinkling of gold and gray. She was able to create good contrast with the bold busy fabrics, and her pretty picture makes me want to cuddle up on that comfy porch!!

Head over to Sherri’s blog to see more of her process including some closeups of her awesome quilting.

Lissa LaGreca – Lovingly Lissa

Starstruck by Lissa LaGreca

Here’s a view of Lissa’s gorgeous quilt top. I love the soft tan, brown, and gray neutrals she chose. I once heard that the hallmark of a great quilt design is that it will look good, no matter which fabrics you choose!

Hop on over to her blog at Lovingly Lissa to see how she quilted it. It’s a lovely finish!

Sandra Healy Designs

Sandra Healey Starstruck

Sandra of Sandra Healy Designs is working on two different projects using the Starstruck blocks. She’s working on a table runner using the fabrics with a white background above, and a pillow with a pretty pink background below.

In the book I recommend chain piecing all of the blocks at once and then lay them out into a pleasing arrangement. This allows you to finish your tops faster which leaves you more time for fun machine quilting.

Starstruck Pillow

Didn’t she do a fantastic job with the quilting on her cushion? She was able to get over her “fear of free-motion” with a little practice and I think she did an amazing job! Head over to Sandra’s blog to read more about her progress with the book!

Today’s Gift: EQ7 Education + Win Your Own Copy!

Because I’m so busy traveling and teaching machine quilting, I’m not able to share my knowledge of EQ7 in person as much as I’d like. So here’s the next best thing – click the links below to download  two PDF class outlines from my previous live classes.

EQ7

You can also click this link to peruse the EQ site for tons of self-study tutorials. I have to say, the folks at Electric Quilt give the greatest customer support I’ve seen. They’ll help you answer any and all questions you may have.

Then be sure and pop over to the EQ blog for your chance to win your very own copy of EQ7. I have to warn you though – you may spend more time designing than you actually do quilting!

Signed copy of Piece and Quilt with Precuts

If you’ve been inspired so far, don’t forget to grab a signed copy of Piece and Quilt with Precuts.
I’m here to cheer you on in your quilt making journey, every step of the way!

Click here to view the blog hop schedule

Save

Save

Save

Save

Save

Save

Save

Save

Save

Save

Save

Save

Save

Save

Save

Save

Save

Save

Save

Save

Save

Save

Save

Save

Save

Piece and Quilt with Precuts Quilt 4: S.W.A.K.

Today it’s time to share the fourth quilt that’s presented in my book Piece and Quilt with Precuts. Here’s, “S.W.A.K.” featuring a colorful X+O themed design. This is the last quilt in the first section of the book that’s all walking-foot quilted. Of course you can mix and match any of the pieced and quilted designs in the book, and there’s tons of options for you to choose from!

SWAK from Piece and Quilt with PrecutsS.W.A.K Photography courtesy of Martingale/That Patchwork Place and Brent Kane.

Piece It

Of course if you look closely, you’ll see that this quilt is constructed entirely from one of my favorite units – the half-square triangle (or HST for short). I could literally design a book full of quilts based on this versatile building block!

The trick that makes this design work is the color placement of the blocks. The pattern actually includes two sizes for the quilt. You can start with fresh fabrics, or you can do what I did and use leftovers from another quilt in the book (coming up later on the hop). Whichever way you choose to make it, I’m sure you’ll have as much fun with it as I did!

Machine quilting on S.W.A.K from Piece and Quilt with Precuts

For the thread, I chose a shade of blue from my Aurifil Piece and Quilt Collection It’s just the right shade that blends into all of the fabrics, but you can still see it on the navy print. The stitches sink in nicely to the quilt because I’m using one of my favorite battings from Hobbs – 80/20 cotton/poly.
See the end of the post below for a fabulous batting giveaway!

Quilt It

In each of my books so far, I’ve taught different ways to quilt spirals with your walking foot (or dual feed). For S.W.A.K. I figured out how to quilt a continuous square spiral. The secret is to count your stitches when you quilt the starting square! Of course I go into a much more detailed explanation in the book and include plenty of diagrams and closeup photography so you can follow along. I also include which fabrics and precuts I chose, along with which batting and thread I used for each quilt. I wanted you to have all the details for each quilt!

More S.W.A.K inspiration

Check out the amazing color options below. Head to each blog to read more about their fabric and quilting choices and be on the lookout for more giveaways! Whether you like to piece, or quilt, or both, we’ve got you covered with loads of inspiration!

Michelle Bartholomew

SWAK made by Michelle

Who says you have to make the quilt exactly as shown in the book? I love how Michelle Bartholomew made fewer blocks and turned them into this lovely table runner. And her straight line quilting adds incredible texture to the piece. Visit her blog to see more stunning pics and read what she has to say about her version of S.W.A.K.

If you plan to attend at QuiltCon next year, you’ll definitely want to take her photography workshop. Isn’t her picture so fab?? I always admire those who can style and shoot a beautiful beautiful image!

Sherry Shish – Powered by quilting

SWAK by Sherry

Sherry from Powered by Quilting chose stunning black, white and gray prints with a pop of blue and red. Here’s a bonus tip: If you want to skip all the triangle trimming, you can, as long as all of your blocks are the same size. It will make your quilt slightly bigger but since it’s made from the same unit throughout, they’ll all fit together.

If you do choose to trim, here’s any idea on what to do with the waste: stuff them all into a pillowcase. When it’s full, simply stitch the end closed and donate it to an animal shelter to use as a pet bed. It’s an eco-friendly way to recycle even the tiniest of scraps!

SWAK by Sherry Shish

Didn’t Sherry do such a fantastic job with her version of S.W.A.K? The color scheme gives it a sort of modern patriotic vibe and she did an amazing job with her quilting! Head over to Sherry’s blog to see more gorgeous pics and read about her interaction with the book.

Allison Dutton – Allison Sews

SWAK by Allison sews

As you can see by all of these examples including Allison from Allison Sews, this is such a fun design to make from your favorite scraps or coordinated precut bundle!

SWAK by Allison Sews

Look at all that yummy texture!!

I’ve enjoyed watching Allison share her in-progress videos on Instagram. Now you can pop over to her blog to see how she chose to quilt this beauty, along with her fabulous finish!

Today’s Gift – Win Batting from Hobbs

In the book I made nearly each quilt from a different batting so I could try them out, and I listed which batting was used so you can try them out, too. My #1 piece of advice when choosing batting is to use a different batting on your next few quilts and see which ones you like best!

My preference is for natural fiber battings and I love that Hobbs offers such a wide assortment. Today’s lucky winner will receive a Hobbs batting of your choice, so you can experiment, too!

Hobbs Batting

Natural fiber battings cling to the quilt, helping you to prevent shifting and puckers!

To enter, leave me a comment on this blog post letting me know how you prefer to buy batting – do you like to get it by the yard, in pre-sized packages, by the bolt, or some other way? I’m curious to know! This giveaway is open to all, and a winner will be chosen at the end of the hop.

Box of Books - Piece and Quilt with Precuts by Christa Watson
If you haven’t yet purchased your copy of Piece and Quilt with Precuts,
I have a fresh box of them waiting to ship, and I’m happy to sign one for you!

Update: Winner Selected and Comments Closed

Congrats to Peggy P. who has been notified via email.

Save

Save

Save

Save

Save

Save

Save

Save

Save

Save

Save

Save

Save

Save

Save

Save

Save

Save

Save

Save

Save

Piece and Quilt with Precuts Quilt 3: Frequency

I got a really nice comment on Instagram earlier this week saying “I love how you show real life ordinary quilting that doesn’t require a super fancy machine.” That made me happy because my goal in writing and teaching is to empower you to be able to quilt your own quilts, no matter what type of machine you use!

Without further ado, here’s quilt #3 from Piece and Quilt with Precuts. It’s called “Frequency” because it reminds me of those pulsing lines you see on your electronic device while your music is playing. Yes, I’m easily amused…

Frequency by Christa Watson for Piece and Quilt with Precuts

Frequency Photography courtesy of Martingale/That Patchwork Place and Brent Kane.

Piece It

Frequency is made from 2 1/2″ strips of lights and darks. You could either use one bundle if it’s split up evenly, or a smaller 20-strip bundle of each. Or use up leftover strips from other projects!  This design is a good one to get your feet wet with improvisational piecing because your strips don’t have to look exactly like mine. There’s a lot of variety in how you can trim the length and join the strips. Part of the fun of making this quilt is arranging the strips, which you can do randomly or with intent.

For a completely different look, rotate the blocks so that the strips are stacked horizontally. Now it kind of looks like stacked books, don’t you think??

Frquenecy Rotated

Quilt It

I used my “divide and conquer” method to easily quilt Frequency with a walking foot (or dual feed). The pattern includes step by step instructions and diagrams, but here’s the simple version: Step 1: Stitch in the ditch between each of the rows to stabilize the quilt. Step 2. Quilt a fun zig-zag design in each of the strips.

I personally prefer to quilt my lines randomly, rather than trying to be too “matchy-matchy.” It’s a LOT easier to do and I think makes for a much more interesting design! Although I quilted them using walking foot techniques in the book, you could totally free-motion quilt them instead!

Frequency Quilting

Thread tip: When quilting with one thread color over a variety of contrasting fabrics, a lighter thread color looks better on darker fabrics, rather than darker thread on lighter fabrics.

More Frequency inspiration

Check out some amazing work in progress using different fabrics and quilting designs. Click on each blogger’s site for their their in-progress photos, awesome giveaways, and more!

Nancy Scott – MasterPiece Quilting

Nancy Scott's Version of Frequency

Isn’t it amazing how different a quilt can look by just changing the fabrics? Nancy from Masterpiece Quilting created a warm, earthy version of Frequency using cheerful red and green Christmas prints. I just love how those pops of gold really add some sparkle to her quilt!

Visit her blog to read more about her process in making this quilt. Nancy was able to easily quilt the same design I did, but she did it on her long arm machine instead of a domestic and it looks just as great!

Martingale/That Patchwork Place

Frequency Progress

Karen Johnson is heading of marketing over at my fabulous publisher, Martingale/That Patchwork Place and she decided to take on the challenge of recreating a mini-Frequency along with a matching pincushion that you just have to see! I love how she chose some of the other quilting designs presented later in the book and applied them to her project. It just goes to show how versatile the quilting motifs are!

 Check out this fun blog post all about Karen’s process, with tons of step-by-step photos, plus sneak peeks of some of the quilts coming up later on the hop. Plus, you won’t believe the fabulous giveaway s they are hosting!!

Christa's book, signed by Martingale

A priceless copy of my book, signed the awesome team at Martingale that helped produce it.

I have to tell you, after writing three books with Martingale, they’ve really become like family to me. I’m sure you can imagine how much work it takes to write a book, and I couldn’t have done it without a fantastic team of people! And what’s even better is that most of them are quilters who love making projects from the books they help produce. No wonder their books are so well loved!! 🙂

Lorinda Davis – Laurel Poppy and Pine

Frequency Quilting by Lorinda

Just look at all that yummy texture quilted by Lorinda of Laurel Poppy and Pine!! I love seeing closeup shots where you can really see the quilting. Lorinda chose a modern fall palette for her quilt and it always amazes me how different a quilt can look just by changing up the fabrics. Just remember, you can either use a precut bundle to make this quilt, or you can create your own custom bundle just like Lorinda did!

Head over to her blog to see the entire quilt, and read more about her process. My hope is that by seeing all of these fabulous finishes, you’ll feel inspired that you, too can achieve amazing results with my simple techniques!

Today’s Gift – Win All of My Books

Yes, you read that right, ALL of my books!! Today’s giveaway is being generously sponsored by my friends over at Martingale/That Patchwork Place and they are going to send them to 3 lucky winners!!

Christa Watson Books

Now, here’s the fine print – not only are they giving away a copy of all three books authored by me, they are also throwing in a copy of every book I’ve ever collaborated on with them. If I counted correctly, it’s a total of 7 so far, enough to keep you stocked with plenty of projects on your “have-to-make” list!

And here’s a hint, I’ll be in at least two more books they are curating coming up next year. So be sure to keep an eye on all the fun inspiration Martingale has to offer! Head over to their blog now for your chance to win.

Save

Save

Save

Save

Save

Save

Save

Save

Save

Save

Save

Save

Save

Save

Save

Save

Save

Save

Save

Save

Save

Save

Save

Save

Save

Save

Save

Piece and Quilt with Precuts Quilt 2: Gridwork

The second quilt featured in my book Piece and Quilt with Precuts is called “Gridwork.”

Gridwork by Christa Watson from Piece and Quilt with Precuts

Gridwork Photography courtesy of Martingale/That Patchwork Place and Brent Kane.

Piece It

Gridwork is made from one set of 5″ squares and one set of 10″ squares. In traditional quilting, blocks are usually laid out in a “grid” format. However, modern quilters like to break up the grid or present blocks in an alternate grid layout. In this case, you can see that this quilt is arranged in a 6×7 traditional grid layout (6 blocks across by 7 blocks down). But the blocks themselves are rotated in a haphazard fashion to obscure the grid and make it a bit more interesting.

Gridwork from Piece and Quilt with Precuts

We took this quilt on a recent camping trip to get some pretty shots of it in nature.

The secret is to piece the blocks in a few similar, but slightly different ways and then rotate them to trick the viewer into thinking there’s much more variation in the blocks. In my book, step by step instructions are given on how to create the different blocks. Plus, a full color layout is included with each quilt pattern so there’s no guesswork when it comes time to assemble the quilt!

Machine Quilting on Gridwork

Wavy Grid is one of my go-to machine quilting designs! I quilted this quilt in a light gray-blue thread from my Piece and Quilt collection with Aurifil.

Quilt It

The first four quilts in the book are quilted completely with a walking foot (or in my case, the BERNINA dual feed which performs the exact same function.) Each quilt build skills as you go, so you’ll be a machine quilting pro in no time! Plus, with my “divide and conquer” method, you can quilt a few lines to stabilize the quilt, then decide at any point how densely you want to quilt it, without locking yourself into an overwhelming task!

More Gridwork inspiration

Check out these alternate versions below. Head to each blogger’s site for more about their process, see their finishes, and enter their giveaways!

Sandy Maxfield – Sandy Star Designs

Sandy's version of Gridwork

I’ve been hoarding my own bundles of Karen Lewis’ Blueberry Park line and I’m jealous at how easily Sandy from Sandy Star Designs was able to break into her precuts!! Here’s a hint – she actually cut the 10″ and 5″ prints from fat quarters, which is a great example of being able to use what you have on hand for successful results.

Don’t you think Sandy did a fantastic job combining the prints into a pleasing combination? The trick is to make sure there’s contrast in each block so none of them gets lost. You can do that by combing lights with darks, solids with prints or a myriad of other ways!

Gridwork quilting by Sandy

She did a fantastic job quilting wavy grid on her quilt. Don’t you just want to cuddle up with all that yummy texture? Be sure to pop over to Sandy’s blog to read more, and to enter her giveaway!

Joanne Harris – Quilts by Joanne

Gridwork by Joanne Harris

Joanne Harris from Quilts by Joanne really made this design look great with her fabulous yellow and gray color scheme. I once heard that the hallmark of a great quilt design is that it will look good in any fabric combination!

Don’t you just love that elephant print?? Now take a look at her blog to see how she decided to quilt it!

Teresa Mairal-Barreu – Sewn Up

Teresa M Gridwork

Teresa aka Teresa Down Under chose to make a smaller smaller version of Gridwork and I just love it! This goes to show that you don’t always have to use up an entire precut bundle, or make your quilt the exact same size.

Head over to Teresa’s blog to see a video of this “flimsy” (aka unquilted top) flapping beautifully in the breeze. Seriously, it will inspire you to want to make one right away!

Today’s Gift – Win a Bundle of 5″ or 10″ Squares

Christa Watson Designer Palette

My designer palette was originally created for Facets, from Machine Quilting with Style.
I’ve now used it to create several colorful quilts!

Today I’m going to give 2 lucky winners a fun prize! One person will win a layer cake of my Christa Watson designer palette and a second person will win a charm pack of the same fabric. Now the trick will be for both winners to find another layer cake or charm pack to go with them to make their own version of Gridwork! But isn’t a challenge fun?? (And in reality of course the winner can do whatever they’d like to with their fabrics!!)

To enter, leave me a comment letting me know what’s your favorite precut to work with. Me personally – I love fat quarters because I think they are the most versatile. But as a designer, I love coming up with creative ways to use these fun fabric bundles!

The giveaway is open to all (int’l winners just pay shipping) and I’ll choose a winner on Aug 31 which is the last day of the hop. Be sure and check in again tomorrow for the next quilt I’ll share along with more fabulous color options!

Griwork from Piece and Quilt with Precuts

If you make your own version of Gridwork, or any of the quilts from my book, please share your progress in my Facebook Group, Quilt with Christa. I’d love to see!

Click here to see all of the stops on the blog hop tour – you’re sure to be inspired!

Update: Winners Selected and Comments Closed

Congrats to Dian. H. and Hedy H. who have been contacted via email.

Save

Save

Save

Save

Save

Save

Save

Save

Save

Save

Save

Save

Save

Save

Save

Save

Save

Save

Save

Save

Save

Save

Save

Save

Save

Save

Save

Save

Save

Save

Save

Save

Save

Save

Save

Save

Save

Save

Piece and Quilt with Precuts Quilt 1: Squiggles

Today I get to share the first quilt presented in my brand new book! Meet “Squiggles” from Piece and Quilt with Precuts.

Squiggles by Christa Watson from Piece and Quilt with Precuts

Squiggles Photography courtesy of Martingale/That Patchwork Place and Brent Kane.

Piece It

I designed Squiggles so that it can be made from either four bundles of 5″ squares, or one bundle of 10″ squares. My favorite tip for working with precuts is to use a super light or super dark background, so that it will contrast with any precut bundle you choose! I love working with precuts because the math always works out nicely. For the background, you can either use 5″ squares or 2 1/2″ strips, giving you tons of versatility based on what you have on hand.

Quilt It

You can see why I named the quilt Squiggles – because of the fun squiggly lines I chose to quilt. This is usually the first quilting design I teach my students to do with a walking foot (or integrated dual feed) because they can achieve instant success from the very first stitch!

Squiggles Quilting Detail

I used my favorite shade of  Aurifil gray (Aluminium) because its blends with all the fabrics!

In the book, I include detailed instructions on how to piece this quilt as well as diagrams on how to actually quilt it to achieve a similar look. It’s so much easier than you might think!

More Squiggles inspiration

Now let’s take a look at what 3 of my blogging friends chose to do with this design. Be sure to click on the links to each of their blogs for more pics,  an explanation of their process, and to see who’s including a bonus giveaway!

Kate Colleran – Seams Like a Dream

Squiggles quilting by Kate

Here’s a sneak peek of the gorgeous colors and quilting that Kate from Seams Like a Dream chose for her version. Be sure and take a look at the beautiful color gradation she did with her blocks, along with an excellent explanation of her quilting process.

Although Kate usually send her quilts out to be quilted, I’m so proud of her for quilting this one herself. If she can do it – so can you! Pop on over to her blog to see the whole quilt, plus more inspiring “in progress” pics. You’ll love it!

Kathy Bruckman – Kathy’s Kwilts and More

Squiggles Blocks by Kathy B

I love the aqua and green color scheme that Kathy from Kathy’s Kwilts and More chose for her version of squiggles. Here’s a small sneak peek of some of her blocks!

Squiggles Pillow

I’m impressed that she hand pieced her blocks and then turned them into a pretty pillow sham. Then Kathy took some of her leftovers and turned them into a matching pillow cushion. Isn’t it adorable!! Head over to her blog to see more!

Sharon Parcel – Yellow Cat Quilt Designs

Gridwork in Progress

Sharon from Yellow Cat Quilt Designs was able to find the same charm packs I used in my quilt, and I like how she chose to quilt the wavy grid design that appears later in the book. She took my advice to quilt loosely across the quilt and then fill in with more quilting with each pass across the quilt. This allows you to decide at any point how dense you want your quilting to be.

I designed the quilting plans so that they can be interchangeable throughout the book, and they will work on nearly any quilt you can imagine! Stop by Sharon’s blog to read more about her process and see more helpful pics!

Today’s Gift – Free Pattern with book purchase

Christa Quilts Patterns

Today’s “present” is from me, for those who haven’t yet purchased their copy of the book. I’m extending my offer for a free pattern with book purchase through the end of the hop. That is, when you order the book directly from me, I’ll throw in a bonus printed pattern with your order.

You can either specify the pattern you want in the notes at checkout, or I’m happy to surprise you. But hurry – as this offer only lasts until the blog hop ends!

Piece and Quilt with Precuts signed by Christa Watson

Click here to purchase your signed copy of Piece and Quilt with Precuts.

And of course, I’ll sign your book, too! Just leave me a note if you want me to personalize it. Be sure to check back here tomorrow to learn more about the next quilt, see more inspiring pics, and enter the next giveaway!!

Save

Save

Save

Save

Save

Save

Save

Save

Save

Save

Save

Save

Save

Save

Save

Save

Save

Save

Save

Save

Save