Welcome to week 2 of my Abacus Quilt Along. Today we will learn a super simple machine applique technique than can be applied to any design, not just circles. It took me a total of 4 1/4 hours to complete this week’s lesson. Remember, you can join in at any time and sew on your own schedule.
Step 1 – Fusing the Circles to the Background (1/2 hour)
Remove the paper backings from all 36 of your circles if needed. Place a circle roughly in the middle of each background square and fuse them in place, according to the manufacturer’s instructions.
At this point, the circles don’t have to perfectly centered as we will trim down some of the excess. Just be sure there’s at least 1/4″ of background around the entire circle.
 Fused circles organized by color – aren’t they pretty?
Step 2 – Machine Applique the Circles (3 hours)
Using a matching thread and a straight stitch, slowly and carefully stitch around the edge of each circle, keeping your thread on top of the bead fabric. Sew very close to the edge without going off of the fabric. Always stop stitching with your needle down for smooth, continuous stitches. If you have a knee-lift for your machine, use it to lift the presser foot every few inches as you turn the circle to sew.
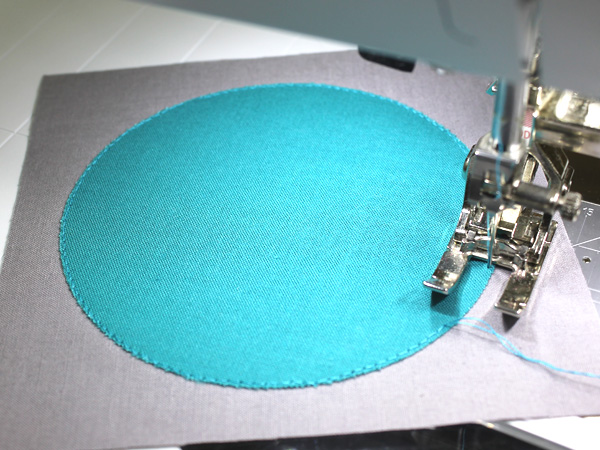 Hint: Using an open toe applique foot makes it easier to see what you are doing.
If desired, you may use a decorative stitch instead. Or for a more “industrial” look, go around each circle two or three times. Be sure to start and stop by pulling the bobbin thread up through to the top of the fabric for a clean look.
Practice on a few scraps first to check your stitch length, thread color and tension, and to audition possible machine applique stitches. Note that I did not need to use any stabilizer. The fusible web on the back of the fabrics provided enough stability for this method.
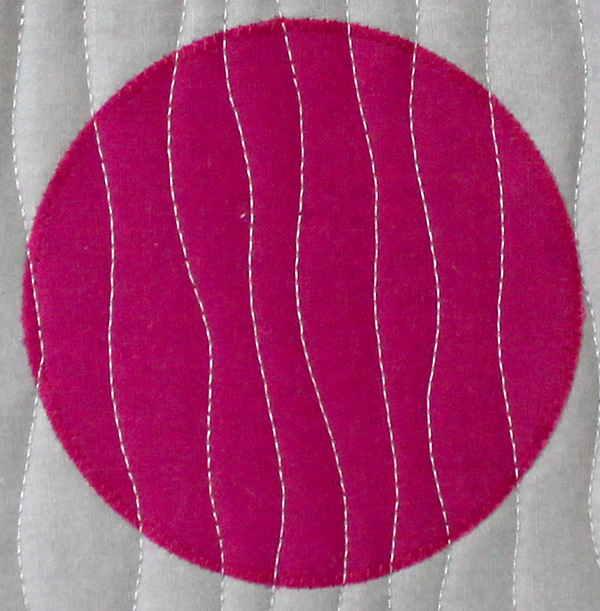 The sample above was my practice piece for both applique and quilting. I first tried a very thin and narrow zig zag stitch by reducing my length and width. Although I liked the look of the edges, I don’t like how it competed with the lines of quilting. That’s why I decided to go with a cleaner line of stitching around the edges. Try a few things and see what you like!
 Match thread colors to your fabrics to help make the stitching seem to disappear!
When you have finished stitching, pull all of your threads to the back of each quilt block and make a knot by hand. Clip off the excess threads. For efficiency, I did all the applique stitching first and then went back and tied all the knots.
 What the backs of your bead blocks should look like when stitched.
Step 3 – Trimming the Circles (3/4 hour)
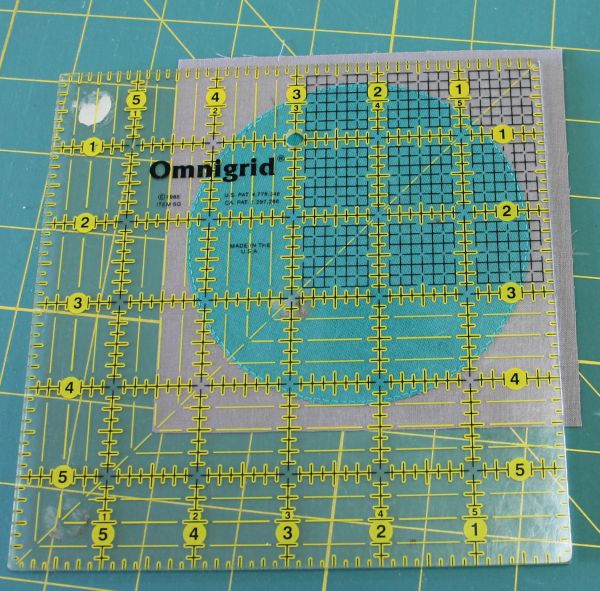
Use a small square ruler to align your circle so that you will be trimming exactly 1/4″ away from the edges on two sides. I have drawn black lines on the picture below showing how you should line up your ruler so that the circle fits within a 4″ x 4″ finished frame. You will be cutting exactly 1/4″ away on all four sides of the black frame shown below.
 Make the first trim to the right and top of the block, leaving 1/4″ around the two edges.

Flip the block around and line it up so that now you are trimming the other two sides, forming a perfectly trimmed 4 1/2″ block.
 Repeat for all 36 blocks. The picture below shows a trimmed block next to an untrimmed block for comparison.
 Have fun doing your “homework” and feel free to leave comments below or email me with any questions! Don’t forget to share you progress on your own blogs, on my flickr group, or on instagram #abacusqal.
I can’t wait to see how you’re doing!
Be sure to visit my Abacus quilt along page for links to the supply list and all tutorials.

wow-the pics were great, totally get how to make it square. And I agree with your thoughts – the straight stitching around the circles looks better. Really cool quilt. I can see using this technique for other things too (drunkards path comes to mind).
Oooh, totally late to the game, but this is such a neato quilt! I want to make one now!
Christa, Help!
I need your input …I mentioned before that my friend was cutting my circles for me with her die cutter. She knows my hand is bad.
Of course you never say no to free fabric that is pre cut right? The PROBLEM: I told her this was for a teacher at the school were I volunteer . She is a math teacher and was recently diagnosed with breastfeeding cancer. Her students plan to write messages of Hope and Support in each bead…her name and year in the #1 bead. The back ground was to be gray (Kona fabric color: Steel..which I have.)
The beads are planned to to be black (8) Down to Red (4) down to white /pale very light pink for #1 bead. (School colors are Red Black and white.) Mr friend cut out the circle s from a Jenny Breyer Mailan collection. ..While the black and red look great the rest don’t work. ..so can I mix solids with batiks (tonal) and should I limit batiks to 3 or is 4 ok. I don’t want to lose the modern simplicity of the solid look.
Please address this so others can see yyour feedback..
BTW: HOW IS THE BOOK COMING?
Thanks for your help.
I think you have lots of options when it comes to this design. I think batiks could be very fun if they read mostly solid. What a wonderful idea to make this quilt. I’m sure it will be much appreciated!
Book is due out sometime next summer/fall 🙂
Very clear directions. Thanks. What happens if we sew the line about 1/4 inch from the outside of the circle? Would that be a way to get some texture to the piece?
I think that would look fantastic! Try it on a scrap piece first and see what you think 🙂 The sky’s the limit when it comes to your creative ideas!!
I like the idea of trimming the background to size after you applique. Makes for a little more work, but not nearly as brain intensive as trying to match up center perfectly. 😀
Sewing the circles to the fabric FIRST and THEN cutting the blocks to size is very clever!! What a great tip! I’m storing this away in my bag o’ tricks.
Christa, i love your directions! I understood everything clearly, even down to why you decided to sew a straight stitch on the edges of the circles! Fingers crossed that I can be as accurate as you were!
I am so excited about this quilt!! I’m making a few changes as to size of the circles because I want the quilt a little larger – it’s going to be a baby quilt! You are really making this QAL so easy!!