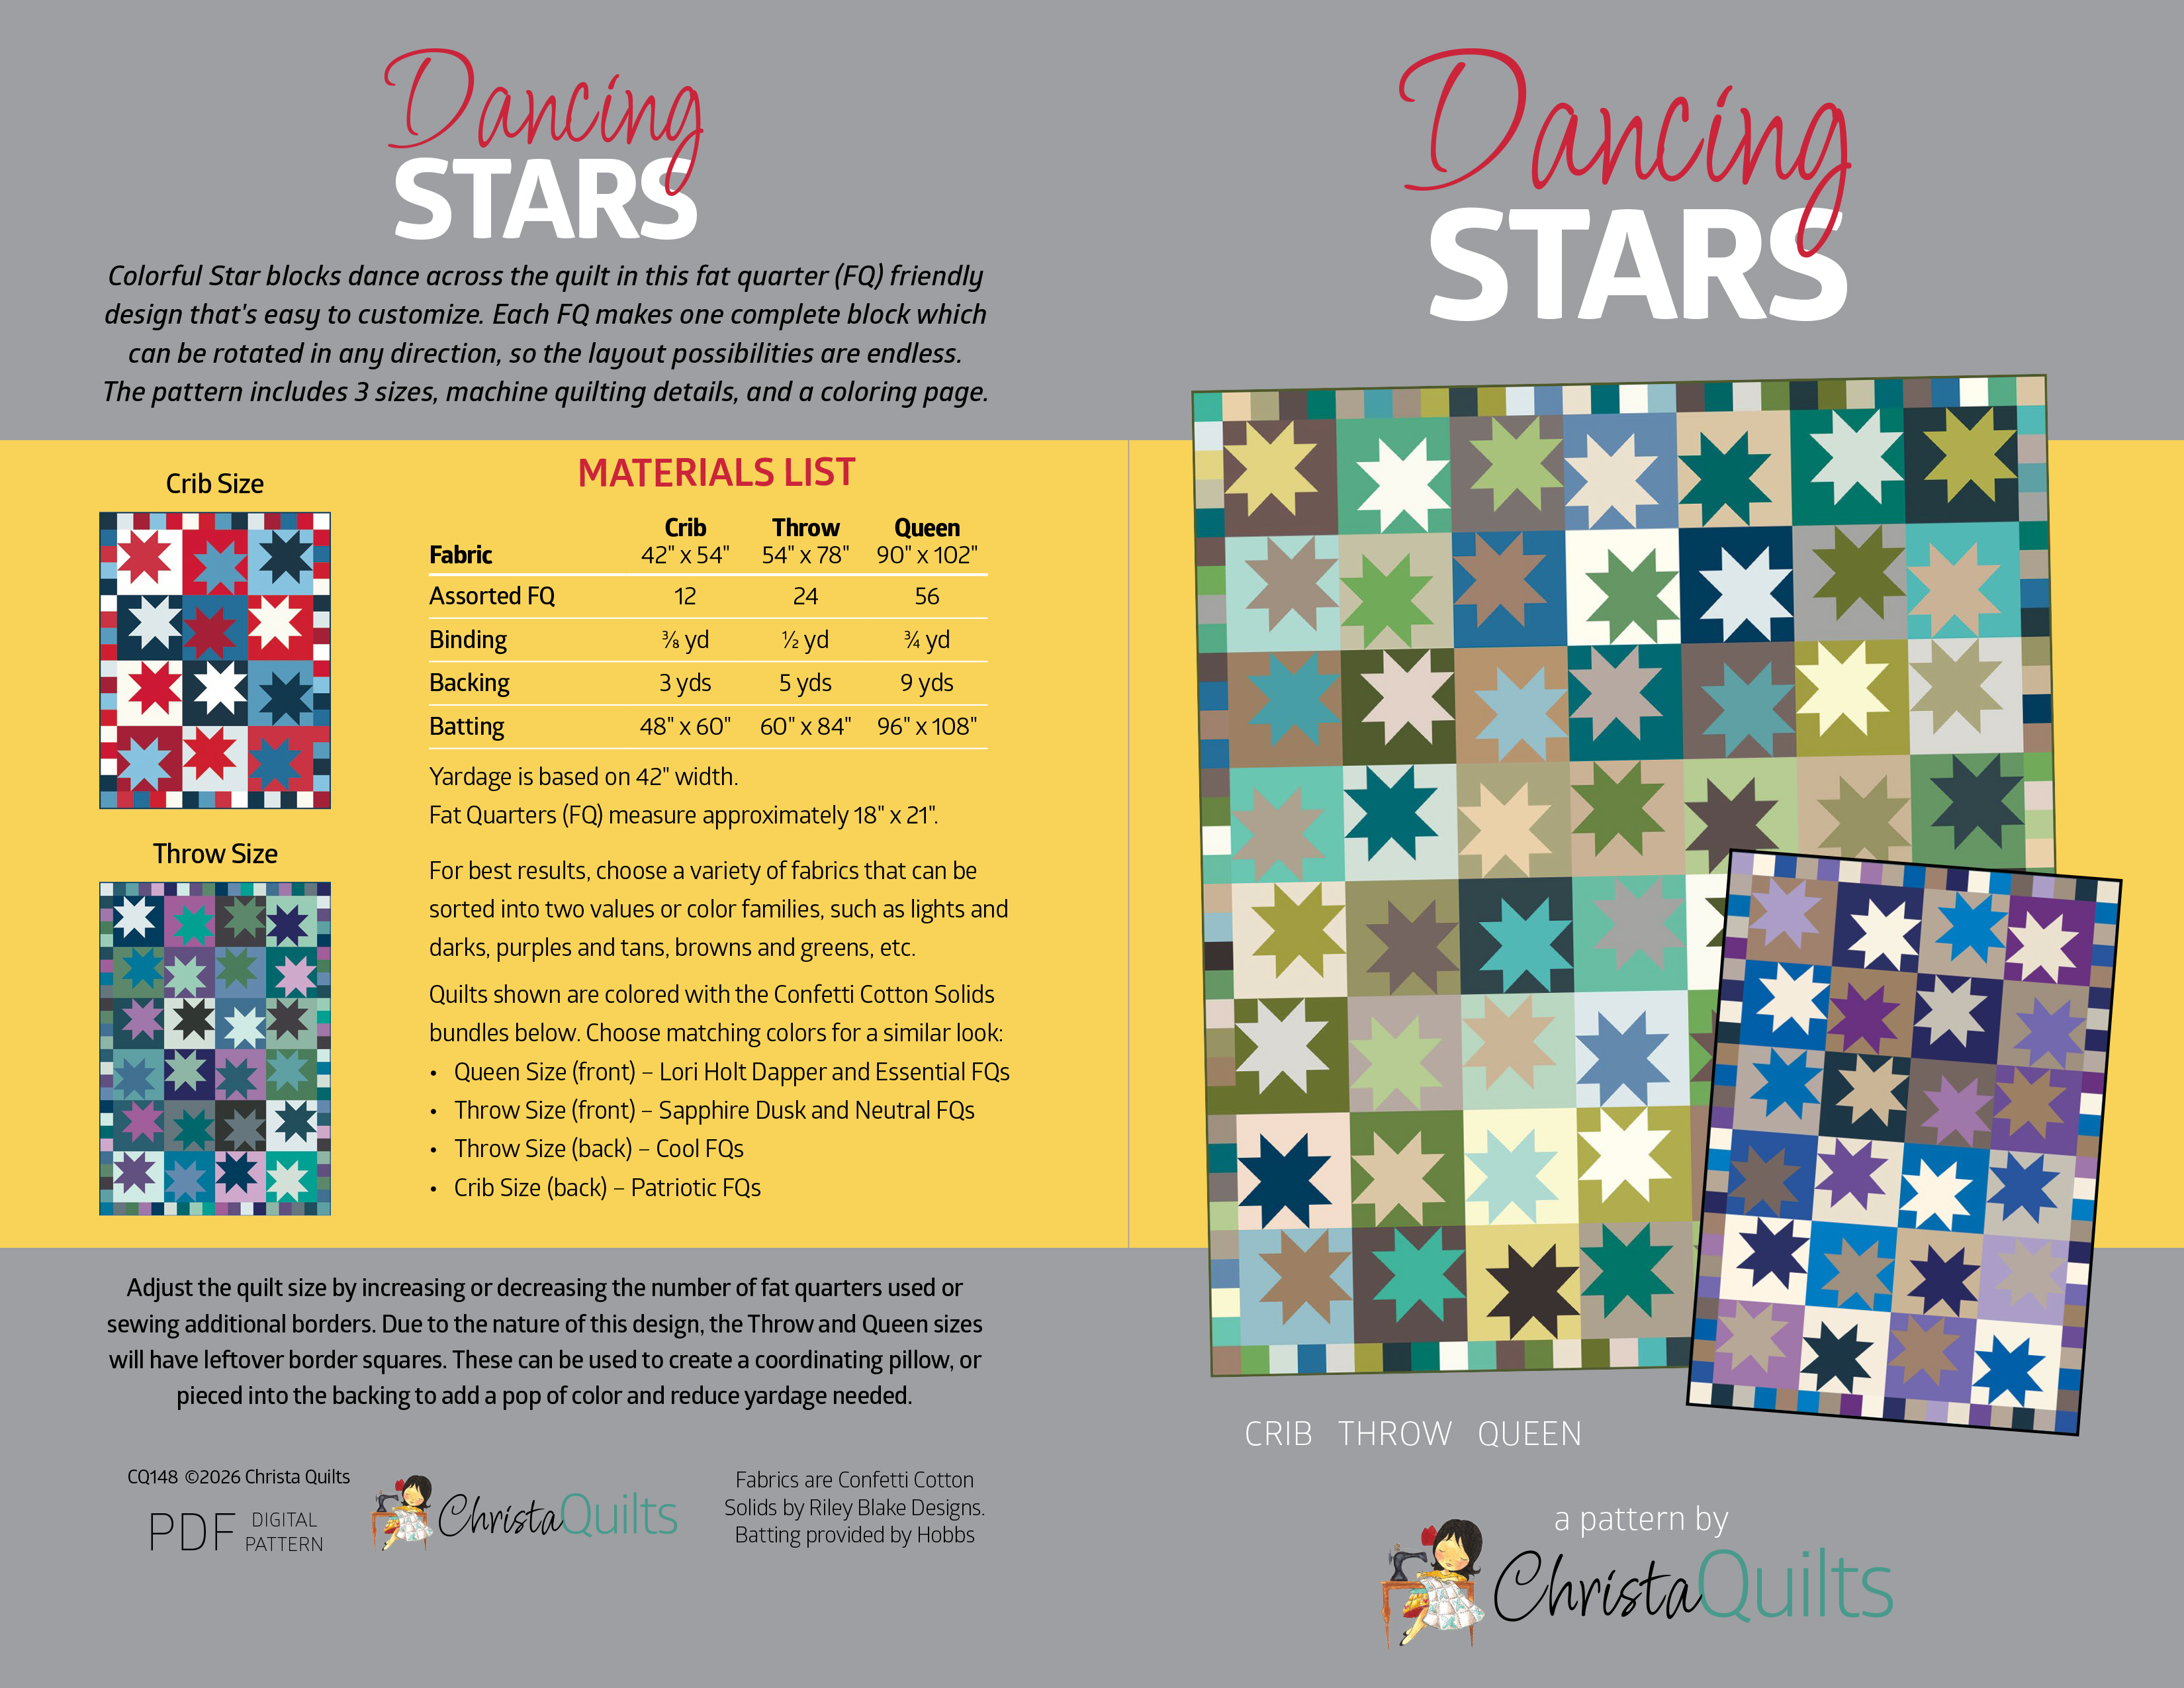
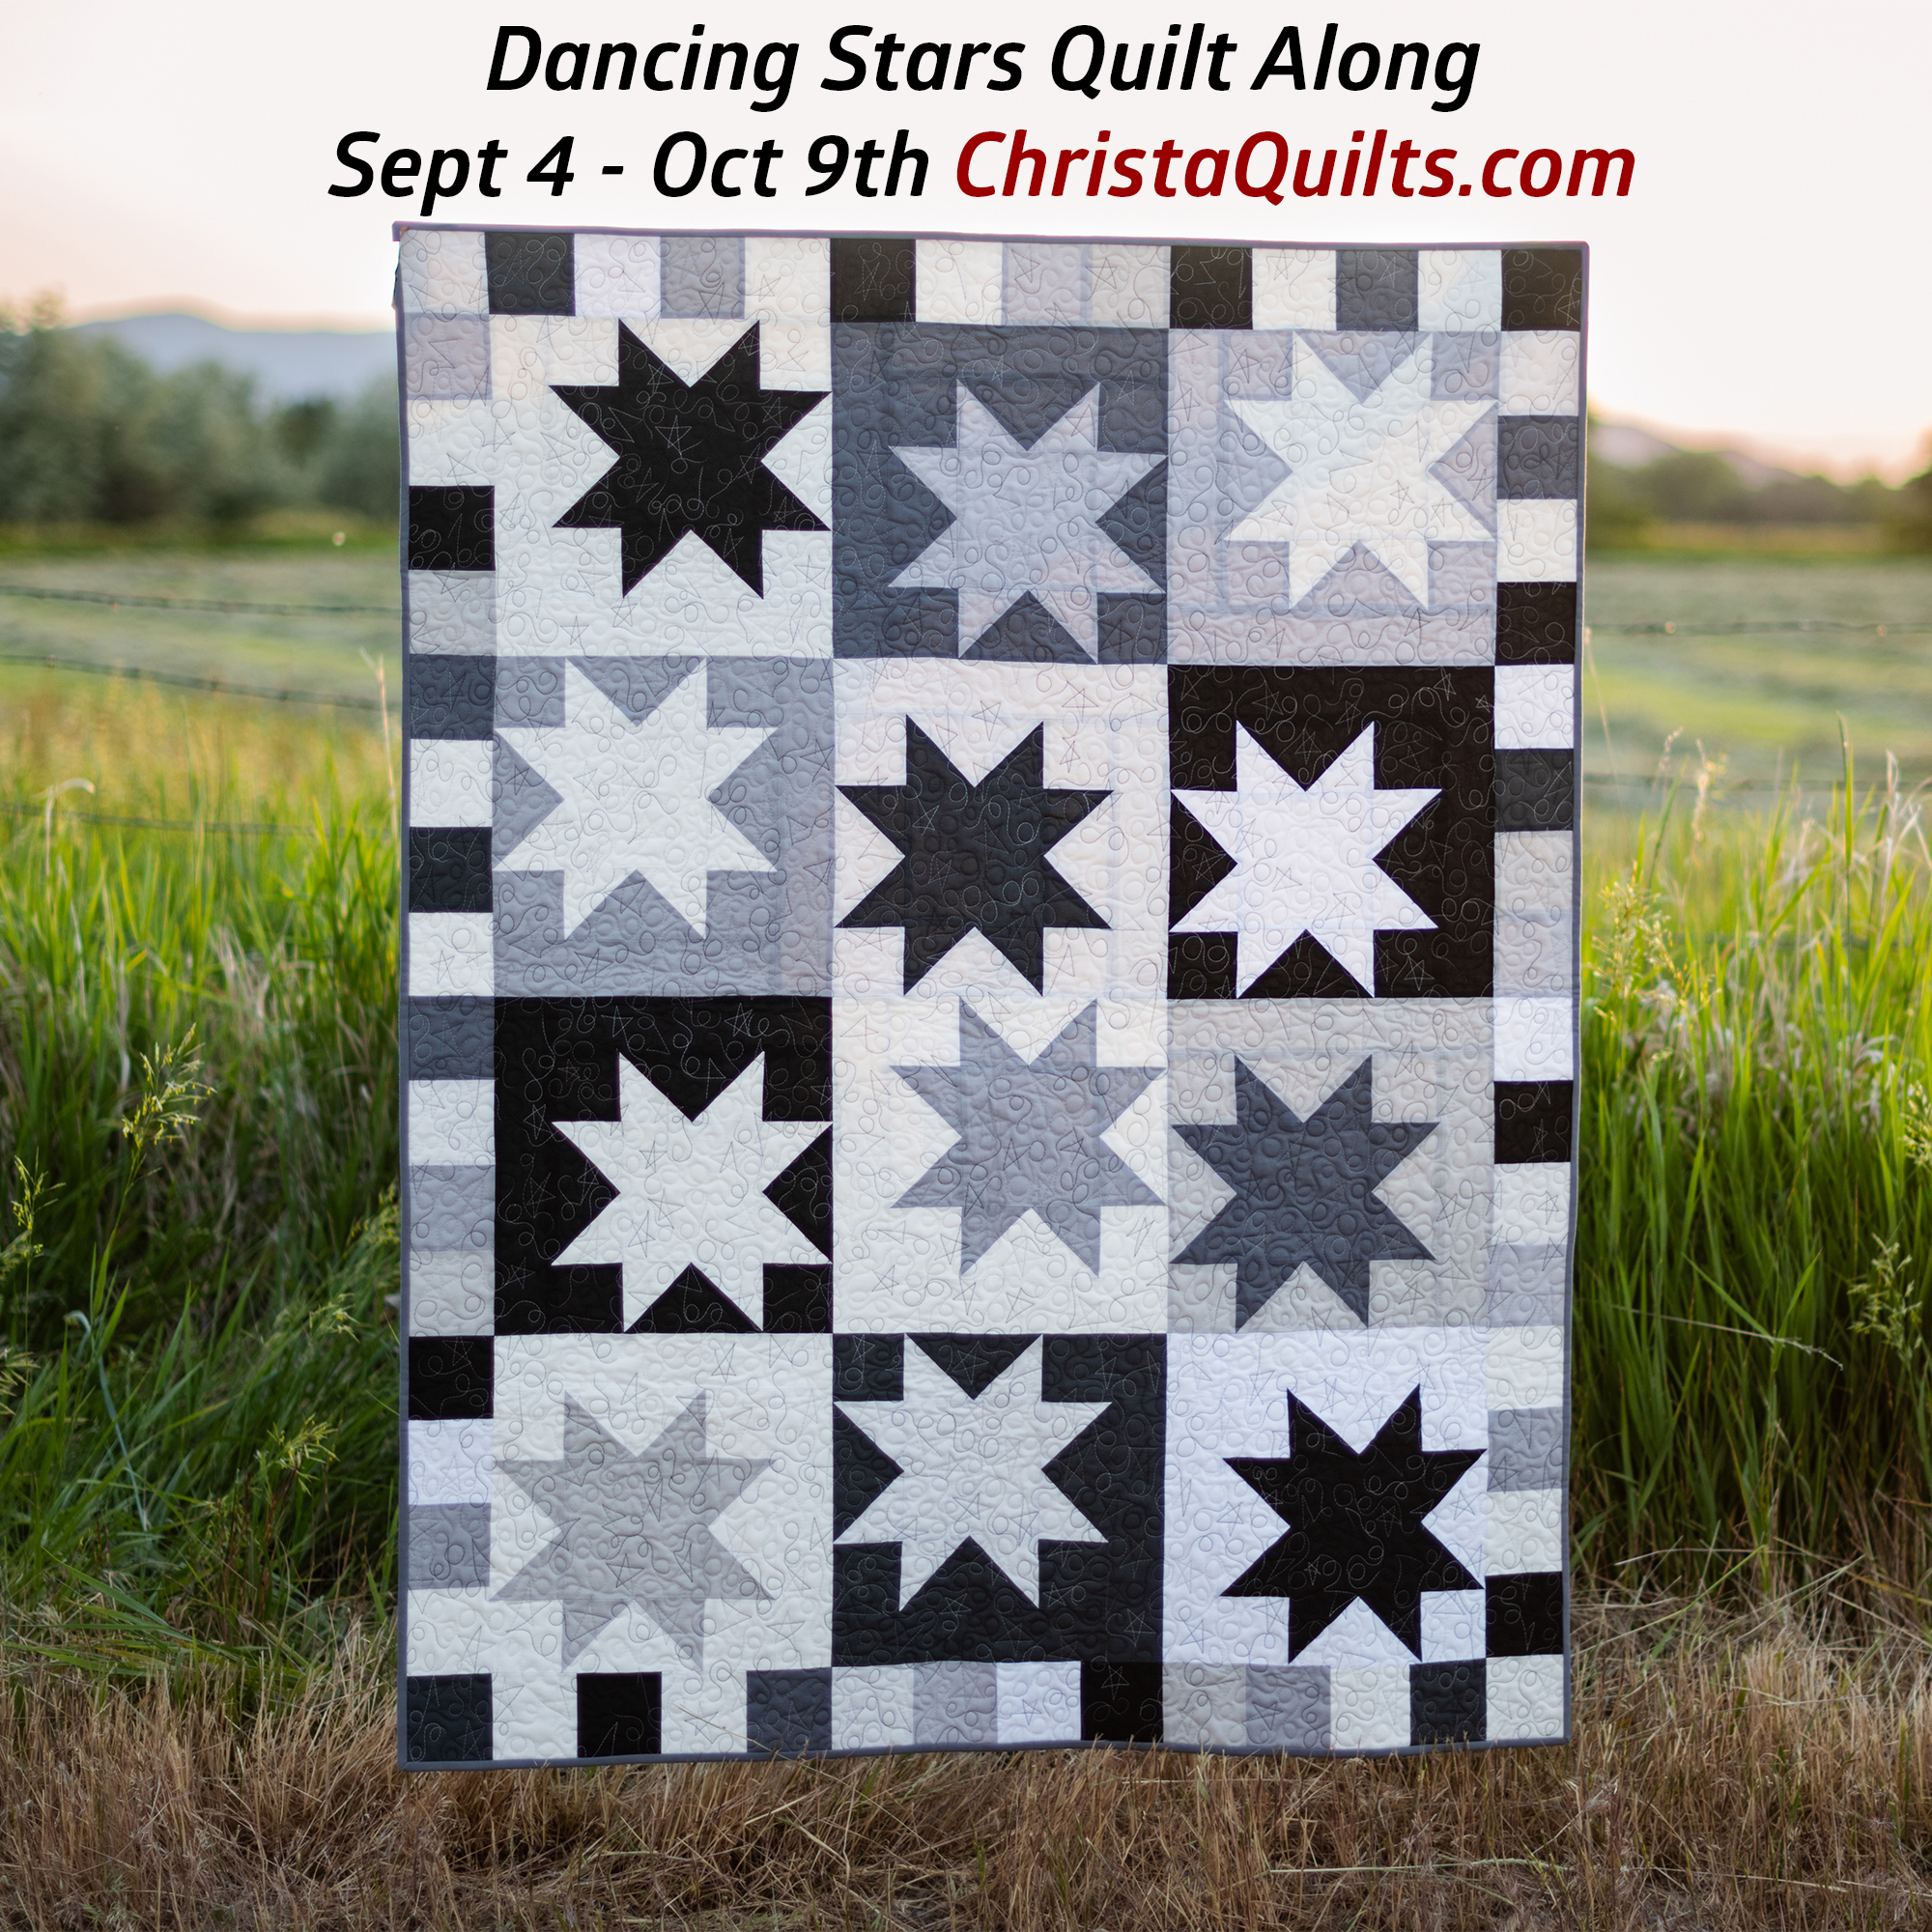
It’s quilt along season and I’m excited to share one of my newest patterns with you! This fall beginning in September we’re going to make my Dancing Stars quilt. This is a fat quarter friendly design that’s easy to customize and make it your own!
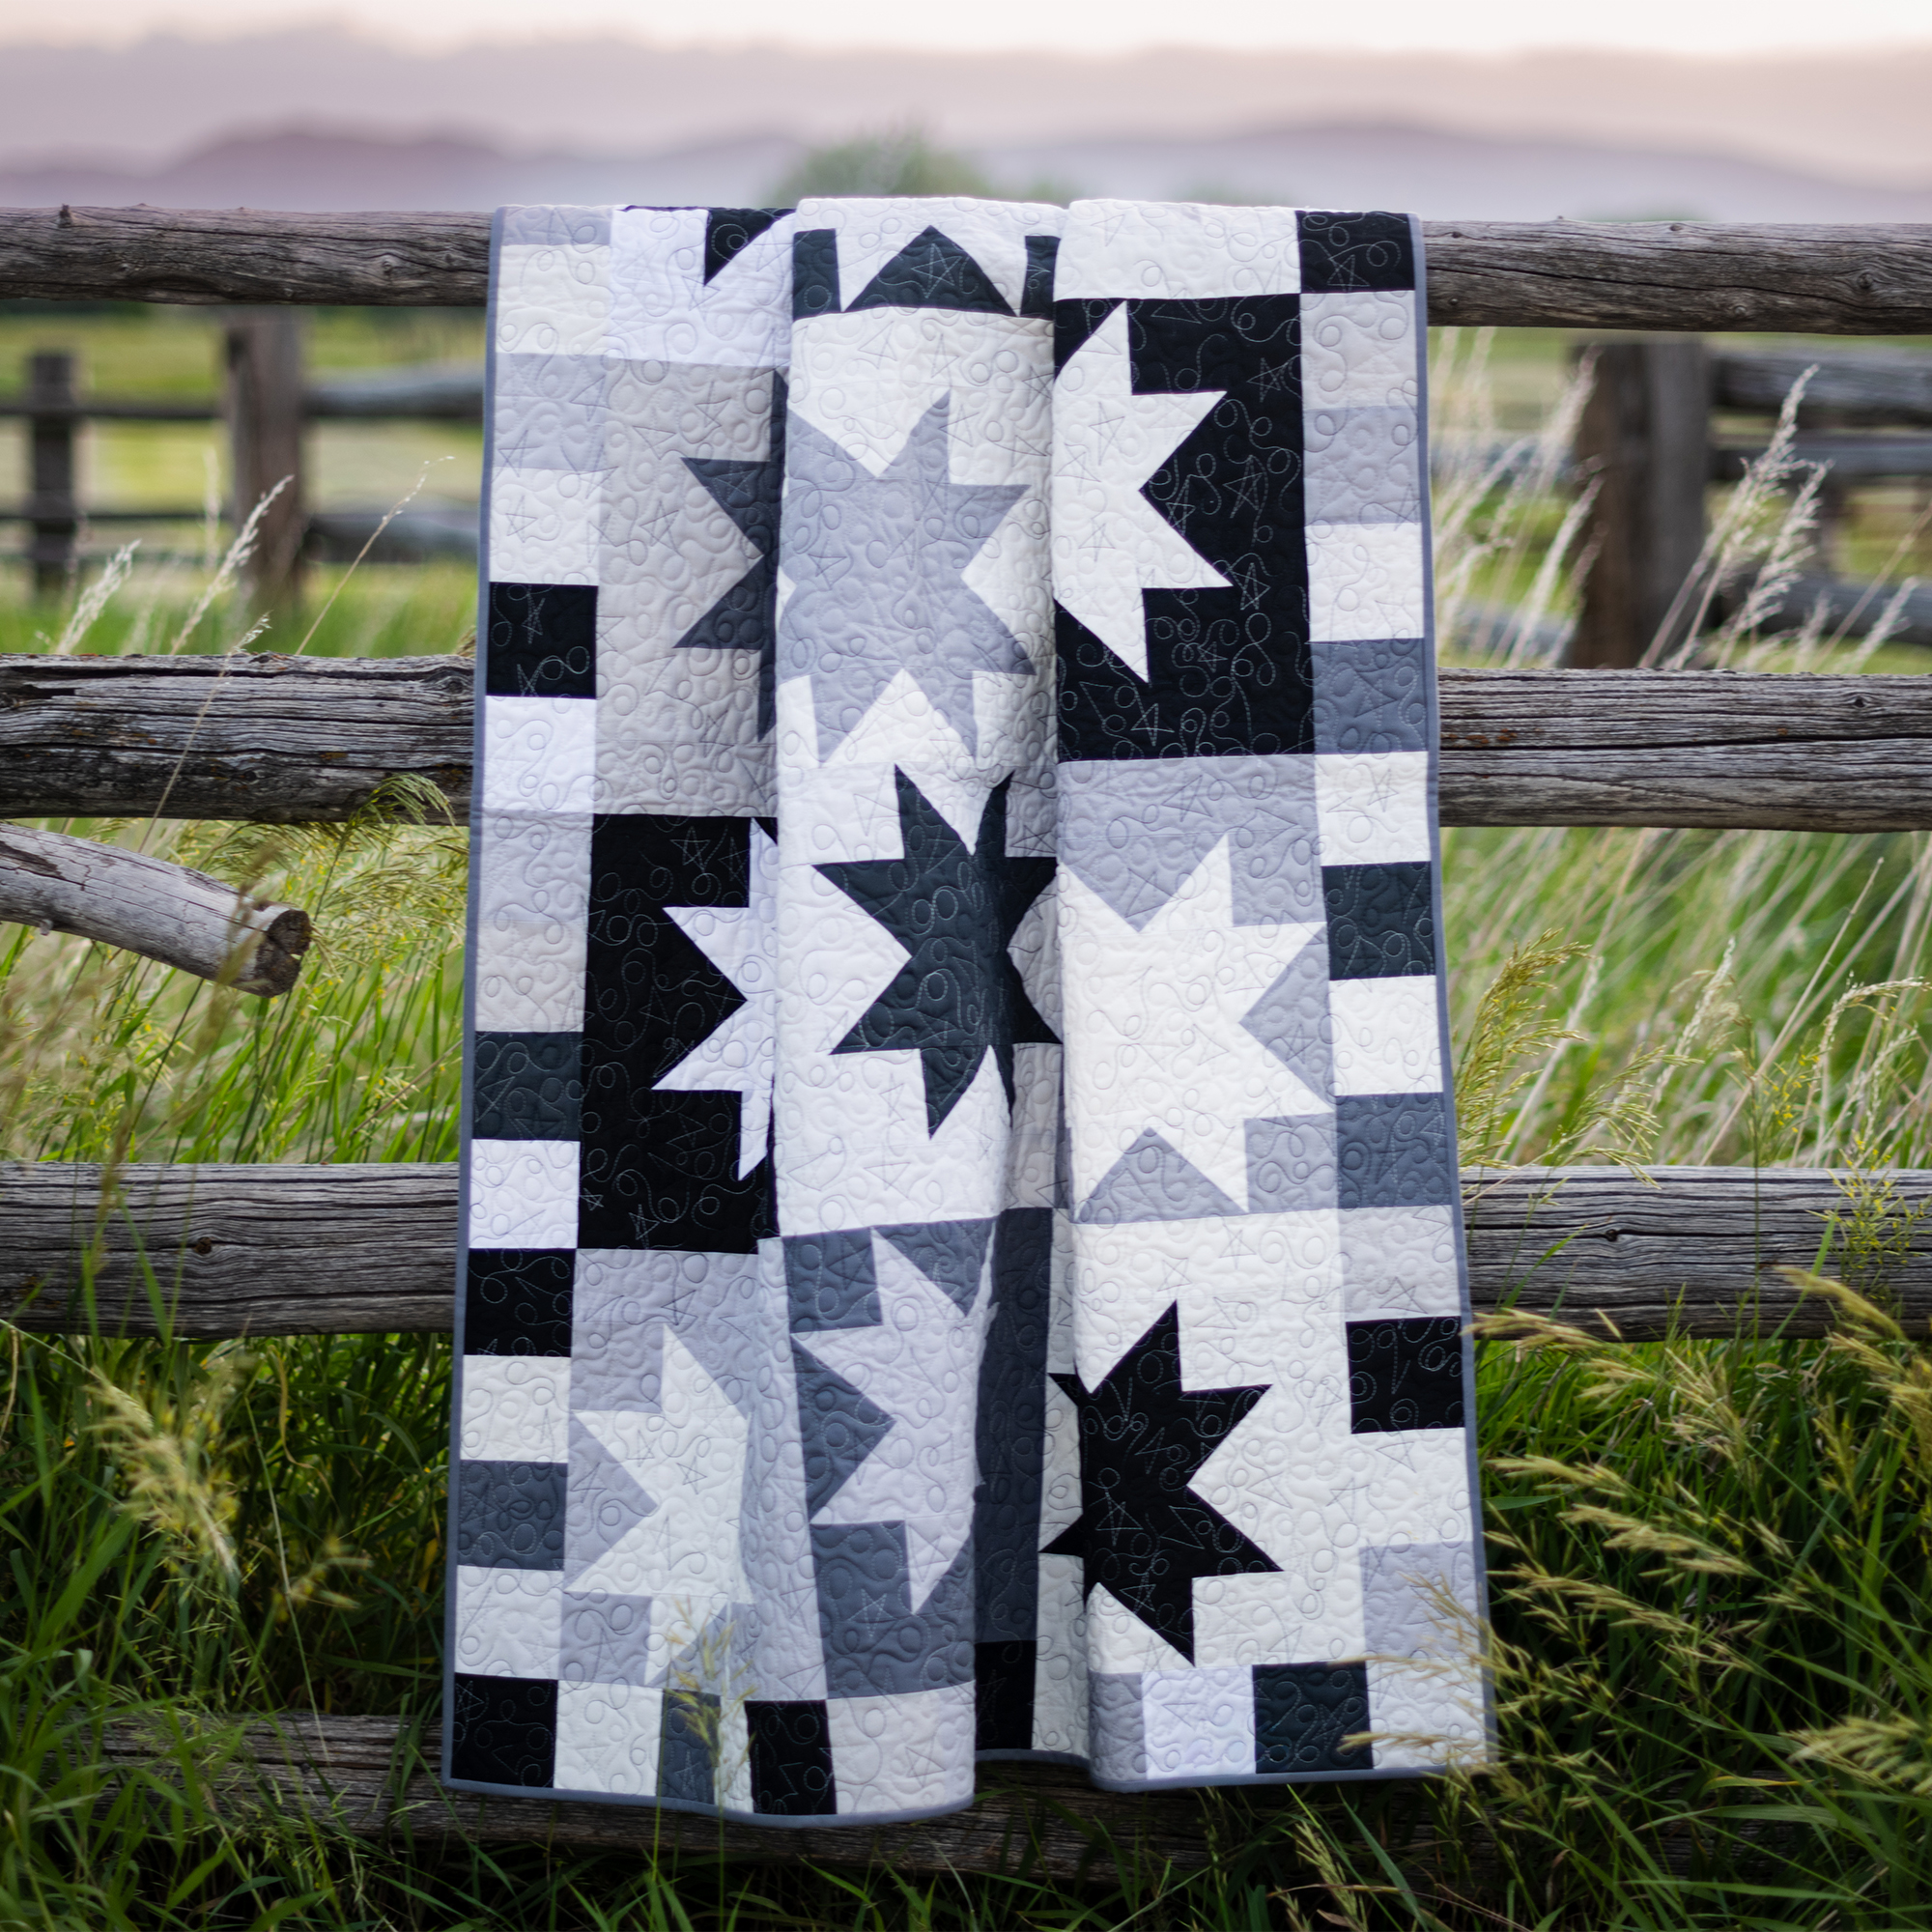
In additional to including three size options and colorways in the pattern above, I’ve already made two versions of this eye catching quilt. The first one was made from black, white and grey Confetti Cotton Solids shown below.
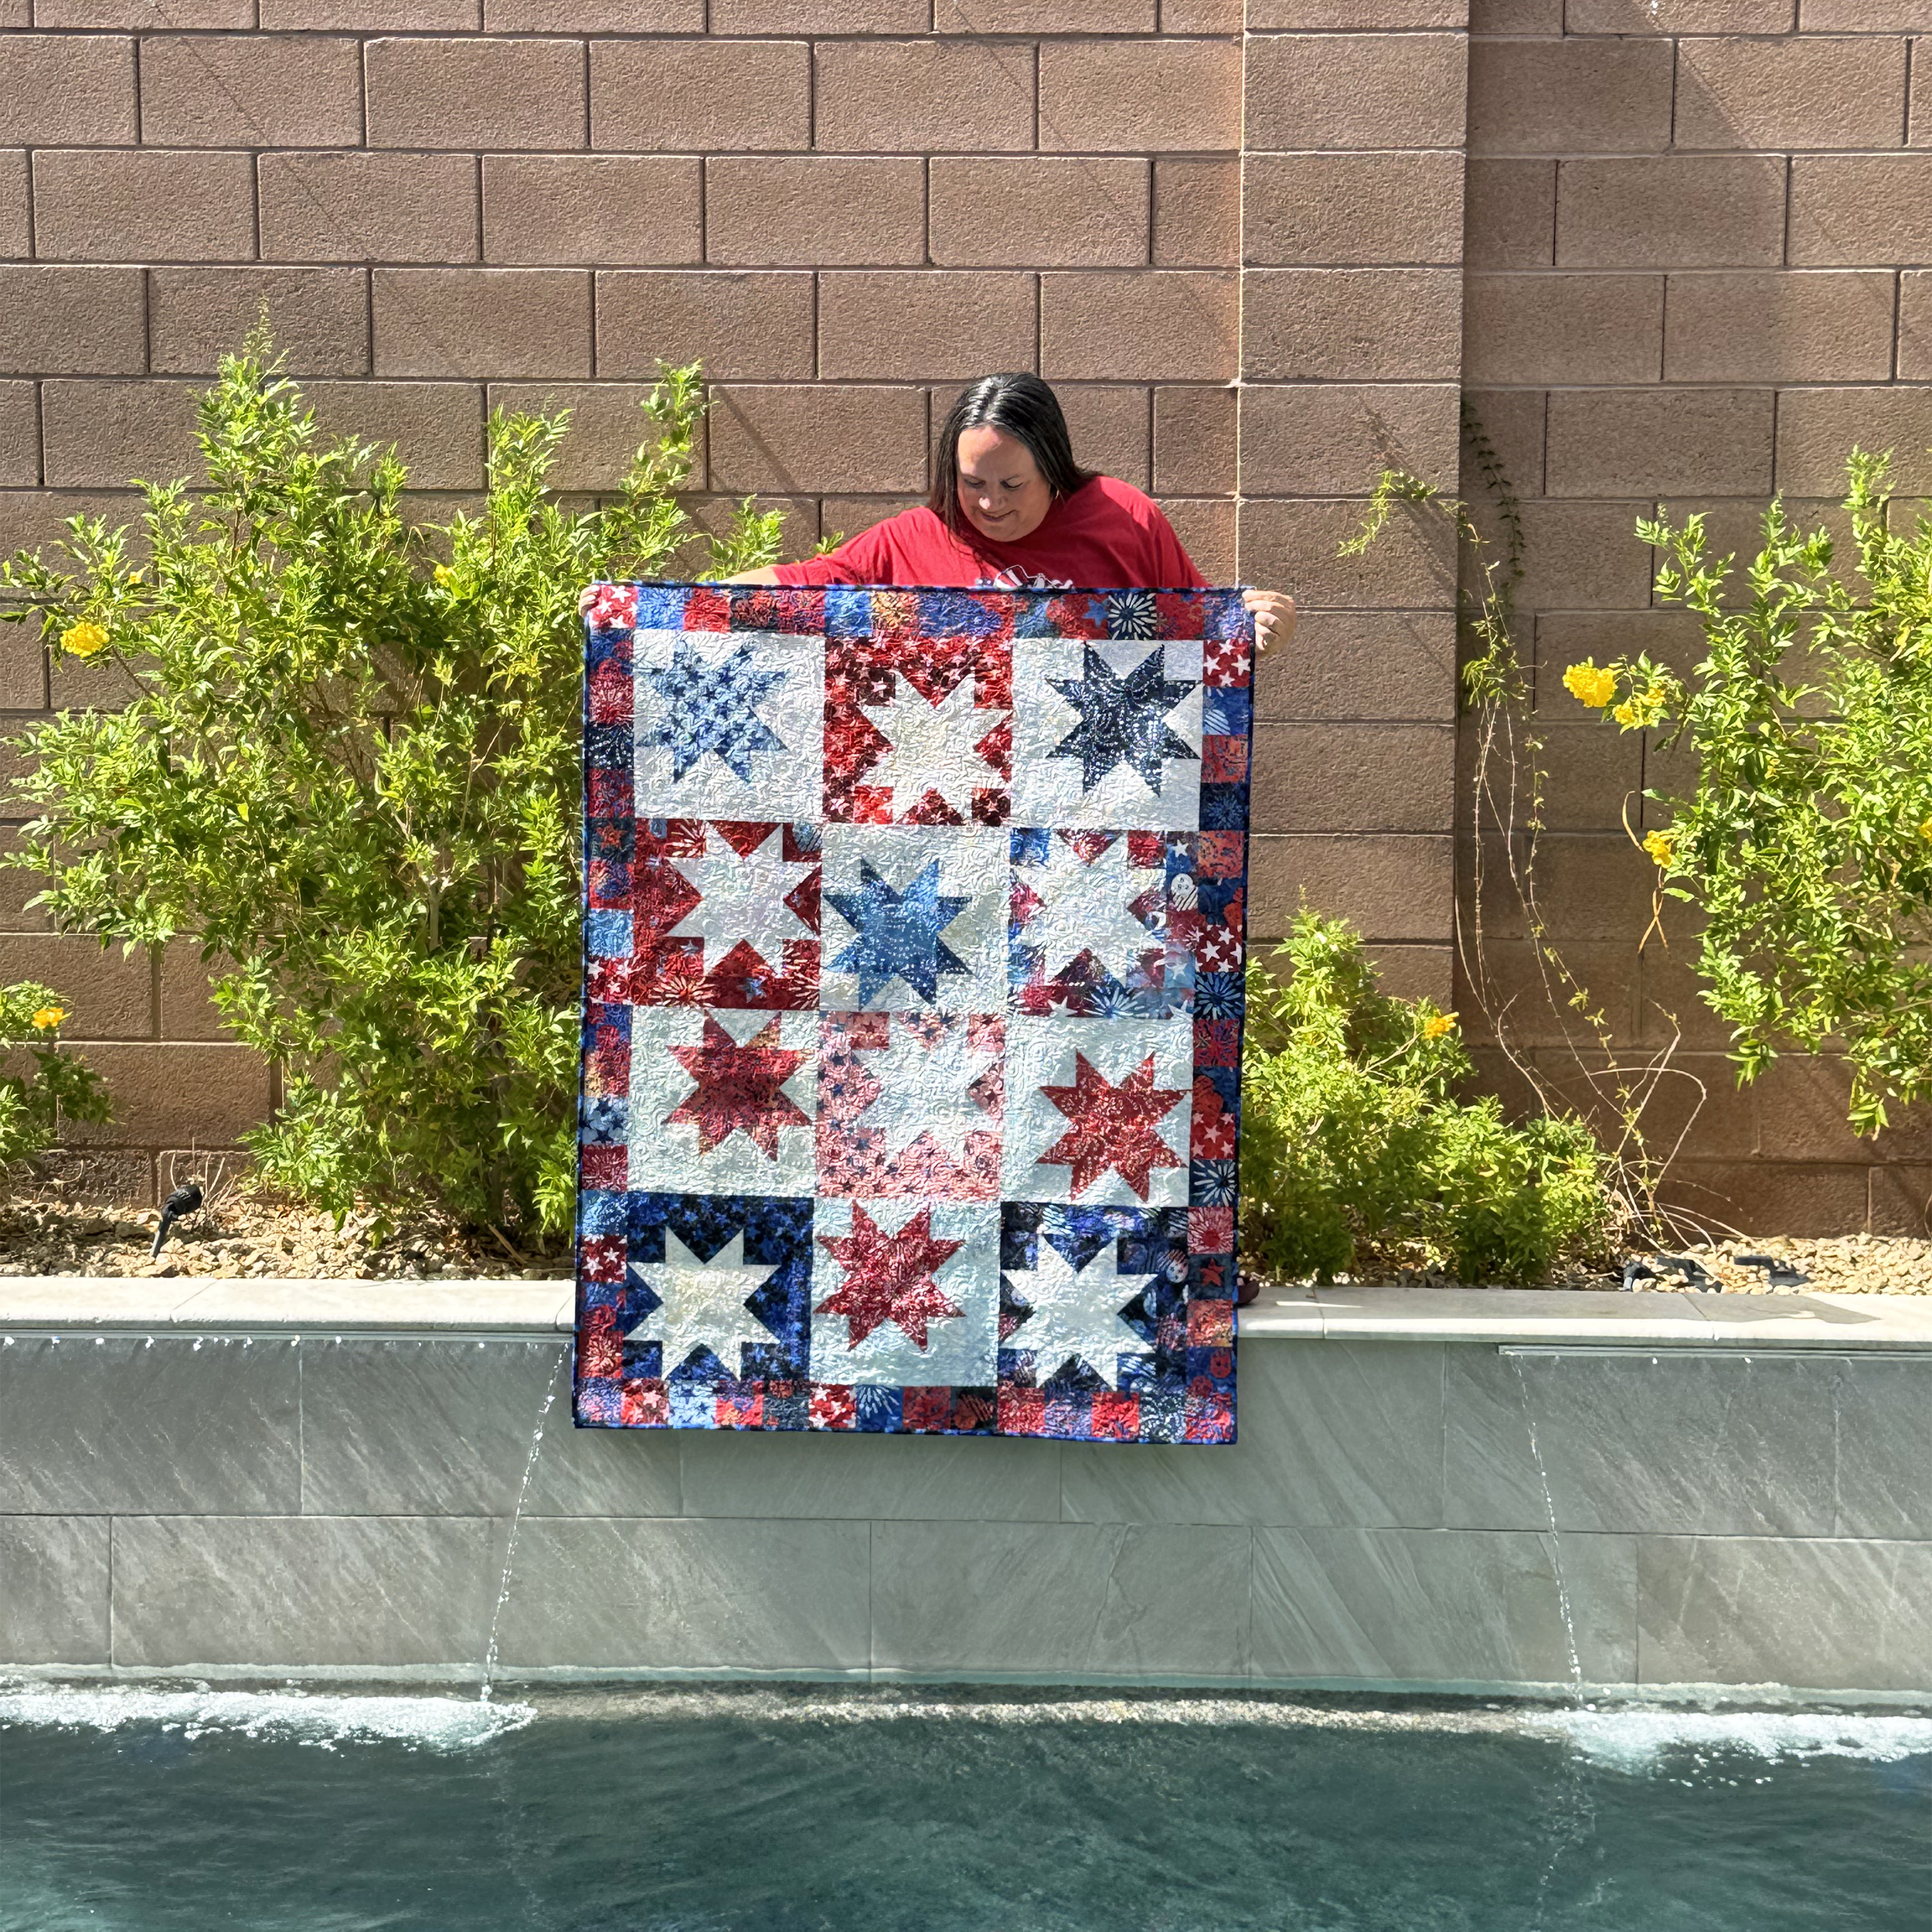
Then just for fun, I whipped up a patriotic version made from batik scraps, shown below.
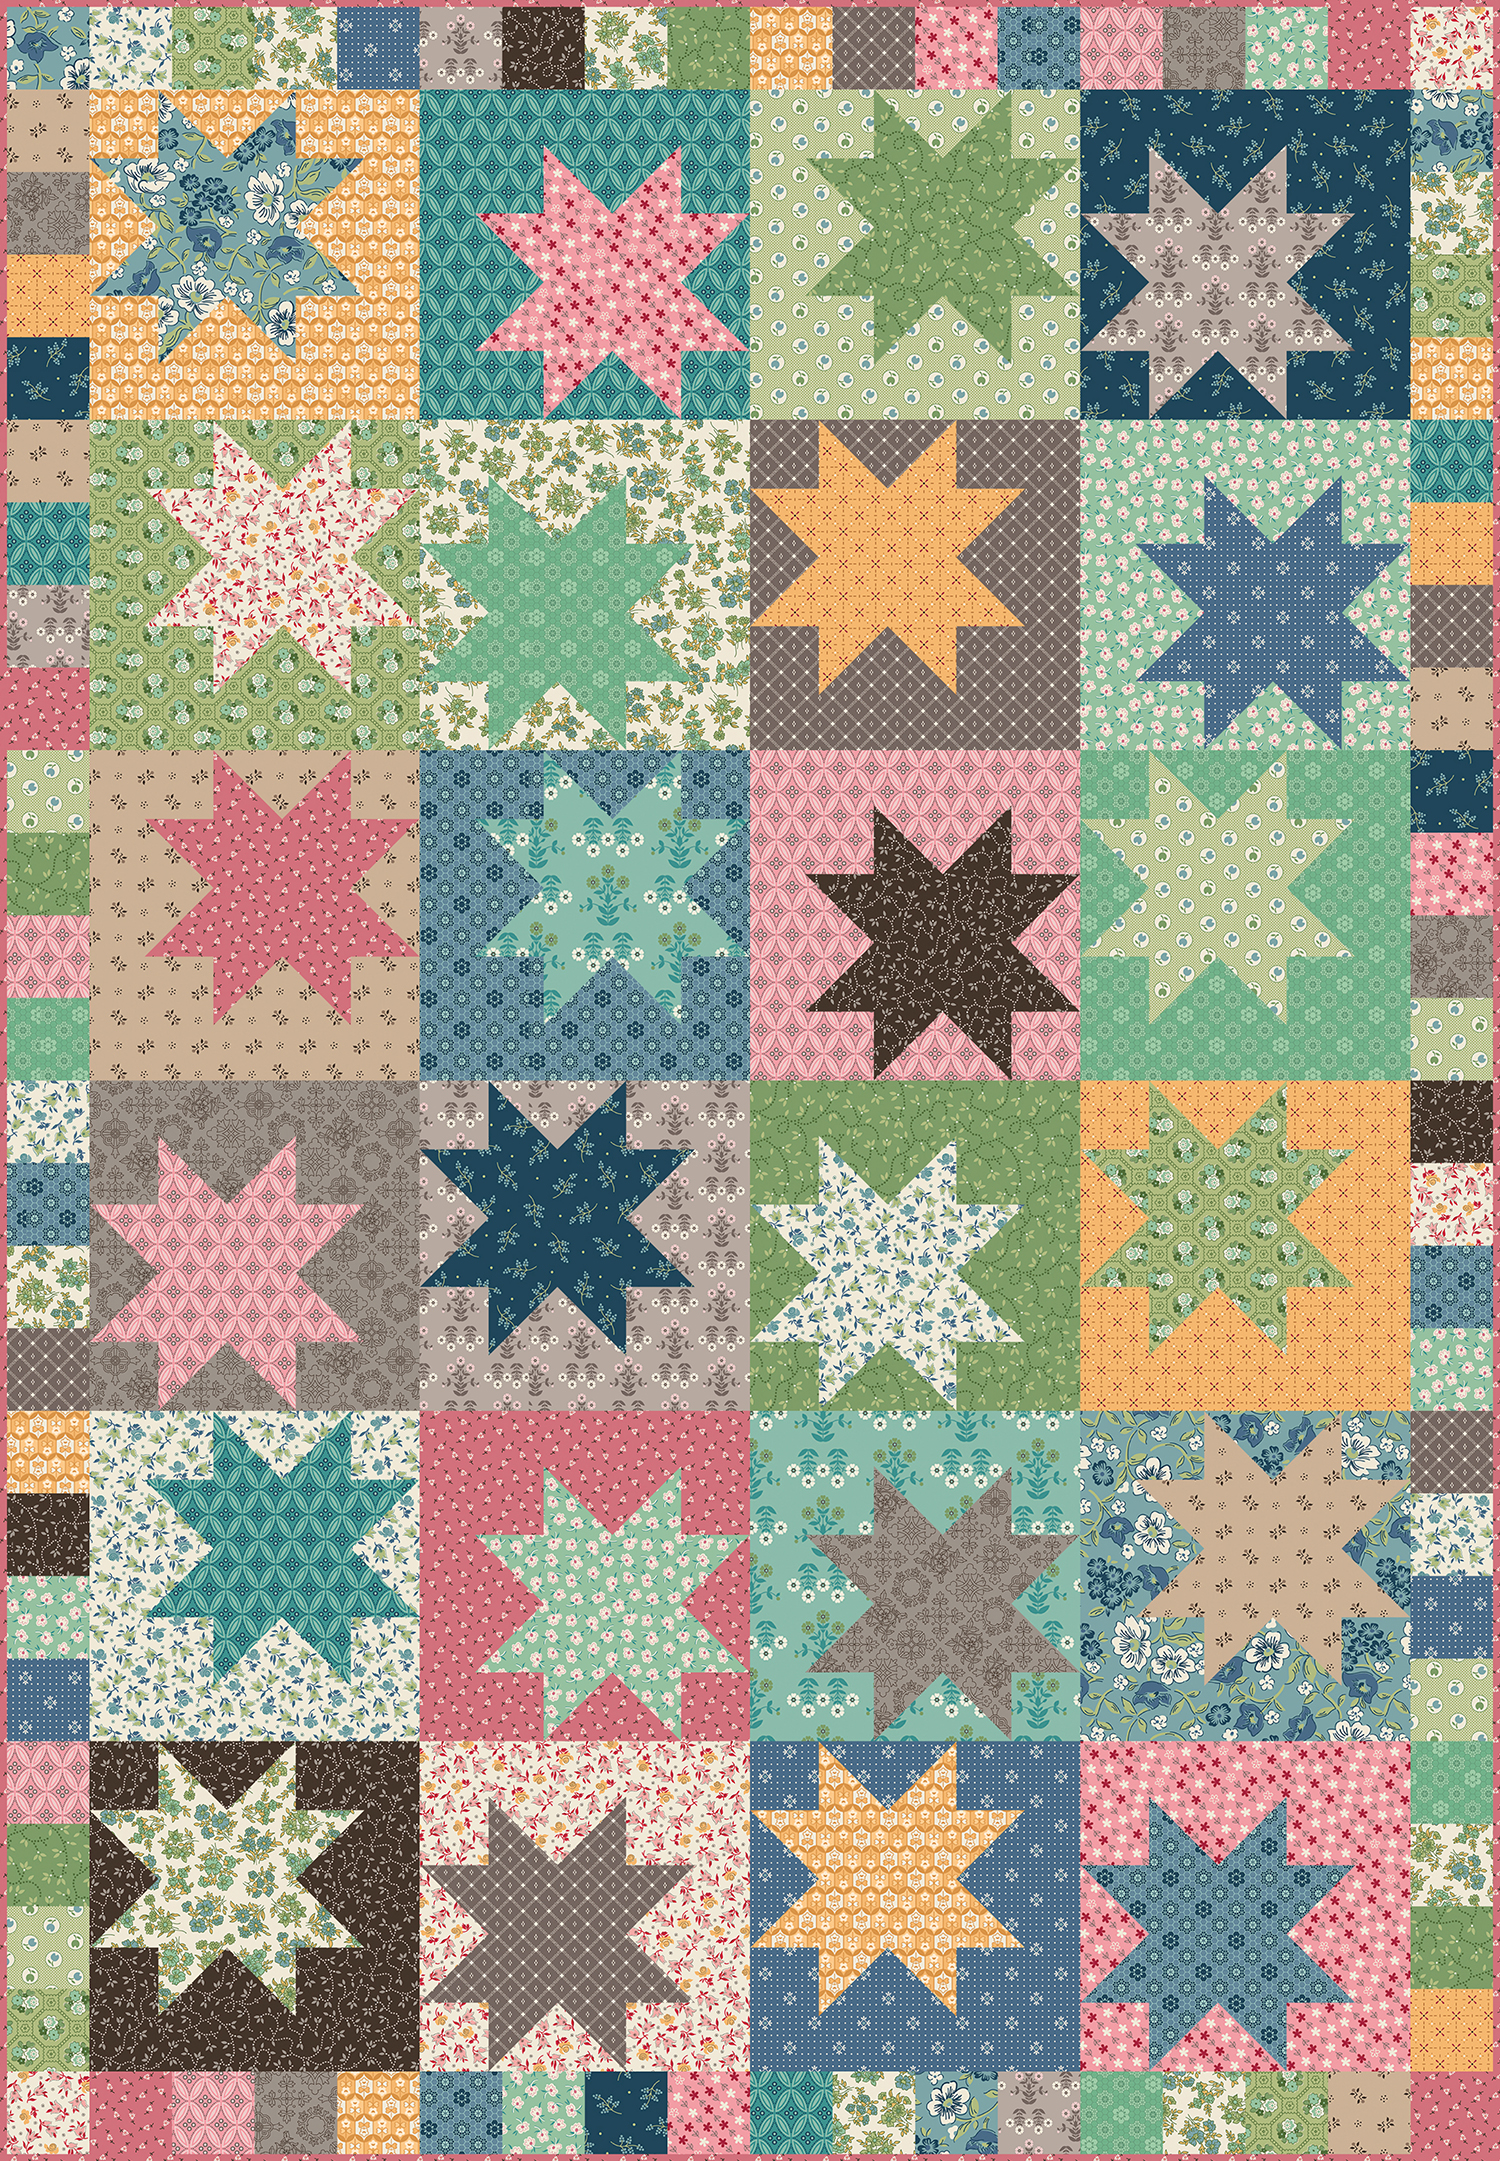
Then by request, I digitally recolored another version using Lori Holt Family Reunion from Riley Blake Designs. Isn’t it cute??
To join, you just need to purchase a copy of the Dancing Stars Quilt pattern in print or PDF and you’ll be all set. I’ll include weekly updates here on the blog, including a bonus machine quilting video showing how I quilted both versions shown above.
We are nearly to my favorite part of any quilt – the machine quilting! But first we need to prep our quilts by making sure the backing is big enough, and then basting. I love making pieced backs from leftovers or other coordinating fabrics because that makes the quilt twice as nice!!
Because I had too many pictures of this process to share, I thought it would be much easier to put them all together into a super short video and talk over the process. You can watch that by clicking play below:
Once the quilt is basted, you are ready to quilt. Just remember, all of these quilt along posts will stay up indefinitely so you can make your quilt any time you wish. I’m here to help you every step of the way!
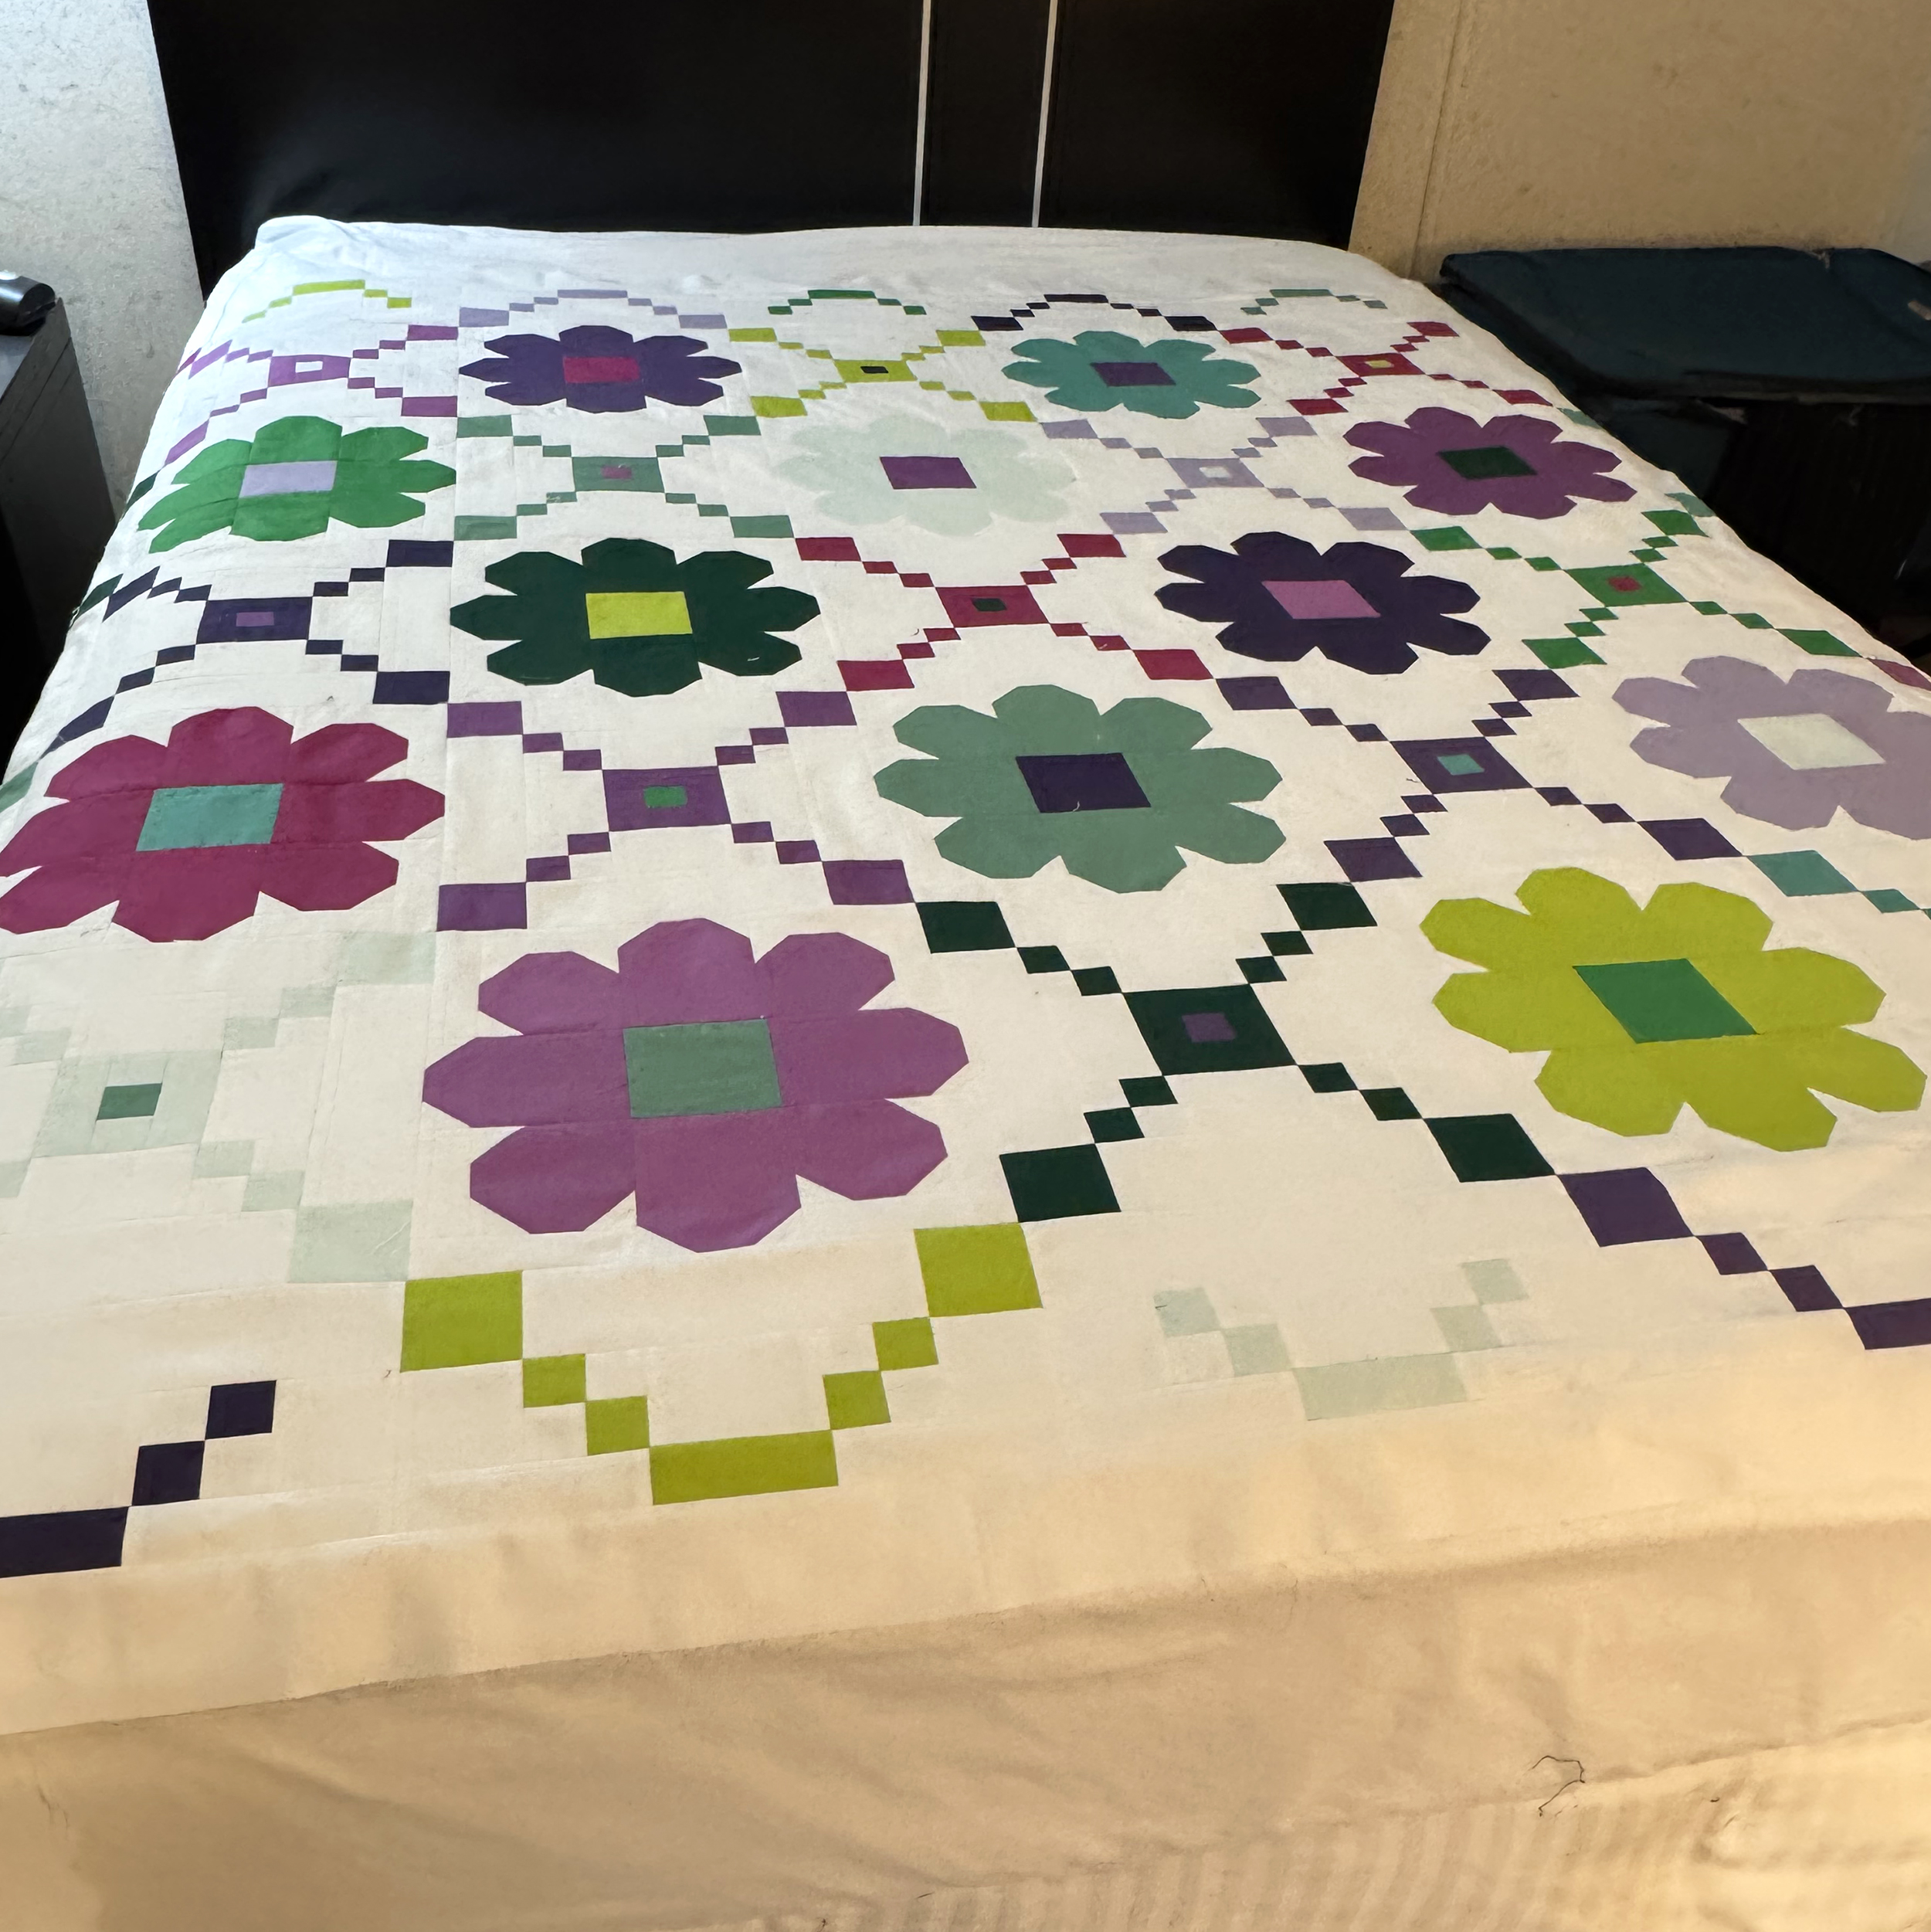
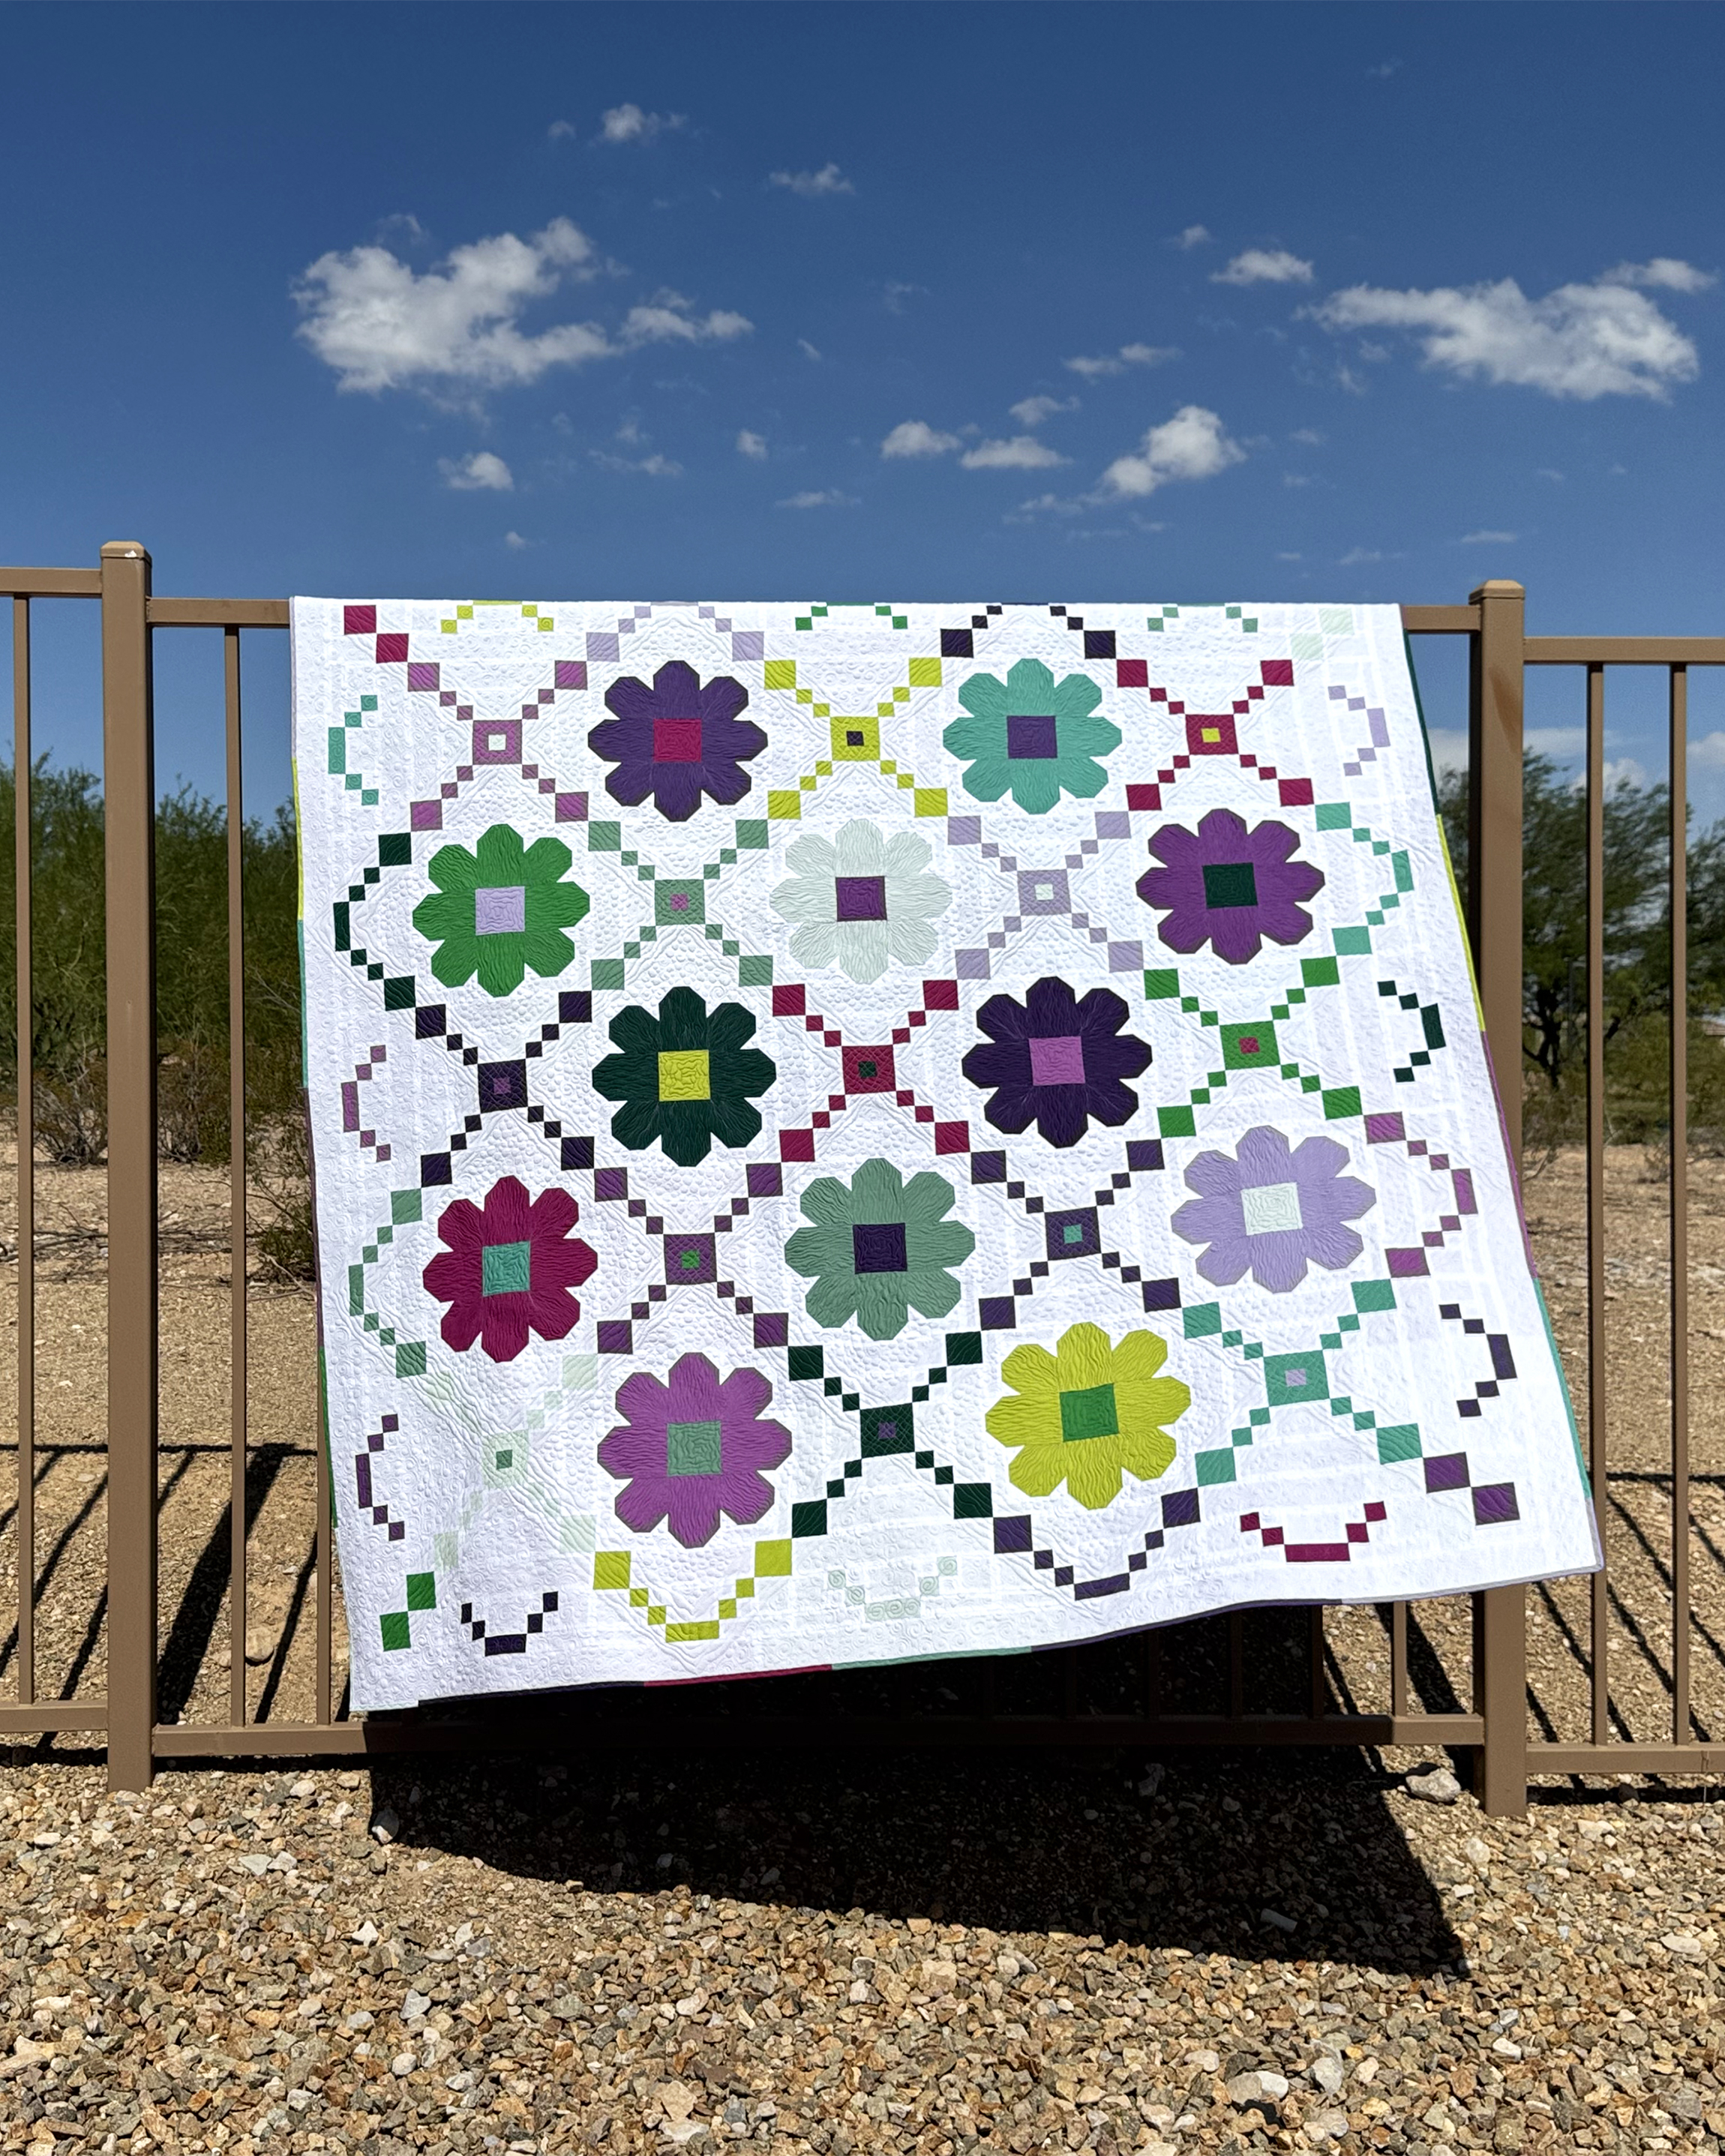
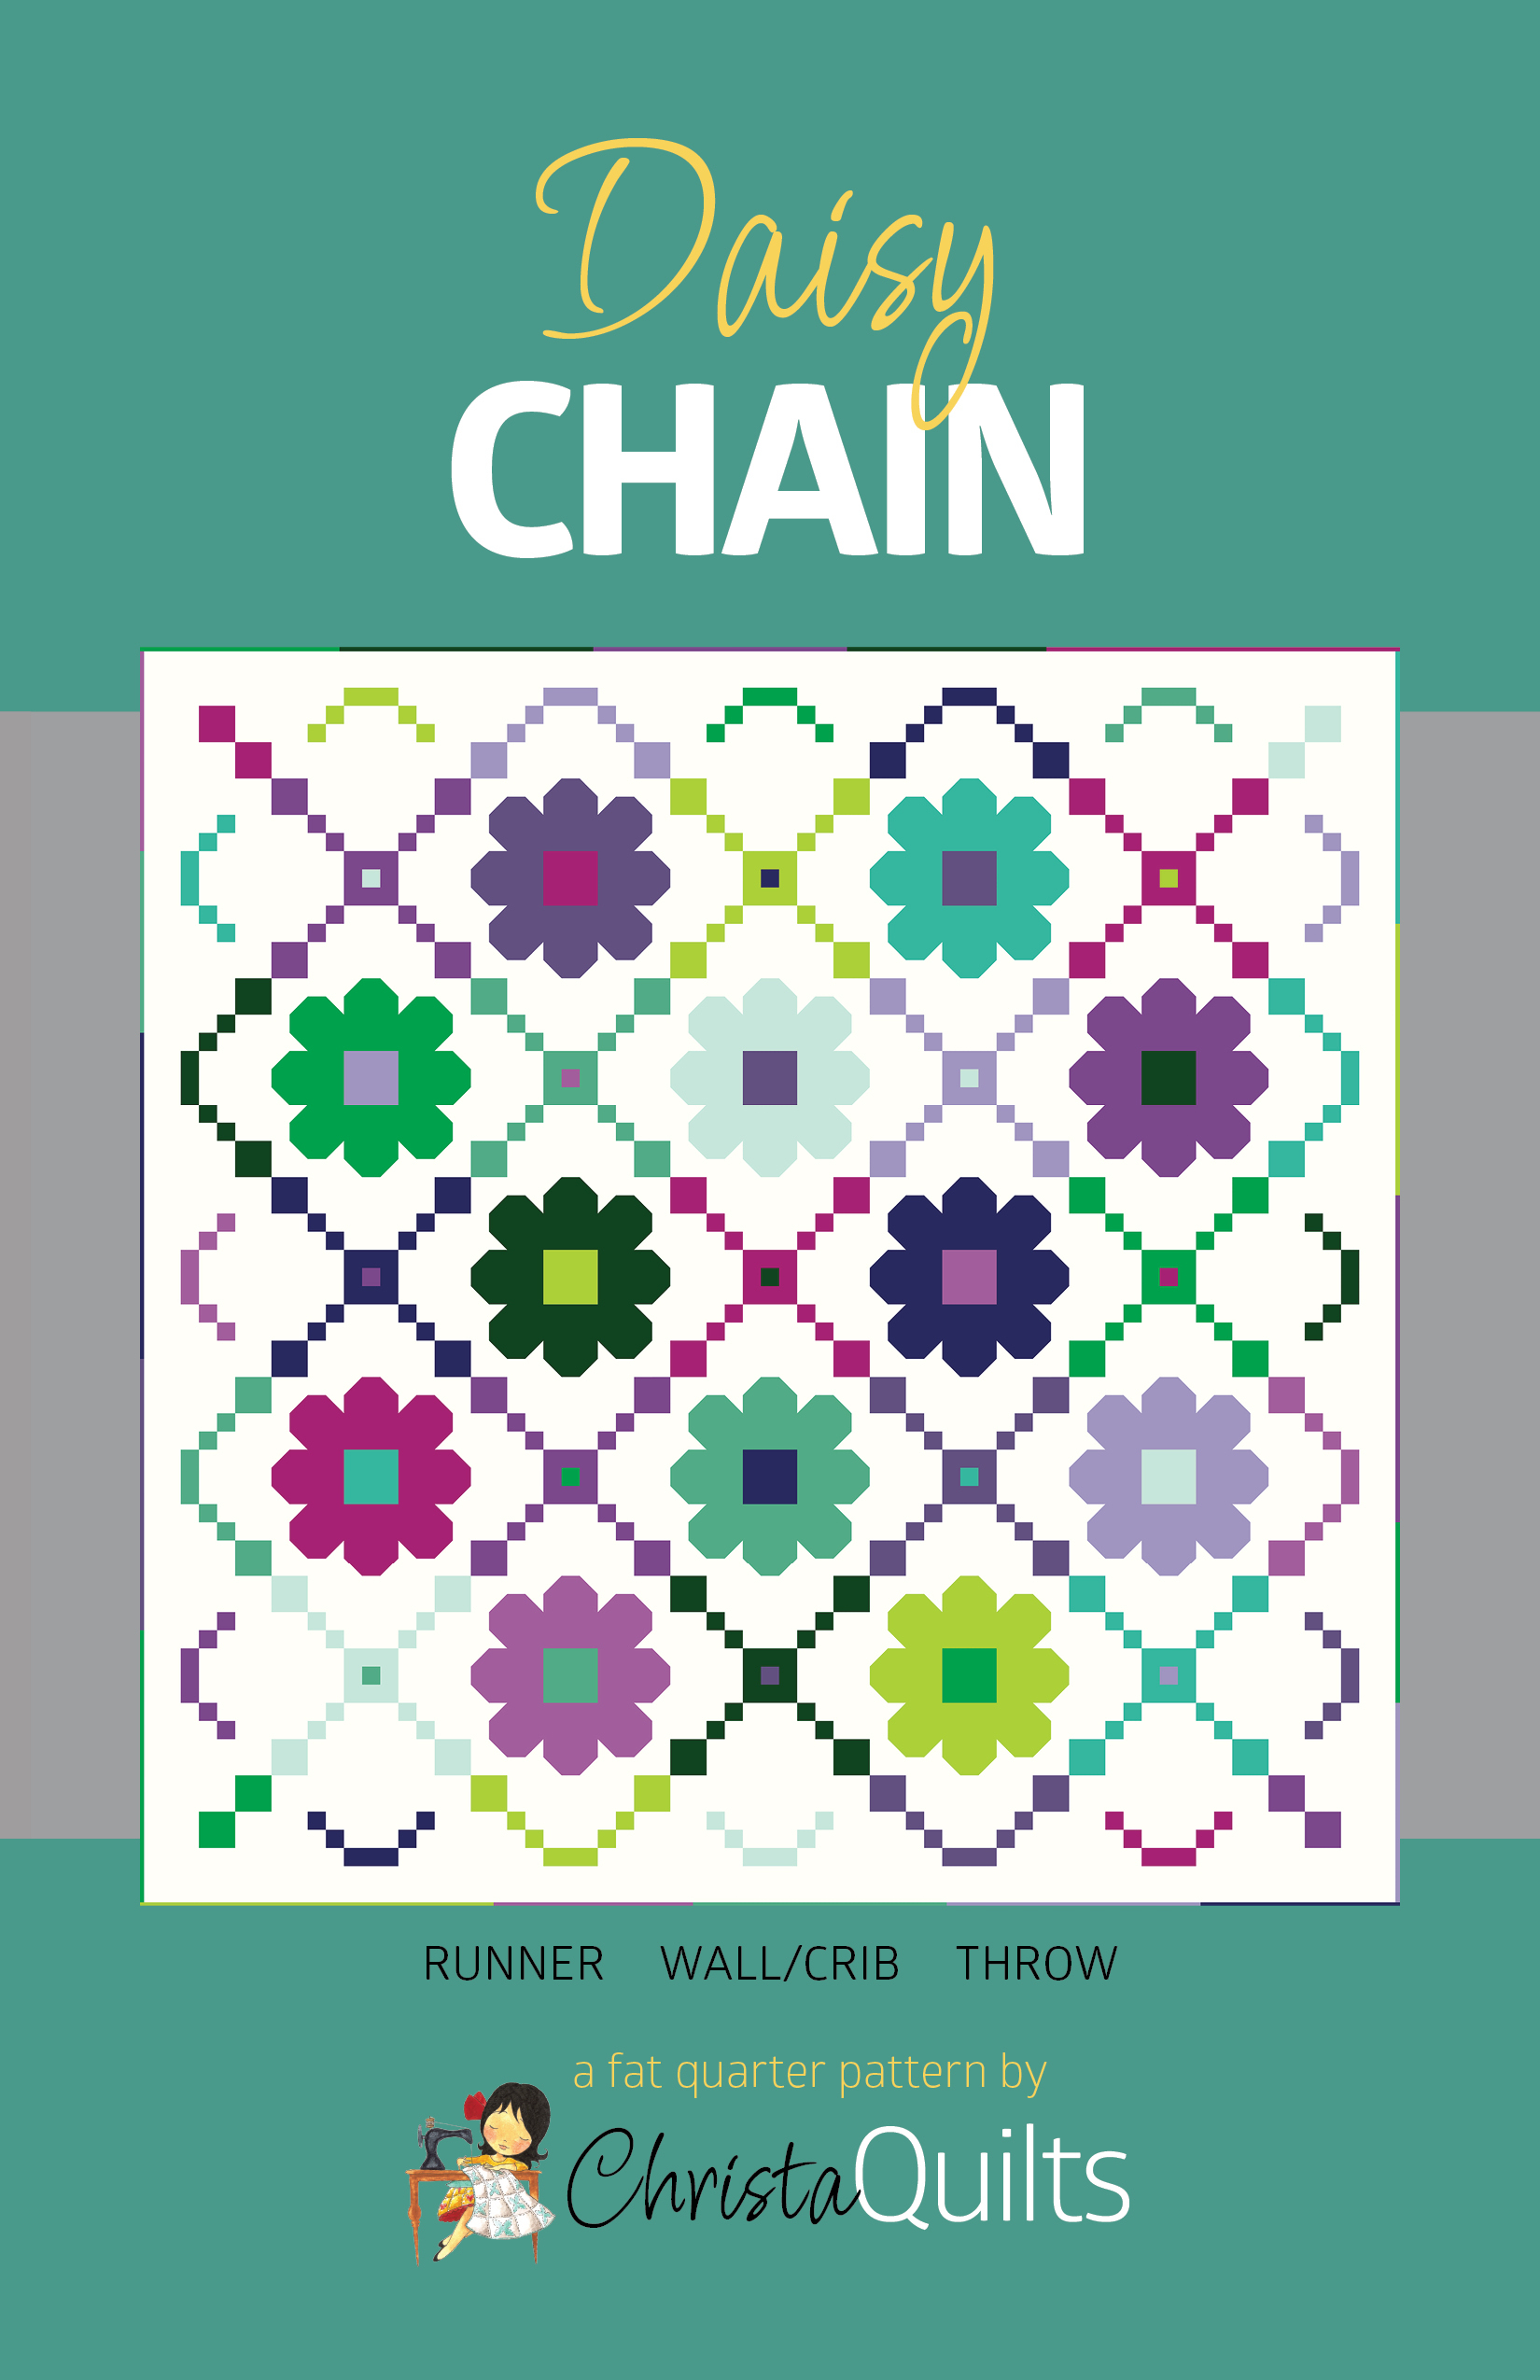
How are your Daisy Chain blocks coming along? If you are just starting, be sure to grab a copy of the Daisy Chain quilt pattern and join the fun. We are currently working through pages 12-13 of the pattern. But the tips I’m sharing below can apply to any quilt in your UFO pile!!
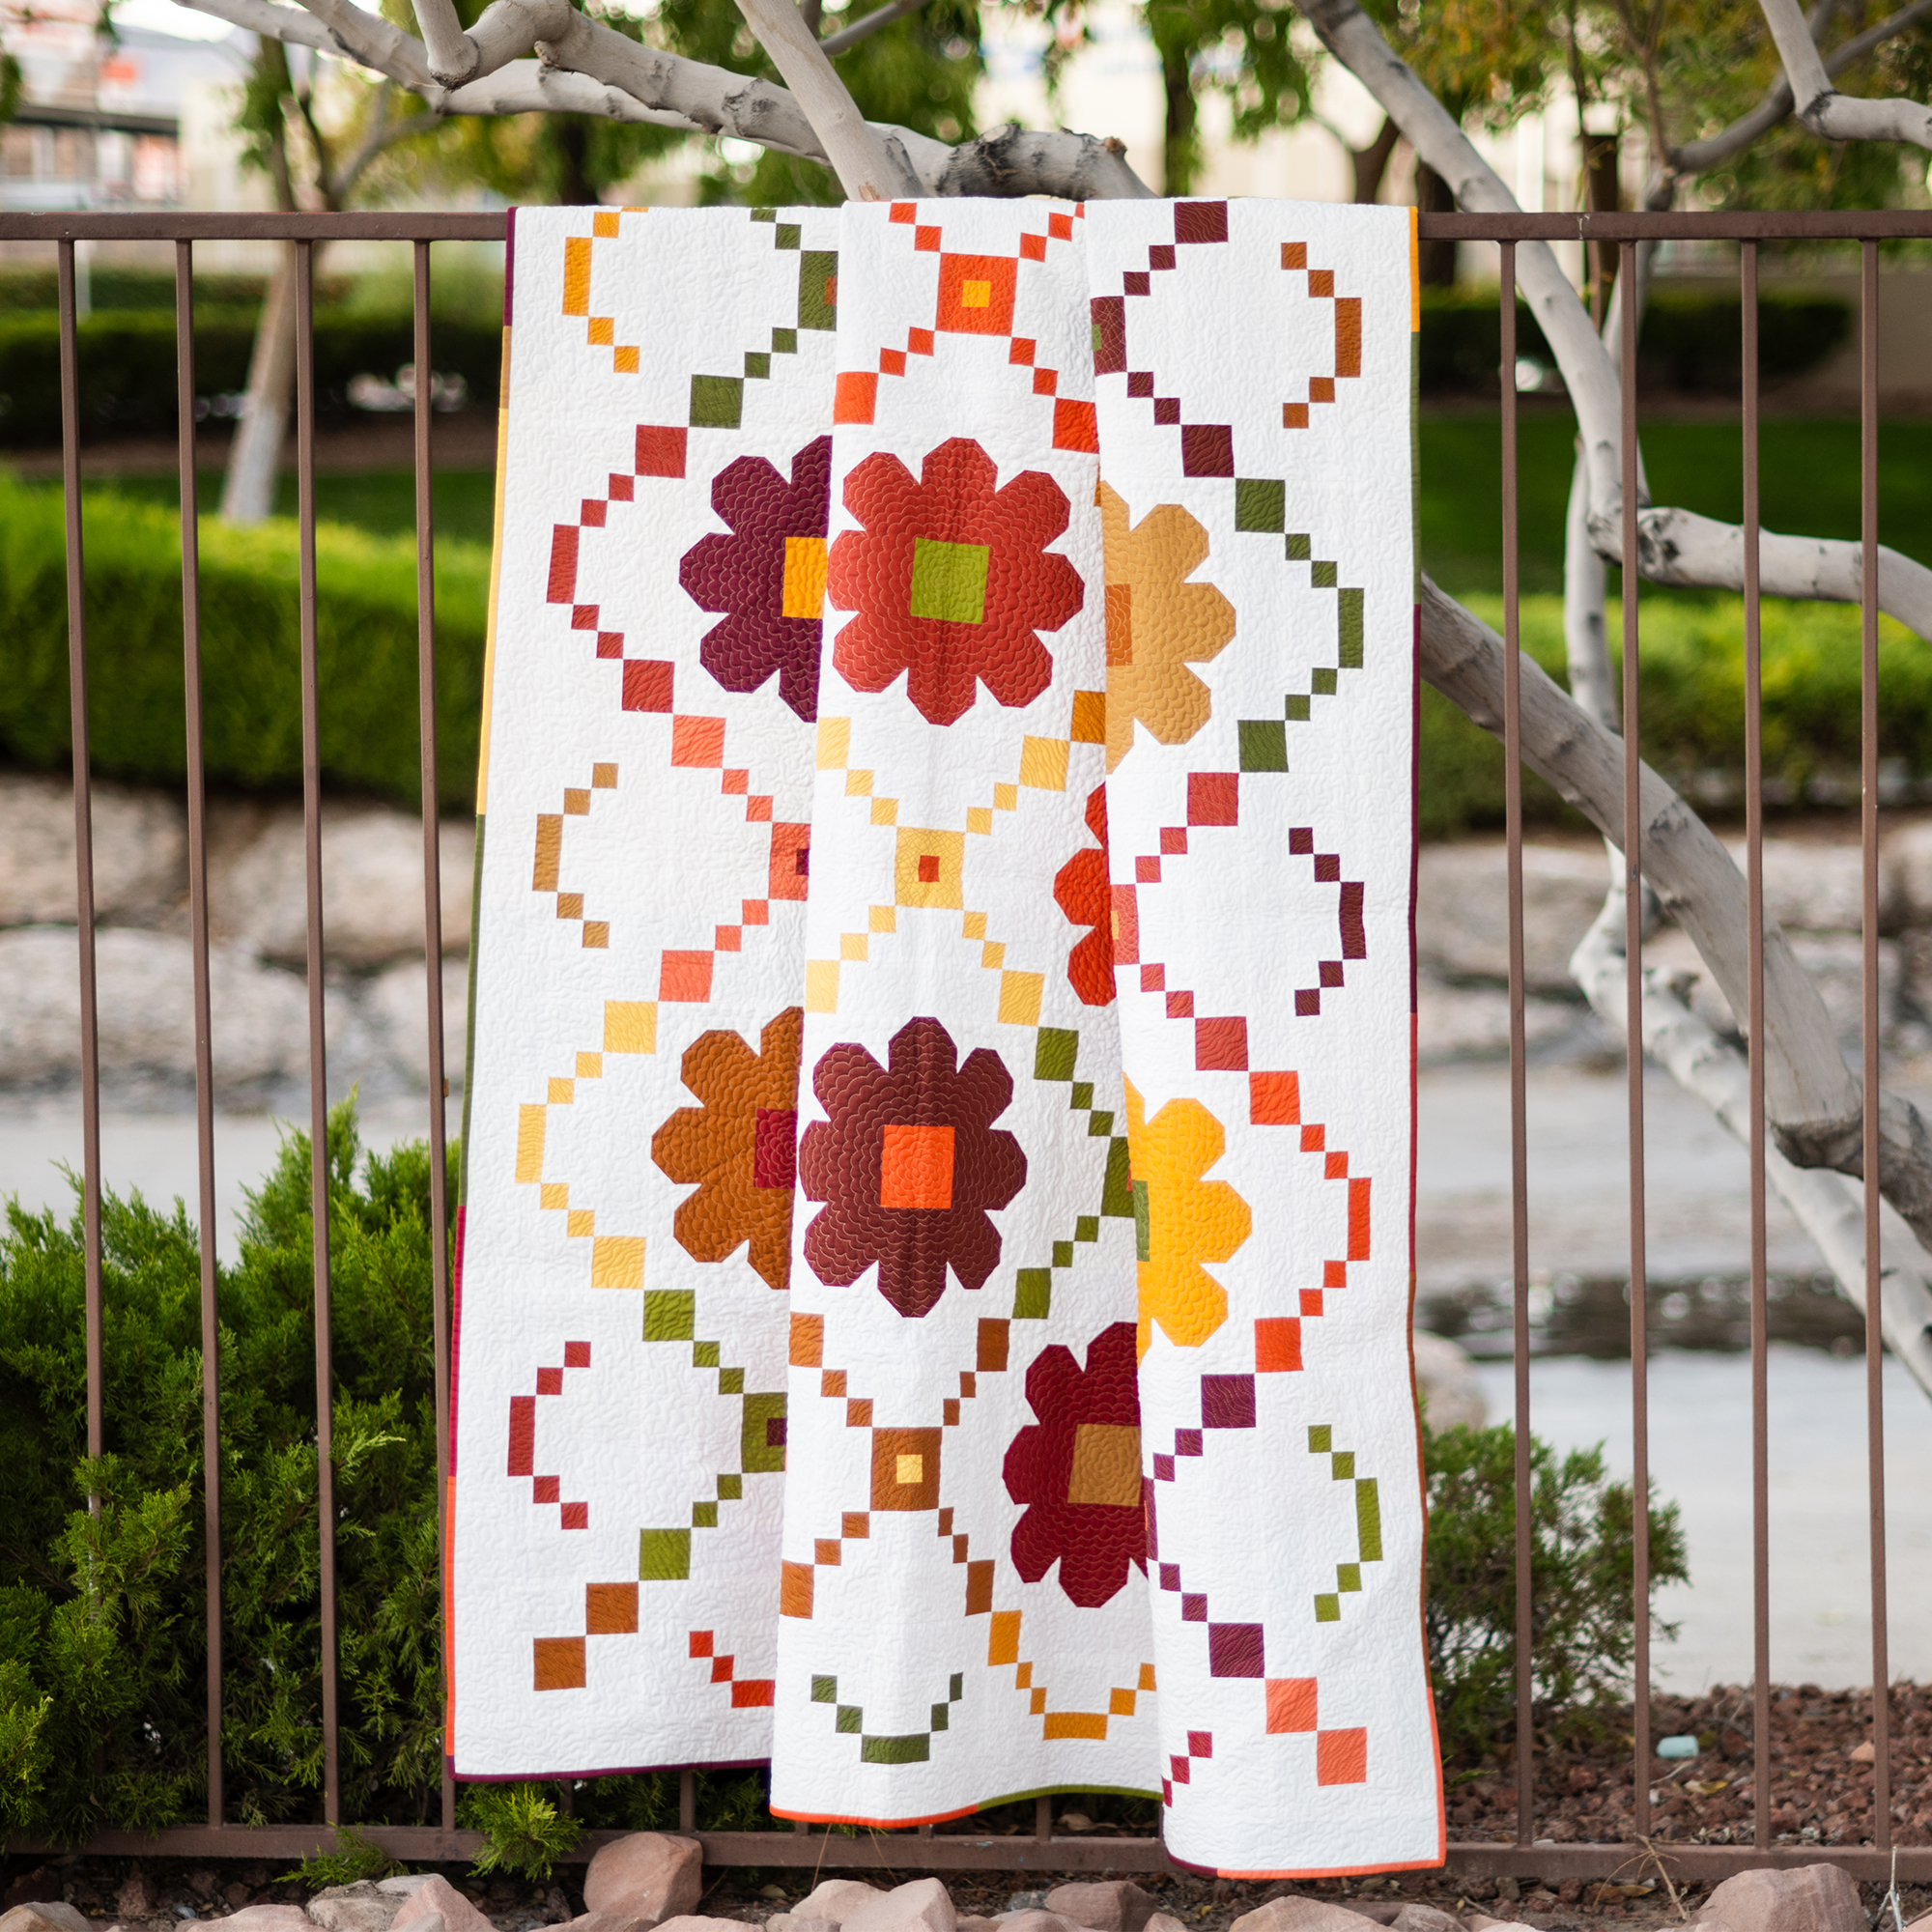
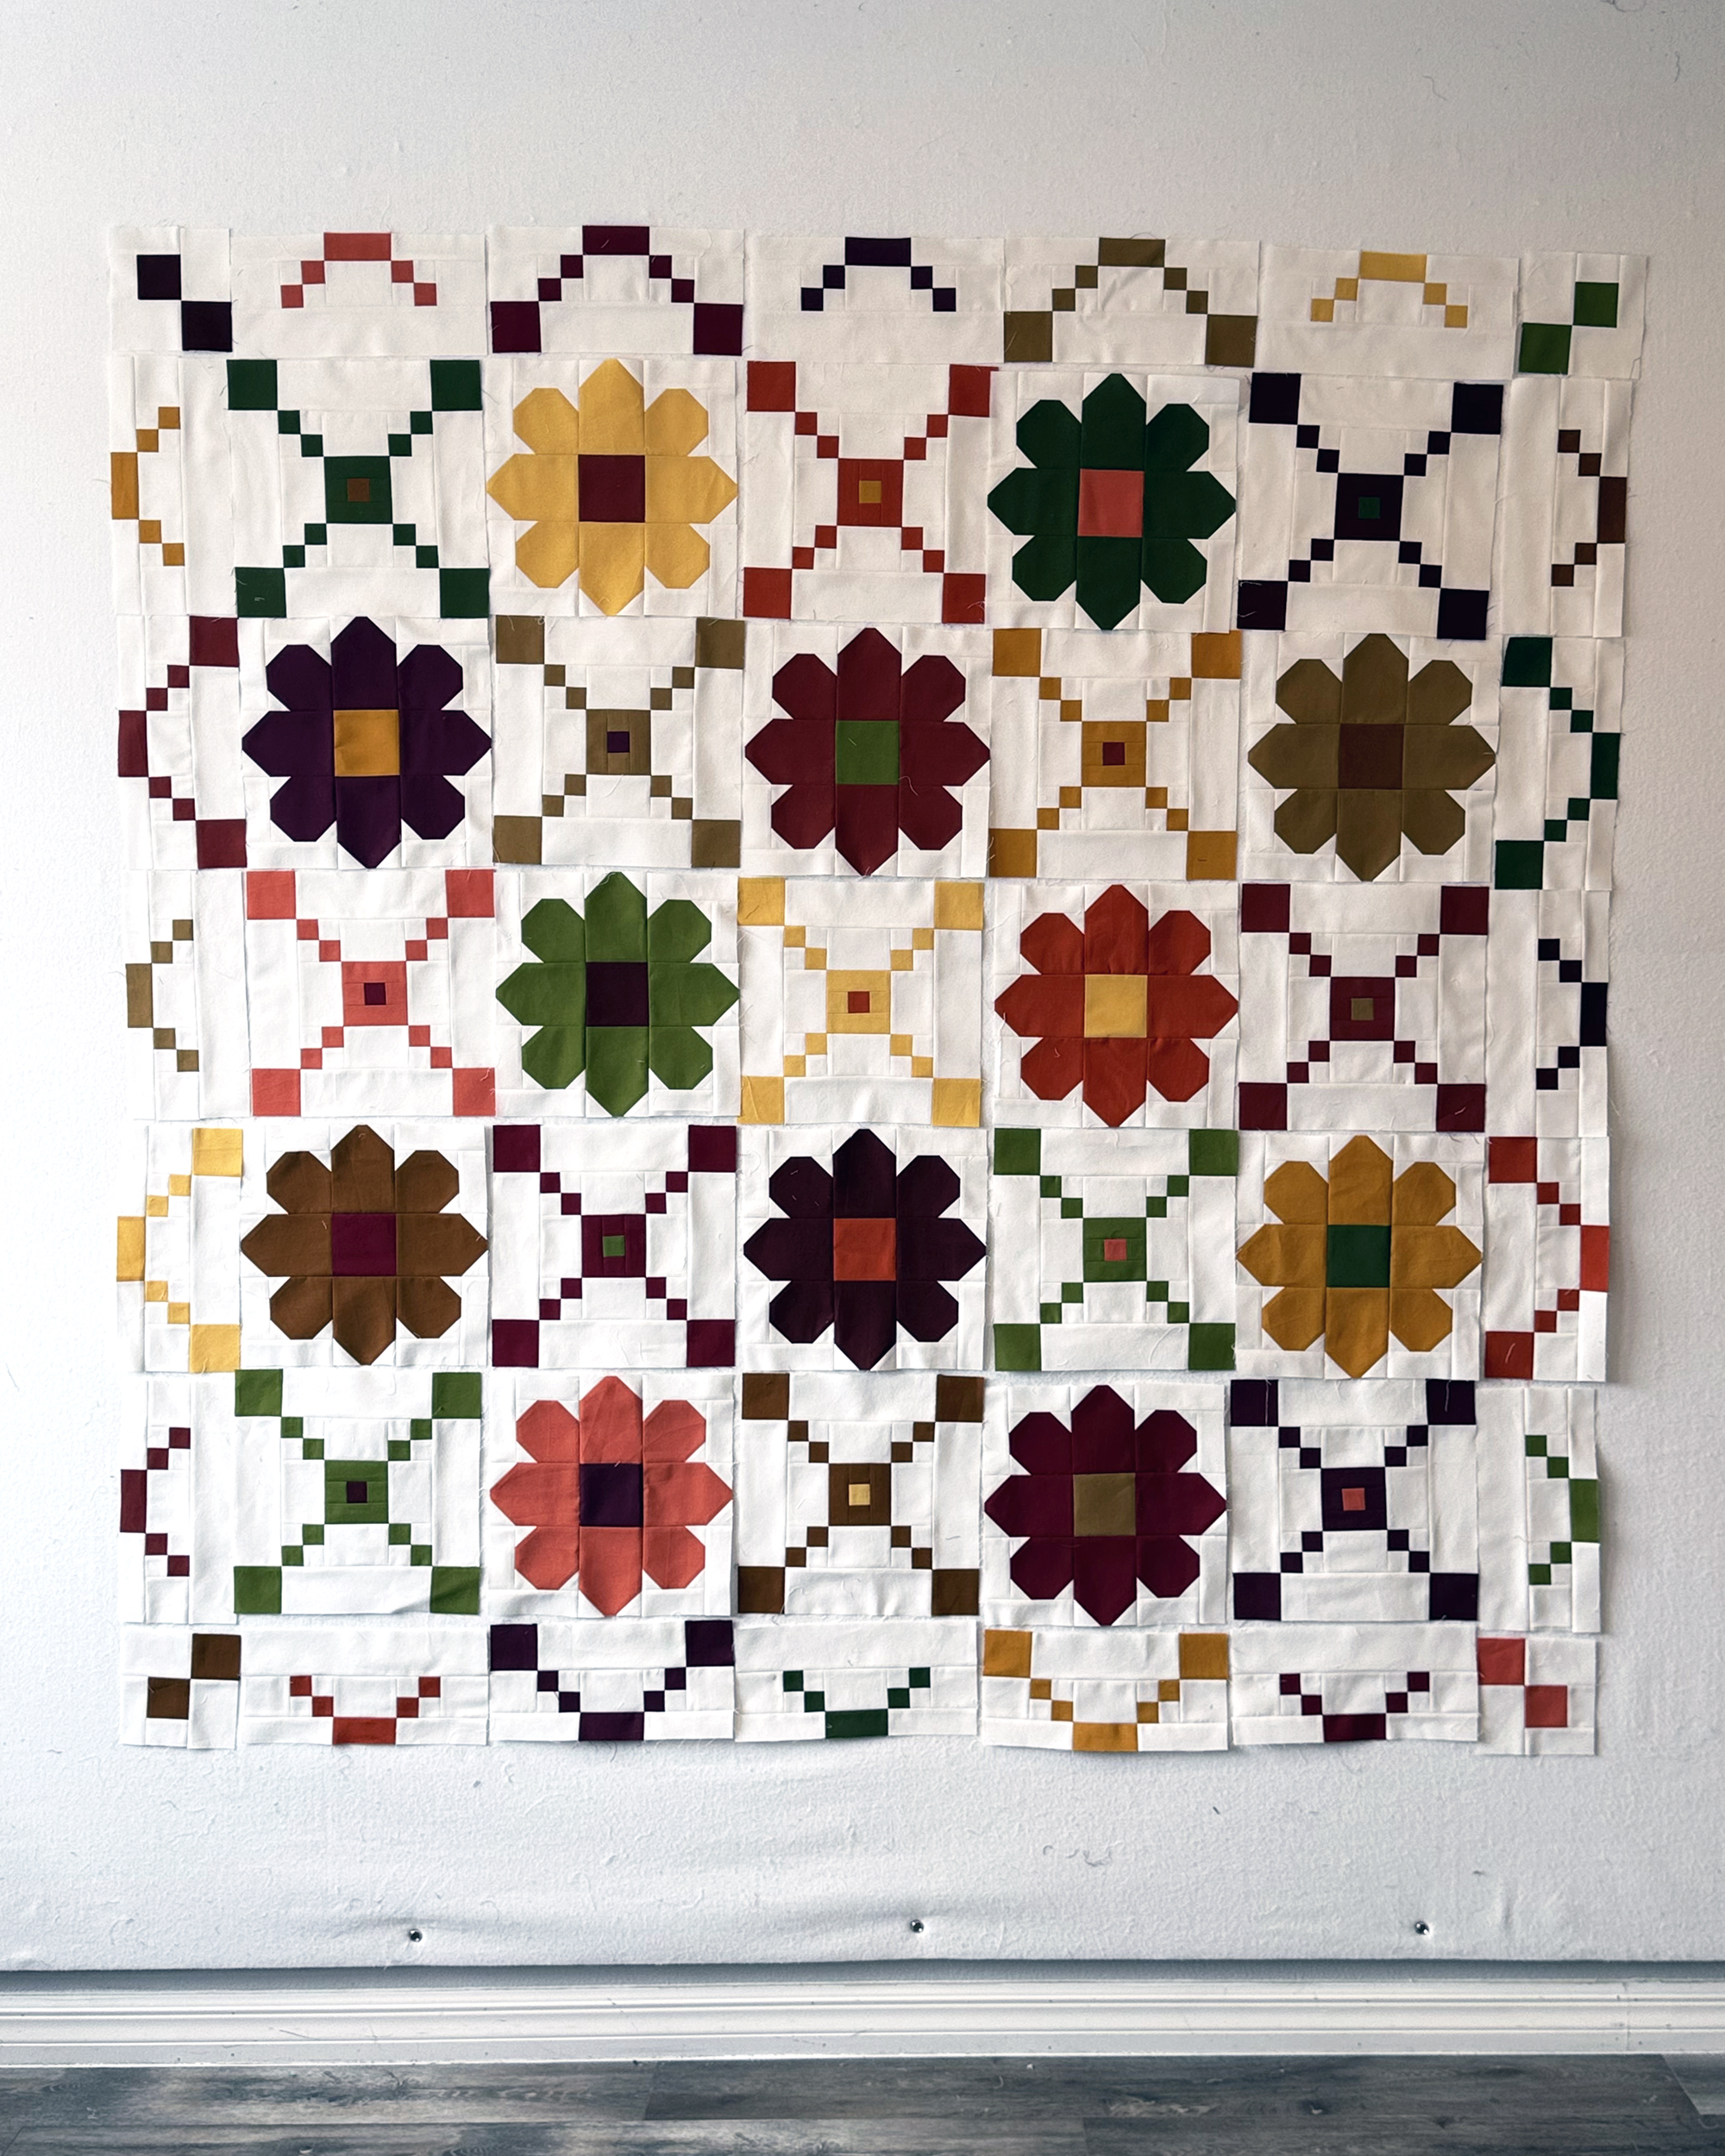
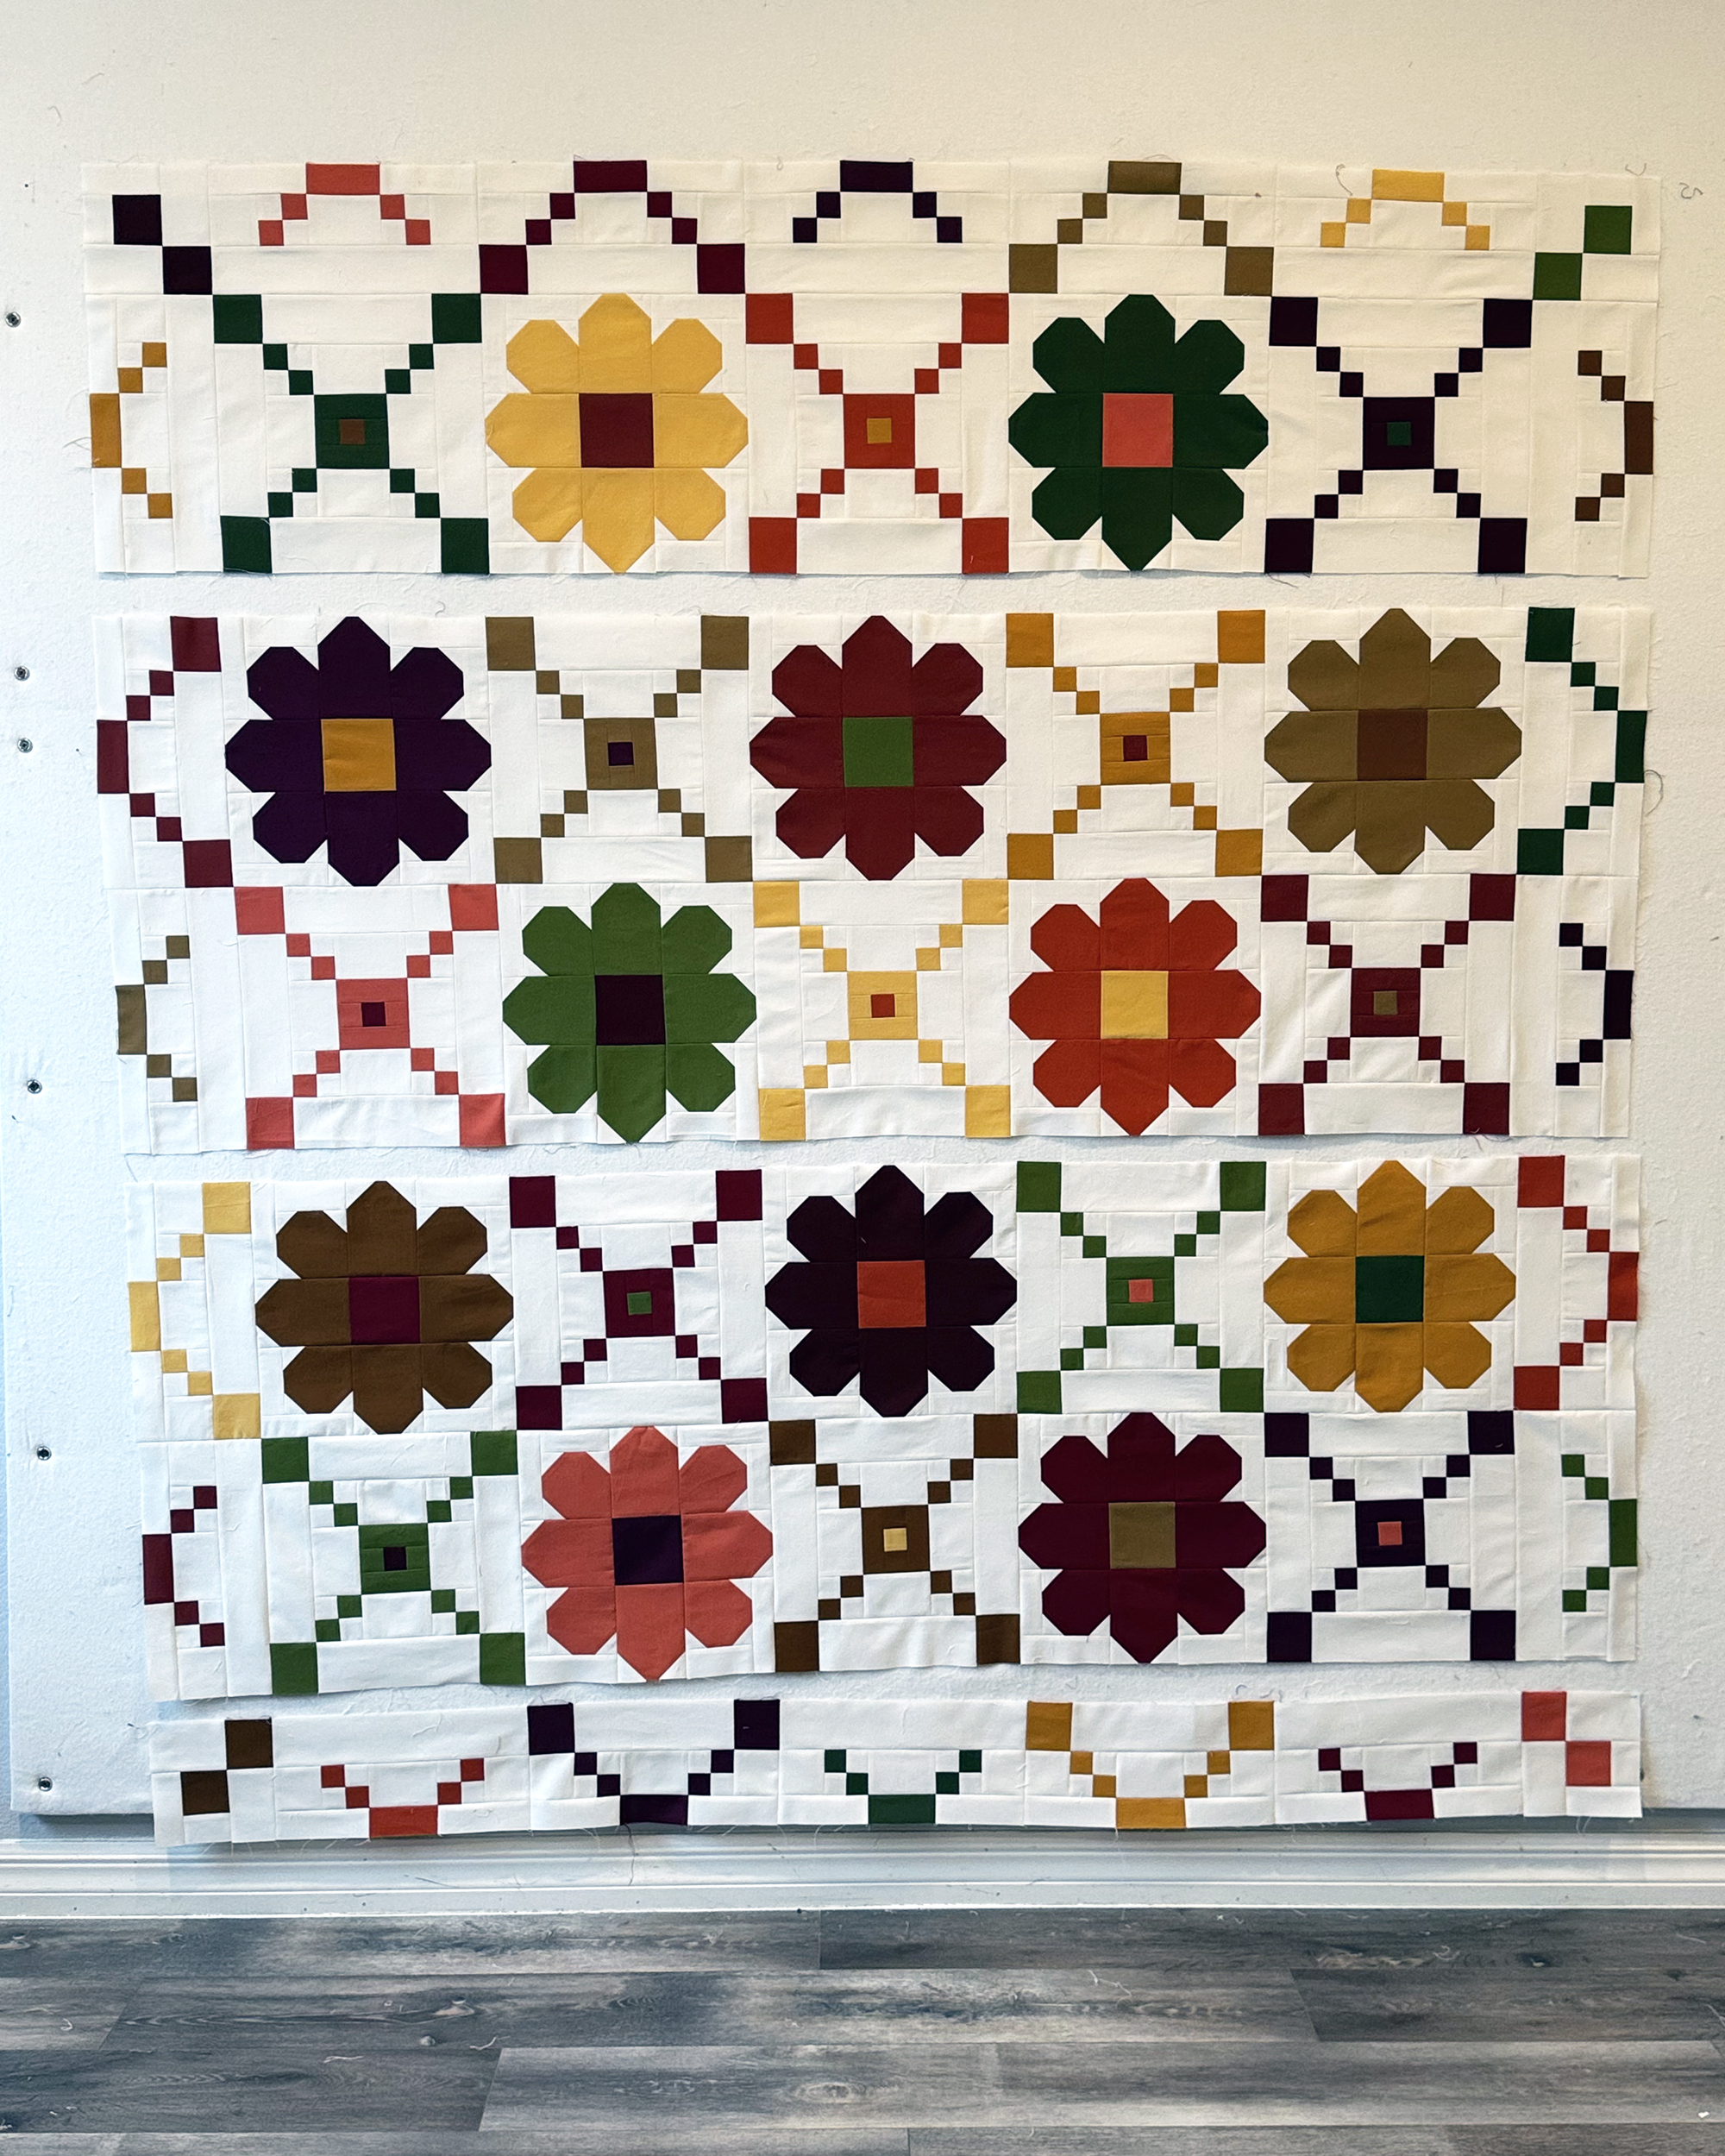
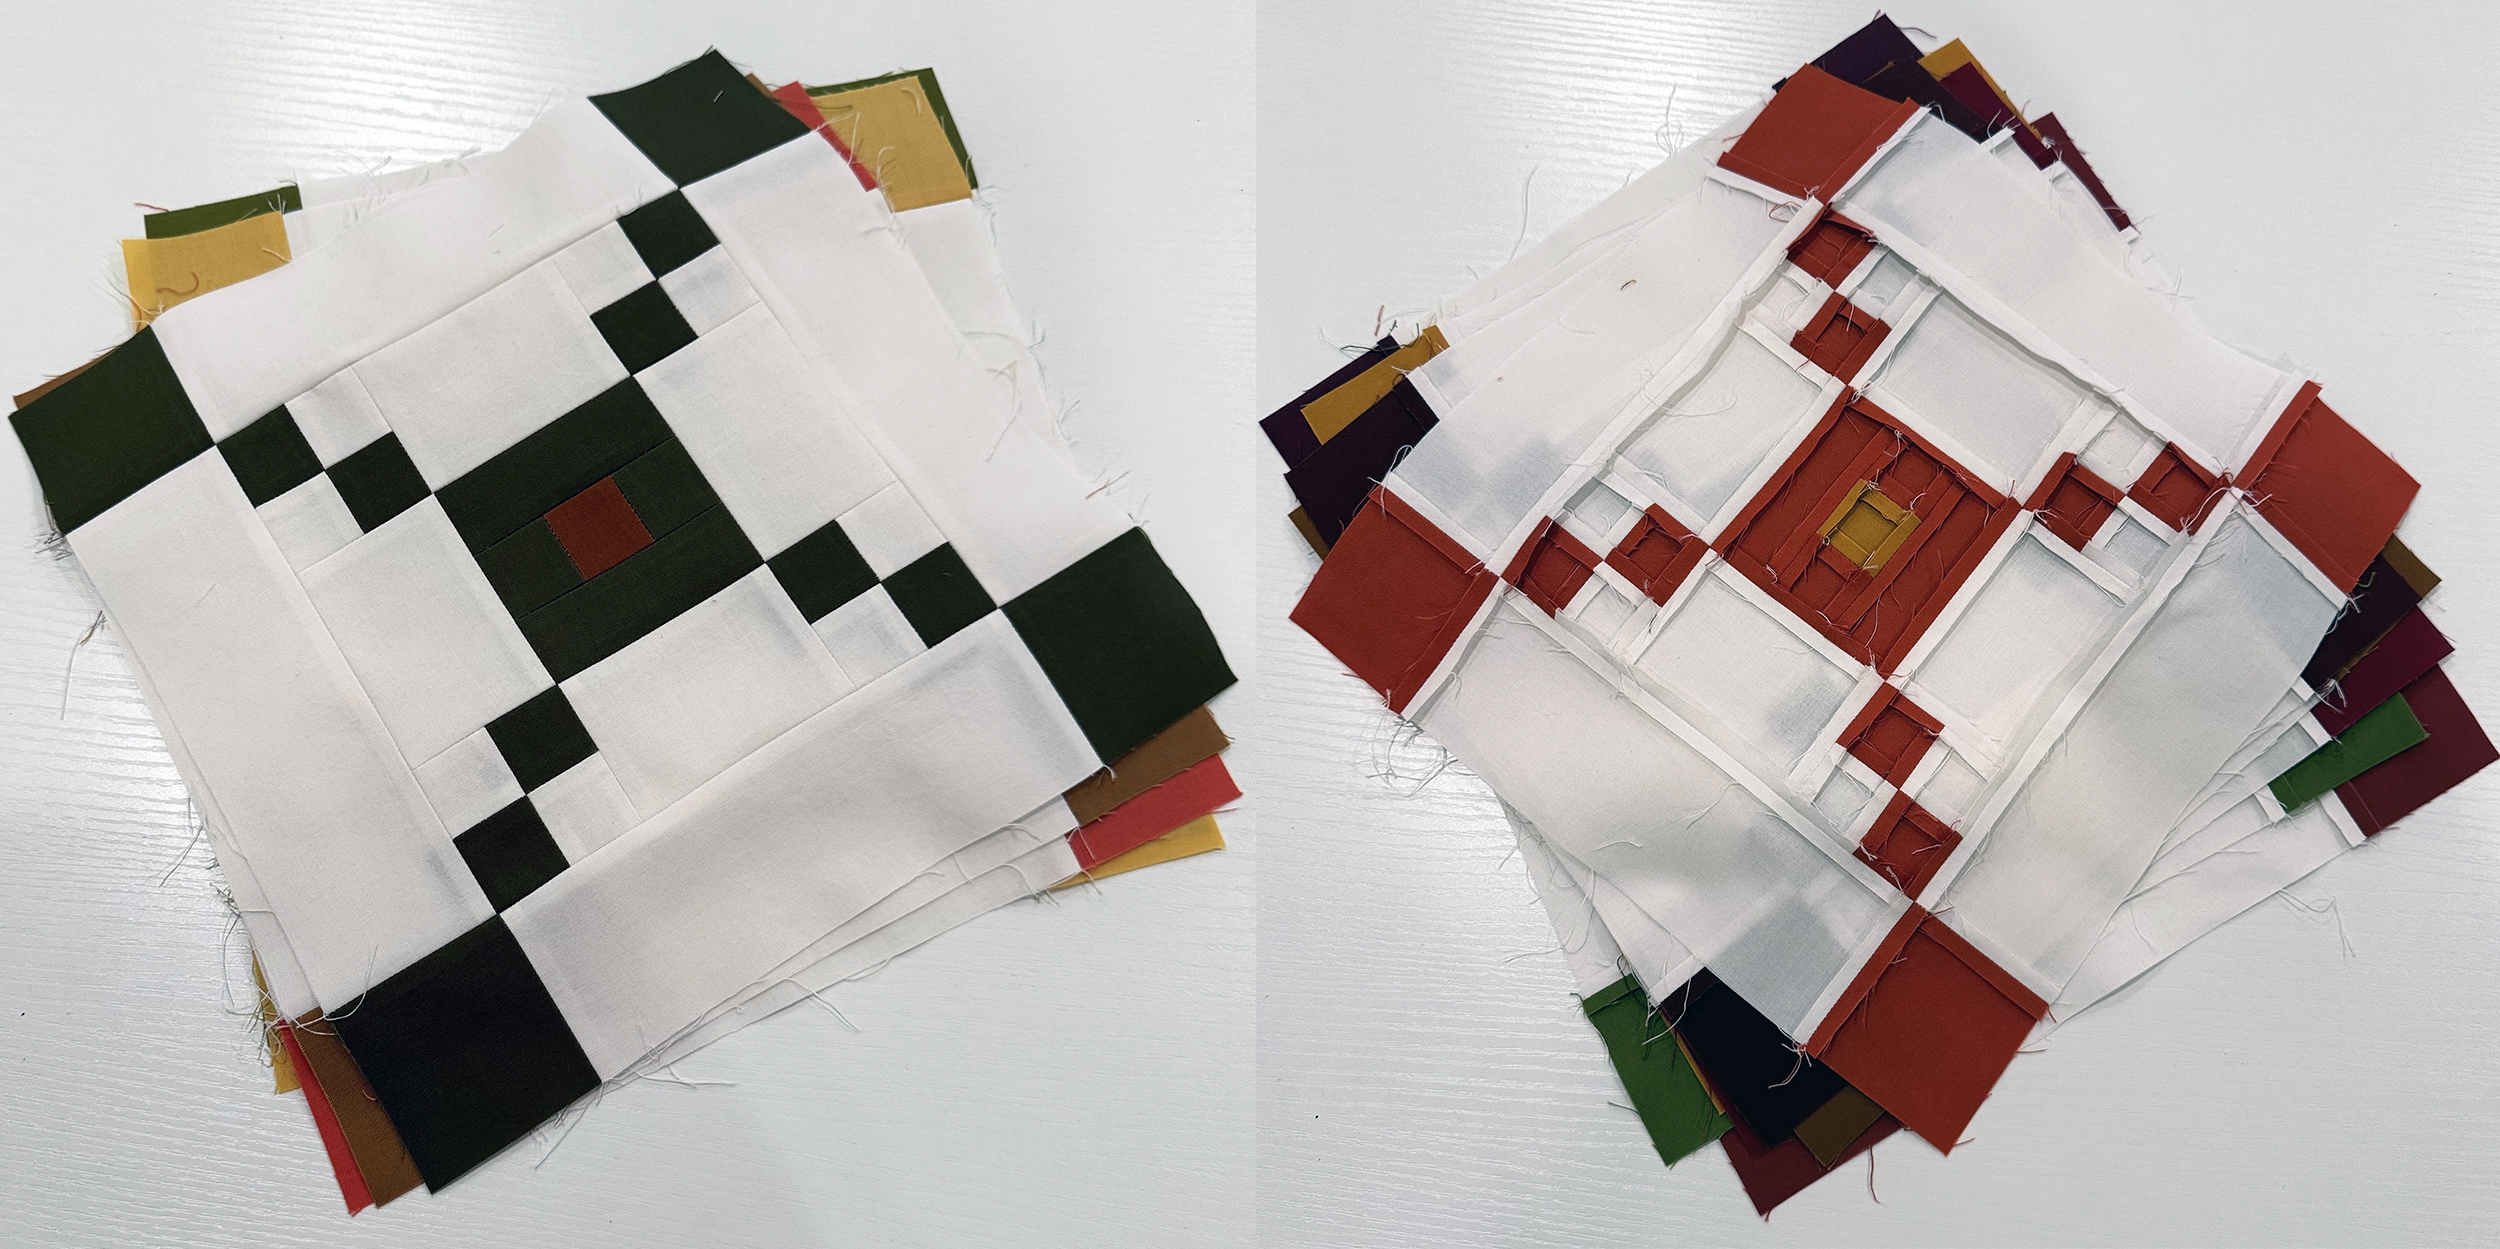
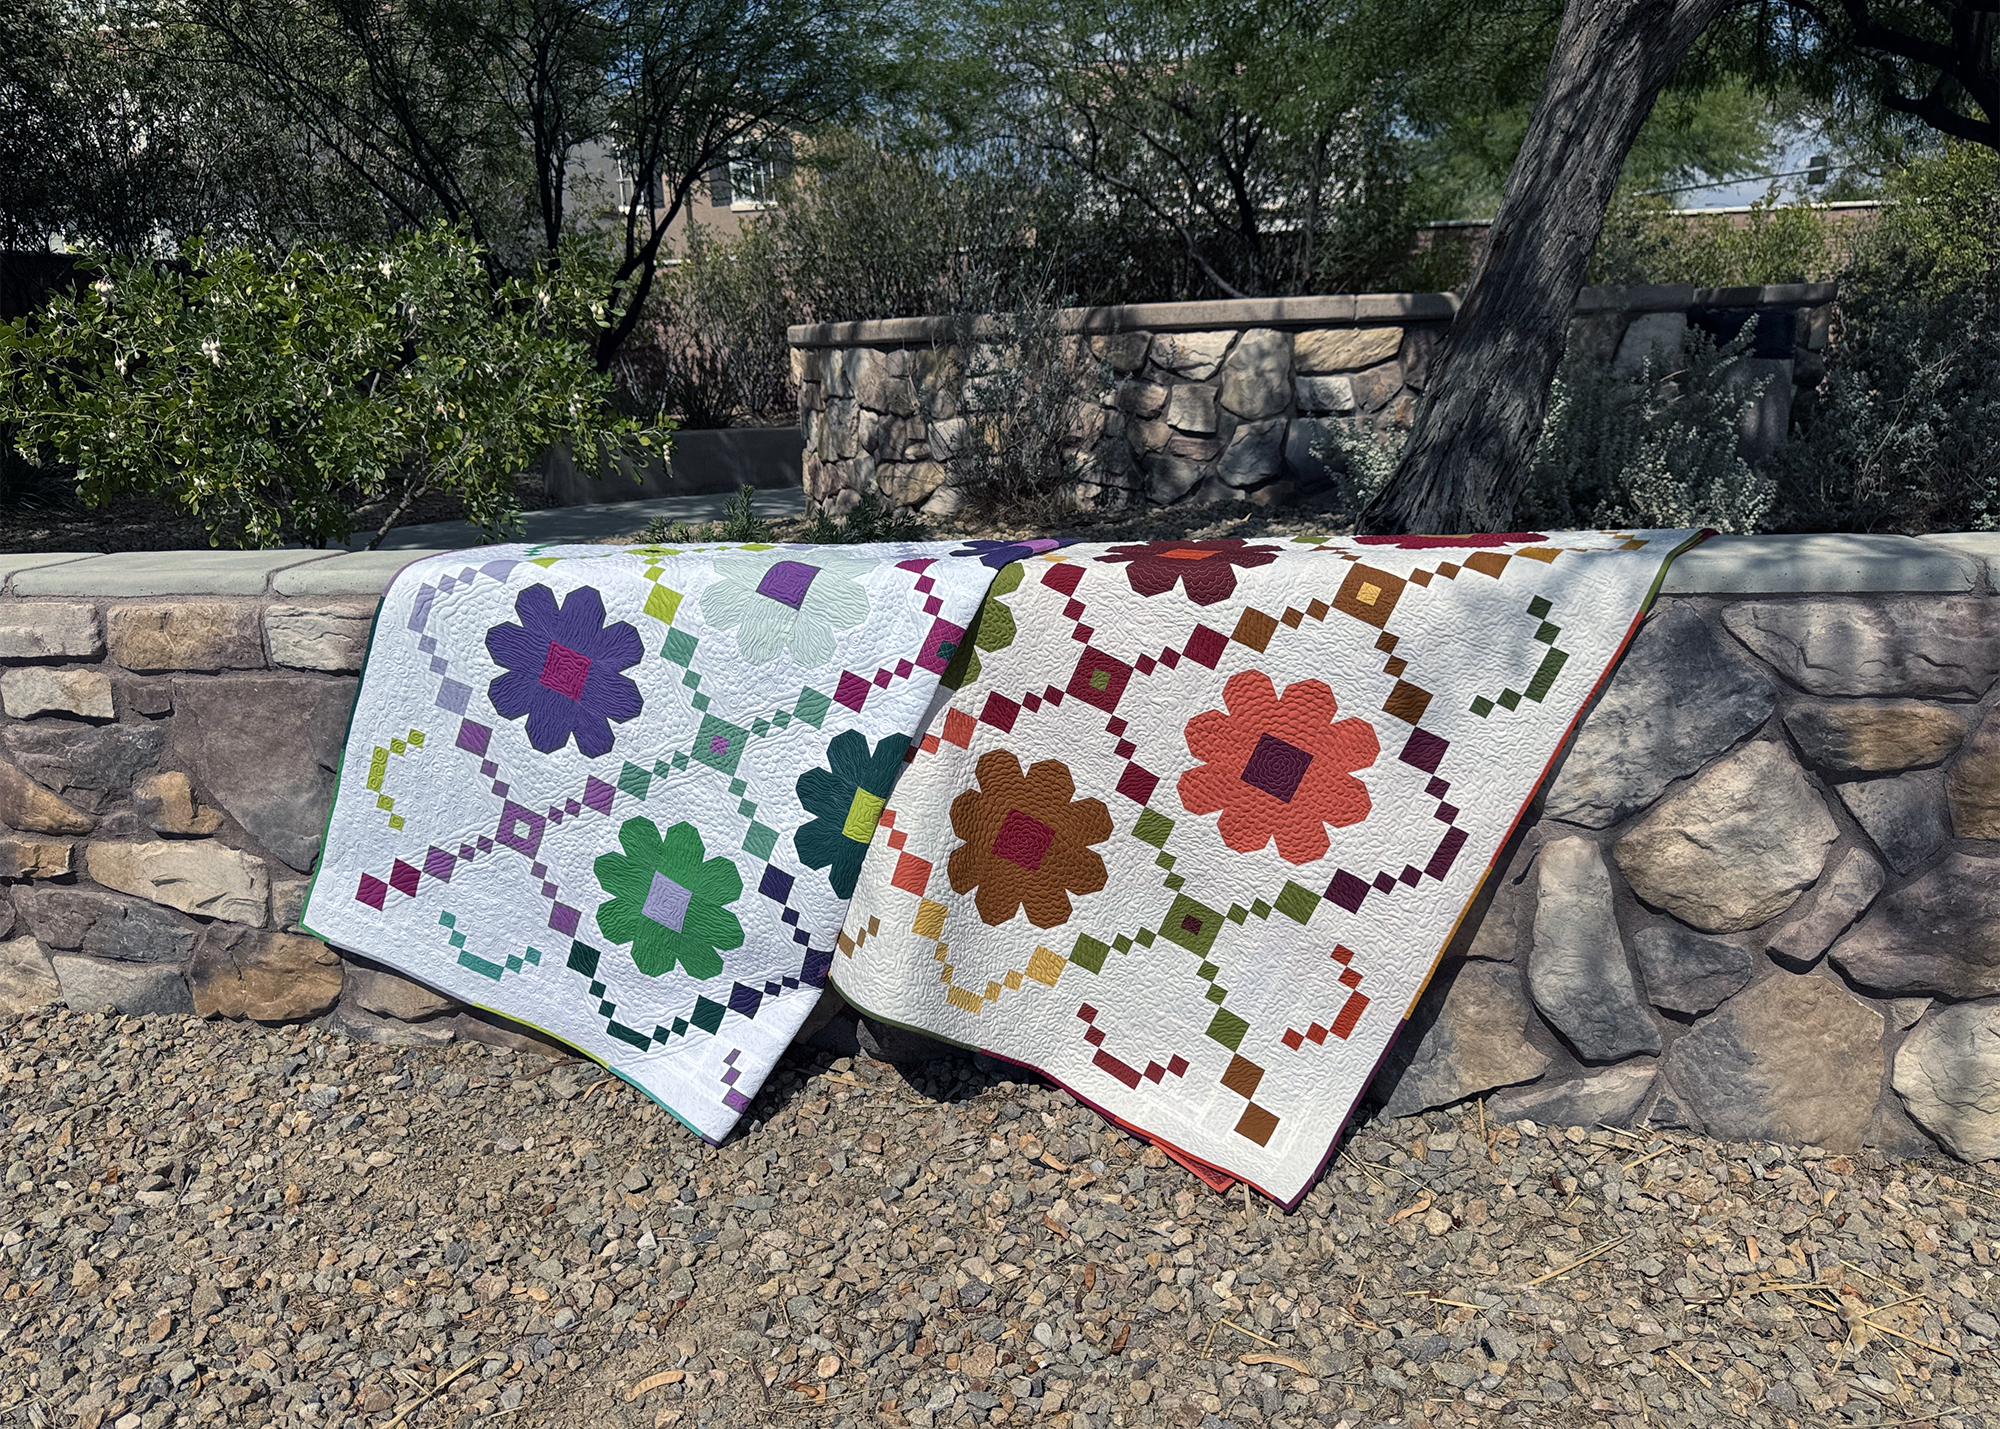
The first thing I like to do whenever sewing a quilt top together is to get all of my blocks up on the design wall and spread out the color. Then I’ll take time to arrange them into a pleasing layout. That’s what I did for the first version of this quilt I made in Autumn colors shown above.
A Design Bed Works Too!
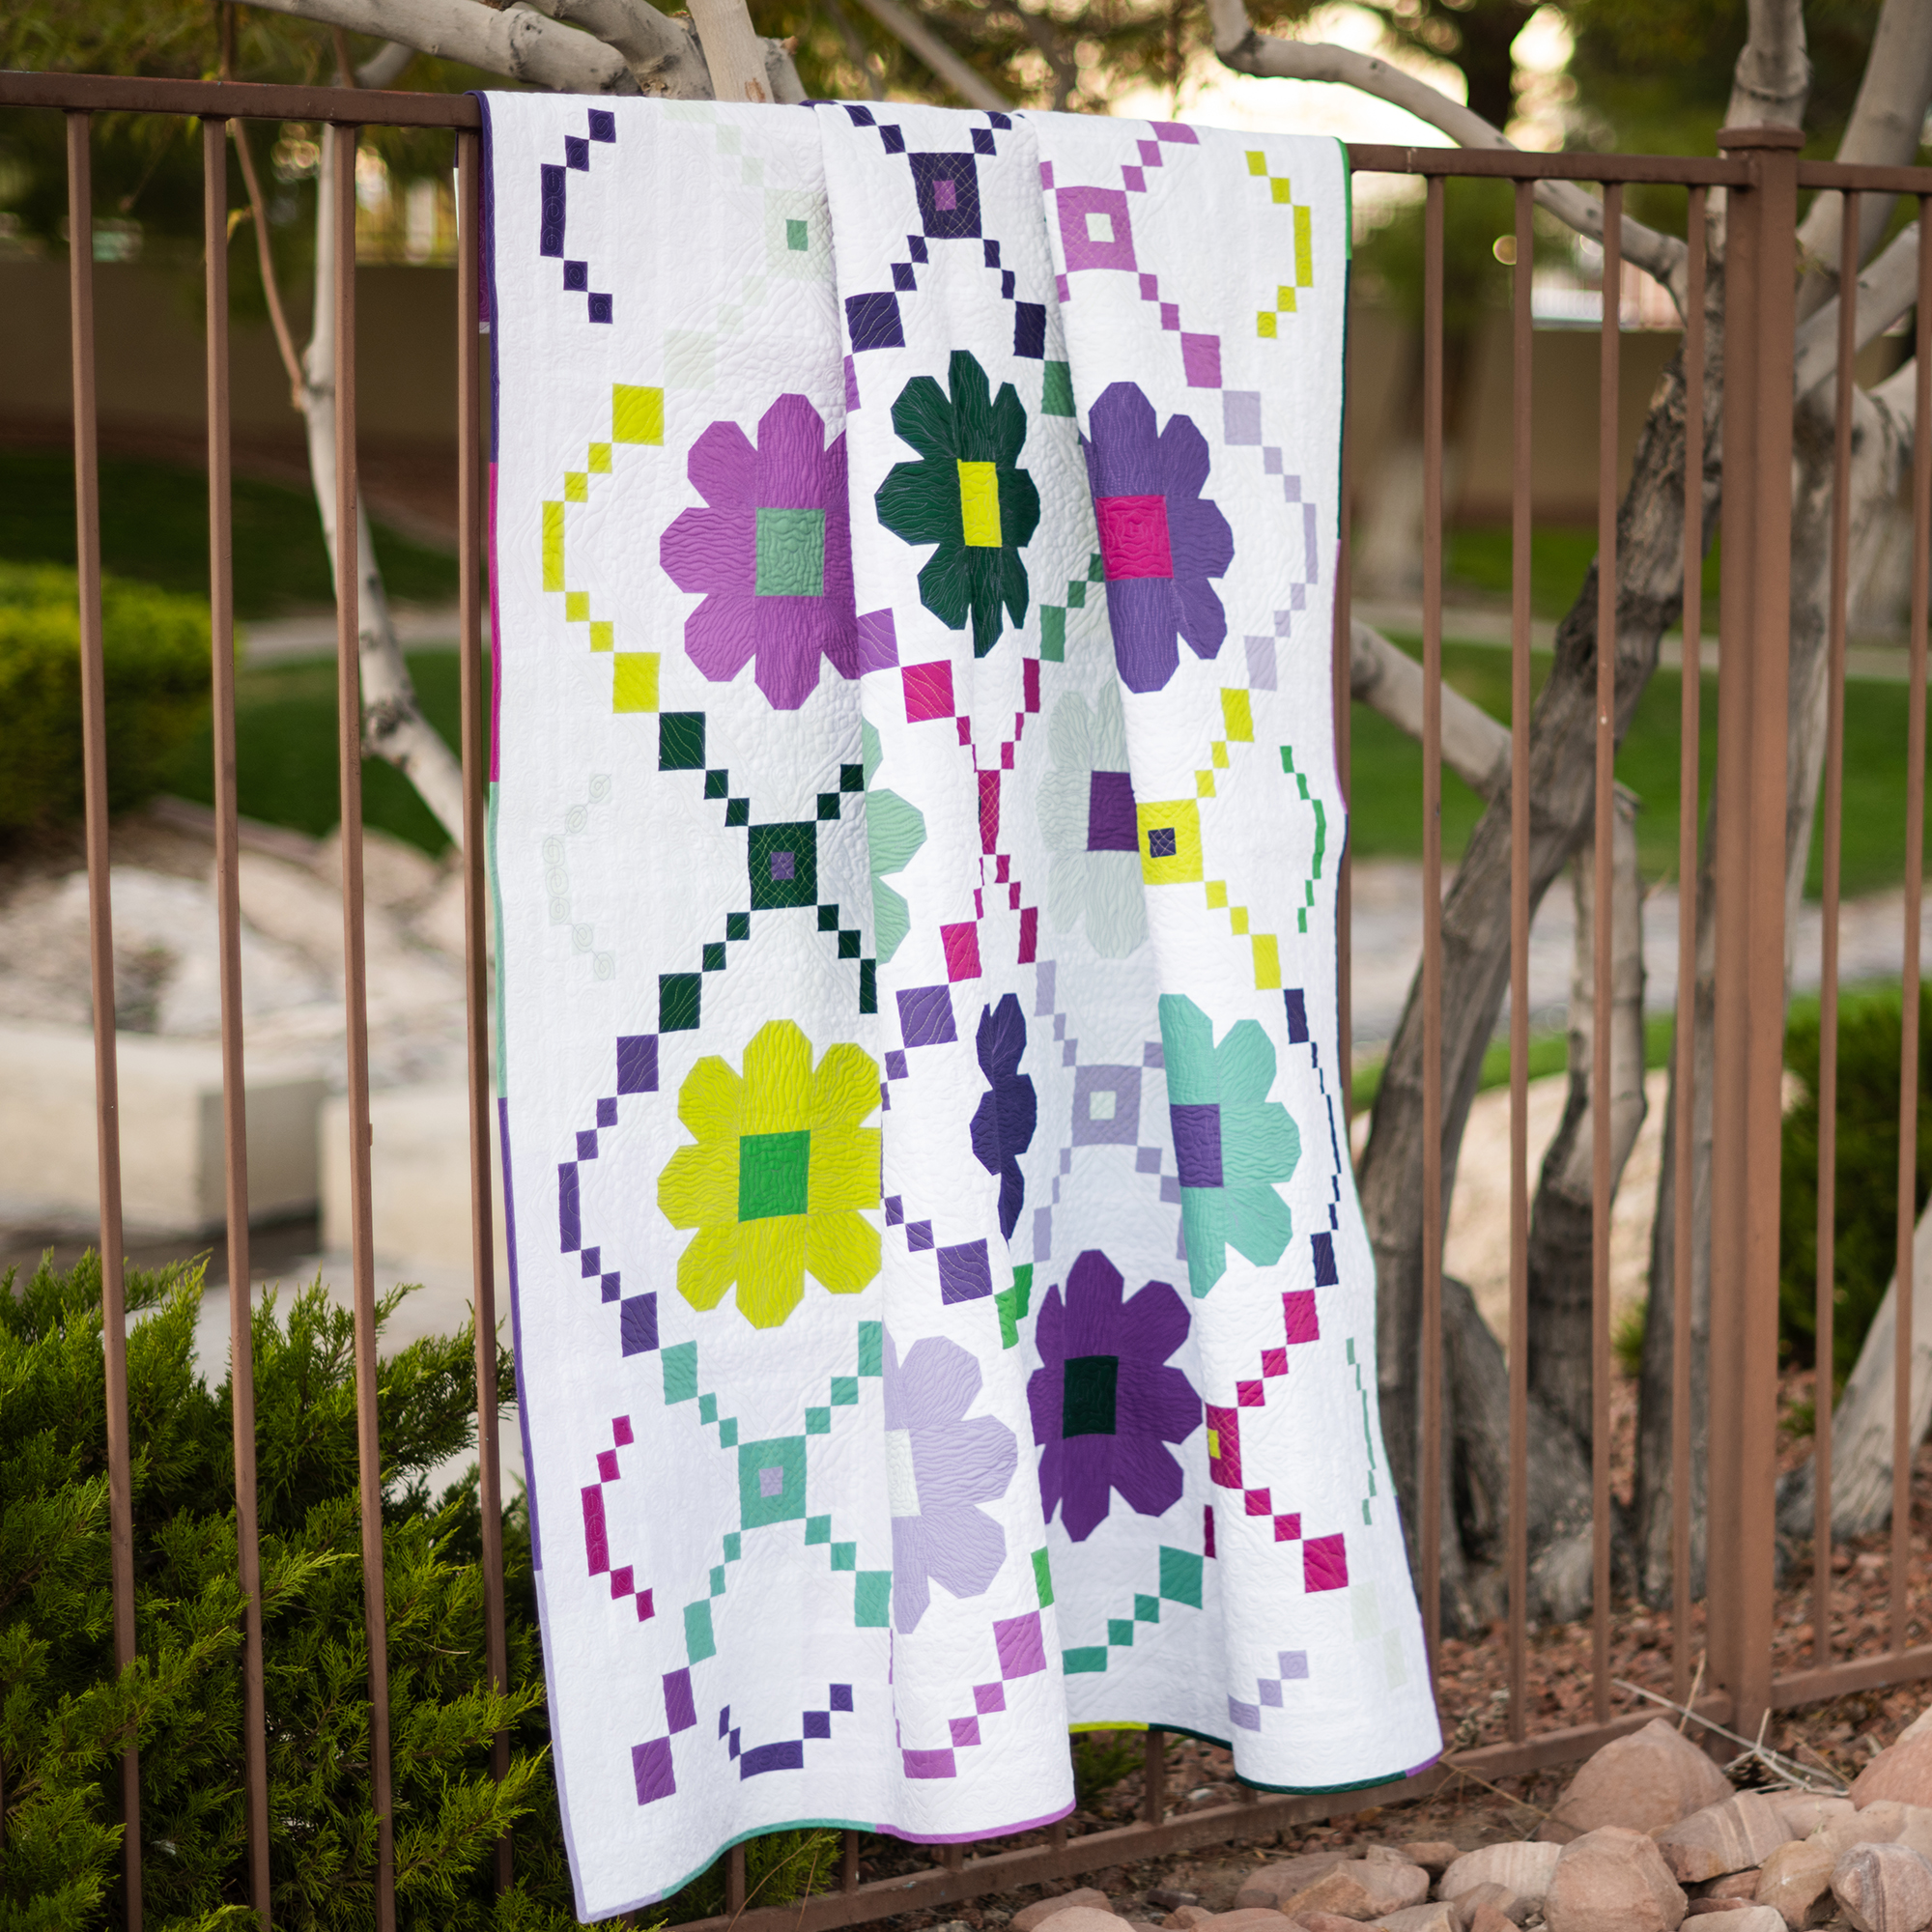
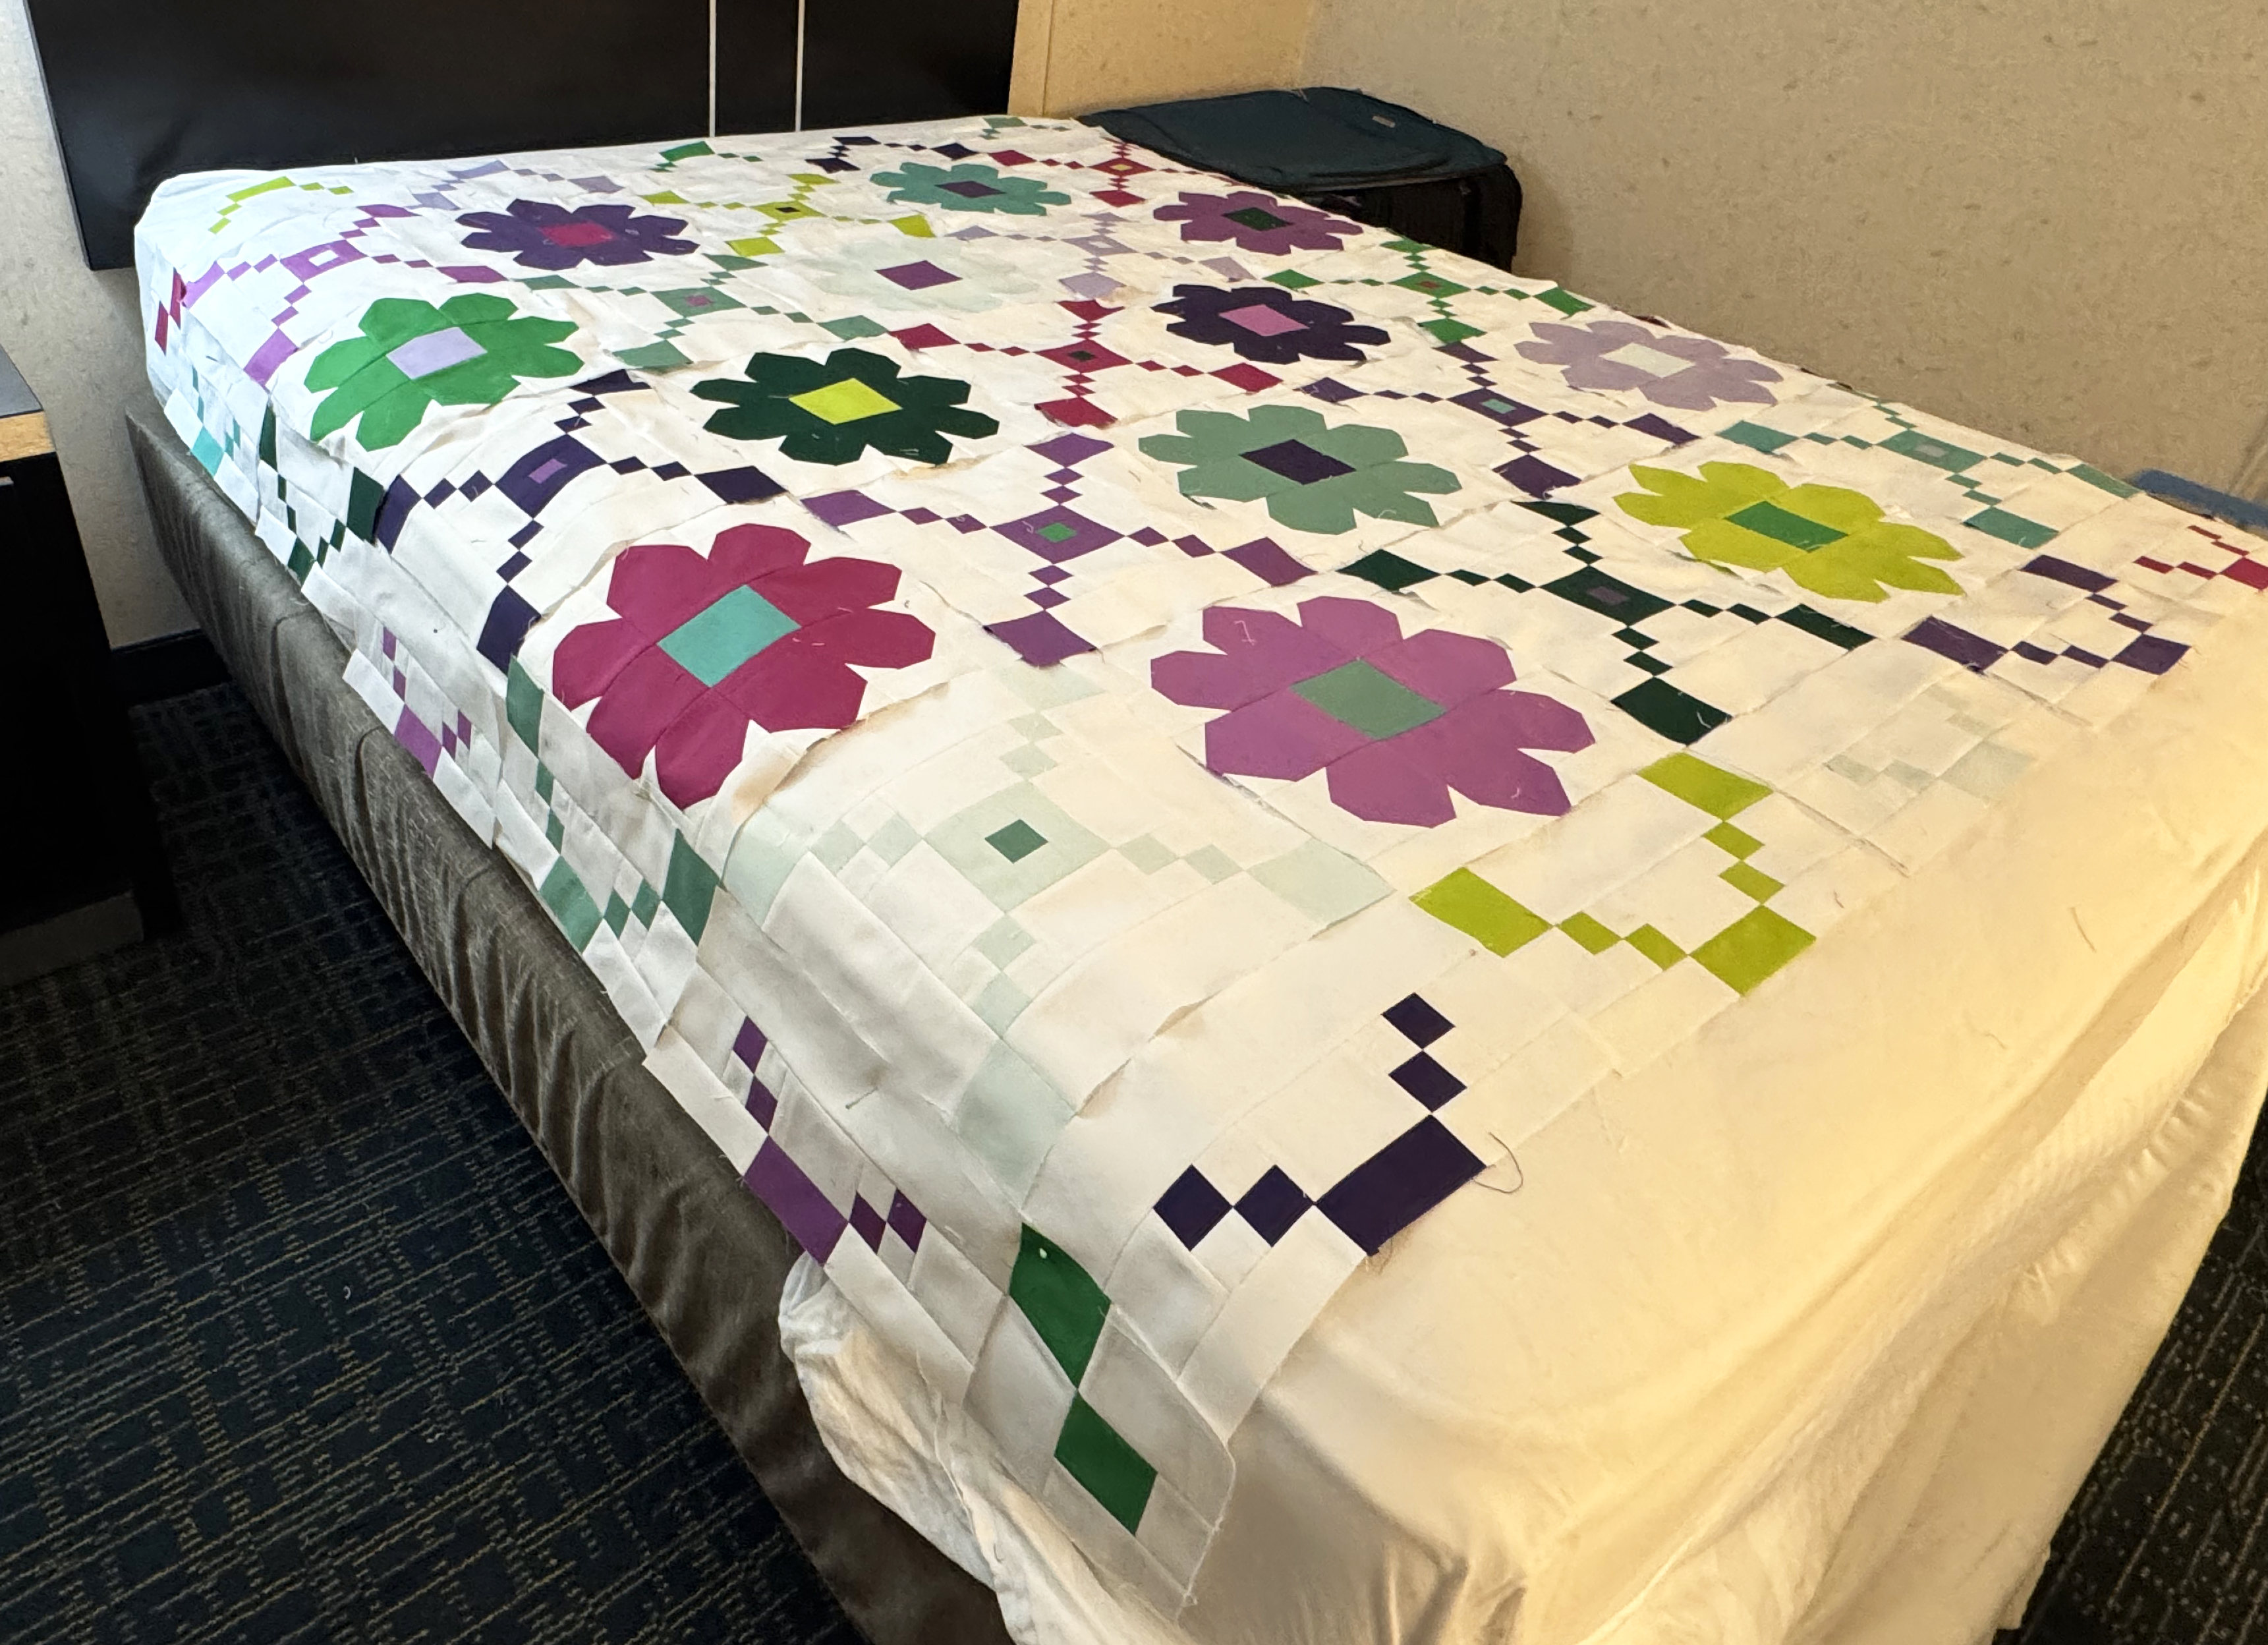
If you don’t have a wall, you can use the floor, a bed, or anywhere there’s room to spread out a little. For my Purple Vibrations colorway below, I sewed the entire top in a hotel room when I was out of town teaching. My bed worked great for the layout, LOL!!
Use what you have to lay out your blocks!
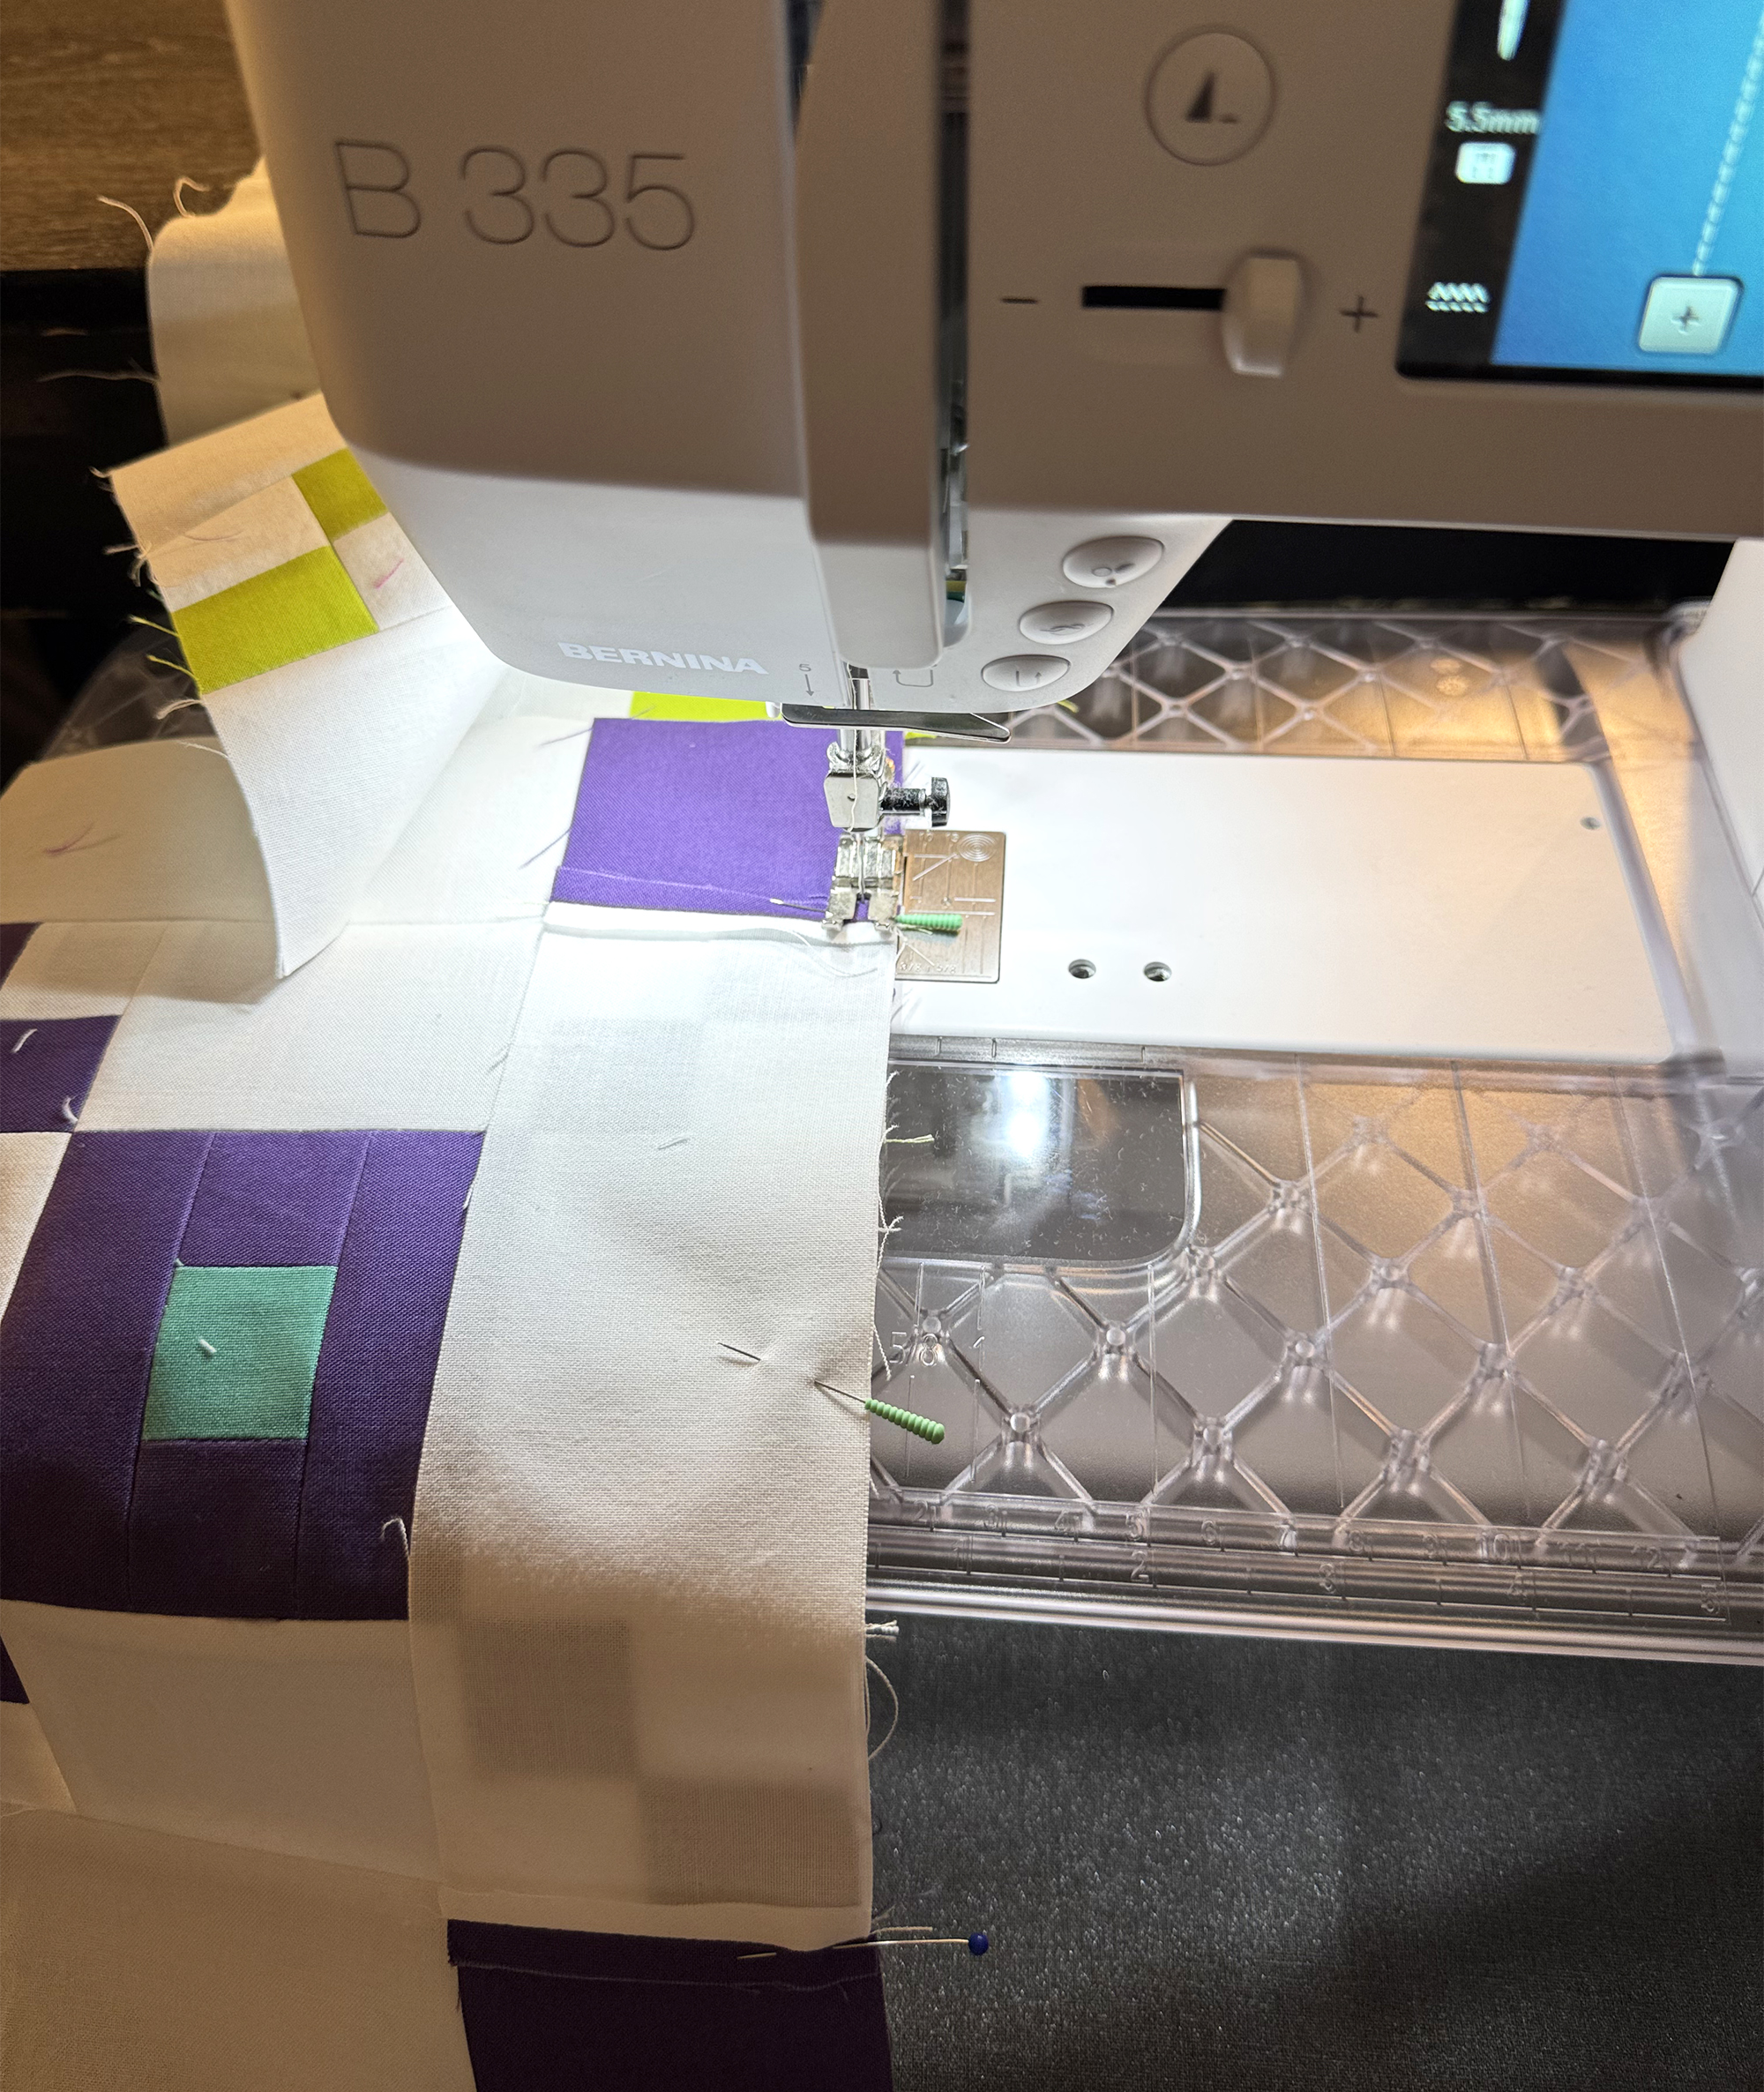
Once I’m happy with the layout, I will take a picture that I can refer to while sewing everything together. This helps me keep the blocks in order. I’ll pick up the blocks in stacks of 2 and then put them next to my sewing machine in order. Just like when sewing my blocks, I press each and every seam as I go. I pin generously and prefer to press all my seams open, but you can press whichever way works for you.
Below is a pic from when I was sewing in my hotel room. I had borrowed a BERNINA 335 machine to sew on which was perfect because it’s so lightweight. It didn’t take up much room in the hotel but it did the trick and I pieced the entire quilt top on it!!
As I complete each row, I will press the entire row from the front and again from the back, then put it back up on the design wall (or bed) to make sure everything stays in the correct order. I’ll repeat this until all of the rows are complete. Then I’ll join rows together to make bigger sections of the quilt.
Once the rows are done I will add the borders. I often like to add a “floater” border which is just more of the background fabric that frames the quilt and gives it a little breathing room. This also comes in handy later when it’s time to square up the quilt and add the binding.
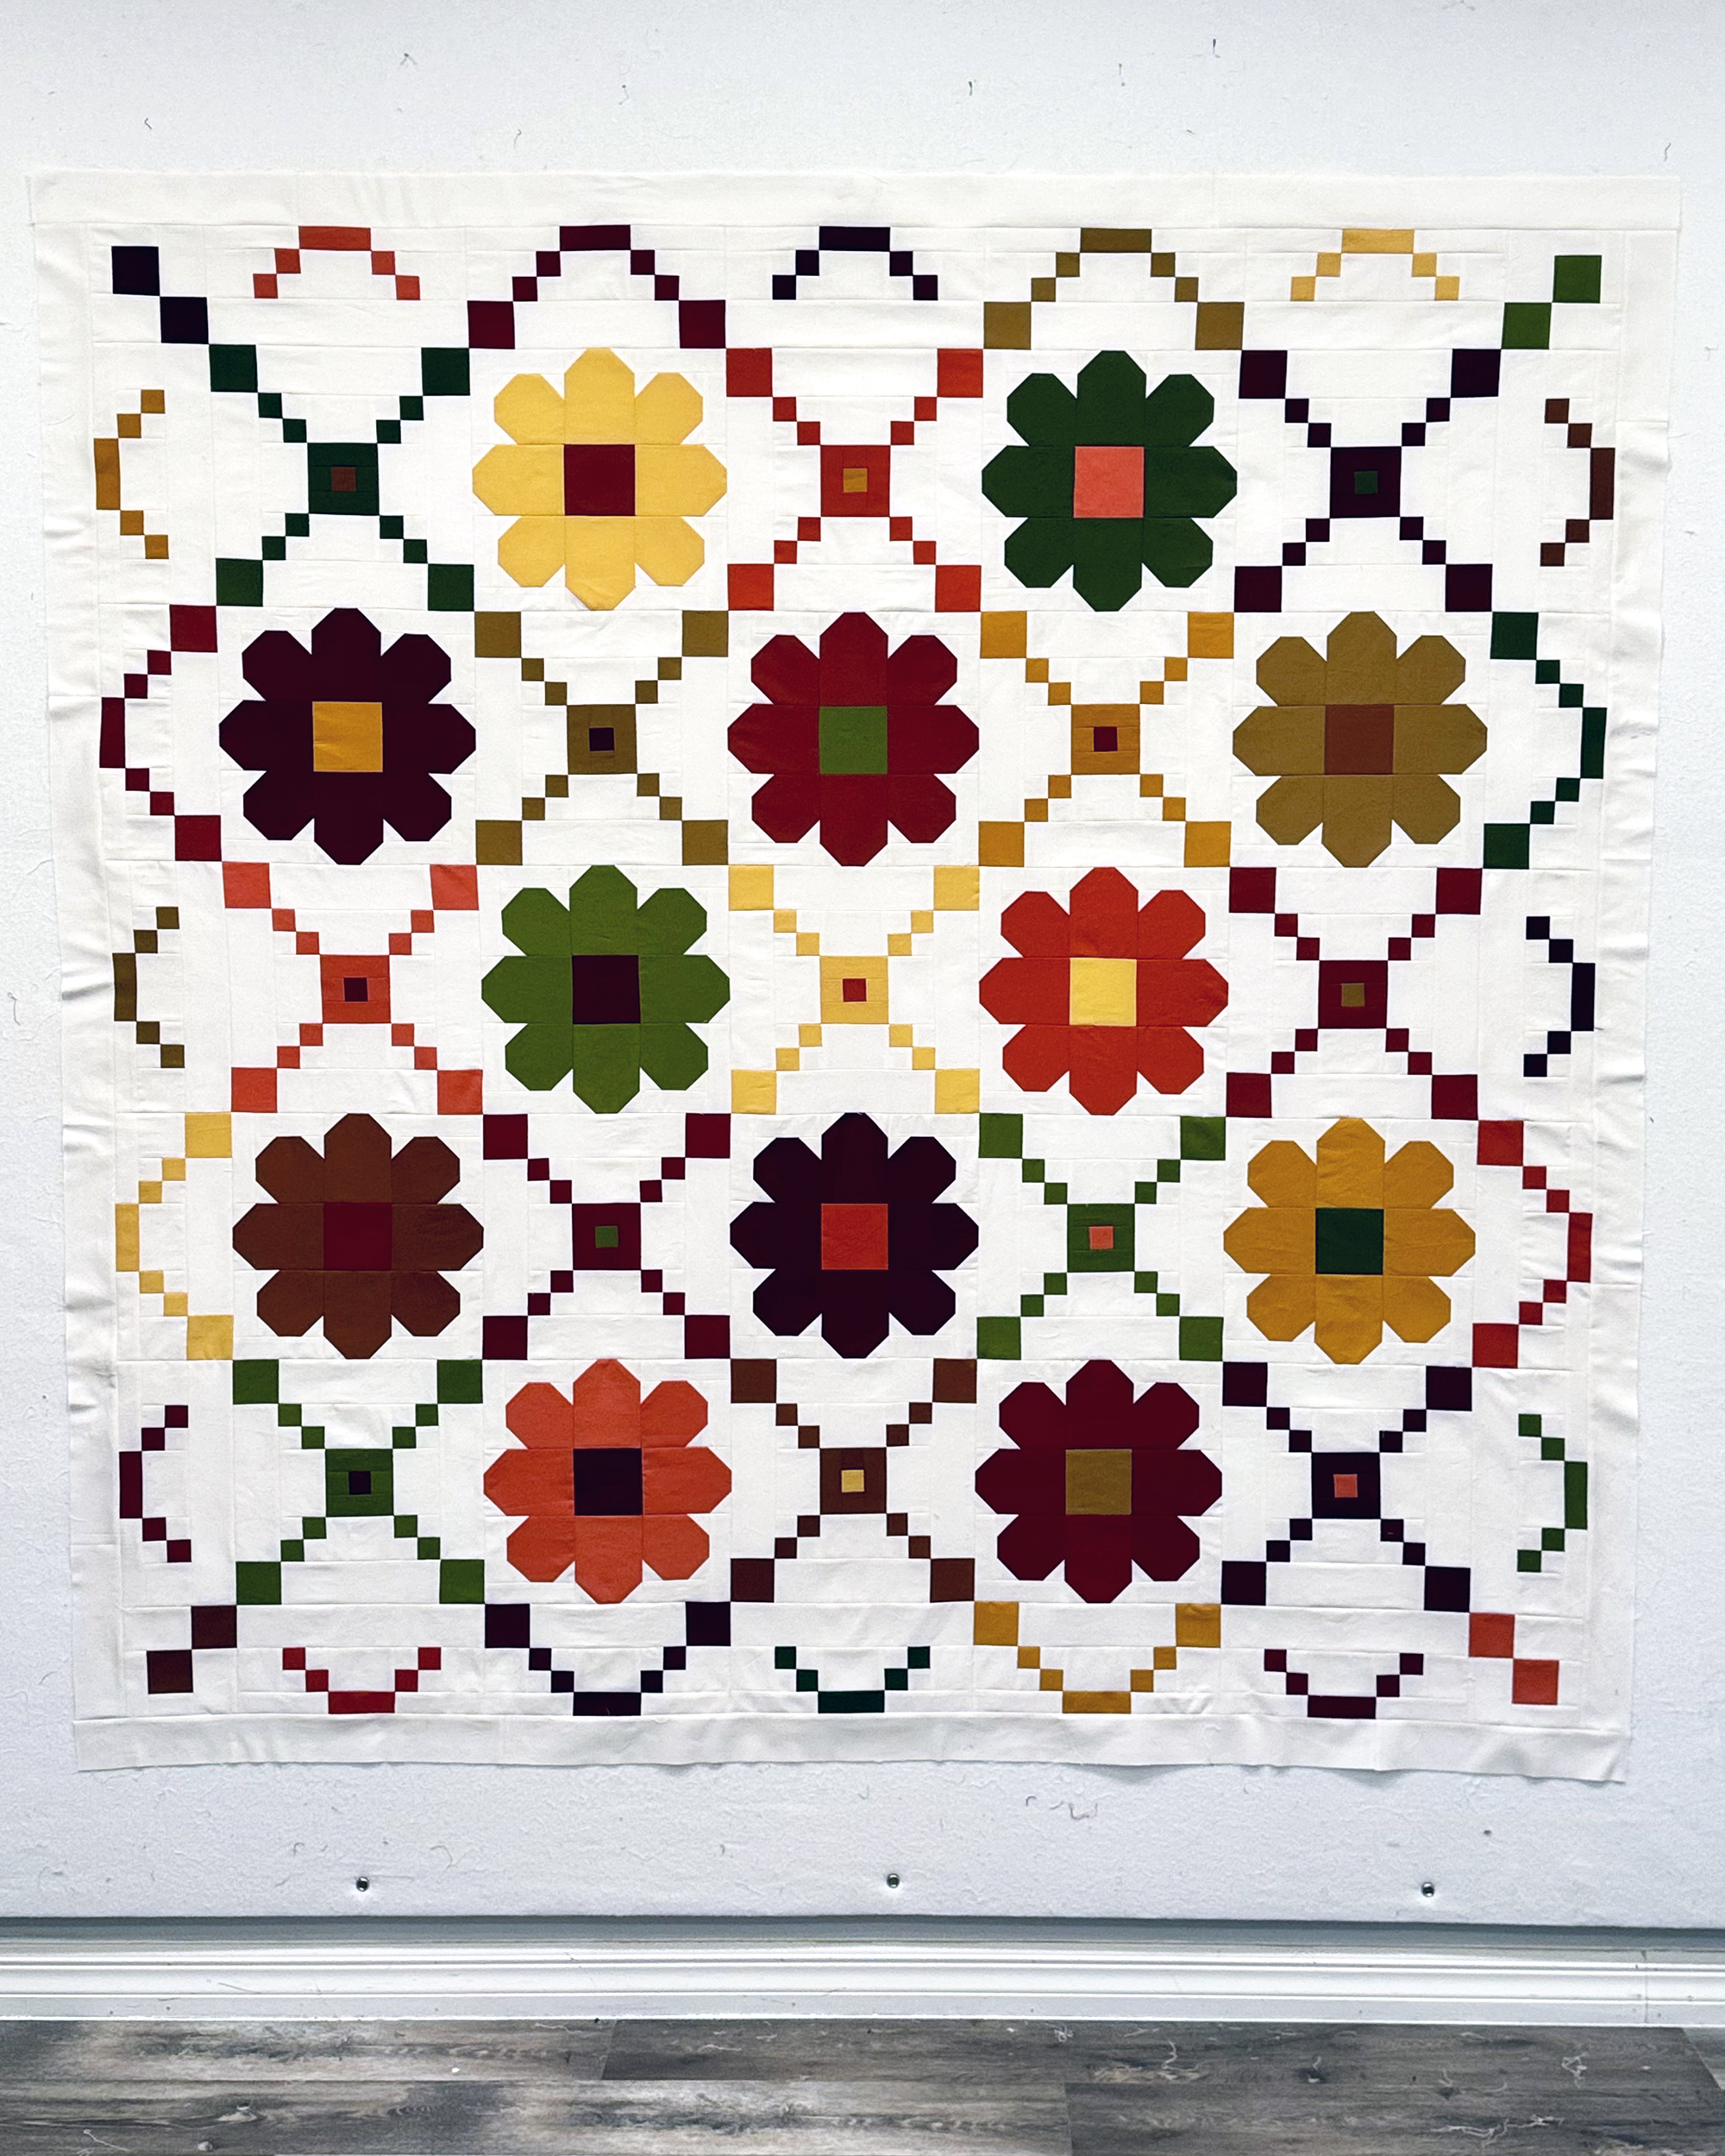
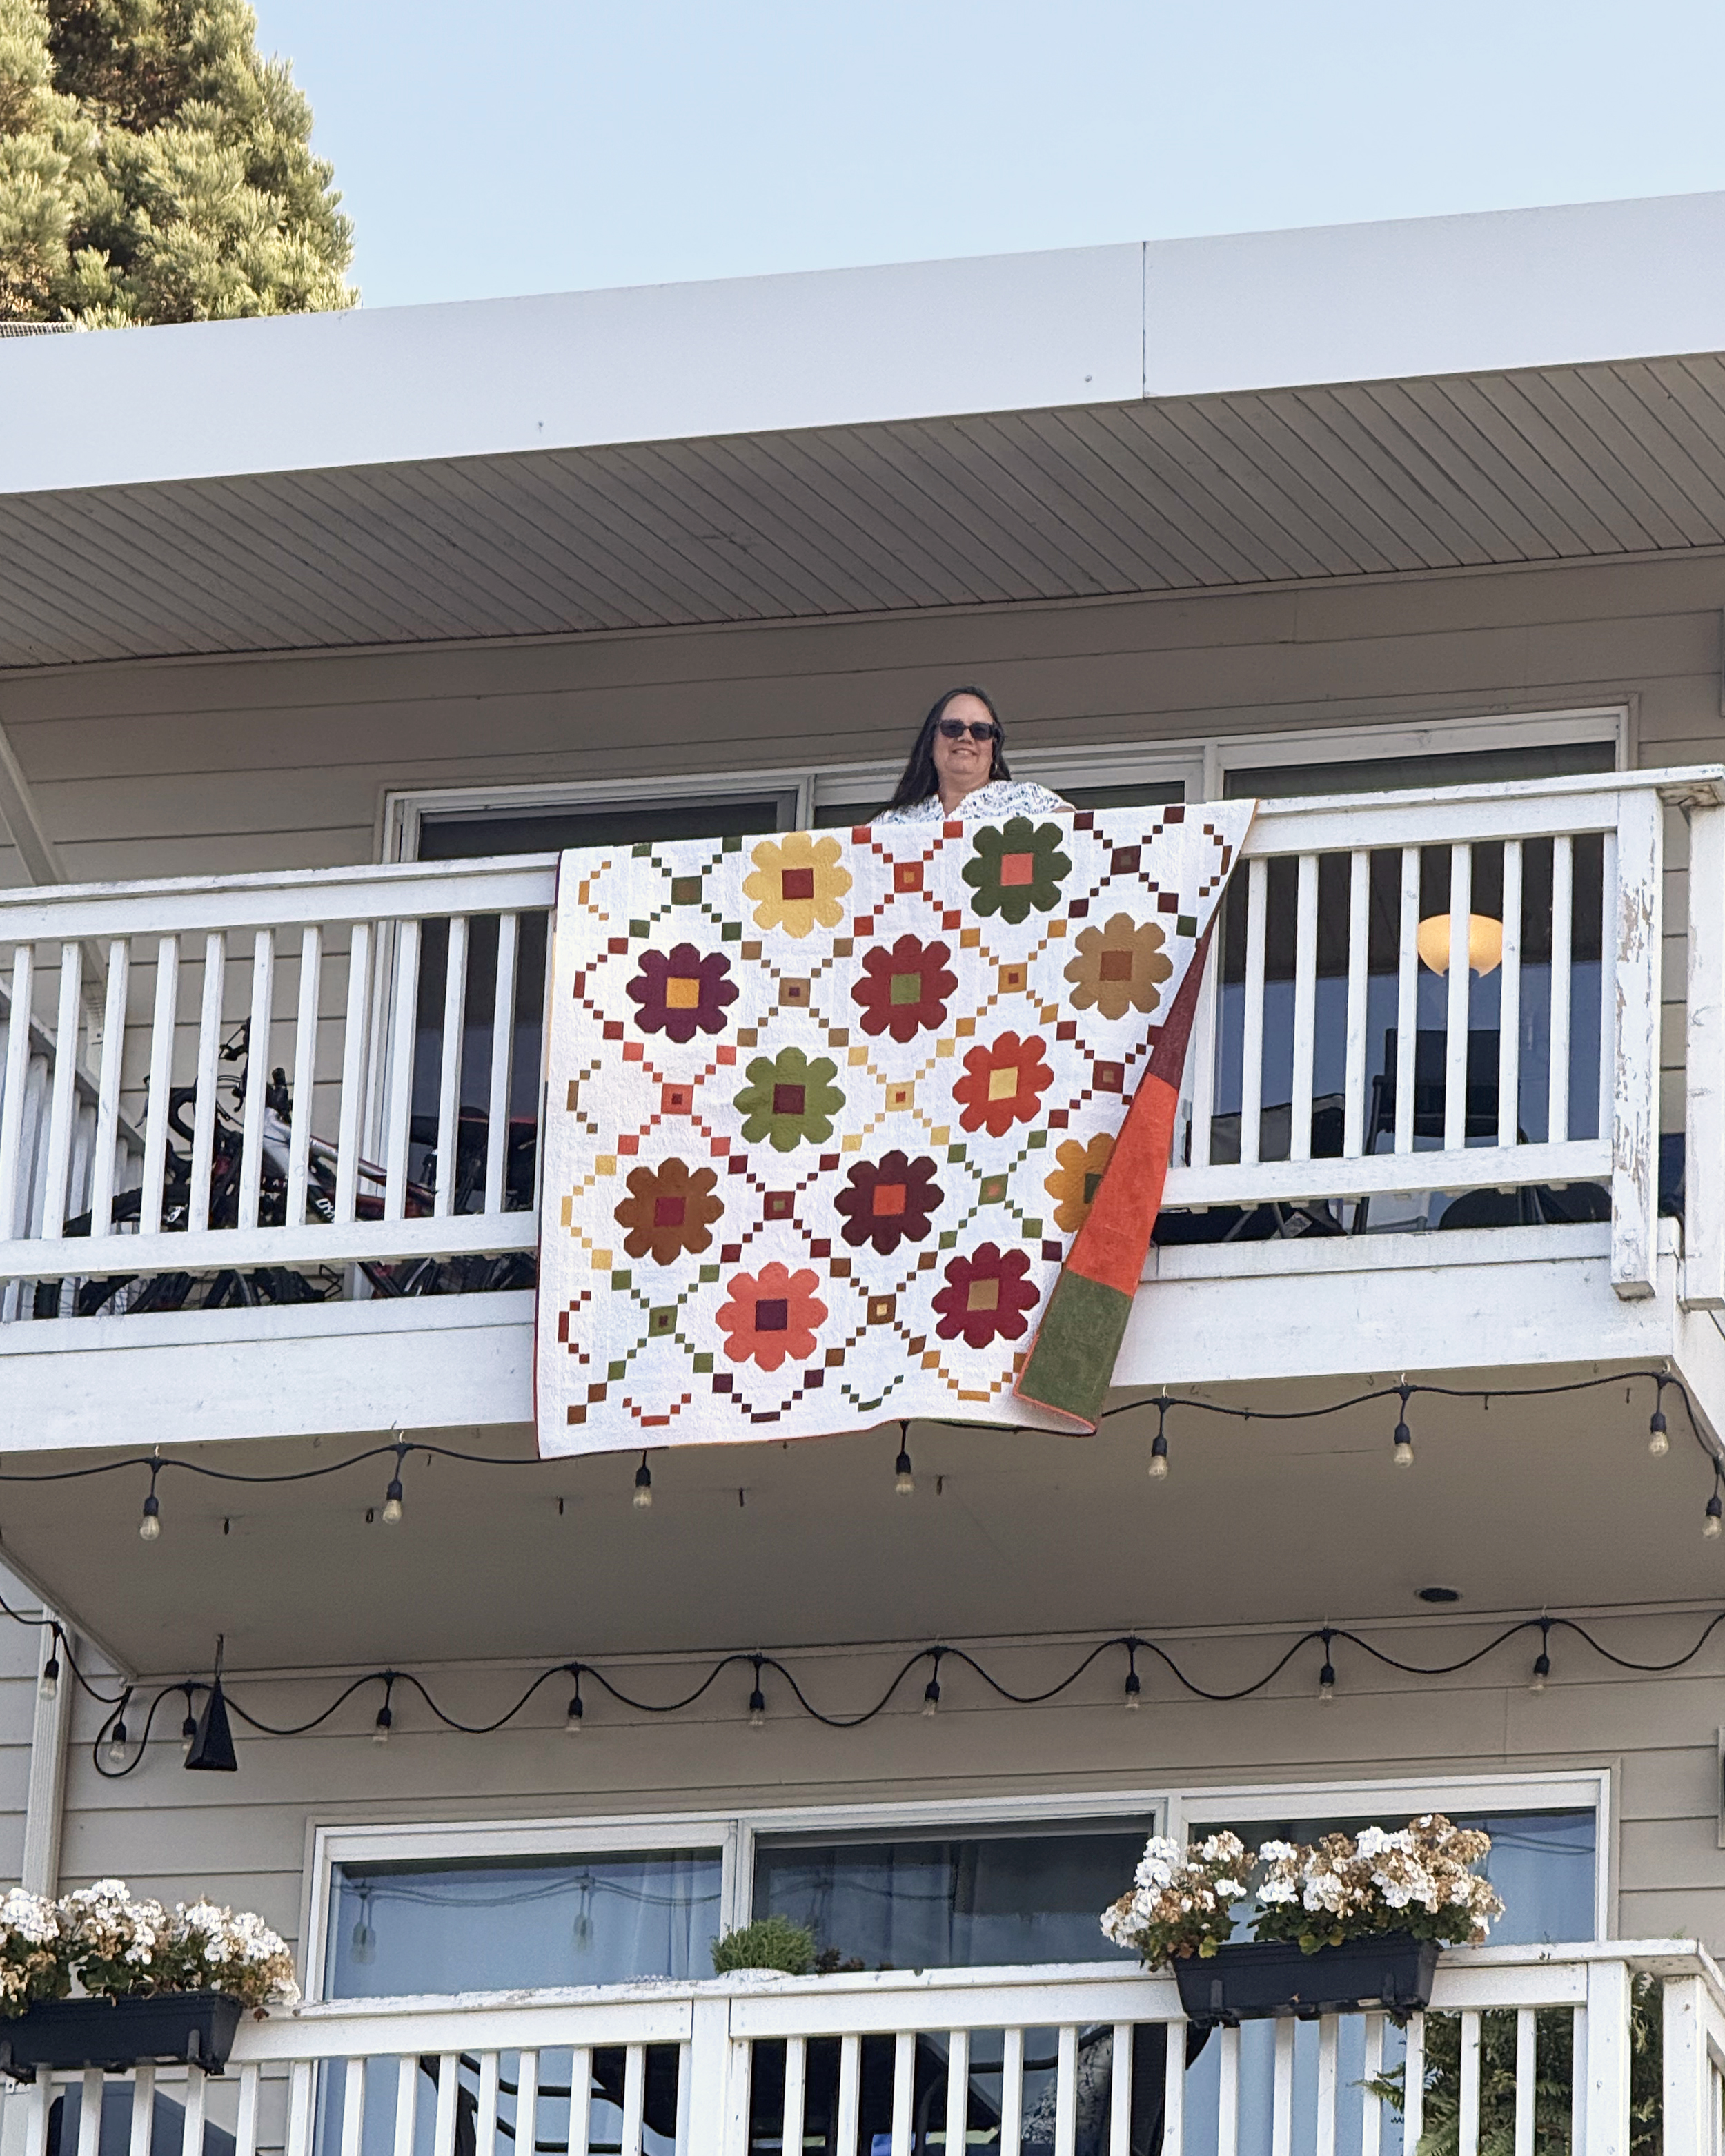
Finished Daisy Chain Quilt Top
Ta-Da! Both of my quilt tops are complete and ready to quilt!
Quilty Homework
Finish your quilt top and share pics of your work. Next week it will be time to prep the backing and baste. That will give you some time to catch up if you’re just getting started. But remember, you can work on this quilt on your own schedule!
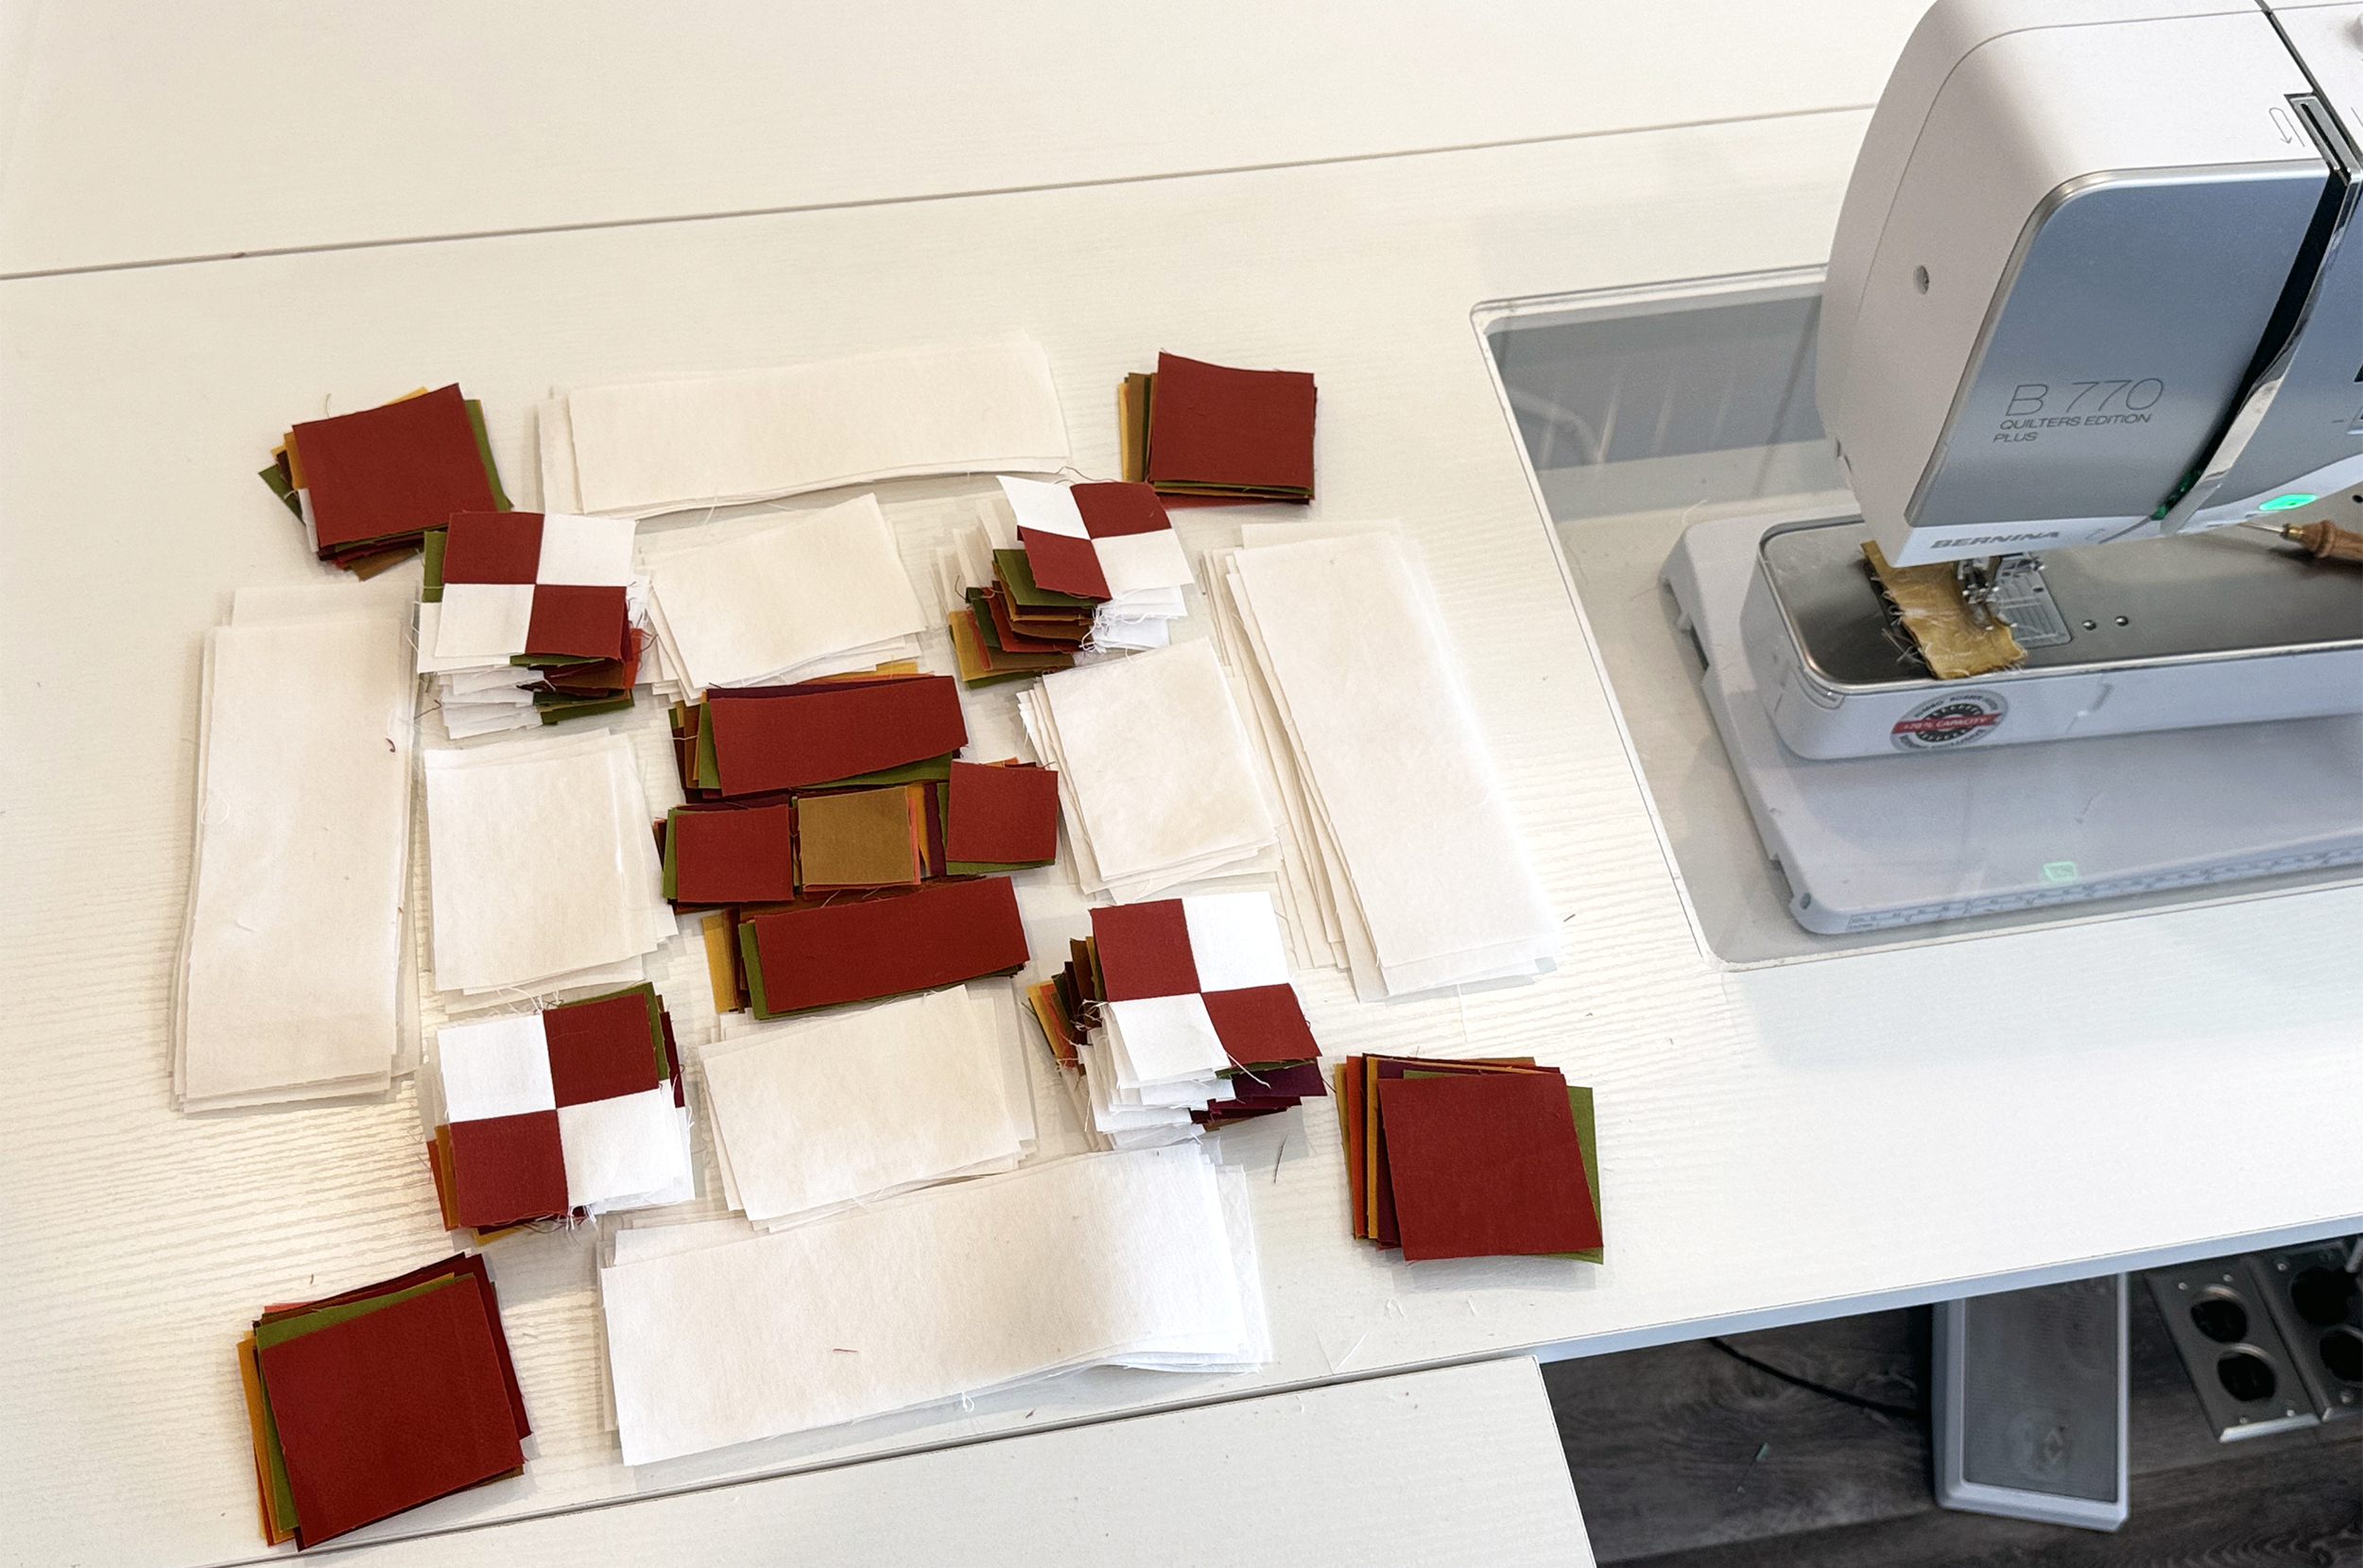
Follow along in the Daisy Chain quilt pattern pages 8-11 as you work on this week’s quilty “homework.” Start by chain piecing your strips that create the small 4-patch units. I’ve given step-by-step diagrams to follow in the pattern so it shouldn’t feel so daunting. Just remember to take it one section at a time!
Aren’t these units so cute??
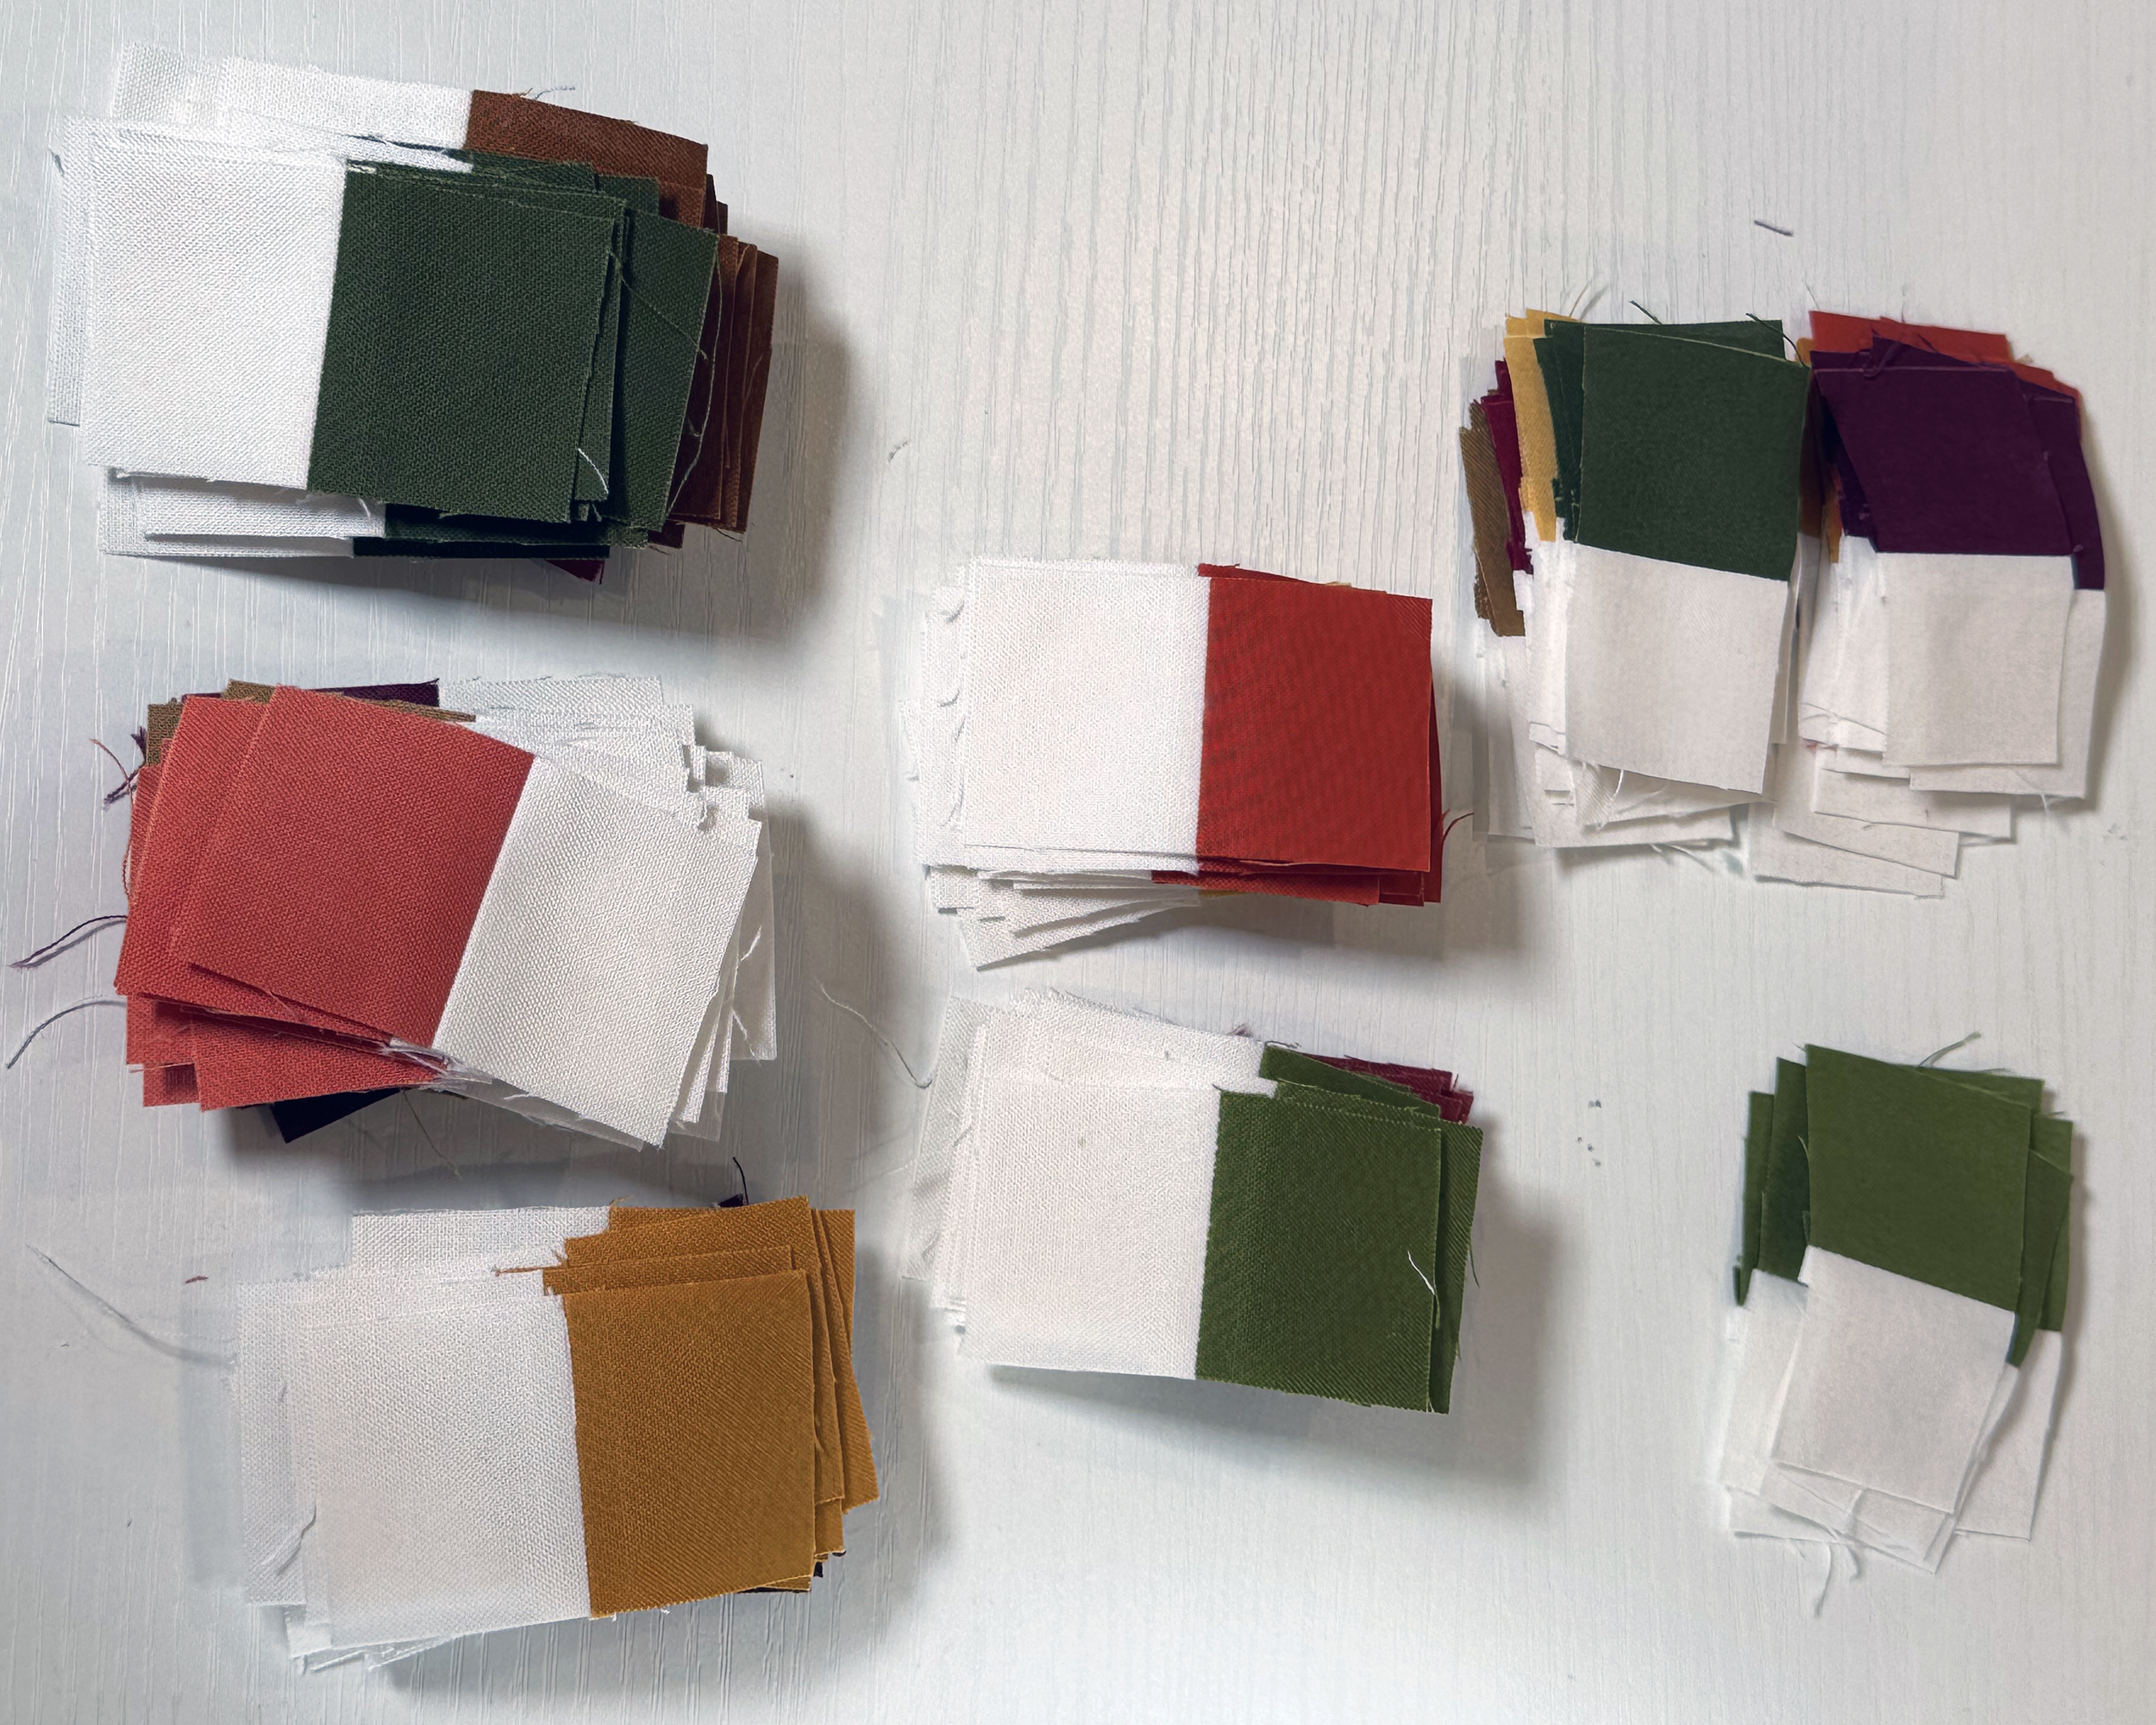
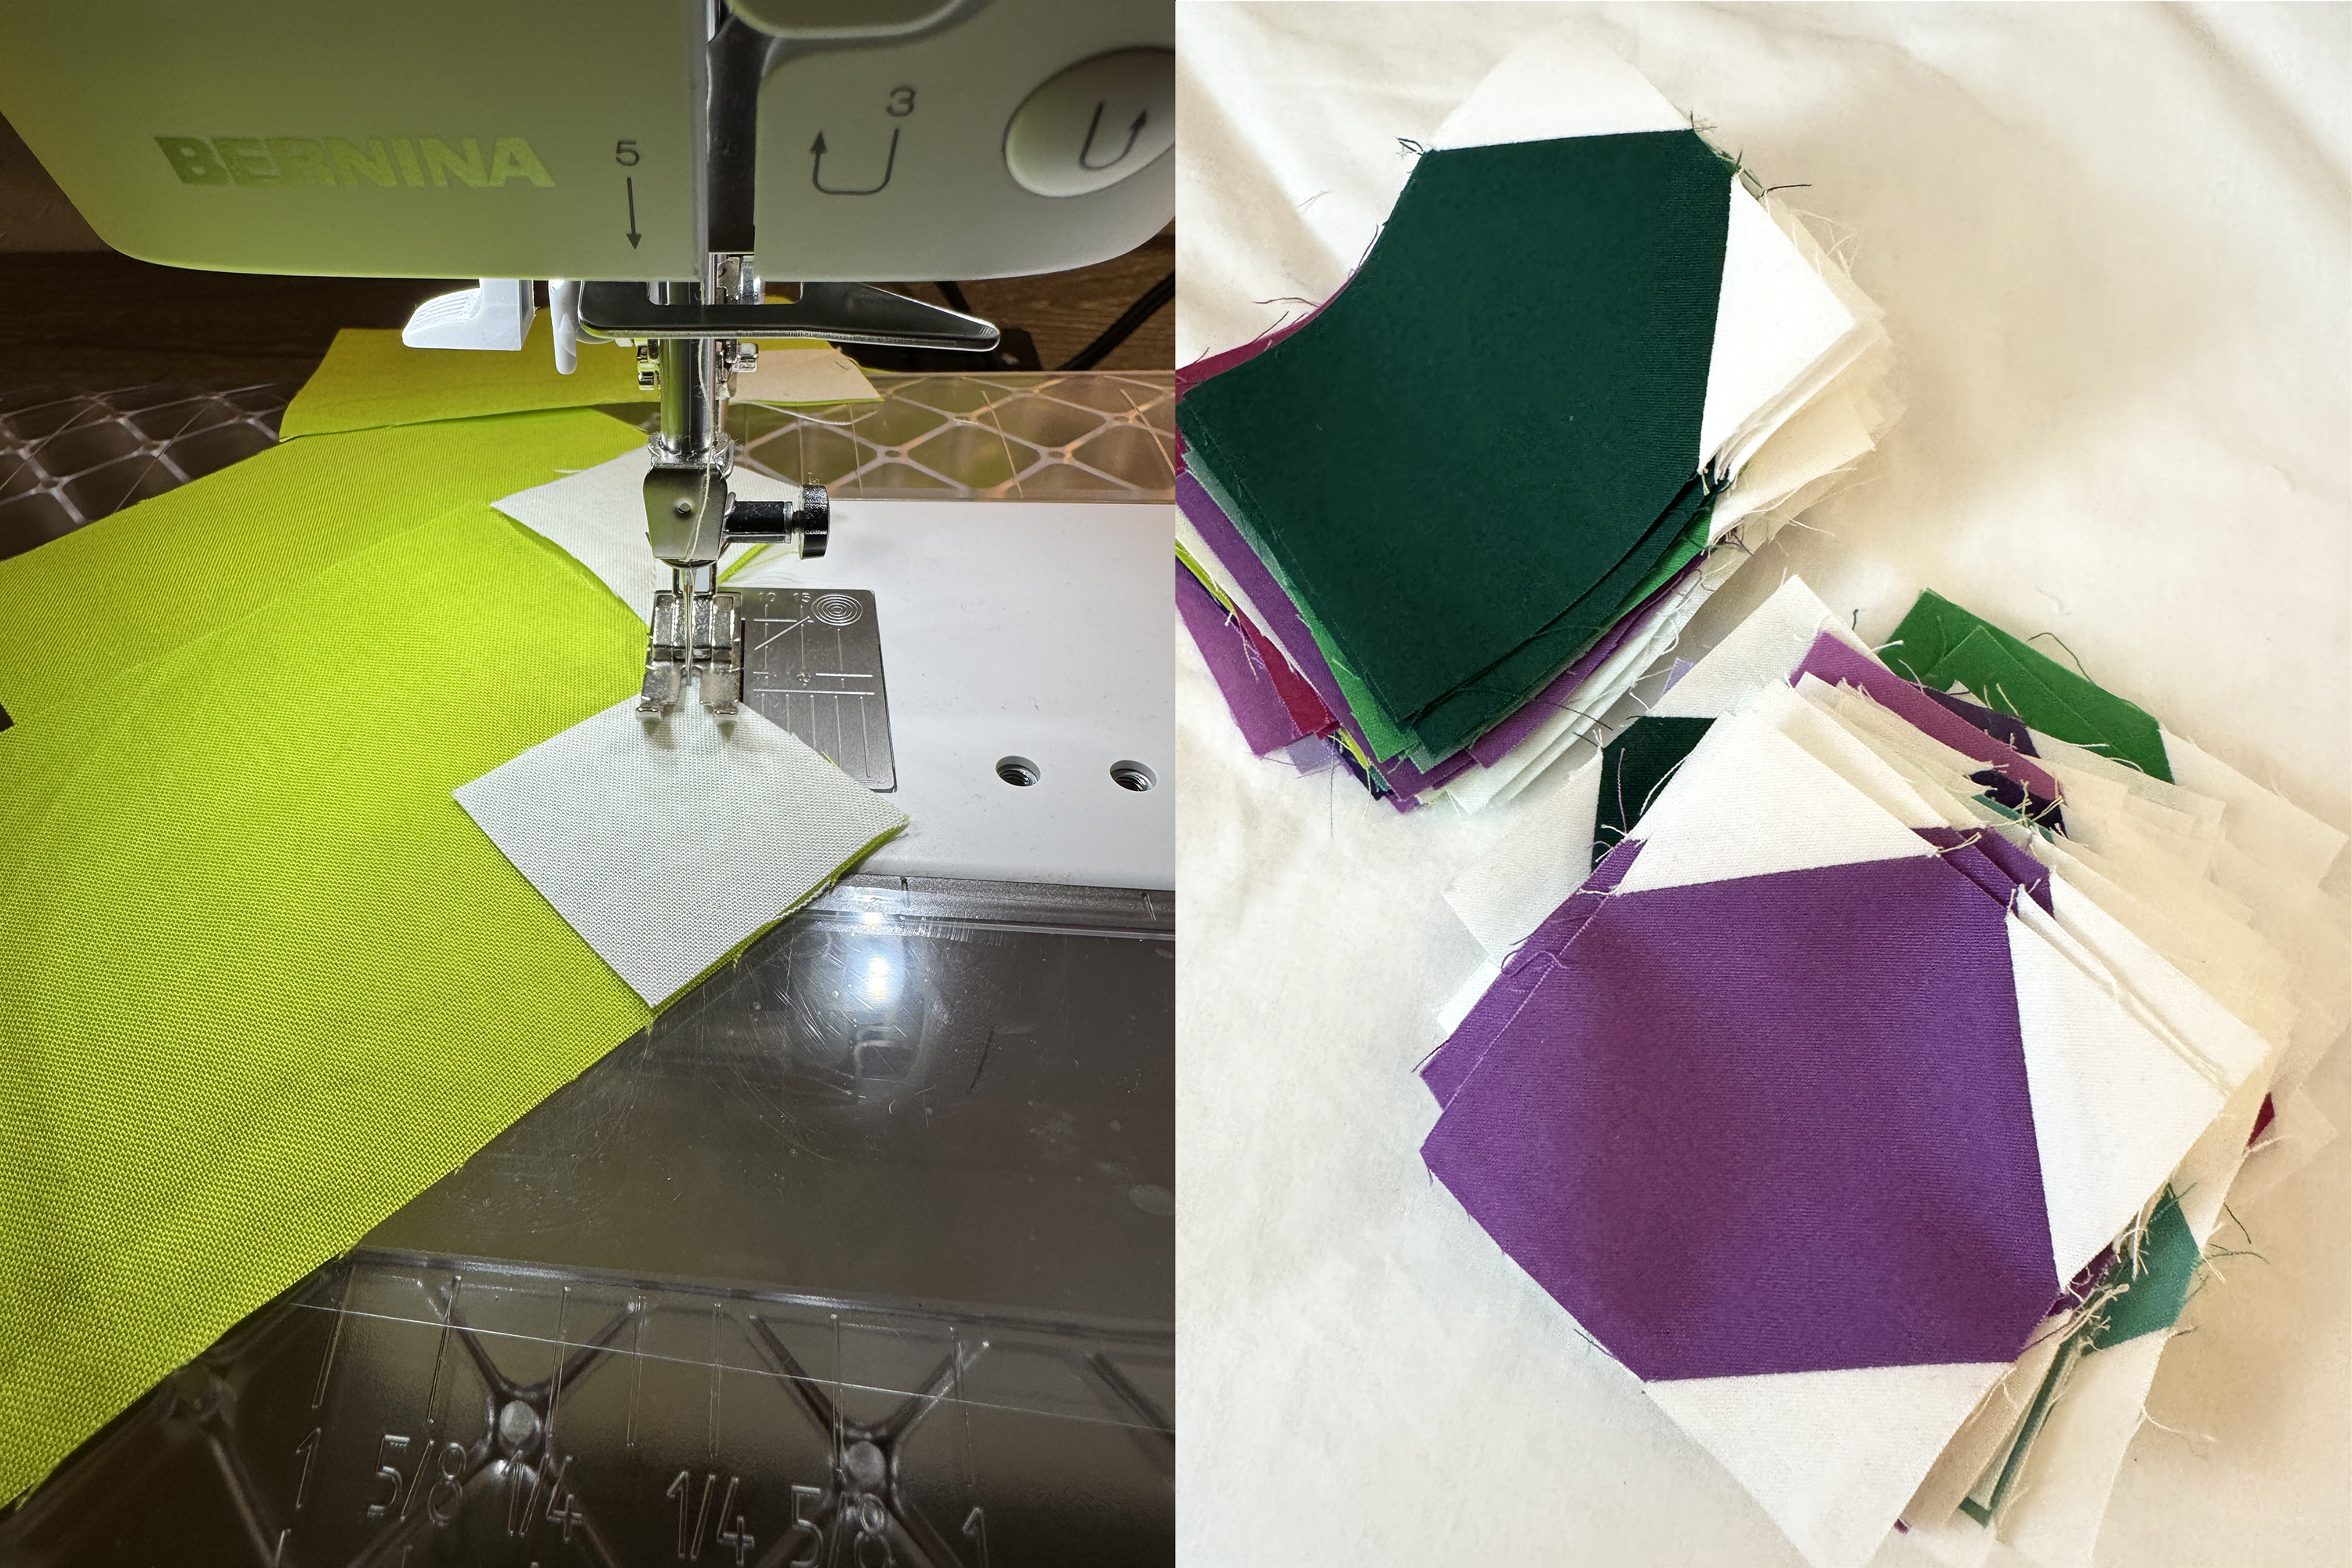
Keep all similar colors together so it’s easier to create each chain block or border unit. I’m pressing all of my seams open and sewing with a shorter stitch length so my small pieces will lie flat as everything goes together. I’ll work on the border blocks first, since those are smaller and it’s nice to get them out of the way.
Once the 4 patches are sewn, they can be treated as a single unit when sewing the rows together in each block. I’ll stack all of the same units on top of each other so I can sew a whole bunch at once.
This is one of the border units. Each piece is the same color so you can play around with final block placement later.
I use lots of pins and press after each and every seam. The Daisy Chain pattern includes the correct sizes that each unit should be at each step so you can double check your measurements as you sew. Accuracy is key to getting things to line up, so test your 1/4″ seam allowances and adjust if needed.
I chain piece, and then I assembly line press to speed things up.
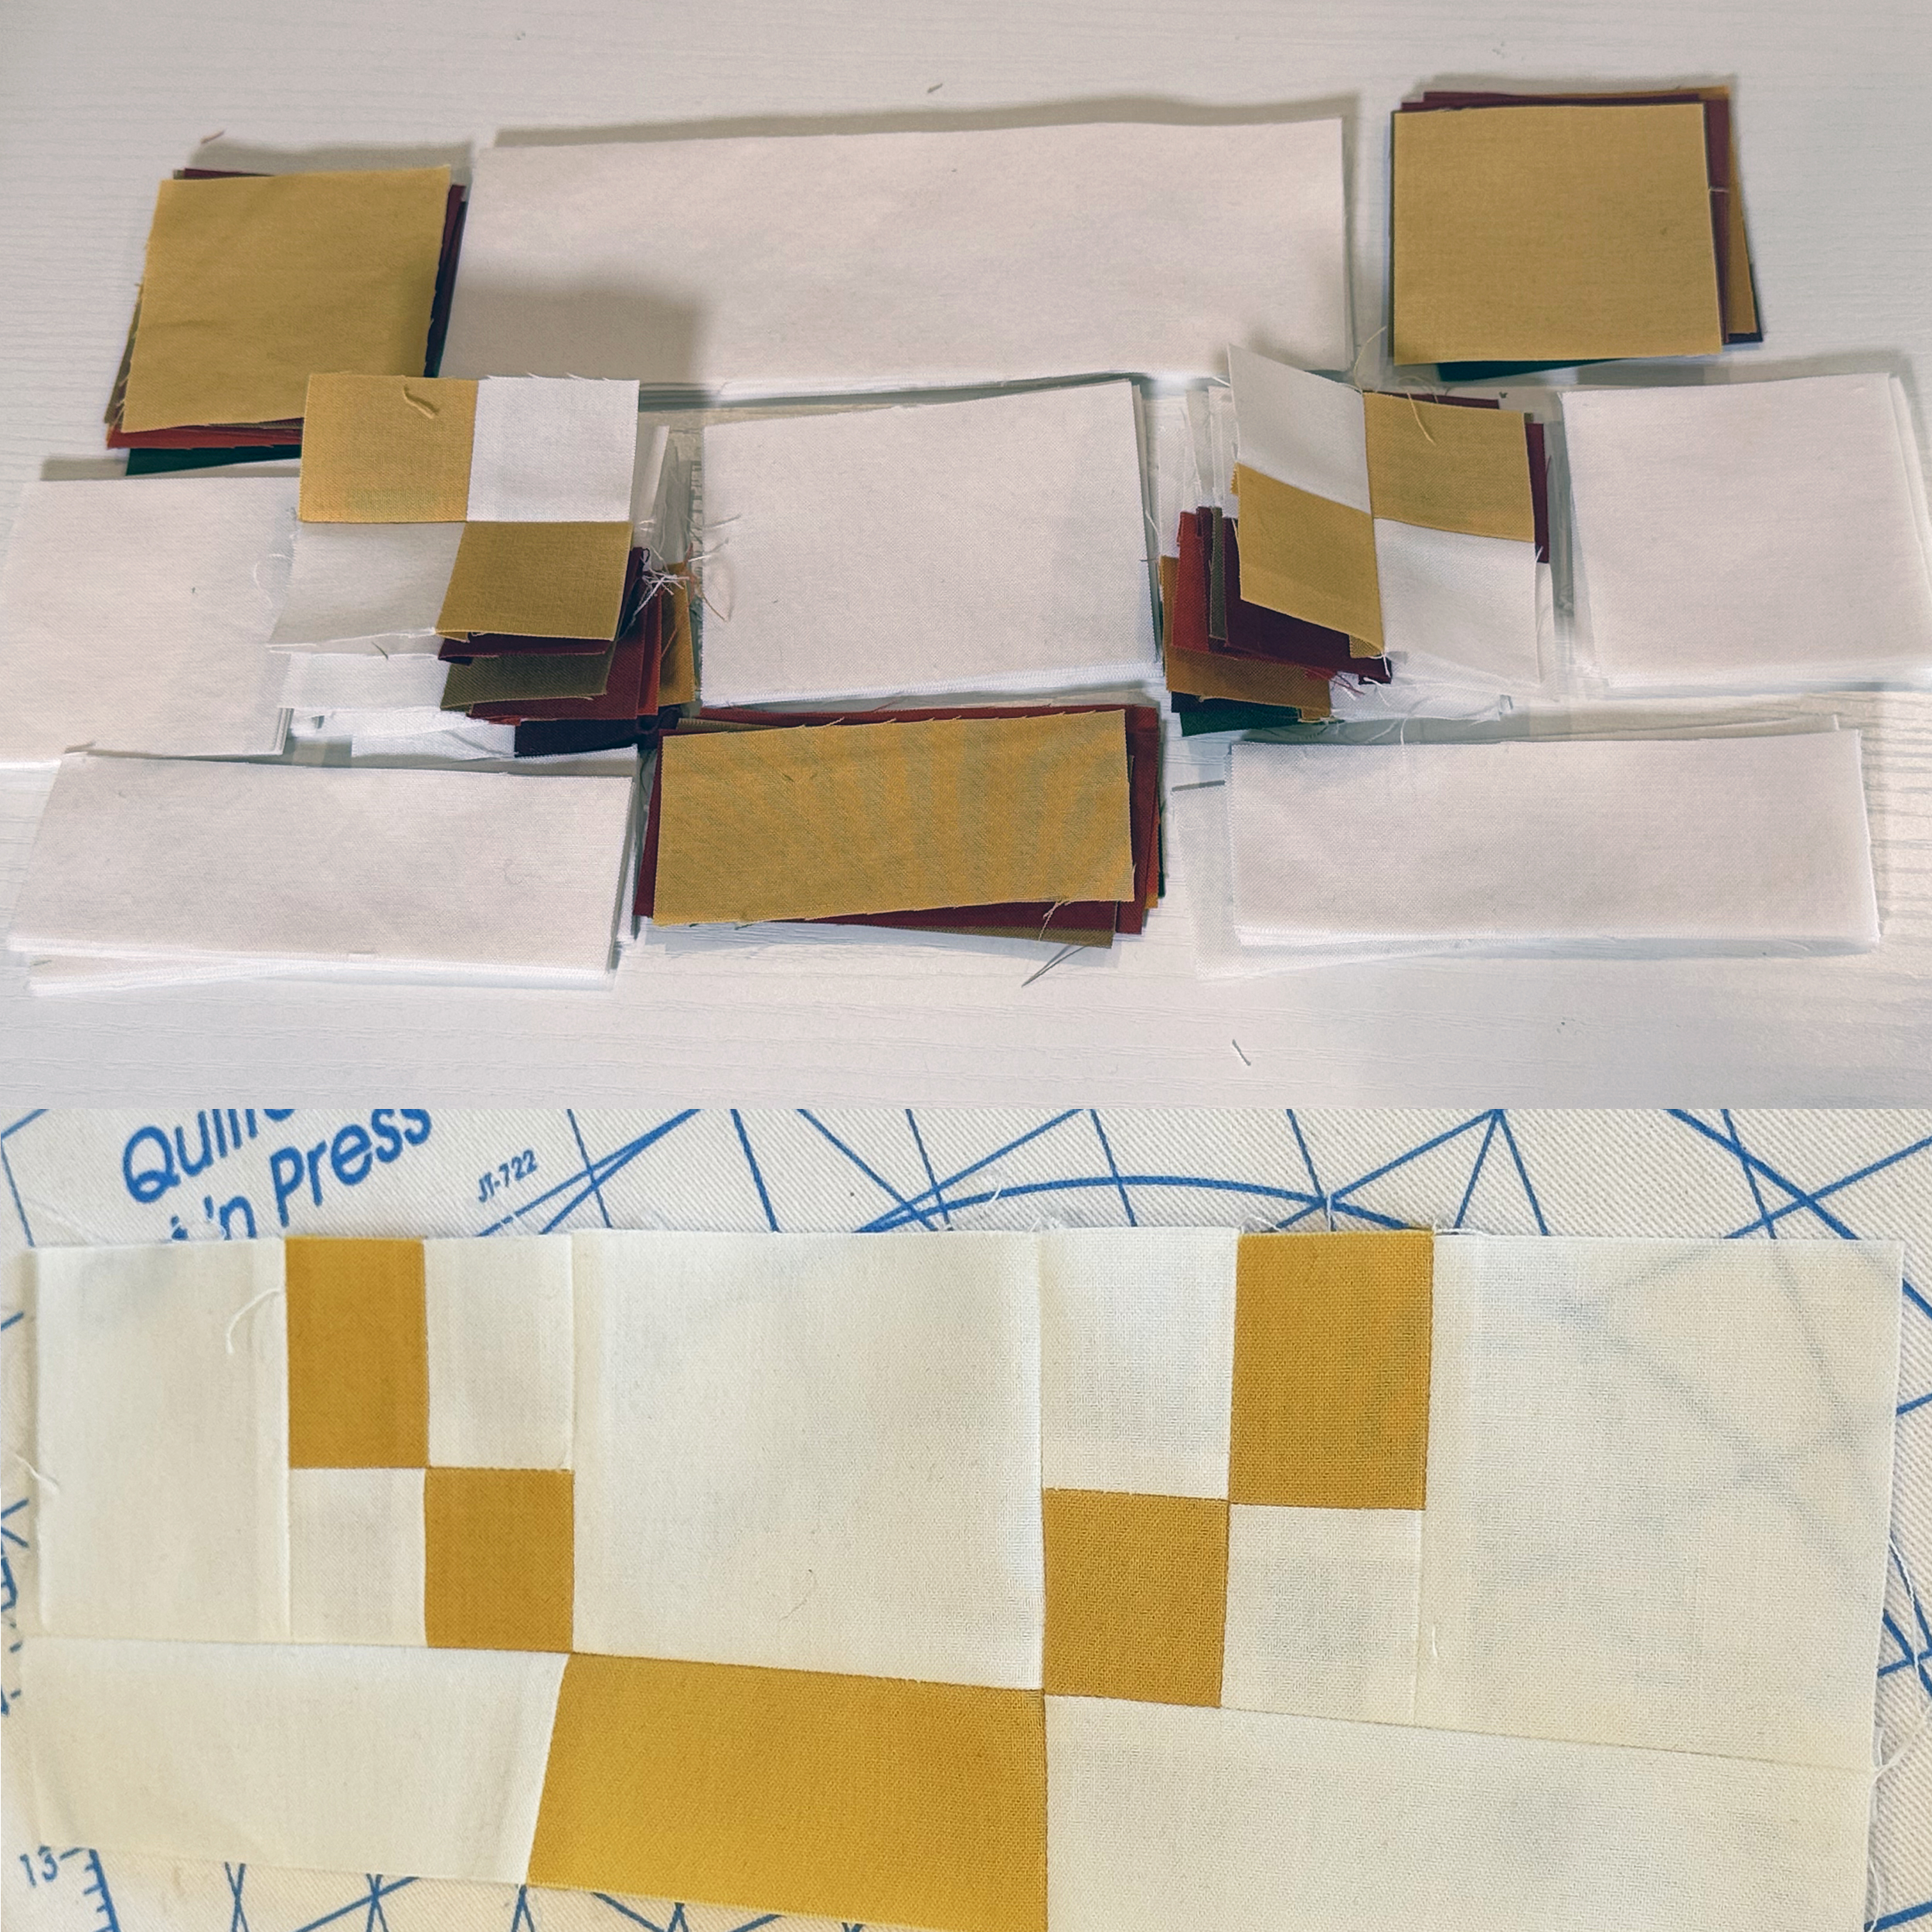
Now it’s time to organize everything else for the full size chain blocks. It’s a lot of pieces but as long as you organize all the smaller units by color, they go together fairly quickly. I make sure that the pieces for all of one block are laid out correctly first.
It’s really fun to sew all of these units at once, then stack them together by color.
Next, I stack all of the rest of the units on top right next to my sewing machine. I like to chain piece, or assembly line sew as I go. This means I don’t cut threads in between each pair of units I’m sewing. I’ll do that at the end. It looks like the background pieces are so much smaller, but that’s only because the seam allowances aren’t sewn yet.
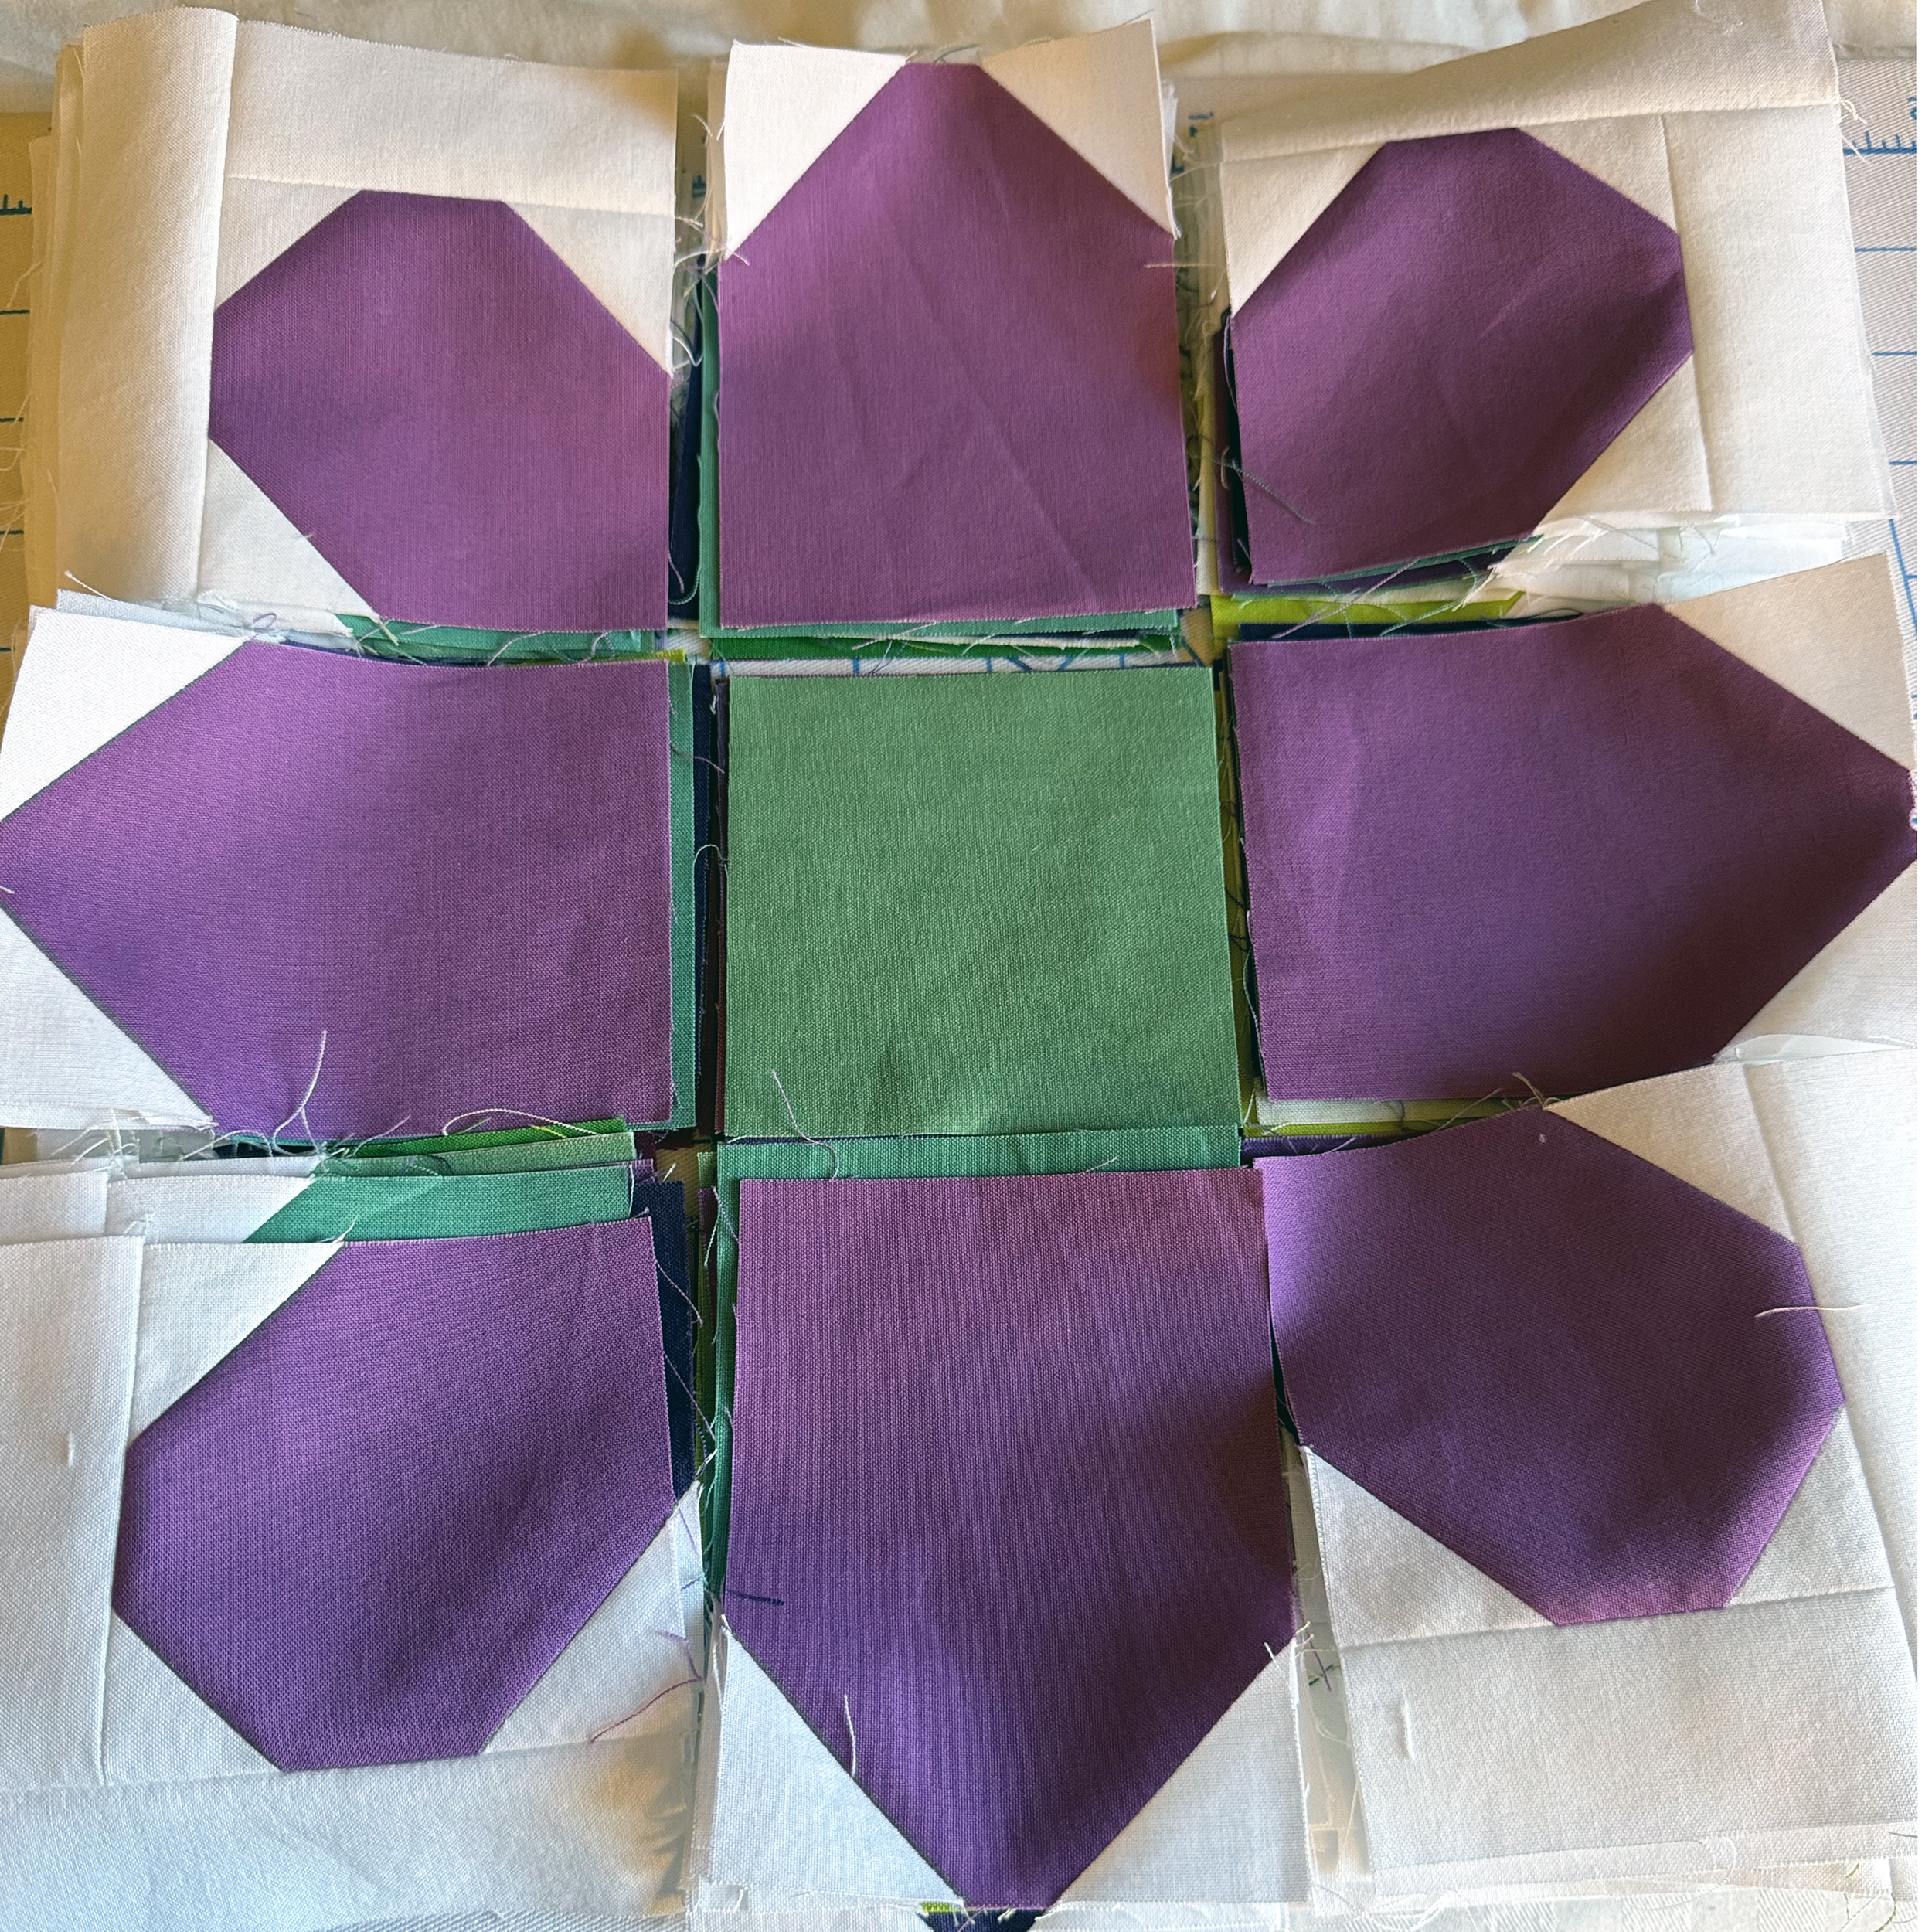
Bonus tip: be sure to use a contrasting fabric for your center square of each block so the colors don’t look “muddy.”
When I chain piece, I will sew 2 units together at a time and finish up a whole stack at once.
Below is my pretty stack of finished blocks! I used pins at each intersection so that my corners matched up nicely. Here you can see that I’ve pressed each an every seam open, resulting in super flat blocks!! I made another stack in another colorway, but sadly forgot to take a pic of my finished blocks, but you’ll see more of the other version in the next post, so stay tuned!
Homework for next time
Don’t forget to sew the corner blocks, and next week it will be time to assemble the Daisy Blocks, Chain Blocks and border blocks into the quilt top.
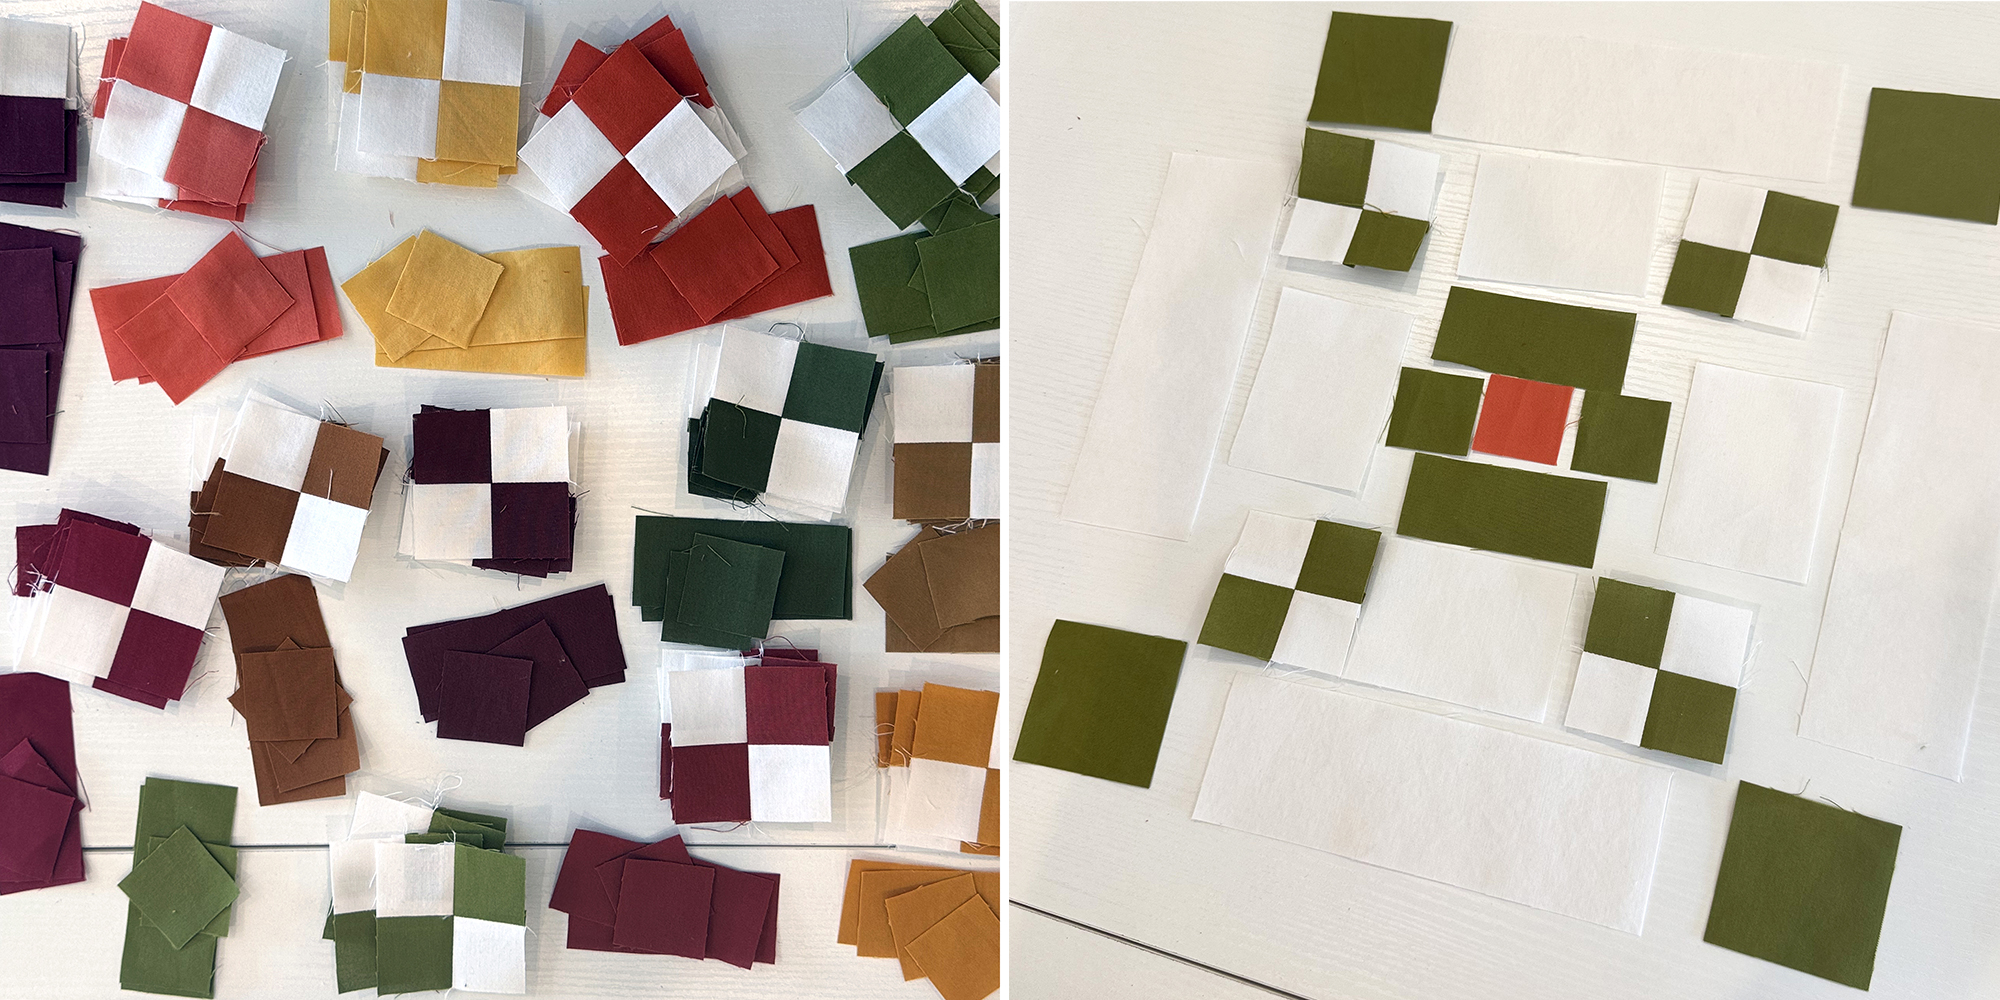
Whenever I’m sewing quilt blocks that have lots of pieces, I find it much easier to sew the smaller units of each block into larger units, then chain piece everything for speed and efficiency. Follow along in the Daisy Chain quilt pattern on page 6-7s for the images and tips shown below. I’m making two of these at the same time in 2 different colorways: Autumn & Purple Vibrations.
Making Stitch-N-Flip Units
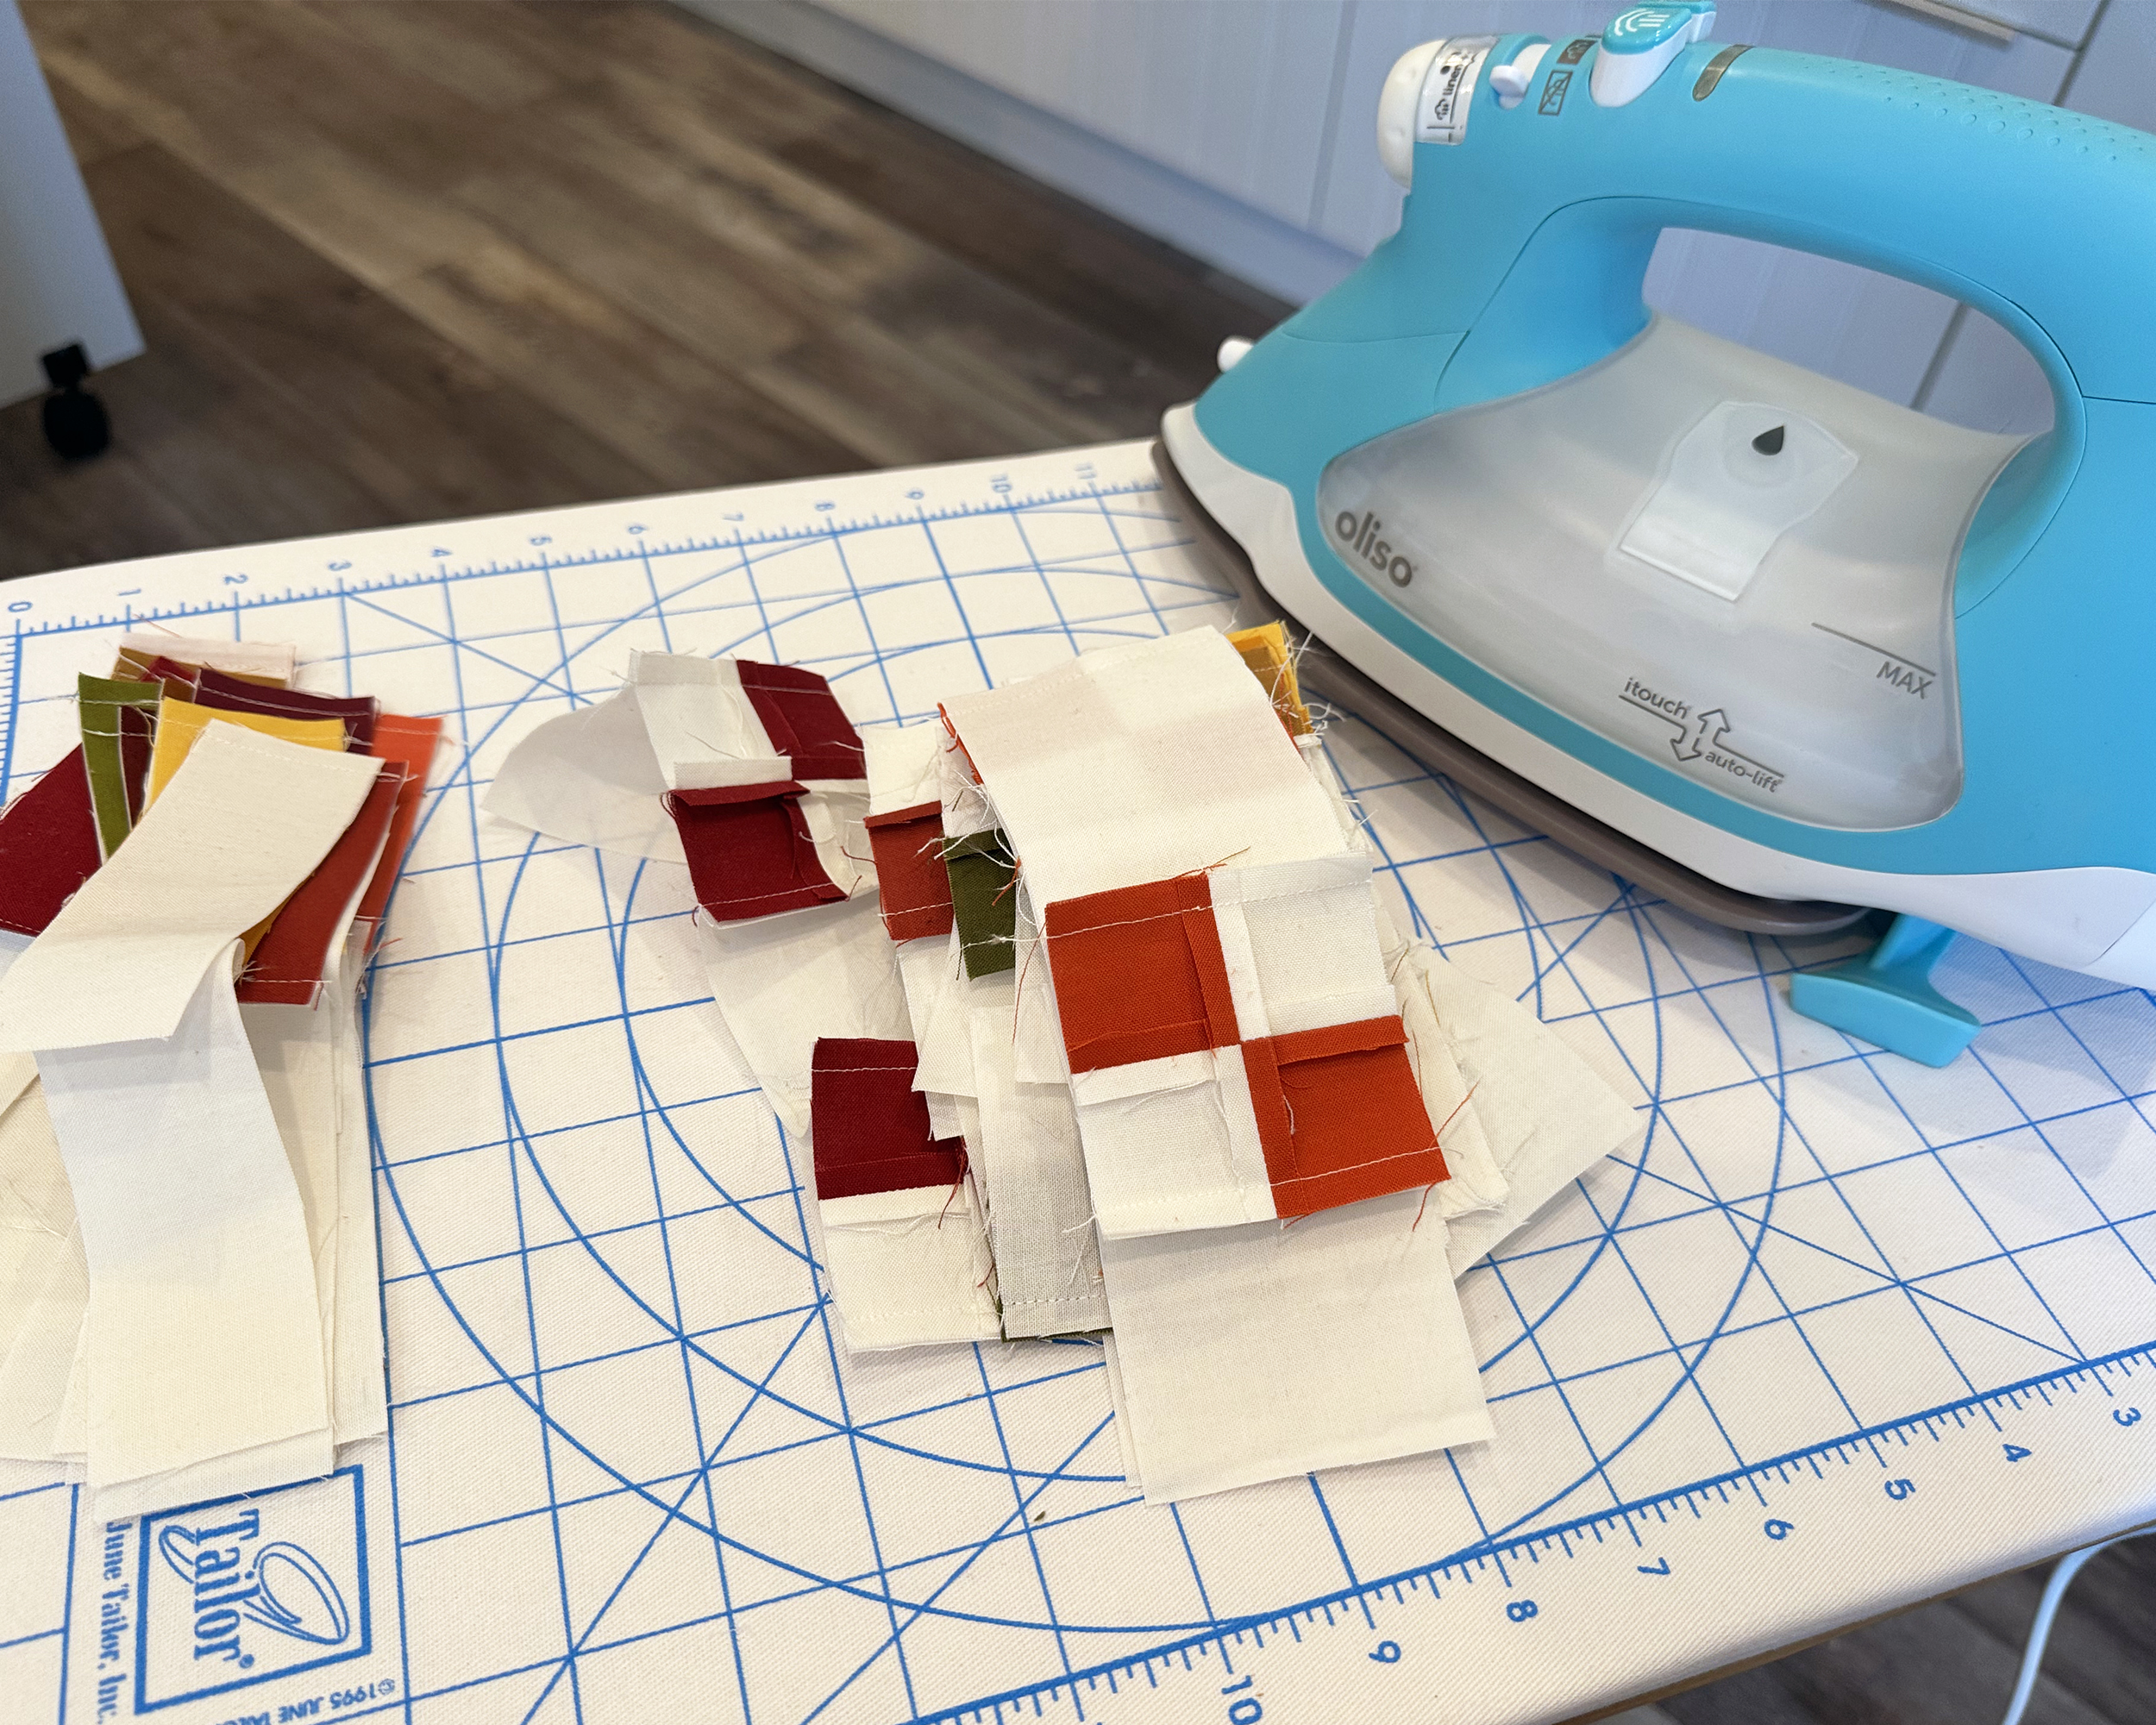
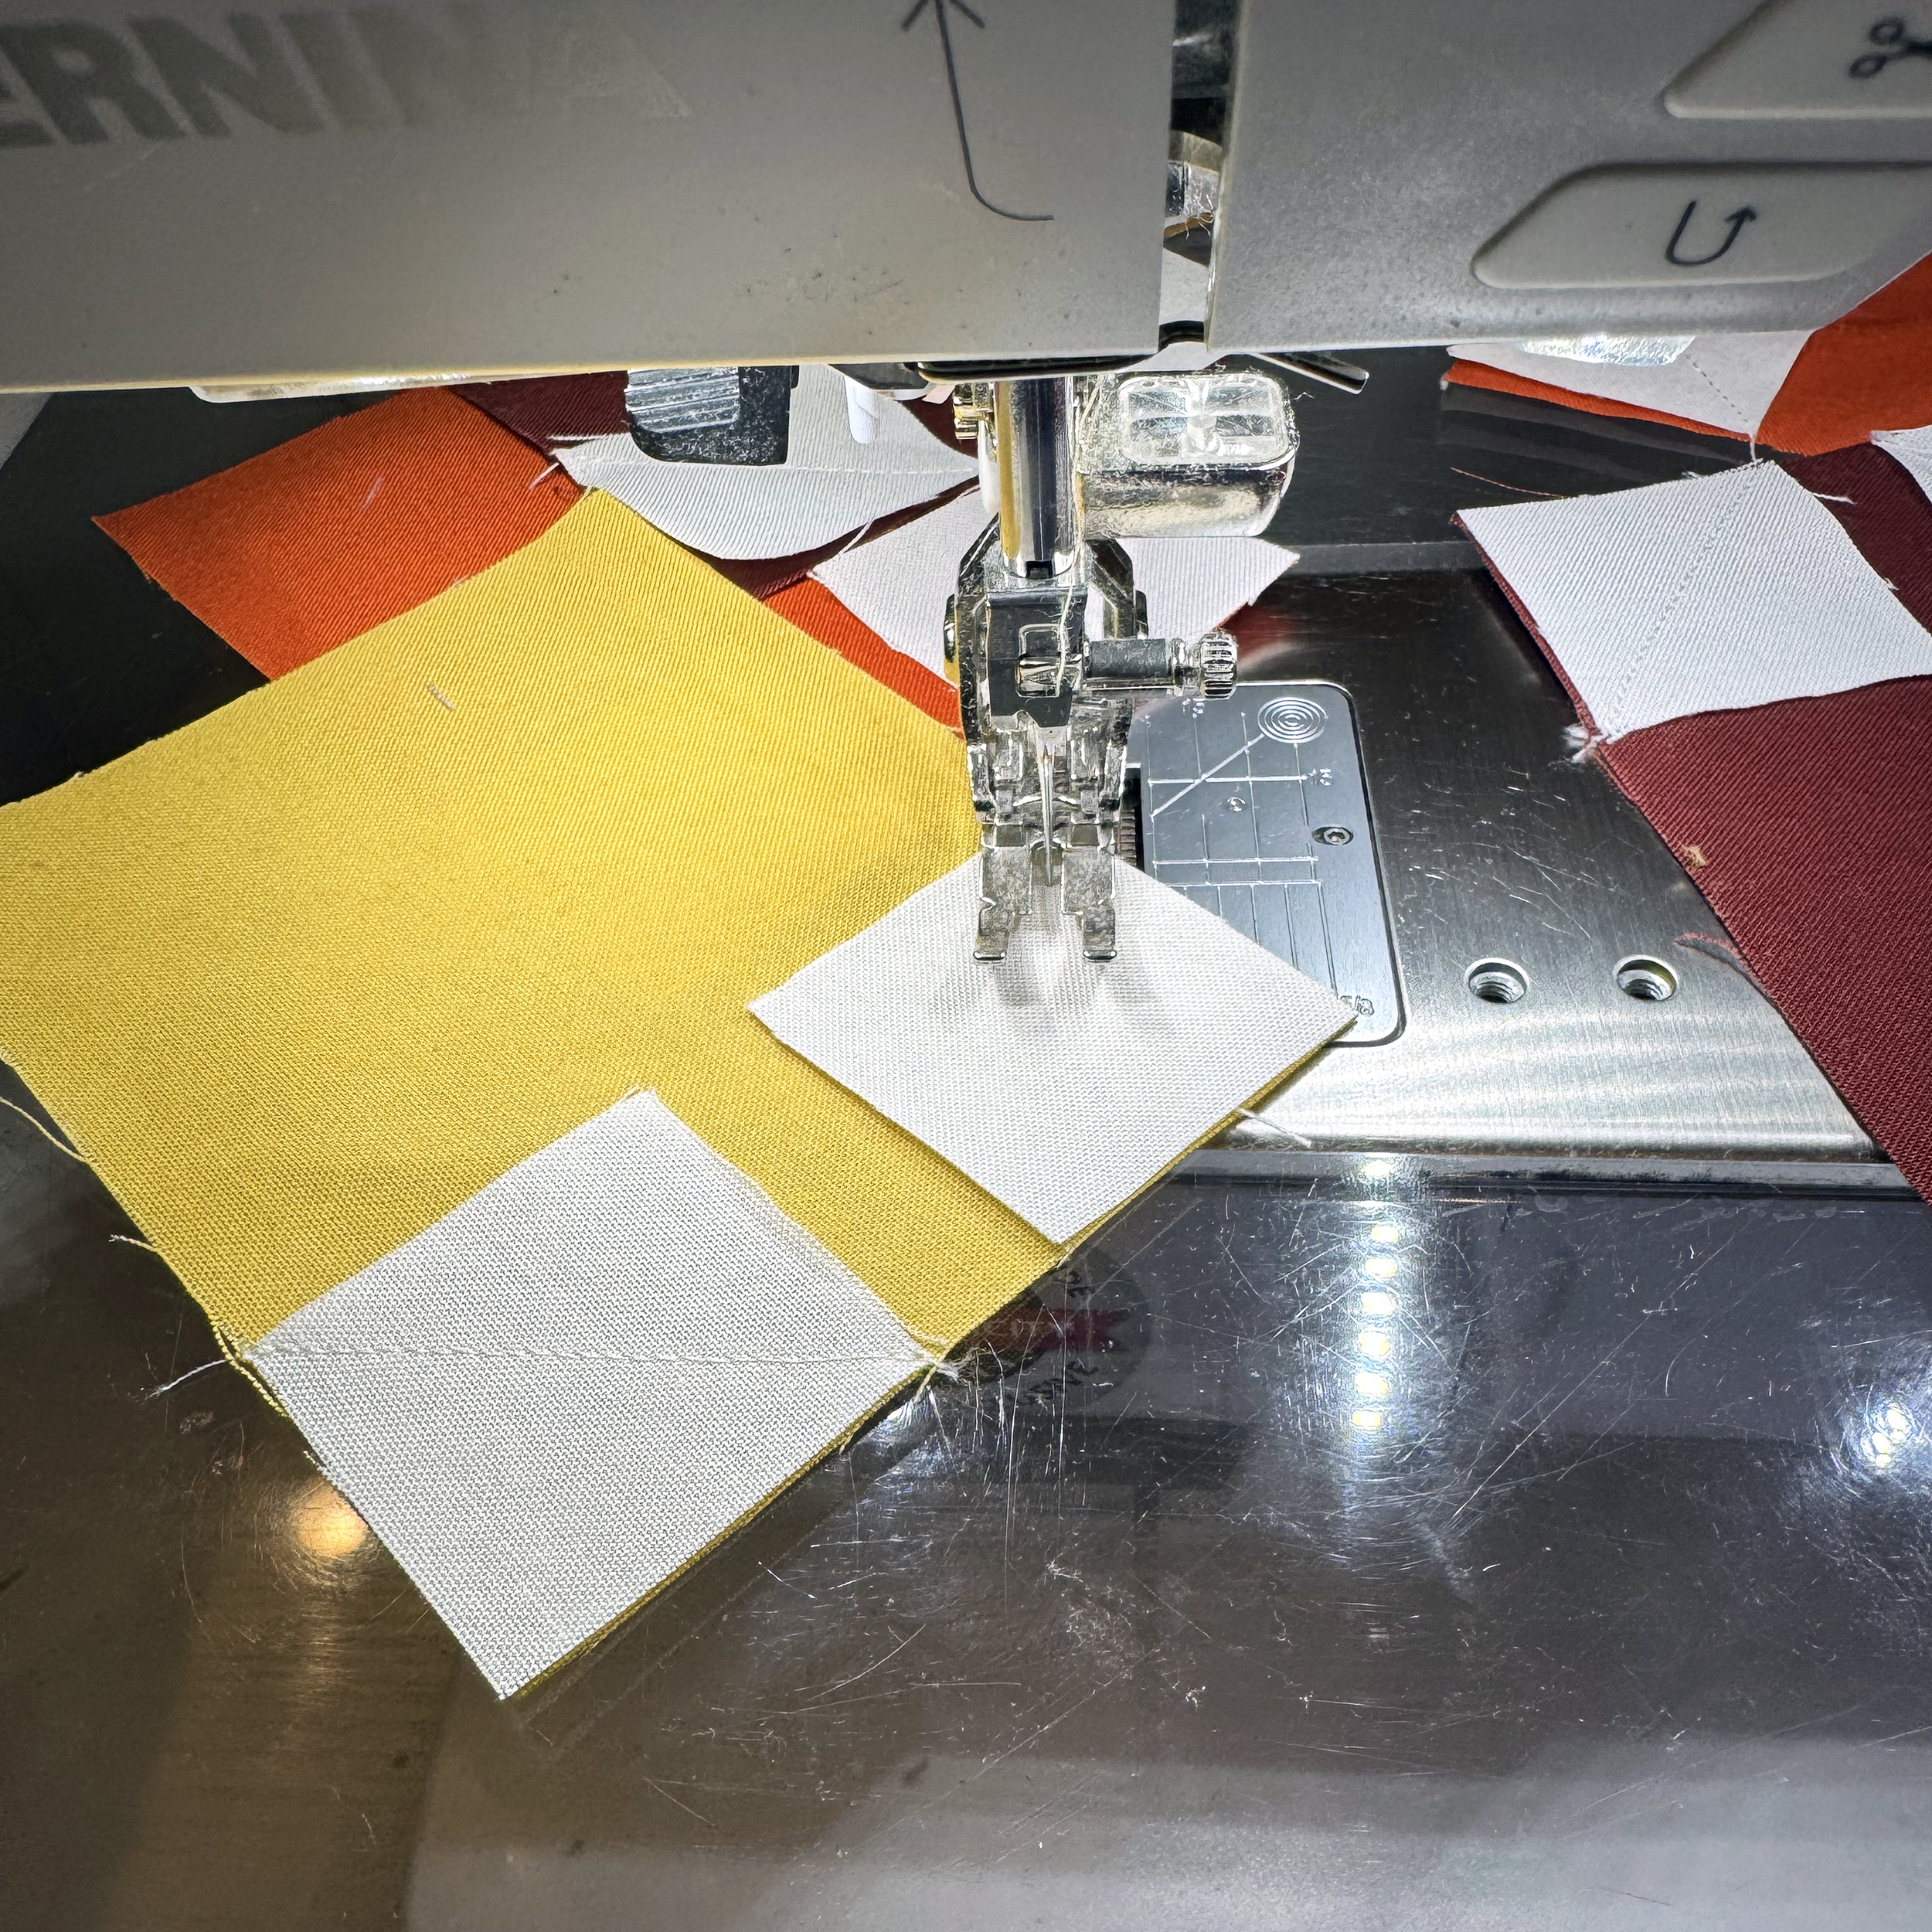
So the first thing we are doing is sewing all of the stitch-n-flip units which will make the petals of each daisy flower block. You can either mark lines down the center of each background unit, or you can eyeball since they are very small.
At each step in the pattern I give what the measurements should be so that you can closely follow along. It’s not that huge of a deal if your units aren’t the exact same size as mine, but you do want them to be all the same size for consistency.
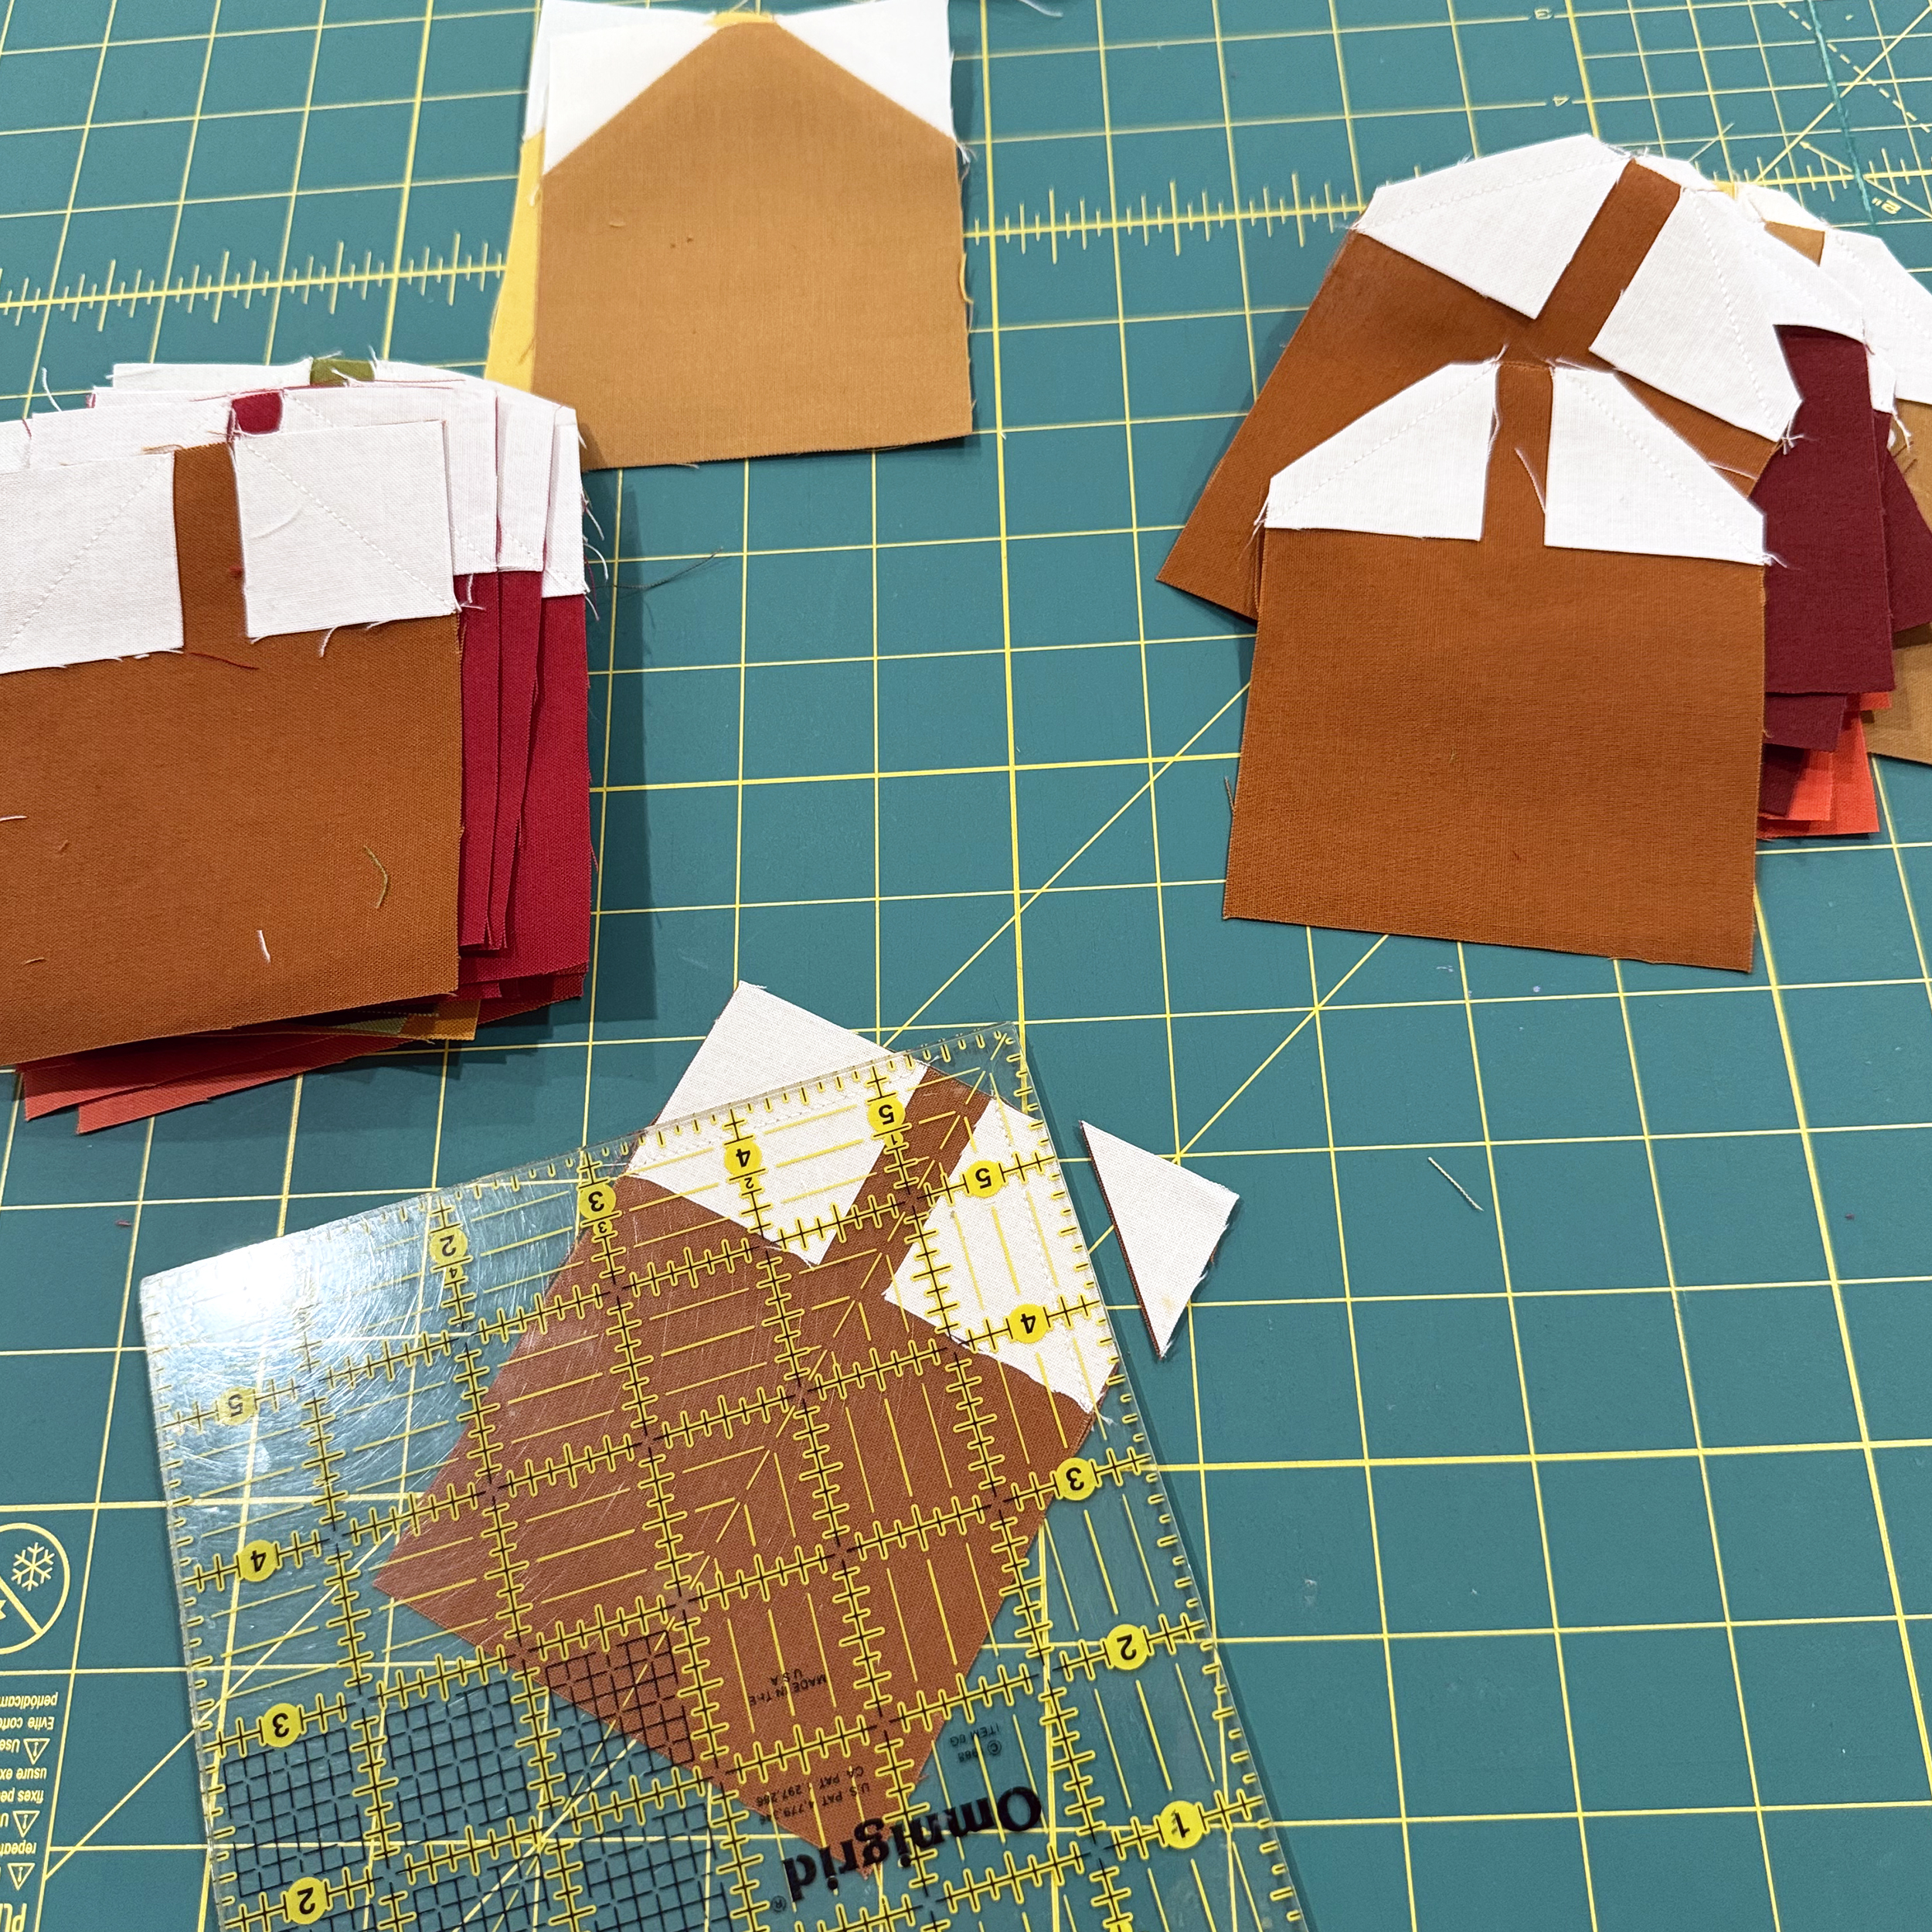
I prefer to sew all of the little stitch-n-flip squares on one side of each block so I can chain piece. That means assembly-line sewing a whole bunch without cutting threads in between. Then I will trim off all the corners at once and press my seams open.
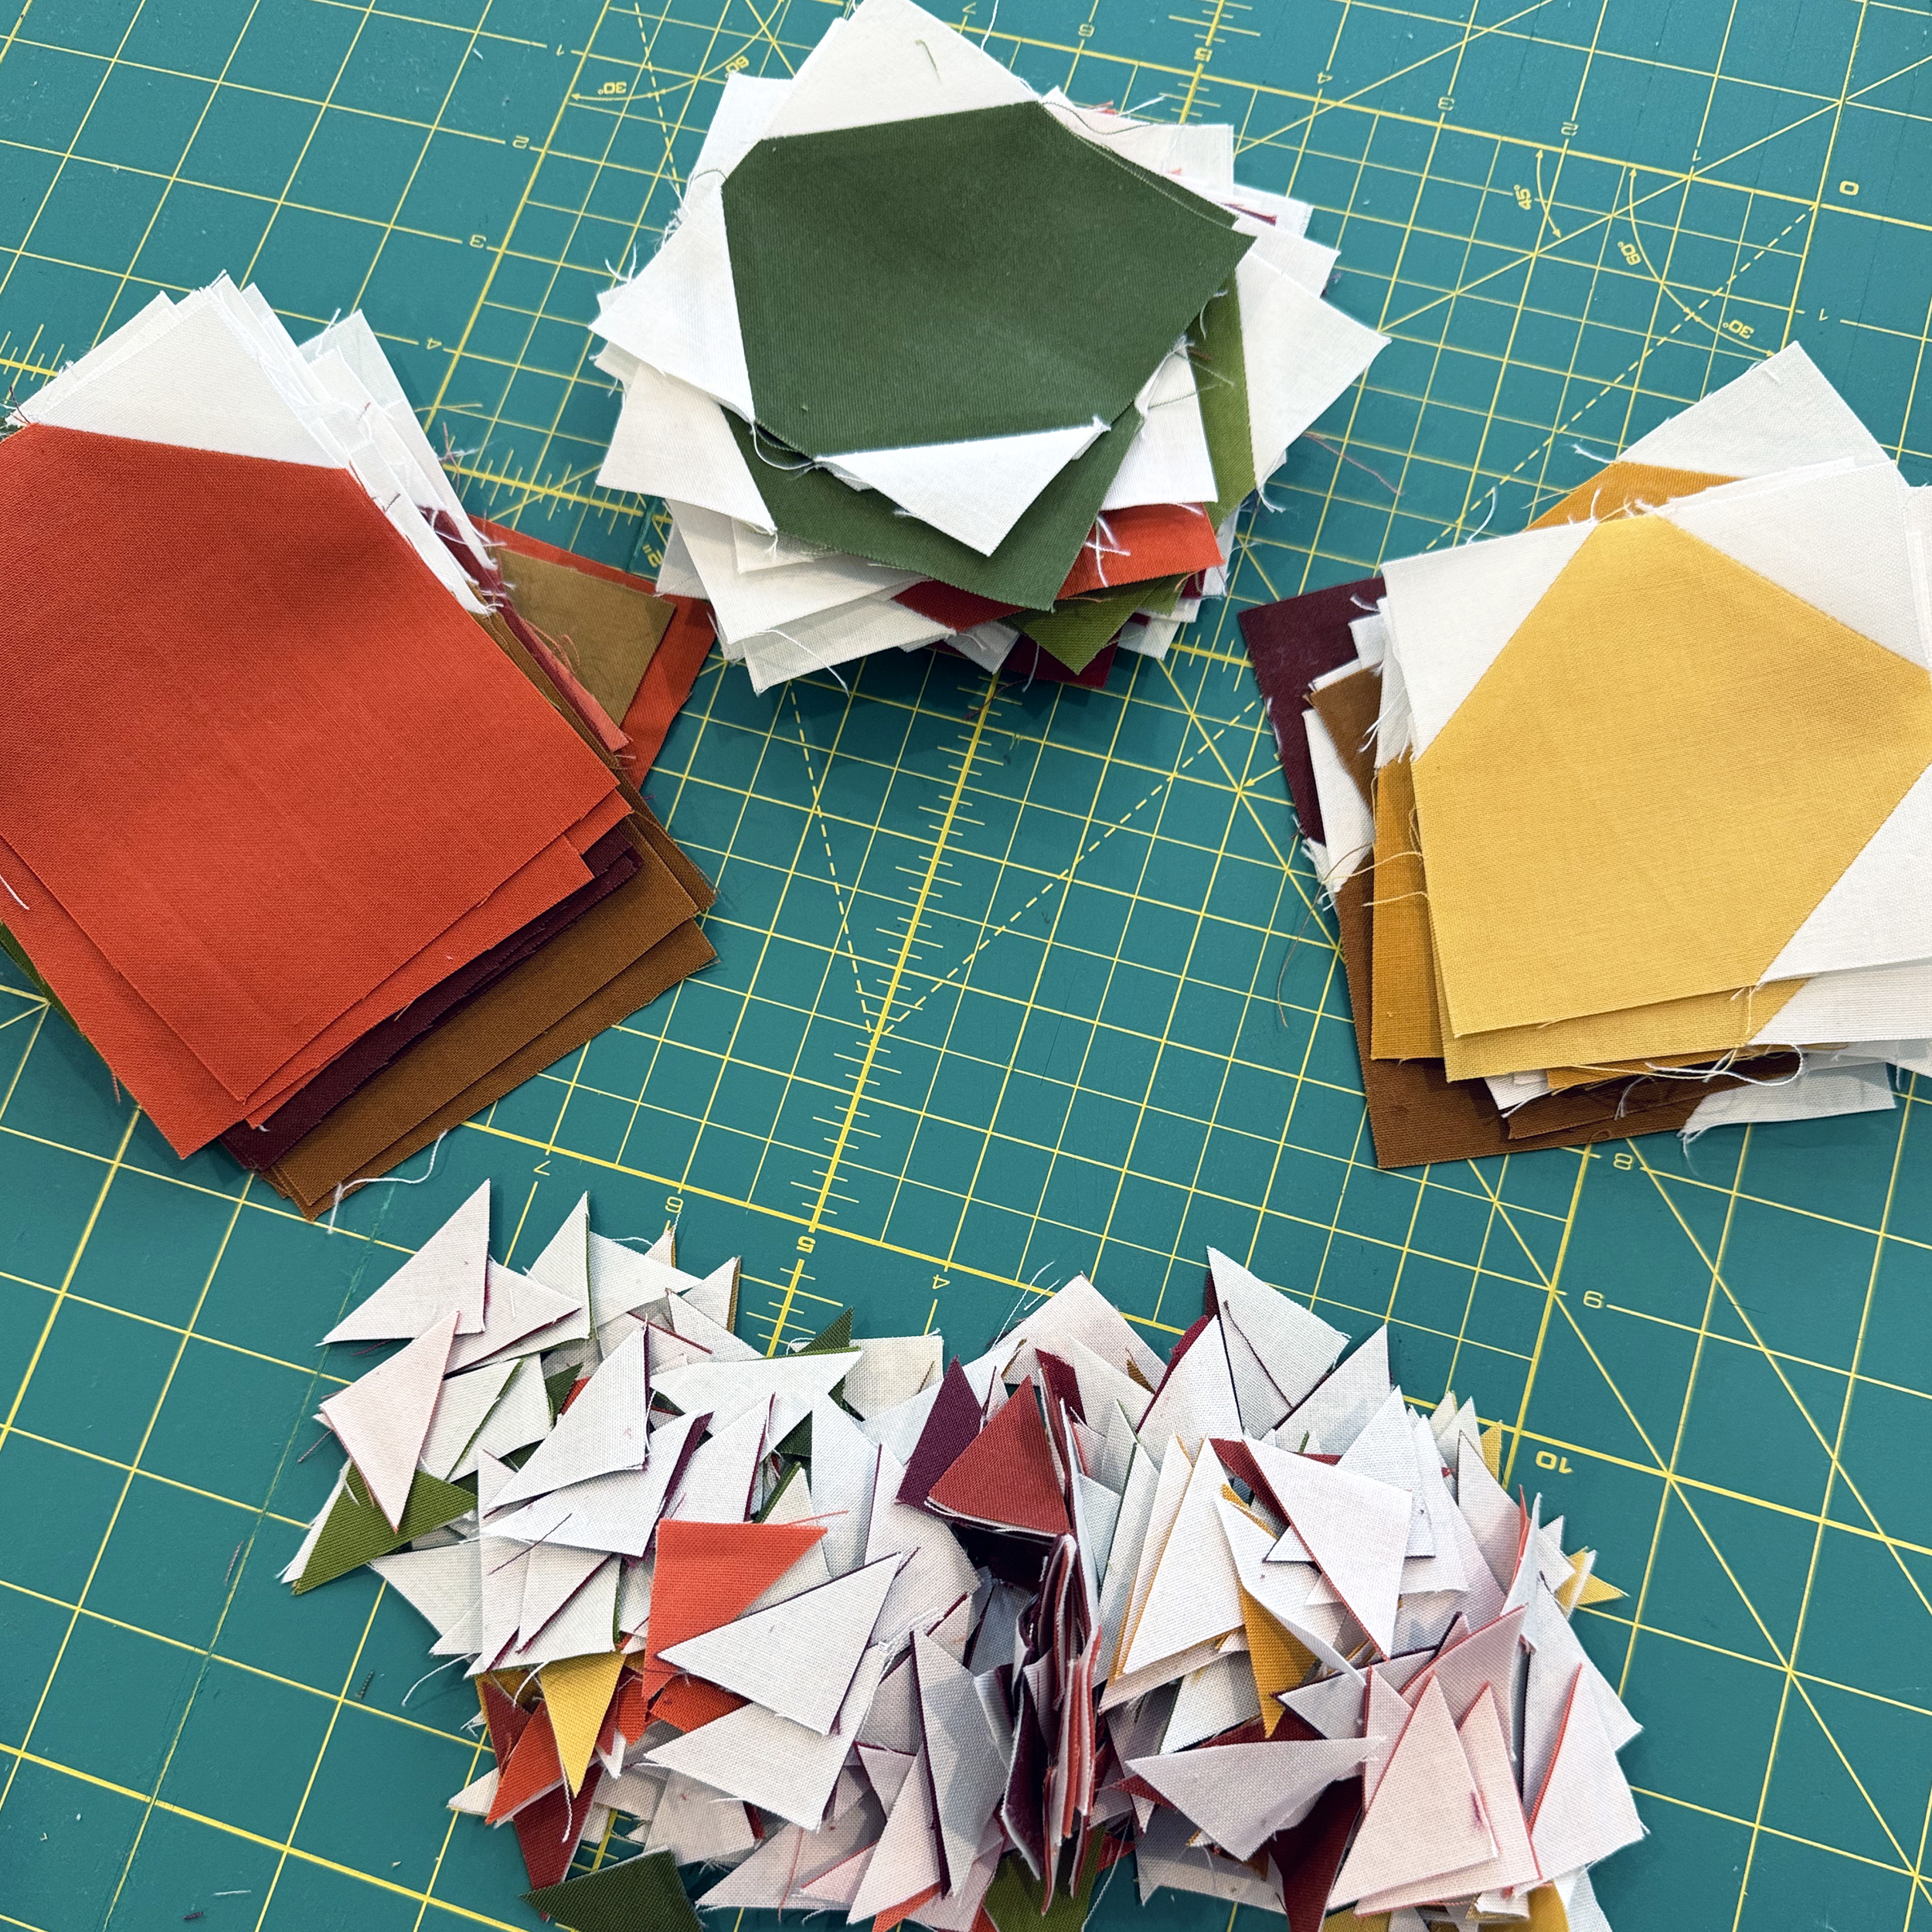
I end up with a lot of leftover triangle tips at the end. You can totally save these for another project if you want to! You’ll also notice that some of the petals have 2 white corners and others have 3. Be sure you follow the pattern diagrams closely to sew them onto the correct corners.
Once the petal units are sewn, you will be adding extra background strips to the square petal units to make them the correct size. I’ll stack all of the units up facing the same direction before adding the background strips. Notice that one background strip is shorter and one is longer. As long as you sew ALL units the same, you’ll be able to rotate them into position correctly.
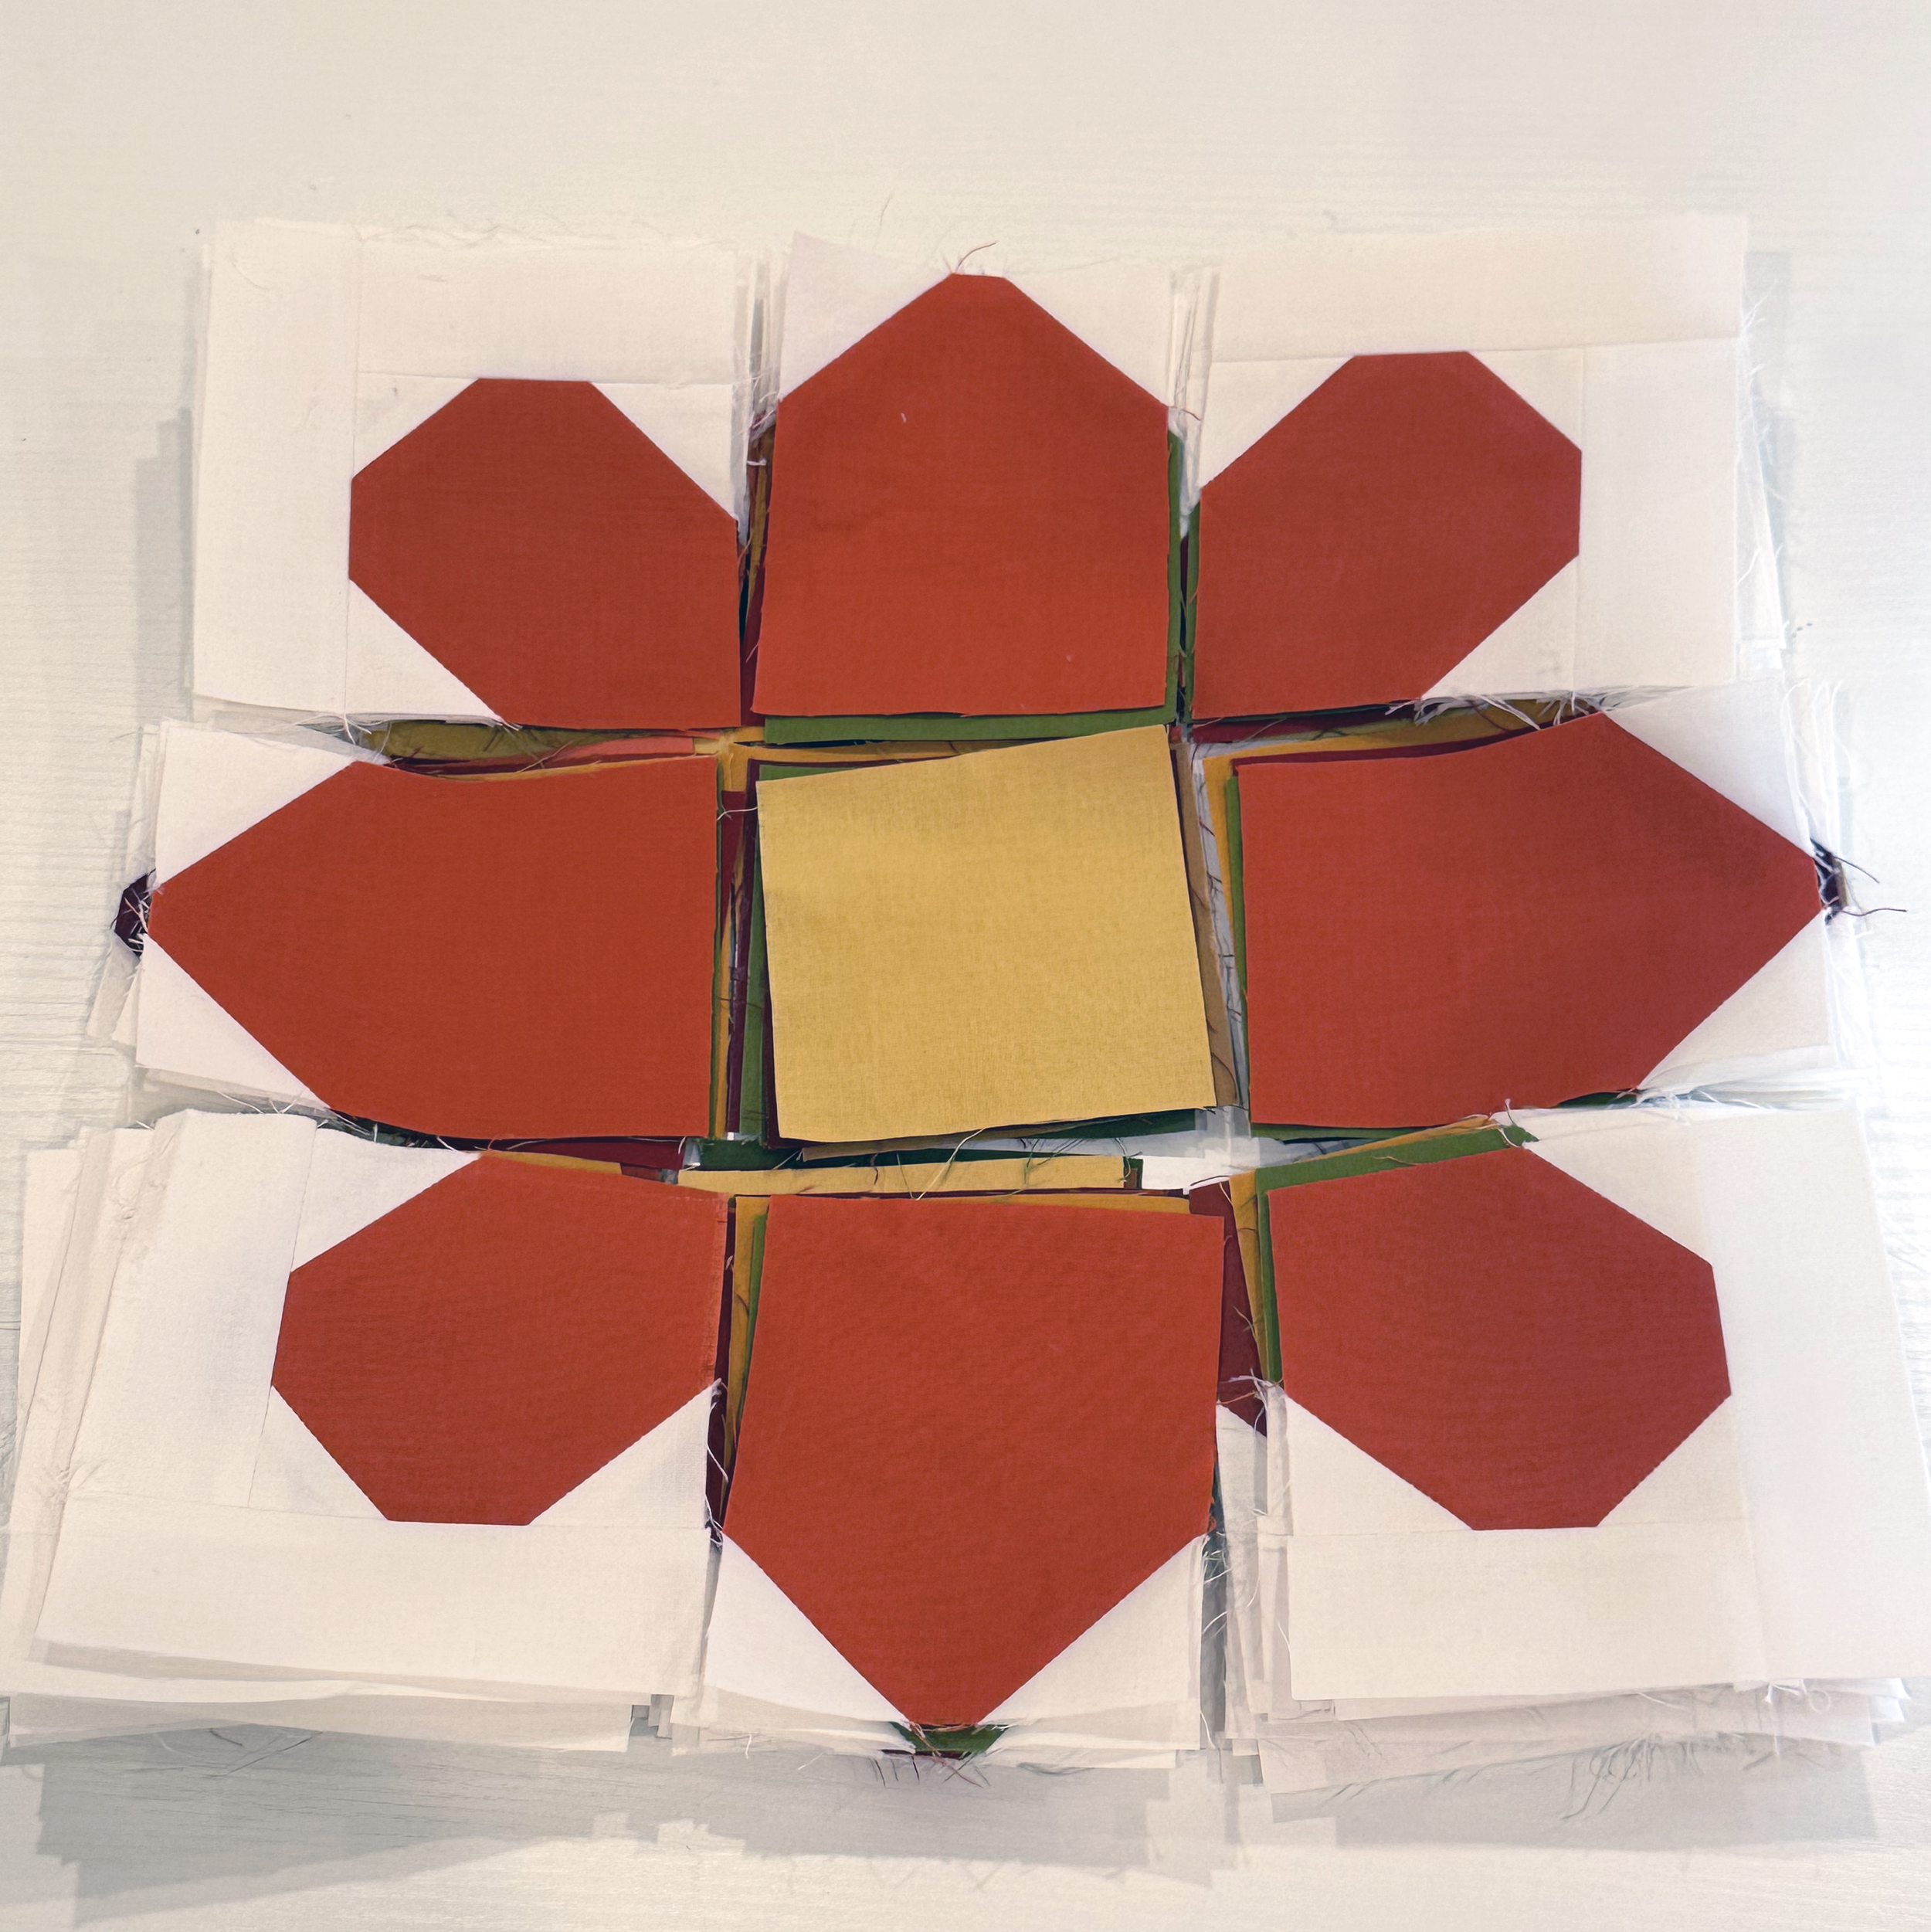
I will continue to assembly line sew by laying out all of the units for each block and stack them on top of each other. The main flower parts are all the same color so it’s easy to keep track of what unit goes where. Then you can decide which color you want for each center flower.
One thing to notice is that 4 of the petals look a little pointier than the others and that’s correct. They will appear more rounded once the blocks are finished and sewn together due to the seam allowances.
Why Make 1 When You Can Make 2??
Here’s what it looked like when chain piecing the stitch-n-flip units for the second colorway I made.
And my units are all in position and ready to sew!
This Week’s Homework:
Finish all of your Daisy Blocks for the size you are making, and then post pics of your progress in my facebook group!
Are you excited to make Daisy Chain along with me? See below for the complete quilt along schedule. Although this event will be quickly paced, I’ll leave these blog posts up indefinitely so you can work on your quilt any time you wish. I’m here to help you each step of the way!
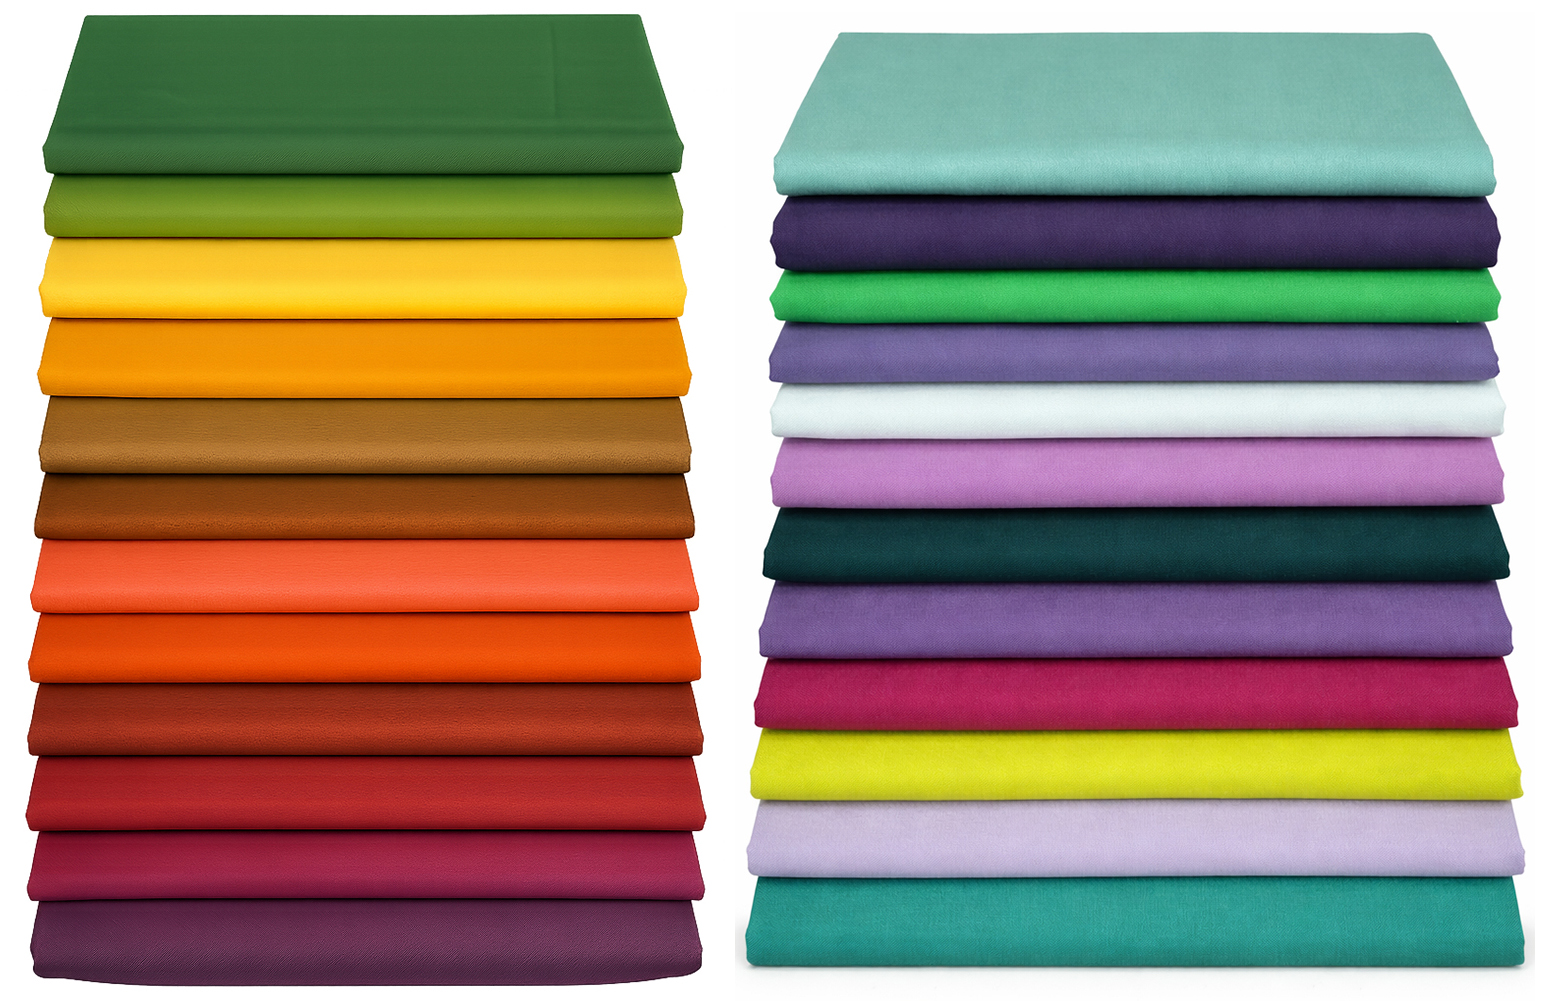
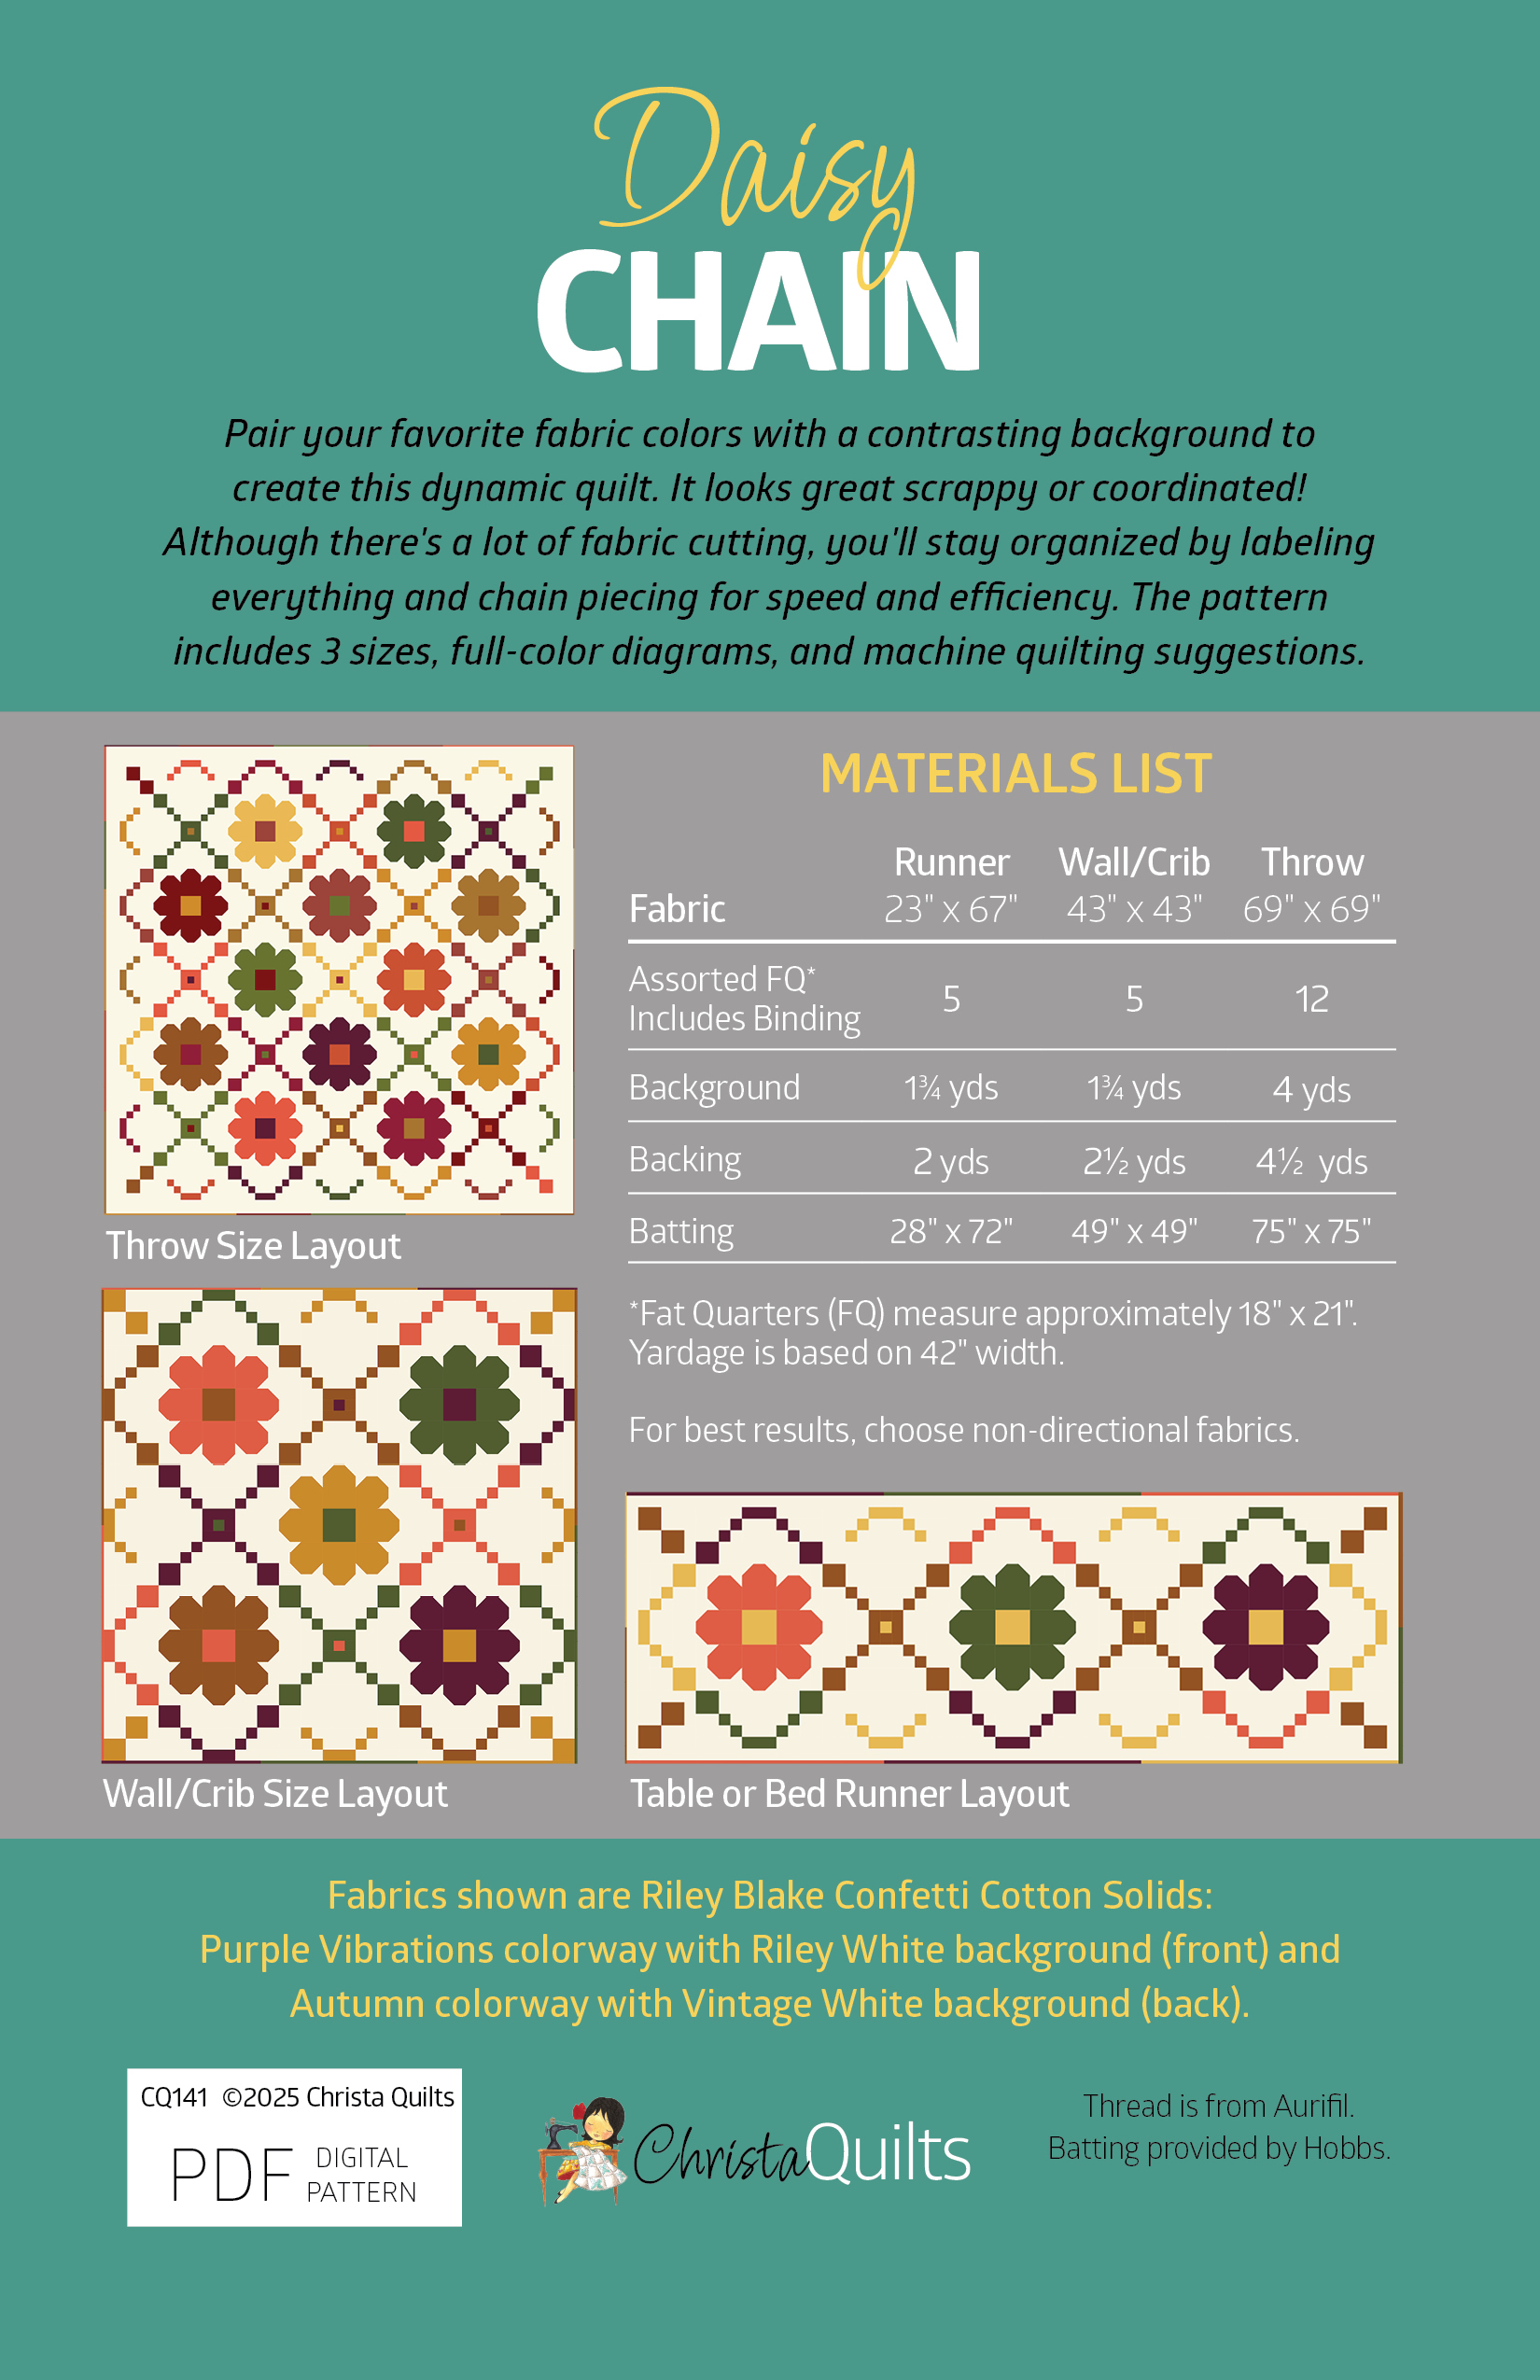
I made both versions of this quilt using fat quarters of Riley Blake Designs’ Confetti Cotton solids. The throw sizes shown here are made with 12 fat quarters plus 4 yards background, and the leftovers form a scrappy binding. Color selection is super easy for this quilt – just grab your favorite fabrics and pair them up with a highly contrasting background and you are good to go!!
I used fat quarters in the Autumn & Purple Vibrations Colorways for my Quilts
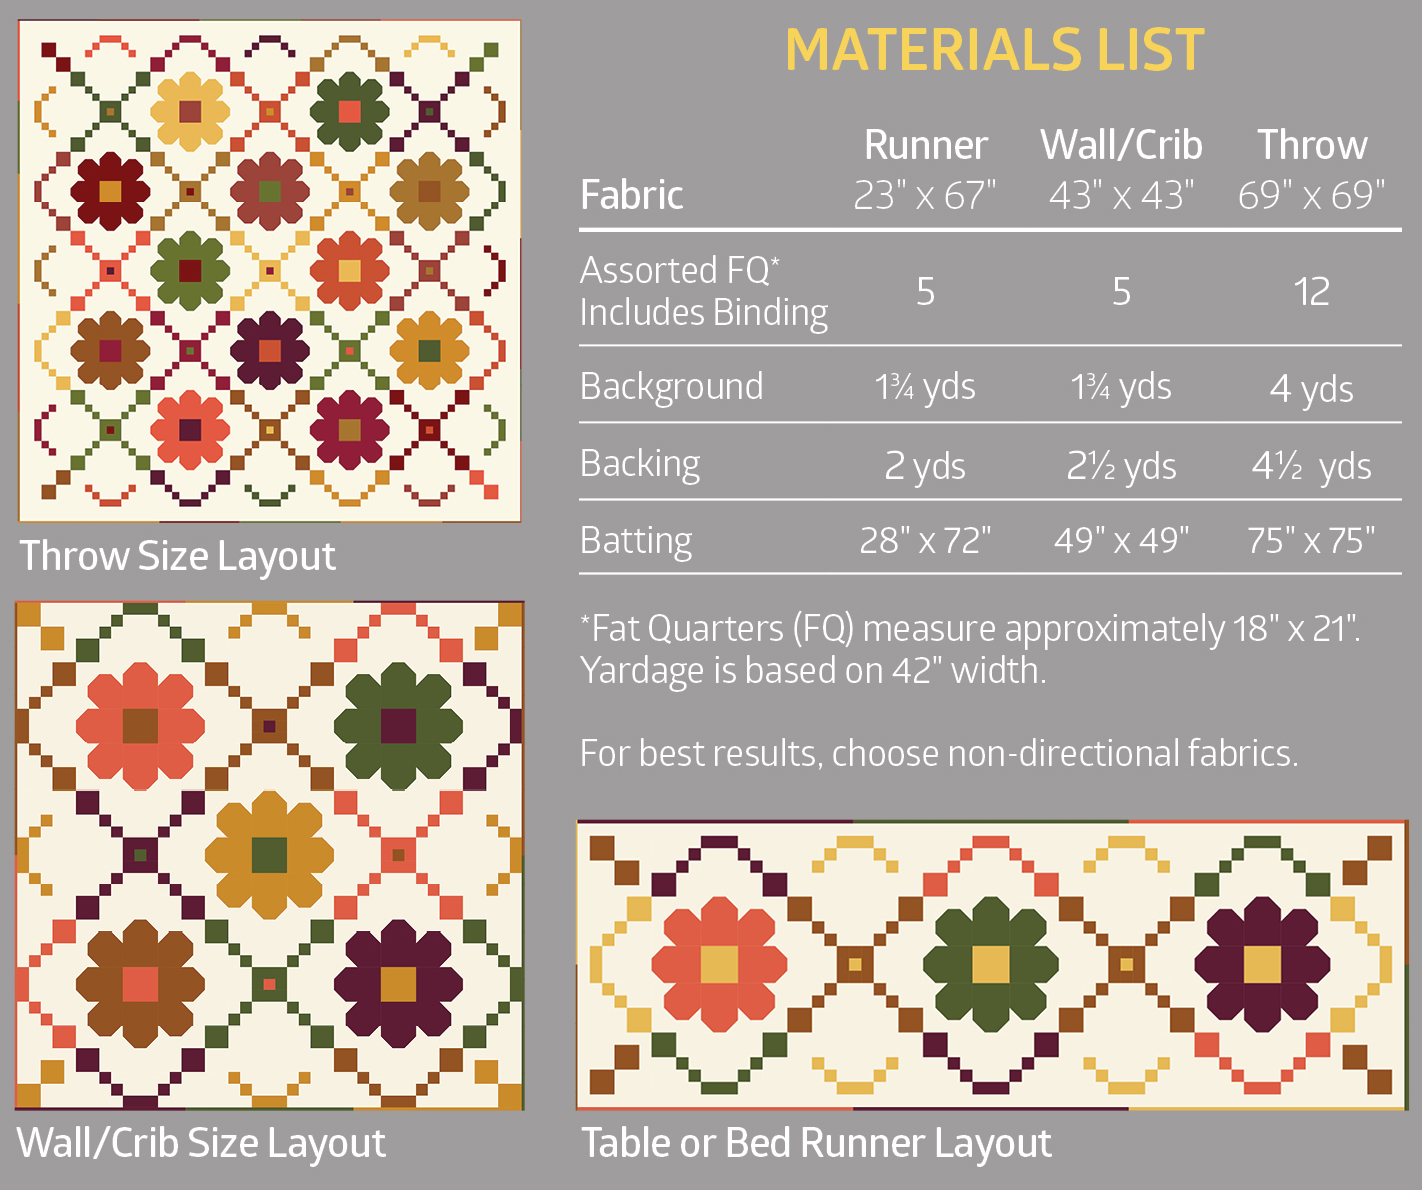
Here’s a the complete supply list so you can make this quilt in 3 different sizes. It’s a LOT of cutting, but it’s all just straight seams with traditional piecing techniques. So there’s no specialty rulers required. I do recommend getting some small label stickers though so you can label all your pieces to stay organized.
Quilt Along Schedule
Throughout the quilt along I will refer you to specific parts of the pattern and will share lots of in progress pics and bonus tips. When it’s time to machine quilt, I’m going to share 2 bonus videos showing how I quilted each version. Hopefully this will inspire you get it done!! After all, machine quilting is my favorite part of the entire process, and there’s lots of room for experimentation and play in this quilt.
Feb 27 – Week 1: Cutting
March 6 – Week 2: Sewing the Daisy Blocks
March 13 – Week 3: Sewing the Chain Blocks
March 20 – Week 4: Sewing the Quilt Top
March 27 – Week 5: Backing & Basting
April 3 – Week 6: Quilting Option #1 – With Bonus Video Tutorial!!
April 10 – Week 7: Quilting Option #2 – With Bonus Video Tutorial!!
April 17 – Week 8: Binding to Finish
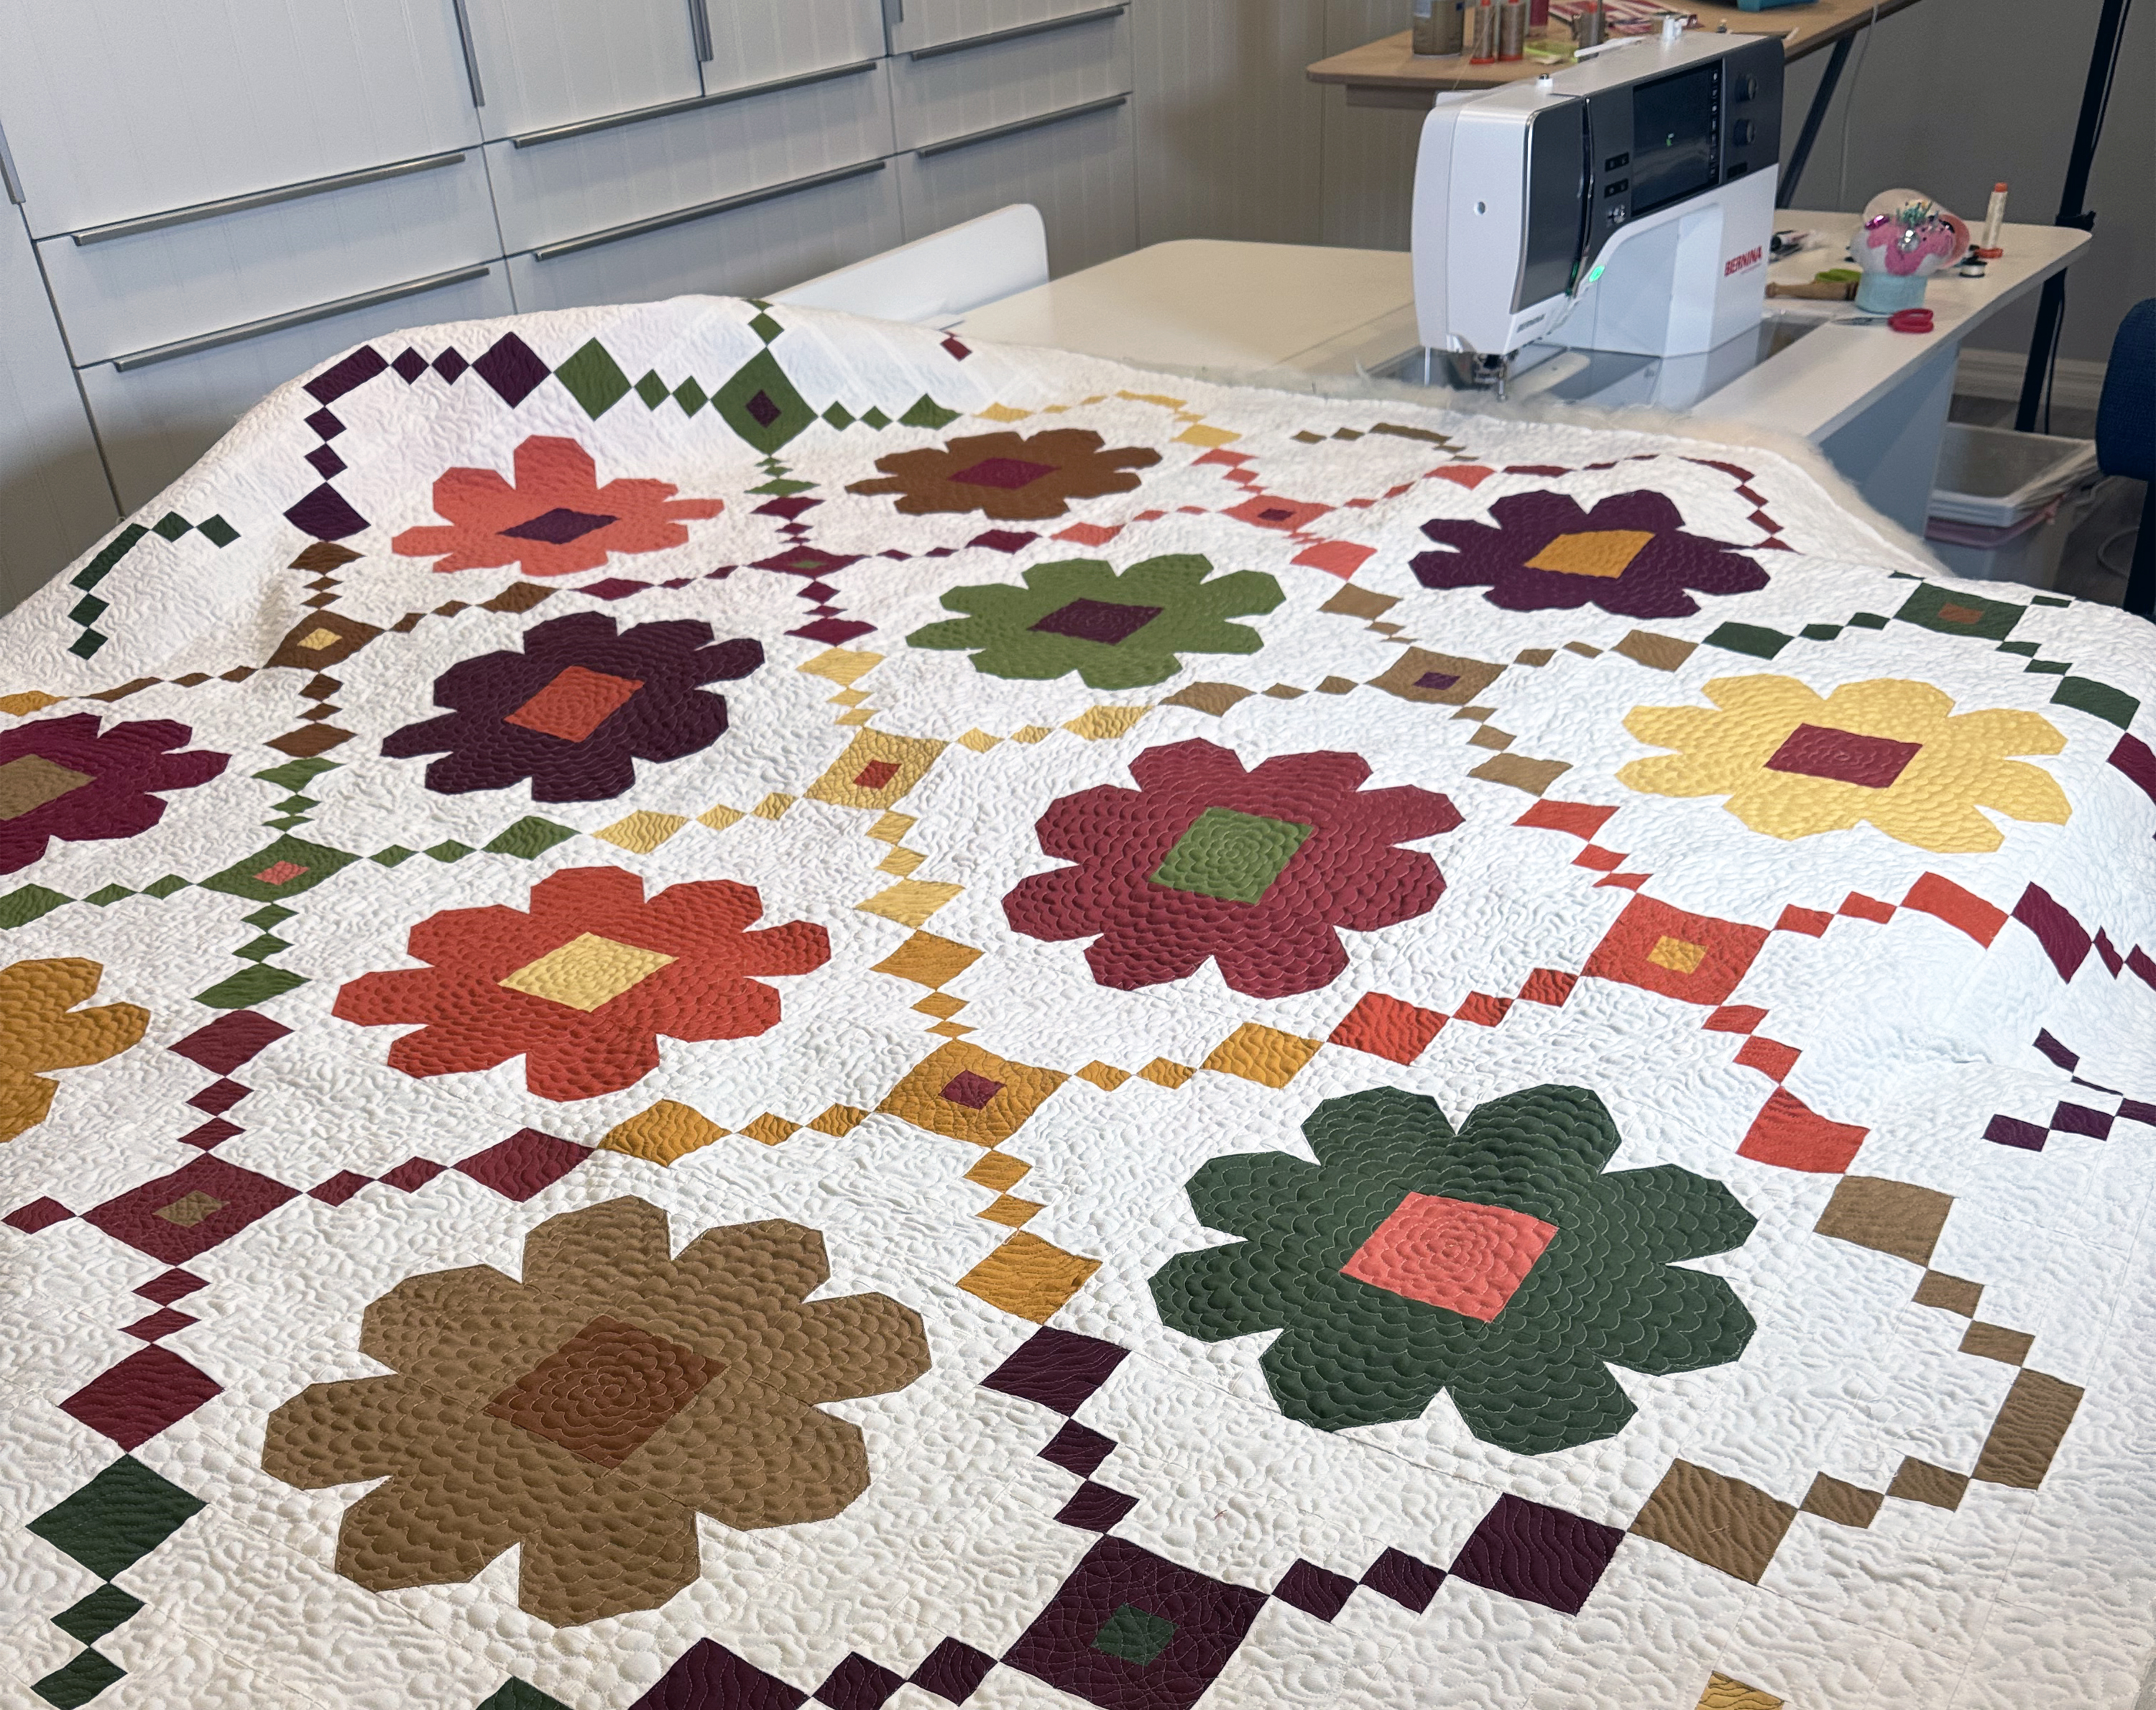
Machine Quilting in progress – can’t wait to share more details on how I quilted them!!
I’m happy to offer lots of support during this quilt along. You can share pics in my ChristaQuilts group on Facebook or leave a comment here on the blog with any questions you have. You can also share on social media using #daisychainquilt. I can’t wait to see how you make this your own!!
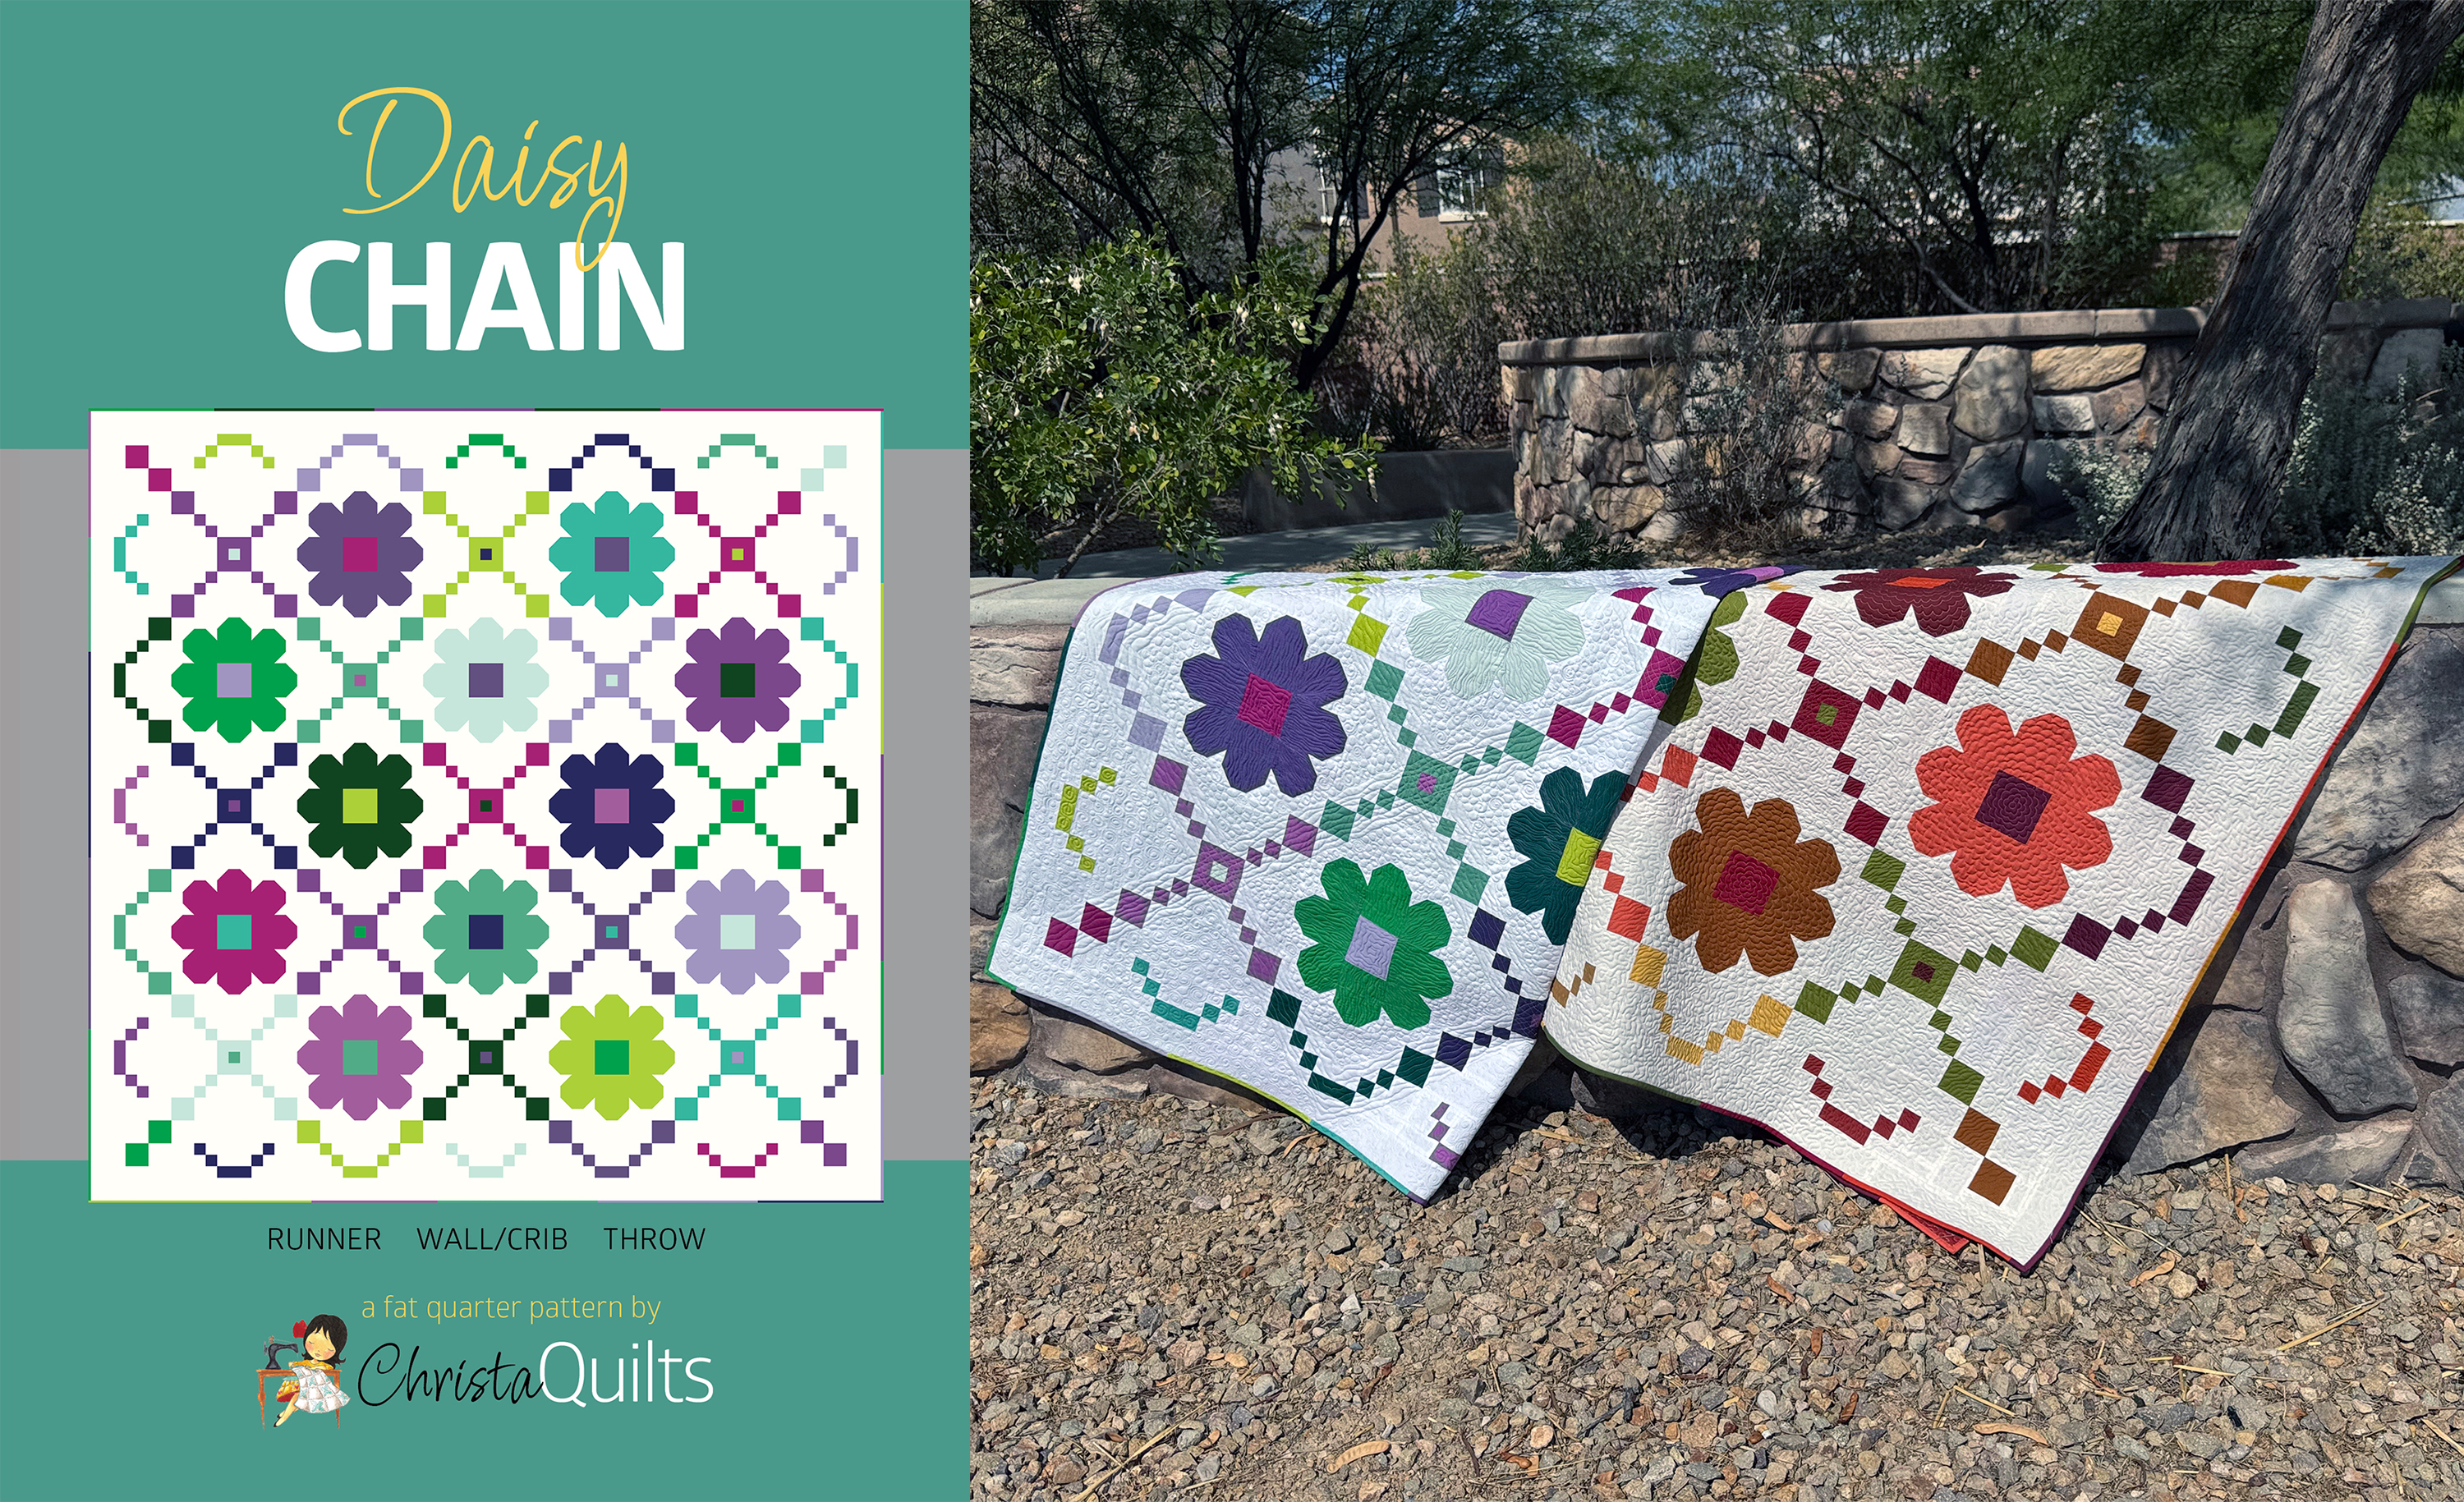
Let’s kick off the new year right with a new pattern and Quilt Along! Check out Daisy Chain, a super fun pieced pattern shown in 2 colorways, with multiple sizes.
It’s been awhile since I’ve made a quilt completely from solids, and I chose to work with Riley Blake Confetti Cotton solids for both colorways. It really shows off the quilting and I’m thrilled with how they turned out.
I thought it would be fun to host a quilt along to make this quilt completely from start to finish. The quilt along will kick off right here on my blog, beginning February 27, 2026 so save the date if you’d like to join in. The quilt along is free – all you need is a copy of the quilt pattern.
Pre-sales of this pattern to quilt shops have been the best I’ve ever seen, so you can always ask for it at your local quilt shop, and any shop owners out there can purchase it wholesale directly through Riley Blake.
Stay tuned for next week where I’ll share a break down of the quilt along schedule, along with a supply list to make this quilt. For now here’s a sneak peek of the back cover, showing the different sizes and alternate colorways.
If you’d like get notified when the quilt along begins, be sure to sign up for email notifications (in the sidebar of this blog post) so you don’t miss a thing! You can also join my ChristaQuilts group on Facebook to share pics of your quilt in progress and to ask questions at any time. I can’t wait to tell you more, so stay tuned!!
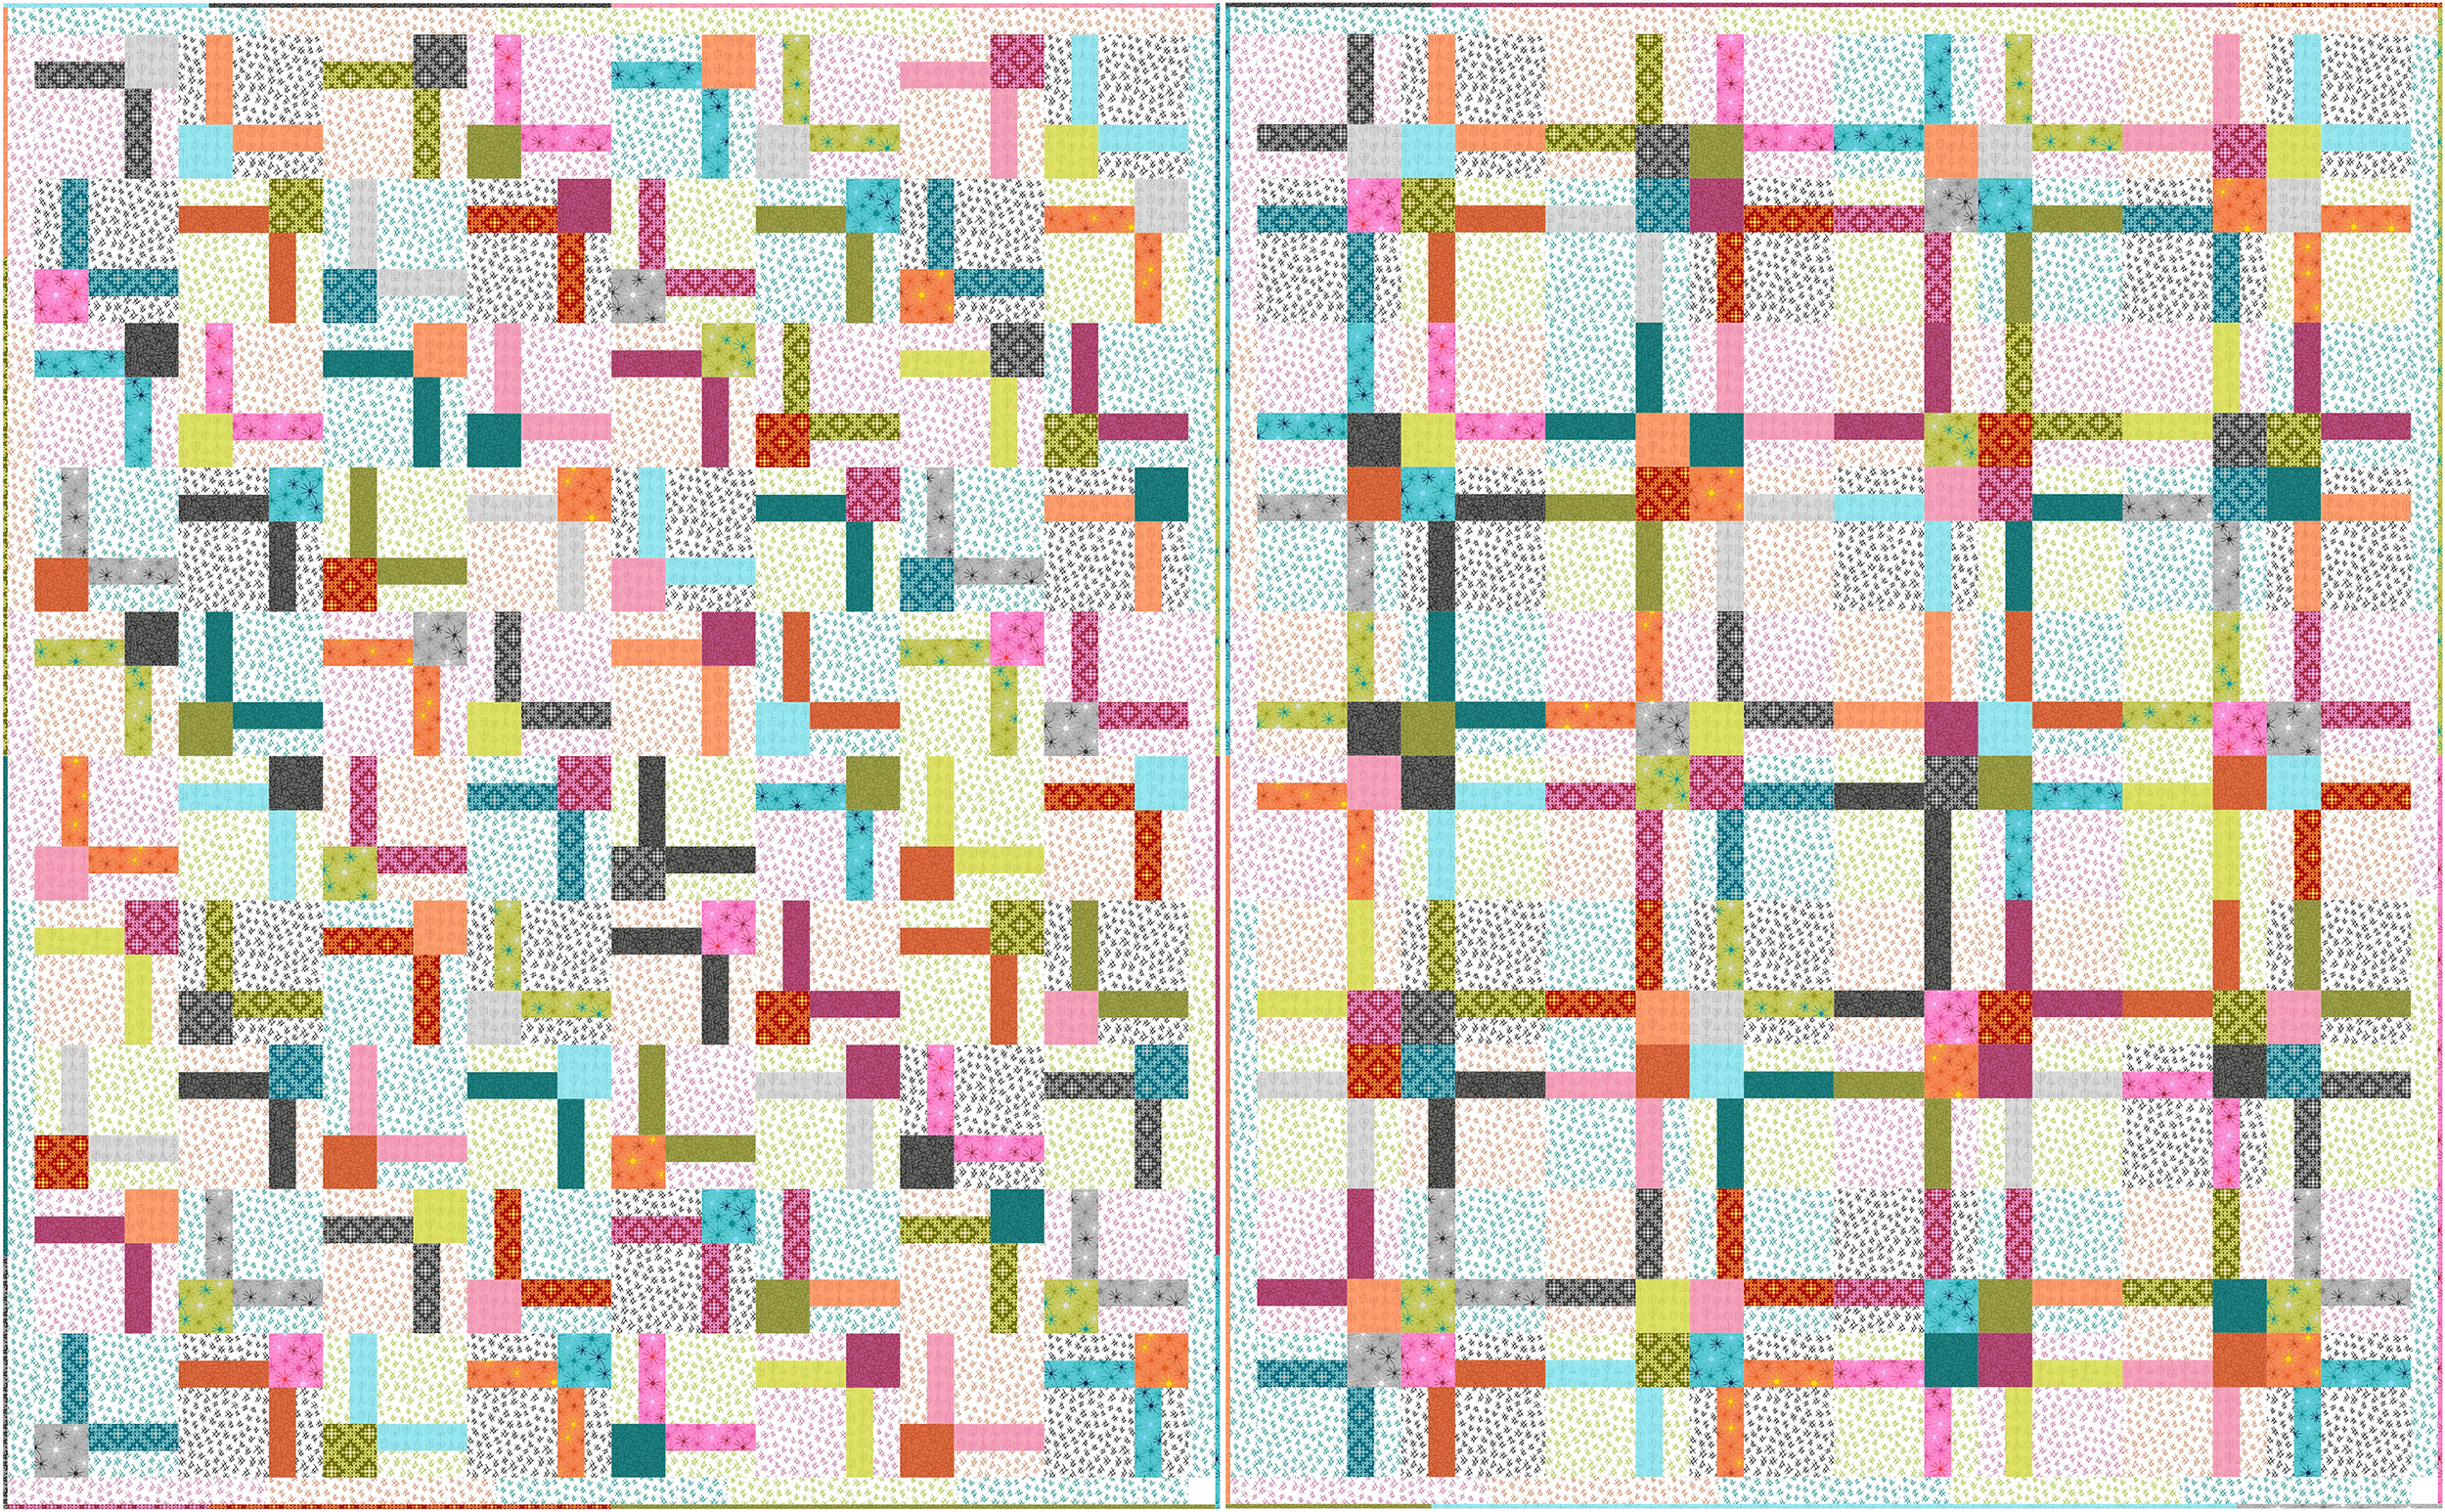
How are you doing with this quilt along thus far? Just remember, you can make this quilt at your own pace, and on your own schedule! This week we are assembling our quilt top. For my Dazzle Dots version of Bling, I rotated the individual blocks so that each set of 4 formed a larger hashtag block. Then I sewed the larger block units into rows, and then joined the rows to complete the top.
In the Bling quilt pattern, I share several different layouts. Pick your fave and then find a large flat area to lay the blocks out before you sew. I use a design wall to help me decide which blocks go where, and I tried not to have any 2 blocks with the same fabrics touching.
Bling is one of those designs that will look different depending on how you rotate this blocks. I’ve actually made this quilt several different times, so take a look at these other variations for inspiration as you sew your quilt top together!
Any Questions? Share Your Work!
If you have questions, or want to share your progress, feel free to do so over in my Christa Quilts Facebook group. It’s fun to see what others are making and cheer each other in our efforts!
My Color Weave Quilt along kicks off Monday, Sept 16th and I’m doing something a little a little different this time around. I’ll be sharing everything via email rather than here on my blog. Lately I’ve been rethinking my social media strategy and looking at numbers. Because I get higher engagement via my direct newsletter, this will be an experiment to see if that format works best for a quilt along. Keep reading below to see how you can join in the fun….
Now, not to confuse things, but this is my blog post you are reading right now. You may get this delivered to you via email if you’ve signed up for that. But that’s a totally different system than my regular, weekly email newsletter. So if you aren’t sure if you are on that list, you can sign up here. This link will take you to my free patterns page which automatically signs you up for my emails. Got it??
Everyone already on my email list will automatically get the Quilt Along emails, and the best thing about it is that it’s free and you don’t even have to make the quilt! I will share tips and tricks for making the entire quilt from start to finish, including basting, machine quilting AND binding. These are techniques that will apply to any quilt you make. I really love empowering others to actually finish their quilts and reduce their UFO piles!
And while supplies last, I’ve put together kits made from precut strips of my Dazzle Dots fabric line. This includes the beautiful rainbow colors as well as both the light and dark grey strips. This is everything you’ll need for the quilt top – including the binding.
I love it when we get to the machine quilting part of a Quilt Along! I’ve just finished my fourth book on machine quilting so I feel like that is one of my specialties. I’m excited for you to try free motion stipple quilting like I did on my Modern Logs, or another quilting design of your choice.
I made a video with all my best tips and tricks for quilting Modern Logs. Just nine minutes but it’s packed full of help and guidance! Click play below to watch.
If you’ve never tried free motion quilting or a stipple (also called a meander), layer up a couple of fat quarters with batting and practice there before you start on your real quilt. You can quilt on this practice sandwich many times over, using it as a warm-up if you like.
I can’t wait to see how you decide to quilt your Modern Logs!