Sew and Tell – Upcoming Quilt Show Entries for 2014

More and more large quilt shows are adding modern quilting categories to their lineup which I think is simply fabulous! I love to support the art of modern quilting, and I encourage others to enter their work into shows so we can all be a part of shaping this movement.

Two of my recent quilts will be in a couple of upcoming shows this year, so if you are in the area – please stop by and say hello to them for me. 🙂

String of Pearls

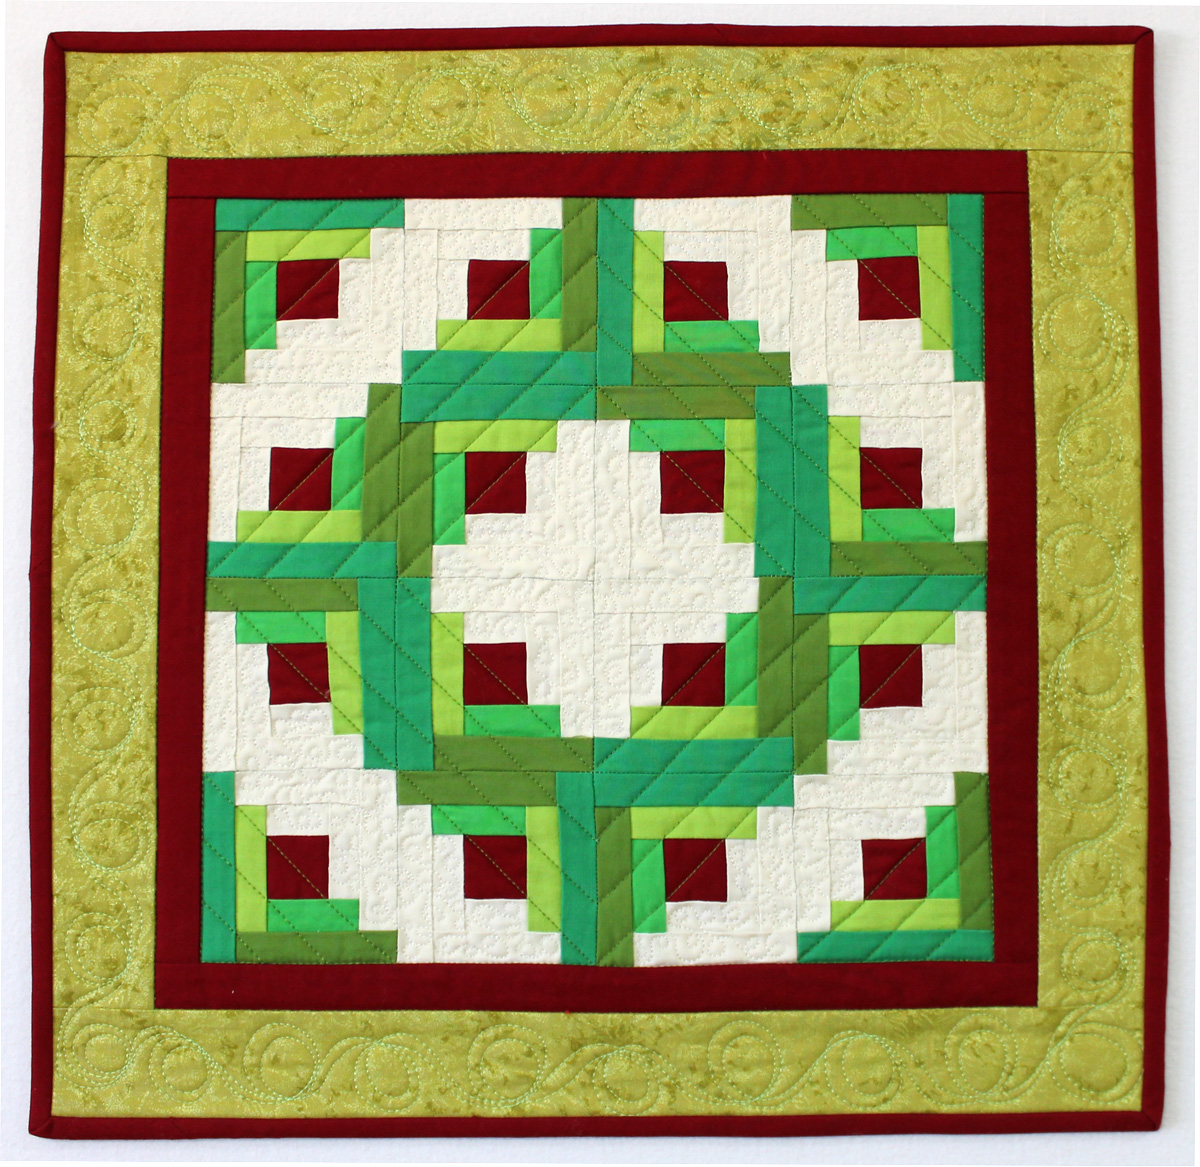
String of Pearls, 64″ x 64″ Pieced and Quilted by Christa

String of Pearls (above) will be part of the Modern Quilt – Negative Space category at the Road to California showcase in Ontario, California January 23 – 26th, 2014. I will be attending this show, so it will be fun to see in hang in person. (I missed attending MQX last year in which String of Pearls received an honorable mention.)

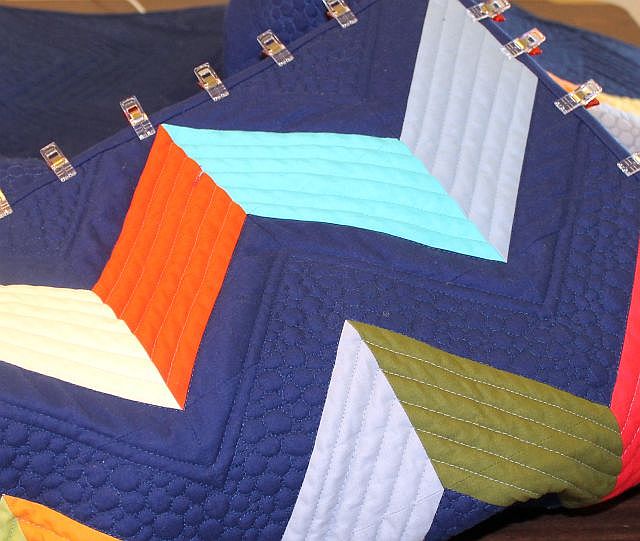
Charming Chevrons (below) was accepted into AQS QuiltWeek in Phoenix, Arizona February 5-8, 2014. It will be displayed for competition in their Modern Quilt – Wall Size category. I haven’t made up my mind if I’ll attend (it’s a long drive for me), but I’m hoping someone who is there will recognize the quilt and snap a picture of it hanging for me.

Charming Chevrons is such a special quilt to me because it was my first modern quilt. It’s been shown at QuiltCon and has won two awards – both locally and online.

Charming Chevrons

Charming Chevrons 45″ x 53, Pieced and Quilted by Christa

Sometimes I worry that I’m being a little silly entering the same quilts into lots of different shows, but I learned recently that each quilt has an average “show-span” of 2 years in which it can be entered. That means I can make quilts and send them around the country for a couple of years for others to enjoy viewing. Then they can retire and come home to live with me where I can use them and love them!

The reason I never entered large shows before was because I always thought the quilts that were accepted had to be “perfect” or that I had to make a new quilt for each contest. Fortunately, I have now learned that is not the case.

I never expect to win when I enter (though it’s kind of fun when I do), and I don’t quilt for the judges. I just enjoying sharing my quilts in public and getting feedback on how to improve my skills. 🙂

Merry Christmas 2013 from all of us at Christa Quilts!

Merry Christmas from the Watsons!

Merry Christmas

I love Christmas time because it’s the only holiday I’ve made a lot of quilts for! (Note to self – get a jump start on those other holidays right away in the coming year.)

Christmas Quilts

Nutcrackers with an earlier version of my Log Cabin Wreath Mini

When we first moved into our house 8 years ago, I let everyone pick out any fabric they liked for their stockings (the kids’ tastes have changed a bit since then). My mom embroidered the names for me on a separate piece of fabric which I then appliqued to the front of the stockings.

Stockings

And the stockings were hung by the front door with care…

I’m not much of a decorator and I like to recycle many of my ideas so I don’t have to think too much! (I have made two “tree” quilts and two mini’s from pretty much the same patterns I created about 10 years apart.)

Christmas Quilts

This is the original Christmas Trees quilt and the updated Log Cabin wreath mini.

I like how Modern Trees looks hanging down over the bannister from the second floor of the house. It’s the first thing everyone sees when they walk though the door. I think I’ll eventually add some loops on the back that I can velcro around the wooden spindles so I can show the whole quilt.

Modern Trees

This is the view from the bottom floor looking up.

The only thing I’m missing now is a quilted tree skirt. Maybe next year…

Merry Christmas!

Riley Blake MQG Challenge Quilt Post #1 – The Start

For Sew and Tell today, I’m excited to be participating in the Modern Quilt Guild’s upcoming challenge focusing on these Riley Blake prints:

Challenge Fabric

Riley Blake MQG Challenge Fabric

Each of the challenge participants received a fat 1/8th of each of these fabrics. We can add any other Riley Blake fabrics to the mix to create any type of quilted item we wish. Finished projects are due by February 17th and if I know me, I’m sure I’ll be finishing right under the wire. 🙂

Since I’m not hosting any new Quilt Alongs for awhile (here’s why), I thought I would share some of my in-process quilts as they happen. I’m not sure how many blog posts it will take to complete this quilt, but I invite you along for the ride.

I started playing around with this block that I had designed a few months ago – parallel lines. I blogged about it here (including a free paper pieced template to make it).

Parallel Lines

Parallel Lines block by Christa Watson

What if I added additional lines, sewed them more randomly, and filled them in with color? I thought it would be fun to piece a few improvisational “string” blocks and leave a little negative space to add extra machine quilting texture (my #1 passion)! I’m thinking maybe light or dark grey for the background negative space. What do you think?

Improv String BlockImprov String Block


I started by doodling a few improv blocks in EQ7 and cutting out some strips. (Anyone else get the irony of planned improv blocks?) I’ll be back next time to show you how they are shaping up!

Guest Posting at Quilt Story – Log Cabin Wreath Holiday Tutorial

Today I’m excited to share a holiday tutorial over at Quilt Story with Heather and Megan! Learn how to make my log cabin wreath wallhanging – or turn it into a pillow. 🙂

Log Cabin Wreath, Pieced and Quilted by Christa Wason 18" x 18"

Log Cabin Wreath, Pieced and Quilted by Christa Watson, 18″ x 18″

I made my Log Cabin Wreath last year for Christmas and I’ve re-created the instructions so that they all fit in one post. Pop on over to check it out!

Holiday Tutorials

Here’s the complete Holiday Tutorial Series. Enjoy!

Bar Graphs Pieced Backing Tutorial

Bar Graphs is the name I gave to the design of the pieced back I made for Colorful Chevrons. I like my backs to be just as fun and colorful as the original quilt, and many times they end up being even more modern than the fronts!

Bar Graphs

Strips of Color Backing by Christa Watson

I really like the chunky “bars and graphs” look to this design, so I thought I would share a tutorial with you on how I pieced this backing. After all, it could stand on it’s own as an independent quilt design.

Strips of Color

Bar Graphs 72″ x 88″

I started off with some basic measurements. Since my finished quilt size is approximately 64″ x 80″, I needed my backing to measure at least 4 inches larger on each side so that there would be “wiggle room” around the entire perimeter.

I also wanted to make sure that whatever design I chose would look okay once the top, bottom and sides were trimmed up. I designed the backing to be 72″ x 88″ with plenty of blank space on the top and bottom strips for trimming.

I started by sketching long colorful strips in a stair step design, filling in with dark blue solid for the negative space.

I used leftover Michael Miller Cotton Couture solids from the front of the quilt along with more of the dark navy.

The backing is basically a horizontal strippy quilt sewn together in rows. A list of yardage requirement and cutting dimensions are shown below:

Cutting StripsDark Blue Fabric – Approximately 4.5 yards. Cut (18) 8.5″ x 42″ strips. Piece them together to create the lengths shown in the above diagram

Colored Scraps – Approximately 1/4 yard of 9 different fabrics. Trim each piece to the lengths shown above. In some cases you can use a fat quarter where the pieces measure less than 22″ in length.

Colored Strips

Bar Graphs Pieced Together – Ready to Baste!

Join together the rectangles with 1/4″ seams to create each strip. Then join the strips to create the backing (or new quilt top). I prefer to press my seams open and I starch the whole piece when sewn together. This is especially helpful if you are making a pieced backing. It will help the quilt glide more smoothly under the machine.

When I basted my quilt, I was careful to line up the strips as straight as I could. I knew that a lot of the blue would be trimmed up from the top and bottom strips and I’m pleased with how it turned out. I used the same dark navy for the binding as well.

Here are pictures of the finished quilt, both front and back:

Colorful ChevronsBar Graphs


Click here for detailed shots of the quilting and more about the front.

Whether you use it for the back or front of your quilt, please share pictures of your progress on my flickr group: Christa’s Quilt Along. Remember, you can make it yourself and make it your own. 🙂

EQI hope you enjoy making Bar Graphs. Click here for the EQ7 download and play around with different colorings, layouts and sizes.

Blogger’s Quilt Festival Entry – Strips of Color (Home Machine Quilted Category)

I’m doing something a little bit differently this time around and probably unheard of. Since I’ve been blogging so much about the front of my quilts and how much I adore machine quilting, I thought I would enter the back side of my Colorful Chevrons quilt into the Bloggers Quilt Festival. Crazy, huh? After all, every quilt has two sides and I really like to make my backs just as fun as the fronts!

Strips of Color

Strips of Color by Christa Watson

The “other side of the quilt” was inspired by a simple line sketch I drew on paper some months ago. I like the simplicity of the design and how it really shows off the machine quilting. I used leftover chunks of fabric from the front of the quilt, plus a rich dark navy for all of the negative space. The fabrics are Cotton Couture by Michael Miller.

Strips of Color Backing

Strips of Color Backing

I call it Strips of Color and it measures 64″ x 80″ – perfect for snuggling! I quilted it myself on my Bernina 710 and loved every last stitch! Machine quilting is very meditative for me. I can put on an audio book and quilt for hours. 🙂

Bernina

Quilting on My Bernina

I straight-line quilted tons of zig zag lines with a walking foot following the pattern on the font of the quilt. I free-motion quilted pebbles in between for added texture. For those of you new to my blog, here’s a detailed shot of “Colorful Chevrons”, just so you can see the complete picture!

Quilting

Detailed Quilting on the Front

You can vote for this quilt as your favorite in the Home Machine Quilted category here. Voting is open November 1-7, 2013.

Quilt Market

Colorful Chevrons at Quilt Market, Fall 2013

I’m not at Quilt Market but my Chevron Quilt Is

I didn’t get a chance to attend Fall Quilt Market in Houston this weekend because I’m home judiciously revamping my sewing room. However, I just found out a little piece of me is there. 🙂

Thanks so much to my BQF (best quilting friend) Stacy who snapped this picture of my Chevron Quilt while she was there and emailed it to me. (Can we say jealous?) I had no idea it would be on display so this is a pleasant surprise! I was kind of wondering when they’d mail it back to me after the issue was published, but now I’m completely happy to wait a few more days, knowing it’s getting a little more exposure.

Quilty Chevrons

Quilty Chevrons at Market

Seeing it paired up next to the blown up cover shot gives me a thought – is it ok to change the name of one’s quilt after it’s been “christened”? I originally named it Colorful Chevrons, but lately I’ve been referring to it as Quilty Chevrons in honor of the magazine, and to help me keep track of which chevron design I’m referring to.

I plan on entering this quilt into shows in the future and using it as teaching sample, so the name Quilty Chevrons is kind of growing on me. What do you think?

By the way, for those of you who are new to my blog, you can read more about the quilting of this quilt here, and enter my giveaway to win a free copy of the magazine here.

You can be sure I’m not missing market next time around, and you can quote me on that!

Quilt MarketUpdated – I have to give a big shout out to another of my BQF’s Denise, who talked the gals from the booth into sending me the poster sized cover shot. Won’t that look great in my new sewing room?!

Blogger’s Quilt Festival (Fall 2013) Begins This Week!

The online Blogger’s Quilt Festival kicks off this week, on Friday, October 25th to be precise. Hosted by Amy Ellis, it’s an online quilt show open to anyone who loves to quilt and enjoys blogging about their creations.

Blogger's Quilt Festival

Rather than stressing about making perfect quilts, it’s a chance to share and connect with others who share the same passion. There were over 600 entries in last spring’s show and it was like inspiration overload! My two entries from last spring’s festival are shown below:

Charming Chevrons, one of my early quilt along tutorials:

Viewer's Choice

Charming Chevrons, awarded Viewer’s Choice Spring 2013

Roses for Katelyn, made for my sweet sister’s baby girl:

Roses for Katelyn

French Rose Buds Pattern, Blogger’s Quilt Festival Spring 2013


If you have a recent finish, I encourage you to enter. It’s a great way to find new blog followers and fantastic blogs to follow! Plus it’s pretty fun to get positive feedback on your quilts. And you might even win a prize, either for entering your own quilt, or nominating your favorites. You just can’t go wrong by participating in this fun event.

Here’s an idea – show off one of your quilt along quilts, or finish up a current WIP!

For complete details including the festival schedule and rules, be sure to visit the Blogger’s Quilt Festival Main Page.

Be sure to check out last spring’s winners. You may even recognize some of the quilts from people you know (wink, wink)!

Cover Girl!

I am over the moon about this. I am a cover girl. Well, really my quilt is, and it looks much better closely cropped than I do. 🙂 My Chevrons quilt is on the cover of the Nov./Dec. 2013 issue of Quilty Magazine.

Quilty Cover

I was beside myself when the folks at Quilty accepted my submission many months ago. I set to work diligently cutting and piecing this labor of love and giving little hints whenever I could. I was thrilled that someone wanted to publish it. Not that I don’t take pride in my work. It’s just that seeing it in print is somehow a validation of everything I work for.

Quilting Practice I pieced it on my older Bernina 1630 and quilted it on my brand new Bernina 710 . (Buying a new machine mid-deadline can be a pretty stressful experience, LOL!)

I practiced on a bunch of scrap pieces before I was happy with the quilt design. I basted my quilt with lots of pins and anchored the rows by stitching in the ditch. I quilted straight lines about 1/4 away from the seams, using painter’s tape to help keep them straight.

SITDHere’s a closeup of the back after all the rows were quilted. This is technically enough quilting for this quilt, but since I tend to go a little crazy when it comes to machine quilting, I decided to add quite a bit more.

Chervrons BackI filled in all the Chevrons with straight lines using a blending thread. I added pebbles and echoed lines in the background, leaving some un-quilted areas to create a textural “relief”.

Chevrons DetailI was unsure how this would turn out, but once I flipped the quilt over to the back side, I was happy with how the texture was looking.

Chevrons BackingI’m still learning how to photograph my quilts so that the quilting can show, but it’s a work in progress. For some reason, I get better details when the quilt is flat on a table rather than a straight shot. I know it has something to do with the lighting.

Closeup QuiltingThe down side is that since I can’t get a straight on shot, you get to see my messy sewing room with ugly chairs, plastic bins, and cords sticking out everywhere, LOL!

Finished Chevrons

Chevrons Front

It took me several years to get the quilting part down. It may be several more before my photography skills catch up to my quilting skills. Be sure to pick up your copy of Quilty so you can see it professionally patterned, styled, and photographed. 🙂

I almost forgot – I owe a huge thanks to the folks over at Micheal Miller who supplied their gorgeous Cotton Couture Solids to me to make this quilt. I simply adore solids!

Chevrons Back

Chevrons Back

Here’s a shot of the back. I’ve written up a separate tutorial on how to make your own colorful strippy backing here.

Shades of Grey – Pieced Backing Tutorial

I love to make pieced backings and by popular request I’m sharing with you a tutorial on how to put one together. This goes with my String of Pearls Quilt Along.

Shades of Grey Backing

Shades of Grey Pieced Quilt Back, 72″ x 72″

Before we start, there are a few things to consider. First of all, how big is your quilt top? You want to sketch out a backing design that leaves plenty of wiggle room around the sides. A good rule of thumb is to make your backing at least 6 inches larger than your quilt top.

String of Pearls

String of Pearls Quilt Top 66″ x 66″

For example, my String of Pearls quilt finishes approximately 66″ x 66″. Therefore, I need to have a backing that measures about 72″ x 72″. That’s a nice measurement because 72 inches is the same as 2 yards, so you can visualize a backing roughly 2 yards wide by 2 yards long.

One Fabric Backing

Backing, One Fabric, 72″ x 72″

The second thing to consider is, do you want to make your backing from all one fabric (most efficient), or would you like to make it a little more artistic (my favorite)?

The solid backing above requires 4 yards of fabric (two – 2 yard lengths). Join them with a seam down the middle making a rectangle of approximately 72″ x 80″. Trim off about 8″, making a 72 inch square and throw the excess into your scrap bucket.

Finally, you need to decide ahead of time if you will be quilting the quilt yourself, or hiring a longarmer to do it for you. When quilting yourself, you can get away with less extra around the sides.

When sending a quilt out for professional quilting, however, you may need more fabric around the edges for the longarmer to work with. She also may request that your seams need to run either horizontal or vertical depending on how she loads the quilt on the machine. Be sure to check ahead of time (or just quilt it yourself like I love to do!)

One Fabric Backing

Leftover Pearls

When deciding on a pieced back, I like to incorporate leftover fabrics or blocks from the top to give it a little interest.

Pieced BackingFirst, I lay the quilt top on the floor or a large table, then start randomly placing leftover pieces of fabric on top until it’s covered. I rearrange all my pieces as needed until I’m happy with the layout.

Pieced BackingNext, I will trim up my pieces and start joining them together in sections until my backing is big enough to overlap the top on all sides by at least 3 inches. Remember, it will shrink up some with seam allowances, so be sure to add more if needed.

Pieced Backing Diagram

Pieced Backing Diagram

For your convenience, I have included cutting diagrams for my pieced back. The measurements include seam allowances. Note, the pieced Pearl Bracelets section is made from 12 (3.5″ x 4.5″) rectangles to create a 3.5″ x 36.5″ unit.

Voila! Time for basting!

For more inspiration on making a pieced backing, check out Elizabeth Hartman’s FREE online Craftsy class, “Creative Quilt Backs.”

You can also see how I made these pieced backs by clicking the links below the pictures:

Hugs N Kisses BackSea of Squares Pieced Back

Charming Chevrons Pieced Back


Hugs ‘N Kisses Pieced Backing Tutorial
Sea of Squares Pieced Backing Tutorial
Charming Chevrons Pieced Backing Tutorial