Blooming Wallflowers Week 3 – Continue Sewing the Blocks & Loads of Inspiration!

If you are new to the Blooming Wallflowers Quilt along, click here for links to all of the QAL posts.

Blooming Wallflowers Triangle in a Square Blocks

Click here to get the Blooming Wallflowers (printed) quilt pattern to join in the fun!
Click here to purchase the downloadable PDF version.

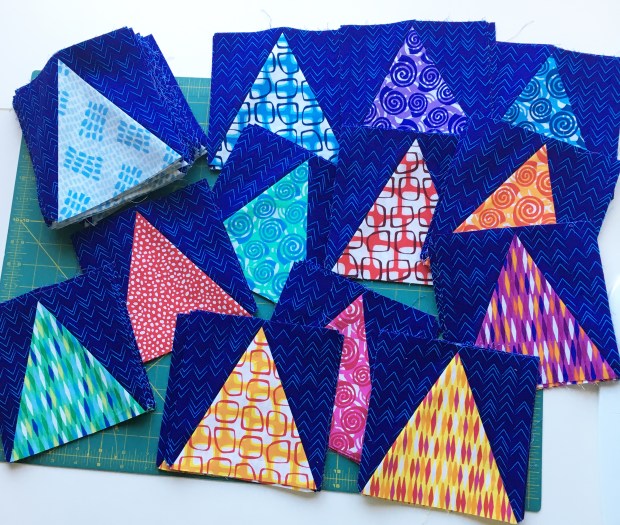
Welcome to Week 3 of Blooming Wallflowers Quilt Along! I’ve built in a few “catch-up” breaks so that you won’t feel overwhelmed with the process. After all, there are a LOT of blocks to sew! This week we are continuing to make the blocks as shown in the videos from last week.

Inspiration From Fellow Quilt Along Participants

Here’s some inspiration to motivate you as you start, or continue to work on your blocks. Each person featured will get a free PDF pattern of their choice as my thanks for sharing their progress!

Blooming Wallflowers Work in Pr

Patti B has picked out a lovely blue and and yellow combo that I think is going to be just fabulous!! She’s got her rulers and pattern ready to go and will make great progress in no time!

Blooming Wallflowers Quilt Along

Charald C. purchased a Blooming Wallflowers quilt kit and she’s finished cutting all her pieces; now they are ready to sew! I love how she lined them all up in yummy colorful stacks!

Blooming Wallflowers QAL

Caroline C. has chosen a rainbow of yummy goodness for her quilt. I’m in love with the aqua polka dot that she’s using for her background. I can’t wait to see it coming together!!

Blooming Wallflowers QAL

Kimberly W. took my advice about sewing all of one side of the triangle first and then all of the other side to make the sewing faster! I love her batik-y prints!!

Blooming Wallflowers QAL

Laina L. is about halfway through sewing her stack of blocks. Don’t they look great? She’s also using the Abstract Garden/Modern Marks fabric combo.

I hope this inspires you to make one of your own, and remember, you can join in anytime! Click the links below for supply lists and other important info. And continue to share your progress in my Facebook group, or on Instagram using the hashtag #bloomingwallflowersquilt.

IMPORTANT LINKS

Coming up next week will will start putting the top together so stay tuned!!

Blooming Wallflowers Quilt Pattern

I’m the Guest Curator For February’s Quilty Box!

I have some super fun and exciting news to share: I’ll be the guest curator for February’s Quilty Box. And even better news: click here to get $10 off your first Quilty Box subscription!

Quilty Box February 2019

Here’s the way this fun subscription service works: choose a 1 month, 3 month, 6 month or one year subscription and received a fabulous box of quilt goodies curated by some of your favorite designers. They usually include fabrics, a brand-new pattern, and several awesome notions, all for an amazing lower price over what you would pay for them separately. And the more months you sign up for, the better the deal gets!

February 2019 QuiltyBox with Christa Watson

Click here to get $10 off your first subscription of QuiltyBox.

Each monthly box is like getting a fun surprise in the mail, so be sure to up by Feb 9th! It will ship approximately February 11, and as a special bonus for subscribers of my box, I’ll be offering an exclusive quilt along in March with a brand new pattern that will be revealed in the February box. I can’t wait for you to see it! and I can’t wait for the big reveal, coming soon!!!

Blooming Wallflowers Week 2: Sewing the Blocks

This week it’s time to start sewing our blocks from the pieces we cut out last week. (Be sure to scroll to the end for all of the pertinent QAL links.) And don’t worry if you haven’t started yet; next week will be a catch-up week so you won’t get too far behind!

Anatomy of a Triangle in a square block

Triangle in a Square Block

Designed in EQ8, using Abstract Garden & Modern Marks by Christa Watson for Benartex
Note that this is the FINISHED block, not including seam allowances

The triangle in the middle is called an isosceles triangle which has two sides that are the same length. Many people confuse this with an equilateral triangle because it looks similar, but it’s not. So take care to ensure the triangle is in the correct orientation when sewing it together. Just remember to keep the blunt edge at the top of the block and you’ll be fine.

The triangles on the sides are called “scalene right triangles” because none of the sides are the same length and it has a 90 degree angle. The triangles are similar to each other except that one is a “left-facing” triangle and the other is a “right-facing” triangle. For ease of reference, I refer to them as triangle pairs in the pattern since you need both to complete each block.

(Silent) Video Tutorial

Please bear with me as I’m still learning how to do videos on my own.  So for now, they won’t have sound. As I add videos to the QAL, hopefully they’ll get better each week. Think of it this way: I’m doing this Quilt-Along for YOU, but it’s a YouTube-Learning-Along for ME, LOL!!

Follow along on page 7 of the Blooming Wallflowers quilt pattern for detailed instructions of what I’m doing in the (silent) video below:

Tips to Remember

(1) Notice that the middle triangle has the blunted edge at the top and the two half rectangles have the blunted edge at the bottom. The most common mistake people make is switching the placement of the triangles so be careful not to do that.

(2) Once the placement looks good, pin the units and sew them right sides together. If you are sewing multiple blocks, be sure and chain piece (assembly line sew) all the lefts, then all the rights, etc. I always recommend sewing with a smaller stitch length and pressing the seams open for flatter blocks.

(3) When your blocks are sewn correctly, the top triangle tip will be floating 1/4″ from the the top (for seam allowances) and the bottom triangle tips will go all the way to the edges. Don’t forget to trim off the little dog ears (excess triangles) sticking out beyond the edge of the blocks!

Above is a 20 second video snippet showing how I quickly cut apart my chain pieced units using of of my favorite notions: the Triangle Thread cutter from SunflowerQuilts.

Homework: Sew all of the Blocks

Half of the blocks will be made with the light blue centers while the other half will be made from the assorted colorful prints. See page 7 of the pattern for details.

Blooming Wallflowers QAL by Christa Watson of Christa Quilts

So remember, you’ll have 2 weeks to finish up your blocks. Next week I’ll share a few inspiration images showing the different block combinations that you all are making. Everyone who gets featured will get a free PDF pattern of their choice, so be sure to share your progress in my Facebook group, or on Instagram using the hashtag #bloomingwallflowersquilt.

IMPORTANT LINKS

Blooming Wallflowers Triangle in a Square Blocks


Home Update Week 6 – Save 10% on Your Entire Order!

Whew! I can’t believe it’s been 6 weeks since we decided to move. We’ve now been in the home  for 3 weeks and there is still. So. Much. To. Do!!! But we are making great progress each week.
The interior painting is finally done, and Jason installed shelves for me in the laundry room.

Laundry RoomI’m enjoying adding touches of color to our home!
In our previous home we had really nice wood cabinets in the laundry room, but discovered that we never used them. Things got shoved in there, never to see the light of day. So this time around, I think shelves will be much more functional and will provide tons of space for all of my cleaning essentials. I’m excited to have a utility sink and there’s plenty of room for a folding table too, once the appliances are moved in.

Dining Room Before and After

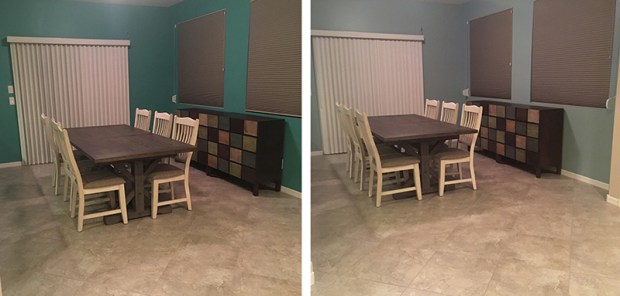
Dining Room before and after: darker versus lighter teal.

The other big change we accomplished was swapping out the dining room paint for a lighter, more muted teal. At first we had painted it a very dark turquoise, which I loved on the sample card, but realized quickly that it was way too intense and didn’t quite match the rest of the house. Once we changed it to a softer tone I was much happier. Yes, it cost a little extra for paint and labor, but in the end, It was totally worth it!

Kitchen

The kitchen area was a huge selling point for us and is truly the heart of this home!

Our kitchen area is in the focal point of the home and really sets the color palette for the downstairs area. The backsplash is a really pretty teal/green/blue combo which looks fantastic against the dark gray/brown cabinets and silver appliances. I’m waiting to purchase barstools until the rest of the living room furniture has been acquired to ensure it all harmonizes together. So be on the lookout for more updates as they happen!

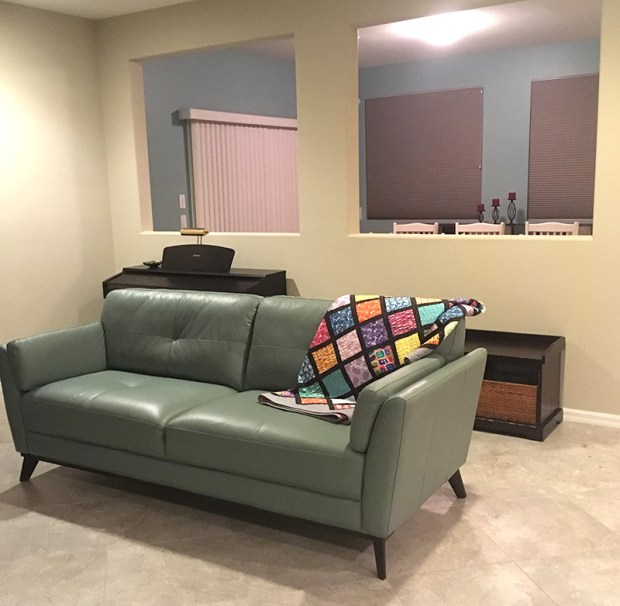
Quilt on a Couch

I want to incorporate more quilts into my decorating, too! I’ve draped my LatticeWork quilt on the couch which adds a fun pop of color, while being super cozy for cuddling!!
Now I’m just waiting for the rest of the living room furniture to arrive.

Use code MOVE6 to Save 10% on Your Entire Order

My sewing room will be the LAST thing to get set up in the house but that’s okay since I don’t have any sewing deadlines until the end of next month. In the meantime, you can take advantage of this week’s sale: 10% off anything and everything in my store at shop.ChristaQuilts.comUse code MOVE6 at checkout, and thanks for your support of our latest adventure!!

Blooming Wallflowers Week 1: Cutting

Are you ready to dive in and make this dynamic looking quilt? All you need is a copy of the Blooming Wallflowers quilt pattern and you can jump in anytime! See the end of this post for all relevant links.

Blooming Wallflowers quilt

Blooming Wallflowers can be made in three sizes: Crib, Throw, or Queen

Cutting the Center Triangles

The triangles used in this pattern are a specific shape and require either the use of the full-size templates included in the pattern, or a specialty ruler. Tri recs is recommended for the smaller sizes or Creative Grids Triangle Squared AND Perfect Rectangle for the larger size. Of course you can use the larger rulers for the smaller blocks, too.

Cut Pieces for Blooming Wallflowers Quilt

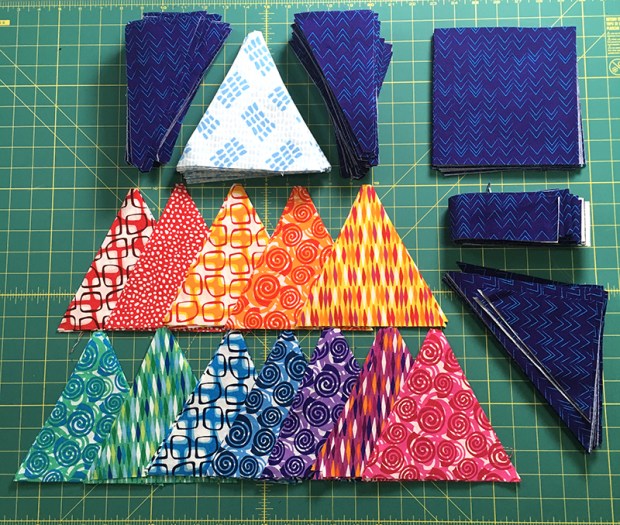
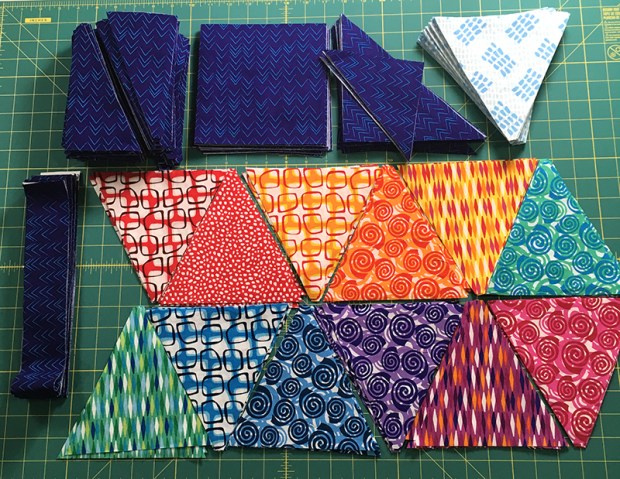
These are all of the cut pieces used to make Blooming Wallflowers.
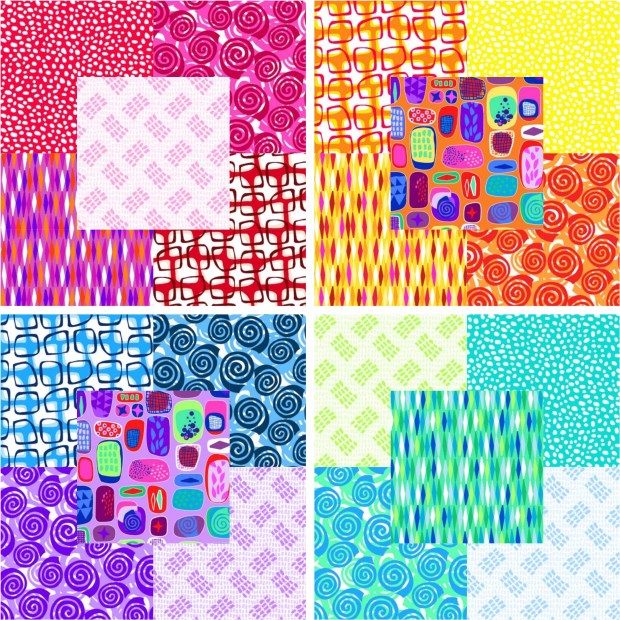
I used my Abstract Garden fabric line for the “flowers.”

Stack and layer the fabric strips for faster cutting. Follow the chart on page 6 of the pattern to cut the center triangles from the colorful prints. Here’s a quick 1 minute video demo showing how I used the specialty ruler. Notice the position of the blunt end on the ruler.

Corresponding diagrams can be found on page 2 of the quilt pattern.

Cutting The Triangle Pairs

The background triangle pairs s are cut in the same way except you will want to make sure to cut one left and right triangle at the same time. The easiest way to do that is to make sure the background fabric strips are folded in half. Then you’ll get one pair per cut. See the step by step cutting diagrams on page 3 of the pattern.

Here’s another short video showing how I cut the triangle pairs. Don’t forget to trim off the little triangle tip at the top to ensure proper matching when sewing them together next week. I used the ruler to trim off the left edge of the fabric strip first, and didn’t worry about the direction of the print while cutting.

The background fabric is Navy Herringbone from my Modern Marks fabric line.

Cutting the rest of the background

The rest of the background is pretty straightforward. Follow the chart in the pattern on page 6 to cut extra background squares that allow the design to float, plus the side and corner triangles and the binding strips. See the diagram on page 3 to cut the corner and side triangles.

Blooming Wallflowers cut pieces

I love a pretty stack of cut pieces, don’t you?

Once everything is cut, you’ll be ready to sew the blocks together next week! Don’t forget to share pics of your progress in my Facebook group, or on Instagram using the hashtag #bloomingwallflowersquilt.

Important Links

Moving Sale Week 4: Save 10% on Precuts, Bundles and Kits

We are making great progress on our new house, but there’s still a ton left to do! Last week, we got several of the rooms painted and started moving things into closets. My daughter is thrilled with her new pink room and now we are just waiting for her furniture to arrive from Ikea. Since she will be the only child living with us once my son Ryan leaves for his mission in China, we wanted to make sure she’d be happy in the new place.

Painting before and after

Before and after pics of painting Jenna’s room – she loves it!

My sewing room will probably be the last room to get organized, so I’m continuing to have a different weekly sale to cut down on the amount of things we’ll need to move!

Click here and use code MOVE4 to save 10% on all precuts, bundles and kits.

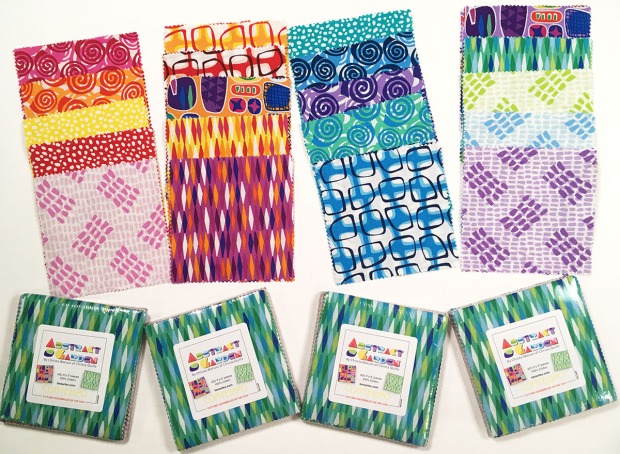
Abstract Garden Charm Packs

All precuts are on sale, from all 3 of my fabric collections.
Use code MOVE4 at checkout.

It’s kind of crazy to think that from the time we thought about moving to the time we closed on the house was just 3 weeks, but that’s kinda how I roll. When I’m ready to do something, I usually throw all of my effort into it ASAP!! Fortunately, my schedule doesn’t get busy again until mid February, so for now, getting moved and settled is my full-time focus!!

Blooming Wallflowers Quilt Along Supply List and Schedule

All you need to get started is a copy of the quilt pattern and a few supplies listed below:

Scroll to the end for links to all of the quilt along posts.

Blooming Wallflowers quilt

Supply List

(1) Blooming Wallflowers Quilt Pattern

(2) Fabric Needs – see materials list in the image below. I will be making the throw size.

Blooming Wallflowers Supply List

(3) A set of Tri Recs rulers for the Crib or Throw Size.

Please get these exact tools. Anything else won’t be the correct angle for cutting. Tri Recs makes blocks up to 6″ finished. For the Queen size quilt, you will need the Creative Grids Triangle Squared AND Perfect Rectangle rulers that make up to 9″ finished size blocks.

If you don’t have access to these rulers, you can use the full-size templates included in the quilt pattern.

Tri Recs Tools

(4) Batting for your quilt size
(5) Basic rotary cutting equipment – mat and rulers, and cutter with new sharp blade.
(6) Basting supplies – either safety pins or 505 basting spray. (I will spray baste)
(7) A “can-do” attitude and willingness to share – this is going to be fun!!

Quilt Along Schedule

The quilt along will run for a total for a total of 10 weeks which includes 3 scheduled breaks to catch up. If you follow along each week, you’ll have a completely finished quilt at the end!!
Once each post has been published, the links below will become clickable so you can navigate to any post you need as you follow along.

Sharing is Caring

As you are gathering your supplies and getting ready to start, please share pics of the fabrics you’ll use – I’d love to see! Also, anytime during the quilt along, I encourage you to share your progress in any of these ways:

  1. On Your own blog – share links in the comments section of any of the QAL posts
  2. On Instagram – use hashtag #bloomingwallflowersquilt so others can see your progress
  3. In my Christa Quilts Facebook group – this is also a great place to ask questions and interact with other quilt along participants.

Blooming Wallflowers Quilt Along

I’m so excited to get started!! Who’s with me?? As always, it’s totally OK to follow along virtually, or save the blog posts for later and make this quilt any time, on YOUR schedule.

Moving Sale Week 3: Save on Fabric by the Yard

Today’s the day!! We close on the house and get the keys – whoo hoo!! Although we are giving ourselves some extra time to decorate before the big move, I want it to be done like NOW. But last week was very productive. I ordered a new set of couches for the living room – leather in a very pretty seafoam green that will match the blacksplash in our kitchen.

Sofa Shopping

Jason is testing out the sofa while I rearranged the furniture in the store. Fortunately the sales person was very accommodating of our request to move things around, LOL. I grabbed the red pillows from another couch and paired it with a dark leather ottoman from another display, just to see what it would look like. I haven’t settled on the final accessories yet, but we ended up purchasing two of the longer couches to fill up more of our living room space. They are super comfy!!

Save $1 Per Yard: Use Code MOVE3 at Checkout

Click here to purchase yardage from all 3 of my fabric lines.

Christa's Fabric

Right now I currently have bolts of fabric from all 3 of my collections stashed in various places in my sewing room. In the new house, we plan to build shelving to display it and add a pop of color to the room. However, the amount of storage will be limited, so please help me clear out a few of the extra bolts before we move!

Use code MOVE3 at checkout to save $1 per yard. You can order the fabric in 2 yard increments and I’ll cut it into one continuous piece.

Click here to get yardage from Modern Marks, Fandangle, and Abstract Garden.

Abstract Garden Fabric is Here – Hooray!

First a quick thanks to all of the kind comments I received last week on our new home, AND this week on my QuiltCon entries. It’s been a bit hectic around here so I wasn’t able to respond individually like I usually do, but I so appreciate your kindness and support! And now for the best news: Abstract Garden yardage has finally arrived and is shipping to stores, whoo hoo!!

Abstract Garden Fabric

Click here to purchase Abstract Garden Fabric

Soon, I’ll be posting a list of which shops I know of are carrying it. In the meantime, I bought some for myself and some to sell as yardage, precut bundles, and kits. Really, it’s just an excuse to fondle my fabric as much as possible and imagine what you all will make with it!

In fact, please be sure to use the hashtag #abstractgardenfabric on instagram so I can see your beautiful creations! You can also share them over in my ChristaQuilts Facebook group.

Blooming Wallflowers Kit

Click here to purchase the Blooming Wallflowers kit, while supplies last.

I’ve also been busy cutting out more Blooming Wallflowers kits to get ready for the upcoming quilt along next month – click here to sign up for free.

Of course you can use any fabrics you like for any of my QAL’s and I’m super excited about the extra interest now that the quilt will be hanging at  QuiltCon. I had a nice surge in Blooming Wallflowers pattern sales once the news went out, so that definitely made my day!

Abstract Garden Fabric

Click here to purchase Abstract Garden precuts, bundles, or kits.

Don’t forget about the pre-cuts, too. Abstract Garden comes in fat quarters, 5″ charm packs, 10″ squares and 2 1/2″ precut “strip-pies”. I’ve already set aside room in the new house to display my precuts on a shelf, because I’ve finally realized that fabric collecting is its own hobby just like quilting, right???

Thank You Bonus – Score a Free Pattern!

For everyone who places a fabric order with me now through the end of the year, I’ll throw in a bonus surprise pattern as my way of saying thanks. I ordered it all before we decided to move, so needless to say, the more I can ship off before we have to pack up, the better!!

Click here to visit shop.ChristaQuilts.com for all of my fabrics, patterns, and books.

New Patterns and Kits: Pieced Primrose, Geese in the Garden, Blooming Wallflowers, LatticeWork

Just a quick note to say that the print versions of my 4 new patterns have now arrived from the printer – whoo hoo! Although they were made to feature my new Abstract Garden fabric line, they are versatile to use any fabrics you like! You can pull similar colors, or mix it up for your own unique take! I’m also offering kits for each, while supplies last.

Abstract Garden Quilt Patterns

To give you a quick overview of the quality and layout of the print versions, I made this short one-minute (silent) YouTube video of me thumbing through the pages. They are printed on high quality semi-gloss paper with a firm cover so they’ll hold up while you use them! Click the image below to watch.

And now, to end this post with some colorful “eye candy” here are images of the finished quilts themselves. Coming up soon, I’ll be blogging more about the making of each quilt with some bonus tutorials and tips. And don’t forget, I’ll be hosting a quilt along to make Blooming Wallflowers in January, so be on the lookout for the QAL schedule, coming soon!

Pieced Primrose Quilts

Click here to purchase this pattern.
Click here to purchase the kit.

Pieced Primrose Quilts Made from Abstract Garden

Geese in the Garden Quilts

Click here to purchase this pattern.
Click here to purchase the kit.

Geese in the Garden with Abstract Garden fabric

Blooming Wallflowers Quilt

Click here to purchase this pattern.
Click here to purchase the kit.

Blooming Wallflowers quilt

LatticeWork Quilt

Click here to purchase this pattern.
Click here to purchase the kit.

LatticeWork Quilt Made from Abstract Garden