Riley Blake MQG Challenge Quilt Post #1 – The Start

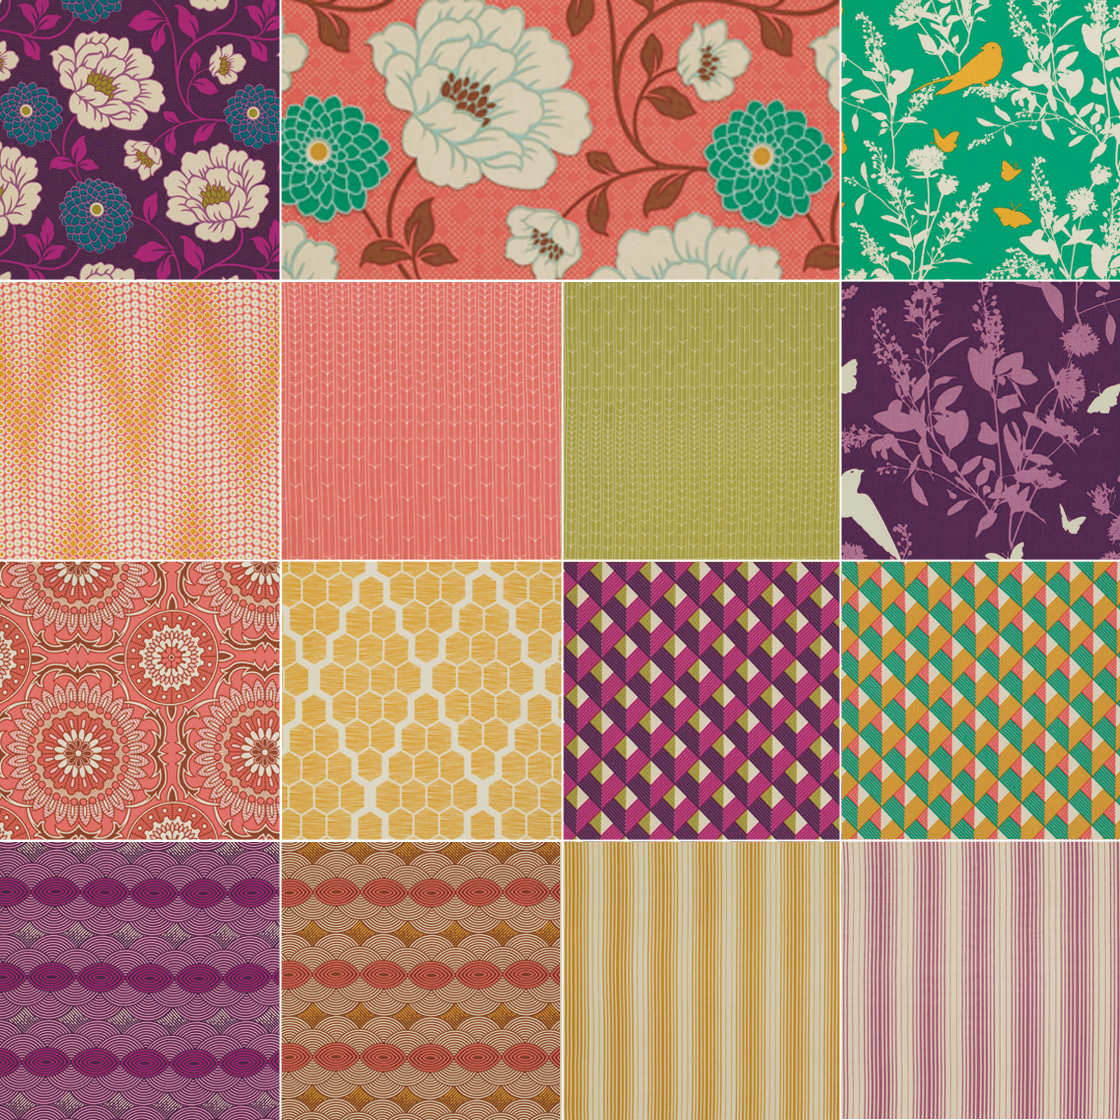
For Sew and Tell today, I’m excited to be participating in the Modern Quilt Guild’s upcoming challenge focusing on these Riley Blake prints:

Challenge Fabric

Riley Blake MQG Challenge Fabric

Each of the challenge participants received a fat 1/8th of each of these fabrics. We can add any other Riley Blake fabrics to the mix to create any type of quilted item we wish. Finished projects are due by February 17th and if I know me, I’m sure I’ll be finishing right under the wire. 🙂

Since I’m not hosting any new Quilt Alongs for awhile (here’s why), I thought I would share some of my in-process quilts as they happen. I’m not sure how many blog posts it will take to complete this quilt, but I invite you along for the ride.

I started playing around with this block that I had designed a few months ago – parallel lines. I blogged about it here (including a free paper pieced template to make it).

Parallel Lines

Parallel Lines block by Christa Watson

What if I added additional lines, sewed them more randomly, and filled them in with color? I thought it would be fun to piece a few improvisational “string” blocks and leave a little negative space to add extra machine quilting texture (my #1 passion)! I’m thinking maybe light or dark grey for the background negative space. What do you think?

Improv String BlockImprov String Block


I started by doodling a few improv blocks in EQ7 and cutting out some strips. (Anyone else get the irony of planned improv blocks?) I’ll be back next time to show you how they are shaping up!

Guest Posting at Quilt Story – Log Cabin Wreath Holiday Tutorial

Today I’m excited to share a holiday tutorial over at Quilt Story with Heather and Megan! Learn how to make my log cabin wreath wallhanging – or turn it into a pillow. 🙂

Log Cabin Wreath, Pieced and Quilted by Christa Wason 18" x 18"

Log Cabin Wreath, Pieced and Quilted by Christa Watson, 18″ x 18″

I made my Log Cabin Wreath last year for Christmas and I’ve re-created the instructions so that they all fit in one post. Pop on over to check it out!

Holiday Tutorials

Here’s the complete Holiday Tutorial Series. Enjoy!

Sew and Tell – Colorful Chevrons: Now Available as a Dress!

Where quilting and fashion collide…

Who knew I was so fashion forward? I got a kick out of this picture showing a dress version of Colorful (Quilty) Chevrons! One of my blog readers (Samantha K.) pointed it out to me and it’s from Southern State of Mind Boutique on facebook, a store in Texas that sells amazing boutique dresses. (Picture re-posted here with their permission).

20131120_chevron_dress

Isn’t it fabulous? I’m almost tempted to buy one for myself. Wouldn’t that be a riot? I didn’t realize that when I compared my quilting to a runway fashion show earlier in the week that could actually be a possibility, LOL!

Quilty Chevrons

Colorful Chevrons as seen in Quilty – image shared with permission.

You know of course that I was independently working on my color and design months ago while whoever designed this dress was independently doing the same thing. The fact that we chose similar colors and design is a testament to just how much the chevron shape has infiltrated popular culture!

Hmm – maybe I should commission someone to make dress versions of all my quilt designs….?

Sew and Tell Friday – Melissa Corry Edition

I love having quilty friends, and I especially love it when they make such amazing and inspiring quilts! When I visited with my friend Melissa Corry on my way to Sewing Summit a couple of months ago, I took so many pictures of her fun quilts that I barely had room to fit them in one post. So I thought I’d share more of them with you today.

Once Upon a Time

Once Upon a Time Quilt – My Favorite!

It’s always fun to see how other quilters decorate their home with quilts and Melissa did not disappoint. She displayed them on walls, tables, and beds throughout her cozy home.

Bed QuiltI love the combo of green and brown, and especially how she tucked her bed quilt into the frame. It’s very clean looking. See those fantastic alumni quilts folded at the edge of the bed? Check out her detailed blog tutorial on how to achieve precise layered applique by machine.

A Bed Fit for a Princess!

A Bed Fit for a Princess!

Doesn’t every sweet little girl deserve a pretty quilt on her bed? And don’t forget the boys!

Bed Quilts

Start the day with a freshly made bed!

I arrived pretty early at Melissa’s that day and was impressed that nearly every bed was made up with a quilt on top! (She did know that I was coming…)

Melissa's Quilts

Melissa’s Quilts

And who can resist a yummy pile of quilts stacked up so nicely?!

In Your Neighborhood

In Your Neighborhood Quilt

This was my other favorite quilt of the day, Melissa’s In Your Neighborhood quilt. Bold graphic design really appeals to me. In fact, she’s teaching this one at a fun event coming up next year, the Small Town Quilt Show. I will definitely have to attend!

Melissa is truly a kindred spirit. She loves machine quilting her quilts (almost) as much as I do, and has shared many amazing videos of the process here on her blog.

Thanks Melissa, for sharing your hospitality and your quilts with me that day!

Machine Quilting Inspiration

I love scheduling two weeks in between quilt along tutorials. That gives everyone time to work at their own pace. It also gives me a chance to highlight a few of the WIP’s that everyone is sharing on flickr and on their blogs.

Susan's Trees

Susan N – Desertsky Quilting

Today I especially wanted to give a shout out to a few gals who have already begun machine quilting their quilts.  I’ll start off with Susan from Desertsky Quilting. She whipped up 4 blocks into this cute quickie table runner. She stitched a simple outline around her trees which shows up wonderfully on the back in the photo below:

Susan's Quilting Detail

Susan’s Quilting Detail

I love Susan’s can-do attitude with her quilt. She said, “The walking foot really helped me, and I don’t know if I’ll go beyond straight lines and wavy lines with that, but it was fun, and I loved how easy it was!” It tickles me when quilters like Susan realize that you really can add extra dimension to your quilts, even with simple quilting!

She made my day with her sweet comments when she said, “Your encouragement gave me the confidence I needed and I loved every minute of it.  The quilting is my favorite part.” Me, too, Susan!!

Straight Lines

Katie’s Straight Line Quilting

Katie A. did a fantastic job straight-line quilting this adorable baby quilt made from leftover blocks. Don’t you just love the texture her quilting adds? Fantastic!

Swirls

Mara C’s Swirls

I adore the quilting that Mara (aka Simon Says Sew) is adding to the background of her trees. It looks like a blustery day in the forest, blowing up piles of snow drifts! I think Mara’s made at least 4 different Modern Tress so far. Can we say teacher’s pet? 🙂

Loops Swirls

Anne J. Loops and Swirls Quilting

Look at those fun loops and swirls that Anne J. has added to her background! Isn’t it great? She’s going for swirling snow and scattered snowflakes. I love it!

There are many more beautiful quilts that everyone is sharing. The fabric choices and color combinations are simply amazing. You can see more fabulous pics here on my flickr group.

My hope with this quilt along is that you will not be afraid to jump in and give machine quilting a try. (And don’t worry – if machine quilting’s not your thing you can still play with us and sew along!)

Background Quilting

Background Quilting for Christa’s Modern Trees

Here’s a sneak peek of my FMQ progress. I’ll give some more in-depth tutorials on background fillers when I finish quilting Modern Trees next week!

Sew and Tell WIP – Sewing Room Redo

While I’m not quite ready for the complete reveal, I have been hard at work this week improving my sewing space. After reducing my fabric stash by about half, I spent the early part of this week combing though my entire collection of notions and supplies and getting rid of as much as possible. That sure felt good. 🙂

Messy Room

What a mess! Going, going… gone!

For example, I kept hanging onto a huge supply of stencils for years, hoping that one day, I’d use them on the perfect quilt. Then I quickly realized that I actually prefer to quilt more organic shapes on my quilts that don’t need stencils and usually require little to no marking. So they are on their way to finding a better home…

Stencils

Stencil Stash – I may keep just 1 or 2…

As I’ve been dejunking and reorganizing, it’s helped me realize just who I am and how I like to work. I previously opined about being a minimalist. The more I reduce the clutter, the better I feel.

After rearranging furniture and getting rid of ugly plastic bins like these, I realized I enjoy negative space not just in quilting, but in decorating, too.

Plastic Bins

Lots of junky bins and stacks of clutter to get rid of!

I was able to completely empty them out and organize them into prettier containers – baskets, bins, and on shelves behind closed doors. It’s amazing how much you can clean up the place when you stash it away where no one can see it!

Decorative Baskets

Use pretty buckets to hide things away!

Instead of cramming shelving and bins all together haphazardly, the closed shelving units look much better by themselves with a little empty space around them.

Storage UnitSee all that blank space on the right side wall? That will soon be my huge design wall area. I used to have both white storage units there and it really took up too much visual space. By getting rid of excess junk and furniture, I was able to separate the storage units, tuck them into corners, and free up some wall space so that I have more room to design!

Getting there - but I still need to replace those clunky tables!

Getting there – but I still need to replace those clunky tables!

Now all I have left to do is create the design wall, hang my rulers on the sides of my storage units, replace the junky basting tables, and maybe throw up a couple of valances for a touch of color. I plan on being a busy bee over the next few days until it’s done. Then I can quilt again. 🙂

Updated – Ok, I’ll give you guys my stencils!

After I posted this I was inundated with requests on where they will go. So I will give them to you guys. I’ll make them my giveaway for next week – so stay tuned. :-)

Sew and Tell – Wholesale Fabric Shopping

Jason and I attended a fabric trade show this week right here in Las Vegas. There are some good things to be said about living in this city! It’s like a mini quilt market where we get to go twice a year and meet with our fabric reps to preview the latest lines.

Christa Meeting with Michael Miller Sales Rep

Christa Meeting with Michael Miller Sales Rep

Jason and I are on a mission to search out the best precuts to sell in our Amazon store as a way to transition much of the work we do away from our home. (The kids would like their play room back.)

As we met with lots of different fabric companies, it was interesting to note how many of them are not carrying much in the way of precuts.

We all know that Moda is the king of precuts. We carry most of their charm packs, layer cakes and jelly rolls and quite a few fat quarter bundles. We also stock a fair amount of Kaufman precuts, and we just added Riley Blake to the mix to see how well they sell.

Precut Fabric Samples

Precut Fabric Samples

However, some of the smaller companies are having a harder time breaking into the precut market. One very small company whom I will not name, didn’t even know what a charm pack was!

We tried to talk to as many vendors as we could, letting them know if they were interested in adding precuts to the mix, we were willing to buy! I was very impressed with the excellent variety of precuts that Michael Miller has to offer. So watch for those in our precut section soon.

Hotel Carpet

Inspiring Hotel Carpeting

The convention hotel had some great carpeting that we noticed on the way out. Would this make a great machine quilting design or what?!

Sew and Tell Finish – Amy Butler Sling Bag

Whoo – hoo! I was able to finish my Amy Butler Sunday Sling just in time for Sewing Summit. I’m there all weekend and will be sure to post a complete wrap up of the event when I return on Monday.

Sunday SlingFor now I am feeling very accomplished. I much prefer making quilts to clothing and accessories. However, since I like to encourage everyone to make at least one quilt from start to finish, this was my turn to make something outside of my comfort zone.

Sunday SlingIt took a few afternoons of sewing but I followed the step by step instructions and took my time with it. After all, it was quicker than making a quilt. The pockets were fun to make and I didn’t even mind learning to sew pleats!

Sunday SlingThe only trouble I had was when it came time to finish. The pattern called for slipstitching the opening by hand to finish. I cheated a little and finished that part by machine since the pieces were too bulky for me to sew by hand. It’s on the inside of the bag though, so no one will know it’s there but me.

Sunday Sling

After checking this 2 year old UFO off my list, now I get to quilt again. 🙂

Lee’s Freshly Pieced Cartwheels Quilt – Kits Available

My friend Lee from Freshly Pieced recently had her beautiful Turning Cartwheels Quilt featured in the October issue of Quilt magazine. Isn’t it sew fresh and gorgeous?

Turning Cartwheels

Lee Heinrich’s Turning Cartwheels Quilt 74″ x 90″

Lee teamed up with me to provide kits for her quilt and I was very happy to oblige. Lee chose 15 prints of Joel Dewberry’s Bungalow line to make the cartwheel blocks. The neutrals are Free Spirit Essential Solids in Cream for the background and Sand for the binding.

Freshly Pieced Quilting

Freshly Pieced Quilting – Gorgeous Stippling!

The full kit makes up into a generously sized 74″ x 90″ quilt and it includes the exact fabrics shown above to make the top plus binding. I’ve also put together a “starter bundle” featuring half yard cuts of the 15 Bungalow prints from the quilt.

Bungalow

Bungalow Starter Bundle – 15 Half Yard Cuts

Both kits are available for sale in my shop at ChristaQuilts.com and they include a copy of the magazine, too.

Quilt Magazine

If you like Lee’s style, we’ve also teamed up to create her Sparkler quilt kit. Her original quilt was made from RJR solids, but she personally selected all of the Kona Solids for my kit version in similar colors. Both quilts use paper piecing techniques which are super fun to do!

Sparkler Quilt

Sparkler Quilt by Lee Heinrich, 60″ x 84″

If you haven’t met Lee yet (either in person or online) – be sure to stop by her blog and say hi! She hosts the weekly WIP Wednesday linkup and was recently announced to be one of the teachers at the upcoming Sewdown in Portland put on by the Modern Quilt Guild.

Go, Lee!

An Old Finish and a New Start

I recently finished hand piecing, yes hand piecing this Winding Ways quilt top I started about 16-17 years ago, soon after I began quilting.

Winding Ways

Hand Pieced Winding Ways – Fabrics Circa Mid 1990’s

I remember cutting out plastic templates and joyously hunting through my local quilt shop’s fat quarter bin to find just the perfect fabrics. I had no stash at the time so I had to create my own “scraps.”

I forgot about it in a closet for a good 10 years at least. Then, when all these awesome modern quilters starting embracing hand-work, I decided it was high time to get it out and do a little hand stitching myself. You can definitely tell the difference in my stitch quality between then and now, but it has been relaxing to work on while watching TV with the family or going away on a family vacation.

Lots of Pins

You can see the hand-marked seam lines. Yes, that was a lot of work!

Now I’ve got to decide how to quilt it (by hand of course) and get it basted. Suggestions anyone?

While I wait for my Winding Ways quilt top to tell me how it wants to be quilted, I’ve decided to start on something a bit more modern. This is my version of an improv quilt.

Rain SketchStrips of Rain


I started with a sketch my hubby made on his ipad and started interpreting it in fabric. The improv part is that I’m not exactly sure how long to make the strips or how far apart to space them, but it will be a fun exploration. I’m really stretching myself with this quilt, but so far, I like what I see. 🙂