Blogger’s Quilt Festival Spring 2013 – Roses for Katelyn

I am entering my quilt, Roses for Katelyn, into the bloggers’ quilt festival this spring. I was excited to read that you can enter two categories! (See my other entry here.)

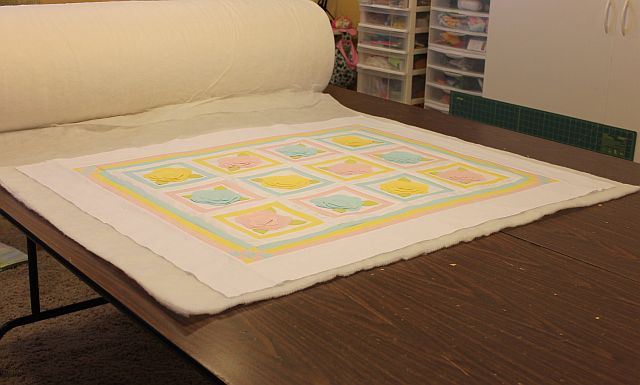
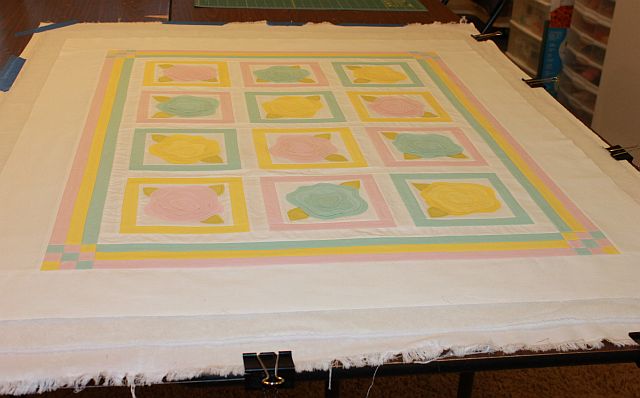
Roses for Katelyn was completely made by me and it measures 36″ x 43″. I used soft edge applique techniques and machine quilted it on my old Bernina 1630.

I am entering it into the applique quilt category and would love your vote!

Roses for KatelynThis is my first time entering something into the festival but after reading more about it in the latest issue of Modern Patchwork magazine I decided to give it a try.

This quilt is very special to me because I made it for my brand-new niece Katelyn.

Roses for Katelyn

Roses for Katelyn

My older sister and I have always been very close. When I had children she was such a terrific aunt and I felt so sad for her when she was not able to have children. After several years of trying she finally adopted her first baby boy, who’s now almost 8!

Alphabet Applique Quilt

Ethan’s Alphabet Applique

Monkeys Quilt

Jacob’s Monkeys

Then she adopted her second sweet son who’s nearly two. Finally, she adopted her little girl just two months ago.  I’ve made quilts for all of 3 them and it makes me very happy to visit and watch these little quilts get used and loved. 🙂

Quilting Plan

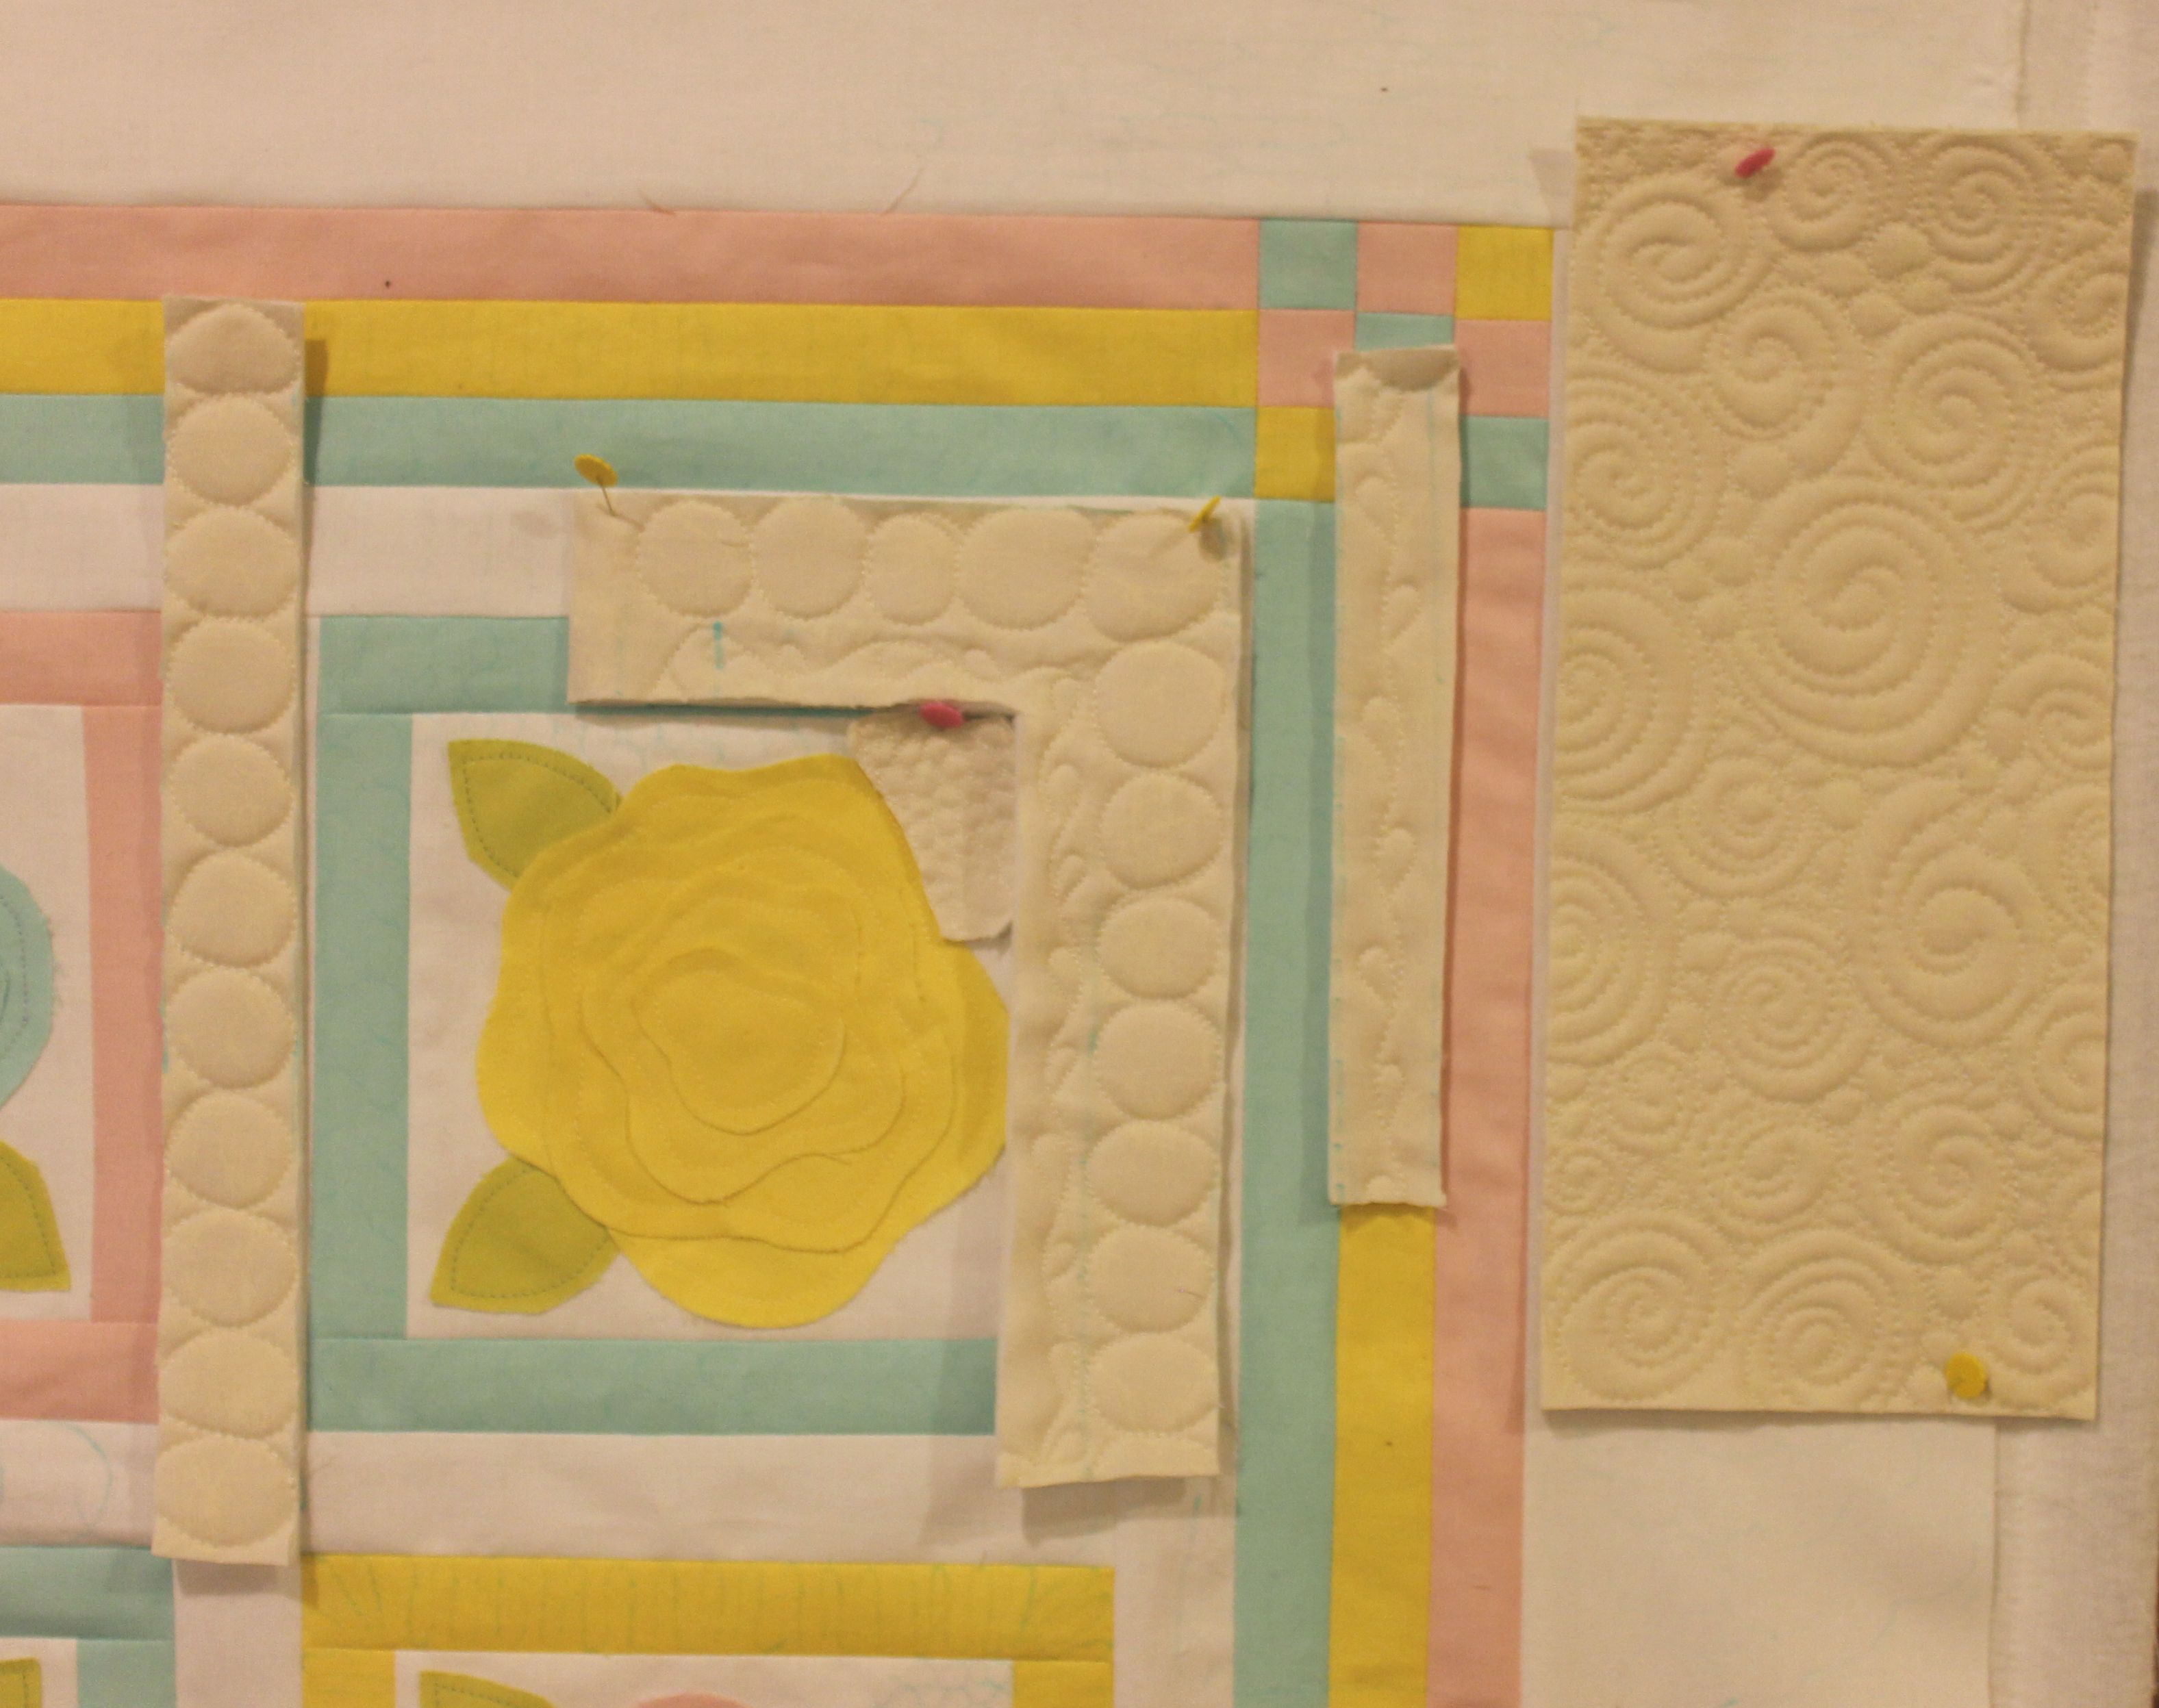
Original Quilting Plan

I blogged about Roses for Katelyn as I was making it, so I was able to show a lot of the in-progress work while I appliqued the blocks and decided how to machine quilt it. You can read the last blog entry here which gives links to all of the previous WIP posts.
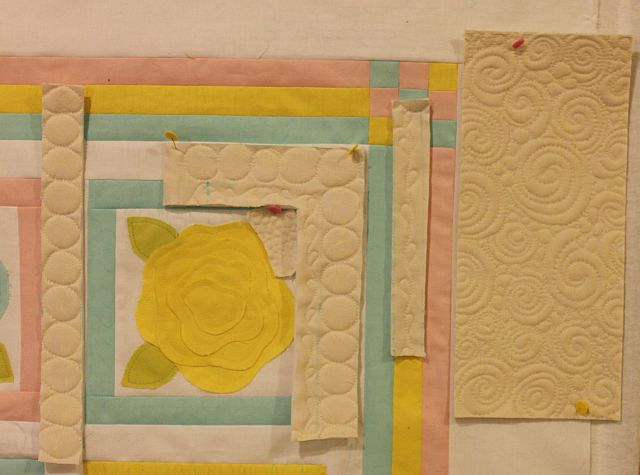
Actual Quilting

Actual Quilting

I loved every stitch that went into this quilt and I’m especially pleased that both mom and baby are happy with the quilt and are doing well. 🙂

Roses for Katelyn

Roses for Katelyn, by Christa Watson

Bloggers Quilt FestivalBlogger’s Quilt Festival hosted by Amy Ellis

May 17 – 24 – Linkys Open & Nominate for Viewer’s Choice

May 24 – 30 – Vote for favorites in each of the categories

May 31 – Winners announced

Hey Quilty! New Project Start with Cotton Couture Solids

I am so thrilled I could hardly keep this to myself!

This bundle of gorgeous Cotton Couture solids just arrived in the mail from Michael Miller. I am going to turn them into an original quilt which will be featured in an upcoming issue of Quilty magazine!

Michael Miller Couture Solids

Michael Miller Cotton Couture Solids

Have you seen Quilty yet? Edited by Mary Fons, it’s an amazing new magazine geared toward beginning contemporary and modern quilters which has quickly become one of my favorites. (Be sure to catch her fabulous QuiltCon lecture for free on Craftsy!)

Quilty May/June 2013Quilty Winter 2012Quilty March/April 2013


When I first met New Track Media publisher Kristi Loeffelholz at QuiltCon back in February, I immediately knew I wanted to work with them. While I’m chatting with Kristi, who walks up to us but none other than Mary Fons? So of course I quickly got a picture with my camera phone, even though it was pretty dark in the room. (Sorry for the fuzzy pics!)

Quilty

Mary Fons, Christa Watson, Kristi Loeffelholz (New Track Media Publisher)

The next day at QuiltCon, I ran into Mary’s mom Marianne Fons checking out the quilts! We had a fun little conversation where I was able to tell her what an influence she and Liz Porter have been on my quilting over the years. Their book, The Quilter’s Complete Guide was the first quilting book I ever purchased way back in 1995!

Marianne Fons

Marianne Fons and Christa Watson at QuiltCon

Now, some 18 years later as I am ready to take my quilting to the next level, I think it’s wonderful kharma that it’s Marianne’s daughter’s magazine that will have my first published quilt. Hmmm, I wonder if it’s too late to be adopted into the Fons quilt mafia family???

Stay tuned for updates on this quilt!

Michael Miller Couture Solids

Michael Miller Cotton Couture Solids

Sew and Tell Baby French Roses #5 – Basting

I have been basting up a storm this week! I finished basting my Hugs ‘n Kisses Quilt Along as well as my French Rose Buds quilt. I am itching to start stitching both of them this weekend as soon as I get all of my other “quilty chores” done. 🙂

French Rose Buds Basted

Basting as you know is probably one of the least fun tasks of making a quilt. But whenever it’s time to baste, I set aside a whole day, put on some relaxing music and try to keep my distractions to a minimum. No, it doesn’t take me a whole day to baste (usually just an hour or two), but it does take a while to get in the mood to baste.

Bolt of Wool Batting

I start off by pulling down my big ol’ bolt of batting and laying the quilt on top of it so I know how much batting to cut. I leave a couple extra inches on all four sides which I will trim down later. My favorite batting to use is wool because it shows off the quilting and helps my quilts to hang flat nice and flat.

Binder ClipsPearl Bracelets backing


I use a couple of long banquet tables and random binder clips to secure my quilt backing. If the quilt doesn’t stretch across the whole table, I secure the loose ends with painter’s tape. I also starch my backing first as well as my quilt top.

Quilt Sandwich

I love the soft look of the Kona pastels on the front of my Baby French Roses. So I chose a low-volume fabric to go on the back: Pearl Bracelets in Cotton Candy Pink.

I’ve tried several different ways to baste such as thread basting (no thanks), spray basting (too hard to ventilate properly) and using all sorts of gizmos to help close the safety pins (too clumsy to figure out).  I even used plastic pinmoors to cap off my straight pins and while they are terrific to take out, I’m not sure they hold as well as I’d like.

Safety Pin Basting

So I’m back to using plain jane regular old safety pins, and quite a lot of them! I do have the fancy schmancy quilter’s curved pins, but this week I was scrambling to find as many safety pins around the house as I could so I’d have enough to baste two quilts at the same time. I ended up using a variety of pins in my quilt and they all work just fine.

Here are a few tips I’ve learned from basting scores of quilt tops:

  1. When using a lot of white fabric on the front, use a clean white polyster or wool batting, or a bleached cotton batting or a blend. Regular cream cotton may have little flecks or seeds that will show through to the top of the quilt.
  2. Use a backing that will not show through (shadow) through to the front of your quilt.
  3. Take the time press both the quilt top and back of your quilt before basting – and don’t be afraid to use starch. The flatter your pieces, the easier it will be to baste and quilt.
  4. Use lots of pins! The more pins you have in your quilt, the less it will shift while quilting. Sad, but true. Ask me how I know!

French Roses kits are available in my store for a limited time. You can see my progress and read my previous post here.

WIP – Skillbuilder Pieced Blocks February and March

I am slowly catching up on my Skillbuilder Block of the Month blocks. I sewed together two month’s worth of blocks last month during my family getaway. From left to the right, the blocks are called Em Dash, The Mood, Woven Star, and Woven Chevrons.

Skillbulder BOMI chose to go with Kona Solids in all of the blocks since we will be quilting as you go. I chose Coal grey as the background, then I sold out of it and had to order more just for me LOL!!

I think solids really let the quilting stand out. Here are pictures of the first two month’s blocks that I quilted previously. They are called Sound Wave and Magnum.

Skillbuilder Blocks Quilted

(I just got a new camera and am learning how to take better pictures with it – but the lighting is still a little off.)

I am using the same grey for the front of all of the blocks but am toying around with using different shades of greys for the back of each pair of blocks. I think that will give a patchwork look to the backing and break it up somewhat so it’s not just a sea of grey.

Fabric LayoutFabric Layout


To keep everything organized, I took pictures of each set of fabrics I would use for each block. Then, when sewing the pieces together I worked on one block at a time. I kept my pieces right next to my sewing machine and constantly referred to the layout diagram. I also pressed all of the seam open which helped the blocks lie really flat.

BOM Pieces

I am pleased with how they turned out and now I’m excited to quilt them – which for me, is the most fun part!

Skillbulder BOM

Sew and Tell Baby French Roses #4 – FMQ Practice

I am moving right along on my French Rose Buds quilt. This week I practiced some free-motion quilting designs which I will finalize shortly. I decided to enter the quilt top into the weekly Quilting Gallery contest so I’d love for you to vote for it!

Vote here and you can be entered to win the Quilting Gallery’s weekly giveaway!

French Rose Buds Top

French Rose Buds Quilt Top 36″ x 43.5″

Before I jump right into quilting this puppy, I decided to take some time and plan out my quilting. Since this quilt is for my brand new niece, I want to make it extra special. I also think it’s a great quilt to show off some fun free-motion quilting texture.

Swirls Quilting

I started by drawing out some quilting designs on paper and then making up a few practice sandwiches to test it out. I’ve always wanted to try swirls ever since taking Angela Walters’ quilting negative space class at QuiltCon and on Craftsy. (Even though she quilts on a long-arm I was able to adapt her techniques to my domestic machine.)

Quilt DoodlingQuilting Audition

Next I tried starting sketching out possible designs directly onto the quilt top.

That didn’t give me enough of an idea so I pinned my quilted practice piece onto the quilt top for a better perspective. So far so good. Now I want to try swirls and pebbles.

Swirls and Pebbles

I really like this! I think combining two designs makes it more fun and whimsical. I stitched out a couple more practice sandwiches, cut them to size and pinned them to the top so I could see how they would really work in the quilt.

Quilting AuditionMy plan is to quilt each section in matching thread so all you see is the quilting texture, not the thread. Hopefully I will have time to baste and start quilting this weekend. I will post more of my progress next week.

By slowing down and only working on this quilt a little each week, I am able to get all of my other projects accomplished without feeling overwhelmed!

You can read about my previous Baby French Roses progress here.

Sew and Tell Baby French Roses #3 – Top Done!

I am finally starting to feel like I’m having more personal time to sew. Perhaps I’m being more efficient, or maybe I’m just not getting distracted by things that waste my time.

Whatever the reason, I am loving it. I was able to finish up my French Rosebuds quilt top this week and I’m very pleased with how it turned out. French Roses kits are available using these exact same fabrics. You can see my progress and read my previous post here.

French Rose Buds Top

French Rose Buds Quilt Top 36″ x 43.5″

French Rose Buds Pattern

French Rose Buds Pattern

I changed a few things from the original French Rosebuds pattern to make it a little more sassy.

First of all, I chose pastel Kona Solids for a fresh, modern look. I also widened the frames and borders.

The pattern calls for the frames around each block to be the same color as the roses. I thought that by switching up the colors, it looks a little more lively.

Finally, I added small 9-patch blocks in the border corners to give it a little more pizzaz. This actually made the borders easier to sew, too.

Whenever you make a quilt from a pattern or a kit, you can still change it up and make it your own!


Seam Roller

During construction, I pressed all of my seams open.

My new favorite tool, a wooden seam roller came in handy for this task.

I rolled each seam first to open the seams.

Then I went back and pressed each seam with a hot dry iron from both the back and the front to keep them open and flat.

This nifty tool is really nothing more than a wooden wallpaper roller. I originally bought it for paper piecing but use it now for all of my “finger pressing.”


Now I am excited to baste this puppy and start quilting!

Rosebuds Detail I’m thinking I want to stitch a small filler around the roses and then quilt the white sashing with pebbles – sort of mimicking a path or stone wall surrounding the roses.

Then I think I’ll free-motion quilt some sort of floral motif in the outer borders. When I took Angela Walter‘s FMQ class at QuiltCon, she showed us how she quilts her free-form feathers and flowers. So I’ll practice on some scraps first and see what I can come up with.

Angela Walters at QuiltCon

Angela Walters at QuiltCon

Angela Walters' Flower Quilting

Angela Walters’ Flower Quilting

Now it’s back to work so I can earn a little more free time sewing this weekend!


Follow my blog with Bloglovin

Sew and Tell – Baby French Roses 2 and National Quilting Day

For National Quilting Month, Worldwide Quilting Day and just plain old weekend fun, I’m working on my applique quilt below. I hope to get the top completed this weekend. I also finished sewing all the the blocks for my Hugs ‘n Kisses Quilt Along.

There’s nothing better than a nice quiet day of sewing!

In my recent blog post about slowing down and enjoying the process, someone made the comment that we all need to stop and smell the roses. So far, I am savoring every delicious step of making my pretty rose buds quilt! You can read about French Roses #1 here.

French Rose Buds Pieces

French Rose Buds Pieces

I’m calling it Baby French Roses since it’s the baby sized version of the original French Roses pattern. I was on a roll this week and finished all of the rose blocks using soft edge applique techniques. This method is contemporary and quick, allowing me to enjoy the process. I stitched down all 4 blocks of one color per day, over 3 days, and never felt rushed.

Stitching the Leaves

Stitching the Leaves

First Petal

First Petal

Using the knee-lift on my Bernina was especially helpful so I could leave my hands free to turn the blocks as needed, sometimes after just one or two stitches. I also like to use an open toe foot so I can see exactly where I’m going.

Pre-wound Bobbins

Pre-wound Bobbins

I matched my threads to the fabric colors and paid attention to details like pulling the loose threads to the back of the blocks and tying them off.

That way you can’t see my starts and stops on the front of the blocks.

I used an assortment of pre-wound bobbin thread colors to match. It didn’t take much thread to applique each block.

Trimming the Roses

Trimming the Roses

I trimmed the excess fabric underneath each rose patch as I went so there would not be too much bulk underneath each flower. Using curved tip scissors helped me avoid poking through the top fabric while I cut.

20130315_french_rose_block_single

I really like how the flowers have texture, each made from 4 layers of the same solid fabric in pastels. They will fray up nicely when I wash the finished quilt.  Now it’s time to play around with block placement. I’ll blog again next week when I finish the top.

French Rose Buds

French Rose Buds

If you’d like to make a quilt like mine, I have a few more French Rose Buds kits left. Or you can purchase the French Roses pattern (original or baby size) and make it your own. 🙂

Applique Rose Blocks

Applique Rose Blocks

To read my post about starting this project last week click here.

My goal is to make every day a Quilting Day!

Christa’s Sew and Tell – Baby French Roses #1

My sister just adopted this sweet baby girl a few weeks ago and you know what that means –
I get to make her a baby quilt! (That’s my daughter holding her new baby cousin.)

Jenna with cousin Katelyn

Jenna with cousin Katelyn

Ever since I put together some French Rose Buds quilt kits, I have been looking for an excuse to make one myself and now I get to! I created the kit completely from Kona Solids to give it a clean, fresh appeal. This quilt will go in the baby’s room.

French Rose Buds Kit

French Rose Buds Kit

The kit includes one of Heather French’s fabulous French Rose Buds patterns, a smaller version of her original French Roses. Read my French Roses Quilt blog posts here and here to see the variations I’ve made from the larger sized pattern.

French Rose Petals

Tracing and cutting the petals was fun!

I spent a glorious day cutting out all of the fabric for the quilt. I’m making mine slightly larger by increasing the width on a couple of the sashes. I may use some of the leftover scraps to extend the borders, too.

French Rose Buds Pieces

All Pieces Cut and Ready to Sew

The rose appliques are all cut and ready to stitch down.  I’ll be sure to blog about my work-in-progress. This is going to be fun!

French Rose Bud Blocks

French Rose Buds Blocks

Skillbuilder BOM – January Blocks Quilted

I am excited to share a WIP/block finish with you today! I am participating in Pile O’Fabric’s Skillbuilder Block of the Month series where we sew and quilt two blocks a month using quilt-as-you go techniques. I’ve never made a quilt like this before, and it’s “sew” fun!

Here are my finished blocks from January, called Magnum and Sound Wave. Click each picture to enlarge so that you can see closeups of the quilting detail.

Magnum, Quilted

Soundwave, Quilted


I chose fat quarters of Kona Cotton Solids in shades of red, orange and yellow, with a complement of turquoise thrown in, just for fun. I used cotton threads (Aurifil and Superior) to match all the colors of the fabrics with thin grey polyester thread for the background.

Colorful Thread

I stitched in the ditch through all of the seams first to stabilize them, then filled in each color with a fun design, changing thread colors as I went. I used a quarter to mark the circles.

Quilting

Add a Quarter


Here are the backs of the blocks. I love how the thread colors stand out!

Soundwave BackMagnum Back


Now I’m off to catch up on February’s Blocks!

Sew and Tell – Meet Lisa Sipes

For show and tell today, I want to introduce you to my new friend and amazing machine quilter, Lisa Sipes.

I was first introduced to Lisa’s work when I attended Road to California last year. Her quilt, BeDazzled really dazzled me. The bright solid colors really spoke to me and this was even before I started using them in my own quilts.

Bedazzled by Lisa Sipes

Bedazzled by Lisa Sipes

Fast forward to QuiltCon this year and who won best of show? Victoria Findlay Wolfe and Lisa Sipes with their quilt, Double Edged love. I mean can you see all the detail in that quilting? This gorgeous quilt is a fantastic modern interpretation of the classic  double wedding ring quilt pattern.

Double Edged Love

Double Edged Love by Victoria Findlay Wolfe and Lisa Sipes

And guess who took Viewer’s Choice at QuiltCon? Again, it was Lisa’s amazing quilting along with Alison Glass’ impeccable applique in “Overgrown” that stole the show.

Overgrown Quilting Detail

OverGrown – Detail of quilting by Lisa Sipes

I believe it’s amazing quilting like this that is becoming one of the hallmarks of the modern quilting movement. I recently had a chat with Lisa to talk about her inspirational work.

Lisa began quilting near the end of 2008 when her mother suggested she take up long arm quilting as a new career direction (after dabbling in such varied occupations as accounting and bartending).

Lisa Sipes

Lisa Sipes

Lisa does all of her quilting on a Gamill long arm machine. She is a Gamill quilting artist which means she gets to travel with them showing off what these machines are capable of.  Her work has been seen in such magazines as American Patchwork and Quilting, Generation Q, and Modern Quilts Unlimited.

She does mostly quilting these days and her friends help with the piecing. Like any good artist, she always has several designs in her head that just HAVE to get made someday (I can relate!) as therapy to soothe the soul.

It takes her anywhere from a few day to a couple of weeks of focused effort to achieve such impeccable results. She doesn’t quilt just for the sake of quilting, but instead likes to have conversations with the quilters to determine how the quilt would best be quilted.

Sometimes she bases the quilting on the name of the quilt or why it was made or for whom. Other times, her inspiration comes from the design of the quilt or fabric. In all cases, she tries to make the quilting tell a story, such as her collaberation with Thomas Knauer for In Defense of Handmade:

In Defense of Handmade

In Defense of Handmade by Thomas Knauer and Lisa Sipes

This quilt is the actual barcode representation of a celebrity designed quilt that was mass marketed and sold through department stores. According to the quilt’s artistic statement, “the… bar code becomes a place for color and play… in lieu of the homogeneity of the factory-made.” Lisa’s painstaking quilting, tied off at every single straight line start and stop embodies the meaning of this quilt. It is beautiful hand-crafted work, indeed.

I applaud Lisa for bringing the art of machine quilting to a higher-level. Whether you quilt on a long-arm like she does, or use a domestic machine like I do, I hope you appreciate the artistry and vision that quilting can bring to a quilt.