Preorder Good Vibes Paper Quilt Patterns: Buy 2, Get 1 Free

I am so excited about my two newest patterns, Charming Chevrons and Modern Logs. I’ll be doing quilt alongs for both later this year, and I can’t wait!!

Charming Chevrons by Christa Watson

Lap-size Charming Chevrons in Good Vibes fabric by Christa Watson for Benartex Contempo Studio

The lap and throw sizes of Charming Chevrons are made from 5″ charm packs. (The thinking is done—so you just relax and sew!) This design has a lot of movement for great visual interest.

Charming Chevrons by Christa Watson

Twin-size Charming Chevrons in Good Vibes fabric by Christa Watson for Benartex Contempo Studio

The larger sizes of Charming Chevrons (twin and king) are made from 10″ precut squares, also called Layer Cakes or Ten by Tens.

Watch for Good Vibes 5×5 and 10×10 packs coming in July!

Right now, I’m taking pre-orders for the paper patterns of Charming Chevrons and Modern Logs, and I have a special offer for you. Please read on!

Charming Chevrons by Christa Watson

The cover quilts were made with my new Good Vibes line for Benartex Contempo Studio. I’m really pleased by the interplay of the modern low-volumes and the saturated bright prints. It’s just the look I was after! More thoughts on Good Vibes coming soon.

Click here to browse Good Vibes modern prints. 

All of my patterns include step-by-step instructions and machine quilting suggestions so you’re never stumped when it’s time to finish. We have it covered!

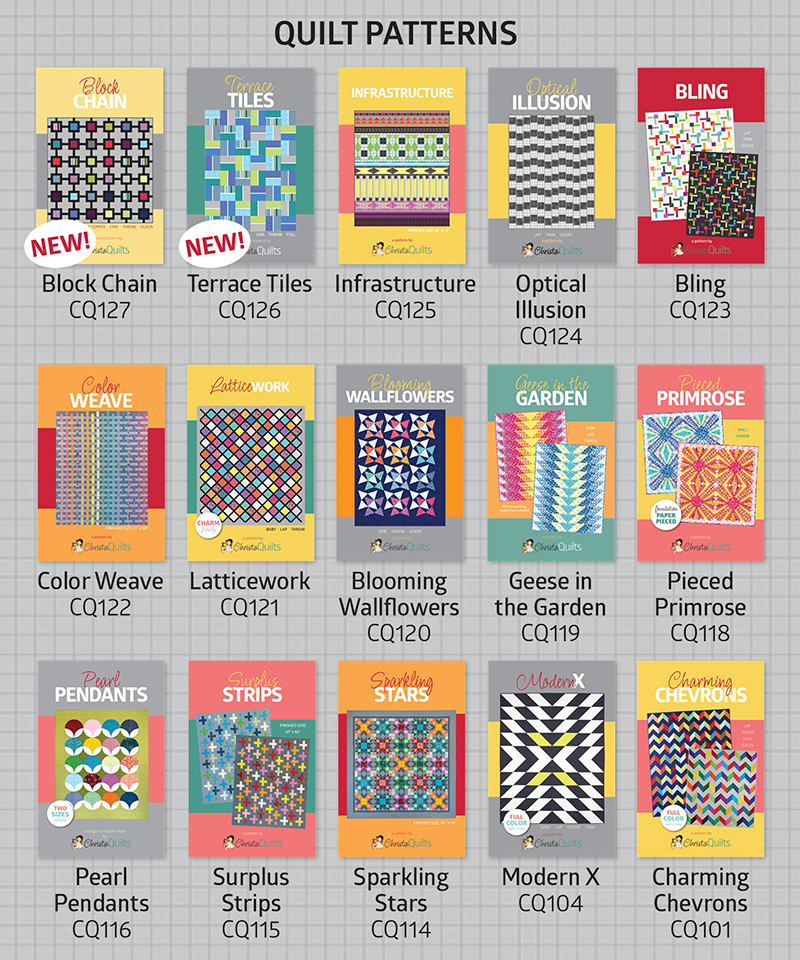
Choose from four handy sizes in Charming Chevrons: Lap, Throw, Twin or King! See the pattern’s back cover below for the dimensions.

Charming Chevrons by Christa Watson

Maybe you have some charm packs around just waiting for the right project. Or have you been looking for the perfect quilt to use a special layer cake? Look no further than Charming Chevrons!

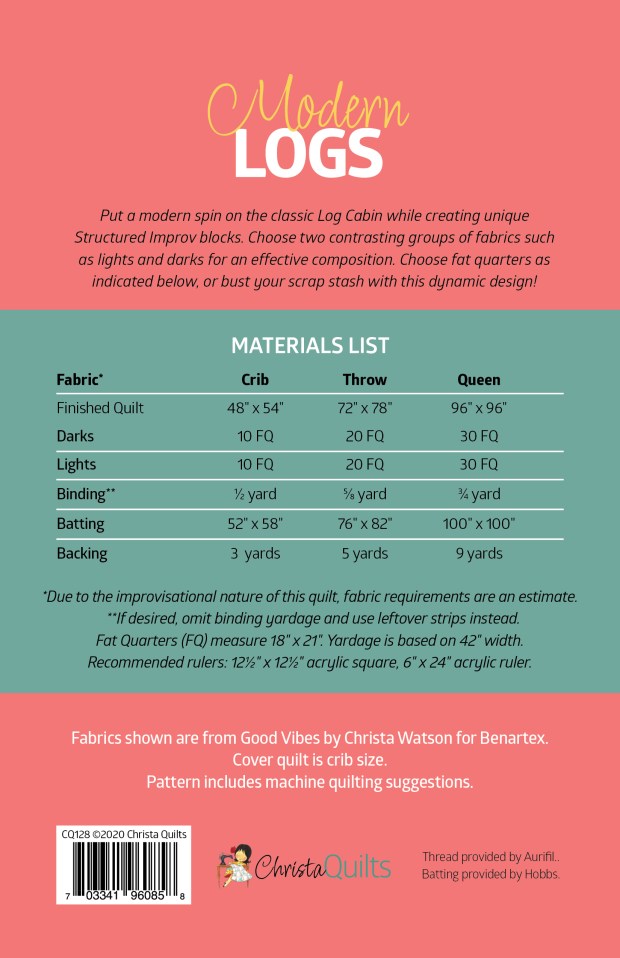
Maybe Modern Logs will suit your fancy! It’s made from 1, 2 or 3 fat quarter bundles, depending on the size you want to make. The pattern gives instructions for making crib, throw and queen sizes, but the improvisational technique means you can adjust the size of your quilt by making more or fewer blocks. That’s a great design bonus!

Click here to get Good Vibes fat quarter bundles.

Modern Logs by Christa Watson

Maybe you’d want to get some Good Vibes and then supplement from your stash for a unique project that’s totally you! You can go with a coordinated look or be super scrappy. I think you’ll really have fun with the improv nature of these blocks!

Modern Logs Quilt Pattern by Christa Watson

I’m putting the finishing touches on both of these quilts now and I can’t wait to share them with you!

Seeing your excitement when you like my fabric or fall in love with a quilt design is a real boost for me. And I always meet some wonderful people during a quilt along, so I’m really looking forward to that, too!

Modern Logs by Christa Watson

Remember…

  • Patterns include multiple sizes
  • Step-by-step easy to follow instructions
  • Machine quilting suggestions
  • A great deal when you preorder!
  • I’ll host Quilt Alongs for both designs later this year.

I’m offering a special preorder bargain through the end of June for paper patterns of Charming Chevrons and Modern Logs. Buy two, get one free! Here’s how it works:

.   

Use code PATTERN to get a free paper pattern of your choice when you preorder both Modern Logs and Charming Chevrons paper patterns. Add three patterns to your cart, enter the code in the coupon box and then remember to hit the + to make sure the discount is applied. Offer expires end of day June 30, 2020. 

Thanks so much for being here!

Pattern Clearance: Grab 6 of My Paper Patterns for just $6.95 Each!

Thanks to everyone for your tremendous support of my pattern business. I’ve been focusing on creating fresh new patterns to showcase my fabrics and the response I’ve been receiving is simply wonderful! So I’ve decided to reduce the price of all previous paper patterns that were published before I started designing fabrics:

Modern X

Click here to purchase Modern X paper pattern for $6.95 + free US shipping

Modern X Received a 2nd Place ribbon in my local guild’s show back in 2014.

Plus, if you stock up on any of my other paper patterns and spend $50 or more, I’ll throw in a free bonus fat quarter (my choice so it will be a fun surprise)!

String of Pearls

Click here to purchase String of Pearls paper pattern for $6.95 + free US shipping

String of Pearls at Road to California

String of Pearls was my first national award winner! It received an honorable mention at MQX in 2013, but the thrill I felt was as if I had received best in show!

Patterns make great gifts for a quilty friend because you can provide them with great instruction and inspiration and you don’t even have to make them a quilt, LOL!! So stock up now and help me make some room for more great things coming your way!

Stepping Stones

Click here to purchase Stepping Stones paper pattern for $6.95 + free US shipping

Stepping Stones by Christa Watson

I learned how to do interesting outdoor photography when I made Stepping Stones in 2015.

I’ve learned a lot over the years about designing patterns and what makes for a fun and interesting quilt. Plus I share machine quilting suggestions for all of them so you can actually finish the quilt!

Charming Chevrons

Click here to purchase Charming Chevrons paper pattern for $6.95 + free US shipping

Colorful chevrons

The one that started it all – my first published pattern is made completely from charm packs.

Nothing thrills me more than seeing someone make a quilt from my patterns. It’s always fun to see the fabrics and colors they choose and how fabulous it ends up looking!

Modern Logs

Click here to purchase Modern Logs paper pattern for $6.95 + free US shipping

Modern Logs Quilt Pattern

Iconic wonky logs made from improv piecing – it’s so fun to make!!

Most of my quilts are either precut friendly or scrap friendly so you can really use up your stash. I especially love making “coordinated scrappy” quilts with lots of color, pattern and texture!

Positive Direction

Click here to purchase Positive Direction paper pattern for $6.95 + free US shipping

Positive Direction quilt pattern by Christa Quilts

Make this fun scrappy quilt just in time for 4th of July!

If any shop owners owners out there want to stock up on this deal, please send me an email to christa@christaquilts.com and I’ll give you distributor pricing on these 6 patterns only and then wholesale pricing on my entire line. 🙂

Click here to shop all ChristaQuilts paper patterns.

New Patterns and Kits: Pieced Primrose, Geese in the Garden, Blooming Wallflowers, LatticeWork

Just a quick note to say that the print versions of my 4 new patterns have now arrived from the printer – whoo hoo! Although they were made to feature my new Abstract Garden fabric line, they are versatile to use any fabrics you like! You can pull similar colors, or mix it up for your own unique take! I’m also offering kits for each, while supplies last.

Abstract Garden Quilt Patterns

To give you a quick overview of the quality and layout of the print versions, I made this short one-minute (silent) YouTube video of me thumbing through the pages. They are printed on high quality semi-gloss paper with a firm cover so they’ll hold up while you use them! Click the image below to watch.

And now, to end this post with some colorful “eye candy” here are images of the finished quilts themselves. Coming up soon, I’ll be blogging more about the making of each quilt with some bonus tutorials and tips. And don’t forget, I’ll be hosting a quilt along to make Blooming Wallflowers in January, so be on the lookout for the QAL schedule, coming soon!

Pieced Primrose Quilts

Click here to purchase this pattern.
Click here to purchase the kit.

Pieced Primrose Quilts Made from Abstract Garden

Geese in the Garden Quilts

Click here to purchase this pattern.
Click here to purchase the kit.

Geese in the Garden with Abstract Garden fabric

Blooming Wallflowers Quilt

Click here to purchase this pattern.
Click here to purchase the kit.

Blooming Wallflowers quilt

LatticeWork Quilt

Click here to purchase this pattern.
Click here to purchase the kit.

LatticeWork Quilt Made from Abstract Garden

Charming Chevrons Pattern Makeover – Now Available in 4 Sizes

Exciting news! I’m updating all of my patterns, and I just finished the first one! Charming Chevrons is now available in 4 sizes: Lap, Throw, Twin, and Queen.

CharmingChevronsCover

 Purchase the PDF version of Charming Chevrons here.

 Thanks to the fabulous graphic design work of Design by Lindsie, I’ve checked off something that has been on my to-do list for literally 10 years!!

Charming Chevrons is currently available as a PDF, but as we speak, I’m also getting them professionally printed so that quilt shops can carry them, too! (Just email me for wholesale pricing if you are a shop interested in carrying my patterns.)

I had a certain look I wanted for my patterns, and Lindsie knocked it out the park! She’s busy working on updating my other patterns, too, and I can’t wait! They will all be full-color with plenty of diagrams to help you out. After doing a little research on what others wanted in their patterns, I decided to offer each of my patterns in 4 different sizes. Where possible, I’ve also included extra tips for machine quilting or additional layouts.

Here’s the back cover with the fabric requirements for Charming Chevrons:

CharmingChevronsDigital_back

So, what do you think of the new look?

Just for fun-sies, you compare the new pattern with all of my older ones here.

Sew and Tell – Do You EQ? I Do!

It’s no secret I love designing and making quilts.

Since discovering the modern quilting movement, I’ve been inspired to create more original designs in the last 2 years than I have in the last 10 years combined! All it took was finding my niche and discovering the right motivation.

I’m pleased to announce that the folks over at Electric Quilt are enjoying my passion for design, too!

I’ve recently been invited to become an “official” EQ Artist and am now featured on their Do You EQ? site along with plenty of other well-known quilters in the industry. I have to tell you, it’s a little bit intimidating to be featured alongside so many amazing quilters who also design in EQ. I keep waiting for them to tell me, “not really – we were just kidding!”

But lots of good has come out of this. For starters, it has encouraged me to do all of my designing in EQ7 so that I can practice becoming comfortable with more aspects of the software.

Modern Log Cabin Rough SketchMy latest EQ7 design – This quilt will do double duty as my entry into the next MQG fabric challenge, and as a future class sample. Stay tuned for more!

Also, I’ve finally taken the plunge and have started publishing my own patterns, integrating images from EQ7 along with good old basic word processing software. So far I’ve only finished one pattern, but the next one will launch soon, and I’ve got more coming. Be sure to keep an eye on my Craftsy Pattern Store for more.

Charming Chevrons – my first officially “published” pattern. You’ve seen this one before!

Finally, I’ve decided I will start teaching some introduction to EQ7 classes later this year. I’ve had several requests to teach about the software, but it will take me awhile to develop a class. My favorite local quilt shop is in need of new teacher so the timing is right. I’ll keep you posted in case any of you are in the mood for a road trip to Vegas later in the fall.

And now, on to the next design!

Christa’s Quilt Along 2.7 – Binding Baby Bricks

To finish off both the girl and boy versions of Baby Bricks, I am finishing my bindings by hand. I’m always needing a hand project that I can stitch while watching TV with the family!

A limited number of Baby Bricks Quilt Kits are available, using these exact fabrics shown.

Girl Baby Bricks My quilts are trimmed and ready for binding. I think that binding by hand gives a tidy finish which helps the quilt to lie flat and straight; very important when being hung in a show!

Boy Baby Bricks

Step 1 – Securing the Binding to the Front of the Quilt by Machine

Please review my Jolly Jelly Roll quilt tutorial for step-by-step photos of this process. I show how to sew continuous binding strips using my favorite method called double fold, French binding. I also demonstrate how to complete it by machine, for a faster finish.

Step 2 – Pin Basting and Preparing Needles and Thread

I enjoy binding by hand if I am not rushed and everything is prepared ahead of time. I chose a heavier weight cotton thread that matches the binding. I like to thread several needles onto my spool so I can cut off a new length of thread and not have to worry about re-threading so many needles.

Thread Several Needles

Next, I use pins and Pinmoors to secure the edges while sewing. I usually pin one large section at a time (enough for one length of sewing thread). Then I repin and move onto the next section as I go.

Pinmoor Basting

Step 3 – Sewing by Hand

Cut off about 18 inches of thread and knot it on one end. Then slip the needle between the backing fabric and the binding. The knot will be hidden under the binding.

Beginning StitchHand SewingMake one stitch at a time, backtracking slightly as you enter the needle for each new stitch.

This is very similar to hand applique or a blind hem stitch.

Be sure to stitch the corners closed on front and back.

Corner FrontCorner BackYou can click on any of the smaller photos to see more detailed closeups of the sewing.

It takes longer to sew by hand, but it’s a very relaxing and enjoyable process!

Smaller needles make a tiny stitch.

When I get near the end of my thread, I simply make a knot, take a last stitch and pop the knot into the binding. Then I start the process again until the entire binding is finished.

Knot the Thread

I will finish up the binding on both of my quilts, then post photos of the finished quilts next week. I have decided to add on a bonus week to this project so that I can talk about blocking and labeling your quilt.

Here is the complete tutorial schedule below:

If you enjoyed these tutorials, please join me when I begin the next quilt-along series, called Charming Chevrons! I will post the supply list next week. Here’s a hint: it’s made from charm packs! (4 charm packs total – 2 of the same light/background and 2 of the same dark/print)

Christa’s Quilt Along 2.6 – Baby Bricks Option 2 FMQ

I love adding free-motion quilting to my quilts whenever I can. That is why I chose to enhance my girl version of Baby Bricks with some decorative double loops.

Baby Bricks - Girl VersionStep 1 – Securing the Blocks

Before getting to the fun part, the quilt needs to be secured with a little stitching in the ditch between all of the rows. This anchors the piece for more decorative quilting later.

Beginning the RowsStitch in the DitchWhen stitching to the end of a row, pivot and sew along the side to get to the start of the next row. I used my walking foot with an “open” toe so that I could clearly see where I was quilting.

Step 2 – Quilting the Loops

I quilted all of the white “negative space” with random double loops. To do this design, first quilt a row of single loops. I changed the direction of each loop for interest – think of stitching e’s & o’s in an alternating fashion.

Single LoopsWhen I reached the end of the row, without stopping, I went back the other direction, echoing the flowing lines between the loops and filling the inside of the circles with another loop. This created a ribbon look which I really like.

Double LoopsFor the FMQ, I used Isacord polyester thread in a Vanilla color which I bought from Leah Day. This was the first time trying that thread and I really like it. I need to get more colors!

Step 3 – Quilting the Blocks

At first I had planned on adding more free-motion quilting to the rectangular blocks, but then decided the quilt needed some geometric looking quilting instead. So I got out my ruler and washable marking pen and added registration marks, crisscrossing the blocks.

Add Registration MarksHad I planned this out more, I would have marked the quilt before I basted and probably quilted the straight lines first. But it just goes to show it’s ok to change your plans during quilting and it will still turn out great!

Straight Line Echo

With my walking foot and pink thread, I quilted lines 1/4″ away from either side of the marked lines. Then I spritzed the lines with water. (I will completely soak the quilt later.)

I marked an “x” design going in both directions on the center row of the quilt. Then each of the rows to the left and right accentuated the direction of the straight line quilting.

Quilting Detail

I pieced the back using some pink and green scraps from my stash. I like how much the quilting shows up on the back. (I used wool batting to give the quilting some body.)

Pieced Back

Here is the schedule of tutorial posts for my Baby Bricks do-it-yourself quilt along:

Christa’s Quilt Along 2.5 – Baby Bricks Option 1 Straight Line Quilting

I finished up the quilting on my boy version of Baby Bricks while I was at a quilting retreat last weekend.  I brought along a few items to sell so the weekend paid for itself!

Christa Quilts!

Step 1 – Quilt the Marked Lines

This quilt was so easy to machine quilt. It was just a matter of following the marked lines! I timed myself and it took less than 2 hours to machine quilt the top. Start with a large area for quilting so you have room for the quilt. A drop in table is best but as you can see here, I quilted this just using the surface available on the bed of my machine.

Gripping the Quilt SandwichI started on the very edge of the quilt with the first marked line. I scrunched up the quilt under the arm of the machine and used Machingers quilting gloves to grip the quilt making it easier to push through the machine.

I used a walking foot to quilt the straight lines with my feed dogs engaged. I set my stitch to a longer length (4 out of a max of 5), and quilted with 50 weight variegated light blue cotton thread on both top and bobbin. I used a new Topstitch needle, size 80/12 for the quilting.

Quilting Straight LinesI quilted about half of the quilt from one direction, turned it around and then quilted the other half. Because my marked lines ran from one edge to the other, I did not have to tie off or bury my threads. The ends will be covered by the binding so they will be secure. I left the basting pins and Pinmoors in the quilt and removed them one at a time as I quilted.

Step 2 – Remove the Markings

I used a spray bottle to remove all of the marked lines. I will soak the quilt after binding to block it and remove any excess marks. (I advocate prewashing all the fabrics first to be sure they don’t bleed. This gives me piece of mind when I completely soak it later.)

Spritzing the Quilt

It’s all quilted now and ready for binding. Next week I will show how I quilted the pink and green girl version using more advanced free-motion quilting techniques. You can use either option on your quilt, or combine them!

Finished Quilting

Here is the schedule of tutorial posts for my Baby Bricks do-it-yourself quilt along:

Sew and Tell Friday – Finished Jelly Roll Quilts

I am so excited to see that people are finishing their Jolly Jelly Roll quilts. This was my first ever quilting tutorial and it gives me great satisfaction to see that it was a success! You can click here to see all the tutorials. (I still have a few Jolly Jelly Roll kits available, too!)

First, we have Joanne P. who made her quilt from fabric she got from me plus scraps from her stash. She picked a bright white inner border for a little “pop” and then bound it in blue.

Joanne's Jelly Roll Quilt

Joanne quilted a wavy grid effect by starting the quilting in her piano keys borders and continuing across the surface of the quilt  from top to bottom and side to side. You can see the neat effect it gave on the back of the quilt. I am so glad she “did-it herself!”

Quilting CloseupQuilted Grid

Kathleen W. was also very productive and finished her quilt, too. I just love the aboriginal prints, don’t you?

Kathleen's Jelly Roll QuiltKathleen’s favorite part of the quilt is her pieced backing. I concur! She did a nice job on the serpentine stitching,  and she even added a label, too. Way to go, Kathleen!

Kathleen's Quilt Back