Beaded Lanterns Quilt Along Starts Sept 10 with BERNINA

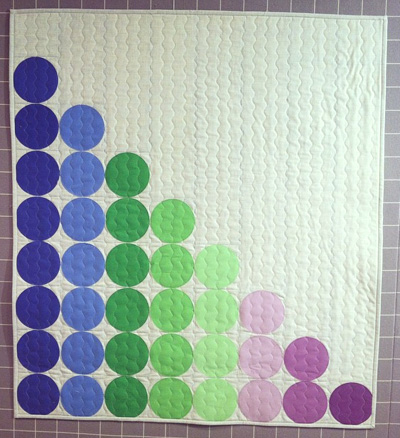
I know many of you are excited about the Dot ‘n Dash quilt along which starts on Friday!! But you know what? I love quilt alongs so much I’m starting another one a few weeks later!! My Beaded Lanterns Quilt Along will be hosted over on the BERNINA We All Sew Blog and it will run in a similar format: 6 weeks of start to finish tutorials to make an entire quilt!

Beaded Lanterns Quilt Along

Click here to grab a quilt kit to make this quilt using Fandangle fabric.

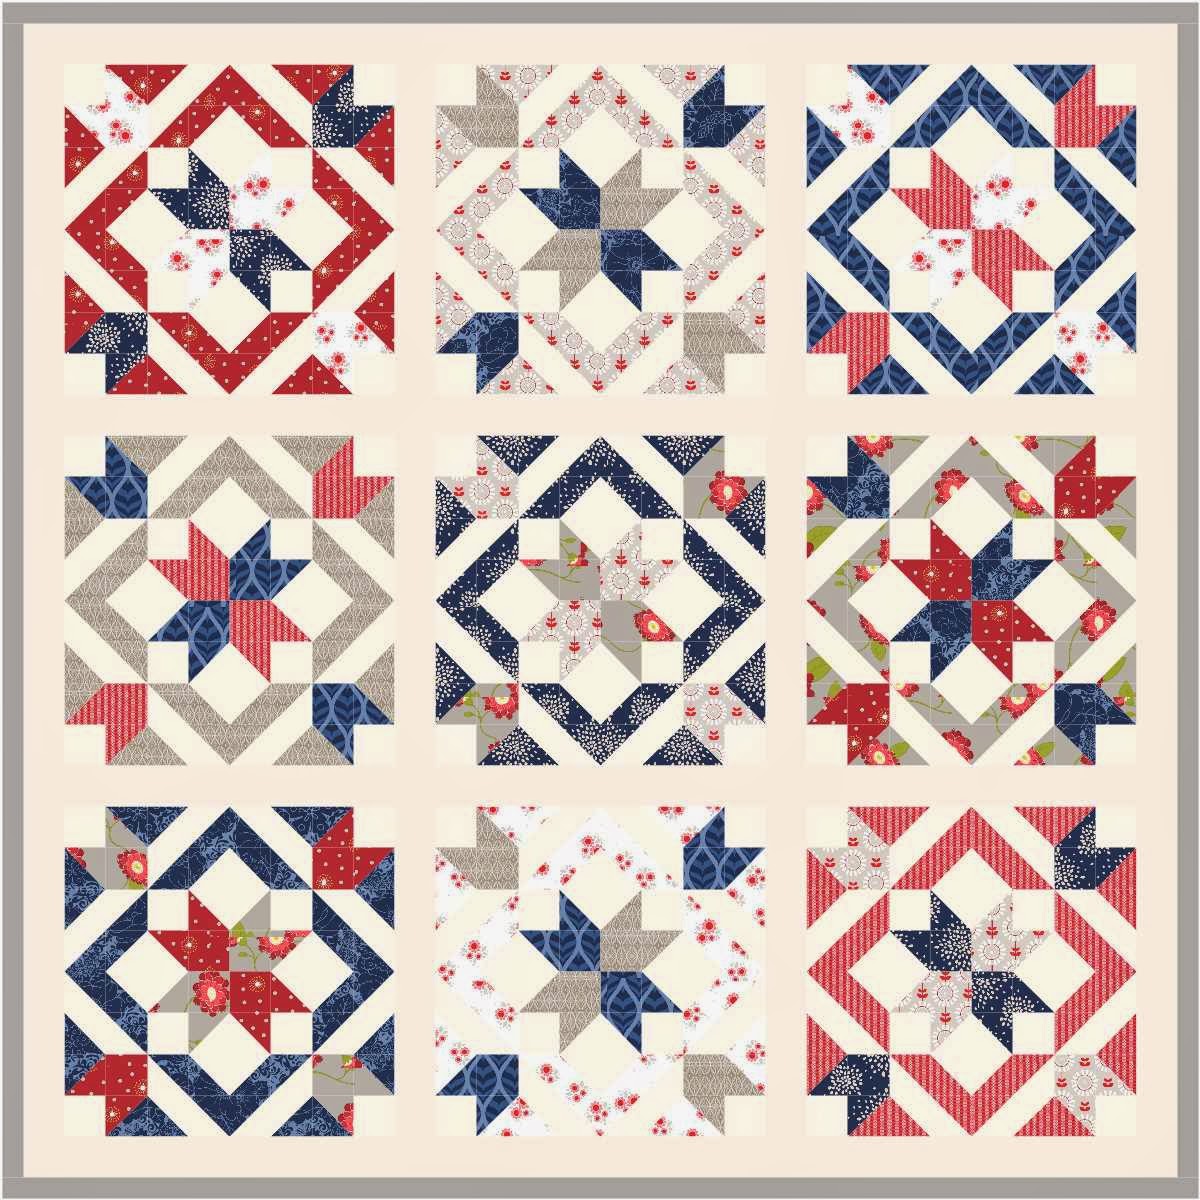
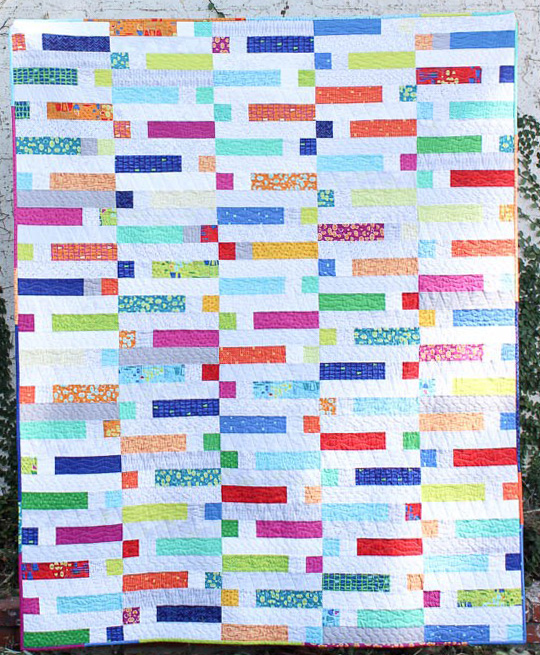
I’m using my Fandangle fabric to make my version of the quilt shown above, and I’m offering a limited number quilt kits over at shop.christaquilts.com if you want to make one just like it.

All you need to make this quilt are a jelly roll (set of precut 2 1/2″ srips) and 4 yards of background fabric. The pattern for this quilt along is a free pattern I created for with Benartex to help promote the fabric line.  Of course it would look fabulous in any fabrics you choose!

Beaded Lanterns by Christa Watson

Click here to get the free PDF pattern to make Beaded Lanterns.

Now I don’t want to stress you out with the idea of two quilt alongs overlapping for a few weeks at the same time. Both will be available indefinitely so you can do them at any time!

The hashtag for this quilt along on instagram is #beadedlanternsqal so be sure to share your progress so I can see how you are doing. When the QAL launches over on the BERNINA blog, you’ll be able to share over there, too, on their community site.

I can’t wait – it’s going to be fun!! And really, my quilt alongs are just an excuse for me to play with my new Fandangle fabric as much as possibile, LOL!!

Beaded Lanterns Quilt Along

Click here for full quilt along details on the BERNINA blog – we all sew.

Save the Date – Next Quilt Along for Dot ‘n Dash Launches in August

Earlier this year in my Facebook group we were discussing the idea of doing another quilt along this summer/fall. Well guess what – after organizing my schedule for the remaining year, I have room to squeeze one in and I’d love for you to join me!

Dot ‘n Dash recolored in Fandangle Fabric

Dot 'n Dash Quilt

Starting on August 17 and each Friday for several weeks (to be determined) we’ll make my Dot-n-Dash quilt pattern from my book Piece and Quilt with Precuts. The best thing about this quilt along is that many of you already have the book from my previous Squiggles quilt along.

Piece and Quilt with Precuts by Christa Watson

If you haven’t yet grabbed a copy of the book, you can get a signed one here! The other best thing is that just like my previous quilt alongs, we’ll make the whole quilt from start to finish.

I’ll be re-making my version of Dot-n-Dash using my brand new Fandangle fabric and am offering kits for a limited time. Click here to pre-order your Dot-n-Dash Fandangle kit and I’ll ship it out as soon as the fabric arrives – hopefully by the end of June/early July.

Original Dot ‘n Dash from the Book

Dot 'n' Dash by Christa Watson from Piece and Quilt with Precuts

Above is the original version made by me as shown in the book. Check out these other fabulous versions that friends of mine have made. I just love seeing the same pattern made in a variety of fabrics!!

Dot ‘n Dash made by Cheryl Brickey

Cheryl Brickey Dot n Dash from Piece and Quilt with Precuts

Dot ‘n Dash made by Laura Piland

Laura Dot 'n Dash

Dot ‘n Dash made by Kristin Esser from Modern Marks

Dot n Dash by Kristin Esser

Materials List for Dot ‘n Dash

I’ll be posting the complete schedule on Friday, August 17 but in the meantime, here’s what you need to get started:

  • A copy of Piece and Quilt with Precuts
  • One jelly roll (or 40 precut 2 1/2″ strips of assorted prints – includes binding)
  • 3 yards of background fabric (or a light colored jelly roll – all one fabric, or a mix is ok)
  • 4 yards of backing
  • 67″ x 79″ piece batting

Click here to get the optional kit made from Fandangle fabric.

Fandangle Fabric Strips

I can’t wait to dive into these! I cut my own strips using sample yardage, but the Strippies (Jelly Roll Strips) will be precut and neatly packaged by the manufacturer.

Share Your Work in Progress

I’ll be posting weekly stepouts of my progress with the quilt along with some bonus tips as I make the quilt. I’d love for you to share your progress so I can cheer you on, too. You can do that in several ways:

  1. In my Christa Quilts Facebook group
  2. On Instagram #dotndashqal
  3. Leave a comment and include a link to your own blog or social media images

Dot 'n Dash Quilt

I can’t wait to make this quilt and hope that you’ll join me!

Click here to get the optional kit made from Fandangle fabric.

Whether you’re a brand-new quilter or have been creating for a long time, I’d love for you to join me in this journey! Be sure to sign up to receive an email each time a new blog post goes live by entering your email address in the box on the right hand side-bar (or scrolling ALLLLLL the way down to the bottom of the page if viewing this on a mobile device.) I can’t wait to get started!!

Simple Strips Quilt Along Revisited – Make a Quilt from Start to Finish

Last year I hosted a really fun quilt along as part of my BERNINA Ambassador obligations. (It’s a fun gig by the way – I travel the country letting folks know how much I love my machine which is something I did anyway before I became it became “official.”) So today I thought it would be fun to revisit the quilt along for those of you who are new to my blog, or missed it the first time around.

Simple Strips Quilt Along

Links to the Simple Strips Quilt Along

The quilt tutorials are all hosted on the BERNINA blog at We All Sew and they’ll be there indefinitely, so you can make this quilt on your own schedule, any time you want. Just click the hotlinks below to get each set of instructions for this quick and easy quilt!

Week 1 – Materials List and Cutting
Week 2 – Pieced Quilt Top Tutorial
Week 3 – Wall Basting Tutorial
Week 4 – Decorative Stitch Machine Quilting
Week 5 – Machine Binding Tutorial

I made this quilt before I started designing fabric and it works well with any fabrics you choose, whether coordinated or scrappy. Fabric selection is super simple too – it just requires 20 strips (or 1/2 of a jelly roll) of print fabric and the same amount of background/light fabric.

Simple Strips – Modern Marks

Simple strips recolored with Modern Marks

And just for fun, I wanted to see what it would look like recolored in MY fabric – because as a fabric designer, I wish I had time to make ALL the quilts in my prints, LOL!! The recoloring shown above uses a bundle of the Modern Marks prints plus 1 1/2 yards of the cream/lime Boxes print for background and 1/2 yard of the Navy Herringbone for binding.

Here’s what it looks like recolored in Fandangle, my newest fabric collection. I thought it would be fun to separate the warms and cools for a more curated look:

Simple Strips – Fandangle Warm and Cool

Simple Strips in Warm colorway of Fandangle

This coloring can be made from a fat quarter bundle of Fandangle in warm plus 2 yards of Confetti Crosshatch dark gray for the background and binding.

Simple Strips Fandangle Cool

This coloring can be made from a fat quarter bundle of Fandangle in cool plus 2 yards of Confetti Crosshatch light gray for the background and binding.

Although the instructions for Simple Strips are written using precut 2 1/2″ strips, you can totally make your own bundles from your stash, scraps, or even fat quarters.

Do You EQ? (Bonus Download)

Here’s a bonus for those of you who like to work with Electric Quilt software:

Click here to get the Simple Strips EQ download file to resize or recolor this quilt. (It only works if you have the software installed on your computer.) Because I don’t have all the time in the world to make all the quilts, recoloring them virtually gives me the satisfaction of seeing what it would look like “in the cloth!”

Sharing is Caring

Remember, if you make this quilt or any of my designs for that matter, I’d love to see them! You can email me pics to christa@christaquilts.com, include a link to your own blog or social media in the comments, share pics in my ChristaQuilts Facebook group or tag me @christaquilts and #christaquilts on Instagram.

I hope you enjoy making this quilt!!

Squiggles Quilt Along Week 3 – Assembling the quilt top

How are you doing on the Squiggles Quilt Along? Some of you may have just started while others of you have already finished the quilt top, and that’s totally fine. With all of my quilt alongs I encourage you to work at your own pace and share progress. Share on instagram with the hashtag #squigglesqal and see the other amazing versions everyone is creating. Or join my Christa Quilts facebook group to post pics and get additional support!

This week it’s time to assemble the quilt top!

See the diagram and instructions. page 18 of Piece and Quilt with Precuts for the quilt top assembly. Here’s a tip from one of the members of my facebook group who recently completed her top:

“Try sewing the rows together vertically instead of horizontally – it’s easier to line things up that way.”

And a bonus tip from me: notice that when you sew the rows together it looks like the background triangles don’t match up and that’s correct. This gives the design a slightly more interesting look and makes it faster and easier to go together. I also recommend pinning generously for best results.

Squiggles Blocks

The centers of the Squiggles blocks don’t intersect. That’s correct.

Once the quilt top is complete, take a “victory lap!” Sew approximately 1/8″ in from the edge of the quilt to keep the seams from splitting open as you handle the quilt. I usually do this with a longer stitch length so it goes faster.

My Work in Progress

My mom helped me put together the quilt top earlier this summer so that I could display it along with the fabric at a company trade show. I only had a few days to complete the top, so my in-progress pics aren’t great. But here are the rows going up on my design wall. The rows were sewn together randomly and then I spent time arranging them until I was happy with the overall composition

Squiggles work in Progress

I called in the reinforcements to help me put together 5 quilt tops in 4 days! You can see one of my quilting buddies pressing Squiggles amidst all of the sewing chaos!

Sewing Party at Christa's

(Notice the other quilt going up on the design wall? You can get that free pattern here.)

Bonus Inspiration

Here are a few quilt tops in progress shared by some members of my facebook group. I’m just blown away by the creativity!!

Yellow and Gray Squiggles

Karen T. is working on this lovely yellow and gray combo. She’s currently deciding on her final layout, so you can pop over to the Facebook group and lend your suggestions!

Squiggles Gradation

I love this fabulous color gradated design that Maritza F is working on. It’s so clever and a great way to use up some of her older charm pack stash!

Modern Marks Squiggles

Marcia D recently finished her quilt top from one of the Squiggles Modern Marks kits. Because of the color placement, even kitted versions of Squiggles will each be unique!

Kits and books still available

Pick up a signed copy of Piece and Quilt with Precuts from me book here.
Click here to grab a Squiggles quilt kit or Modern Marks Fat Quarter bundle.

(As of this writing I have 7 fat quarter bundles and 3 kits left – two with a white background/red binding, and one with a black background/blue binding. But of course you can use any fabric you like!)

Squiggles from Piece and Quilt with Precuts

Click here for the complete Quilt Along Schedule with links to all of the previous posts.

Simple Strips Quilt Along – Machine Quilting

I have to say, we’ve now reached my favorite part of my Simple Strips Quilt Along – machine quilting! Because I’m sharing these tutorials over on the BERNINA blog at We All Sew, I wanted to really show what these machines can do, and how anyone can have success quilting on a home sewing machine!

BERNINA machine quilting

This week focuses on using a decorative stitch to create incredible machine quilting texture. I also how teach how to achieve this type of look in both of my books. It’s that important to me to spread the word that yes, you can, make a “professional” looking quilt using the machine you currently have. 🙂

Click here for the latest quilt along tutorial.
Click here to share your progress in my facebook group: Quilt with Christa.

Simple Strips Quilt Along Over at We All Sew

Want to make a quick and easy Jelly Roll quilt? Then be sure to join me for my Simple Strips Quilt Along which just launched over on the BERNINA blog at We All Sew.

Super Simple Strips Quilt Along

This quilt along will work a little differently than my previous quilt alongs, since I’m sharing it over at BERNINA, but it will be just as fun! I will be sharing 5 weeks of step-by-step tutorials showing you how to make a complete quilt from start to finish. I am proud to be a BERNINA ambassador and I do all of my piecing and quilting on my B770 QE.

New Quilt Along

Super Simple Strips – Piecing in Progress on the BERNINA 770 Quilter’s Edition

But of course, you can use your favorite machine to make this quilt! I’m going to show you how to do some very easy decorative machine quilting, plus we’ll even finish it by machine. 🙂

To get started pick up a jelly roll of your favorite fabric. Either choose a Jelly Roll that has half light/half dark strips; or grab a smaller bundle in a nice solid background color to go with your regular sized roll (you need a total of 40 strips for the quilt).

Super-Simple-Strips-Jelly-Rolls

I chose to go with half a Jelly Roll of Valley by Sherri and Chelsi for Moda, plus a Jelly Roll Junior of Bella Solids in Ivory.

The complete supply list and quilt along schedule are posted at We All Sew – so please follow along each week, then share your progress in my Facebook group Quilt with Christa, or on instagram, #simplestripsqal.


Facets Quilt Along Week 7 – Free Motion Quilting

Free-motion quilting is probably the most exciting, but scary part of making any quilt! But never fear, help is here. I have written numerous times about machine quilting that can help you out as you make your Facets quilt.

facets_quiltingMachine quilting is my favorite part of the quilt-making process!

Read my articles about machine quilting here.
Purchase my machine quilting books here.

book-covers2Writing and teaching about machine quilting is just as much fun as doing it!

This week, we are free-motion quilting switchbacks and swirls. They make a great combo when quilted together!! 🙂 Notice how I quilted the switchbacks using white thread (Aurifil 50 wt cotton). I quilted the red swirls with red Aurifil thread and quilted the improv patchwork with a blending light yellow Aurifil thread.

switchbacks_swirls

Detail of Facets, from Machine Quilting with Style

In Machine Quilting with Style, I give you some practice exercises on how to quilt switchbacks and swirls on pages 69-70. Then, the Facets instructions include diagrams with a suggested free-motion quilting plan on page 95.

Take a peek at the beautiful Facets quilts being made by members of my facebook group:

renee

 Renee gets a gold star for practicing on a sample first before quilting the full sized quilt!

katherine_d

Katherine’s quilt is dramatic and beautiful with the black sashing. Her switchbacks look great!!

suzy_k_switchbacks

Can you believe it’s Suzy’s first time doing FMQ? Way to go Suzy!! Keep it up!

If you are just finding this quilt along now, here’s the introductory post to get you started!

Abacus Show and Tell

Half the fun of hosting a quilt along is seeing all of the different quilts. Here are a few of the awesome variations that you guys shared via instagram (#abacusqal), flickr (christasquiltalong) and email!

For those just joining my blog, click here for all of the Abacus Quilt Along tutorials.

Elizabeth QuiltElizabeth aka Catskill Quilter with her rainbow colored version.

Elizabeth BibsElizabeth even made matching bibs. How cute!

sluslcaySusan C. (slusclay on instagram) chose blue, green, and purple solids for her version. She did a fantastic job on the quilting!

Susan Farm QuilterSusan aka farmquilter chose a darker grey background for her top. I love it!

sconehead1Sconehead1 changed up the bead count and used an awesome background!

sewstitchingcute_1

Sewstitchingcute incorporated Cotton & Steel prints into her pretty piece! She also put the quilt on an angle and quilted more circles in the background. Isn’t that great?

Joanne-P_2Joanne P used batiks and made it her own with an extra bead and borders!

This quilt along was so fun and I can’t wait to do another in the spring!

Announcing My Fall 2014 Quilt Along: Abacus

Ok guys, I’m super excited to bring you another fun quilt along! With my new quilting schedule, I’ve decided I can still fit in a couple of quilt alongs twice a year – one in the fall and another in the spring. As with all of my Quilt Alongs, I will post tutorials for each step of the quilt-making process from start to finish. Abacus features simple machine applique and fun machine quilting that anyone can do!

Abacus_EQ7Abacus, designed in EQ7 by Christa Watson – 32″ x 32″

Below I have listed the supply list, and I’ll post the full quilt along schedule next week.

I’ve also lined up a few sponsors who are going to give away some fabulous prizes. But don’t worry – you don’t have to quilt along to enter the giveaways – they will be open to all followers of my blog. 🙂 Check back tomorrow for the first one!

I will officially launch the quilt along on Wednesday, September 24th, so that should give you plenty of time to start planning your colors and fabrics. If you’d like to help spread the word, please grab the quilt along button below and share it on your blog!

<div align="center"><a href="http://christasquiltalong.com" title="Christa's Quilt Along" target="_blank"><img src="https://christaquilts.com/wp-content/uploads/2013/03/christas-quilt-along-175-2.png" alt="Christa's Quilt Along" style="border:none;" /></a></div>

Abacus Supply List

  •  1 – 5″ x 40″ strip of 4 different fabrics (solids 1-4 above, blue through teal)
  • 1 – 5″ x 20″ strip of 4 different fabrics (solids 5-8 above, burgundy to pink)
  • 1 3/8 yard background fabric (grey above)
  • 3/8 yard fabric for binding (I will probably use the same grey)
  • 1 1/8 yard of fabric for backing
  • 36″ x 36″ square of batting
  • Thread for machine quilting (I recommend Aurifil 50 weight cotton)
  • 2 yards of 17″ wide light paper backed fusible web. Note: you can use (9) –  9″ x 11″ sheets instead, but there will be a lot of waste.
  • Sharp Scissors for cutting through paper and fabric
  • Optional: 4″ circle die cutter (only if you have one – otherwise you will trace and cut out the circles by hand)

Fabrics and Threads Used

Because I know some of you are going to ask, these are the Kona Solids fabrics and Aurifil 50 weight cotton threads I will be working with (going left to right from blue to pink):

  • Kona Solid 1243 Navy; Aurifil #2785
  • Kona Solid 1376 Turquoise; Aurifil #2810
  • Kona Solid 1010 Baby Blue; Aurifil #5007
  • Kona Solid 1183 Jade Green, Aurifil #4093
  • Kona Solid 1016 Berry, Aurifil #4030
  • Kona Solid 1066 Cerise, Aurifil #2535
  • Kona Solid 24 Petunia, Aurifil #2560
  • Kona solid 1295 Pomegranate #Aurifil #1100
  • And the grey background is Kona Solid 1223 Medium grey, with Aurifil #2610

 Who’s ready to have some fun?


Blog Reviews – Fun Quilt Alongs and Challenges to Join

I just wanted to give a quick shout out to a few of my blogger friends who are hosting some amazing events! Many of them have already started, but thanks to the convenience of the internet, you can join at any time and work at your own pace and on your own schedule!

First of all, Melissa from Happy Quilting has another fabulous quilt along called Star Light Star Bright. It features one of my favorite units – half square triangles, lovingly known as HST’s. Melissa is always sharing tons of cool video tutorials and plenty of inspiration on her blog so be sure to check it out! You won’t be disappointed.

Quilt Along

Happy Quilting Quilt Along

Next, the super talented machine quilter, Amy from Amy’s Free Motion Quilting Adventures just launched a new quilt along which will run for the entire month of March. It’s called “McTavishing: a Free Motion Quilting Adventure” and she’ll include a giveaway to go along with the series. Fun stuff indeed!

QAL

Free Motion Quilting Adventures QAL

SewCalGal is hosting two year-long events that will really get your creative juices flowing. Her Handmade Christmas Challenge features monthly challenges throughout the year to share holiday projects you finish in 2014.

Christmas Challenge

SewCalGal Christmas Challenge

She’s also hosting a Year of Red and White Quilt Challenges, inspired by the fabulous Red and White quilt exhibit held in New York back in 2011. As part of this year long event, there’s a special design competition running now through March 23rd. Be sure to read the full details here. It’s perfect for budding pattern designers and of course there will be fabulous prizes!

Quilt Design Challenge

Red and White Challenge

Finally, I wanted to give another shout out to my good friend Alyssa from Pile O’ Fabric. She’s hosting another fabulous skillbuilding quilt as you go series. It’s called “For the Love of Sewing” and features all sorts of adorable sewing-themed blocks. This one has a small fee involved but trust me, it’s totally worth it as she puts in way more time than what she charges for!

2014 SkillbuilderI hope you will check out these fun events!