This week we will work on cutting out all of the fabric pieces to make your blocks. The cutting chart is on pages 3-4 of the Pieced Primrose quilt pattern. I include instructions to cut enough fabric for 1 block (for practice), 16 blocks for the wall size, or 80 blocks for the throw size.

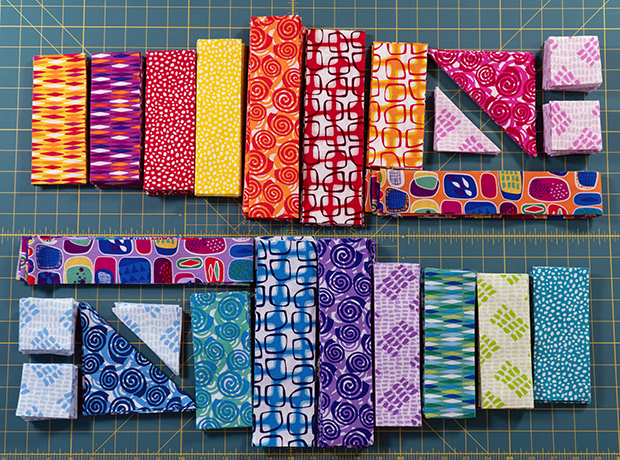
Above is the one of the bundles of fabrics I used from my Abstract Garden fabric line.
Click here to get a kit in the cool or warm colorway.
When it comes to cutting, I like to speed through the process as fast as possible by layering multiple fabrics on top of each other and cutting strips, then cutting those strips into subunits. I was generous in my cutting calculations so that there would be enough fabric to cover each piece as it’s sewn.
Refer to the pattern to cut each of your fabrics into piles as shown below. If your fabric colors are different, just make a note in the pattern and label your piles so you know what is what.
How to Measure a Foundation Paper Pieced Template
I still want to teach foundation paper piecing to those of you who are aren’t following my particular pattern because the methods are still the same. So here’s how you can easily figure out how big of a piece to cut:
For each section of the foundation template, measure the length of the longest line and add one inch. For example, look at the section A1 below and let’s figure out how big the piece of fabric needs to be so that it will cover the entire area on all sides:

Measure the length of both of the long lines on either side of the A1. In this case, one side was about 4 3/4″ and the other is 4 7/8″ so I just rounded that up to 5. Then I added 1″ for seam allowances, so the LENGTH of the piece to cut is 6 inches.
Now measure the width. At one end it comes to a point. At the other end, it is slightly wider than 1 1/4″. Adding an inch makes the WIDTH to cut 2 1/4″ which is close enough. Therefore, each A1 piece will be cut 2 1/4″ x 6″.
Now If I wanted to save some fabric, I could cut a slightly bigger rectangle and cut it in half on the diagonal to get 2 pieces, but honestly that will be more trouble than it’s worth trying to line up that diagonal properly. I’d rather work with rectangles and have a little bit of scraps left over.
So you could repeat this process to figure out how big to cut each piece in the design. But don’t worry, I’ve already done that for you in the pattern – so just follow the chart given.
Most good foundation paper patterns should figure this out for you, so that all you have to do is cut what you are used to: strips, squares, and rectangles (and maybe the occasional triangle).
Homework: Cut All the Pieces for Your Size
Refer to the chart on pages 3-4 of the pattern for the number of strips to cut, and then the number of units to subcut. Just remember to measure twice, cut once! So double check your measurements as you go. Since I made two versions of this quilt in warm and cool, my cut units for both quilts look like this:
Click here for coordinating fabric from my Abstract Garden collection from Benartex.
Next week, we will start sewing the blocks! If you’d like to practice first, just cut enough fabric for one block from scraps so you can see how the whole process works. Remember to share your progress on instagram #piecedprimrosequilt or in my ChristaQuilts Facebook group!
LINKS AT A GLANCE
Click the links below for supplies needed to make this quilt:
- Click here to get the Paper Pieced Primrose quilt pattern – PDF version
- Click here to get the Paper Pieced Primrose quilt pattern – Paper version
- Click here to get the optional Primrose kit in warm or cool
- Click here to get my favorite notions
- Click here for my Aurifil Thread kits
- Click here for the complete QAL supply list and schedule

I’m wondering what your thoughts are on pre-washing fabric, as well as the batting. I’m making the smaller quilt so washing isn’t as big an issue, but I’m still wondering. Thanks!
I highly recommend prewashing to preshrink the fabric and prevent bleeding.If you choose to prewash your batting, you want to tie it in a pillowcase so it doesn’t disintegrate in the wash 🙂