Above is a sample I made for my in-person quilting classes. Notice that I used a blending thread so that you don’t see the imperfections.
Below is the sample I quilted for you on video this week so you can see how the process works. I quilted with black thread on white fabric which shows ALLL the imperfections, LOL!!
For my Optical Illusion quilt, I used a black/white thread from my Aurifil Variegated thread collection. I love using 50 weight cotton thread for both piecing and quilting, because I’m able to use any leftover bobbins when piecing my next quilt!
Click the image below to watch my spiral quilting video tutorial on my YouTube channel. It’s just over 9 minutes long and will demo how to quilt the basic spiral.
If you’d like to learn how to quilt additional spirals, be sure to grab a copy of my machine quilting books.
In my first book, Machine Quilting with Style, I show how to do the basic spiral, plus a wonky spiral variation. Then I expand on that with overlapping spirals in The Ultimate Guide to Machine Quilting. Finally, I teach how to quilt a continuous square spiral in my third book, Piece and Quilt with Precuts.
All 3 of my books are currently on sale for just now on sale for just $19.95 each until they sell out!
So grab 1 (or all 3) today! And who knows – you may find a completely different design you want to quilt on your version of Optical Illusion.
Remember to share your version of Optical Illusion in my ChristaQuilts Group on facebook. I love seeing everyone’s progress and the variations with all the different fabric colors are amazing!!
I am so excited about my two newest patterns, Charming Chevrons and Modern Logs. I’ll be doing quilt alongs for both later this year, and I can’t wait!!
The lap and throw sizes of Charming Chevrons are made from 5″ charm packs. (The thinking is done—so you just relax and sew!) This design has a lot of movement for great visual interest.
Twin-size Charming Chevrons in Good Vibes fabric by Christa Watson for Benartex Contempo Studio
The larger sizes of Charming Chevrons (twin and king) are made from 10″ precut squares, also called Layer Cakes or Ten by Tens.
Watch for Good Vibes 5×5 and 10×10 packs coming in July!
Right now, I’m taking pre-orders for the paper patterns of Charming Chevrons and Modern Logs, and I have a special offer for you. Please read on!
The cover quilts were made with my new Good Vibes line for Benartex Contempo Studio. I’m really pleased by the interplay of the modern low-volumes and the saturated bright prints. It’s just the look I was after! More thoughts on Good Vibes coming soon.
All of my patterns include step-by-step instructions and machine quilting suggestions so you’re never stumped when it’s time to finish. We have it covered!
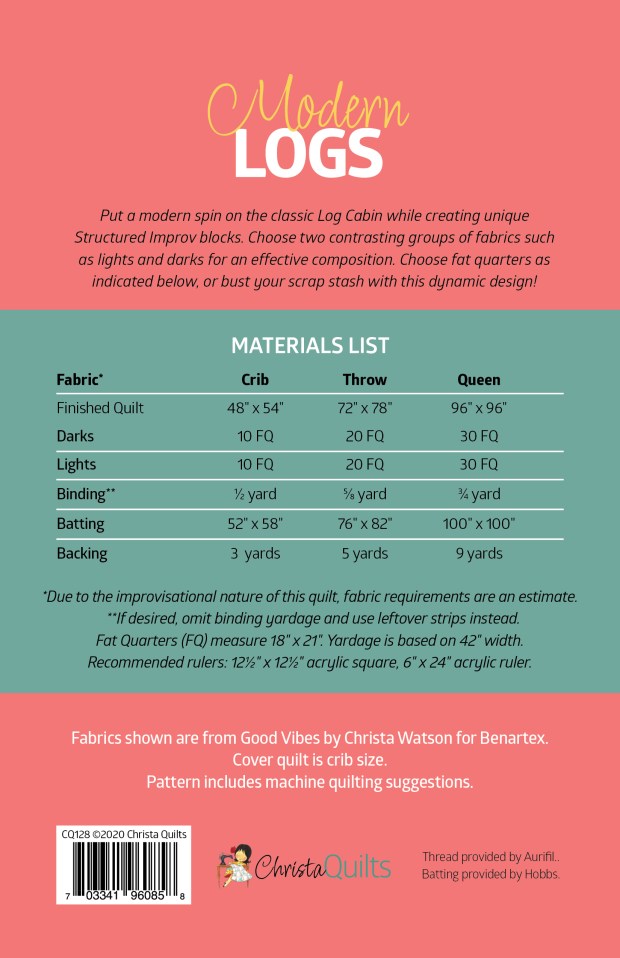
Choose from four handy sizes in Charming Chevrons: Lap, Throw, Twin or King! See the pattern’s back cover below for the dimensions.
Maybe you have some charm packs around just waiting for the right project. Or have you been looking for the perfect quilt to use a special layer cake? Look no further than Charming Chevrons!
Maybe Modern Logs will suit your fancy! It’s made from 1, 2 or 3 fat quarter bundles, depending on the size you want to make. The pattern gives instructions for making crib, throw and queen sizes, but the improvisational technique means you can adjust the size of your quilt by making more or fewer blocks. That’s a great design bonus!
Maybe you’d want to get some Good Vibes and then supplement from your stash for a unique project that’s totally you! You can go with a coordinated look or be super scrappy. I think you’ll really have fun with the improv nature of these blocks!
I’m putting the finishing touches on both of these quilts now and I can’t wait to share them with you!
Seeing your excitement when you like my fabric or fall in love with a quilt design is a real boost for me. And I always meet some wonderful people during a quilt along, so I’m really looking forward to that, too!
I’ll host Quilt Alongs for both designs later this year.
I’m offering a special preorder bargain through the end of June for paper patterns of Charming Chevrons and Modern Logs. Buy two, get one free! Here’s how it works:
.
Use code PATTERN to get a free paper pattern of your choice when you preorder both Modern Logs and Charming Chevrons paper patterns. Add three patterns to your cart, enter the code in the coupon box and then remember to hit the + to make sure the discount is applied. Offer expires end of day June 30, 2020.
Welcome to Part 4 of the Optical Illusion Quilt Along! You’ve made it through the piecing, so congratulations! Now we come to what may not be your favorite part of the process: prepping the backing and batting, and basting the layers together in preparation for quilting.
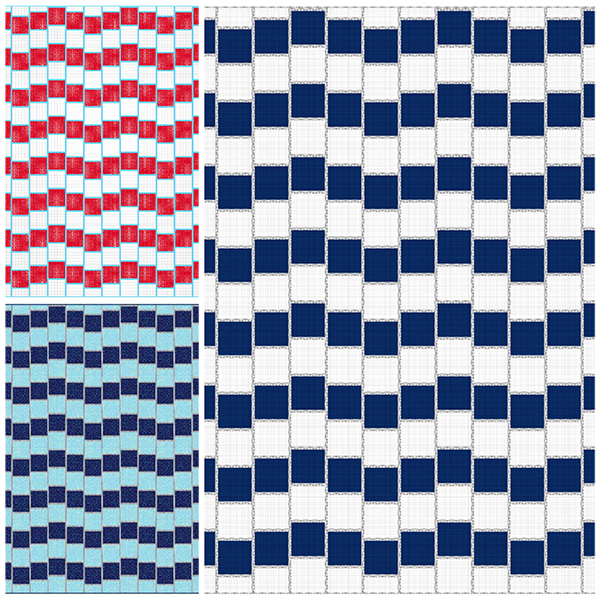
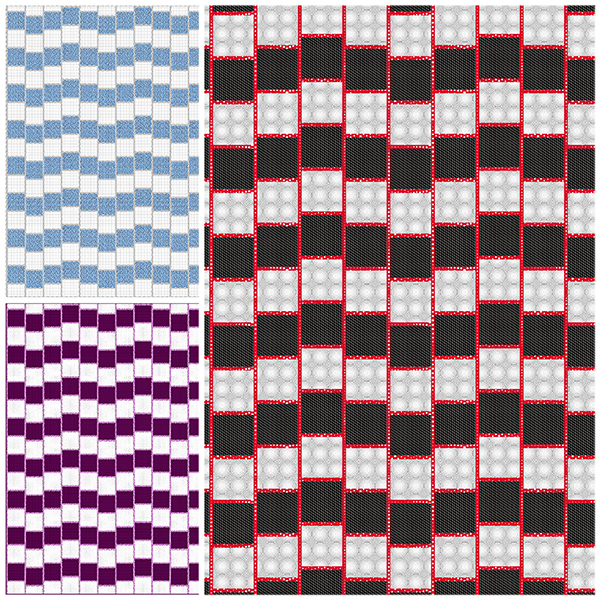
Above is one of the alternate colorways for Optical Illusion. You can make something similar with red, light blue, and white fabric from my online shop.
But if you’ll let me guide you through the next steps, I’ll share some tips to make it less painful and move you along to the quilting that much sooner.
Prep the Batting
The most important step in basting a quilt is to ensure that the batting and backing are several inches larger than the quilt top all the way around.
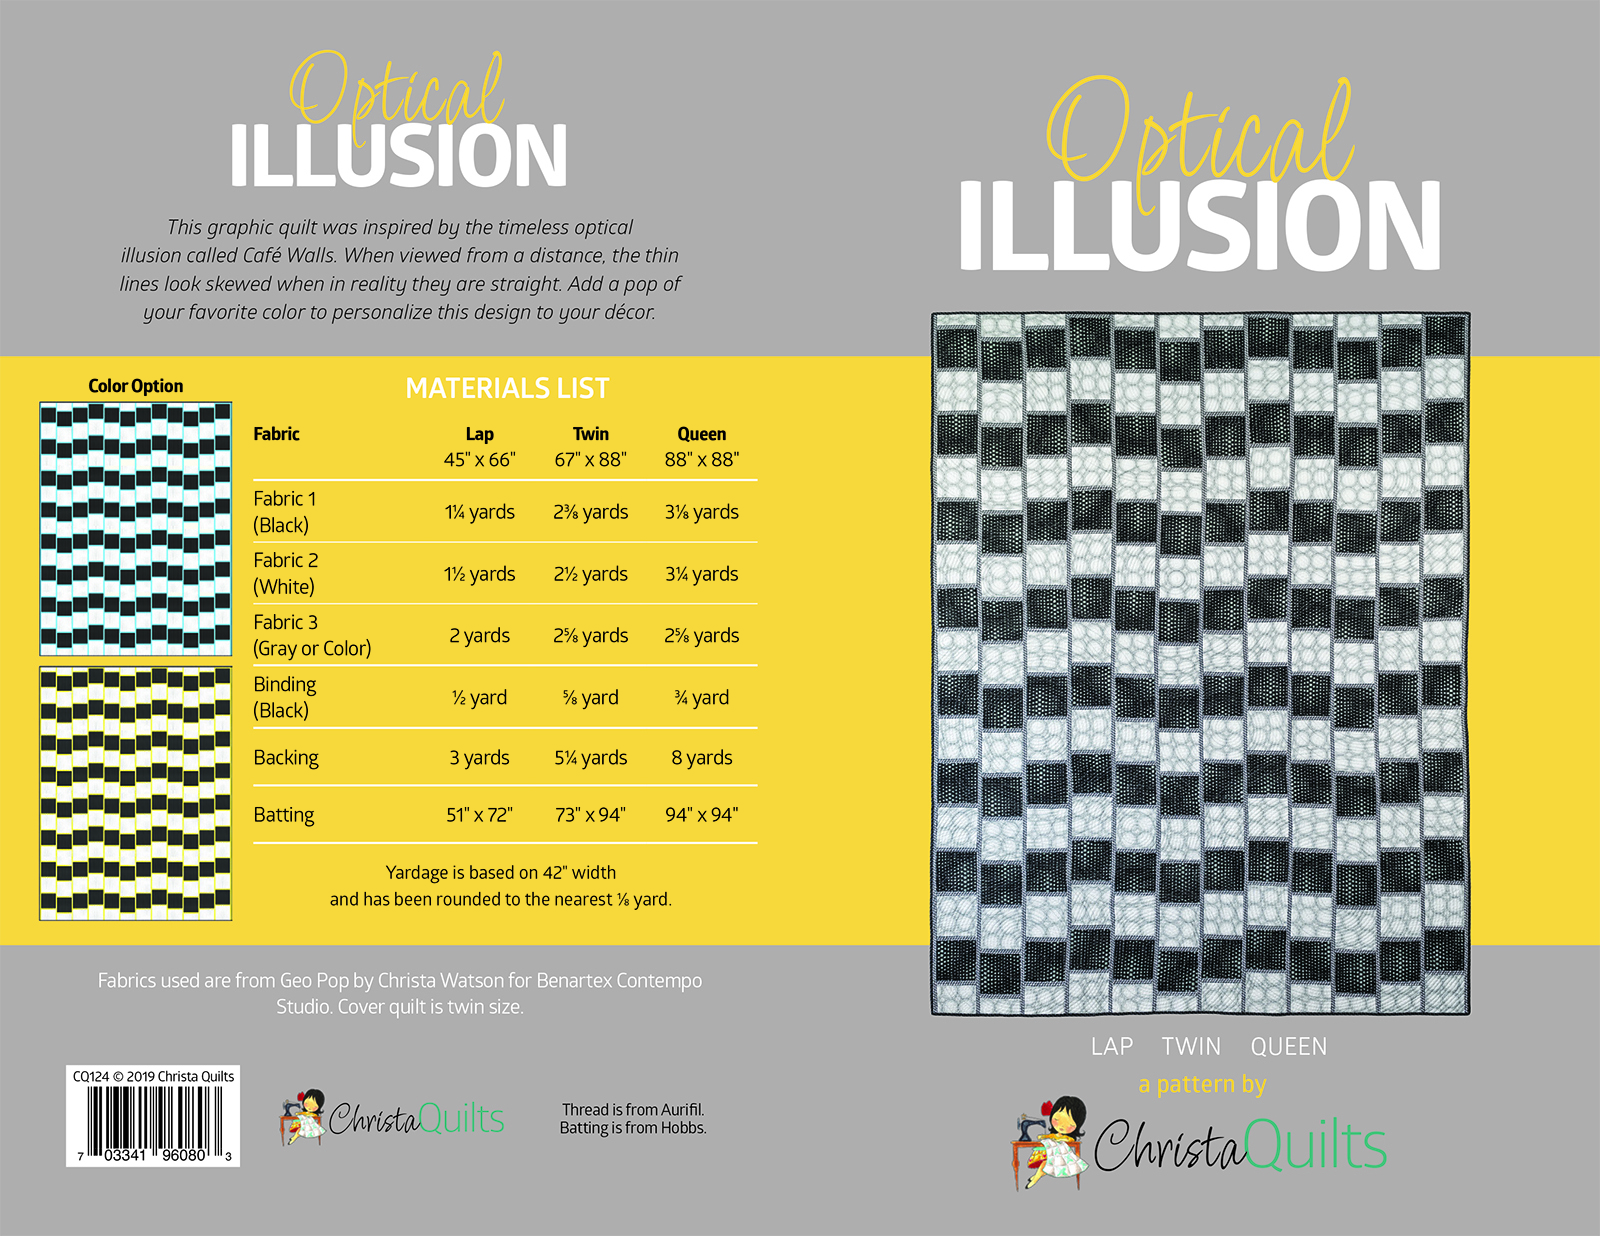
If you look at the back of the pattern, you’ll see that for the batting size, I have added 6″ to the length and width of the quilt top. For example, the lap-size top is 45″ x 66″. The batting needed is 51″ (45″ + 6″) x 72″ (66″ + 6″).
Example of measuring batting from a previous Quilt Along:
The batting should be several inches larger than the quilt top all the way around.
For me, the easiest way to measure the batting is to buy a roll of it, then unroll it across the width of the quilt top and roughly trim off the amount I will need. In the photo above, I’m using Hobbs Tuscany cotton/wool batting which is one of my favorites.
It’s 90″ wide and folded double on the bolt. So after I trim off a chunk from the bolt, I’ll lay the quilt top out and trim off several inches from the top of the batting. I save those chunks to make practice quilt sandwiches later.
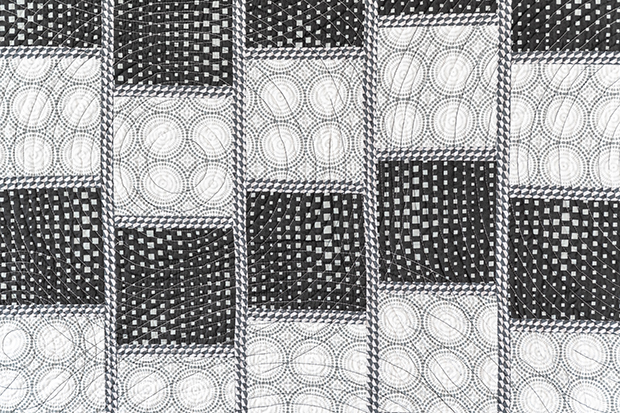
Geo Pop Tiny Hex in black by Christa Quilts for Benartex/Contempo
Piece your backing so that it is a few inches larger than the batting size given on the back of the pattern.
For example, for the lap size, I would cut my three yard piece of backing fabric in half crosswise. This gives me two pieces about 40″ x 54″. I need backing a bit larger than 51″ x 72″.
Backing, pieced horizontally.
I’ll sew the two pieces together for a backing that’s roughly 54″ x 80″. The seam will be horizontal across the quilt.
Now you are ready to baste!
Basting the Layers: Quick Overview
I baste using my design wall and 505 basting spray. I make sure my batting and batting are bigger than my quilt top and I trim away some of excess after it’s been basted. I spray the top and backing outside separately, then assemble all the layers on my design wall, taking care to smooth each layer as I go.
Once everything looks nice and flat, I’ll roughly trim the edges so that only and inch or two remain around all 4 sides. I cut off as much extra as I can to prevent it from tucking under the back and quilting the quilt to itself!!
The final basting step is to iron the quilt on both sides to set the glue and smooth everything out one final time.
I didn’t have a chance to take pictures of this process while making Optical Illusion, but here are links and tips from previous quilt alongs.
And if you have any more specific questions, you can alway post pics and ask questions in my Christa Quilts Facebook Group!
Next week I’ll include a video showing spiral walking foot quilting practice to get you ready for the most fun part of making this quilt!! I can’t wait!!
Spiral Quilting on Optical Illusion can be done with a Walking Foot or Dual Feed system.
Welcome to Part 3 of the Optical Illusion Quilt Along! I hope you are enjoying your fabric choices and feel confident in your cutting and sewing skills. Now I’m excited for you to start sewing the quilt top. It’s easy and fun!
If you haven’t already, please go through your pattern and highlight or circle the number of units to make for your size on pages 3 and 4. You’ll be so glad you did.
Begin with Step 1 on page 3 of your Optical Illusion pattern. Remember to sew with the gray on top for each sashed square. If you do, you’ll automatically alternate the direction in which you’re sewing, which helps prevent your strips from warping.
I press all of the seams open on this quilt. Whether you press seams open, to the side or toward a specific fabric is up to you. The seams don’t have to match up with anything, which is one of my favorite things about this design.
Continue with each Step as given in the pattern, referring carefully to the diagrams in the pattern for each unit. I use sticky notes to label each little pile of units as I finish them.
When you’ve completed all the Steps, move on to Sewing the Rows on page 5.
Sewing the Rows
As I am making the rows, I keep them oriented horizontally so they match the diagrams. Be sure and notice that there are different diagrams for the Lap Size than for the Twin and Queen size. It will help to circle the diagram for your size!
Label the rows with their letters to help you stay organized.
When your rows are finished, give yourself a high five!! Great job!
Quilt Top Assembly
Moving on to Quilt Top Assembly: In last week’s post, I mentioned alternating your sewing direction by keeping the long skinny strips on top. This will be helpful as you assemble the top.
The layout diagram below is included in the pattern. Refer to pages 6 and 7 of the pattern for more info as you assemble, including a method for trimming. Use your design wall to stay organized, or snap a quick picture on your phone for a helpful reference point as you progress.
I pin generously during this process. I match and pin at each end, at the middle and at several points between. Remember to sew with the skinny strip on top each time so that your sewing direction will automatically alternate.
TIP: If you have a row or a sashing strip that is longer than its neighbors, sew with the longer strip on the bottom, next to the feed dogs. This helps to ease in the fullness.
Press the quilt top gently to wrap up the piecing.
SEW A VICTORY LAP!
When the quilt top is complete, you’ll want to “stay-stitch” the edges by sewing across the top and bottom of the quilt. Do this about 1/8″ away from the edge on the top and the bottom so it will be hidden when you add the binding. Just a note: When you make a quilt with borders, you can skip this step since the borders will stabilize the edges instead.
Congratulations! Your Piecing is complete.
Next week we’ll cover how to prepare your backing and batting, and how I baste a quilt. Here is the back of the pattern with info that you’ll need. Click the image for an enlarged view.
You know how much I enjoy machine quilting. Just a few more weeks and we will quilt walking foot spirals—I can’t wait!! Being able to finish your quilt on your own sewing machine because you’ve built the skills to do it is a great feeling. You’re going to love it!
Are you having fun making your Optical Illusion quilt? This week it’s time to sew our cut units into the blocks. Follow along in the quilt pattern on pages 3-4 and pay close attention to what goes where. It’s simple to sew but the key is to follow the diagrams precisely for proper fabric placement.
In a nutshell, the interplay between the dark/light squares and the medium skinny strips is what causes the illusion to appear. Because you are working with long skinny strips, your pieces can stretch if you aren’t careful. In the previous post I mentioned starching your fabric before cutting as this will help.
Piecing Tips
To prevent the rows from bowing or warping out of shape, I like to sew all of my units with the medium, skinny rectangles on top at all times. This will automatically switch the sewing direction for you each time you assemble a unit, which helps keep things nice and square.
I also sew with a shorter stitch length (2.0mm instead of 2.5; about 13 stitches per inch) and press my seams open. This will ensure crisp, flat blocks that are easier to work with so that things line up properly. I always start and end a session of sewing with a “leader or ender” – scraps of fabric that catch my starting and ending threads. Then I don’t lose my thread and chain piecing is a breeze!
Example of Subunits in Progress
Stack up similar units that will all be sewn at one time so you can assembly line sew, or chain piece as you go. Pay particular attention to the number of units specified in the Optical Illusion quilt pattern on pages 3-4 and make sure everything is in the right place. Once all of your pieced units are complete, you are ready to assemble them into rows and complete the quilt top next week!
Most of my kits include the pattern plus all of the fabric needed for the quilt top and binding. All of the kits on clearance have been reduced by 25% off the original price with no coupon required!
Next up, Lattice Work features charm packs from my Abstract Garden fabric line with light and dark neutrals to make those bright colors pop! This kit includes fabric for the top and binding in the throw size at 74″ x 82″.
The beginner-friendly design is quick to piece and fun to make. The bright, colorful fabrics make it interesting enough for anyone to enjoy!
Cool things off with my Pieced Primrose quilt kit on sale. As of this writing, I have one of these left in the wall size kit for 25% off the original price – no coupon required!
If you’d like a larger version, the throw-size Pieced Primrose in warm or cool colors is also on clearance. It’s 4 times as big as the wall size and with the clearance sale, you’ll save over $50 on this kit – what a deal!
I hosted a quilt along awhile back to make this quilt and you can still access all of that free content here on my blog. I even included YouTube videos of my basting, quilting and binding process which you can apply to any quilt you make!
Not a care in the world when the fabrics are neatly packed into a convenient kit, ready for you to have all the fun!
Pattern Clearance
Positive Direction paper pattern is on clearance.
A number of paper patterns are on clearance including Positive Direction. The soft neutrals let the plus signs take center stage in this modern quilt design.
I have fond memories of creating my very first fabric line, but now it’s time to clear out the old to make way for the new. I know you’ll love Modern Marks at just $8.95 a yard while it lasts. Much of it is sold out already, but you can still grab yardage of the remaining prints to stock your stash or add a pop of color to the back of your quilt.
Cutting out the fabrics to make Optical Illusion is pretty straightforward. Just follow the cutting instructions on page 2 of the Optical Illusion Quilt Pattern. You can reference my previous post on choosing fabric color combos that will work. For my version I used highly contrasting black and white for the squares with gray for the long skinny strips.
Before cutting, I highly recommend starching your fabric. This will keep the smaller skinny strips from stretching out of shape and will give body to your pieces as you handle them. I like to use inexpensive starch from the grocery store. I spray one side of my fabric and iron from the opposite side. Then repeat for the other side. It works like a charm!
Cutting the Squares
When cutting the squares, the easiest way is to first cut strips from your fabric, then subcut those strips into the square sizes as indicated in the pattern. If you are using a directional fabric like I did, you can choose to have the print always running in the same direction, or let it be more random. The choice is completely up to you depending on the look you want.Still need the Optical Illusion pattern? Get a printed version or get the instantly downloadable pdf. Refer to the quilt pattern for the number of squares to cut for your size.
When it comes to cutting the rest of the units that are a slightly different size (for the starting and ending rows), be sure to label them to keep the sizes organized. I’m constantly referring to my pattern for unit size and placement so I keep everything in the right spot!
Cutting the Skinny Strips
When you are cutting out long skinny strips, you’ll either need to piece together shorter lengths of fabric to get a long enough piece or you can rotate your fabric and cut them parallel to the selvage so that there aren’t any seams. This is the method I recommend in the quilt pattern.
Cut long strips parallel to the selvage.
You can fold your fabric into about four layers by shaking it out so it hangs straight, then folding it in half, and half again parallel to the selvage. If your folded length of fabric is longer than the width of your cutting mat, I recommend getting another cutting mat and another ruler so that you can line things up along the entire edge.
Once everything is cut, you are ready to start sewing your pieces together next week! Feel free to take your time, or work ahead. The choice is up to you and you are the boss of your quilt!
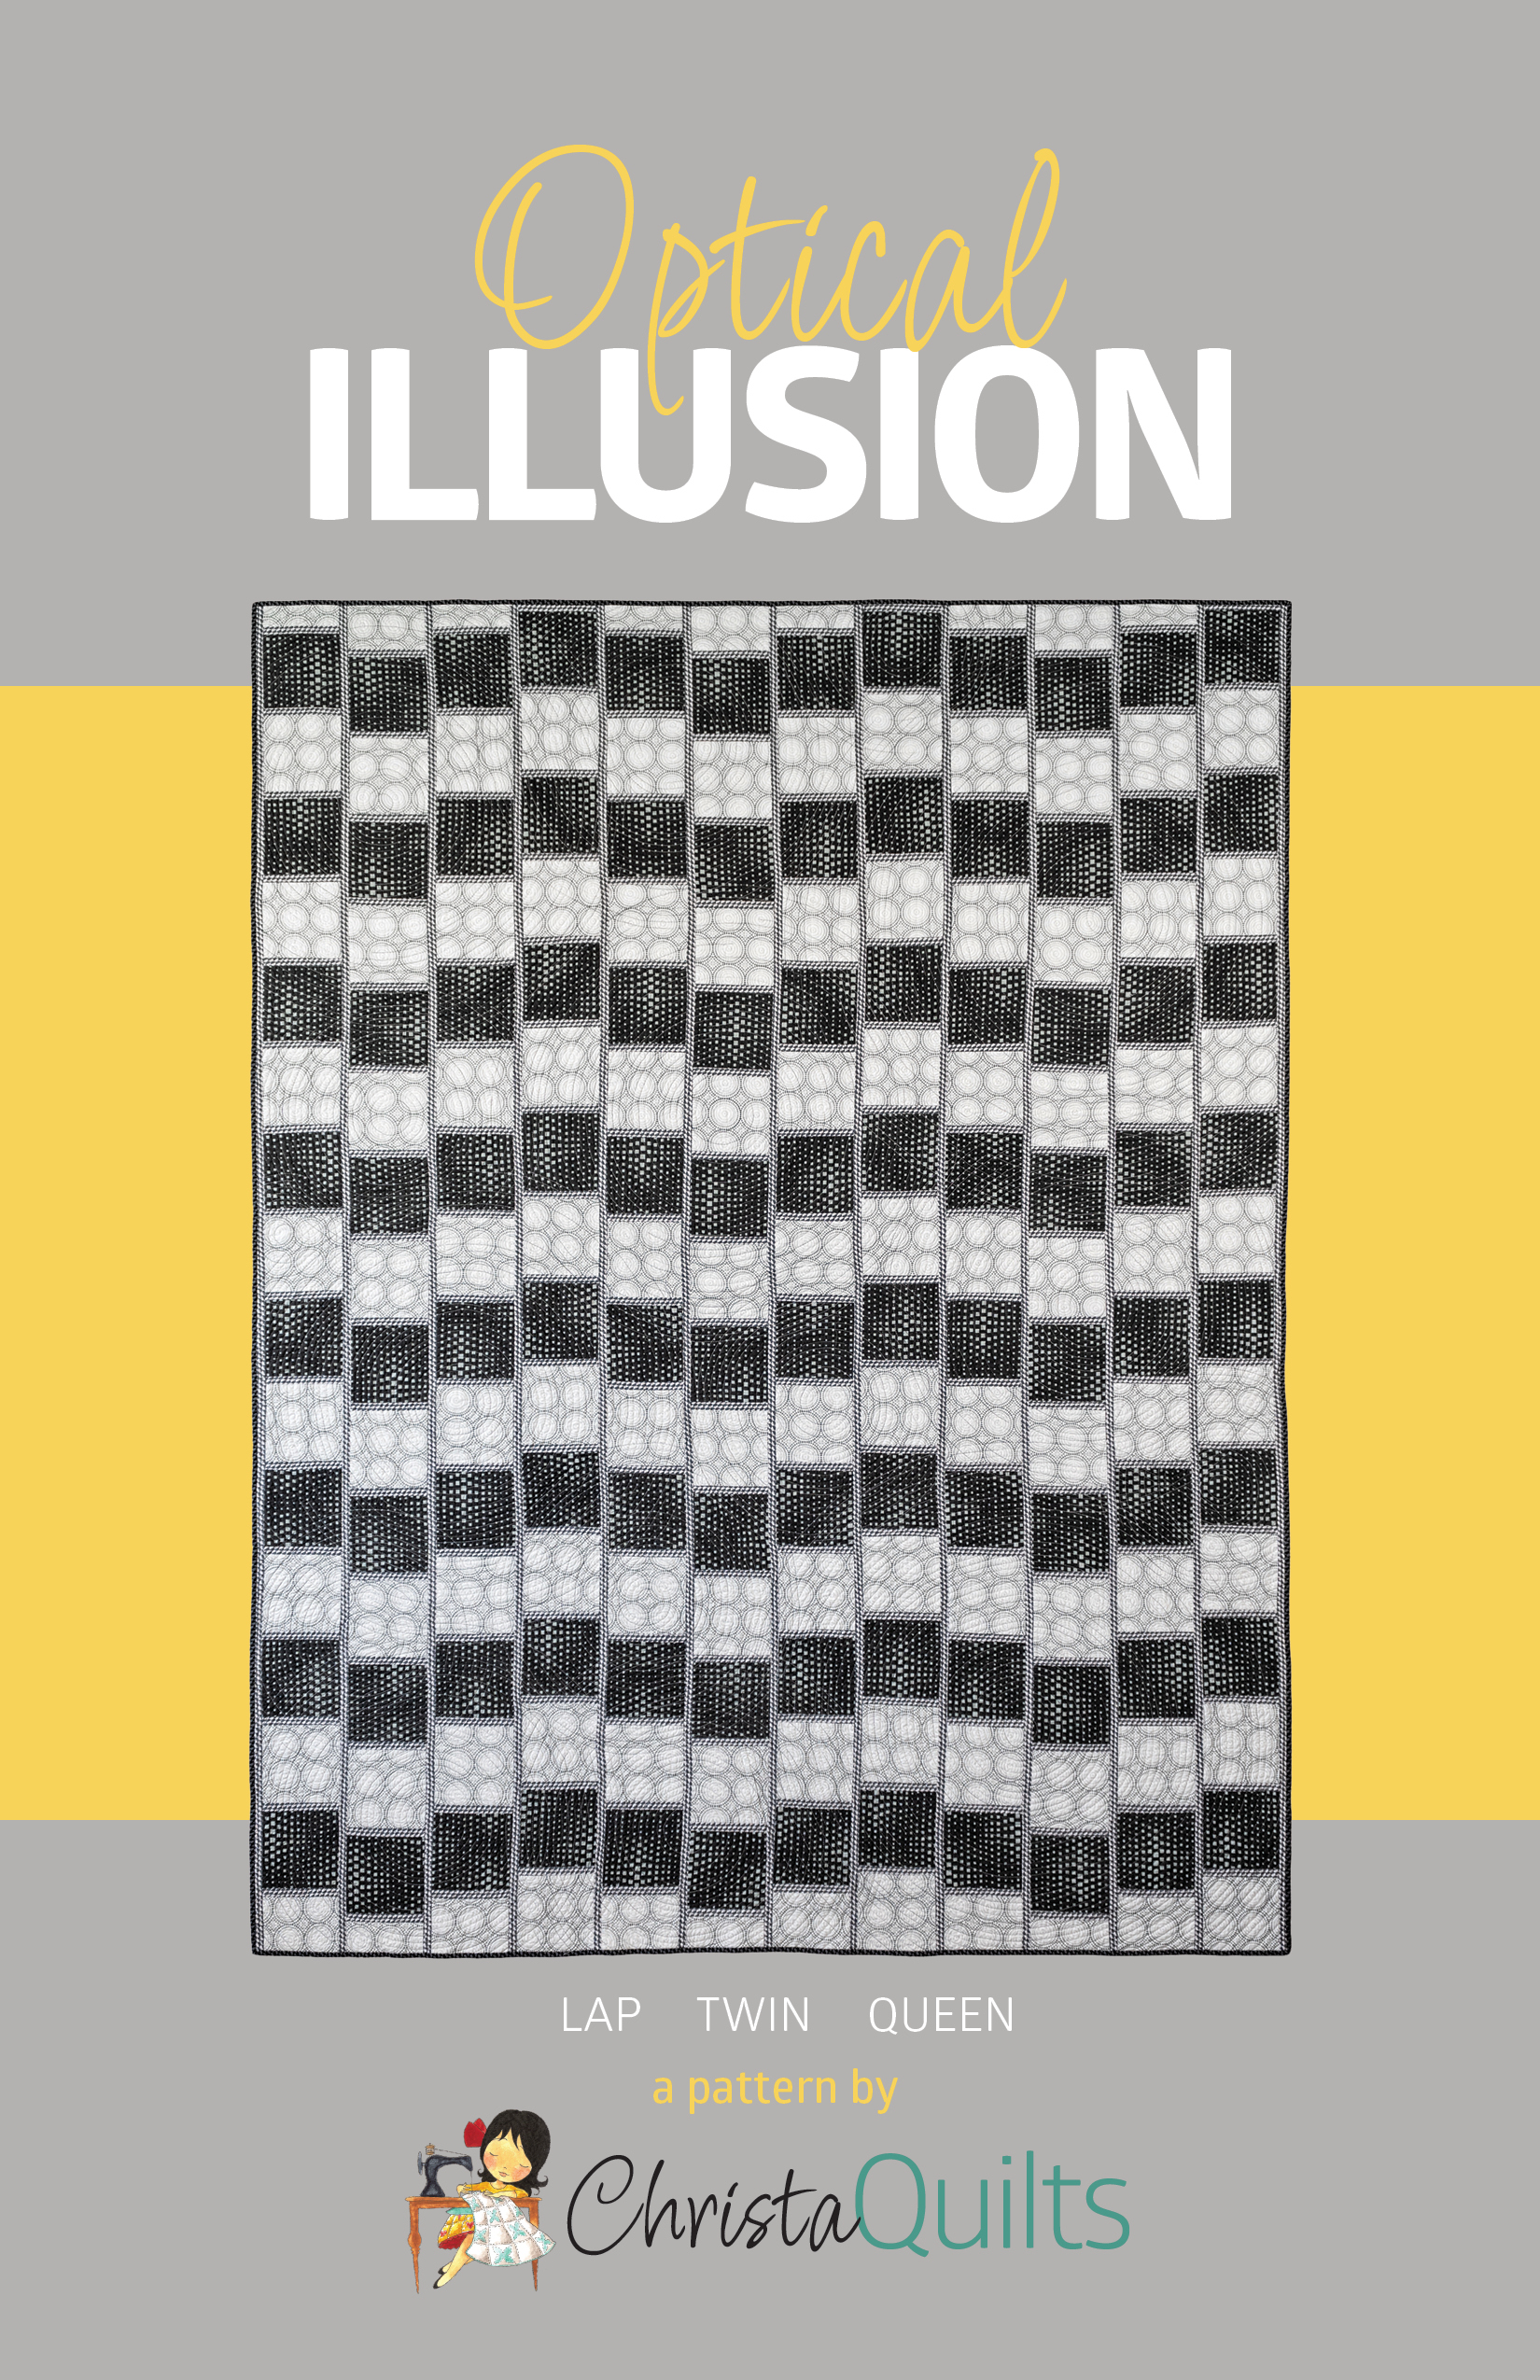
Are you ready to join me for the adventure of a lifetime? Or at least a fun sewing escapade over the next several weeks? I’m excited to guide you as we make my Optical Illusion quilt from start to finish. All you need is a copy of the Optical Illusion quilt pattern and a can-do attitude!
Optical Illusion made from Geo Pop, 67″ x 88″
Scroll this image to see the lines move!
My original version was sewn up in bold black, white and gray from my Geo Pop fabric line. I had requests to see how it would look in other colorways, so thank goodness for EQ8 software which allowed me to quickly recolor lots of fun combinations!
I made some of them into quilt kits which you can pick up if you desire, or just use them as a color guide and pick something similar from your stash.
Color Play: Choose Light, Medium and Dark
The trick to making the design work is the interplay of the values. Value is just the lightness or darkness of a fabric compared to its neighbors. For this design to work you need three fabrics that read as light, medium and dark.
So take a look at these color combos and scroll your screen up and down to see the illusion of the lines waving back and forth. Pretty trippy right?
The illusion works because the medium fabric is ALWAYS used for the skinny strips whereas the light and dark color combos are used for the squares.
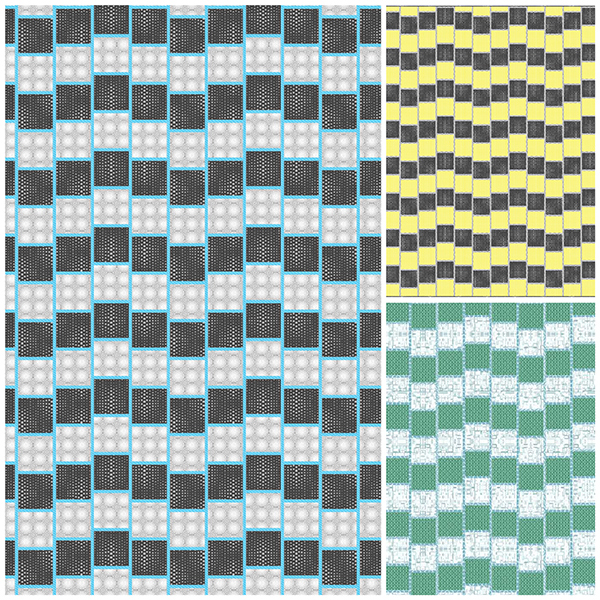
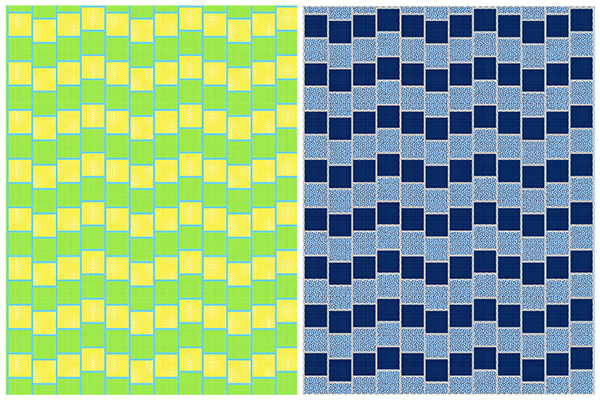
Here’s another group of colors that also showcases the illusion with some interesting color combos:
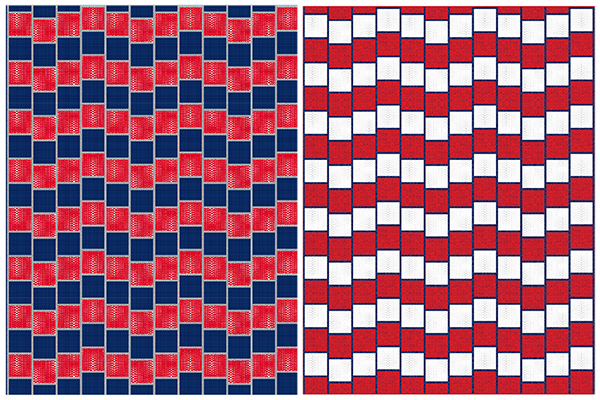
Solids, or fabrics that read as a solid look best for the bold, graphic design, but that doesn’t mean you can’t use prints. Just be sure you choose something that is mostly one color or color family per print. Here’s another color grouping that works well:
Remember, for best results, use the lightest and darkest fabrics are for the squares, with the medium for the skinny strips. To test the value of your fabrics, take a picture set on gray scale from your camera phone. Then you can easily tell which should be classifued as light, medium or dark.
That’s a dozen different combinations that WORK! (Many are available as kits for the Quilt Along.) I have no idea why our brains read it this way, but it sure is cool, don’t ya think??
Now…
Watch what happens when the skinny strips are LIGHTER or DARKER than the two colors in the squares. It creates too much contrast and doesn’t give the illusion.
These 4 colorways above and below still make a nice looking modern quilt, so don’t despair if your color combos don’t work exactly as you thought. Part of the fun is learning new things, right??
For further discussion and some more examples, check out this video from my Facebook Live “Ask me Anything” series. Click the image below to play. It’s just under and hour and I go through color combinations as well as other quilty tips and advice asked by the audience. (I do these live sessions each wee k and have started posting them on YouTube so be sure to subscribe!)
In my examples, I’ve used mostly prints that read as one color for the best results. But don’t worry—the modern quilt design looks cool whether the illusion works or not!
Optical Illusion Supply List
Start thinking about the colors and fabrics that you would like to use, and gather up the needed supplies. The quilt pattern comes in three sizes. Click the pattern image below to expand.
Here’s what you need for the Twin size quilt top (67″ x 88″), which is what I made:
I can’t wait to show you how to quilt the walking foot spiral design!
Quilt Along Schedule
The links below will go live as each part is posted. Bookmark this page and refer back to the schedule anytime in the future to work on this quilt at your own pace.
If you’re an Instagram junkie (like me!), please tag me at @christaquilts and use the hashtag #opticalillusionquilt so I can see what you are doing and cheer you on!
If you’d like to ask questions or need additional help, please participate in my Christa Quilts Group on Facebook. It’s a great place to encourage your fellow makers and get additional ideas for fabric choices and a quilting plan!
Sign up for Email Notifications
Be sure to enter your email address in the box on the sidebar of this blog. If you are viewing this on your phone or tablet, scroll aaaaaaaallllllllllllll the way down to the bottom of the page to find the email address box.
I’m super excited about my next quilt along which will kick off on May 19th with a complete sewing schedule and supply list. Every time I share my Optical Illusion quilt, I love how many people ask for the quilt pattern. I’ve also had numerous requests for a quilt along, so I was finally able to work it in to my schedule, yippee!
Several years ago, my family and I were out to dinner and I saw this really cool optical illusion on the back of a kid’s menu. As with most things whenever I see an interesting design, I wonder to myself, “can I make a quilt out of that??” The design was called “Cafe Walls” and here’s a public domain image of it:
Cafe Walls Optical Illusion
So I began to design in EQ8. It took awhile to get the proportions right and I decided that for an interesting quilt, I preferred the lines to run vertically rather than horizontally.
Once I was happy with my design, I made a version of it from solid fabrics, to try out the idea. It actually hung in QuiltCon back in 2015 and I had sooo many requests to turn it into a quilt pattern, but was so overwhelmed with other deadlines at the time that I had to put it on the back burner for awhile.
I did manage to get it into an issue of a magazine, that is sadly no longer in print, and then I kept putting off the editing and rewriting I needed to release on my own. Since then I’ve seen several different design variations, so it’s fun knowing I’m not the only one who thought this would make a fabulous quilt!
The original version of Optical Illusion Hung at QuiltCon in 2015
Finally, the timing was right to recreate the quilt and pattern when I released my fourth fabric line, Geo Pop for Benartex. I included a lot of black and whites in this colorful collection and knew I wanted to do something special with them!
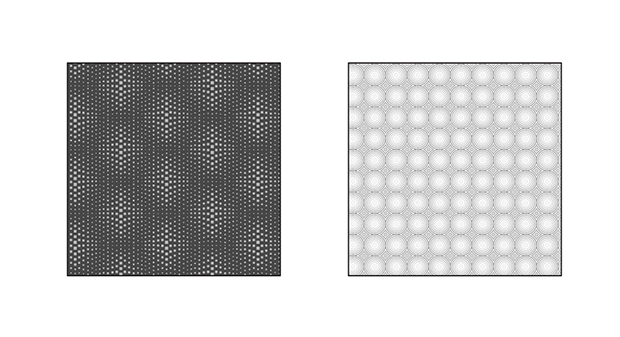
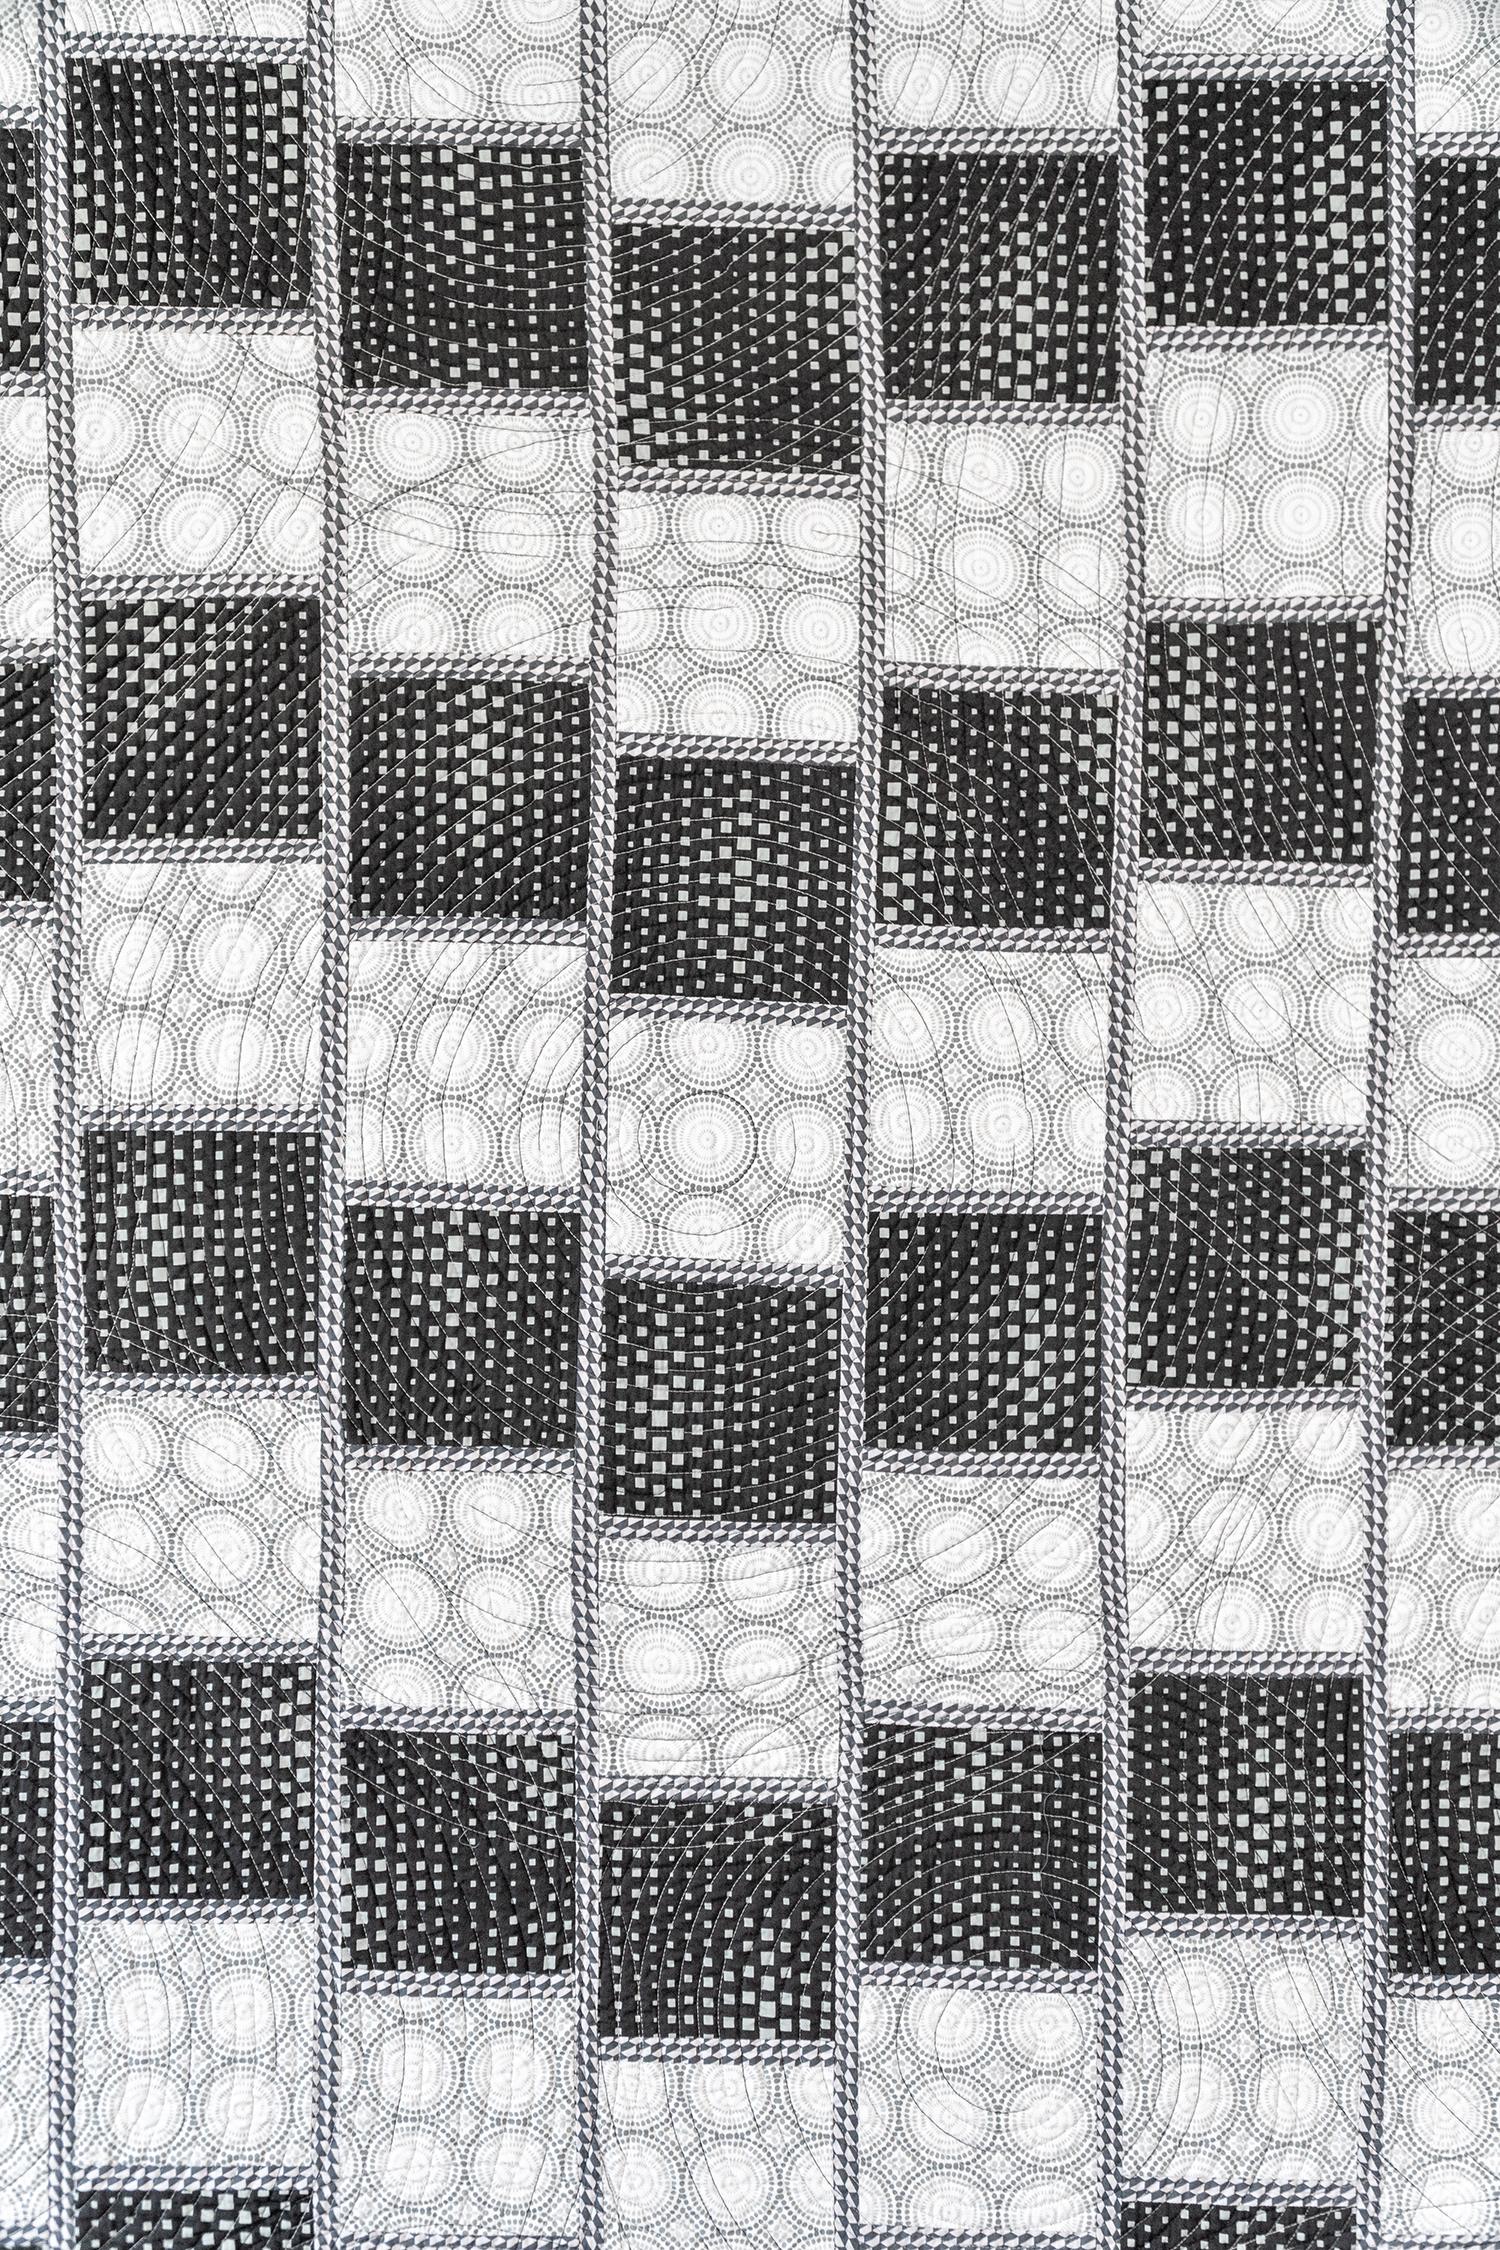
As you can see from the detail pic below, I only needed one black fabric, one white fabric, and one gray fabric to create the design. The biggest test for me was to see if the illusion would still work using prints – and I’m thrilled that it does!!
So I really hope you’ll join me for this quilt along to make your own version. Here’s a hint as you start thinking about colors: It doesn’t have to be strictly black and white. But you need good contrast between the lightest color (white), the darkest color (black) and the medium color (gray) to make the illusion work. And the further back you stand, the more you will see the illusion.
Next week I’ll post the full supply list and quilt along schedule, and we will actually dive into making the quilt starting on Tuesday, May 26. So that gives you plenty of time to start gathering your supplies.
Get the Optical Illusion Quilt Pattern
For now, grab a copy of the quilt pattern or optional kit and be sure to sign up to get an email whenever there’s a new blog post. You can do that by entering your email address in the sidebar if you are viewing this on a computer. Or scroll AAALLLLL the way down to the bottom of this post if viewing on your phone.
If you really ant to see the illusion in this quilt, scroll up and down to see the lines wiggle!!
Next Week: Choosing Fabrics
In addition to posting the schedule next week, I”ll dive into sharing some tips and trips for successful fabric combos. The quick answer is that you want very good contrast between light, medium, and dark, with fabrics that read as one color. I’ll go in depth with this more next week with good and not so good examples of successful fabric combo’s. See ya then!
I’m thrilled to introduce a brand new quilt to you today! It’s called Interlinked and was a design I came up with a couple years ago when playing around with some modern design ideas.
Interlinked Quilt by Christa Watson, 64″ x 80″
Made from neutrals of Fandangle, Geo Pop, and Gridwork
I love making all kinds of quilts and most of my designs fall on the “Modern Traditional” side of things. But with Interlinked, I wanted to get out of my comfort zone and really embrace modern principles like “minimalism” and “negative space.”
Interlinked Beauty Shots
I’ve also been having fun taking some styled shots of my quilts. there’s something about surrounding a stark neutral quilt with some earthy color that makes it pop, don’t you think?
The most fun part about making this quilt was combining white and gray prints from several of my fabric lines. After releasing my first fabric line, Modern Marks back in 2017, I realized I needed to add more backgrounds and neutrals to work with in each of my succeeding lines. So this one includes white & gray from Fandangle, Geo Pop and my newest line, Gridwork.
When I shared sneak peeks of me making this quilt a few months ago, I immediately got requests for kits once the pattern was available. So I’m happy to announce that kits are now in stock and ready to ship over in my online store at shop.ChristaQuilts.com.
The PDF pattern can be found in my Etsy shop and it includes a couple of bonus options such as adding borders, color ideas and even a coloring page.
The quilt is actually really quick and easy to make and you can have fun with the quilting just like I did. I quilted a different geometric design in each fabric of the quilt and it was so fun putting this one together. It’s the first time I’ve made a quilt from my fabrics where I’ve used more than one collection and I really enjoyed the freedom of doing that!
Interlinked free-motion quilting detail – click image above to enlarge.
I hope you enjoyed looking at all these fun pics and I can’t wait to see your version of the quilt. When you make it, please use the hashtag #interlinkedquilt on social media so I can cheer you on!