The Making of Bling Quilt Part 4 of 4 – Machine Quilting

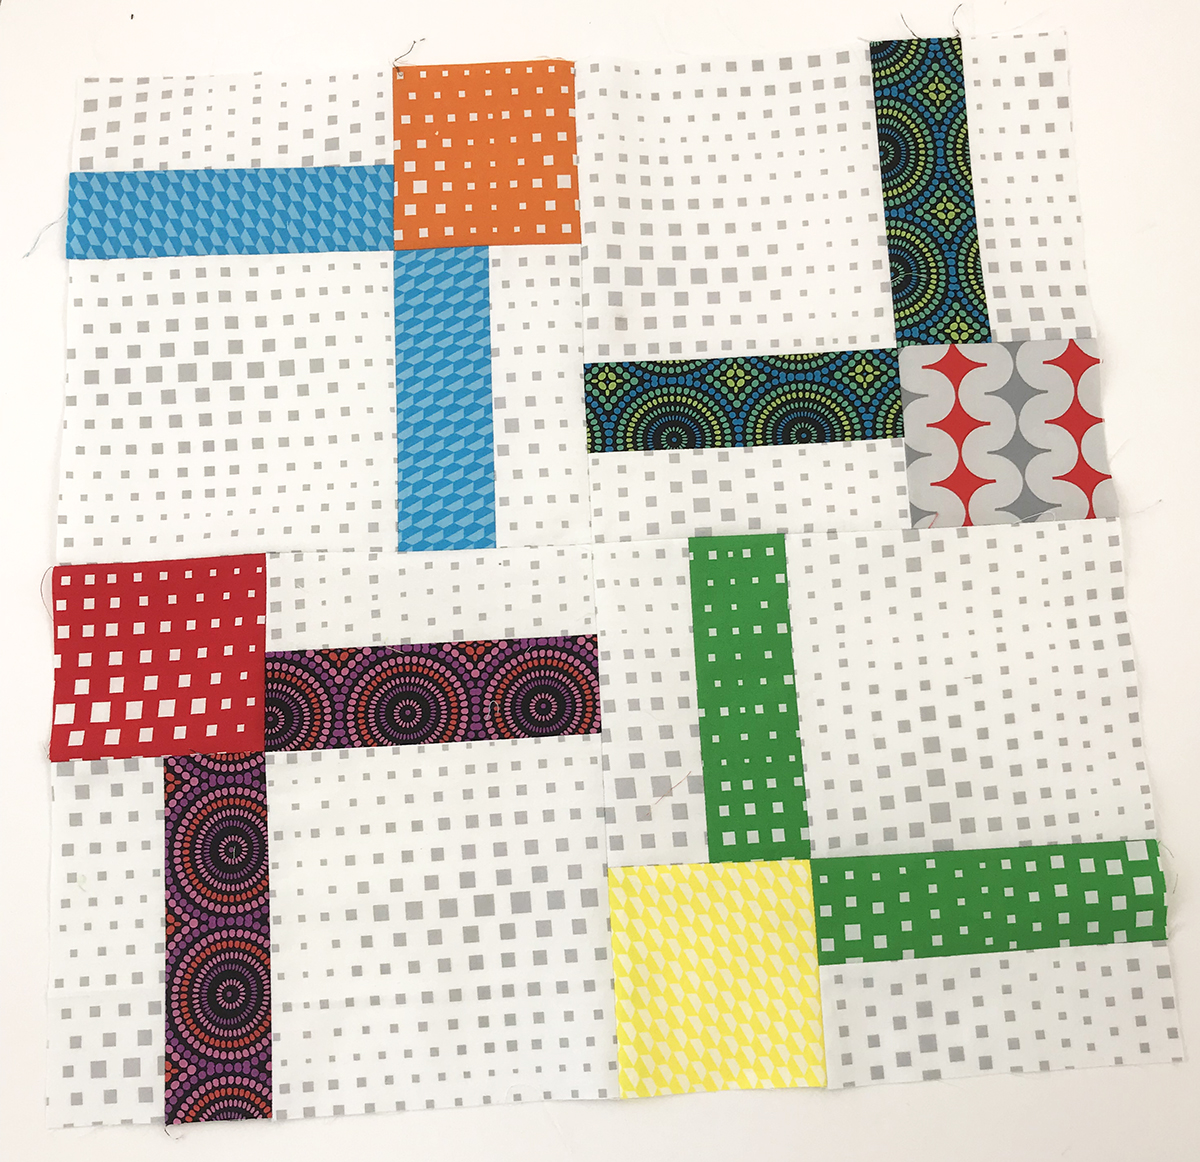
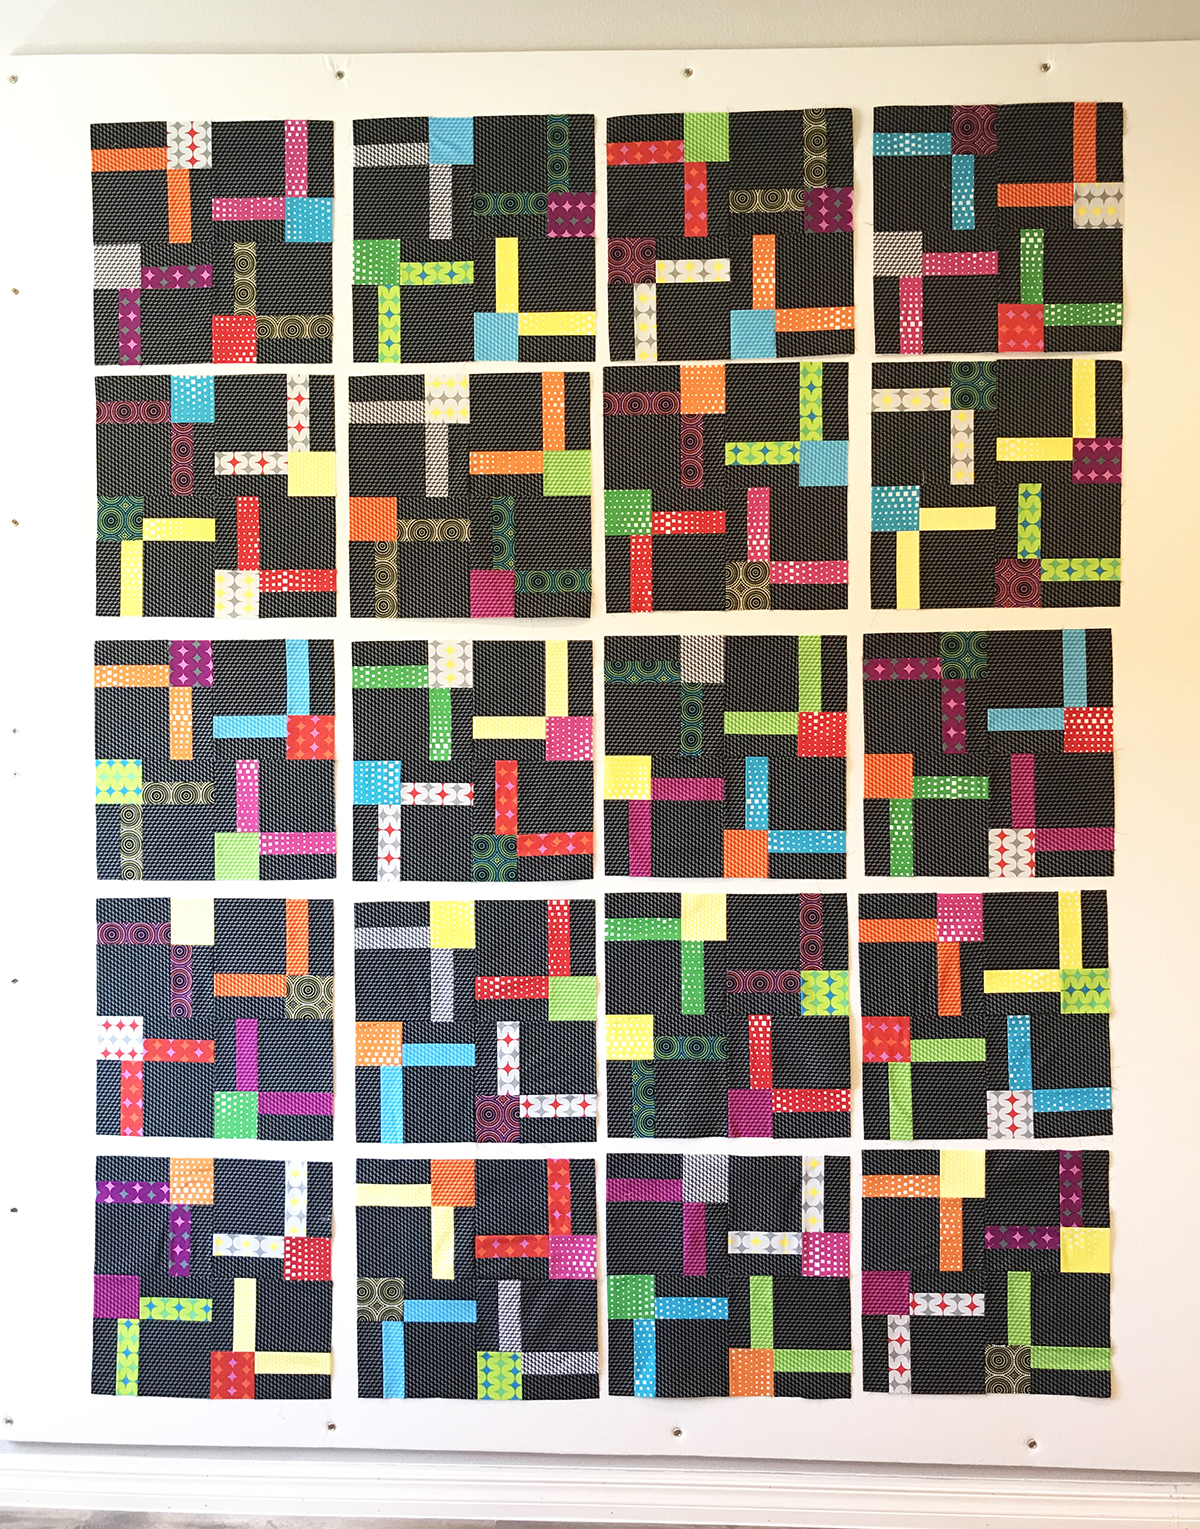
I’m back to share the final step of making my Bling quilts that I starting telling you about last month. Check out the links below to catch up on the previous posts.
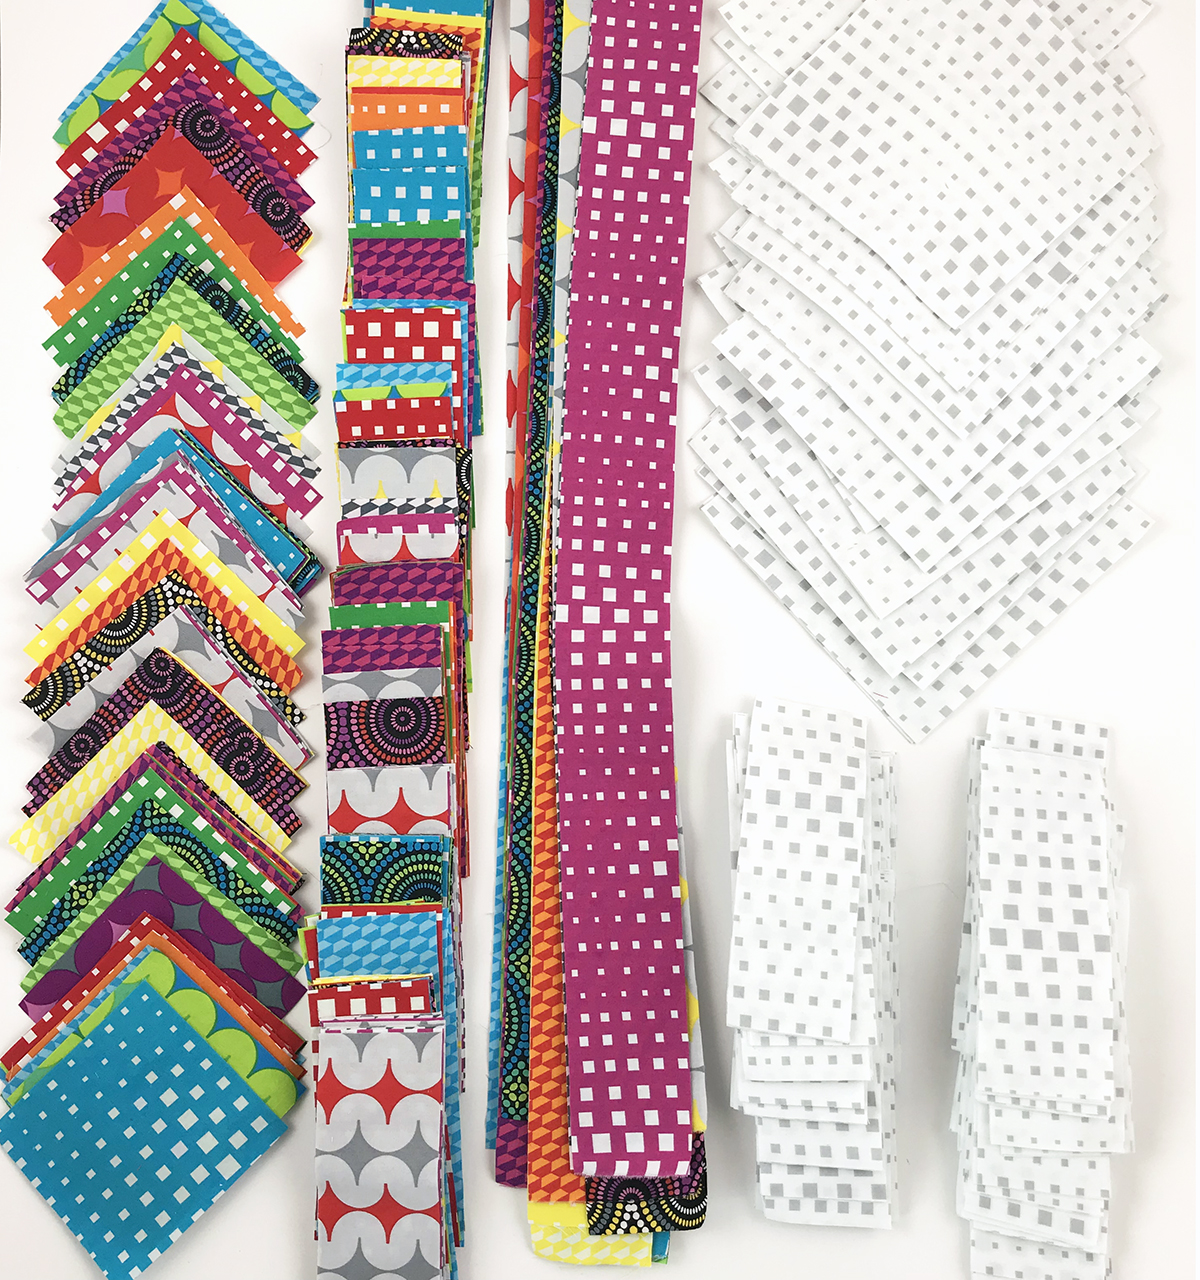
Bling Quilts with Geo Pop

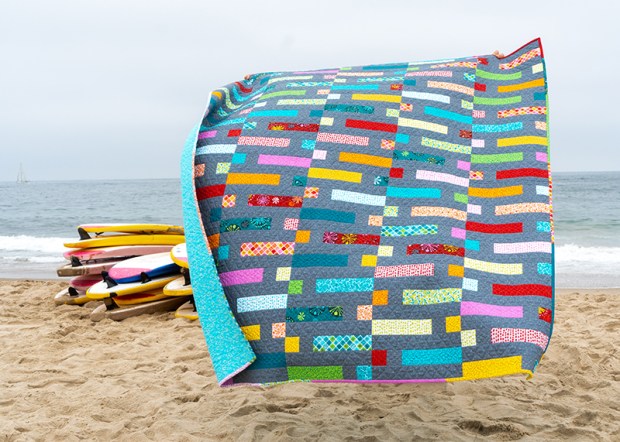
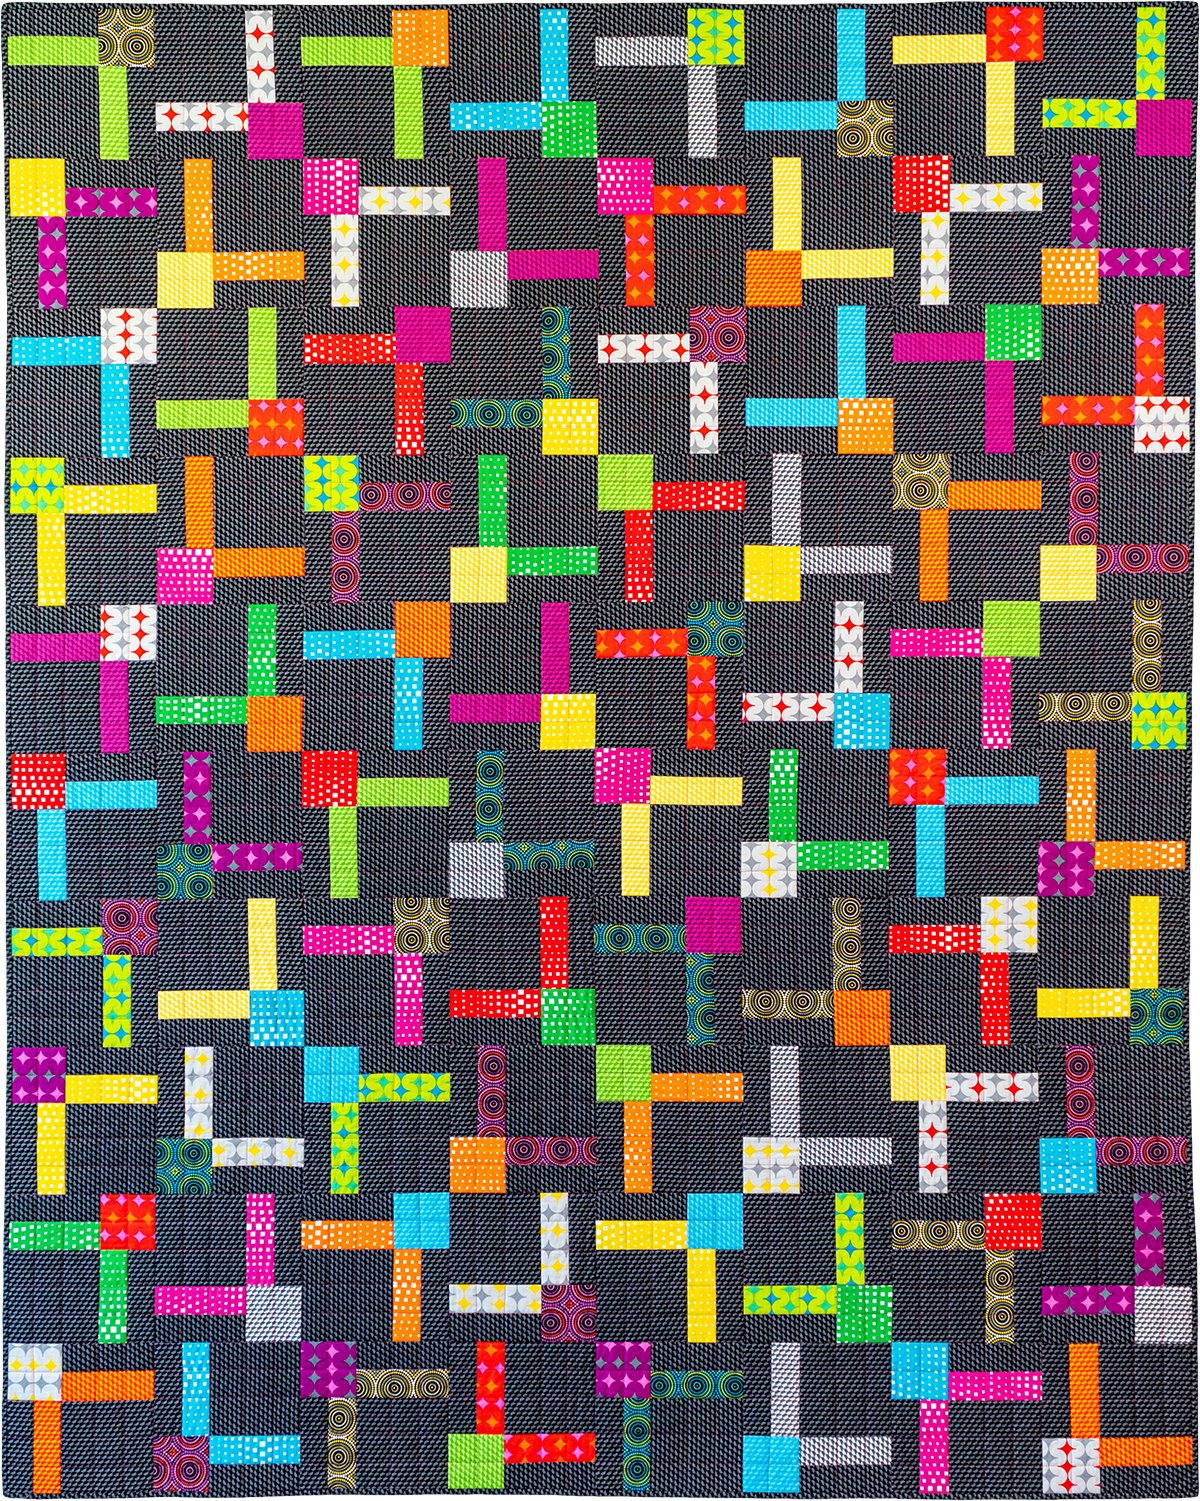
Whenever I make the same quilt twice, I like to show different fabric combos and machine quilting ideas. I quilted both versions of Bling using a walking foot but with two very different designs. I always make a quilting plan so I know what I’m doing before I get there.

Here are two suggested quilting plans that I included in the Bling Pattern:

Random Crosshatch quilting

Random Crosshatch Quilting
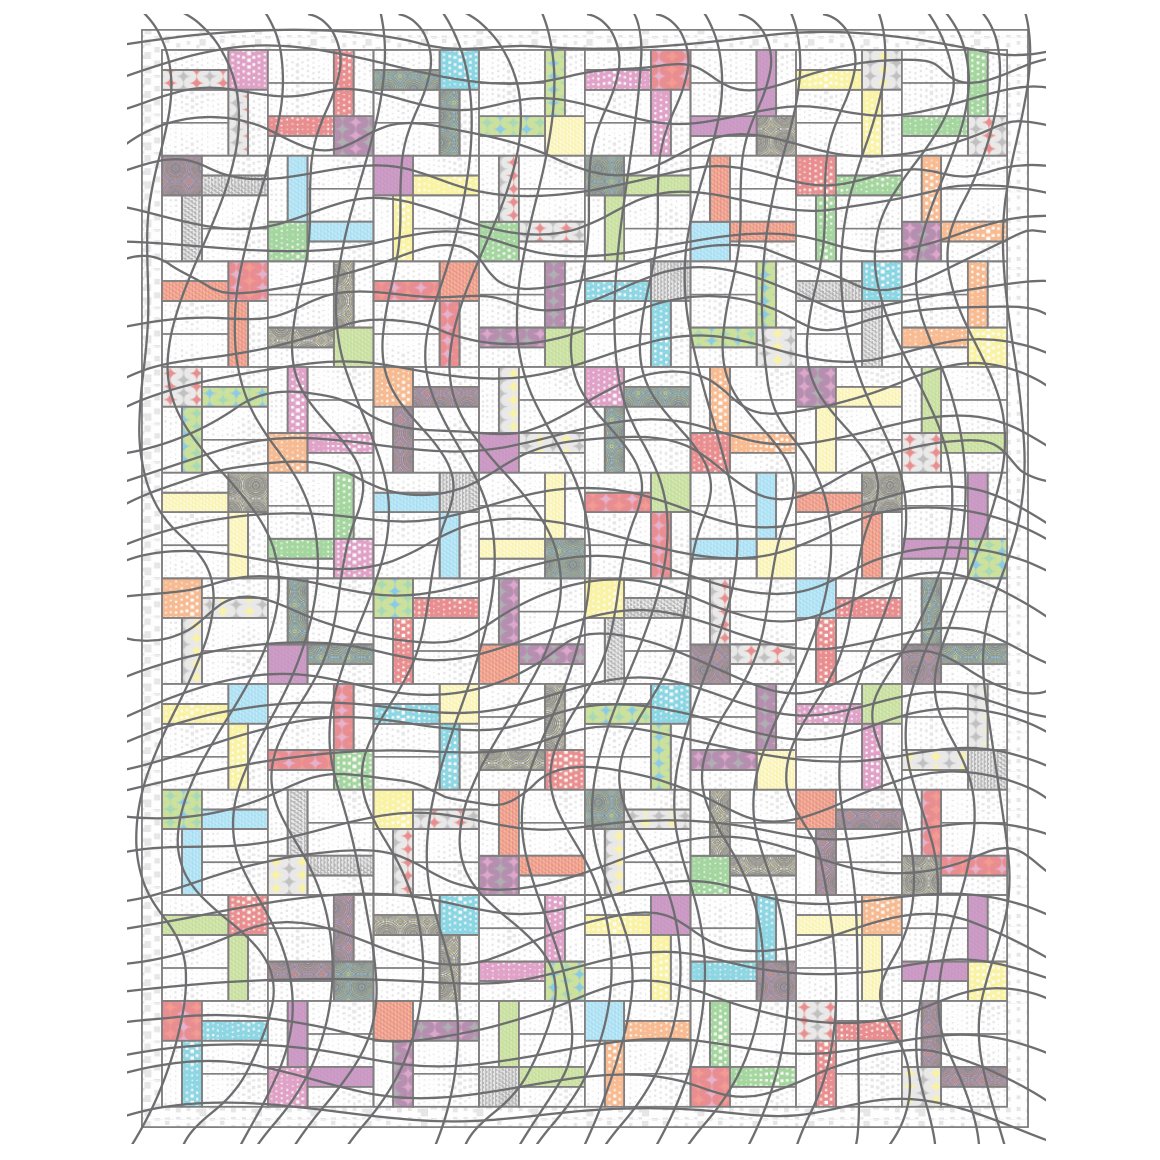
Wavy Grid Quilting

Wavy Gird Quilting

Both techniques are basically the same: you quilt a series of lines across the quilt in both directions, starting with widely spaced lines, and then filling in the gaps with more lines until you like how dense the quilting is. The only difference is that the first version uses straight lines, and the second version uses wavy lines.

Here’s a short video I’ve put together with two 30 second snippets of me quilting each quilt, using the dual feed on my BERNINA, which works just like a walking foot.

These are super simple, fast and fun designs to quilt and are my go-to’s when I’m in a hurry!

Here are two other helpful tutorials in order for you to make a complete quilt. I use these same methods, no matter which quilt I’m making:

And here are the finished quilts! I have quilt kits available for both versions if you’d like to make them just like this. Because they have a scrappy look, no two quilts will be the same!

Bling Quilt - Geo Pop Fabric by Christa WatsonBling Quilt with Geo Pop fabric by Christa Watson

Sharing is Caring

Remember – I love to see you work and I know others do, too! So share pics of your progress on instagram with the hasthtag #blingquilt and be sure to tag me @christaquilts. You can also post pics, ask questions, and get any type of quilting advice over in my ChristaQuilts Facebook group. I love virtual show ‘n tell, don’t you??

Infrastructure Week 1 – Quilt Design and Fabric Prep

It’s finally here!! The start of our Infrastructure Quilt Along!! I love sharing quilt alongs with you because I get such joy out of encouraging others to make a complete quilt from start to finish. To kick off the QAL first we’ll discuss a bit about the design and then prep our fabric so we are ready to start cutting and sewing next week.

Infrastructure Quilt

Infrastructure Design

This was a fun collaboration between me and my talented friend Heather Black of Quiltachusetts. I asked Heather to design a modern block of the month type quilt without any curved piecing (her specialty) that would really showcase my Geo Pop fabric line. I was thrilled when she came up with this design and then I had the fun of breaking it down into sections and writing up the pattern.

Because Heather is such a fabulous designer, she had two ideas of how it could go together, either in blocks or rows. I decided that rows made more sense and figured that if we divided the design into 9 rows, that would work well to create the top row by row. Here’s an overview of each section of the quilt, which is explained step by step in the quilt pattern.

Infrastructure Diagram

You’ll notice there are some piece-heavy rows and some fairly simple pieced strip rows. This will allow us to keep up the interest while putting the quilt together over the 12 weeks, but also give us a few breaks so we don’t get burned out. You’ll also get to try out lots of different piecing techniques along with some optional fussy cutting!!

I highly recommend using the Tri-Recs ruler set for cutting the anvil blocks and diamond blocks. The pattern includes full size templates, but the ruler is so much faster and easier  – and I use it for lots of quilt patterns that I design.

Tri Recs tools

Prepping the Fabric

Geo Pop Bundle

I’m using all 25 Geo Pop fabrics for my  version of Infrastructure. Of course you can make any fabric substitutions that you like – see the back cover of the pattern below for similar colors to use.

Infrastructure Supply List

I’m a big advocate of prewashing because I’ve seen too many accidents occur even with high-quality fabric. I recommend separating lights and darks, and washing the fabrics using a couple of dye magnet sheets like Shout Color Catchers in the wash. This will help catch any excess dye and will prevent it from redepositing onto your fabric in places where you don’t want it to be.

Shout Color Catcher

If you are working with smaller chunks of fabric like less than 1/2 yard, you can put the fabrics in a mesh laundry bag to keep them from getting all tangled up.

After my fabric is washed, I iron it and starch it. I use a hot, dry iron on the highest setting and cheap starch from the grocery store. My favorite brand is Faultless premium starch.Binding

Starching Tips

To prevent flaking, I spray starch completely on one side of the fabric I’ll be using. I let it rest for a few seconds, and then flip the fabric over to the back side to iron (the non starched side). Once that’s done, I starch the side I just ironed, and then flip it over to the previous side and press again. So I’m adding starch to both sides and ironing both sides, but the iron doesn’t burn the starch since I’m pressing from the opposite side. The starch makes the fabric stiffer so that there’s less stretch while manipulating it.

Check out this short video on how I starch and press my fabric:

Share Your Fabric Pull

Once you’ve decided on which fabrics you’ll use, be sure to tag us on instagram @christaquilts  and @quiltachusetts and use the search hashtag #infrastructurequilt so we can all admire your pretties!!

You can also share pics in my ChristaQuilts Facebook group and ask questions as you are getting ready. We’ll dive in and make Row 1 next week and I can’t wait to see your progress!

Enter the Givewaway!

Head over to Heather Black’s blog at Quiltachusetts to see which fabrics she’s working with and enter this week’s giveaway. The prize is a copy of EQ8 software from Electric Quilt! I use EQ8 for ALL of my quilt designs. In fact, I was able to take Heather’s original sketches, redraw them in EQ8 and easily recolor the quilt pattern using swatches of Geo Pop.  Now I can’t imagine making quilts without it!

Electric Quilt 8

Important Links

Infrastructure Kit

Infrastructure Prize Sponsors, Giveaways, and Geo Pop Digital Download

Infrastructure quilt along begins next Monday, Sept. 9th so today is a great time to tell you about our sponsors! My co-host Heather Black (aka Quiltachusetts) has rounded up some fabulous prizes that will be given away on her blog each week.

Infrastructure Sponsors

Because Heather is super organized (like me) she’s scheduled out the prizes for the entire quilt along. Check out the schedule below and be sure to head over to each company’s website to give them some love!! I can’t wait for you to see what’s up for grabs each week!!

Click here for the Infrastructure quilt along schedule & supply list.
We can’t wait!!
Infrastructure QAL

Geo Pop Digital Images Available from Electric Quilt

For those of you who love and use Electric Quilt software like me, you can now download digital images of Geo Pop right into your program. Each month, my friends at EQ offer a images of a brand new line for free, so this is a great time to play around with the fabric swatches and make virtual quilts to you heart’s content!

Click here to get Geo Pop digital images.

Geo Pop EQ

From now until the end of the year you can use the promo code GEOPOP to receive 20% off their whole site, including 20% of the EQ quilt design software!

Infrastructure Supply List and Quilt Along Links

Click here to be notified about the QAL each week via email.

Are you excited to make Infrastructure? Heather Black and I will both hosting the quilt along and sharing tips and tricks for making the quilt on our blogs each week. See below for the supply list along with links to all of the quilt along posts as they go live.
Infrastructure Quilt

Infrastructure designed by Heather Black of Quiltachusetts, pattern written by Christa Watson

Infrastructure Supply List

Infrastructure Quilt Pattern:
Recommended Ruler Set:

Tri Recs Tools


Fabric Requirements:

Infrastructure Supply List

Other Recommended Supplies:
  • Natural fiber batting such as Hobbs Cotton or Wool
  • Olfa Rotary Cutter with brand new blade
  • Cutting mat and a variety of acrylic rulers
  • 505 basting spray if you choose to spray baste your quilt
  • Sewing machine in good working order
  • Brand new needle
  • Hand sewing needle and thimble for binding by hand
  • Thread for piecing and quilting – I recommend my Aurifil 50 weight thread kits
  • ***If using a die cutter instead of the ruler or included template, I recommend the  Accuquilt Triangle in a Square 4″ Finished Square Die # 55409***

Piece and Quilt Collection Aurifil Thread by Christa Watson

Click here to get my Piece and Quilt thread collections from Aurifil.

Alternate Color Way in Solids

Heather will be making her version using Superior Solids by Benartex.

Infrastructure in Solids by Heather Black

Click here to follow Heather on her blog at Quiltachusetts

Infrastructure Quilt Along Schedule

Both Heather and I will share our process as we make the quilts. She’ll be custom quilting hers on a longarm machine and will bind by machine. I’ll be quilting mine using a decorative stitch with my walking foot and will bind by hand. Links to both of our blogs will go live below after each step has been posted.

Infrastructure QAL

Share Your Progress on Social Media

We can’t wait to get started! So gather your fabrics and get ready to make a complete quilt from start to finish!!

Infrastructure Kit

Click here to get the Infrastructure Quilt Kit while supplies last.

Bling Quilt Part 3 of 4 – Making the Quilt Top

Now it’s time to take those yummy cut up pieces from Geo Pop and sew them together into a quilt! Although I’m making two versions of Bling at the same time, it’s really not that much extra effort to do double the amount of sewing! This is a quick overview of my process – please purchase a copy of the Bling quilt pattern for more detailed instructions.

Geo Pop Cutting in Progress
Bling Fabric Cutting in process

Cutting in progress for both version of Bling – in black or white

Geo Pop Fabric

Click here to get Geo Pop fabrics, kits, precuts and coordinating patterns.

Thread Tips

When choosing thread for piecing, I prefer to use Aurifil 50 weight cotton from one of my 3 thread collections. When sewing with lots of colorful prints like Geo Pop, I’ll choose a lighter color when sewing with the light background, and darker colors when sewing with the dark background. I’ll use the same color in top and bobbin or similar shades.

Aurifil Thread and Geo Pop Fabric

Because these quilts were so colorful, I was able to use up some leftover spools and bobbins while piecing. I sew with a shorter stitch length (2.0 instead of 2.5) and I press my seams open so that everything will lie flat. The shorter stitch length also prevents the stitches from showing through the seams.

Aurifil Thread and Geo Pop fabric

Click here to checkout my Aurifil thread collections – Colors, Neutrals and Variegated.

Sewing the Blocks

The block that forms the Bling quilt is actually very versatile. First take a look at the finished sewn blocks using both background colors below.

Bling Block White

Look at those beautiful seams pressed open!!

Bling Blocks

Each block in the quilt pattern uses the same background fabric and then two fun colorful prints.But look at the other options you could try! You could rotate the unit placement to create a slightly different block:

Geo Pop Bling

Or you could make the block a bit scrappier if desired.

Geo Pop Bling

However, you make it is it up to you – because you are the boss of your quilt!!

Piecing the top

Although my usual method is to sew blocks into rows, you can actually sew groups of 4 into larger blocks for easier handling.

Geo Pop Bling

Geo Pop Bling

Once the blocks are all sewn, the quilt top goes together very quickly. The pattern even includes several alternate layouts for you to try. I use my design wall to help me keep the blocks arranged just how I want them. You could also take a picture with your phone to refer to!

Geo Pop Bling

Click here for my design wall tutorial.

Quilt in Progress on Design Wall

I love quilts that show off the fabrics, and Bling was sooo fun to make! Stay tuned for the last segment where I talk about the machine quilting (my favorite part!!)

RELEVANT LINKS:

If you’ve enjoyed these helpful tips and tricks, pleas consider supporting me by purchasing my quilt patterns, fabrics, and other supplies.

The Making of Bling Quilt Part 2 of 4 – Cutting the Fabrics

I’m working on both versions of my Bling quilt at the same time, so it will be double the fun! If you remember from my last post, I’m making the same design and using the same Geo Pop fat quarters for both quilts, but one will have a white background and the other will have a black background. Any colorful prints will work as long as you have contrast between your fat quarters and background fabric.

Geo Pop by Christa Watson

Geo Pop Fat Quarter Bundle – I love working with my own fabrics!

I have more fabrics than I need since the pattern calls for just 20 fat quarters, and Geo Pop includes 25, so I’m going to save the leftovers for another project. Of course, you could use the extra fabrics for some of the blocks, since each print will be repeated in more than one block.

Washing and Starching

First, I separated the fabrics into lights and darks and then pre-washed everything on cold, using several Color Catchers in the wash. Even though this is premium quality fabric I’m working with, I still like to wash to preshrink it and wash out any excess dye so there’s no chance of bleeding when I wash the quilt later. I starched the fabrics by spraying the back side with inexpensive Faultess Premium Starch from the grocery store,  and then pressing from the front side. I repeated for both sides of the fabric.

Bling by Christa Watson of Christa Quilts

Click the image above to enlarge

Click here to purchase the Bling quilt pattern – paper version.
Click here to purchase the Bling quilt pattern – PDF version.

Cutting the Units

See the quilt pattern for specifics on cutting each of the prints.

Even though I design, test, and make all of my own quilts myself, I always write the pattern first, then follow my own instructions to make sure I haven’t missed anything as I go. I love when quilts are easy to cut out. The block units are all cut from fat quarters and the background is all cut from one fabric – light or dark.

Because I had a lot of fabric to cut, I made sure to layer 4 fat quarters at a time, and fold my background fabrics into 4 layers so I was cutting more at the same time. In a pattern like this, you don’t have to worry too much about directional prints, because they can randomly go in any direction.

Geo Pop Fabric for Bling Quilt by Christa Watson

Cut Block Pieces – with White Background
Click here to purchase yardage of Op Squares White

When dealing with large pieces of fabric, like my white or black background, I’ll cut off smaller chunks like a yard or two to work with. There’s enough so that if I lose an inch or two by squaring up the fabric, it won’t make that much of a difference.

The white version will have a scrappy binding and the black version will use the same binding as the background fabric. Here’s a tip: although the pattern calls for the standard  2 1/4″ wide strips, I actually cut mine out 2″ wide so I get a super skinny binding that’s the same side on front and back.

Geo Pop fabric for Bling quilt by Christa Watson of Christa Quilts

Cut Block Pieces – with Black Background
Click here to purchase the Bling Quilt Kit in White or Black

Now everything is ready to sew! Stay tuned for the next post where I’ll sew them up into two fun and colorful quilt tops. Click any of the links below to purchase supplies to make these quilts.

Bling Quilts with Geo Pop

RELEVANT LINKS:

The Making of Bling Quilt Part 1 of 4 – Choosing Fabrics

I enjoy sharing my process of quilt making so that you can have more success when you make your own quilts. Over the next 4 blog posts, I’ll share my process for making Bling – one of my newest patterns featuring my 4th fabric collection – Geo Pop for Benartex/Contempo. Of course it would look great in any fabrics, which is what today’s topic is all about.

Bling Quilt Pattern by Christa Watson

Bling Quilt Pattern by Christa Watson

I love this design for Bling, and especially enjoy making fat quarter friendly quilts. When choosing fabrics, the easiest way to choose colors for a successful quilt is to pick a whole bunch of fabrics that you like with the same theme or color scheme, then pair them up with a highly contrasting background fabric.

Geo Pop fabric by Christa Watson

Geo Pop fat quarters for Bling.

For example, I knew I wanted to use as many fabrics as I could in the line and most are all very bright. So bright, bold, and geometric was my fabric “theme” for this quilt.

Because there’s a lot going on with the fabrics themselves, I paired them up with the lightest fabric in the line and the darkest fabric in the line to ensure there was contrast between the main fabrics and the background. I honestly couldn’t decide which I liked better, so I decided to make both quilts!

Geo Pop fabric by Christa Quilts

I used Tiny Hex black for the darker background and Op Squares white for the lighter one.

For me, fabric selection really is that easy. I don’t get hung up too much on color theory; rather I just go with my gut feeling. After all, most of us are pretty successful choosing what to wear each day, so choosing the colors our quilts will wear isn’t that much different, right?

Geo Pop by Christa Watson

Geo Pop – 20 Colors for Bling.
Click here to get the kit of 20 FQ’s plus background fabric.

My Bling quilt pattern calls for 20 fat quarters + 4 yards of background fabric for the Twin size that I’m making. Geo Pop has 25 prints in the line including several light and dark grays. To ensure I had the most contrast possible, I pulled out the 5 light and dark grays and just use the more colorful prints. I’ll plan to use the leftovers in another project, or add them to my stash.

Geo Pop by Christa Watson

I pulled these grays out of the bundle and will use them in another project.
You could also piece them into the back of the quilt.

For the white version, I’m using some of the leftovers to make a scrappy binding that frames the quilt. For binding on the black version, I’ll use the same fabric as the background so that the the negative space goes all the way to the edges – two slightly different looks for two great quilts!

Geo Pop by Christa Watson

Geo Pop full collection – 25 colorful prints!

The first step after choosing fabrics is to prewash and starch. I always prewash any fabric that’s a fat quarter or larger. My favorite starch is inexpensive Faultless premium starch from the grocery store. To prevent flaking, I spray starch on one side of the fabric, and then iron it from the opposite side, then repeat for both sides of the fabric.

In the next post, I’ll show you these lovelies all cut and ready to piece, so stay tuned!

Relevant Links:

***Thanks for your purchase – your support of our mom and pop shop makes my day!!***

Fandangle Grays + Color Weave Kits + Other Faves Back in Stock!!

Welcome to a “virtual” quilt show of many of the quilts I’ve made in the couple of years since I began designing fabric!Color Weave Quilt

Color Weave photographed in my neighborhood desert of Las Vegas.

I’m so pleased with the reception that my fabrics have been getting. Although I always encourage you to buy my things from your local quilt shop first, I realize not everyone has access to a shop nearby, and not all shops carry my fabrics, books and patterns (yet!!!) So I try to keep a supply on hand just in case you can’t get them locally.

Geo Pop Fabric

Click here to get yardage, precuts and kits of my fabric collections.

Today I’m excited to announce that I just got in more of the Gray fabrics from my second line – Fandangle. These prints are called “Confetti Crosshatch” and have been selling like crazy for over a year now. I’m so happy that Benartex will reprint hot-selling fabrics as long as there is demand for them. It took a few weeks for them to get reprinted overseas and then shipped back here, but I’m happy to say they are back in stock!!

Fandangle Confetti CrosshatchClick here to get Confetti Crosshatch in 4 colorways: light-dark grays/red/pink.

What that also means is that my custom quilts kit that have they grays in them are available once again. My most popular “Color Weave” quilt kit now comes in 2 versions:

The original Color Weave Kit featuring Abstract Garden strips with light/dark gray background, shown below:

Color Weave Quilt

And the second version of Color Weave I’m currently making: with Fandangle precut strips, light gray Confetti Crosshatch and black Tiny Hex (from Geo Pop). I honestly can’t decide which one of the two like best!!

Color Weave Fandangle

Speaking of other popular kits, I was able to get more of the Modern Marks Navy Herringbone print too – which is featured prominently as the background of my Blooming Wallflowers kit, shown below. Blooming Wallflowers quilt

Modern Marks by Christa Watson

More Kits!!

A few other popular kits that I’ve restocked are shown below. You may have a hard time deciding which one to make next!!!

Beaded Lanterns Finished Quilt

Squiggles by Christa Watson

Dot 'n Dash quilt by Christa Watson

Sparkling Stars quilt by Christa Watson made from Fandangle fabric

free-motion detail by Christa Watson

Surplus Strips Warm by Christa Watson

Most of the kits I’ve shared on this page have a free quilt along that you can follow to help you make the quilt from start to finish!! Click here for ALL of my quilt along tutorials. But be careful – you may go down a rabbit hole for hours!!

Remember, if you need help on basic quilt-making techniques, or advice on how to quilt it – be sure to pop over to my Facebook group and share an image of your quilt in progress and ask away. There are thousands of other enthusiastic quilter just like you excited to cheer you on in your journey!!

LatticeWork Quilt Part 2 of 2 – Quick and Easy Walking Foot Quilting

If you missed it, click here for part 1 – tips on sewing the LatticeWork quilt top.

LatticeWork quilt by Christa Watson

LatticeWork is made from charm packs; I used my Abstract Garden fabric line.

Today I’ll be sharing how I quilted my LattticeWork quilt using a super simple, fast and fun walking foot quilting design. It’s called “wavy grid” and it’s one of my fave designs when I’m on a deadline, so you’ll probably see it in lots of my quilts!

Here’s a close detail shot of what it looks like quilted with my Aurifil Variegated Thread collection. I love the funky modern texture it adds to the quilt, especially where the thread contrasts the most:

LatticeWork Quilt Detail

The most fun part about machine quilting is choosing which thread color I’m going to use to quilt it. Because this quilt was so colorful, I could have used nearly any hue and it would look great. Below are the colors in my Variegated Collection.

Variegated collection by Christa Watson

Variegated collection by Christa Watson

Click here to get my Aurifil Variegated Thread Collection.

I chose to go with the cheddar/orange color because the variegation is really subtle and it reads as one shade of orange. But I love the slight sparkle that the it adds to the quilt!

Wavy Grid Quilting Detail

How to Quilt a Wavy Grid

Because I’m quilting continuous lines all the way across the quilt from edge to edge, it’s easiest done with a walking foot (or a built in dual-feed system like I’m using on my BERNINA 770 QE). The idea is to quilt a “line” from one end of the quilt to the other and slightly rotate the quilt from side to side to form the wavy lines.

First I do what I call “anchor” quilting: stitching in or near the ditch along the major seam lines to secure the quilt. Then I made additional passes across the quilt in both directions, creating a wavy grid. With each pass across the quilt, the gap in between the lines shrink. You can quilt a 2″ grid, 1″ grid, 1/2 grid, etc. depending on the look you want. Notice that nothing is marked – I just eyeball the spacing and it ends up looking great!!

Here’s a 4 minute silent video of me quilting the wavy grid on my LatticeWork quilt. I’m still getting the hang of editing videos but this is a good start!! Notice how I make one path across the quilt in both directions, then keep subdividing the area until the grid gets to the size I want. I hope you enjoy it!!

In the video above, notice how I stop and shift a lot. I’m quilting the area near my hands which is only a few inches at a time. When I feel like I’m starting to reach, that’s when it’s time to stop and shift the quilt. But you’ll get the hang of quickly so it’s not too disruptive.

I’m also quilting from edge to edge into the batting so I don’t have to worry about tying off my threads. I’ll just trim the excess and cover it all with binding when finished.

If you’d like to make this quilt , click either of the links below to purchase the pattern in your favorite format. I appreciate your support of my small mom and pop shop!

Lattice Work Quilt Pattern

If you have any questions about this quilt in particular, or the machine quilting process in general, please ask them in the comment box. I’d love you to enjoy making this quilt as much as I did!

LatticeWork quilt by Christa Watson

Happy piecing and quilting!!

LatticeWork Quilt Part 1 of 2 – Making the Quilt Top

While we wait for my next quilt along to start, I thought I would share some “making of” blog posts. Think of them as process posts rather than full-on quilt alongs. Because I’m usually sewing on a deadline I have to make my quilts months ahead, but when my fabric and patterns are finally released into the world, my favorite part of the process is sharing behind the scenes of them being made.

LatticeWork quilt by Christa Watson

LatticeWork by Christa Watson, 74″ x 82″ made from Abstract Garden 5″ Squares + background
Click here to get the LatticeWork quilt kit (while supplies last)

So without further ado, I’d like to introduce you to LatticeWork, made from Charm Squares + contrasting background fabric. I made my version using my Abstract Garden fabric line, but of course it works well for any set of precut squares.

Cutting the Fabric

Because this quilt is mostly made from precut squares, there wasn’t much cutting. The pattern comes in 3 sizes and calls for 1, 2, or 4 standard size 5″ charm packs. I made the throw size above, from 4 Abstract Garden 5″ square packs, but you could also use precut 10″ squares and cut them down.

Or how fun would it be to mix and match precut packs, or create a custom bundle from your scrap pile? Anything goes with this quilt. As long as you have good contrast with the other 2 fabrics (black and grey in my version) it will look great!!

latticework cutting

You can make this quilt quickly and easily from my quilt pattern. Click the links below to purchase it in your favorite format:

Sewing the Rows

The only tricky part about this quilt is that you sew the rows with the black lattice and then cut off the extra to get nice straight edges. But I have easy to follow diagrams in the pattern so you won’t get lost. It’s very meditative for me to put up the pieces on my design wall and sew them together methodically. Here are a few in process shots of the top going together:

LatticeWork Making Of

My design wall allows me to lay out the entire quilt while sewing!

Whenever I sew scrappy looking quilts, I don’t spend too much time arranging the fabrics. As long as I don’t have 2 of the same fabric next to each other, I’m good to go. Most of my quilts are bright and colorful anyway with at least 20 different fabrics, so I don’t over-think it.

LatticeWork Making Of

Working with setting triangles isn’t tricky once you get the hang of it!

As you can see above, I don’t always lay out my quilts completely straight, but no biggie – it all sews together straight and that’s what matters!

LatticeWork Making Of

Those extra black tips will get trimmed away before adding the floating border.

Here’s a tip when lining up lots of rows without intersecting seams: fold over each previous row until the sashing lines up. Then pin like crazy to keep it from shifting.

Lining up the rows

Make sure each lattice row lines up before sewing. 

The last step before adding the final floating border is to trim up the corners and sides. Get the biggest acrylic rulers you can to help with this!

I forgot to get a picture of the finished quilt top before I basted it, but in part 2 I’ll share how I machine quilted it using one of my favorite fast and easy walking foot designs. Stay tuned!

Lattice Work Quilt Pattern

Part 2 – Machine Quilting will be available later this week so stay tuned!