Writing Book 4 – Part 2: Contract Accepted, Work Begins

If you are new to my blog, I’ve begun documenting my progress as I write a book from start to finish. In my last post, I discussed the book proposal process, so be sure to check that out! I’m currently working on my fourth book, and kinda maybe sorta know more about what I’m doing this time around. Just kidding about the “sorta” part, but it’s always a learning process, for sure!!

Christa Watson Books

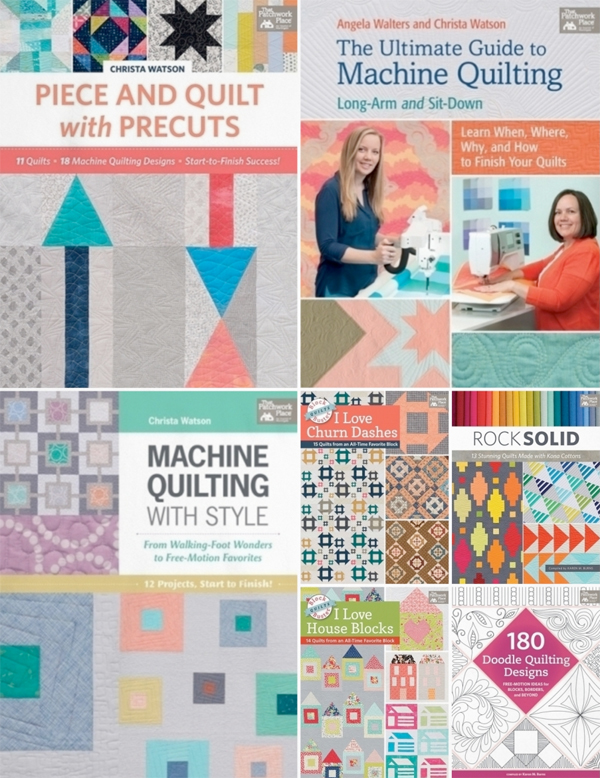
I’ve written 3 books on my own and have been featured in numerous collaborations with my publisher Martingale/That Patchwork Place, a few of which are shown here.

So here’s what’s happened so far. After I submitted my proposal back in April of this year, I met with my publisher in person in May at Spring Quilt Market 2018 in Portland, OR. I had an in-depth meeting with the acquisitions editor and content editor to nail down the specifics of what the new book will be about (machine quilting – duh!!)

I had originally wanted to go in one direction with the book, but when they pointed out that some of the content I wanted to include was already covered in my first three books, they helped me narrow down my focus and solidify the overall direction for this new book.

Martingale Collaboration Books

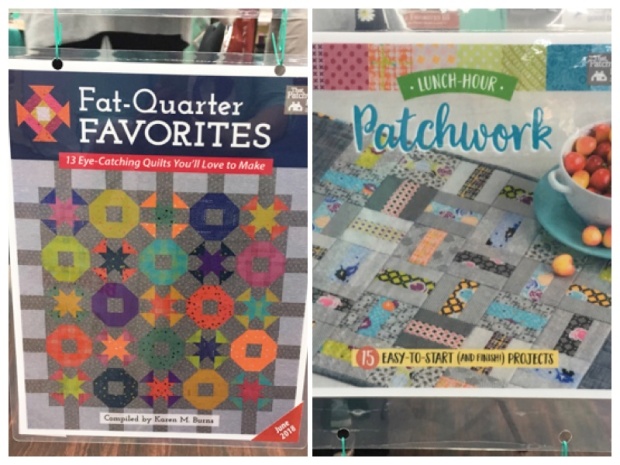
Two new Martingale titles that debuted at Spring Quilt Market include Fat Quarter Favorites, featuring my quilt on the cover, and Lunch Hour Patchwork which includes my modern mini.

A couple of months after our meeting at market, Martingale offered me the formal contract in writing, which of course I accepted, and I made myself a time line/to do list of all the steps I’ll need to finish on time.

The first section of the book isn’t due until the next February and the final manuscript, instructions, and samples are due by the end of summer 2019. I’m thrilled because this will give me plenty of time to create the book along with other new and exciting projects I have in the works.

The most wonderful part about working with a publisher is that although I create all of the content, including “placeholder” photos and illustrations, Martingale has a team of professionals who photograph and illustrate everything based on my images. I love it when they take what I create and make it look even more beautiful!

Publishing Agreement for my Next Book

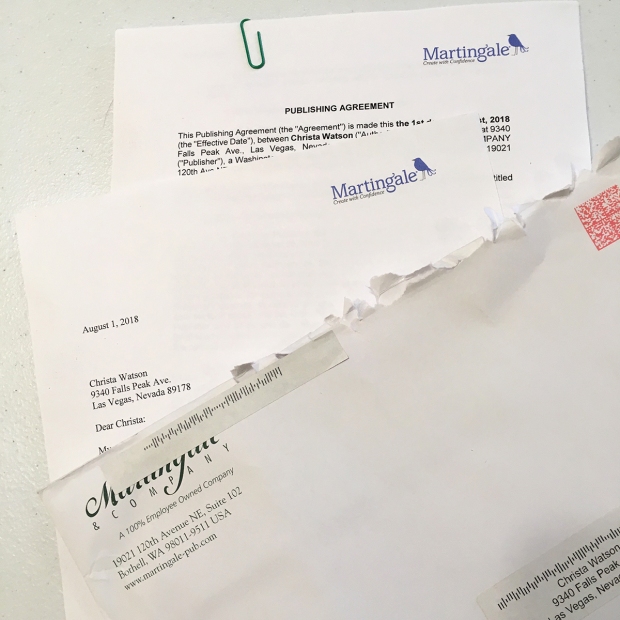
Happy mail! Getting the contract in the mail is always an exciting day!

Book 4 (as I will be calling it until the cover art is finalized) is slated to be 96 pages which is the same length as my most recent book Piece and Quilt with Precuts. Of course that can change depending on final editing, and it’s due to be published in September of 2020 (also subject to change). I have a working title for the book, but even that can be tweaked.

As an example, for my first three books, the publisher named the first two while I titled the third. I have a feeling that the title for Book 4 is something we both are in agreement on! (Sorry for all the teases, but I’m giving away only as much as I can at this point.)

I can’t say enough about how excited I am to work on this new book. It’s actually something that many of my students have been asking for, so I love being able to meet their needs. And the best thing about machine quilting is that it’s timeless: the ideas I create now will be just as relevant in two years when the book is available for sale. Even though that seems like a long way off right now, I know that time is going to fly!

Christa at Quilt Market 2015

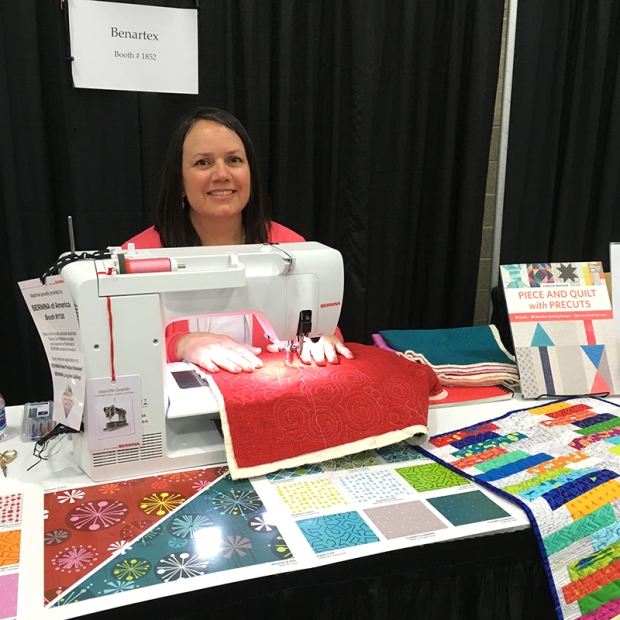
Doing a demo for my first book at quilt market in 2015

While I can’t discuss the specifics of my contract, I can tell you that royalties are based on the wholesale price of the book, and I will also have the opportunity to purchase them wholesale myself. In fact, most authors who sell their own books make more from direct sales of their books than they do in royalties, so it’s something to keep in mind if you are considering writing a book, or purchasing a book directly from the author.

Now the real work begins. The toughest part for me is balancing out my workdays so that I work on my book a little each week, rather than trying to cram in everything right before the deadline. I’m currently planning in detail everything that needs to be done, and my publisher was fabulous to work with on the timing, since I let them know I wouldn’t really be able to start on it in earnest until after Fall Market later this year.

Machine Quilting Demo

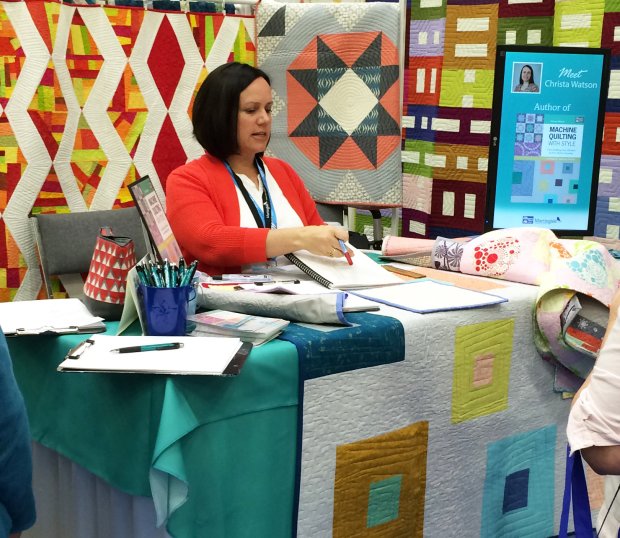
Machine quilting demo to promote my latest fabric and book at Spring Quilt Market 2018. I will be doing lots and lots and lots of quilting over the next few months. I can’t wait!

I have to be honest and say it’s been nice to have a two year break from book writing, since work on my previous book was completed in 2016, a full year before the publish date. But now I feel refreshed, re-energized, and excited to dive into the new work! I’ll be sure to keep you updated on my progress, and will share a few sneak peeks as I can, so stay tuned!

In the meantime, if you have questions about the book writing process, please ask away in the comments below. If there’s enough interest, I’ll be glad to do a separate blog post devoted to answering your questions about anything I haven’t covered so far. I love sharing what I know and inspiring others to reach their goals, no matter how big or small!

Dot ‘n’ Dash Quilt Along Begins August 17

Are you ready? The Quilt Along for Dot ‘n’ Dash kicks off next week on Friday, August 17th!

Dot 'n Dash quilt by Christa Watson

We had fun photographing the finished quilt at the beach.
Dot ‘n’ Dash Finished Size 60″ x 72″

On that date, I’ll share the complete quilt-along schedule and there will be plenty of time to gather your materials, share the fabrics you’ll be working with and get to know everyone else who’s participating.

Kits Available for a Limited Time

Dot n Dash with Fandangle Light Gray

I’m offering two versions of the Dot ‘n Dash Quilt Kit – with either a light or dark grey background. Both will look fantastic, but I only cut a limited number, so grab one before they’re gone!

And don’t forget to grab a copy of my book, Piece and Quilt with Precuts for the instructions you’ll need to follow along.

Click here to purchase the Dot ‘n’ Dash Quilt Kit while supplies last.

Dot n Dash quilt with Fandangle Dark grey

You’ll notice in my finished version I didn’t include any of the light gray strips in the blocks as shown above. I think it looks great either way. There’s enough fabric that you can customize it however you like!

Materials List

Click here to get coordinating yardage of Fandangle

I can’t wait to cheer you on as we make this quilt from start to finish. I’m going to cover all the basics from cutting, to pressing and piecing to sewing the backing. And then we’re going to baste, quilt and bind it. So if you follow along each week, you’ll have a finished quilt by the end of the quilt along!

Machine Quilting detail on Dot n Dash

I’m excited to teach you two fun new quilting designs based on the designs in my book!
Click here to get your signed copy of Piece and Quit with Precuts, shipped asap.

And not to worry if you join later: you can work at your own pace, and the quilt along posts will stay up indefinitely! To follow along, make sure you are subscribed to my blog so you get an email each time a new post have gone live.

(To subscribe – add your email in the box on the side bar on the right. If you are viewing this from a mobile device, you’ll need to scroll ALLLL the way to the bottom of the screen to find the subscribe box.)

Machine Quilting on Dot n Dash

Be sure to join my Christa Quilts Facebook group to share pictures of your quilt in progress, and use the hashtags #fandanglefabric and #dotndashqal on instagram to share your work!

EQ Design Challenge: Design a Quilt with Fandangle – Win the Fabric to Make It!

For all of my Electric Quilt loving friends out there, I’ve teamed up with Benartex and EQ to bring you a fun challenge this month! Use any of the fabrics from my latest collection Fandangle to design a quilt you’d like to make using EQ7, EQ8, EQ Stitch, or EQ Mini.

Click here for complete contest details and entry.

Fandangle Fabric by Christa Watson for Benartex Contempo Studio

Fandangle collection by Christa Watson for Benartex Contempo Studio

Three winners will each win the fabric they need to make the quilt! Complete details along with the link to download the Fandangle fabric swatches are over on the EQ blog today, so check it out! The contest will run through the end of the month.

Electric Quilt 8

I personally love using EQ8 to design all of my quilts because I usually have to design and write all of my quilt patterns for any new fabric collection months before I get the fabric. EQ makes it easy for me to see exactly how my finished quilt will look before I even make the first cut!

Fandangle by Christa Watson

If you are on instagram, be sure to also share your designs using the hashtags #fandanglefabric and #eq8. I can’t wait to see what you create!

EQ design challenge

Finished Quilt – Sparkling Stars

I’m excited to finally share “glamour” shots of my finished quilt Sparkling Stars which  was made to showcase my latest fabric line – Fandangle – from Benartex Contempo Studio.

Click here to purchase the kit to make this quilt.

Sparkling Stars Quilt by Christa Watson

I design all of my quilts in Electric Quilt so that I know exactly how they are going to look with the chosen fabrics. The EQ design is shown above left. The finished quilt is above right.

My favorite thing about this quilt (besides the fabric of course) is the quilting design I chose. I quilted it with a large continuous spiral. This is one of my favorite designs to quilt with a walking foot or dual feed.

Spiral quilting detail

I teach how to quilt the continuous spiral design in my book Machine Quilting with Style, and also in my Craftsy class, The Quilter’s Path.

This quilting design is super fun and fast to quilt and it’s hard to go wrong! I used a variegated Aurifil 50 weight thread to add a little something “extra” to the quilt.

Walking foot quilting large spiral

In these extreme closeups the slight wobbles give the quilt interest and when you step back to admire the quilt, all you see is amazing texture!

Spiral Quilting on Sparkling Stars

Below are some more pictures we took while on a recent family vacation at the beach. We love taking long walks and exploring our surroundings to scout out scenic locations.

Sparkling Stars Quilt by Christa Watson

It was Jason’s job to climb to the edge of this rocky cliff and style the quilt. All the while I was holding my breath, hoping the wind wouldn’t catch the quilt and toss it into the sea!!

Sparkling Stars quit photography

Just imagine how peaceful this was, the waves breaking on the rocks, and us enjoying mother nature at it’s best! Every now and then a wave would splash on the rocks., but fortunately we were high enough up  that the quilt didn’t get wet.

Sparkling Stars Quilt by Christa Watson

I love how the wind blew the quilt so that it naturally folded on itself.

The bright colors really stand out against the gray ocean, charcoal colored rocks, and even the sandy beach.

Sparkling Stars Quilt by Christa Watson

One of our favorite vacation spots is Hermosa Beach, California, and I think I need to go on lots more adventures just so we can take more pics of my quilts in scenic locations!

Sparkling Stars Quilt by Christa Watson

Click here to get the Sparkling Stars quilt kit – (only a few left!)

Sparkling Stars Finished Stats

Sparkling Stars Quilt Pattern

Click here to purchase Fandangle fabric for a limited time.
Click here to view all of my quilt patterns for sale.

Sparkling Stars Quilt by Christa Watson

Links to additional information about this quilt

Click here for the making of Sparkling Stars part 1
Click here for the making of Sparkling Stars part 2
Click here for the making of Sparkling Stars part 3

Creative Spaces Blog Hop Week 1 – My Sewing Room

Welcome to Week 1 of the creative spaces blog hop! Scroll to the end for links to everyone who has posted about their spaces this week – I’m sure you’ll love it, be inspired, and hopefully, feel good about your own creative space!

Creative Spaces Week 1

This week, we are blogging about our sewing spaces, and sharing before and after pics.

I like to keep a tidy room, but whenever I travel, things can become a hot mess. I’m usually trying to finish up some deadline at the same time and my sewing space can often look like this:

I have a big space in our upstairs loft area. There’s a big table in the middle where I do most of my computer work, cutting and organizing of projects. It tends to attract all the mess when I’m in a hurry to leave on a big trip.

When my studio is tidy and clean and I’m able to efficiently use every space, it looks more like the image  below (taken a couple of years ago for a feature on someone else’s blog):

Christa's Sewing Room

I’ve got a quilt under the machine on the back wall with another quilt top on two tables in the middle of the room. My design wall on the right is big enough to hang a large quilt top. It now doubles as my basting area and my photography studio.

I can fit a full size ironing board with a big board on top, and there’s a desk where my daughter can also sew if she’s interested. You can barely see the couch peeking behind the railing where I like to drape a couple of quilts in progress.

Photographing Sparkling Stars Quilt

Jason does all of the flat photography for me since that’s definitely not my skill set.
Here he’s photographing Sparkling Stars, my newest quilt pattern featuring Fandangle.

Probably my favorite thing in my sewing room is the design wall because I use it all the time. Whenever I’m working on a new quilt, or even a new fabric line I’ll hang up whatever I’m looking at and step away, to see what it looks like at different angles.

It also servers as my photography studio to take flat shots for pattern covers. We (meaning Jason) build the design wall back in 2013 the last time I did a major studio renovation. You can read about our process here.

Clean Sewing Room

I’m lucky to have a large space with enough room to put everything away when I clean up.

My least favorite thing in my sewing space is the hand-me-down wooden entertainment center. It doesn’t match anything in the room, but it was free and fits the space well. It also holds a ton of stuff, including our big ugly office printers (one for black and white printing & labels – the other for color printing.)

One of my goals during this six week blog hop is to replace that ugly brown monstrosity with something nicer from Ikea. We recently got one in our town, and it’s sad that I haven’t even been there yet! But I’m hoping I can assemble a series of smaller units and bookcases (in white) that will make the space look a whole lot nicer! I’d also like to replace my plastic work table with a taller table on wheels that I can use for cutting.

Christa Quilts

I’m definitely in my happy place when I can quilt in a clean, organized room. My sewing machine is against a wall with a window so that I have lots of natural light steaming through while I quilt during the day. My favorite thing to do is listen to a podcast or audio book while I quilt. It relaxes me and I can get into a good flow while I work.

Other Stops on the Hop

Be sure and visit these other stops on the Creative Spaces Blog hop and see how my quilty friends deal with taming their creative spaces:

Mondays

Tuesdays

Wednesdays

Thursdays

Fridays

Saturdays

Sundays

Creative Spaces Blog Hop


Kits for and fabrics for my Craftsy Classes are now Back in Stock

Many of you have asked me when Craftsy will offer more kits for my beginning class: Startup Library – Quilting. The good news is that they are available once again! The first round of kits performed so well, that they finally ran out of fabric using the original prints so they decided to re-kit it with a similar collection with the same look and feel of the original.

Click here to check out Startup Library: Quilting

Friendship Stars quilt by Christa Watson

Click here to get the Friendship Stars Quilt Kit

Although you can certainly get the kit without the class (it comes with a detailed pattern), you can also get the class and make your own version using any fabrics you choose.

This quilt was super fun and fast to make because the blocks are simple to piece and the quilting is easy enough for a beginner to handle. I quilted the remake using the same quilting plan as the original and the class includes step by step tutorials on how to quilt it the same way shown here:

Friendship Stars quilt by Christa Watson

In the class I go over how to quilt gentle wavy lines with your walking foot, plus two fun and easy to learn free-motion designs: stipple and continuous curves.

As a recap, here’s what the projects look like for my other two classes:

Click here to check out Startup Project: Starry Path

If you’ve already tackled Friendship Stars and want to go to the next level, kits are also available for my followup class: Startup Project – Starry Path Quilt. It was fun to try out a completely different color scheme and expand my repertoire of star blocks!!

Starry Path Quilt by Christa Watson

Click here to get the Starry Path Quilt Kit

Click here to check out The Quilter’s Path

I made three versions for this class to show how to quilt with a walking foot, free motion – or both! It’s fun to see how the same design looks in different fabrics, with different quilting!

Pinwheel Quilts from The Quilters PathFabric selection for this class is super easy – just pick two jelly rolls in colors that you like.

Enroll in My Classes at Your Convenience

My Craftsy classes are available for you in two ways – either a la cart where you own it forever, or you can sign up for Craftsy Unlimited which gives you 24/7 access to all three of my classes as long as you continue with your subscription. Either way you view – you have unlimited access to me when you take any of my classes, and each one comes with a free pattern to make the projects featured in the class! Here are the relevant links below:

And remember – I’m here to help you each step of the way so you can enjoy making a complete quilt from start to finish as much as I do!

Friendship Stars Quilt by Christa Watson

Click here to get the new Friendship Stars Quilt Kit

Save the Date – Next Quilt Along for Dot ‘n Dash Launches in August

Earlier this year in my Facebook group we were discussing the idea of doing another quilt along this summer/fall. Well guess what – after organizing my schedule for the remaining year, I have room to squeeze one in and I’d love for you to join me!

Dot ‘n Dash recolored in Fandangle Fabric

Dot 'n Dash Quilt

Starting on August 17 and each Friday for several weeks (to be determined) we’ll make my Dot-n-Dash quilt pattern from my book Piece and Quilt with Precuts. The best thing about this quilt along is that many of you already have the book from my previous Squiggles quilt along.

Piece and Quilt with Precuts by Christa Watson

If you haven’t yet grabbed a copy of the book, you can get a signed one here! The other best thing is that just like my previous quilt alongs, we’ll make the whole quilt from start to finish.

I’ll be re-making my version of Dot-n-Dash using my brand new Fandangle fabric and am offering kits for a limited time. Click here to pre-order your Dot-n-Dash Fandangle kit and I’ll ship it out as soon as the fabric arrives – hopefully by the end of June/early July.

Original Dot ‘n Dash from the Book

Dot 'n' Dash by Christa Watson from Piece and Quilt with Precuts

Above is the original version made by me as shown in the book. Check out these other fabulous versions that friends of mine have made. I just love seeing the same pattern made in a variety of fabrics!!

Dot ‘n Dash made by Cheryl Brickey

Cheryl Brickey Dot n Dash from Piece and Quilt with Precuts

Dot ‘n Dash made by Laura Piland

Laura Dot 'n Dash

Dot ‘n Dash made by Kristin Esser from Modern Marks

Dot n Dash by Kristin Esser

Materials List for Dot ‘n Dash

I’ll be posting the complete schedule on Friday, August 17 but in the meantime, here’s what you need to get started:

  • A copy of Piece and Quilt with Precuts
  • One jelly roll (or 40 precut 2 1/2″ strips of assorted prints – includes binding)
  • 3 yards of background fabric (or a light colored jelly roll – all one fabric, or a mix is ok)
  • 4 yards of backing
  • 67″ x 79″ piece batting

Click here to get the optional kit made from Fandangle fabric.

Fandangle Fabric Strips

I can’t wait to dive into these! I cut my own strips using sample yardage, but the Strippies (Jelly Roll Strips) will be precut and neatly packaged by the manufacturer.

Share Your Work in Progress

I’ll be posting weekly stepouts of my progress with the quilt along with some bonus tips as I make the quilt. I’d love for you to share your progress so I can cheer you on, too. You can do that in several ways:

  1. In my Christa Quilts Facebook group
  2. On Instagram #dotndashqal
  3. Leave a comment and include a link to your own blog or social media images

Dot 'n Dash Quilt

I can’t wait to make this quilt and hope that you’ll join me!

Click here to get the optional kit made from Fandangle fabric.

Whether you’re a brand-new quilter or have been creating for a long time, I’d love for you to join me in this journey! Be sure to sign up to receive an email each time a new blog post goes live by entering your email address in the box on the right hand side-bar (or scrolling ALLLLLL the way down to the bottom of the page if viewing this on a mobile device.) I can’t wait to get started!!

Simple Strips Quilt Along Revisited – Make a Quilt from Start to Finish

Last year I hosted a really fun quilt along as part of my BERNINA Ambassador obligations. (It’s a fun gig by the way – I travel the country letting folks know how much I love my machine which is something I did anyway before I became it became “official.”) So today I thought it would be fun to revisit the quilt along for those of you who are new to my blog, or missed it the first time around.

Simple Strips Quilt Along

Links to the Simple Strips Quilt Along

The quilt tutorials are all hosted on the BERNINA blog at We All Sew and they’ll be there indefinitely, so you can make this quilt on your own schedule, any time you want. Just click the hotlinks below to get each set of instructions for this quick and easy quilt!

Week 1 – Materials List and Cutting
Week 2 – Pieced Quilt Top Tutorial
Week 3 – Wall Basting Tutorial
Week 4 – Decorative Stitch Machine Quilting
Week 5 – Machine Binding Tutorial

I made this quilt before I started designing fabric and it works well with any fabrics you choose, whether coordinated or scrappy. Fabric selection is super simple too – it just requires 20 strips (or 1/2 of a jelly roll) of print fabric and the same amount of background/light fabric.

Simple Strips – Modern Marks

Simple strips recolored with Modern Marks

And just for fun, I wanted to see what it would look like recolored in MY fabric – because as a fabric designer, I wish I had time to make ALL the quilts in my prints, LOL!! The recoloring shown above uses a bundle of the Modern Marks prints plus 1 1/2 yards of the cream/lime Boxes print for background and 1/2 yard of the Navy Herringbone for binding.

Here’s what it looks like recolored in Fandangle, my newest fabric collection. I thought it would be fun to separate the warms and cools for a more curated look:

Simple Strips – Fandangle Warm and Cool

Simple Strips in Warm colorway of Fandangle

This coloring can be made from a fat quarter bundle of Fandangle in warm plus 2 yards of Confetti Crosshatch dark gray for the background and binding.

Simple Strips Fandangle Cool

This coloring can be made from a fat quarter bundle of Fandangle in cool plus 2 yards of Confetti Crosshatch light gray for the background and binding.

Although the instructions for Simple Strips are written using precut 2 1/2″ strips, you can totally make your own bundles from your stash, scraps, or even fat quarters.

Do You EQ? (Bonus Download)

Here’s a bonus for those of you who like to work with Electric Quilt software:

Click here to get the Simple Strips EQ download file to resize or recolor this quilt. (It only works if you have the software installed on your computer.) Because I don’t have all the time in the world to make all the quilts, recoloring them virtually gives me the satisfaction of seeing what it would look like “in the cloth!”

Sharing is Caring

Remember, if you make this quilt or any of my designs for that matter, I’d love to see them! You can email me pics to christa@christaquilts.com, include a link to your own blog or social media in the comments, share pics in my ChristaQuilts Facebook group or tag me @christaquilts and #christaquilts on Instagram.

I hope you enjoy making this quilt!!

Introducing Tic-Tac-Toe on the Cover of Fat Quarter Favorites

I love it when I get to reveal a quilt that I worked on many moons ago! Meet Tic-Tac-Toe, a fat quarter quilt featured on the cover of Fat Quarter Favorites – a new collaboration book from my publisher Martingale/That Patchwork Place that releases today!

Fat-Quarter-Favorites

This was one of those “secret sewing” projects that I worked on last year. I shared a few sneek peeks on my Instagram account while making it so if you scroll back through a year’s worth of posts, you can see some of it in progress, LOL!!

The book features 13 original designs by a dozen different designers all based on fat quarters (plus additional background fabric where needed).

I was in such a hurry to make this quilt that I forgot to take many in-progress pics, but here’s a shot of me “scrunching and smooshing” the quilt through the machine as I quilt:

Scrunching and smooshing to machine quilt

It helps to have a wider throat space on my BERINA so there’s more room for the quilt!

I only saved on detail pic where you can see the quilting while I added and pressed the binding. I quilted it with a dense allover free-motion square spiral design – one of my favorite “modern machine quilting” designs! (It’s similar to “boxes” – another fave design but you go round and round a couple times to get the spirals.)

square spiral design machine quilting

For the pieced design, I played around with the idea of combining blocks that look like X’s and O’s. It took several tries to adjust the proportions so they felt right. The O blocks came pretty quickly, but it took awhile until I was happy with the X blocks. I originally started with bigger center stars and they evolved into the design shown here. I extended the gray lines all the way to the borders to give it a bit more movement and overall I’m pleased with how well it turned out!

Tic Tac Toe by Christa Watson from Fat Quarter Favorites

Tic-Tac-Toe by Christa Watson, 76″ x 76″

Once I have the basic design in place it also takes me a bit to refine the sizes so the fabric yardage is used more efficiently. That’s why a lot of times, you’ll see me do scrappy bindings, so I can use up a bit more of the fun prints in the quilt!

If you like my design click here to see images of all 13 quilts from the book – I’m sure there’s something for everyone!

A Plethora of Stepping Stones Quilts: Student Work from my Latest Workshop

Last week I taught a week-long class at John C. Campbell Folkschool on how to make a complete quilt from start to finish. Everyone made the same quilt from my Stepping Stones quilt pattern – but as you can see in the group pic below, they all look so different – and so fabulous!

Students' Stepping Stones Quilts

A Colorful Plethora of Stepping Stones Quilts

Last Saturday, I flew to Atlanta, Georgia along with my mom, Jason and two of my kids. My mom and the kids stayed with my aunt and uncle for the week while Jason and I drove over to the Folkschool. He took a photography class while I taught quilting, and we both had a fabulous time!

Fabric Cutting for Stepping Stones Quilt

Cutting in Progress. Each student chose their own fabrics and they were all fabulous!

My students got to work right away, cutting their fabrics to make their quilts. I love how most of them chose bright colors, but I’ve seen this design worked up in a wide variety of fabrics and it always turns out great!

Stepping Stones Quilt Blocks in Progress

Quilt blocks in progress – some students sewed theirs together randomly while others took time to carefully arrange each piece and either way works great!

It was fun to see the blocks going up on the design walls in the studio space. There was plenty of room to spread out and most students had their quilt tops pieced by the second day.

stepping stones quilt in progress

Quilts in progress decorated the walls beautifully all week!

They were excited to try out my spray basting technique and we had a gorgeous spot to baste, just outside the studio door in the lush green hills of Brasstown, NC.

spray basting

Can you imagine a more beautiful place to baste a quilt??

Once the quilt top and back are sprayed outside, we brought them in doors to assemble on a couple of work tables.

Basting: smooth the batting

The trick to good basting is to smooth out each layer of the quilt! A long acrylic ruler helps.

Although there were lots of quilts to baste, we made a party of it, helping everyone get theirs done so the process went very quickly!

Quilt Basting - pressing the quilt

Another trick is to iron the quilt once it’s basted to set the glue and smooth out wrinkles.

During class, I did a mini-lesson on both walking foot quilting and free motion quilting. and the students picked which techniques and designs they wanted to try, based on their skill level and ambition.

Machine Quilting in progress

Students learned how to “scrunch and smoosh” a real quilt underneath their machines.
Walking-foot quilting detail of the quilt above is shown below:

walking foot quilting detail on stepping stones

I was so proud of them for going outside their comfort zones and trying out different techniques. Those that wanted to do custom quilting practiced on a sample block like I suggested so they could see how the design would work with the thread and fabrics they chose.

custom quilting on stepping stones

One student’s custom quilting design. Although it’s taking her much longer to quilt this intricate design in each block, the results will be well worth it at the end!

Once the quilts were quilted, it was time to bind. I taught them how to apply an even 1/4″ binding by starting with 2″ strips. They were even willing to finish it by hand and most of them added the final stitches on the last morning before the closing ceremony.

Hand binding stepping stones

You can get a LOT of binding done while chatting hanging out!!!

Although class time went for 6 hours a day Monday-Thursday and 1/2 day class on Friday, most of the students took advantage of bonus sewing time in the evenings. I also worked on an upcoming project during that time (which I’ll reveal shortly) and we all had a grand time! It really was like an intimate quilting retreat. None of the students knew each other before class but were BQF’s (best quilting friends) at the end of the week!

It really felt like quilt camp for adults and I have to say I had just as much fun as they did!!

Finished Stepping Stones Quilt

First quilt!! It’s never too late to learn!!

It’s rare that I get to teach an intense in-person class like this but it’s such a joy to see them all do such a fabulous job. We even had one sweet quilter that had never made a quilt before and hadn’t even touched a sewing machine in over 30 years. But with help and encouragement of the class, she had a fabulous finish and was so proud of it!!

Fiber Arts Studio at John C. Campbell Folkschool

The Fiber Arts Studio wouldn’t be complete with out a Barn Quilt Block!!

We were very lucky to call the Fiber Arts Studio at the Folkschool our home away from home for a week. This is the third time I’ve been able to teach here, and it just gets better and better! (See my previous two classes here and here.)

Students' Stepping Stones Quilts

Folkschool Quilt Class, June 2018

Just remember – if you decide to have fun making your own version of Stepping Stones quilt – I’m here to cheer you on!!