What Really Happens at Quilt Market: My Experience at Spring 2018 in Portland, Oregon

Quilt Market wrapped up a couple weeks ago but I finally feel settled enough to blog a little bit more about my experience as I debuted my second fabric line and my latest batch of quilt patterns.

(Click here for my latest post all about the newest quilts and patterns.)

Christa Watson Contempo booth Quilt Market 2018

My booth was next to Cherry Guidry,another Benartex Contempo designer – she introduced a beautiful collection of neutrals called “Words to Live By.” A friend made four skirts from me from my fabric and I paired them up with a fun pair of shoes each day!

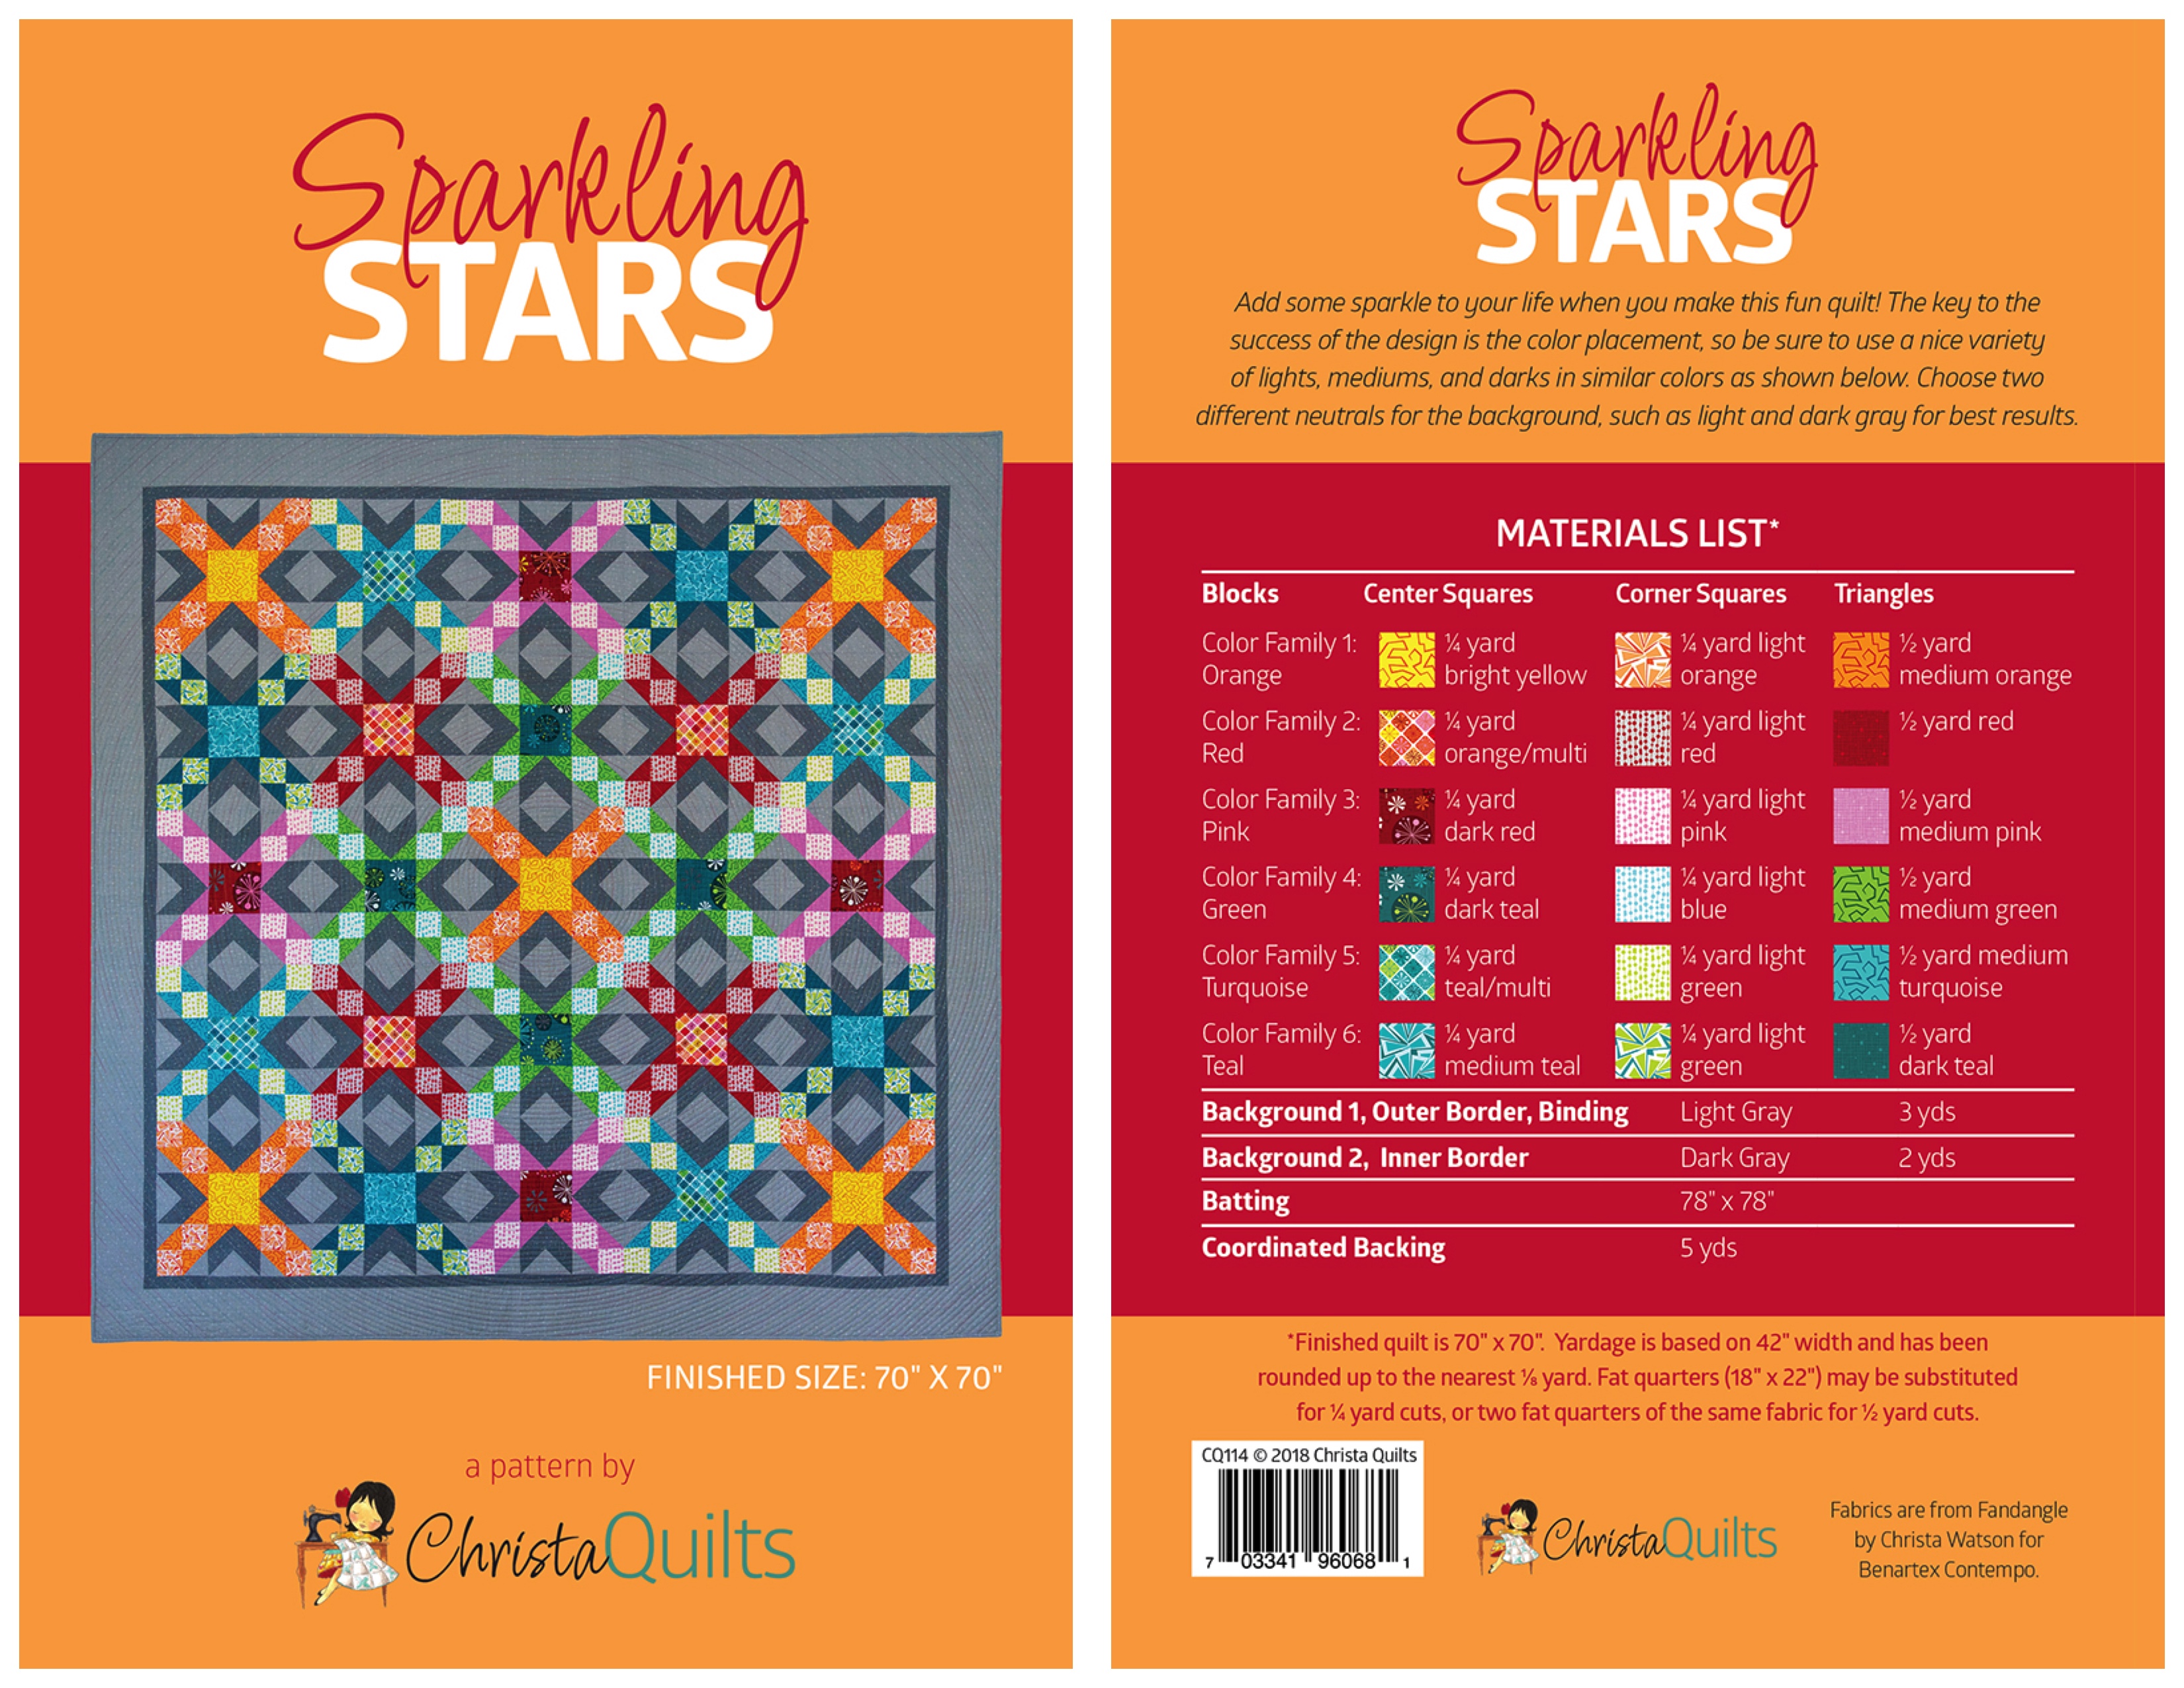
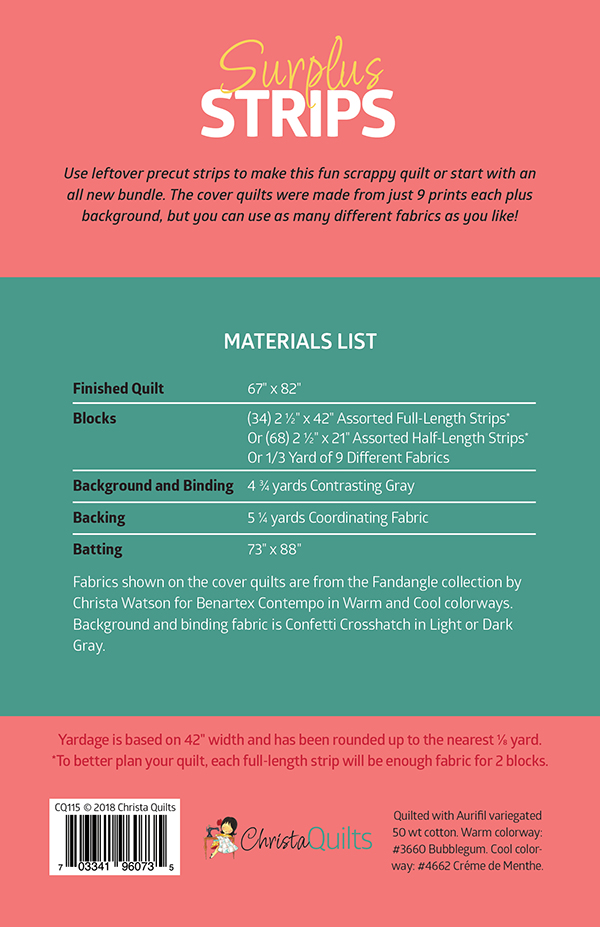
Here’s a shot of the full booth where you can see all five quilts that were on display. Sparkling Stars took center stage and got quite a lot of attention. You can see the cool version of Surplus Strips on the ladder with Heather Black’s gorgeous Pearl Pendants quilt.

Fandangle by Christa Watson for Benartex

The warm version of Surplus Strips (on the right above, near the Contempo sign) did double duty: it added color to the side of the booth, and also covered up a functional bookcase full of fabric samples for the sales associates.

The table was decorated with Sylvia Schaefer’s fabulous Pinwheel Rings quilt, and it served as an overflow sales station for those sales reps who “worked the floor” rather than staying in the Benartex area the whole time. Although I mostly took pictures when no one was around, just imagine people milling through the booths entire time, talking shop, placing orders and oohing and ahhing over all the beautiful new things.

Bags by Annie Unrein made from Fandangle

By Annie bags and containers were scattered throughout the booth showcasing her latest patterns and adding a colorful touch while being very functional for me. I used them to hold business cards, pattern giveaways and hidden items like snacks and my phone – stuff I need easy access to but don’t want to have sticking out in public!

Annie and I have a great deal going – I send her sample of my newest fabrics, and she makes up a bunch of samples showcasing her new patterns and my new fabric. I get to use them in my booth when they debut at market and then she takes them when she travels, and sets up for trunk shows. My mom has even spotted things made from my previous line, Modern Marks in some of her newer videos so it’s fun to see them “out in the wild!”

What Really Happens at Quilt Market

2 Days Before Show Time

So now that you’ve seen my booth, I’ll give you a play by play of my experiences each day. Two days before the show opens is booth setup. Fortunately the amazing folks at Benartex have a team that designs, builds and decorates the booths. The pics below are during setup: crates are shipped in, flooring is laid down, curtains are hung on poles and furniture is arranged.

For two days, the show floor looks like a disaster zone in everyone’s booth and then it all comes together magically at the last minute! That’s my hubby Jason in the shot below looking on and being so grateful he doesn’t have to build my booth!!

Quilt Market Booth Setup

1 Day Before Show Time

Below – I’m wearing my first day outfit – a skirt made from the red colorway of Baubles and bits. I stopped by to check up on booth setup and they were pretty much done with everyone but my corner.  My quilts were the last to be hung because I had to share them at a few pre-opening marketing events first.

Christa with Fandangle outfit

The day started off with a breakfast meeting with the Benartex sales reps. The designers attending were able to show our quilts and tell the reps a little bit more about the inspiration behind the designs as well as talk about the patterns we created to help support the line. They have much of this information already in their sales books that they show to shop owners, but getting to present to them in person allows them to get to know us better and tailor their visits to quilt shops to better meet their needs.

Many of the sales team represent several different fabric companies, so it’s a lot of information for them to take in and remember. Although shops can stop by any booth they like and place orders at quilt market, most buying and selling happens through fabric company sales reps, so anything we fabric designers can do to help our collections stand out will give us a better chance of quilt shops purchasing them for their shops.

Showing Fandangle to Benartex Sales Reps

After meeting with the sales team, it was time to prepare for schoolhouse. This is a set of 15-30 minute education sessions aimed at helping shop owners understand the benefits of carrying our products in their shops. My session was teaching how to host a quilt along to help shops sell more patterns and fabric. Of course the hope is that they’ll decide to carry my things, but I make sure my tips will work for anything they choose to carry in their shops.

Schoolhouse Schedule

I was a little nervous that no one would show up for my session since it was the second to last one of the day. By this time, everyone’s been on their feet all day and it can start to be a little tiring. Plus there are about 15-20 sessions happening during the same timeslot, so attendees really have to pick and choose which ones they want to see.

Fortunately every seat filled up and it was standing room only. Everyone who attended got a little goody bag with a free pattern to entice them to carry my fabric. I won’t know how the first round of sales for Fandangle went until I get my first royalty report after the fabric ships, but I’m keeping my fingers crossed that a good number of shops decide to carry it!

Quilt Market Schoolhouse

Show Time!

The show floor of quilt market is open for 3 days so it can be a bit of a blur! That sounds like a lot of time but it goes by very quickly, especially when it’s spent talking about fabric non-stop! But because quilt market is also a very social event, its great when some industry legends stop by to chat, too. Below I was able to catch up with Luana Rubin, the amazingly talented owner of eQuilter.com. We first got acquainted at a BERNINA ambassador reunion and I love following her work and travels on instagram.

Luana Rubin of EQuilter

In this photo I wore a skirt made from the cool colorway of Sparkling Squares.

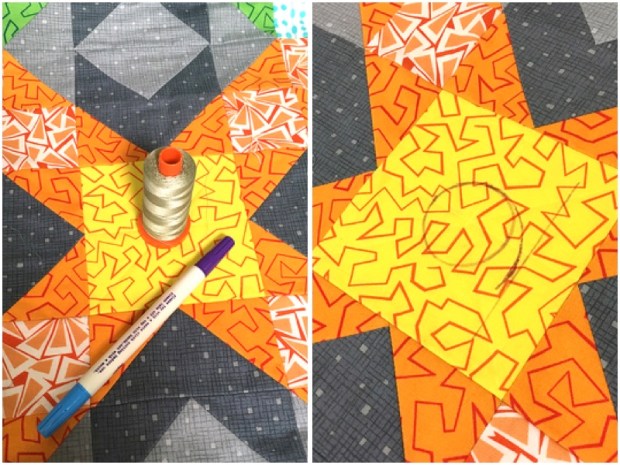
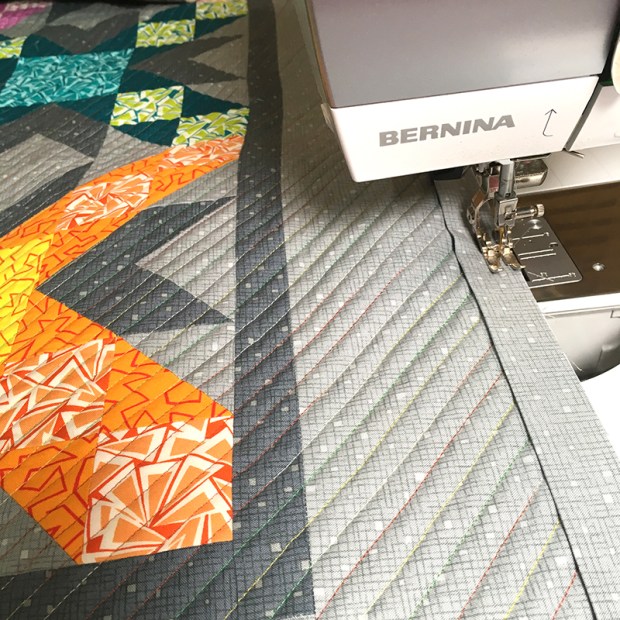
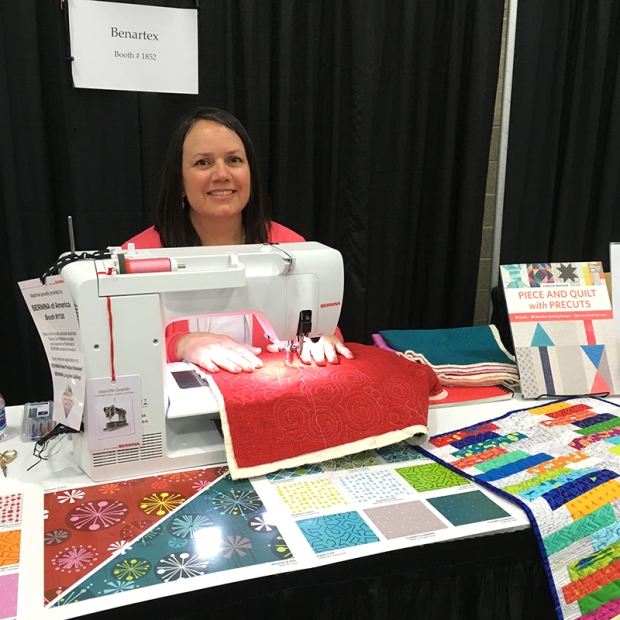
During this whirlwind time of hanging out in the booth and talking to folks as they stopped by, I had a few meetings (more about that later…) and several machine quilting demos. During my demos I explained how several of my designs from Fandangle were actually inspired by some of my favorite machine quilting designs in my latest book, Piece and Quilt with Precuts. And here’s a hint to file away for now – although swirls didn’t make the cut for Fandangle, they’ll definitely make an appearance in the future…. so stay tuned!!

Machine Quilting Demo

It’s always great to meet up with fellow designers and see what they are working on, too. On the last day of the show, Aurifil organized a group picture for some of the designers who were attending that also have Aurifil thread collections. I’ve been chatting with Aurifil about my next thread collection and I’m really excited about what we’ve come up with so far. If all goes well, I’ll be debuting that one at fall market so there’s always fun stuff happening behind the scenes!!

Aurifil Thread Designers

Just a few of the Aurifil thread curators – Aurifil got a ribbon for best notions booth!!
On the last day of market I wore my Baubles and Bits skirt in the teal colorway.
It was fun to wear my fabric each day!

I’ll end this post with some pretty shots of my fellow Contempo designers’ booths that were in the same quad area. It was fun to see their pretty quilts hanging up all weekend and getting to know some of them better! In order below they are Cherry Guidry of Cherry Blossom Studio, Amanda Murphy, Amy Friend of During Quiet Time and Bill Kerr and Weeks Ringle of Modern Quilt Studio.

The next big industry event I’ll be attending is BERNINA University in Chicago at the end of June. It’s like a mini-version of quilt market but exclusively for BERNINA dealers. I’m excited to meet many of the shop owners who didn’t attend quilt market, and I’m looking forward to teaching some hands on BERNINA classes while I’m there. I can’t wait!

The Patterns are Here! The Patterns are Here!

I got some happy mail this weekend – a shipment of my latest print pattern releases. The quilts below are all made from my Fandangle fabric which ships to stores in July, but I’ve written the patterns so that they will look fabulous in any fabrics you choose! I’ve blogged a lot about the quilts already (see links below each image in case you missed it), but now I’m excited to tell you what makes the patterns themselves extra special.

Sparkling Stars Quilt

Sparkling Stars quilt by Christa Watson made from Fandangle fabric

Sparkling Stars designed and made by Christa Watson, 70″ x 70″

For starters, all of my patterns are full color throughout. They are professionally printed, folded into a half-sheet size booklet, and staple-bound by GotPrint.com. I select high-quality glossy paper for the insides and the covers are slightly thicker which makes them a little more sturdy.

Because I purchase them in a higher volume, I’m able to get a quantity discount which I pass on to you all in the form of a lower price point. The MSRP for my print patterns is $9.95 which is much lower than the $12-$14 price I’ve seen for similar quality patterns.

Sparkling Stars PatternSparkling Stars Covers – Click above image to enlarge
Click here to purchase the Sparkling Stars Quilt Pattern

For Sparkling Stars, I included a very detailed materials list so that you could replicate the look in similar colors even if using different fabrics than I did. I also included detailed diagrams and charts by colorway so that it’s easy to follow along and not get lost.

Here’s an example of one of the many full-color illustrations that are included in the pattern:

Sparkling Stars Blocks

If there’s enough room in the pattern, I’ll usually throw in a closeup image of the quilting for inspiration. As an FYI, patterns need to be formatted so that they use up 8 or 12 sides (4-6 full pages). Most of mine tend to be on the longer end so that I can put in as much detail as possible.

I work with my graphic designer Lindsie to lay out the text, photos and illustrations, and if there’s extra room, I’ll throw in an extra diagram, tip, or quilting suggestion. I want you to have as much fun making these quilts as I did, and I try to pack as much helpful info into each pattern as I can!

Spiral quilting detail from Sparkling Stars

Quilting detail included in the pattern – inside front cover.

Surplus Strips Quilts

Surplus Strips Quilt Warm

Surplus Strips Quilt in the Warm Colorway of Fandangle
Designed and Made by Christa Watson, 67″ x 82″

Surplus Strips Cool Colorway of Fandangle

Surplus Strips Quilt in the Cool Colorway of Fandangle
Designed and Made by Christa Watson, 67″ x 82″

Surplus Strips Quilt PatternSurplus Strips Covers – Click above image to enlarge
Click here to purchase the Surplus Strips Quilt Pattern

For Surplus Strips, I wanted to show how you could use up leftover 2 1/2″ strips sorted by colorway to create a dynamic, scrappy looking quilt. In my patterns, I’ll try to include different methods of using your fabric (either yardage, scraps or precuts) whenever possible so you can make the best use of your stash!

Quilting Detail of Triangle Trinkets

Detail of the Triangle Trinkets motif quilted on the cool colorway.

I’m really excited that I was able to include machine quilting diagrams and detailed images in this pattern. Because many of the prints in my fabric lines are based off of my favorite machine quilting motifs, it was fun to include a different allover quilting design for each colorway.

Machine quilting detail of Surplus Strips

Do you see how the quilting design is the same as the Paper Cuts print? So fun!!

Pearl Pendants Quilt

Pearl Pendants Quilt by Heather Black

Pearl Pendants, designed and made by Heather Black, 60″ x 72″
Click here to read more about Heather and this gorgeous quilt.

It was really fun to collaborate on Pearl Pendants with my talented friend Heather Black of Quilt-achusetts. She designed and made the quilt using Fandangle plus Contempo Colorweave coordinates.

We both co-wrote the pattern and it was fun to go back and forth to ensure that the pattern was easy enough to understand and follow. My husband, Jason, who is NOT a quilter was very helpful in proof-reading to make sure even a novice could understand how to make this stunning quilt!

Pearl Pendants Quilt Pattern by Heather Black and Christa WatsonPearl Pendants Covers – Click above image to enlarge
Click here to purchase the Pearl Pendants Quilt Pattern

My favorite illustration included in the pattern is the very detailed chart of blocks which specifies exactly how many of each unit to make to get the same look. We included plenty of step by step diagrams so that you’ll have no problems making this fun quilt while practicing your curved piecing. Of course you can easily substitute the colors below for completely different fabrics, and it will still look great!!

Pearl Pendants Chart of Blocks

The pattern also includes full-sized templates to make the blocks in two different sizes, or you can use a specialty curved ruler if that’s your preferred method.

Heather has become quite proficient at quilting on her longarm and she loves to combine hand-guided work with a bit of computerized work in the quilting detail shown below:

Quilting Detail for Pearl Pendants

How to Purchase Christa Quilts Patterns

(1) Anyone can purchase my complete line of print patterns at shop.christaquilts.com.

(2) PDF versions of my entire pattern line are available in my Craftsy shop (click here).

(3) Quilt shops and other retailers can contact me via email christa@christaquilts.com for wholesale pricing information and exclusive specials.

(4) My fabrics and select patterns are also available wholesale through Checker Distributors and Brewer Sewing.

If you are a quilting instructor and wish to teach a class from any of these patterns, please contact me to get the wholesale pricing discount. I’m happy for others to teach from my patterns (or books) as long as each student purchases their own copy.

Sparkling Stars in the Benartex Contempo Booth at Quilt Market

Here’s Sparkling Stars hanging in my booth at Spring 2018 quilt market. Be sure to catch my next post where I’ll share all about my quilt market experience!

Sparkling Stars Quilt Part 3 – Spiral Quilting

Today I’m finishing up the making of Sparkling Stars, one of the brand new quilt patterns made from my brand new Fandangle fabric collection. Fandangle means embellishment or ornamentation and rather than embellishing my quilts with baubles and beads, I do it with fabric and thread!

Spiral quilting detail

Spiral Quilting Detail on Sparkling Stars

Marking the Center Spiral

Because I was on a tight deadline to finish this quilt, I chose a really fun walking-foot quilting design that looks great and is easy to do. I went with the large continuous spiral which is one of the designs I teach in my quilting classes and also in my book with Angela Walters, The Ultimate Guide to Machine Quilting.

Marking the Center Spiral

The trick to this design is to mark the center spiral, and then follow it around with the edge of your walking foot until the entire thing is quilted. I like to use a small circle shape to start. A spool of Aurifil thread works great by the way!!

Aurifil Variegated Thread

Speaking of Aurifil thread, I used  variegated 50 weight cotton #4650 Leaves for the quilting. I’ve really been enjoying using variegated threads on colorful quilts because they add an extra bit of texture and dimension to my quilts. In this case, it really emphasizes the “sparkling” effect.

Spiral Quilting

Machine quilting detail variegated thread

Yes, I had to rotate the quilt about a bazillion times, but once you get past the first few spirals it goes very quickly. It really helps to use a hands free system (knee-lift) or hover feature if you have one so that you can keep your hands on the quilt at all times.

I don’t ever stress too much about perfection in my quilting. If it wobbles a bit while quilting, I know that once my face isn’t two inches away from the quilt, it won’t be noticeable. Another walking foot quilting tip is to lower the presser foot pressure while quilting (not all machines can do this so check your manual). I also increase the stitch length to 3.0 to help compensate for friction and drag on the quilt.

Scrunching and smooshing the quilt

Rather than using a walking foot, I use the BERNINA dual feed that’s built into my 770 QE. It allows me to get the same result, but I can use different feet. I use the 20D foot – the open toe embroidery foot – for straight line quilting, and the 37D – 1/4″ patchwork foot – for attaching my binding.

Binding the Quilt

I use skinnier strips cut at just 2″ for my binding so that they finish at 1/4″ on both sides of the quilt. Click here for my binding tutorial for a previous quilt.

Attaching the Binding

I will press the binding to the back of the quilt and then keep it in place with about 200 binding clips all the way around the perimeter. I know some people like to use just a few clips and that works too!

Securing The Binding

When I bind, I keep the quilt away from me and bind from right to left. I use a thimble to protect my finger and push the needle through with the middle finger of my left hand. I think it’s interesting that there’s no one right way to do it. Some people do it holding the quilt in the opposite direction, while others stitch from left to right. As long as you are comfortable stitching, that’s the important thing!

Binding a Quilt

I know that binding by machine goes a lot faster, but there’s something I love about snuggling with the quilt at the end for a little hand-stitching. It’s like my reward after all the work it takes to make a quilt! Plus, I just really really like the way hand binding looks.

The final step in my quilt making process is to photograph the quilt. Thankfully Jason does that for me since I do NOT like that part, LOL!! We use my design wall to take flat shots that will be used for the cover of the quilt pattern. The hardest part is getting the lighting right! Later on, we’ll do pretty styled shots outside, but that’s a completely different process.

Photographing Sparkling Stars Quilt

I hope you’ve enjoyed the making of this quilt! You can now purchase the pattern by using any of the links below. And if you make one, be sure to share and use #sparklingstarsquilt on social media so I can see your progress!

See Previous “Making Of” Posts

Sparkling Stars Part 2 – The Quilt Top

I recently made Sparkling Stars to help promote Fandangle, my brand new fabric line at spring quilt market. The pattern is currently available now in print or PDF.

Sparkling Stars in Progress

I decided to name this quilt Sparkling Stars as a nod to one of the prints I call “Sparkling Squares.” The collection name Fandangle means embellishment or ornamentation so I thought it would be fun for the fabric and quilt names to go with that theme.

Once the quilt blocks were sewn and pressed, it was time to sew them together to make the quilt top. This process went together rather quickly because I was able to refer to the image of the quilt top I had created in EQ8 for color placement, shown below.

Sparkling Stars Quilt Design

Here’s a tip when sewing lots of blocks into rows: sew the seams in opposite directions between blocks so that your blocks and rows don’t warp or bow to one side.

For example, refer to the top row in the image above. When sewing block pairs together, I kept the turquoise or teal blocks on top as I sewed the row together. There are a total of 4 vertical seams to sew per block row. By keeping the teal/turquoise on top, it ensured that I switched directions each time I joined the blocks.

Sparkling Stars by Christa Watson

After I completed the rows and added the borders, I pressed the entire top again from the front and back. Pressing often really helps ensure a nice flat top which is essential for successful machine quilting.

Hobbs quilt batting in cotton and wool

Whenever I make a quilt, I like to take a picture of the batting I’m using in the quilt so that I can remember what I used. For Sparkling Stars I chose Hobbs batting in cotton/wool.

This is one of my favorite battings for quilts that will be on display. The cotton gives the quilt drape and stability while the wool allows for good stitch definition and it doesn’t hold crease lines. I basted the quilt using basting spray and my design wall.

Click here for my spray basting tutorial.

Sparkling Stars Quilt PatternClick on the image above to enlarge

You can now purchase a copy of the Sparkling Stars quilt pattern. The PDF is available as an instant download through my Craftsy shop. The print version can be purchased now and will ship by the end of the month – once the boxes arrive from the printer. I can’t wait!!

Click here to purchase the PDF version of Sparkling Stars quilt pattern.
Click here to purchase the print version of Sparkling Stars quilt pattern.

Variegated Thread on Sparkling Stars

I chose Aurifil 50 weight variegated thread #4650 Leaves to quilt it since there was so much color. I’ve been experimenting with using variegated threads for machine quilting and really like them.

Stay tuned for part 3 where I show how I quilted it!

Sparkling Stars Quilt Part 1 – The Design and Sewing the Blocks

Now that I’m back home from quilt market, I have time to share about the process of making Sparkling Stars, one of the quilts from Fandangle, my new fabric line from Benartex/Contempo.

Sparkling Stars Design

Whenever I make an original quilt, I first create it in Electric Quilt Software using the actual fabric swatches I plan to use. If it’s a scrappy-looking quilt, I won’t worry too much about color placement while I design. However, for Sparkling Stars, I took quite a while re-arranging the colors until I was pleased with how they looked.

Sparkling Stars Quilt

Click here to purchase the Sparkling Stars PDF Quilt Pattern.
Click here to purchase the Sparkling Stars Print Quilt Pattern.

I knew I wanted to use all 20 fabrics from Fandangle, but in a cohesive way. So I literally tried every fabric in the line in each part of the star blocks above until I was pleased with the final color arrangement. (I usually don’t save the “reject” versions because they are numerous and I don’t want to get confused by multiple images of the same file I’m working on.)

Fandangle Cut Units for Sparkling Stars

I love a pretty stack of cut units!

I planned the design months before I received fabric samples so that I could get the pattern written ahead of time. I knew time would be short in making the quilt so I tried to get as much work done ahead of time as I could. Once I start on a quilt, I’ll make it pretty quickly from start to finish since I’m usually working on a deadline.

Sparkling Stars HST's

Stacks and Stacks of HST’s in progress…

Making the Blocks

I try to assembly line my process, so I’ll cut everything ahead of time, then sew all the sub-units at once rather than constructing a quilt block by block. It’s much more efficient and I can pattern test as I go by doing it this way.

Sparkling Stars in Progress

I keep similar units together to stay organized.

As you can see, there are a lot of pieces that go into making this quilt so I try to be as careful as I can during every step of the process. I sew with a consistent quarter inch seam, press my seams open, and trim my units as needed to the correct size. By taking care during each step of the process, it ensures the final blocks will go together smoothly.

Sparkling Stars Quilt Blocks

Sparkling Star Quilt Blocks in Progress

When the sub-units are complete, I stack them up and lay them out in order next to my sewing machine so that I can chain piece as much as possible. I also take pictures as I go so I can look at a reduced view of the quilt blocks to make sure nothing is turned the wrong way before sewing together.

For these particular blocks, I made sure turn turn the “Beaded Curtain” print so that they were all facing the same direction. The rest of the prints are non-directional so they didn’t matter.

Seams Pressed Open

I sew with a shorter stitch length and press seams open as I go for best results.
Then I’ll pin the units together as I sew to get accurate seam joins.

Rather then sewing the blocks into rows, I sewed them into 4-patch units so they’d be easier to manage. It also allows makes me feel like I’m getting more done since it’s a lot of pieces to sew! The biggest tip is to just sew one step of ALL the blocks at a time and then take a break so it doesn’t get too monotonous.

Sparkling Stars Blocks in Orange

These blocks will sparkle and glow in the final quilt!

When the blocks are complete, I’ll press them with a hot, dry iron on both front and back. This ensures nice flat blocks which will be much easier to machine quilt!

Sparkling Stars Quilt Blocks

There are a total of 25 blocks in 6 different fabric combinations.

I wrote up the quilt pattern so that it would be extremely easy to follow along either using the same fabrics I did, or using similar colors to get the sparkling effect. Fandangle will start shipping to stores at the end of June, but you can pre-order bundles of the prints and yardage of the grays (along with the quilt pattern) over at shop.christaquilts.com for a limited time.

Sparkling Stars Quilt Blocks

While I’m not offering kits, you can get the enough fabric to make this quilt when you purchase 1/2 yard bundles of both the cool and warm colorways; plus 3 yards of the light gray, and 2 yards of the dark gray. There will be a little left over that you can use for other projects.

Stay tuned for part 2 where I show how I put the quilt top together!

Surplus Strips Quilt Pattern PDF Now Available

I’m having a great time at quilt market this week, sharing Fandangle with the wider quilting world! I was excited to get the PDF version of Surplus Strips finalized before I left, and it’s available for purchase now from my Craftsy shop.

Surplus Strips Quilt Pattern by Christa Watson of Christa Quilts

Surplus Strips Materials List

The print version is being printed now and should be available by the end of the month.
If you missed my process posts about making these quilts, check them out by clicking the links below:

Surplus Strips Part 1 – The Blocks

Surplus Strips Part 2 – Quilt Top and Basting

Surplus Strips Part 3 – Machine Quilting and Binding

Surplus Strips Cool

Surplus Strips in the Cool Colorway

Machine Quilting Detail

It was so fun to make this quilt using both the warm and cool colorways of Fandangle. You can make this quilt using yardage like I did, or you can go super scrappy with leftover precut strips.

Surplus Strips Warm Colorway

Surplus Strips in the Warm Colorway

Machine Quilting Detail

The most fun part was quilting them using designs from the fabric, which were inspired by my quilting! How’s that for circular logic?? f you make this quilt, be sure and share on social media #surplusstripsquilt. I’d love to see your progress.

Click here to purchase an instant PDF download of Surplus Strips.
Click here to order the print version (ships by the end of the month.)

Click here for my complete pattern library.

The Making of Surplus Strips Part 3 – Machine Quilting and Binding

Although machine quilting is my favorite part of making any quilt, I really enjoy the entire process from start to finish. Even though I’m on a tight deadline, it’s been fun to document my progress on Surplus Strips as I go. Be sure to check out my last post for tips on piecing the quilt top and basting it.

Choosing Thread Color

Aurifil Thread Variegated Pink

Audition thread to see which color blends in best. For multicolor quilts, go with a lighter thread on a darker fabric, rather than darker thread on lighter fabric.

I’ve been playing around lately with Aurifil variegated thread, so I chose a pink (#3660 Bubble Gum) for the warm colorway of Surplus Strips. I wasn’t sure how much thread I’d end up using, and since I only had one spool on hand, I chose a 50 weight thread in a similar color for the bobbin. I always try to use the same or similar color in top and bobbin so that I don’t get “pokies” – dots of thread on the top or bottom of the quilt.

Aurifil Creme De Menthe on Surplus Strips

The teal colored thread has a more pronounced color change than the pink.

For the cool colorway, I went with Creme De Menthe #4662. No matter which color thread you use, the more quilting you add, the less you’ll notice the thread and the more you’ll just see the overall texture.

Free-Motion Quilting Surplus Strips

Machine Quilting Surplus Strips

I scrunch and smoosh the quilt under the machine any way I can.

Whenever I quilt, I always start on the right side of the quilt and work my way towards the center. When I reach the middle, I rotate the quilt and keep on going. For an allover/meander type block, I just focus on one are of the quilt so that I don’t get overwhelmed.

Free Motion Quilting Jagged Stipple

I love the slight color change with the pink variegated thread!

Because many of the fabric prints I design are based on some of my favorite machine quilting motifs, I really wanted to play that up with these quilts. For the warm colorway, I quilted “jagged stipple” which is one of the quilt designs I love to teach in my workshops. Can you see how it’s basically the same motif as the “Paper Cuts” print from Fandangle?

Free Motion quilting jagged stipple

Jagged stipple is one of the motifs included in my book Piece and Quilt with Precuts.

When quilting an allover design, sometimes it will show up on some fabrics and blend into others. But that’s okay. I love the overall texture that it gives to the quilt!

For the cool colorway, I quilted triangles that are similar to the “Triangle Trinkets” print from Fandangle. Any of the designs I quilt can be quilted on a smaller or larger scale. My rule of thumb is that if it’s an allover design, I’ll quilt it larger to fill more space quickly. For smaller, custom areas of the quilt, I’ll usually scale down the quilting motifs.

Free Motion Quilting Triangles

I love how the variegated thread gives depth and dimension to the quilt!
I also teach this quilting motif in my latest quilting book.

In my workshops, I always stress the point that I don’t worry too much about making my designs perfect. I like the irregular overall texture you can get from free-hand doodling with your machine. Besides, the best way to hide imperfect stitches is to surround them with more imperfect stitches!!

Triangle Trinkets from Fandangle

I chose Triangle Trinkets in turquoise for the backing.
Click here to see larger images of each fabric from Fandangle.

Binding the Quilt

Click here for my step by step binding tutorial from a previous quilt.

Press the binding

After I attach the binding to the quilt by machine, I press it away from the quilt. This makes it easier to wrap around the back of the quilt to ensure a nice flat binding.

Attaching the binding

The BERNINA Dual Feed acts just like a walking foot, but I can use any specialty “D” foot.

When I first started binding my quilts, I used 2 1/4″ strips, However, lately, I’ve cut them 2″ and I attach them using my BERNINA dual feed and 1/4 patchwork foot. This allows me to get an even quarter inch binding on both sides of the quilt.

Binding Surplus Strips

It was fun to make some extra blocks and throw them on the back of the quilt!

Once I wrap the binding to the back, I secure in place with Clover Wonder Clips. I like to secure the entire edge so that it’s ready to hand-finish without interruption. It usually takes about 3 boxes of Wonder Clips to go around the entire edge, but you could definitely use fewer if you like.

Binding with Wonder Clips

I quilted triangles on the front to match the triangles on the back!

Even though I’m on a tight deadline to finish these quilts, I still enjoy binding by hand. I was able to finish the warm colorway on an airplane trip last week, and I finished the cool colorway while watching a movie with my family.

Surplus Strips Quilt Pattern by Christa Watson

Click here to preorder Surplus Strips quilt pattern – ships on or before June 1.

Now all that’s left is to photograph these quilts, swap out the digital pattern cover above with the actual quilts and get them off to the printer! The PDF pattern will be coming soon, and you can pre-order the print version of Surplus Strips now.

Surplus Strips Quilt Warm Colorway

I had a whole row to myself on a recent flight and was able to finish this quilt on the plane!

Click here to pre-order bundles of Fandangle Fabric.
Click here to see all Fandangle quilt patterns.

Now I have one more quilt to finish up, and then it’s time to pack for quilt market. More about that soon, I promise!!

The Making of Surplus Strips Part 2 – The Quilt Top and Basting

As I prepare for International Quilt Market, which is an industry trade show held this spring in Portland, Oregon (May 18-20), I’m sewing like a madwoman, finishing up samples to promote my new quilt patterns and Fandangle fabric line. I’m currently working on two versions of my Surplus Strips Quilt Pattern – in warm and cool colors. Click here to read my previous post about making the blocks.

Color Arrangement

Surplus Strips Blocks in Cool Fandangle

Arranging tiny blocks was much faster than using my design wall!

Although I designed both colorways in EQ8, I didn’t finalize the exact color placement for each block. Instead, I did something very low tech. I printed out a version of the quilt with the same number of blocks that I made and then cut out all of the tiny paper blocks to arrange on my work table. It actually went a lot faster than putting up the blocks on my design wall and arranging them there.

Surplus Strips Paper Blocks - Warm Fandangle

I like being able to rearrange the blocks until I’m happy with their color placement.
These paper blocks are only about 1″ wide!

Once I was happy with the color arrangement, I printed out the final layout in color, and organized the blocks on my work table by color. In other words, the printed out layout served as a “virtual” design wall that takes up a lot less space!

Surplus Strips Blocks Fandangle Warm Colorway

I printed out the layout in EQ8 which serves as my “virtual” design wall.

It was super fast to sew the blocks into rows using my printed out layout as a guideline. This quilt goes together in vertical columns, rather than horizontal rows, so I just had to make sure I kept everything in the correct orientation as I sewed.

Surplus Strips blocks Fandangle Fabric warm colorway

I sewed the blocks and sashing in order according to my printed out layout.

Pressing Seams Open

I used this process for both the warm and cool colorway, and it went super fast! Pressing all of my seams open really helped the quilt top lie flat when I gave it a final press. It also made it soooo much easier to line up the seams accurately! Because there’s no nesting, it’s important to pin generously while joining the blocks and rows. But I actually get better results and perfect seam joins when I press seams open & use pins, so it’s worth it to take the extra time.

Seams Pressed Open - Cool Colorway, Fandangle Fabric, Surplus Strips Quilt

Seams pressed open ensures a nice flat top, with no lumps and bumps!

When pressing seams open, be sure to use a shorter stitch length (like 2 instead of 2.5) to secure the seams. A shorter stitch also makes it less likely that you’ll see thread poking through the seams, too!

Bonus Measuring Tip

Measuring long borders

Use a ruler to extend the cutting length on your mat for long borders: place the folded end on the ruler, and cut on the mat. If I needed more length, I’d rotate the ruler longways.

Here’s a bonus tip when working with borders that are longer than your mat. When cutting, I fold the border fabric in half and use an “extend a ruler” – my phrase for extending the cutting length by using a ruler, lined up at the edge of the mat. I’ll use as many extra inches as needed to get a nice precise measurement when cutting. Just divide the needed length in half and count over that many inches on the extension ruler and mat.

More Pressing

Press the quilt on both sides

Speaking of pressing, once the quilt top is finished, I give it a final press on the front, too. It seems to make the quilt nice, flat and crisp, so it’s ready to baste! Whenever I press anything on my quilt, I always use a dry iron. I don’t like steam because it can burn your fingers and distort the fabric. Also, if the iron leaks or spits, you can get a nasty mess! If I need a bit of water for an unruly seam, I’ll just use a spray bottle filled with water instead.

Virtual Home and Studio Tour

Surplus Strips Quilt Tops Warm and Cool

Look closely and you can see 2 quilt tops waiting underneath the warm colorway. Plus there’s some yardage of Fandangle peeking out underneath the cool colorway.

When my quilt top(s) are finished and pressed, I hang them over the stair railing on the upper floor of my home so they don’t get wrinkled. Upstairs is my husband’s office, my daughter’s room, our bedroom and my sewing loft. Downstairs is my son’s room, work area for The Precut Store, living room, dining area, and kitchen. It’s a comfy home and we use every square foot!!

Here’s an image of my studio space, across from the stair railing where I hang my quilts in progress. This picture was taken back in 2014 for a magazine profile. It’s pretty much still the same!

Christa's Sewing Room

Image of my sewing studio 2014 – with 3 quilt tops that are still unfinished LOL!!

Our backyard is just off the kitchen downstairs, and is where I keep a plastic table set up on the patio for spray basting. I don’t spend nearly enough time in my yard as I do my sewing room, so it needs a little work, LOL!!

Spray Basting

Basting Outside

Click here for my spray basting tutorial using a design wall.
Click here for my spray basting tutorial using a table.

Once the backing and top are sprayed outside, I then bring them inside and assemble them on my design wall indoors.

Surplus Strips Batting

Take a picture of the batting with the quilt, and take note of what you like/don’t like.
I’m using Hobbs cotton batting for the cool colorway.

To keep track of which batting I use, I take a picture of the batting with the quilt top so I can remember. For these quilts, I used Hobbs cotton for the cool colorway and Hobbs silk for the warm. I used those particular battings because they are what I had on hand and didn’t have time to order anything else, LOL!!

But I love using natural fiber battings like cotton, wool, or silk because they cling to the quilt, provide good stitch definition, and allow the quilt to breathe and hang well.

Surplus Strips Warm Colorway backing

I’m using Hobbs Silk batting for the warm colorway.

Although the quilt pattern calls for all of one fabric for the backing, I had fun and made some bonus blocks with some of the leftover strips. Because I only have a limited amount of Fandangle yardage right now, I got creative with my piecing and used three different warm prints instead.

Surplus Strips Warm basting

Click here for a tutorial on how I made my design wall – back in 2013.

I like to make sure I have several inches of extra batting and backing beyond the quilt top. That way I don’t have to line things up perfectly, and the extra will get cut off when it’s time to bind.

Once it’s basted, I’ll trim down the backing and batting so that there’s only 1-2 inches sticking out. This prevents them from flipping backwards under the quilt, causing you to accidentally stitch through them while quilting. Please tell me I’m not the only one who’s done that!!

Pressing the Quilt After Basting

Notice how closely I trimmed the layers, with only about an inch or two of batting/backing sticking out beyond the quilt top. This prevents quilting the quilt to itself!

The final step is to press the quilt – yet again!! After it’s basted, I’ll press the quilt, first on the back, and then again on the front. This helps set the glue so the layers don’t shift. But more importantly, it allows me to work out any creases or bubbles on either side of the quilt. One the quilt is nice and flat, it’s sooo much easier to machine quilt!

Surplus Strips Quilt Pattern by Christa WatsonClick here to preorder the Surplus Strips quilt pattern – print version.
Click here to preorder Fandangle fabric bundles + background.

I hope you are enjoying seeing my progress as I make these quilts. Once they’re finished and photographed, I’ll release the patterns in both PDF and print. For now, you can pre-order the print version over at Shop.ChristaQuilts.com along with fabric to make them. (FYI the Fandangle 1/2 yard bundle + 5 yards of gray will be enough to make either quilt top.)

Now it’s time to quilt them – so stay tuned for part 3!!

The Making of Surplus Strips Part 1 – the Blocks

I sure have enjoyed documenting more of my real-time progress as I create quilts to help promote my patterns, books and fabric. It’s so much more enjoyable to write about my process as I go, rather than trying to recapture the excitement months later!

Surplus Strips Quilt Pattern by Christa Watson

Click here to pre-order my Surplus Strips Quilt Pattern.

I’m currently making two versions of Surplus Strips – both in warm and cool colorways of my newest fabric line, Fandangle, which will be shown at Spring Quilt Market in Portland, Oregon, May 18-20. The pattern cover art above is shown using my digitally created images from EQ8 as a placeholder until the quilts are finished and photographed.

Once that’s done, I’ll send it off to the printer and release a PDF pattern, too. For now, you are welcome to preorder the print version which will ship on or before June 1, 2018.

Fandangle Fabrics Cool Colorway

Fandangle Fabric in the Cool Colorway

Although my timeline is tight, I’m still going through the regular process I use to create a well-made quilt. I like to prewash and starch all of my fabrics for two reasons: (1) it gets rid of the excess dye so there’s no chance of bleeding or ruining the quilt and (2) the starch makes the fabric stiffer so there’s less stretch while piecing.

My number 1 starching tip is to spray starch on one side of the fabric, then flip it over and iron the other side. Then repeat – starch the side you just ironed, flip it over again and press from the other side. The prevents the iron from burning the starch so you don’t get flakes! Starching and pressing both sides makes the fabric more crisp so it’s easier to work with. Also – I just use cheap starch from the grocery store and I’ve never had a problem with it.

Fandangle Fabrics Warm Colorway

Fandangle Fabric in the Warm Colorway

My Surplus Strips pattern is written for either precut 2 1/2″ strips or yardage. You can go super scrappy with a single jellyroll + background, or do a color blocked quilt like I’m doing. For yardage, It takes about 1/3 yard of 9 different fabrics plus 4 3/4 yards background + binding.

Surplus Strips Quilt Warm Colorway of Fandangle

I like stacking my pieces so they look pretty!

I paired up the darker gray confetti crosshatch print with the warm colorway of Fandangle, and the lighter gray with the cool colorway. If you are interested in using the same fabrics as me, you can preorder 1/2 yard bundles of Fandangle + 5 yards of either gray and you’ll be set, with a little leftover fabric.

Seams Pressed Open

Pressing seams open ensures flat blocks, and a flat quilt top.

I started cutting out the fabrics for both quilts while I was away on my last teaching trip. When I returned home, I finished cutting all of the pieces for the warm colorway and made all of the blocks in about two days. I used a shorter stitch length for piecing (1.8 instead of the default 2.0) and pressed all of my seams open (with a dry iron, no steam). This will allow the blocks to lie flat for domestic machine quilting.

Surplus Strips Quilt Block Warm Colorway of Fandangle

Surplus Strips Blocks in the Warm Colorway of Fandangle

After piecing the blocks in the warm colorway, I jumped into making the blocks in the cool colorway. I like making two quilts at a time, so I can assembly line the process as much as possible.

Surplus Strips Fandangle Fabric Cool

Units are cut and stacked and ready to sew!

Here are a couple more piecing tips that make the blocks go together smoothly and stay square: when sewing, I pieced with the gray units on top to ensure that I switched sewing directions each time I joined the units. When you join two seams in opposite directions, it helps prevent block distortion. It’s not a huge deal on smaller units, but if you are sewing long strips together, it can be more noticeable.

Lining up block seams

Step 1 for proper alignment – match up the fabric seams.

Also, in order to get the top and bottom of each plus block to line up correctly, I placed the top unit right sides together on top of the partially sewn block to see exactly where things needed to line up to keep the seams in alignment. The pressed open seams really help me see this part.

Aligning units for quilt blocks

Step 2 for proper alignment – fold back to make sure lines are straight.

Then, I folded it back up partially to make sure it’s in the proper position before sewing. I didn’t actually need to use any pins because the blocks were small enough and I used my fingers to keep the edges lined up at all times.

Surplus Strips Blocks Fandangle Fabric cool colorway

Click here to preorder bundles of Fandangle fabric by colorway + background fabric.
Click here to preorder the Surplus Strips quilt Pattern.

The blocks went together even faster this time around and I love the color distribution! Now it’s time to sew the blocks together and finish up the quilt top. I’ll make both tops and then have a little basting party to make that chore a little less painful, lol!! I’ll be using my spray basting method that you can read about here (wall basting) or here (table basting).

Stay tuned for the next update!

Quilt Las Vegas 2018 and Lots of Gorgeous Modern Quilts

My local quilt guild, Desert Quilters of Nevada. recently held their 28th annual show of Quilt Las Vegas. I’ve been entering off and on over the years since the early 2000’s and it’s still exciting to participate after all these years.

DQN Quilted banner by Karen Garth

Desert Quilters of Nevada quilted banner made by past president Karen Garth

The competition is always fierce, and the judging is always performed by a certified judge. Even after all these years of entering this show, it’s still thrilling whenever one of my quilts wins a ribbon and I love the feedback provided by the judge.

Below are my entries from the show along with the judge’s comments, plus several more that caught my eye. I’m so happy to see that more and more members are making modern quilts, and especially that more are being accepted into non-modern categories. Enjoy the virtual show!

Diamond in the Rough by Christa Watson

Diamond in the Rough, made in 2016. 2nd place, Modern category.
Originally patterned in QuiltCon magazine 2017, it hung in QuiltCon last year and also received an honorable mention in the modern category at UQSM quilt show in 2017.

Judge’s comments for Diamond in the Rough

  • Repetition of shape unifies design while variations provide interest.
  • Very graphic presentation.
  • Very good piecing.
  • Quilting designs are well-chosen for their areas.
  • Good machine quilting technique.
  • Slight imbalance in tension noted with red thread. Continue to strive for accurate retracing.
  • Bit of red in binding was a good choice.
  • Binding is good.

Positive Direction Quilt by Christa Watson

Positive Direction, made in 2016. 2nd place, Holiday category.
Originally patterned in one size in Modern Quilts Unlimited magazine.
Updated pattern now includes 4 sizes, available as print pattern or PDF download.

Judge’s comments for Positive Direction

  • Good interplay between quilt top design and quilting design.
  • Very good accuracy in piecing.
  • Good machine quilting technique.
  • Strive for more accuracy in retracing bubbles.
  • Binding is well done.

Scrap Happy by Christa Watson

Scrap Happy, made in 2017. 2nd place, Pieced – One Person category
Cover quilt + patterned in American Patchwork and Quilting magazine, October 2017.
I recently gifted this quilt to my son to take with him to college.

Scrap Happy Machine Quilting Detail

Machine Quilting Detail on Scrap Happy

Judge’s comments for Scrap Happy

  • Good definition between figure and ground.
  • Good machine piecing.
  • Colors are well balanced across quilt top.
  • Quilting designs further enhance definition between figure and ground.
  • Continue to strive for consistent stitch length in machine quilting.
  • Pieced binding enhances scrappy feel. Corners should be square.

I always mention to my students when teaching machine quilting not to stress too much about consistent stitch length when making their quilts. Yes, judges notice my “imperfections” in my quilts, but they still like them enough to award them ribbons, and I love making them without stressing about creating perfect stitches!

Other Gorgeous Quilts

Autumn Path quilt by Vicki Ruebel

Autumn Leaf by Vicki Ruebel of Orchid Owl Quilts
1st Place Pieced – One Person category and best machine quilting.

Vicki is a great friend and amazing quilter. We encourage each to other enter lots of quilt shows and I don’t even mind that she usually beats me every time, LOL!!

I love our friendly competition because it always pushes me to be a better quilter. Incidentally, her quilt was also patterned in the same issue of American Patchwork and quilting that has Scrap Happy on the cover. There’s even a bonus article on how she quilted it!

The Big Pickle by Vicki Ruebel

The Big Pickle, also by Vicki Ruebel. 1st Place, Modern

Yep, this one beat mine in the modern category, but isn’t it fabulous? This quilt nabs an award at each show it is entered, and deservedly so!

Corn Flowers by Cory Allender

Corn Flowers by Cory Allender and her Instagram quilting bee.
2nd place, collaboration/group quilt.
Design source: Blossom Heart Quilts Beehive

I love the quilting on this quilt. Cory is an amazing award winning longarm quilter and she’s nailed both the modern and traditional aesthetic.

Diamond Rings by Karen Garth

Diamond Rings by Karen Garth, Honorable Mention Modern Category
Original design and made by Karen

Karen, the past president who made the DQN banner at the top of this post always creates such stunning, dynamic work. I have a thing for black and white and this design really makes my heart sing!

Float by Melissa Bonilla

Float by Melissa Bonilla – Modern Category
inspired by Floating Embers

Every time I attend quilt shows, I wish I could bring my own ribbons! If so, I would have put one on Melissa’s quilt above. I may actually have to do that at a show someday. Hmmm, maybe I can create my own “Christa’s Choice” ribbon!!!

Modern Logs Quilt

Super Star Bingo by Lynda Blair – quilted by Cory Allender – Modern

I walked by this quilt and was stunned by the gorgeous colors and fabric placement. I was thinking “why do I love this quilt?” and on closer inspection realized the maker had used my Modern Logs quilt pattern to make it, LOL!! She even gave me credit in her artist’s statement as the design source.

Super Star Bingo Text

I’m totally happy when people make quilts from my patterns and enter them into shows, and I especially love it when they give credit to the designer. 🙂

Quilt Show Quilts

Bertha (left) by Melissa Curley – Third Place Modern
Theresa’s Crayon Box (right) by Theresa C – Third place, small pieced

I took this picture from the show which illustrates what I love about quilting and the quilting community. From minimalist modern designs to blinged and bedazzled art pieces – there’s truly something for everyone when it comes to quilting!

Ben Modern Quilt by Melissa Curley

Ben by Melissa Curley –  Judge’s Choice – Show Theme Category

Here’s another fabulous piece by Melissa Curley. I’m a fan of everything she makes and her sense of design and color are spot on! I think it’s kinda cool that she gives all of her quilts first names. Read her artist statement below, explaining the fun pop culture reference.

Artists Statement at Quilt Show

I hope you’ve enjoyed the virtual show and remember – entering quilts into shows isn’t really about the competition. It’s about sharing your work with a larger audience and inspiring others to make quilts they’d only dream about!!