Sew and Tell Baby French Roses #7 – Finished!

I am excited to share a finish with you today! I actually finished it last week just in time for it to win a ribbon in my guild’s quilt show. But with all of the quilt show excitement, I didn’t have time to share a little bit about the binding process plus a few in-process shots.

Roses for Katelyn

As you can see, the binding is made from leftovers of the pastel pink, yellow and blue plus some of the white. Scrappy bindings are really starting to grow on me! I stitched the binding finish by hand,  switching thread colors as needed. For detailed steps, you can read my hand binding tutorial here and my machine binding tutorial here.

Clover Wonder Clips
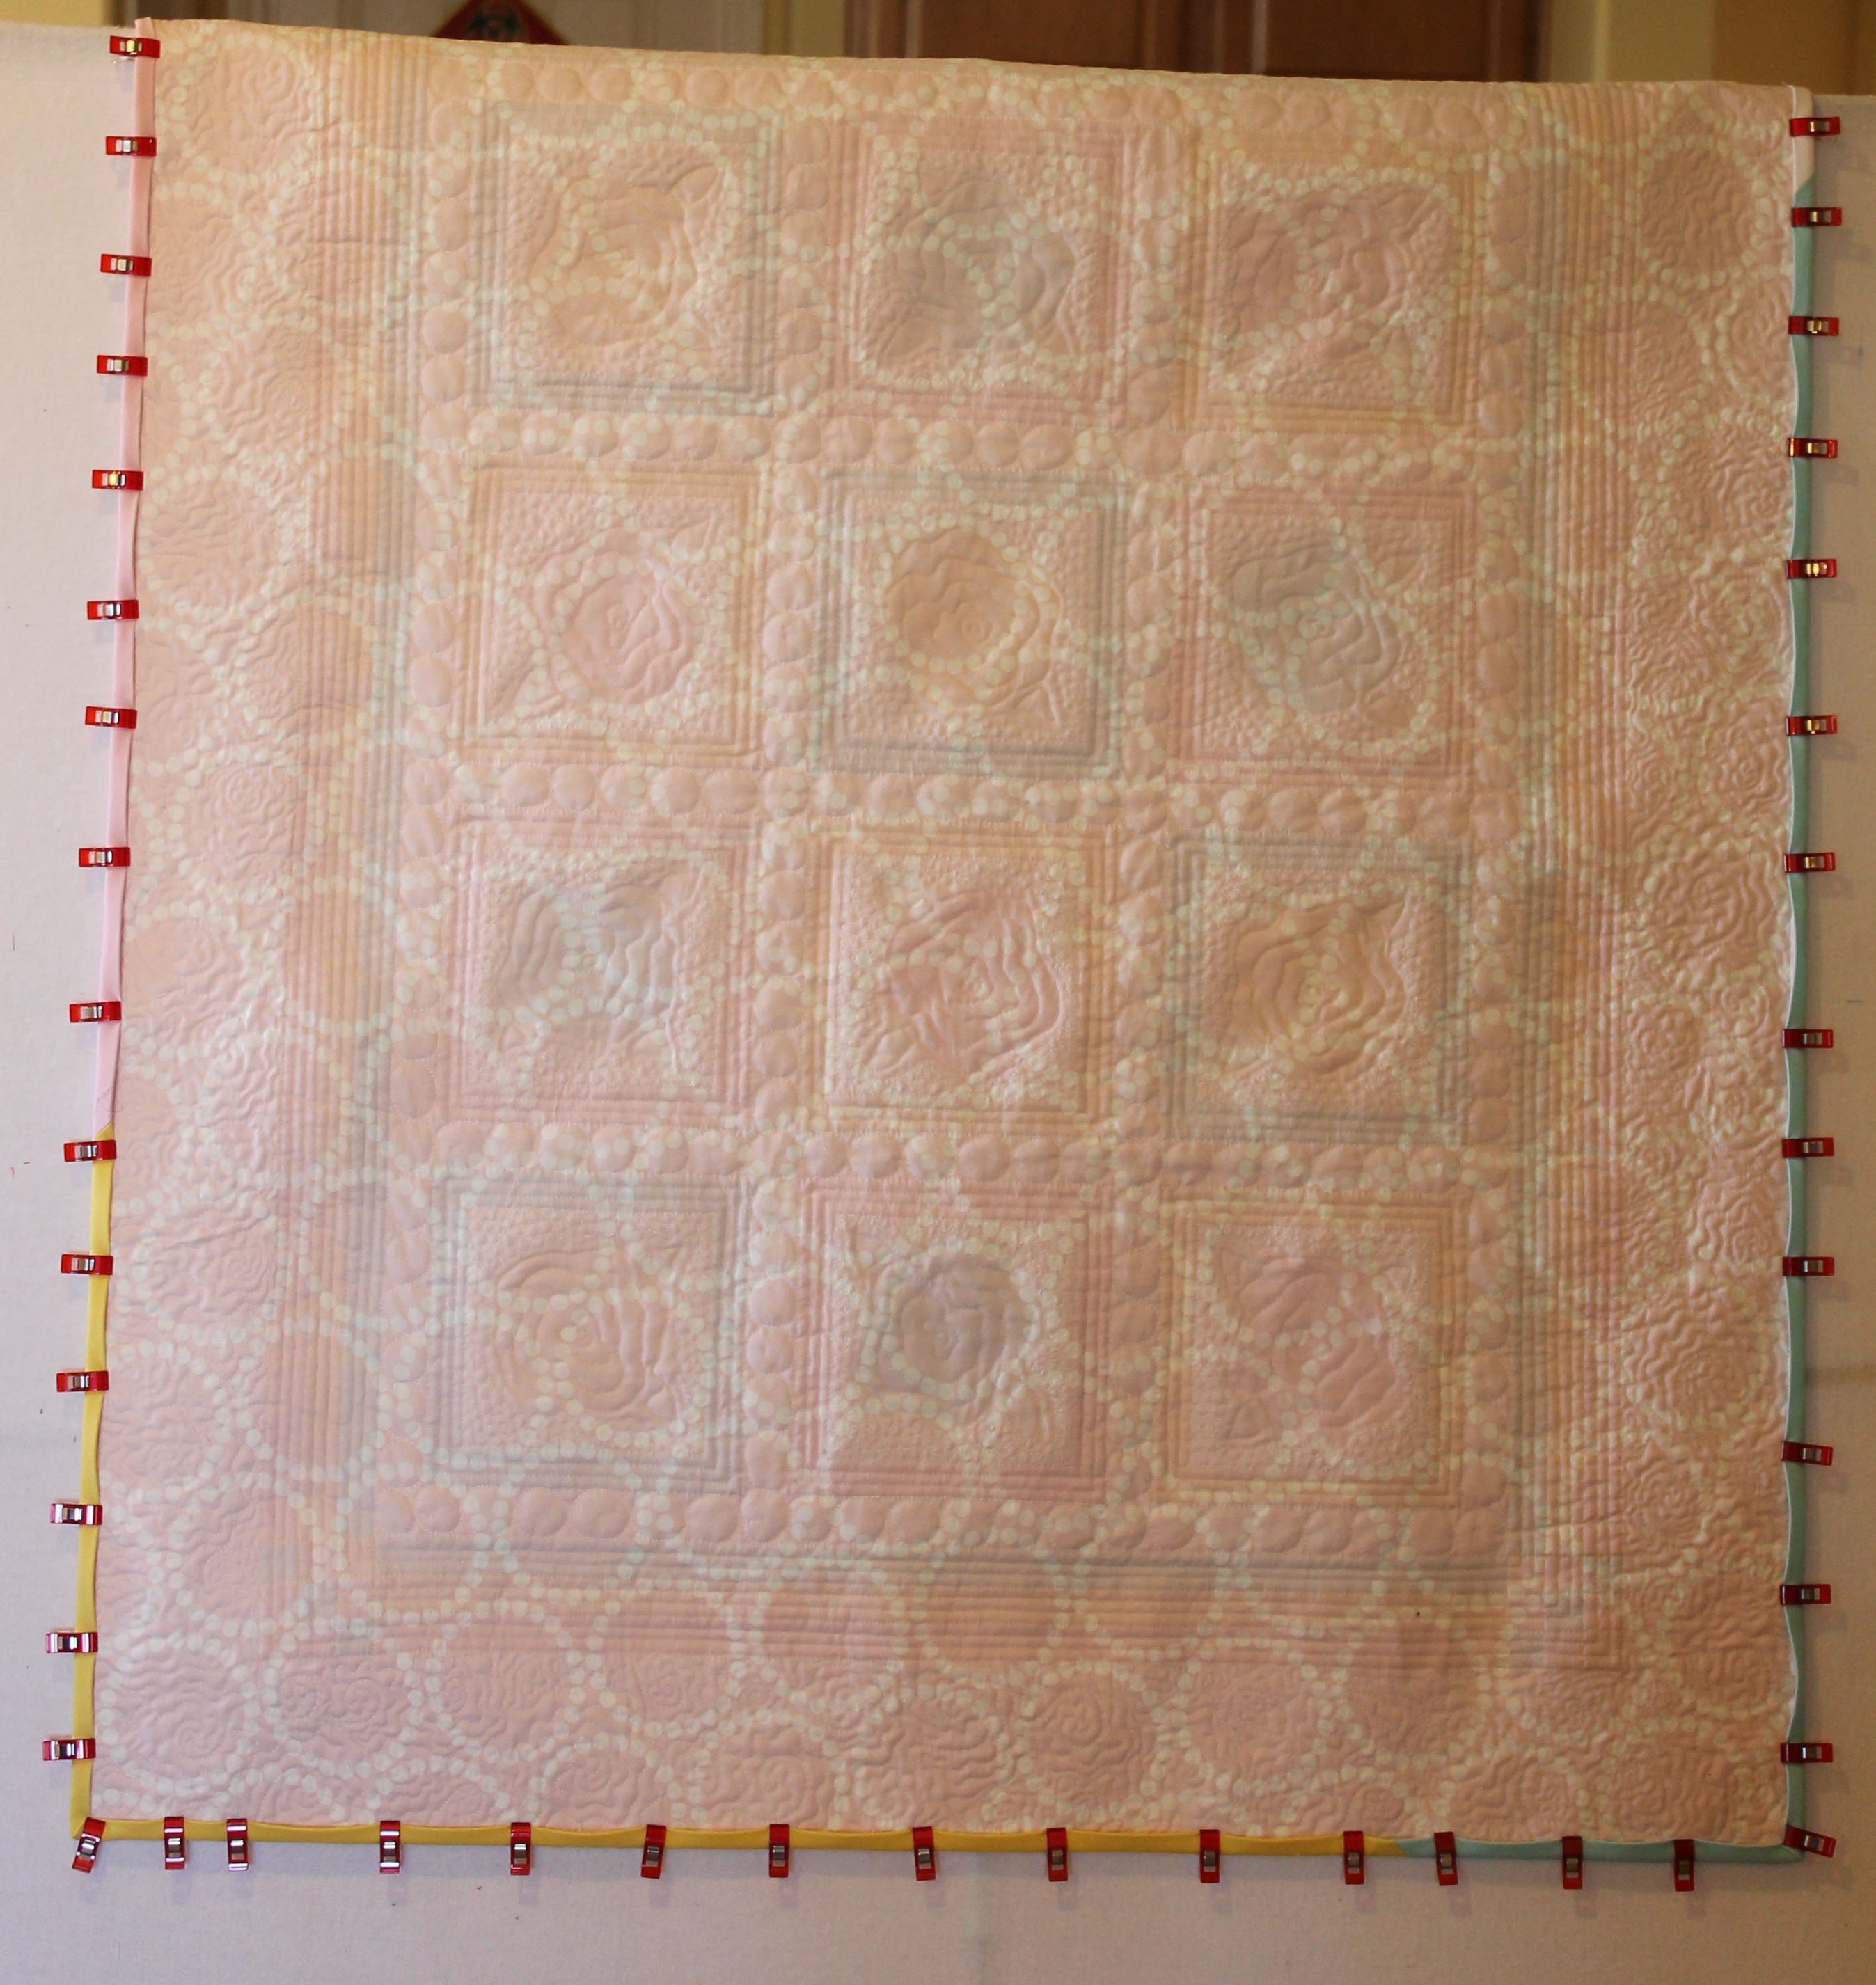
I used Clover Wonder Clips to keep the binding in place. These are my new favorite tool! With one box of 50 I was able to go completely around the quilt. These work way better than pins or hairclips and the hold the corners nice and tight, too.

I used Pearl Bracelets in Cotton Candy for the backing.

Quilting Plan

Actual Quilting

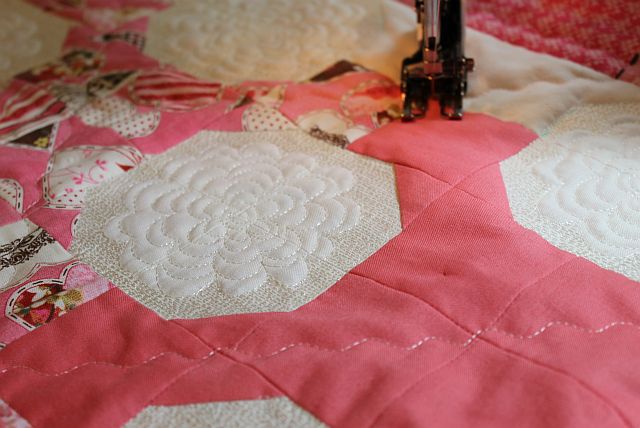
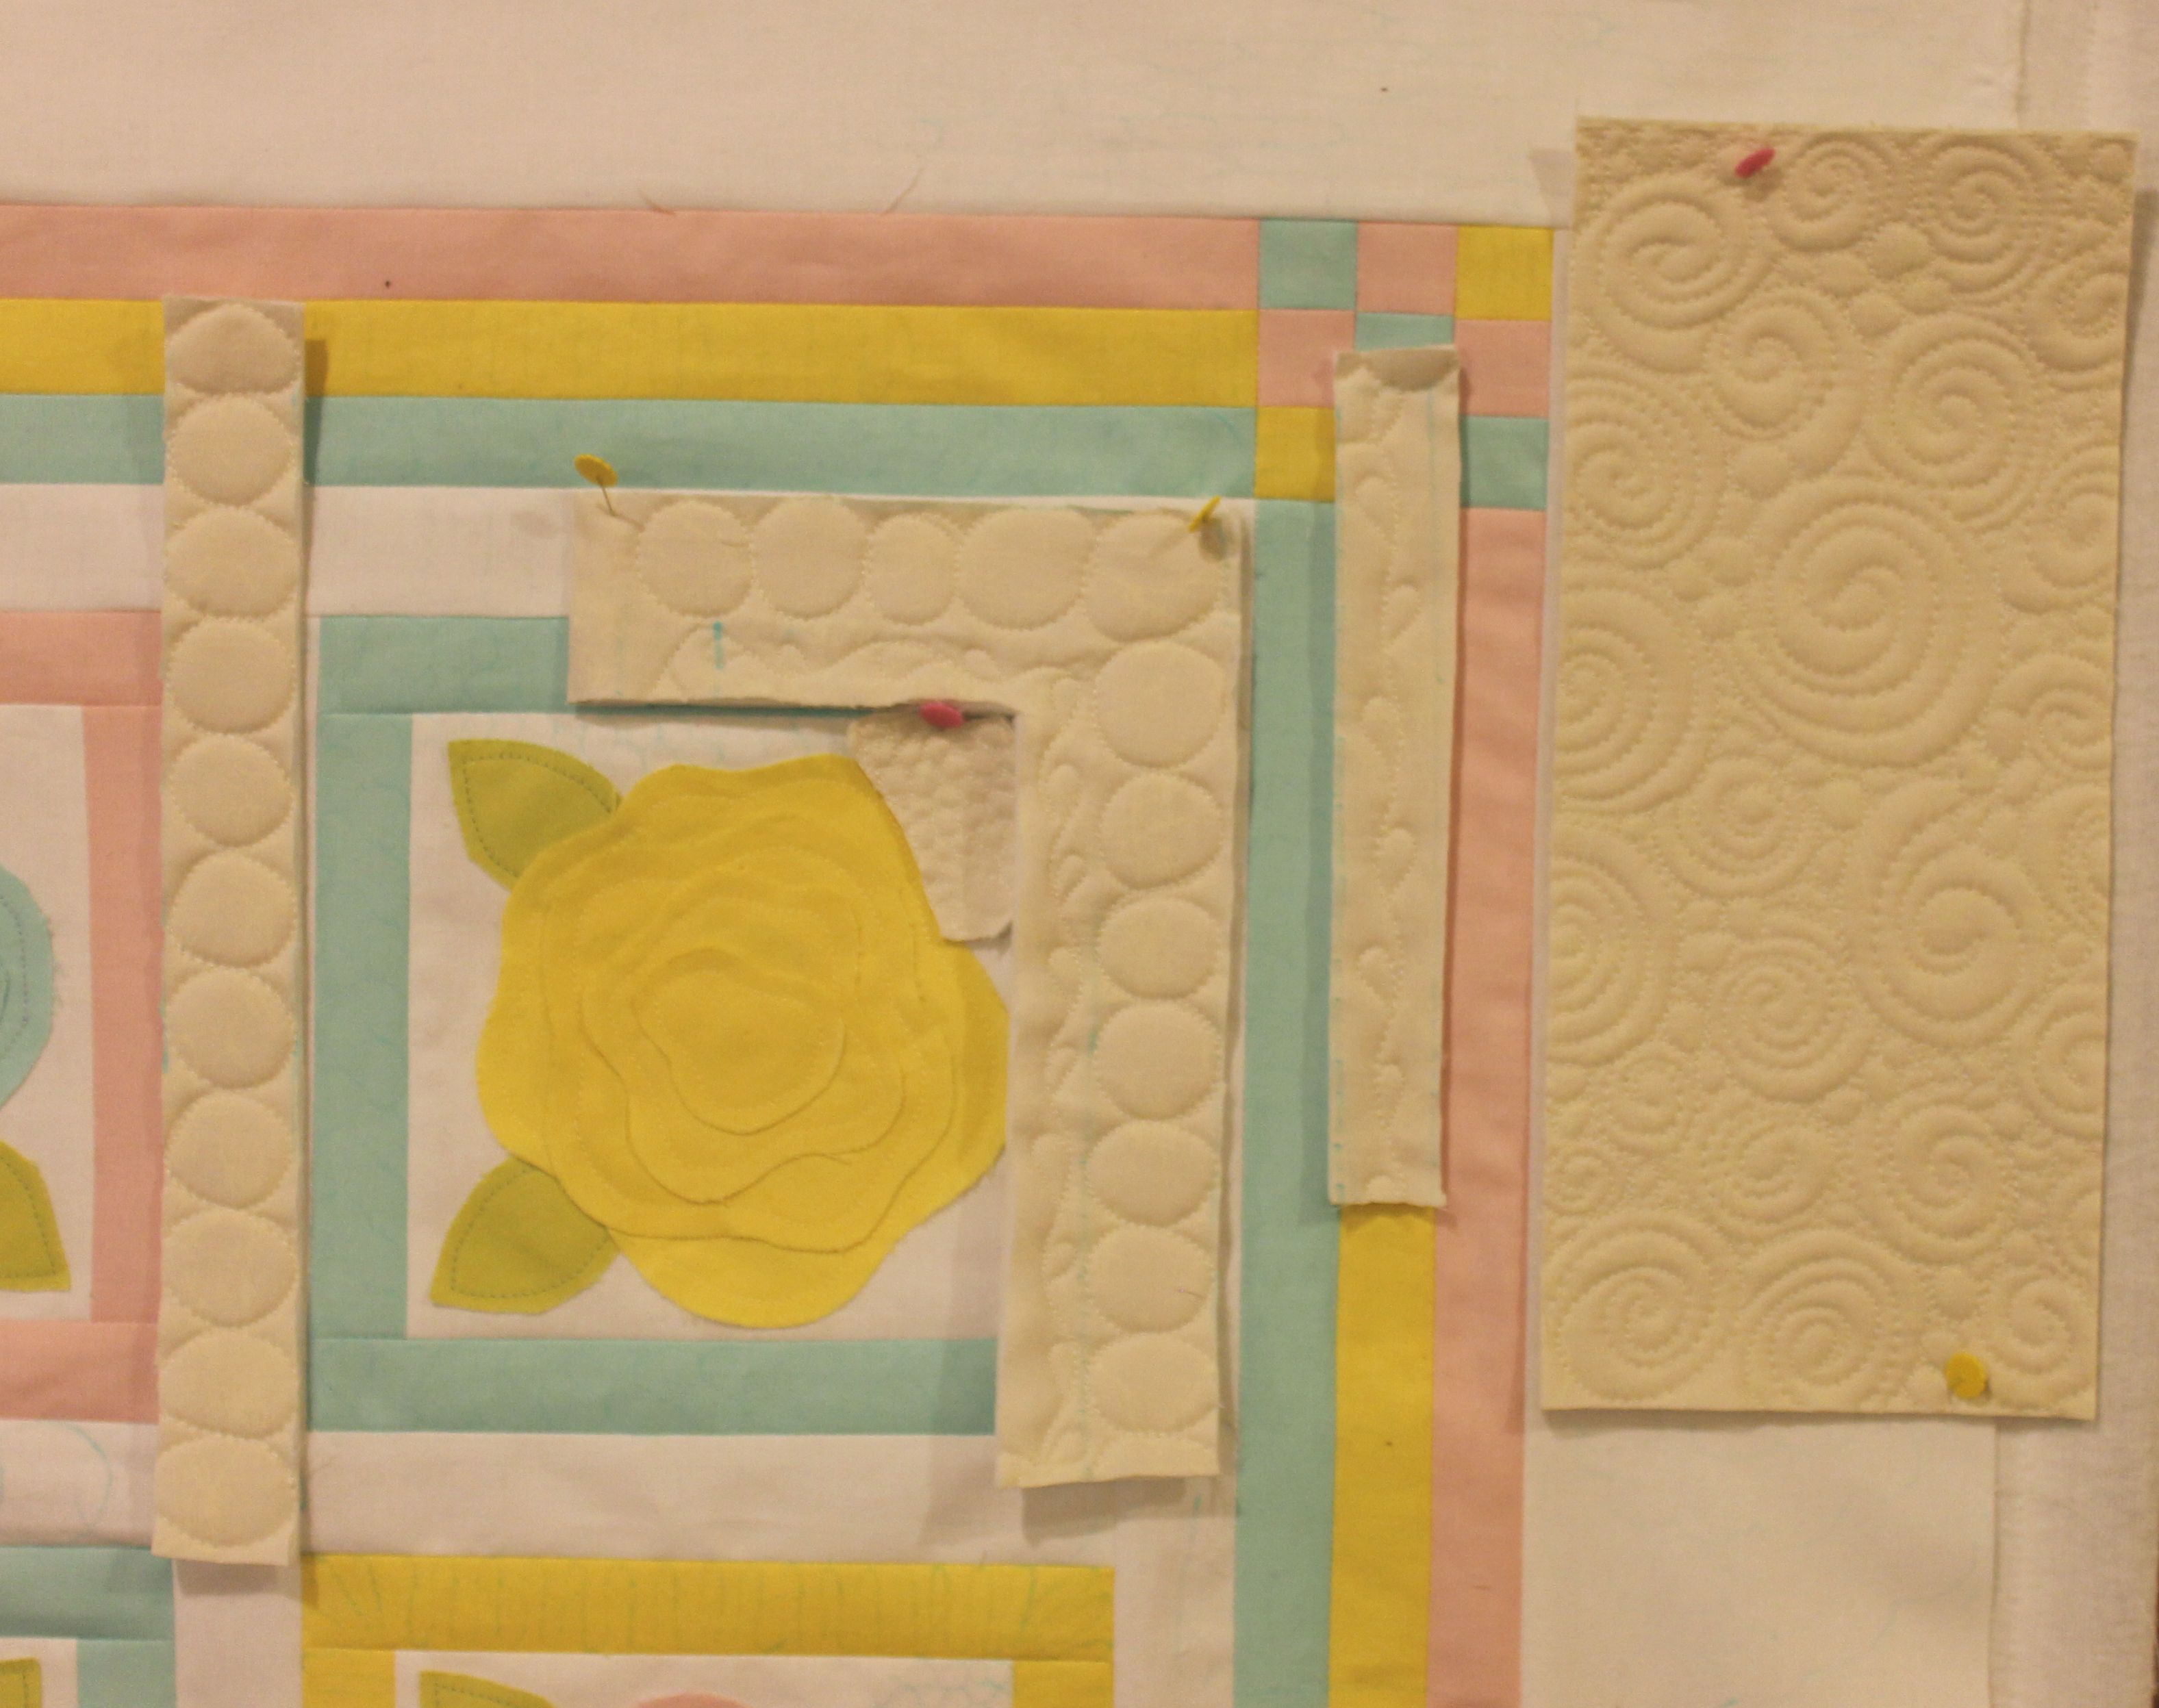
Here’s a side by side comparison of what I thought I would do for the quilting, and then what I ended up actually quilting. Sometimes I change things on the fly, or I get better ideas as I go along.

Christa's Bernina

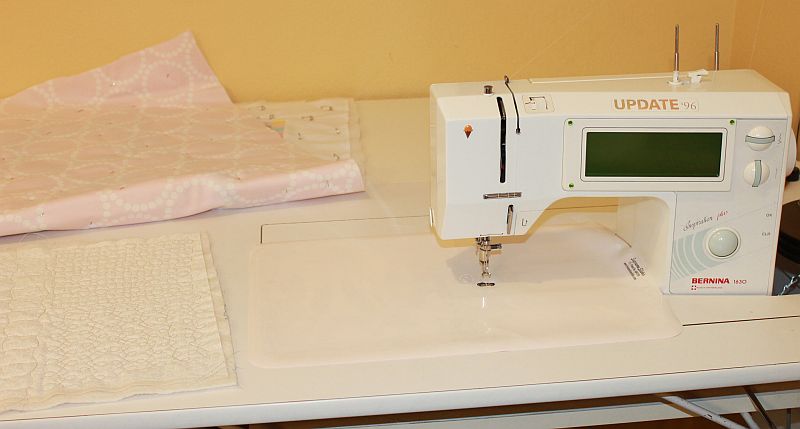
I’m starting to get asked more often about what machine I use to make my quilts. I have a a 17 year old Bernina 1630 with a nice big drop-in table. I always practice a bit before I start quilting and use the queen-size Supreme Slider whenever I do any FMQ.

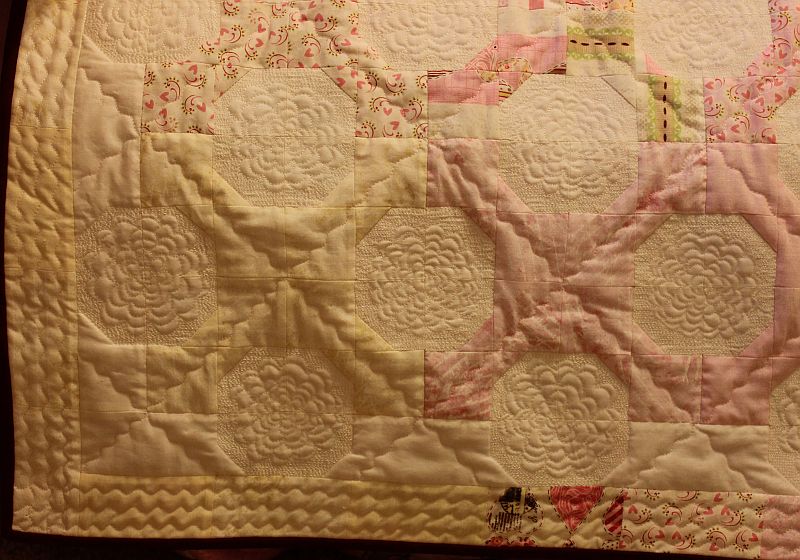
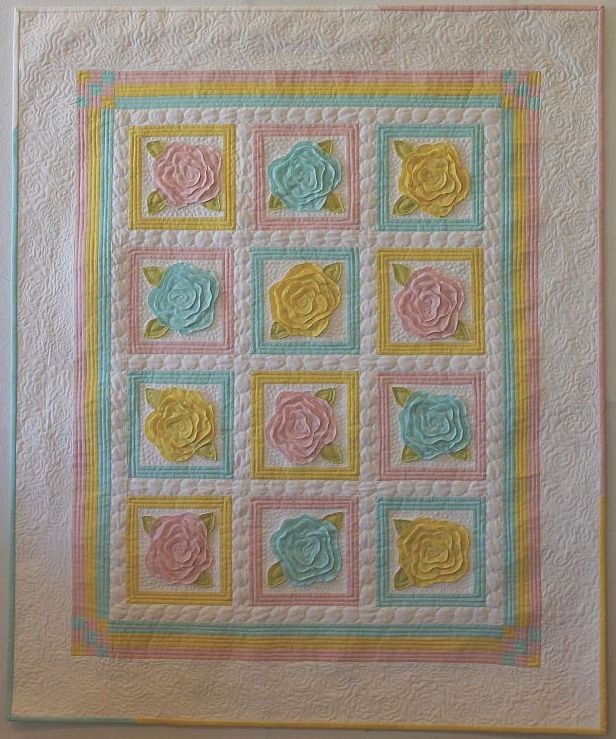
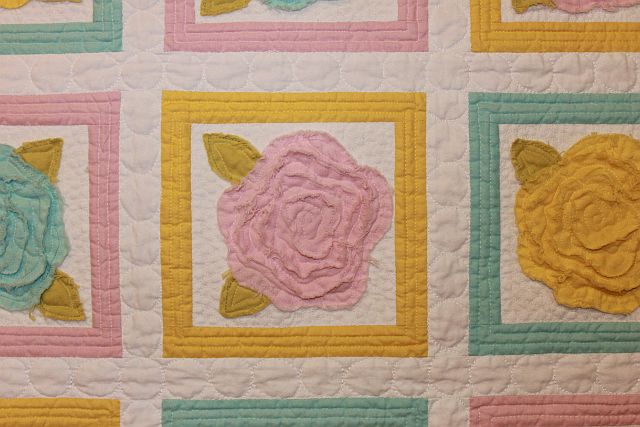
Here’s what Baby French Roses looked like after washing. It’s starting to shrink up a bit and the raw edges are getting nice and fuzzy:

French Roses WashedIt’s such a cozy quilt and I hope my sister loves it! It’s going to her new baby girl.

Cuddly RosesFrench Roses Finished Facts:

  • Quilt Name: Roses for Katelyn
  • Pattern Name: French Rose Buds by Heather French
  • Finished Size: 35″ x 42″
  • Materials: Kona Cotton Solids, Wool Batting
  • Thread: Glide Polyester and Bottom Line Polyester
  • Finished April, 2013
  • Patterns and Kits are available in my shop while supplies last.
Jenna with cousin Katelyn

Made for baby Katelyn

You can read my previous WIP on this quilt here:

  1. Baby French Roses #1- Cutting the Fabrics
  2. Baby French Roses #2- Machine Applique
  3. Baby French Roses #3 – Finished Top
  4. Baby French Roses #4 – FMQ Practice
  5. Baby French Roses #5 – Basting
  6. Baby French Roses #6 – Quilting

Christa’s Quilt Along 5.10 – Hugs ‘n Kisses Extra Quilting

For today’s lesson, I will show you how I used a simple serpentine stitch to quickly quilt through all the centers of my X’s. It only took about 2 hours and gave a really nice finish.

Because the flower quilting I did in the “O” spaces is really the star of the show in this quilt, I didn’t want to overwhelm the quilt with much more quilting.

Extra Quilting

Therefore I chose a simple wiggly line that is one of the decorative stitch options on my sewing machine.  I just eyeballed the quilting as I went and didn’t mark anything.

Wiggly Quilting

I used a light pink thread that blended with most of the fabrics and gave a nice texture even on the darker prints.  I went all the way across the X’s in one direction, then turned the quilt and crossed over in the opposite direction.

Quilting the X'sI like the little bit of “poof” it gives to the quilt in the un-quilted areas. I use this wiggly stitch quite a bit. It’s more forgiving that trying to stitch perfectly straight lines, and I can cover a lot of area quickly!

For the borders, I quilted 3 lines of wiggles which finished it off nicely.

Wiggly Quilting

For another idea on how to quilt the blocks, here’s a picture of my original Hugs and Kisses quilt in yellow and orange. I used a stencil to mark motifs in the O blocks and I quilted straight lines through the X blocks. Then I stippled the rest of the background spaces.

Alternate Quilting IdeaYou’ll notice the original Hugs and Kisses is flatter than the updated version. That’s because I used cotton batting. In the pink version, I used wool batting which gives more of a trapunto look to the quilting. Both are great – it just depends on the look you prefer!


Hugs ‘n Kisses Quilt Kits are available for purchase while supplies last. If you have any questions about this week’s homework, please be sure to join my flickr discussion, leave a comment, or email me directly at christa@christaquilts.com.

Quilt Along Schedule – Links will go to each active post when published.

Hugs 'N Kisses

Hugs ‘N Kisses 48″ x 64″


Grab my Quilt Along button!

<div align="center"><a href="http://christasquiltalong.com" title="Christa's Quilt Along" target="_blank"><img src="https://christaquilts.com/wp-content/uploads/2013/03/christas-quilt-along-175-2.png" alt="Christa's Quilt Along" style="border:none;" /></a></div>

Las Vegas Quilt Show This Weekend!

If you are in the Las Vegas area this weekend, please come check out the Desert Quilters of Nevada‘s annual quilt show at the Henderson Convention Center. See the flyer below for complete details:

DQN Quilt Show

I am very excited for this show. My guild just celebrated their 26th anniversary and they’ve been putting on a quilt show for nearly as long.

I’ve entered my 5 quilts below as part of the show. Quilting really is such good therapy for me so I’m excited to be a part of this, especially this week!

Detail of my Hugs ‘n Kisses quilt. It’s finished, but in my haste to get it delivered by the check-in deadline, I forgot to snap a completed picture. I’ll take one later this week at the show. (Read more about the quilting during tomorrow’s quilt along lesson). This one is going to my daughter after the show and she’s very excited about that.

Hugs 'n Kisses

French Roses for Katelyn is going to my sister for her brand new little baby girl that she just adopted in February. Now she has 3 kids like me, so when we go to Utah for a visit next month, it will be quite the noisy (but fun) house!

Roses for Katelyn

My Charming Chevrons Quilt will be included in my guild’s first-ever modern quilt category. I can’t wait to see the other entries in this category!

Charming Chevrons

Baby Bricks in Pink was one of my early a quilt alongs and is still a favorite of mine.

Baby Bricks in Pink

I like the low volume look of Baby Bricks in Blue. It’s fun to see how a pattern can look so completely different depending on the fabrics.

Baby Bricks in Blue

Whenever I enter anything in a show I never set any expectations of winning. It’s just fun for me to hear what the judges have to say, and learn from them on how to improve my techniques. Plus it’s pretty awesome to stand back and watch the reactions of others as they view my quilts in person. 🙂

Sew and Tell Baby French Roses #6 – Quilting

I am really pleased with how my Baby French Roses quilt is turning out. All I have left to finish is the binding. If I can knock that out this week, I  can enter into my guild’s annual quilt show next week. 🙂

French Rose Buds

It took me awhile to figure out how I wanted to quilt it. You can read about some of my previous FMQ auditions here.

I knew I wanted to quilt small pebbles surrounding the roses, and larger circles in the sashing, so that’s where I began. I quilted a concentric circle around each flower to give it more texture while allowing the raw edges to show. You can see the difference that the quilting in the yellow rose makes compared to the un-quilted pink one. It really defines it!

Quilting the Petals

It was a big stretch for me to quilt all of those circles free-hand with no marking or measuring. I eyeballed it the whole way. In fact, none of the quilting was marked, it was all free-form, a very big step for me!

Quilting the Frames

I had a hard time coming up with an idea for the frames around the flowers until I settled on simple straight lines. I used the edge of my walking foot as a guide and quilted two straight rows around each block. One quilted, the frames had sort of a wood-grain texture, reminding me of planter boxes that the roses could grow in.

I then repeated the straight line quilting in the inner borders to unify the design.

Detail Quilting

Practice DrawingFinally I added a sort of floral motif for the borders that roughly matched the quilting in the petals. I used Glide thread in the top and bobbin for most of the quilting and switched out thread colors to match the fabrics.

It took me pages and pages of practice drawing with pen and paper until I got the feel for how to form wobbly concentric rose petals continuously.

I’ve been keeping track of how long it takes me to machine quilt to get an idea of the complexity. It took me 13.5  hours to quilt this over a 3 day time-span.

After it’s trimmed and  bound I’ll wash the quilt few times (with color catcher sheets) to fray up the edges, and then she’s good to go!

French Rose Buds Quilt

French Roses kits are available in my store for a limited time. You can see my progress and read my previous post here.

Sew and Tell Baby French Roses #5 – Basting

I have been basting up a storm this week! I finished basting my Hugs ‘n Kisses Quilt Along as well as my French Rose Buds quilt. I am itching to start stitching both of them this weekend as soon as I get all of my other “quilty chores” done. 🙂

French Rose Buds Basted

Basting as you know is probably one of the least fun tasks of making a quilt. But whenever it’s time to baste, I set aside a whole day, put on some relaxing music and try to keep my distractions to a minimum. No, it doesn’t take me a whole day to baste (usually just an hour or two), but it does take a while to get in the mood to baste.

Bolt of Wool Batting

I start off by pulling down my big ol’ bolt of batting and laying the quilt on top of it so I know how much batting to cut. I leave a couple extra inches on all four sides which I will trim down later. My favorite batting to use is wool because it shows off the quilting and helps my quilts to hang flat nice and flat.

Binder ClipsPearl Bracelets backing


I use a couple of long banquet tables and random binder clips to secure my quilt backing. If the quilt doesn’t stretch across the whole table, I secure the loose ends with painter’s tape. I also starch my backing first as well as my quilt top.

Quilt Sandwich

I love the soft look of the Kona pastels on the front of my Baby French Roses. So I chose a low-volume fabric to go on the back: Pearl Bracelets in Cotton Candy Pink.

I’ve tried several different ways to baste such as thread basting (no thanks), spray basting (too hard to ventilate properly) and using all sorts of gizmos to help close the safety pins (too clumsy to figure out).  I even used plastic pinmoors to cap off my straight pins and while they are terrific to take out, I’m not sure they hold as well as I’d like.

Safety Pin Basting

So I’m back to using plain jane regular old safety pins, and quite a lot of them! I do have the fancy schmancy quilter’s curved pins, but this week I was scrambling to find as many safety pins around the house as I could so I’d have enough to baste two quilts at the same time. I ended up using a variety of pins in my quilt and they all work just fine.

Here are a few tips I’ve learned from basting scores of quilt tops:

  1. When using a lot of white fabric on the front, use a clean white polyster or wool batting, or a bleached cotton batting or a blend. Regular cream cotton may have little flecks or seeds that will show through to the top of the quilt.
  2. Use a backing that will not show through (shadow) through to the front of your quilt.
  3. Take the time press both the quilt top and back of your quilt before basting – and don’t be afraid to use starch. The flatter your pieces, the easier it will be to baste and quilt.
  4. Use lots of pins! The more pins you have in your quilt, the less it will shift while quilting. Sad, but true. Ask me how I know!

French Roses kits are available in my store for a limited time. You can see my progress and read my previous post here.

Christa’s Quilt Along 5.7 – Hugs ‘n Kisses Safety Pin Basting

For today’s Quilt Along lesson, we will tackle basting which is usually the least fun part of making a quilt. However, I’m giving you a whole week to do it and it only took me 2 hours including ironing and lots of pinning!

Step 1 – Give your top and backing a final pressing (30 Minutes)

This is the first time I have used starch on a quilt throughout the entire process and I loved it! Not only did I press all of my seams open, I starched the completed top and back.

Before Final Pressing

Before Final Pressing

This really made the top lie flat and made it easier to baste. When starching the top for the final pressing, I only starched the back side, waited a few minutes to let the starch soak in, and went over every seam with my iron. Just take a look at the before and after pics to see what a difference pressing with starch makes.

After Final Pressing

After Final Pressing

Step 2 – Lay Out The Quilt Sandwich (15 Minutes)

Use a large flat surface to lay out your quilt. I have 2 long banquet tables that I purchased from an office supply store. I leave them up in my sewing loft all the time and use them as my cutting area, too. Before I got these tables I used to baste on my wooden kitchen table.

Quilt Backing


I use binder clips to secure two edges of the table and painter’s tape to secure the other two edges. You want the backing to be secure but not overly tight. If you have just one table to work with, secure the middle of the quilt, baste it, and then move on to the rest of the quilt, pinning one section at a time.

Add the BattingAdd the Top

Next, add your layer of batting and smooth it out and look for any stray threads. Then add your quilt top. I don’t secure either of these two layers – just the backing.

Step 3 – Pin Basting (1 Hour, 15 Minutes)

I have learned that the key to good basting is using lots of pins! I start out by sprinkling a few safety pins on one side of the quilt. I leave them open after removing them from my previous quilt so they are already open, ready to be pinned.

Sprinkling of Pins

I divide the quilt into 4 areas and completely baste one section at a time. I put all of the pins into the quilt sandwich first, then go back and close them all. A band-aid really comes in handy on my index finger to protect it and help close the pins.

Baste the QuiltBand Aid for Protection


I used a variety of pins – some large, some small, some straight, some bent – whatever I had on hand. I pinned every other square.

Safety Pins

After pinning the entire quilt, I trimmed off the excess batting and backing fabric so there’s only an inch or two around all sides. The less fabric under the machine, the better!

Safety Pin Basting

Basted and Ready to Quilt!


Hugs ‘n Kisses Quilt Kits are available for purchase while supplies last. If you have any questions about this week’s homework, please be sure to join my flickr discussion, leave a comment, or email me directly at christa@christaquilts.com.

Quilt Along Schedule – Links will go to each active post when published.

Hugs 'N Kisses

Hugs ‘N Kisses 48″ x 64″


Grab my Quilt Along button!

<div align="center"><a href="http://christasquiltalong.com" title="Christa's Quilt Along" target="_blank"><img src="https://christaquilts.com/wp-content/uploads/2013/03/christas-quilt-along-175-2.png" alt="Christa's Quilt Along" style="border:none;" /></a></div>

WIP – Skillbuilder Pieced Blocks February and March

I am slowly catching up on my Skillbuilder Block of the Month blocks. I sewed together two month’s worth of blocks last month during my family getaway. From left to the right, the blocks are called Em Dash, The Mood, Woven Star, and Woven Chevrons.

Skillbulder BOMI chose to go with Kona Solids in all of the blocks since we will be quilting as you go. I chose Coal grey as the background, then I sold out of it and had to order more just for me LOL!!

I think solids really let the quilting stand out. Here are pictures of the first two month’s blocks that I quilted previously. They are called Sound Wave and Magnum.

Skillbuilder Blocks Quilted

(I just got a new camera and am learning how to take better pictures with it – but the lighting is still a little off.)

I am using the same grey for the front of all of the blocks but am toying around with using different shades of greys for the back of each pair of blocks. I think that will give a patchwork look to the backing and break it up somewhat so it’s not just a sea of grey.

Fabric LayoutFabric Layout


To keep everything organized, I took pictures of each set of fabrics I would use for each block. Then, when sewing the pieces together I worked on one block at a time. I kept my pieces right next to my sewing machine and constantly referred to the layout diagram. I also pressed all of the seam open which helped the blocks lie really flat.

BOM Pieces

I am pleased with how they turned out and now I’m excited to quilt them – which for me, is the most fun part!

Skillbulder BOM

Sew and Tell Baby French Roses #4 – FMQ Practice

I am moving right along on my French Rose Buds quilt. This week I practiced some free-motion quilting designs which I will finalize shortly. I decided to enter the quilt top into the weekly Quilting Gallery contest so I’d love for you to vote for it!

Vote here and you can be entered to win the Quilting Gallery’s weekly giveaway!

French Rose Buds Top

French Rose Buds Quilt Top 36″ x 43.5″

Before I jump right into quilting this puppy, I decided to take some time and plan out my quilting. Since this quilt is for my brand new niece, I want to make it extra special. I also think it’s a great quilt to show off some fun free-motion quilting texture.

Swirls Quilting

I started by drawing out some quilting designs on paper and then making up a few practice sandwiches to test it out. I’ve always wanted to try swirls ever since taking Angela Walters’ quilting negative space class at QuiltCon and on Craftsy. (Even though she quilts on a long-arm I was able to adapt her techniques to my domestic machine.)

Quilt DoodlingQuilting Audition

Next I tried starting sketching out possible designs directly onto the quilt top.

That didn’t give me enough of an idea so I pinned my quilted practice piece onto the quilt top for a better perspective. So far so good. Now I want to try swirls and pebbles.

Swirls and Pebbles

I really like this! I think combining two designs makes it more fun and whimsical. I stitched out a couple more practice sandwiches, cut them to size and pinned them to the top so I could see how they would really work in the quilt.

Quilting AuditionMy plan is to quilt each section in matching thread so all you see is the quilting texture, not the thread. Hopefully I will have time to baste and start quilting this weekend. I will post more of my progress next week.

By slowing down and only working on this quilt a little each week, I am able to get all of my other projects accomplished without feeling overwhelmed!

You can read about my previous Baby French Roses progress here.

Christa’s Quilt Along 5.6 – Hugs ‘n Kisses Pieced Backing

I just love creative quilt backs, don’t you? For today’s Quilt Along lesson, I will show how I made my pieced scrappy backing for Hugs ‘n Kisses using fabric from my stash. It took me 4 hours to complete my pieced backing.

Backing FabricStep 1 – Choose Your Backing Fabric (30 Minutes)

To get started, comb through your stash for any fabrics you want to use up that “go” with your Hugs ‘n Kisses quilt top.  Don’t worry about pulling too many or too few, you can finalize it a bit later.

I wanted to use up a few pinks and greens and I tried to pull fabrics that were light (or the backside was very light) so that they would not shadow (show through) the quilt top.

Step 2 – Estimate the Yardage (30 Minutes)

Next, lay out your quilt top so you can see how much area you need to cover. I laid mine out wrong side up so I could see where the darker and lighter blocks were. I wanted to mimic a little bit of the light and dark areas on the back of the quilt.

Hugs 'n Kisses TopCovering the Back

Now start covering up the quilt! It’s kind of like a puzzle. I played around with several different arrangements until the top was covered and I liked the way it looked. Don’t forget to stack your pieces so that there are a few extra inches of fabric hanging off all four sides.

Fill in the puzzle.Completely Covered


Step 3 – Figuring Out Exact Measurements (1 Hour)

I drew a sketch of my layout in EQ7 so I could figure out the measurements. You can also do this on graph paper. Start with the finished size of your quilt top which should be around 48″ x 64″. Then add 6 inches to both directions to figure out how large your backing needs to be. This brings me to a total backing size of 54″ x 70″.

Backing PIeces

I drew rectangles of each fabric piece in place on my diagram based on the finished size.  When I cut the pieces I will include 1/2″ for seam allowances. If you would like to skip figuring it out for yourself, you can use my exact cutting measurements below.

Step 4 – Cutting the Backing Pieces (1 Hour)

I recommend pre-washing and starching your backing fabrics. I have listed two charts below. The first one is how much fabric you would need as yardage (with some leftover). The second chart is how big to cut each piece, including seam allowances.

4.5 Yards Total ScrapsQuilt Back Diagram

  1. 5/8 Yard
  2. 1/2 Yard
  3. 1/3 Yard
  4. 1/3 Yard
  5. Fat Quarter
  6. 1/3 Yard
  7. 1/4 Yard
  8. 1 Yard
  9. 5/8 Yard
  10. Fat Quarter

Cutting Measurements

  1. 20.5″ x 20.5″
  2. 34.5″ x 12.5″
  3. 34.5″ x 8.5″
  4. 40.5″ x 8.5″
  5. 14.5″ x 8.5″
  6. 30.5″ x 8.5″
  7. 6.5″ x 42.5″
  8. 30.5″ x 34.5″
  9. 18.5″ x 30.5″
  10. 18.5″ x 12.5″

You may need use a bigger backing if you are sending it out to be quilted, but no one here is going to do that, right?? We are all going to quilt our own quilts and have fun doing it!

Step 5 – Piecing the Backing (1 Hour)

Use 1/4″ seam allowances and press all seams open. Follow the diagram above:

  • Sew piece 2 and 3 together; add to piece 1.
  • Join pieces 4 and 5.
  • Add 6 to the top of piece 8; then add piece 7 to the side.
  • Join pieces 9 and 10
  • Add unit 1-2-3 to unit 4-5
  • Add unit 6-7-8 to unit 9-10
  • So both larger units together to complete the backing and give it a final pressing.

Pieced Backing

Optional Non-Scrappy Backing

Plain BackingIf you would like to sew your backing using all one fabric, you will need a total of 3 yards.

Cut it into 2 equal pieces and trim off the selvedges. Then join the pieces together parallel to the selvedge.

You will have now a large piece measuring approximately 54″ x 80″.

Cut off about 10″ of excess length so that you have a piece measuring approximately 54″ x 70″.


Hugs ‘n Kisses Quilt Kits are available for purchase while supplies last. If you have any questions about this week’s homework, please be sure to join my flickr discussion, leave a comment, or email me directly at christa@christaquilts.com.

Quilt Along Schedule – Links will go to each active post when published.

Hugs 'N Kisses

Hugs ‘N Kisses 48″ x 64″


Christa’s Quilt Along 5.5 – Hugs and Kisses Top and Pieced Borders

Hugs 'N Kisses

Hugs ‘N Kisses 48″ x 64″

Welcome to part 5 of my Hugs ‘n Kisses Quilt Along!

For anyone just joining me, Hugs ‘n Kisses Quilt Kits are available for purchase while supplies last.

Be sure to work at your own pace and please share pictures of your progress on flickr.

Scroll to the end of the post for the quilt along schedule.

It took me a total of 6 hours to follow the steps below and complete my Hugs ‘n Kisses quilt top.


Step 1 – Arranging The Blocks (30 Minutes)

I decided to go with all X blocks for my layout. You will notice that my blog header shows part of a Hugs ‘n Kisses quilt I made several years ago in reds and oranges. I decided to try something different this time around and I encourage you to make it your own. 🙂

Kisses Blocks

Using a design wall or other large surface, play around with your blocks until they are in a pleasing arrangement. I tried to create a radiating effect by grouping all of the lighter blocks together in one corner and gradually darkening them across the quilt.

Step 2 Sewing the Blocks into Rows (1 Hour, 30 Minutes)

Lay out your design forming 5 blocks across by 7 rows down. To keep track of my rows, I took a picture with my camera phone. Then I was able to refer back to it for proper block placement. I pinned at the intersections and pressed all of my seams open.

Pin BlocksPress Seams Open


Sew each set of blocks into a row. For easier joining, press rows 1, 3, 5 one way and press rows 2, 4, 6 the opposite way. Or press all seams open like I did.

7 Rows of Blocks

Step 3 – Joining the rows (1 Hour, 15 Minutes)

Join two sets of rows into one piece. Repeat for 3 pairs of rows with one left over. When pressing my seams open, I open them with a wooden seam roller, then press with an iron.

Pairs of Rows Seam Roller


Join rows 1-2 and 3-4. Then join rows 5-6 with row 7. Then sew the two pieces together.

Step 4 – Adding the Inner Borders (45 Minutes)

Measure the width of your quilt top. An easy way to do this is the fold it in half and measure using a cutting mat. My folded measurement is 20.5 inches which means my quilt measures 41 inches. (Mathematically it should measure exactly 40.5 inches so mine grew slightly.)

Measure the quilt.
Trim two 2.5 inch background strips to this measurement. Attach carefully with pins and sew one strip each to the top and bottom. Usually I sew side borders first. However, since I wanted to avoid piecing the top/bottom borders I sewed them first. 🙂

Inner Border

Next, measure the length of your quilt including the added strips. Use the same folding trick as above. Mine was 61 inches (mathematically it should have been 60.5 inches). You will need to join multiple background strips together for length. Trim two pieced strips so that they measure this length exactly. Add rows to either side.

Step 5 – Adding the Pieced Outer Border (2 Hours)

Each pieced border is composed of bricks that you cut out previously. You need a total of 54 bricks that measure 2.5″ x 4.5″ each. Sew them together into segments until you have 4 pieced segments (you can make them random or gradated):

Pieced Borders

2 Top/Bottom Borders – 12 Bricks Each
2 Side Borders – 15 Bricks Each

Top & Bottom: 12 segments sewn end-to-end (Make 2)
Sides: 15 segments sewn end-to-end (Make 2)

Add the pieced side borders to your top first. If they are too short, you may need to go back and re-sew a few segments with slightly narrower seam allowances. Or you can insert a piece as needed.

If the rows are too long, you may need to go back and increase the width of a few of your seam allowance segments to shorten it up. Or just trim off the excess.

Hugs 'n Kisses Quilt Top

Add the top and bottom borders on in the same way. Voila! A finished quilt top!


If you have any questions about this week’s homework, please be sure to join my flickr discussion or email me directly at christa@christaquilts.com.

Quilt Along Schedule – Links will go to each active post when published.