Quick Quilt Tips Tour – 5 Tips for Faster Quilting on Your Home Machine

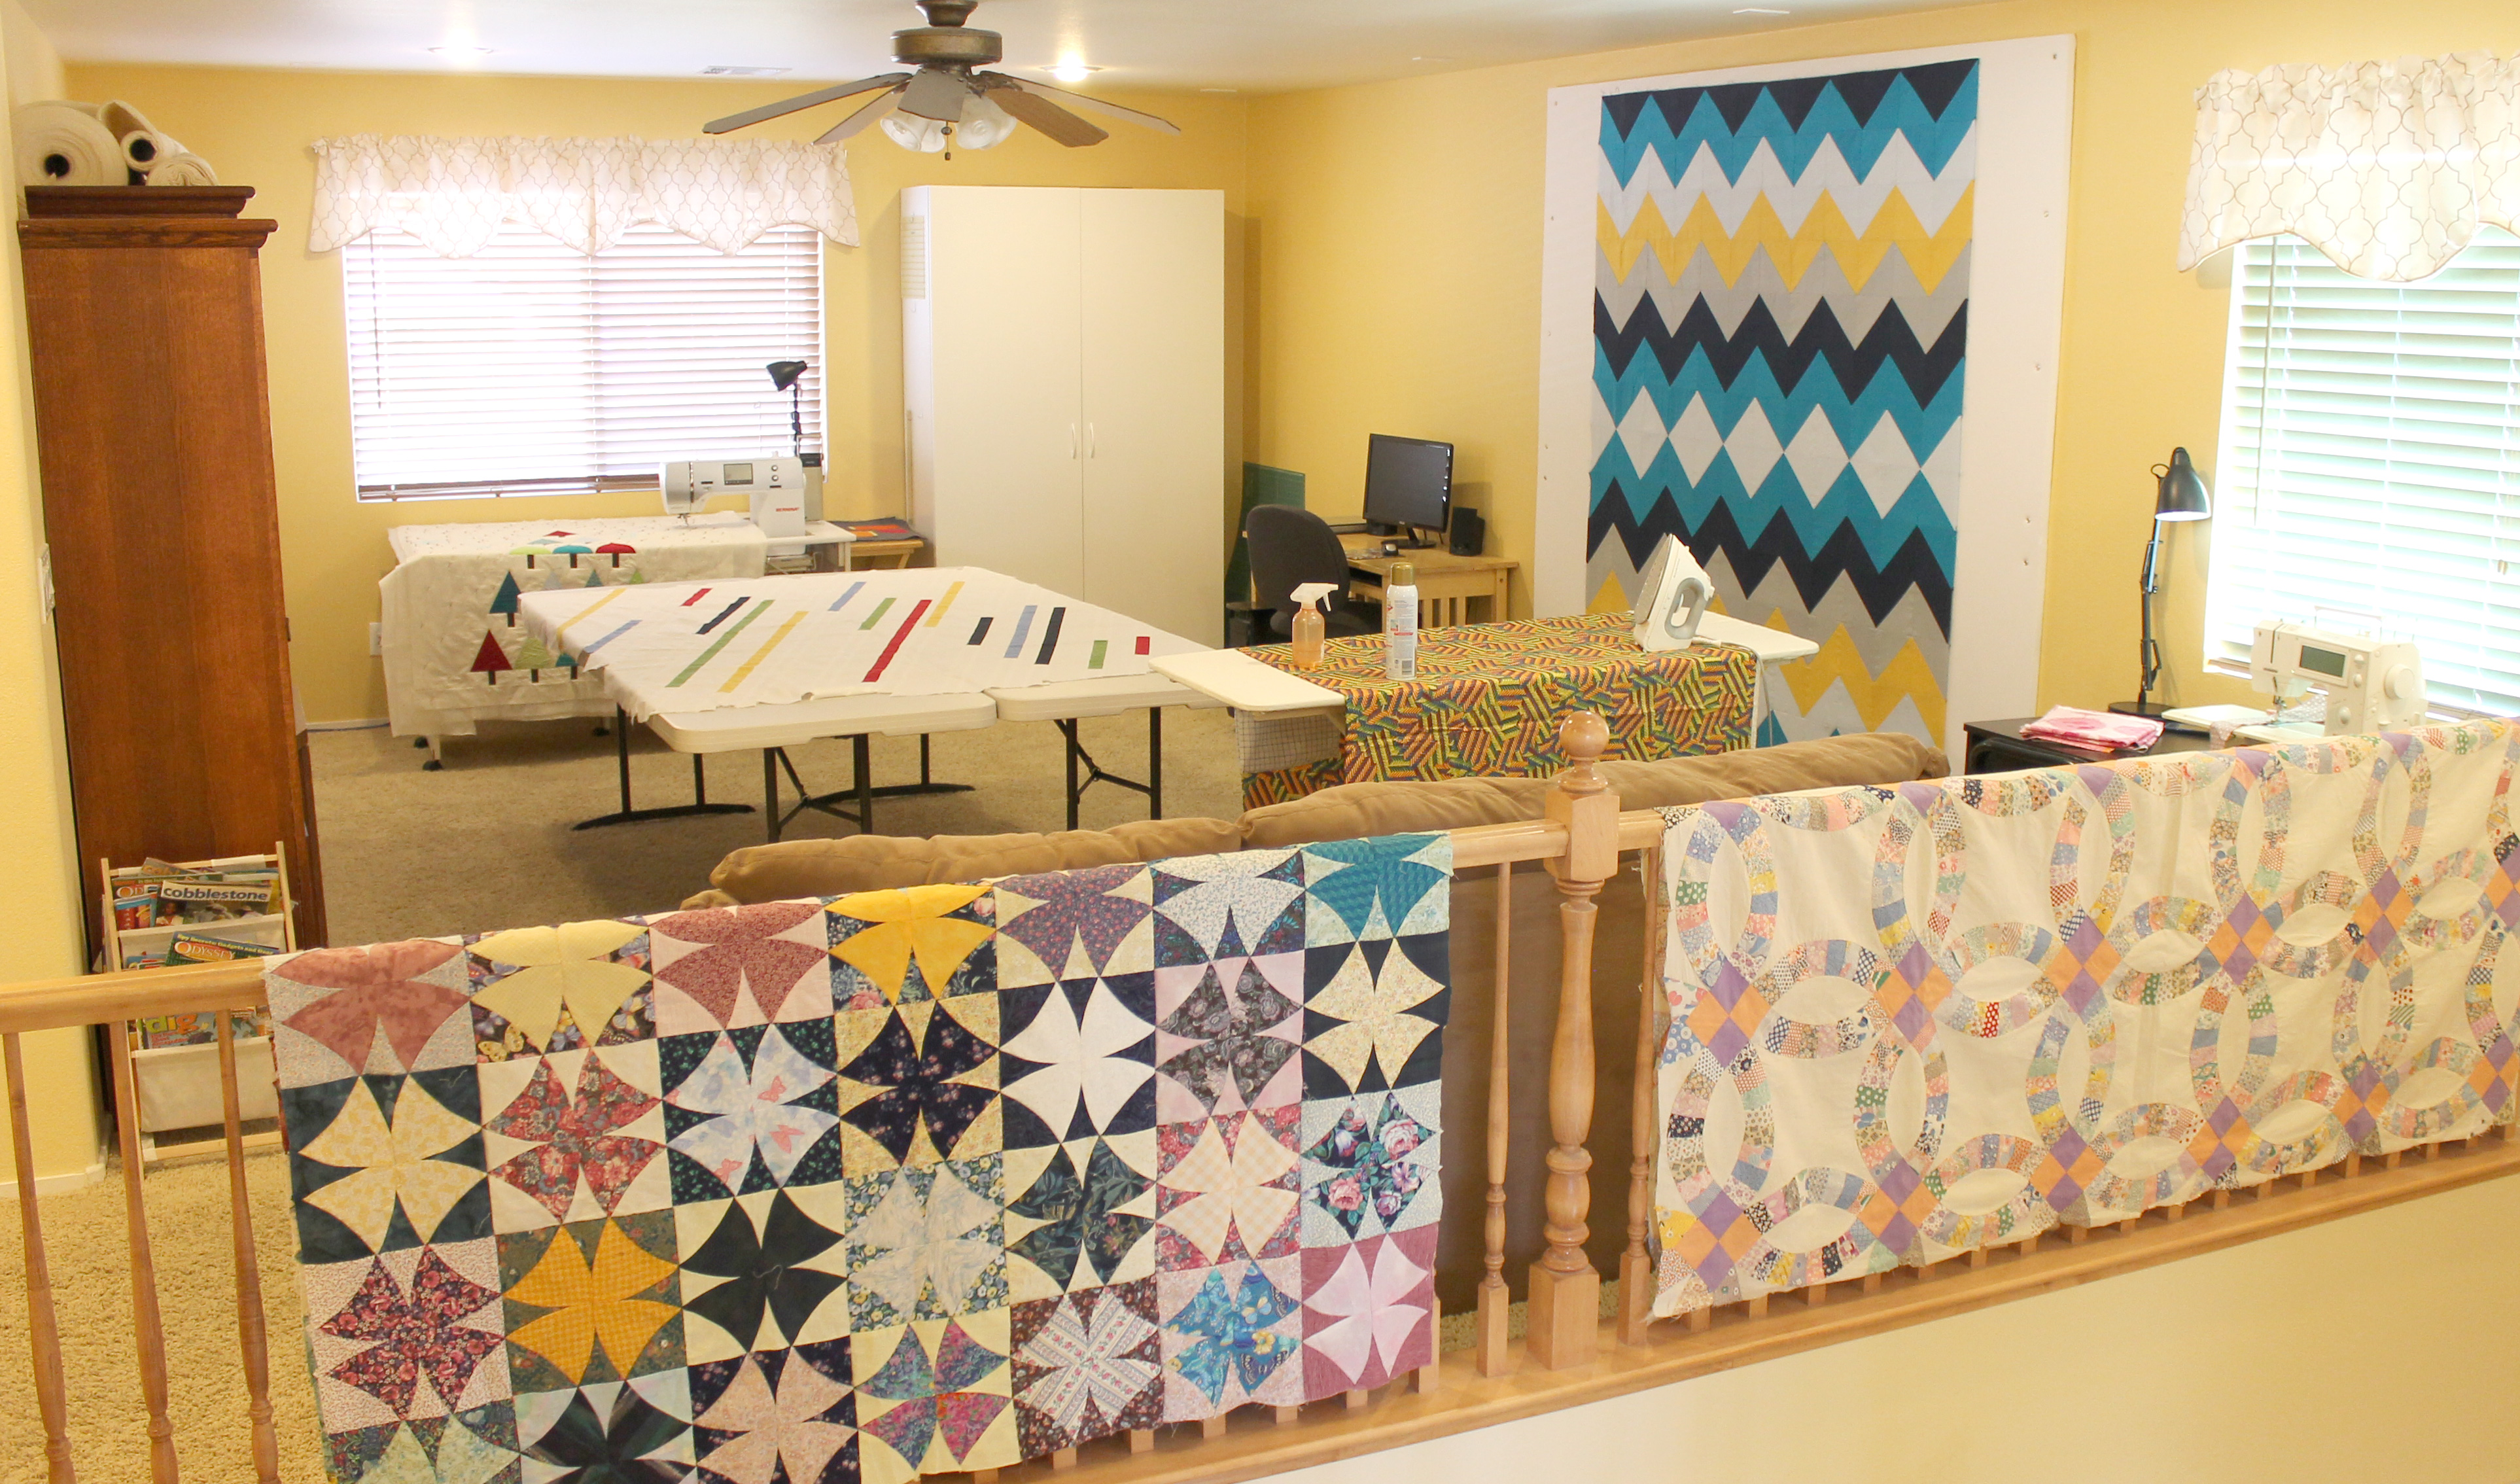
Hi old friends, and welcome new ones! I’m happy to be participating in Amy Smart’s Quick Quilting Tips Tour – Round 2. Amy has gathered together several bloggers to offer some of their favorite tips for faster and better quilting. (Click here to read all of the tips shared in Round 1.)

20150529_tips_amy_smartMachine quilting is one of my great passions so I thought I would share some of my favorite tips for faster quilting on your home machine.

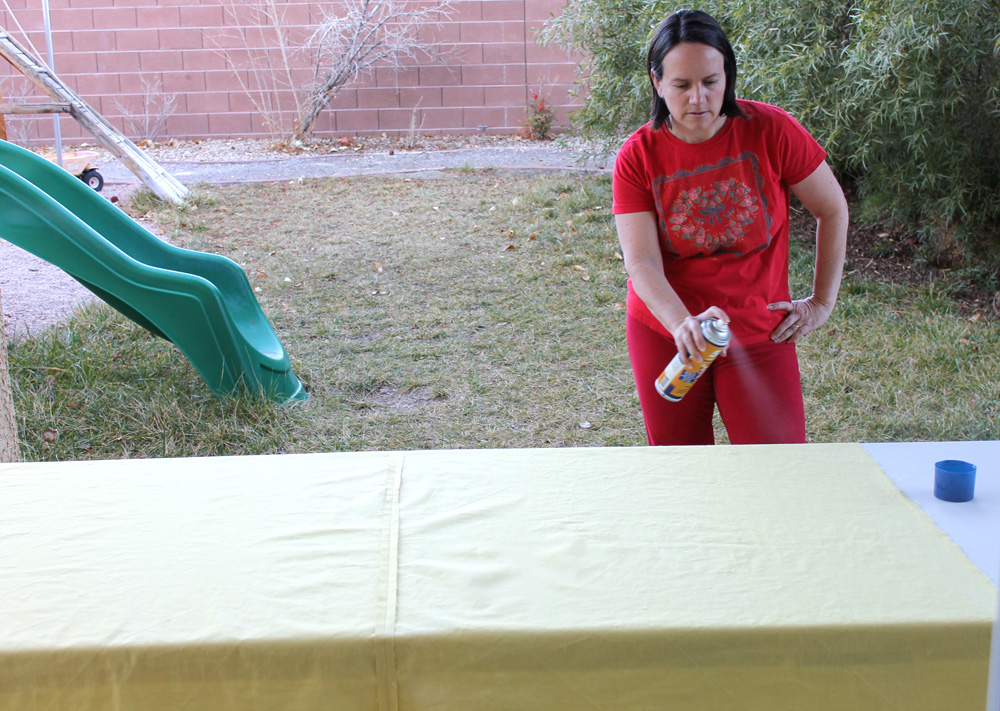
Tip #1 – Use Basting Spray

I am a recent convert to using basting spray and I don’t know if I will ever go back to using safety pins. While it takes me the same amount of time to spray baste as it does to pin, I save a ton of time not having to stop and remove pins while quilting.

spray_basting_0Click here for my spray basting tutorial.

Tip #2 – Embrace No-Mark Quilting

When I jumped on the modern bandwagon (after considering myself a traditionalist for so many years), the best thing I embraced was letting go of perfectionism and symmetry. This meant I didn’t have to mark all of my quilting lines anymore, or use stencils to quilt perfectly aligned motifs. What freedom!

herrinbone_quiltingThere’s nothing quite like a good random stipple to add texture to your quilts. Herringbone, shown above is one of my fastest finishes to date!

My quilting has improved because I can just doodle with my needle and thread while enjoying the improvisational nature of quilting random free-motion shapes and textures.

More Texture
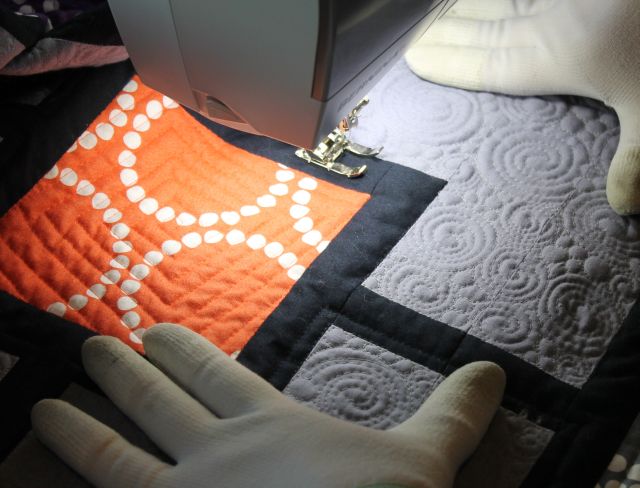
None of the quilting was marked in String of Pearls – I just eyeballed the FMQ and used the edge of my foot as a guide for the straight lines.

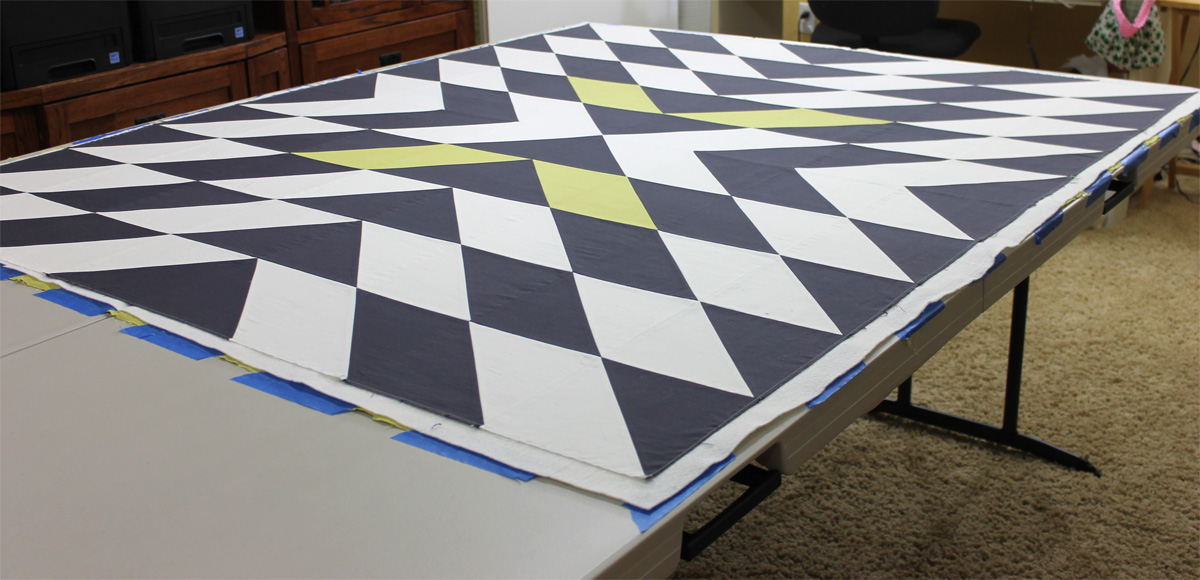
Tip #3 – Try Quilting Designs from Edge to Edge

I love quilting lines which can start on one edge of the quilt and end on the other side. This is a huge time saver because there’s no need to bury threads when you start and stop. I quilted the uneven lines of Modern X starting on one side of the quilt, pivoting to follow the design, and then back off the other side.

straight quilting
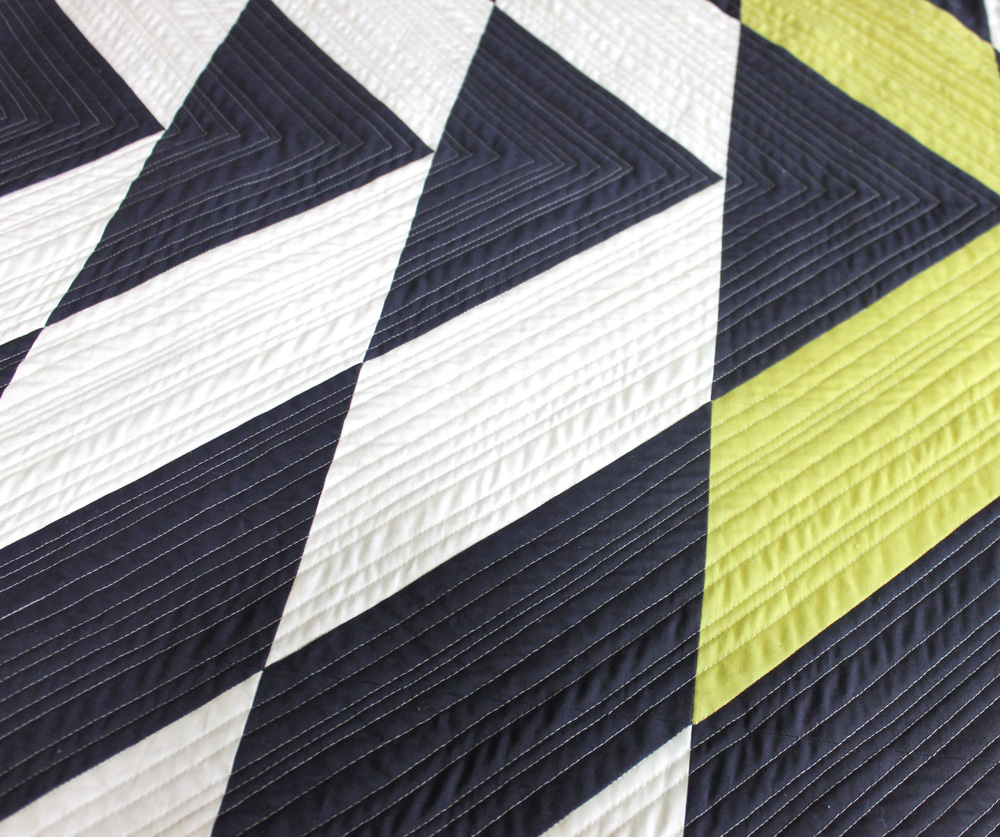
When I felt like my bobbin was getting low, I switched it out so I didn’t have to worry about running out of thread halfway through a line of quilting.

(Bonus tip – since I use Aurifil 50 wt cotton for both piecing and quilting, I use up any partial bobbins on my next piecing project!)

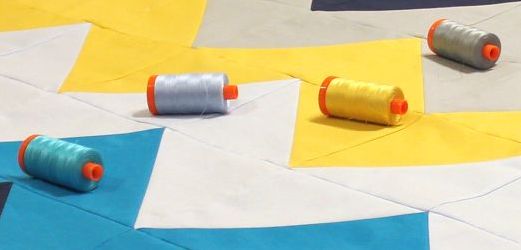
Tip #4 – Use the Same Color Thread in Top and Bobbin

This is a huge time saver because I don’t have to hassle with my machine’s tension to keep tiny pindots of thread from poking through the top or bottom of the quilt. When I want a super-fast finish, I prefer to quilt with one blending thread color over the entire surface of the quilt so that I don’t have to stop and change threads.

test_blockThis recent test block from Modern Logs shows how a thin neutral thread blends in to many different fabrics. It’s such a time-saver when you don’t have to switch thread colors. (I also quilted this quilt using an edge to edge design and it went so fast!)

Tip #5 – Wind Plenty of Bobbins Ahead of Time

It’s much quicker to wind a bunch of bobbins at the start of a project rather than having to stop mid-quilt for more winding. I recently upgraded to a new Bernina 710 sewing machine. One of my favorite features is the huge bobbin capacity, compared to the older machines. So if you get a ever chance to use a machine with a bigger bobbin, I highly recommend it. 🙂

Bernina BobbinsI keep plenty of bobbins on hand and use the biggest capacity bobbin I can.

I hope you’ve enjoyed my tips for faster machine quilting! Be sure to check out the other stops on the Quick Quilt Tips Tour. You just may learn something new. 🙂

Be sure to check out Amy’s new book, Fabulously Fast Quilts. In case you missed it, I recently reviewed it here on my blog.

20140520_fabulously_fast_quilts

New around here?

Be sure to sign up for my Friendly Threads newsletter and get a free PDF quilt pattern!

Favorite Tools – Batting Shears

It’s been awhile since I’ve shared some of my favorite tools (mostly because I’ve been using the same old stuff)! But recently, I splurged on a pair of batting scissors and I’m very pleased with my latest purchase.

batting_shearsBatting shears are pretty spendy but I think they are well worth the money.

I bought a pair of these funky looking scissors a few weeks ago and finally put them to the test while trimming the batting for my Herringbone quilt. I’m not exactly sure what the funky angle is for other then allowing you to cut through bulky battings with ease. The soy batting I used wasn’t really thick but it was still so much easier than using regular scissors.

batting_shears_2So put a pair of these on your holiday or birthday wish list. Think of batting shears as one of those luxury quilting items that’s not necessary, but sure is nice to have!

I’ll leave you with a quilting tip of the day: write on a corner of your batting what the fiber content is so that you can keep track once you take it out of the packaging. My handwriting isn’t great, but this does say “Soy” even though it looks like “Joy.”  Well, you know how much joy I get from quilting my quilts, so it’s all good. 🙂

soy_batting_cornerMark your batting pieces and leftover scraps so you know what’s what!

EQ7 Mac Migration Kit Now Available

Did you hear the good news yet? The EQ7 Mac Migration kit is now available! For those of you who already own EQ7 and are running it on a PC (or with Virtual Windows on your Mac), you can now purchase a migration kit to make the switch and run it natively on your Macintosh! Whoo hoo!

20140320_eq7_mac

We are a Mac family and I’ve always sort of felt like a black sheep using a PC. For a time, I ran parallels on my previous Macintosh so that I could use EQ7. Recently, though, I’ve just been using a cheapo clunker of a PC to get by.

Now I’m so excited that I will finally get to work on the computer I’ve been wanting. This is when having a computer geek for a hubby really pays off. He loves any excuse to buy a new computer and tinker around. So, he ordered this lovely beauty for me over the weekend:

20140320_my_mac

Isn’t that nice? He’s such a keeper! Now I’m just waiting for it to arrive so he can install my migration kit and I’ll be off and designing once again! (Does anyone else get the irony of buying a whole new computer just to run some existing software? That’s kind of how we roll around here!)

For those of you who are current Mac users, but have not yet purchased EQ7, the new stand-alone Mac software will be available soon, so stay tuned!

Tutorial and Tips: How to Spray Baste a Quilt

2018 Spray Basting Update

I’ve updated this method to show I use my design wall to assemble the layers.
Click here for the updated tutorial.

Original Tutorial (From 2014):

I have been dabbling with using 505 basting spray to hold the three layers of my quilt together while quilting. I’ve learned a few things along the way and would like to share them with you. Thanks to Ann Petersen for introducing me to this method of basting.

spray_basting_0Yes, you get to see my ugly backyard during this tutorial. Yay, you!

Tips Before You Begin

First of all, when basting a quilt with spray, it is best to use pre-washed 100% cotton fabrics. The spray make not stick as well to other fibers. Also, if you like to starch the back of your quilt to make it slicker and aid in machine quilting, wait to do this until after you have spray-basted the quilt.

For best results, choose a natural fiber batting made of cotton, silk or wool (or a blend that is mostly cotton) because the adhesive tends to stick better. Finally, be sure to use the spray adhesive outside, or in an extremely well ventilated room with the doors and windows open.

Now on to the Tutorial

Begin by setting up one or two tables on which to work. Alternatively you can place a sheet on the ground, or even drape your fabrics over a wall if needed. Lay out the backing of your quilt first, wrong side up. You will be applying the spray to the wrong side of the fabric.

spray_basting_1Working outside is best so that fumes can dissipate.

Not shown in the photo: place a towel or two on each end of the table under the backing to protect it from over-spray.

Shake the can well before beginning. I have only used the 505 spray, so I cannot speak to the effectiveness of the other brands. Starting on one end of the quilt, spray the adhesive smoothly back and forth across the surface of your quilt. It should be very tacky to the touch. Set the backing aside and move on to the quilt top.

spray_basting_2Not a very flattering picture, but I’m keeping it real!

Lay out the quilt top and use the same method to apply spray evenly over the wrong side of the top and set it aside. I sprayed the center section of the quilt top and then went back and sprayed the sides. I didn’t move the top; I just sprayed the edges while they were hanging off the table.

spray_basting_3Lay out your quilt top wrong side up.

I usually hang my top and backing wrong side up over a railing while waiting to assemble them. You can also fold them up and open them later as needed. The quilt pieces will be tacky but can still be opened up if the sticky ends touch each other.

spray_basting_4I drape my quilt tops over a railing in my sewing room.

Using a large surface (like a couple of long plastic tables pushed together), spread the backing wrong side up and tape or clamp down the edges. Next, place your layer of batting on top.

spray_basting_5Tape the backing down with painter’s tape, wrong side up.

It is really helpful if you can grab an assistant to help you place the batting directly on top of the backing without having to move it around too much. Grab the quilt top, again with help, and place it on top of the other two layers, right side up.

Take some time to smooth out all 3 layers until it is nice and flat. Once you have worked out any wrinkles, take the whole sandwich over to your ironing board and press it together from the back of the quilt. This will help set the adhesive and works best with natural fiber battings. If needed, press the front side as well.bastingYou are now ready to quilt!

The quilt shown is Modern X, made as a free pattern for members of the Modern Quilt Guild. Pattern available for purchase here.

Friday Feature: Aurifil Thread

If I had planned this out better, I should have written this post yesterday. Then I could have called it Thread Thursday. 🙂 Even though I’m enjoying writing my Fabric Friday series every other week, I can’t really neglect talking about the thread that goes along with making a beautiful, functional quilt.

Aurifil Simplify Collection by Camille Roskelley

Aurifil Simplify Collection by Camille Roskelley

I can unequivocally state that Aurifil cotton is my favorite thread and I’ll tell you why:

  • It comes in every color imaginable.
  • It’s very low lint for a cotton thread.
  • It’s strong and thin which is perfect for piecing, and it doesn’t break while quilting!

Over the last two years, I’ve tried out a variety of different threads and brands, knowing I would eventually want to carry them in my store. Since I only sell products that I would recommend and use myself, this took a bit of research and trial and error to find out which thread I wanted to invest in.

Aurifil

Quilters Essentials by Edyta Sitar

I call it an “investment” because unlike fabric where you can pick and choose what you want to carry, if a shop owner carries thread, he/she needs to have a wide variety! And I’ve done it for my own selfish reasons, too. It’s nice to have a shop full of thread to pick from when searching for the right colors for my quilts!

Aurifil Threads

Aurifil Thread Colors Used on My Latest Finish

After a lot of trial and error, I’ve decided that cotton is easiest for me to use for both piecing and quilting. While I have nothing against all of the other beautiful synthetic threads that are available for machine quilting, they just aren’t made for piecing. Because I embrace simplicity, I just love the idea of using cotton thread for both piecing and quilting.

The large spools contain a lot of thread – 1422 yards (1300 meters) each.

Aurifil

Thread Pull for Another Project

I can usually quilt an entire throw-sized quilt with just two large spools of thread: one for the top and one for the bobbin. If I’m switching thread colors a lot to match the fabrics, one large spool of each color is usually enough. If there are specific colors I need in less prominent areas, the smaller spools seem to work well. Because it’s cotton, the leftover thread can then go into my next piecing project. How’s that for efficiency?

Aurifil

Small Thread Kit

So far I’ve only used the standard 50 weight cotton Aurifil. However, I do plan on trying out a few spools of the 40 weight for quilting. It’s slightly thicker so it would give a heavier look to the quilting, which is perfect when you really want your thread to show.

If I have success quilting with the 40 weight, then I’ll start offering that in my store, too. Have any of you tried it yet? If so, what do you think?

Christa’s Sew and Tell – Sewing Room Reveal

Recently I was excited to be featured on the Modern Quilt Guild’s blog, and not just because I’m trying to “get myself out there” (though that is certainly true). Mostly I was happy because it forced me to finish organizing and cleaning up my sewing room! 🙂

Sewing Room

Where the Magic Happens

In the picture above, you can see I have a place for everything. I hang quilt tops over the bannister so that they don’t accumulate fold wrinkles while waiting to be basted. Rolls of batting rest atop a large storage cabinet, and I have plenty of floor space for an ironing station and basting tables. There’s a nice comfy couch in front of the railing (far enough away so that no one can topple over). My daughter even has her own sewing desk, too!

Here is the messy “before” picture with lots of clutter everywhere, ugly plastic bins full of supplies, monstrous utility tables that are hard to move, and no place big enough to lay out a large quilt while piecing!

Before

Before – what a mess!

Below is the calming “after” shot with everything tidied up nice and neat. The big ironing board gets tucked into a corner, misc. junk is either hidden in pretty baskets or behind closed doors, and bigger pieces can be pushed to the side.

Sewing Room

Quiet, Clean, Sewing Room

My favorite acquisition was a gift to myself for Christmas: two 8′ portable plastic tables that are lightweight and easy to move. I use both of them set side by side for basting a large quilt. When not in use, they fold in half and are stored in the corner next to my supply cabinet (and large rotary mat), freeing up the floor space again. (Jason’s present was the photography lights – we are still learning how to use those!)

Portable Basting TablesTwo major projects which made all this possible were installing a huge design wall that doubles as my photography space, and dejunking my overflowing fabric stash. After nearly 20 years of accumulating fabrics and supplies, I was not sorry to see much of it go!

Sewing Desk with Natural Light

Sewing Desk with Natural Light

I love all of the natural light that streams in through the window in front of my large sewing table (which I purchased from a dealer over 15 years ago). When I upgraded to a bigger machine, I removed the custom table insert and brought the machine to the right height with a couple of sturdy books underneath. I may eventually cut a new insert, but for now I haven’t really needed it.

My longer acrylic rulers hang from adhesive hooks on both of my white storage cabinets, and the smaller ones are tucked neatly inside.

I don’t know about you, but I find that I can be much more productive when there’s a place for everything and everything’s in it’s place. Now I’m off to do a little more quilting!

A New Design Wall

New Around here?

Be sure to follow my blog so you can notified each time I write a new post! Just enter your email address in the box on the right side bar (or scroll ALL THE WAY to the bottom of your screen if using a mobile device). That way you’ll never miss a new tutorial or quilting inspiration!


Hubs recently earned some extra brownie points by helping me create a brand new HUGE design wall for my sewing room. In my nearly 20 years of quilting I was fine using the floor, tables, portable walls or what have you.

However, now that I’m getting a little more serious about showing and sharing my quilts in public and online, I realized I needed a better solution. I want a larger space so that I can design and photograph bigger quilts.

Foam Core

2 Sheets of Foam Insulation

We started by purchasing 2 huge pieces of foam core from the home improvement store. Each measures 4′ x 8′ and the space we are covering is about 7.5′ x 8′.

After wrestling them in the SUV and taking them home, we cut off about 6″ with a utility knife so it would be the right size.

Design Wall

Jason putting my rulers to work!

Jason drew the straight lines, while I did the cutting. It wasn’t a perfect cut, so we decided to put this side on the bottom where no one would see it. In retrospect, I should have tried my rotary cutter, but this stuff if pretty darn thick! (We tried to get them to cut it at the store but they said they couldn’t. Bummer!)

Cutting

I’d rather use a rotary cutter than a utility blade, any day!

We then taped the two pieces of foam core together with duct tape on the white side. The other side, the silver side is the “front”.

Tape the Pieces

Tape the Pieces

Next was the hardest part. We bought a king-sized flannel sheet and covered the entire wall by stapling the flannel to the back side. The problem we ran into is that the sheet was not square or even so we had to yank on it quite a bit to make sure it would be nice and smooth on the front. We pinned it to the foam sheet first, then stapled like crazy!

Stapling

Staple the Sheet

We pulled it so it would be taut and attached it with a ton of staples. The corners were the hardest to finagle so that they would look smooth on the front.

Stapling the Corners

Stapling the Corners

We used my basting tables to work on but you could also do this on a smooth floor if you have enough space. It reminded me of basting a quilt but not as fun, LOL!!

Once everything was in place, it was time to mount it to the wall. Jason did this by attaching it with screws and decorative washers to make it look a little less “industrial”.

Mounting the Wall

Mounting the Wall

I am so happy that I have larger space to design. It adds such a pretty element to my sewing space. Now need to keep some WIP’s on there all the time!

Design Wall

Finished Design Wall, 8′ wide by 7.5′ high.


Favorite Tools – Kwik Klip for Basting

Since it’s almost time for my basting tutorial as part of my Modern Trees Quilt Along, I thought I would share one of my favorite tools that makes the job easier – a Kwik Klip.

These puppies have been around for awhile but I finally started using one after tearing up my fingers from previous basting attempts.

Pinning and Clipping

Pinning and Clipping

A Kwik Klip is a simple wooden rod with a metal end with grooves in it. One of the grooves holds the end of the pin in place, so you can bring the head of the pin down to fasten it.

When I first tried it out, I did it wrong. I kept trying to use the tool to push up the pin to meet the head. But that is wrong – don’t do that! Instead, hold the Kwik Klip in one hand and push the pin down to close with the other hand. I’m right handed so I held the Kwik Klip in my left hand and pushed the safety pin with my right hand. Do what feels most comfortable.

Closing the Pin

Closing the Pin

Once I got the hang of it, basting went pretty quick. I put in a bunch of pins first and then closed them all at the end.

Just so you know, I used to use Pinmoors for basting with straight pins. Those are small silicon caps that go on the end of straight pins. They are nice because you can remove them quickly while sewing. However, I timed myself and realized it takes longer to put the pins in and add the caps than it does to push in a bunch of safety pins and close them.

Kwik KlipAfter basting several quilts, I prefer regular safety pins with a Kwik Klip.

And honestly, while quilting, it’s not a big deal to take a second or two to remove a pin. I’d rather save time on the basting end of it rather than during the pin removal process.

I love EQ – Do You? Electric Quilt Software is One of My Favorite Tools

I didn’t realize how much I enjoyed Electric Quilt (EQ) software until I stepped back and counted all of the projects I’ve designed recently using this program. All of my quilt alongs have been designed in EQ7, plus several of my award winning quilts.

Electric Quilt Software

I thought it would be fun to post some before and after pics of my most recent projects that were designed in EQ7.

Since I love designing and using solid fabrics so much, it’s fun to see that the finished quilts look pretty close to the original designs. Sometimes the color placement may vary but you get the general idea.

Here’s Modern Trees, my current quilt along project:

Modern TreesModern Trees


String of Pearls, recently awarded an honorable mention at MQX:

String of PearlsString of Pearls


Charming Chevrons, Blogger’s Quilt Festival winner and displayed at QuiltCon:

Charming ChevronsViewer's Choice


Colorful Chevrons (more about this quilt tomorrow!):

Colorful ChevronsColorful Chevrons


Hugs ‘n Kisses, made for my sweet daughter:

Hugs 'N KissesHugs 'n Kisses


Sea of Squares, an experiment in straight line quilting and designing with charm packs:

Sea of SquaresSea of Squares


I’ve been designing quilts in EQ7 from way back in the days when it was just EQ4! They’ve come a long way in improving the program and I look forward to future enhancements as well. As with anything, the more I use the software, the more proficient with it I become.

EQFor the latest upgrade, I sat down and read the manual and followed along with the tutorials before I began designing. One of my favorite features is the ability to import pictures of any fabric that’s out there so I can see exactly what my project will look like before I start.  I also like how easy it is to design a custom quilt (hint – I like to design it as a single block and then size it to scale).

P.S. – if you enjoy designing your own quilts, be sure to stop by my blog later this week when I announce my next weekly giveaway – it’s a doozy!

Favorite Tools – Tri Recs Acrylic Rulers

I’m using the set of Tri Recs acrylic rulers for my current quilt along, Modern Trees. This ruler set has been one of my favorite tools for a good 10+ years now and I’ll tell you why.

Tri Ruler

Tri Ruler

Recs Ruler

Recs Ruler


Not only does it make amazing tree blocks like those shown below, but you can make tons of other shapes, too!

Solid Trees

Solid Trees

Improv Trees

Improv Trees


My friend Lindsey who’s quilting along with everyone else, started playing around with her tri recs tools a few days ago (you buy it as a complete set of 2 rulers in the same package). She came up with this really cool diamond block.

Diamond Block

Diamond Block Using Tre-Recs

Even though she said it’s probably nothing new, the fact that she “discovered” this block while playing around is a testament to how versatile this tool is. She’s even written up a tutorial here.

54-40

54-40 or Fight Block

One of my favorite traditional quilt blocks is the 54-40 or fight block – a star variation.

(The name has reference to a political campaign about boundary lines.)

This image is courtesy of Quilter’s Cache – click here for a tutorial.


Notice how the star points are basically reversing the values from my tree tops above. The tutorial suggests using templates. You could also take some time with the math to figure it out. But, it’s just much easier to use the ruler set and not have to think about it.

For those of you that have never used the tri recs tool before, here’s a link to a fabulous you-tube tutorial from some of my favorite people – Fons and Porter.

My only suggestion for improvement would be for the manufacturer to make a ruler that’s bigger than 6 inches finished so I can make larger blocks. 🙂

Click here to read more of my favorite tools blog entries.