Pre-order Geo Pop Fat Quarters and Kits

I’m super excited about my next fabric line which is coming  soon! Geo Pop is a bold, bright, collection of 25 geometric prints in gorgeous rainbow color.

Geo Pop by Christa Watson for Benartex

Click here to preorder Geo Pop Fat Quarters

I’m really excited to add black, white, and gray to my mix of modern prints and hope you’ll enjoy working with them as much as I had fun creating them. Best of all, they mix and match with all 3 of my previous collections: Modern MarksFandangle, and Abstract Garden.

I’m also excited to offer several kits shown below:

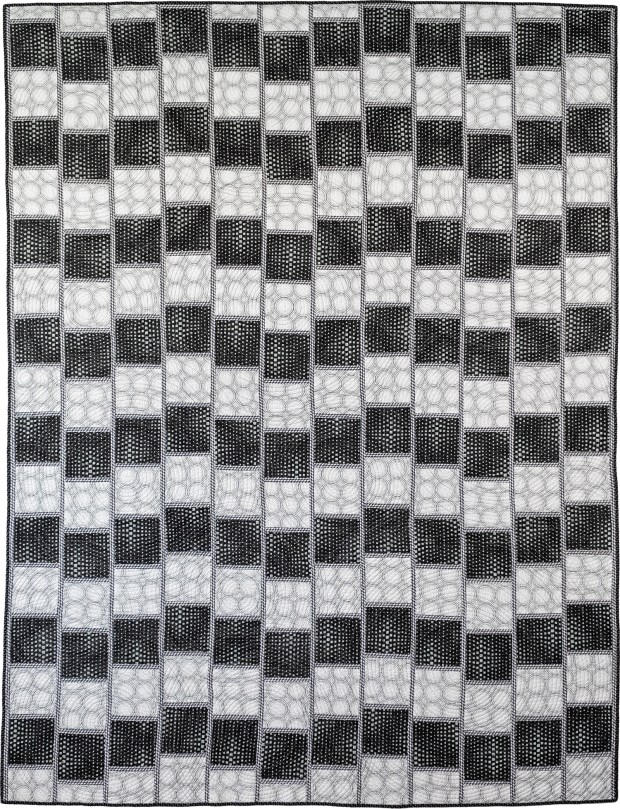
Bling Quilt Kit: Fat Quarters + Background

This quick and easy quilt calls for one fat quarter bundle + 4 yards of white or black. You can even use the leftovers to make a scrappy binding! Choose your fave background: Op Squares in White or Tiny Hex in Black.

Bling Quilts with Geo Pop

Once the fabric arrives, I’ll share more about the making of both quilts shown above. Think of it as a “mini” quilt along!

Optical Illusion KIT: Made From Only 3 Fabrics

This “trippy” quilt kit creates the optical illusion using only 3 fabrics. The bold geometric prints in Geo Pop add such movement to this design. Scroll the image up and down to see it wiggle!

Optical Illusion Quilt

I’ll share more of my step-by-step process for making Optical Illusion soon, so stay tuned!

Infrastructure Quilt Kit – QAL Coming Soon!

I’m really excited to make this one, and it will be my next full length quilt along coming this fall. Pick up a quilt kit now, and stay tuned for more details!

Infrastructure Quilt

Infrastructure was designed by Heather Black and we are both going to be making two different versions of this quilt – one in prints and one in solids. I can’t wait!

Click here to preorder the Infrastructure quilt kit
Click here to get the Infrastructure quilt pattern – paper version
Click here to get the Infrastructure quilt pattern – PDF version

Geo Pop Fat Quarters – Preorder Now

Geo Pop Fabric

To ensure that you get in on the first printing of this collection, claim your fat quarter bundle now. Based on the reaction I’ve received so far, I think this will be my best-selling collection yet!

Click here to preorder Geo Pop Fat Quarters

I can’t wait until Geo Pop arrives, and I especially can’t wait to see what you all make with it!

Color Weave Quilt Along Week 4 – Quilt Top Assembly

How are your Color Weave quilt blocks coming along? Now it’s time to sew them together to complete the quilt top. You’ll want to refer to the quilt top assembly diagram in the quilt pattern often to ensure proper block placement based on color.

Rainbow Weave Blocks

The easiest way to sew this quilt top together if you are doing the Rainbow version is to first sew all of the same colored blocks into long columns (aka vertical rows), and then join the columns together to complete the quilt top. If you are doing a single color for the weave, then you can sew them together into horizontal rows.

Rainbow Weave Block Rows

Notice that there is one of each colored block that has a dark gray strip across the top. This is for the top block of each column so that it appears that the design is “floating” on the dark gray background.

Rainbow Weave Blocks

When joining two blocks together, don’t worry if the print doesn’t like up exactly like in the pair of purple blocks below. Because these are busy prints, you’ll still get the woven effect as long as your seams line up well.

Rainbow Weave Blocks

In the turquoise pair, the join is not as obvious because of the print.

Rainbow Weave Turquoise Blocks

Not all of the prints will have obvious joins, so let the seams fall where they may and the overall design will still look great.

Rainbow Weave Blocks

The easiest way to sew the rows together is to sew them into pairs, then sew the pairs into larger units: 1 set of 3 blocks and 2 sets of 4 blocks. Then sew the sets into each row by color.

Rainbow Weave Blocks

Be sure to use lots of pins to keep your rows straight and organized. In the photo below, the pin at the top is to keep that edge together while I pin the long row along the side. I like to pin perpendicular to the edges, and line up the seams. You can see that I use a lot of pins and this really helps with accuracy.

Pinning rows

I also continue to press EVERY seam. I press all of the long seams open in addition to the individual block seams. The trick is to open the seam ahead of your iron with your fingers and don’t use steam so you won’t get burned.

Here’s a short video showing how I press the seams open:

Because you are sewing long strips together, they have a tendency to bow or warp out of shape. To prevent this from happening, switch sewing directions each time you add a new row.

When you are finished sewing the quilt top, there will be a lot of seams left on the outside of the quilt that have a tendency to split apart due to handling. To prevent this, do what I call a “Victory Lap” around your quilt: stitch the edges with a 1/8″ wide seam all the way around the perimeter of the quilt. This is also known as “top-stitching” or “stay-stitching.”

Color Weave Quilt Top – Abstract Garden

Rainbow Weave Quilt Top by Christa Watson

My finished quilt top made with Abstract Garden strips and Fandangle background.
Click here to get the Abstract Garden Strip-pie.

Color Weave Recolored With Fandangle in EQ8

Color Weave Fandangle

Click here to get a Fandangle Strip-pie.

Just for fun, I recolored the design using Electric Quilt 8 software and my Fandangle fabric line. (plus the black from Geo Pop) I wan’t sure if it would work, but I absolutely love how it turned out! The key was figuring out the order of the colors so I’d still get the rainbow effect. There are 20 prints in both lines (Fandangle and Abstract Garden) and you need 17 to make the quilt (2 strips of each), so that gives a little wiggle room to decide which strips to leave out.

I can’t wait to see how your quilts are turning out, especially if you chose different fabrics. Be sure to click the link below and add your progress to my Facebook group.

In the next step, we’ll do everyone’s LEAST favorite part of the process: basting! But not to worry, with my method, it’s not as hard as you think!

IMPORTANT LINKS

Click here for links to the previous quilt along posts
Click ere to share your progress in my Facebook group
Click here to purchase Abstract Garden precuts and backing yardage
Click here to get the Color Weave quilt pattern – paper version
Click here to get the Color Weave quilt pattern – digital download

Color Weave Quilt Along Week 1 – Cutting

Welcome to the Color Weave quilt along! Cutting and color placement is the key to the success of this design. There is definitely a lot of cutting involved, but just take it step-by-step and give yourself plenty of time to enjoy the process!

Rainbow Weave Quilt

This Week’s Homework – Subcutting the Strips

Although my Abstract Garden Strip Roll includes 20 different fabrics (2 of each), you will only need 17 of them (34 strips total) to get the glowing rainbow effect. Set aside the gray strips and the pastel “tracks” prints for another project, or use them on the back of the quilt.

In my Color Weave pattern, the strips are listed and cut in rainbow order, making it easier to keep track. Cut the strips into the subunits listed in the pattern cutting chart. Keep all of the same piles together and remember to measure twice, cut once!

Abstract Garden by Christa Watson for Benartex

If you are using a different set of rainbow colored strips, you will need 2 of each fabric to get the rainbow effect. You could also make it super scrappy, or coordinated scrappy (same color, different fabrics for each rainbow strip).

The background grays will be quicker to cut since it’s only two additional fabrics. These can either be cut from yardage or from a strip roll of each. Because I cut mine from yardage, I starched them before cutting, so they curled up a little in the corners. But they have a little more body to them now which will make lining up the pieces for sewing much easier.

Starching tip

I prefer to only starch yardage (not precuts or finished blocks). I use inexpensive starch from the grocery store (my favorite is Faultess Premium). The trick to avoid flaking is to starch on one side of the fabric and let it rest for about 30 seconds, then flip the fabric over and iron from the other side. If you want crisper, stiffer fabric, repeat the process for both sides of the fabric.

Fandangle Gray Confetti Crosshatch by Christa Watson for Benartex

Bonus Tips

If you are comfortable cutting through multiple layers accurately, you can cut through two folded strips (4 layers of fabric) at a time. Just keep track of how many units you need to cut per fabric and the number of units you need to cut from each strip. There’s not much room for error, so remember to measure twice, cut once!

If you do make a boo-boo when cutting, you can get additional fabric at shop.ChristaQuilts.com. Or substitute a similar color in your stash for a scrappier, custom look!

Next week we’ll start sewing the pieces into blocks, but remember – you can work at your own pace so feel free to jump ahead if you are an eager beaver, or slow down and enjoy the process.

Remember to share your progress on social media using the hashtag #colorweavequilt. Not only will others cheer you on, but you can see lots of other ways to make this quilt and change things up to make it uniquely your own!

Rainbow Weave Quilt blocks

IMPORTANT LINKS: Supply List & Schedule, Where to buy

Blooming Wallflowers Week 10 – Binding to Finish

Can you believe we’ve come to the end of the Blooming Wallflowers quilt along? I’m so excited to see all of your finishes and encourage you to continue working at your own pace, even if you finish weeks (or months) later.

Blooming Wallflowers quilt

I was literally finishing the hand binding of this quilt on the way to quilt market last fall, so I didn’t get any pics of my binding in progress. However, I’ve written several other binding tutorials, and my process is exactly the same, no matter which quilt I’m making. So choose your favorite method – hand or machine, and enjoy this last step of the process!

Modern Marks binding strips

I cut matching binding strips from my Modern Marks Navy Herringbone print.

Here’s a bonus tip for binding: I like to cut my strips out at 2″ wide and attach them with an exact 1/4″ seam using my BERNINA dual feed (which acts like a walking foot but I can use skinnier feet on it). This gives me a precise finished binding of 1/4″ and it’s even on both the front and back. Many times, I like to use the same background fabric as the binding so that it looks like the design is floating on the surface, rather than being interrupted by a contrasting fabric.

Here’s Blooming Wallflowers hanging in my booth at quilt market last November, along with the other quilt patterns I made to showcase my Abstract Garden fabric.

Christa Watson Abstract Garden

My booth with Benartex at fall quilt market in Houston, November 2018
Other quilts shown are LatticeWork and Geese in the Garden.

And just for fun, below the is the original Blooming Wallflowers quilt I made a couple of years earlier for a quilt magazine to promote my first line, Modern Marks. As you can see, this quilt is fun to make no matter which fabrics you choose!

Blooming Wallflowers in Modern Marks

Blooming Wallflowers Modern Marks

The Modern Marks Navy Herringbone print is one of my all-time faves!

I hope you’ve enjoyed making this quilt with me. And if you are worried about having quilt-along withdrawal, stay tuned for the next quilt along, coming soon!! It features a brand new quilt that I haven’t shared on the blog yet, and I’m sure you’ll love it just as much!

IMPORTANT LINKS

Blooming Wallflowers Week 8 – Machine Quilting Part 2

How is your Blooming Wallflowers quilt coming along? Some of you have completely finished while others are just getting started and that’s perfectly fine. I love to encourage everyone to participate at their own pace. In cased you missed it, click here for quilting part 1 including 4 short You-Tube videos showing exactly how I quilted the blocks.

Blooming Wallflowers made with Abstract Garden and Modern Marks

Today I’ll go over how I quilted the background using one of my favorite filler motifs – jagged stipple. In the quilting plan below, I quilted jagged stipple in the background areas after all of the blocks were quilted. I love filling in a quilt this way: as long as you can trace an unbroken line around your quilt, you can quilt the design continuously without any starts and stops.

Blooming Wallflowers Block Quilting Plan

Quilting all of the blocks first is what I call “anchor quilting” which means that the quilt is secure and won’t shift as I scrunch and smoosh it under the machine to finish up the rest.

I recommend practicing drawing out the design freehand on a blank sheet of paper, and even quilting a practice block to get a flow for the design. The jagged stipple is very forgiving and is basically a series of abrupt jaggedy lines going in every direction.

Machine Quilting Jagged Stipple

I quilted Jagged Stipple on a larger scale for my Improv Squares Quilt Pattern.

There’s really no wrong way to do it! In fact, I love the jagged stipple design so much, that it inspired one of the prints from my previous fabric line – the “Paper Cuts” print from Fandangle.

Fandangle Fabric Paper Cuts

Click here to get yardage of the paper cuts print from Fandangle.

Here’s another short video showing how I move back and forth and all around to quilt this design. I especially love the look of texture on texture when I quilted the jagged lines on top of the navy blue Herringbone print from Modern Marks.

Because I’m using a matching blue Aurifil thread (from my Piece and Quilt Collection – Colors), it’s hard to see the actual stitching, which is usually a good thing so you won’t see all of the wobbles and bobbles as I quilt.

Here’s a detail shot where you can just barely see the quilting. I like quilting textural designs on busy quilts because I want my quilting to enhance the quilt rather than being the star of the show!

Blooming Wallflowers quilting detail

So give this fun design a try – whether you quilt it on this quilt or another WIP (work in progress).

IMPORTANT LINKS

Blooming Wallflowers Week 7 – Machine Quilting Part 1

Now we get to my absolute favorite part of the quilt-making process – machine quilting!!! I’m breaking this section into 2 posts so you’ll have plenty of time to get ‘er done! And thanks to all of you who keep sharing your progress, no matter what step you are on. It’s so inspiring to see all of the fantastic Blooming Wallflowers out there!! Remember to scroll to the end of this post for links to all of the quilt along steps and other important info.

Blooming Wallflowers Quilting

Above is my sewing machine setup. I have a drop in table so that my sewing machine lies flush with the table. I’ve also put another table to my left, forming an “L” so that the quilt has plenty of room and won’t fall off the table. I’ll sit in the chair and scrunch and smoosh the quilt out of the way as I quilt.

Make a Quilting Plan

I always have a plan when I’m going to quilt a quilt. That way there are no surprises and I can enjoy the quilting process. Here’s my basic quilting plan that’s included in the Blooming Wallflowers quilt pattern:

Blooming Wallflowers Block Quilting Plan

I’m quilting 3 different designs: chevrons in the print triangles, pebbles in the light blue triangles, and jagged stipple in the background. I can quilt all of the triangles per block at once without stopping; then I’ll go back and quilt the navy blue background later. I used a light blue thread from my Aurifil Piece and Quilt collection Neutrals on the triangles, and will use a darker blue thread from my Colors collection for the background.

Free Motion Quilting Blooming Wallflowers

Here’s what the back side of the quilt looks like after quilting all of the triangles. I always use the same color thread in top and bobbin so that if there are any tension issues, it won’t show. I don’t mind seeing the quilting on the back of the quilt. In fact, I actually like how it shows up!

Notice how my actual quilting deviated slightly from the plan. I decided to quilt a few more lines in the chevrons, and I embellished the chevrons with an extra row of pebbles and some zig-zags to jazz it up a bit.

Step by Step Quilting Videos

Here are a few short videos of me quilting the blocks so you can see how I did it. Be sure to enlarge the screen for a better view:

First, I stitched in the ditch very carefully around one light blue triangle.

Then I filled in the light blue triangle with pebbles. I’m using a thicker ruler foot because I’m doing the pebbles and ruler work all at the same time.

Next, I used a special acrylic ruler to quilt straight line chevrons. I didn’t worry about the lines being equal in distance or hitting the points exactly. I don’t actually love doing ruler work because it’s a little too fussy for my taste. But I’ll use it to quilt straight lines as long as they don’t have to be exact.

Once the chevrons were quilted, I embellished one section with free-motion zig-zags. I quilted each section of triangles (the Abstract Garden prints and the light blue background) in one pass, with only one start and stop for the whole block.) In other words, I did all of the pebbles in one triangle and then went straight into the chevrons.

To start and a line of stitching, I take about 6-8 teeny tiny stitches and then start quilting normally. When I’m done, I end with 6-8 teeny tiny stitches to hold it in place and cut off the excess threads. Starting and stopping in a seam makes it less noticable.

Next week, we’ll quilt the background! I recommend trying out the quilting designs on a scrap of fabric and batting first, before applying them to your quilt.

IMPORTANT LINKS

Blooming Wallflowers Week 4 – Sewing the Quilt Top

I love seeing everyone’s progress on their Blooming Wallflowers quilts! Whether you are making it from my fabrics, or something completely different, they are looking so fabulous! Check out the hashtag #bloomingwallflowersquilt on Instagram or in my Facebook group to see how everyone is doing. This week we will sew our completed blocks from last week to make the quilt top.

Blooming Wallflowers Quilt Pattern

Blooming Wallflowers Quilt Top – Throw Size

This quilt top is sewn together in diagonal rows, so it’s much easier to assemble than it looks. The trick in getting it right is to pay attention to the placement of each individual block. When I made mine, I constantly referred to the pattern cover and the quilt top assembly diagram on pages 8-9 of the pattern for proper color placement.

If you have the space, I recommend laying out the entire top on a design wall or large area and then working on sewing one diagonal row at a time. When you sew the blocks together, you’ll have little triangle tips sticking out that you’ll want to trim up once each row is complete.

Tips for Sewing the Top

My number 1 piecing tip for accuracy is to sew slowly and keep an accurate quarter inch seam. I also like to use a stiletto which allows me to get right up into the seam I’m sewing together. In the short video below, notice how I’m joining the blocks so that I get a perfectly crisp point. I sew with a shorter stitch length (2.0 instead of 2.5) and I’ve pressed my seams open so that everything lies flat and the intersections are easy to see. I also slow down and ensure that the ends will match. You can also use pins if needed.

Remember to chain piece for speed and efficiency. That means to start sewing two blocks together and then without clipping threads in between, add the next two pieces to be joined. Whenever I start and finish a section of sewing I use a scrap of fabric as a “leader” or “ender” to catch my threads and prevent things from become a big mess!

Your “homework” for this week is to complete the quilt top. But remember, if you are just starting, that’s ok.  This quilt along will stay up indefinitely so you can work at your own pace.

IMPORTANT LINKS

Blooming Wallflowers Week 3 – Continue Sewing the Blocks & Loads of Inspiration!

If you are new to the Blooming Wallflowers Quilt along, click here for links to all of the QAL posts.

Blooming Wallflowers Triangle in a Square Blocks

Click here to get the Blooming Wallflowers (printed) quilt pattern to join in the fun!
Click here to purchase the downloadable PDF version.

Welcome to Week 3 of Blooming Wallflowers Quilt Along! I’ve built in a few “catch-up” breaks so that you won’t feel overwhelmed with the process. After all, there are a LOT of blocks to sew! This week we are continuing to make the blocks as shown in the videos from last week.

Inspiration From Fellow Quilt Along Participants

Here’s some inspiration to motivate you as you start, or continue to work on your blocks. Each person featured will get a free PDF pattern of their choice as my thanks for sharing their progress!

Blooming Wallflowers Work in Pr

Patti B has picked out a lovely blue and and yellow combo that I think is going to be just fabulous!! She’s got her rulers and pattern ready to go and will make great progress in no time!

Blooming Wallflowers Quilt Along

Charald C. purchased a Blooming Wallflowers quilt kit and she’s finished cutting all her pieces; now they are ready to sew! I love how she lined them all up in yummy colorful stacks!

Blooming Wallflowers QAL

Caroline C. has chosen a rainbow of yummy goodness for her quilt. I’m in love with the aqua polka dot that she’s using for her background. I can’t wait to see it coming together!!

Blooming Wallflowers QAL

Kimberly W. took my advice about sewing all of one side of the triangle first and then all of the other side to make the sewing faster! I love her batik-y prints!!

Blooming Wallflowers QAL

Laina L. is about halfway through sewing her stack of blocks. Don’t they look great? She’s also using the Abstract Garden/Modern Marks fabric combo.

I hope this inspires you to make one of your own, and remember, you can join in anytime! Click the links below for supply lists and other important info. And continue to share your progress in my Facebook group, or on Instagram using the hashtag #bloomingwallflowersquilt.

IMPORTANT LINKS

Coming up next week will will start putting the top together so stay tuned!!

Blooming Wallflowers Quilt Pattern

I’m the Guest Curator For February’s Quilty Box!

I have some super fun and exciting news to share: I’ll be the guest curator for February’s Quilty Box. And even better news: click here to get $10 off your first Quilty Box subscription!

Quilty Box February 2019

Here’s the way this fun subscription service works: choose a 1 month, 3 month, 6 month or one year subscription and received a fabulous box of quilt goodies curated by some of your favorite designers. They usually include fabrics, a brand-new pattern, and several awesome notions, all for an amazing lower price over what you would pay for them separately. And the more months you sign up for, the better the deal gets!

February 2019 QuiltyBox with Christa Watson

Click here to get $10 off your first subscription of QuiltyBox.

Each monthly box is like getting a fun surprise in the mail, so be sure to up by Feb 9th! It will ship approximately February 11, and as a special bonus for subscribers of my box, I’ll be offering an exclusive quilt along in March with a brand new pattern that will be revealed in the February box. I can’t wait for you to see it! and I can’t wait for the big reveal, coming soon!!!

Blooming Wallflowers Week 2: Sewing the Blocks

This week it’s time to start sewing our blocks from the pieces we cut out last week. (Be sure to scroll to the end for all of the pertinent QAL links.) And don’t worry if you haven’t started yet; next week will be a catch-up week so you won’t get too far behind!

Anatomy of a Triangle in a square block

Triangle in a Square Block

Designed in EQ8, using Abstract Garden & Modern Marks by Christa Watson for Benartex
Note that this is the FINISHED block, not including seam allowances

The triangle in the middle is called an isosceles triangle which has two sides that are the same length. Many people confuse this with an equilateral triangle because it looks similar, but it’s not. So take care to ensure the triangle is in the correct orientation when sewing it together. Just remember to keep the blunt edge at the top of the block and you’ll be fine.

The triangles on the sides are called “scalene right triangles” because none of the sides are the same length and it has a 90 degree angle. The triangles are similar to each other except that one is a “left-facing” triangle and the other is a “right-facing” triangle. For ease of reference, I refer to them as triangle pairs in the pattern since you need both to complete each block.

(Silent) Video Tutorial

Please bear with me as I’m still learning how to do videos on my own.  So for now, they won’t have sound. As I add videos to the QAL, hopefully they’ll get better each week. Think of it this way: I’m doing this Quilt-Along for YOU, but it’s a YouTube-Learning-Along for ME, LOL!!

Follow along on page 7 of the Blooming Wallflowers quilt pattern for detailed instructions of what I’m doing in the (silent) video below:

Tips to Remember

(1) Notice that the middle triangle has the blunted edge at the top and the two half rectangles have the blunted edge at the bottom. The most common mistake people make is switching the placement of the triangles so be careful not to do that.

(2) Once the placement looks good, pin the units and sew them right sides together. If you are sewing multiple blocks, be sure and chain piece (assembly line sew) all the lefts, then all the rights, etc. I always recommend sewing with a smaller stitch length and pressing the seams open for flatter blocks.

(3) When your blocks are sewn correctly, the top triangle tip will be floating 1/4″ from the the top (for seam allowances) and the bottom triangle tips will go all the way to the edges. Don’t forget to trim off the little dog ears (excess triangles) sticking out beyond the edge of the blocks!

Above is a 20 second video snippet showing how I quickly cut apart my chain pieced units using of of my favorite notions: the Triangle Thread cutter from SunflowerQuilts.

Homework: Sew all of the Blocks

Half of the blocks will be made with the light blue centers while the other half will be made from the assorted colorful prints. See page 7 of the pattern for details.

Blooming Wallflowers QAL by Christa Watson of Christa Quilts

So remember, you’ll have 2 weeks to finish up your blocks. Next week I’ll share a few inspiration images showing the different block combinations that you all are making. Everyone who gets featured will get a free PDF pattern of their choice, so be sure to share your progress in my Facebook group, or on Instagram using the hashtag #bloomingwallflowersquilt.

IMPORTANT LINKS

Blooming Wallflowers Triangle in a Square Blocks