Now we get to my absolute favorite part of the quilt-making process – machine quilting!!! I’m breaking this section into 2 posts so you’ll have plenty of time to get ‘er done! And thanks to all of you who keep sharing your progress, no matter what step you are on. It’s so inspiring to see all of the fantastic Blooming Wallflowers out there!! Remember to scroll to the end of this post for links to all of the quilt along steps and other important info.

Above is my sewing machine setup. I have a drop in table so that my sewing machine lies flush with the table. I’ve also put another table to my left, forming an “L” so that the quilt has plenty of room and won’t fall off the table. I’ll sit in the chair and scrunch and smoosh the quilt out of the way as I quilt.
Make a Quilting Plan
I always have a plan when I’m going to quilt a quilt. That way there are no surprises and I can enjoy the quilting process. Here’s my basic quilting plan that’s included in the Blooming Wallflowers quilt pattern:
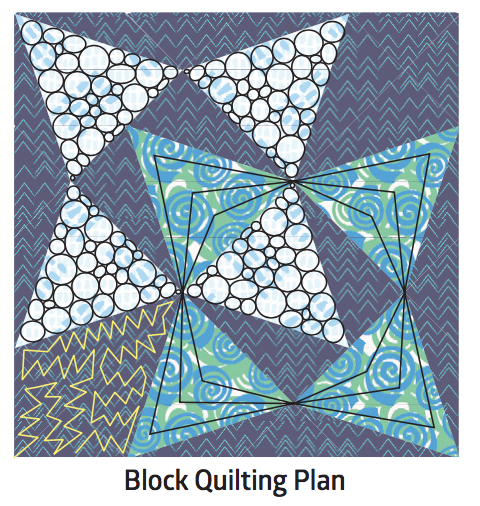
I’m quilting 3 different designs: chevrons in the print triangles, pebbles in the light blue triangles, and jagged stipple in the background. I can quilt all of the triangles per block at once without stopping; then I’ll go back and quilt the navy blue background later. I used a light blue thread from my Aurifil Piece and Quilt collection Neutrals on the triangles, and will use a darker blue thread from my Colors collection for the background.

Here’s what the back side of the quilt looks like after quilting all of the triangles. I always use the same color thread in top and bobbin so that if there are any tension issues, it won’t show. I don’t mind seeing the quilting on the back of the quilt. In fact, I actually like how it shows up!
Notice how my actual quilting deviated slightly from the plan. I decided to quilt a few more lines in the chevrons, and I embellished the chevrons with an extra row of pebbles and some zig-zags to jazz it up a bit.
Step by Step Quilting Videos
Here are a few short videos of me quilting the blocks so you can see how I did it. Be sure to enlarge the screen for a better view:
First, I stitched in the ditch very carefully around one light blue triangle.
Then I filled in the light blue triangle with pebbles. I’m using a thicker ruler foot because I’m doing the pebbles and ruler work all at the same time.
Next, I used a special acrylic ruler to quilt straight line chevrons. I didn’t worry about the lines being equal in distance or hitting the points exactly. I don’t actually love doing ruler work because it’s a little too fussy for my taste. But I’ll use it to quilt straight lines as long as they don’t have to be exact.
Once the chevrons were quilted, I embellished one section with free-motion zig-zags. I quilted each section of triangles (the Abstract Garden prints and the light blue background) in one pass, with only one start and stop for the whole block.) In other words, I did all of the pebbles in one triangle and then went straight into the chevrons.
To start and a line of stitching, I take about 6-8 teeny tiny stitches and then start quilting normally. When I’m done, I end with 6-8 teeny tiny stitches to hold it in place and cut off the excess threads. Starting and stopping in a seam makes it less noticable.
Next week, we’ll quilt the background! I recommend trying out the quilting designs on a scrap of fabric and batting first, before applying them to your quilt.
IMPORTANT LINKS
- Click here to get the Blooming Wallflowers Quilt Pattern (print)
- Click here to get the Blooming Wallflowers Quilt Pattern (digital PDF)
- Click here to purchase the optional kit while supplies last.
- Click here to share your progress in my ChristaQuilts Facebook group.
- Click here to receive quilt along updates via email.
- Click here for the supply list and links to previous quilt along posts.

Christa, are you using the stitch regulator or manually setting the speed?
I’m not using the stitch regulator – I’m regulating it myself by my speed and hand movements 🙂 Christa Watson Instagram @christaquilts website/blog: ChristaQuilts.com
Christa, are you using the stitch regulator or manually setting the speed? Can you tell me the settings? I enjoyed the videos and while I long arm I would love to use my machine for smaller projects. Kathy Hassig
Quilting patterns seems amazing!
Machine Quilting is also one of my favorite part 🙂
Thanks for sharing your love of quilting ☺
am older & didn’t have much time to sew
or quilt when earning a living & being wife,
mom, chauffer, student, & mostly active
member of my church – you’re a very special
lady!