Blogger’s Quilt Festival (Fall 2013) Begins This Week!

The online Blogger’s Quilt Festival kicks off this week, on Friday, October 25th to be precise. Hosted by Amy Ellis, it’s an online quilt show open to anyone who loves to quilt and enjoys blogging about their creations.

Blogger's Quilt Festival

Rather than stressing about making perfect quilts, it’s a chance to share and connect with others who share the same passion. There were over 600 entries in last spring’s show and it was like inspiration overload! My two entries from last spring’s festival are shown below:

Charming Chevrons, one of my early quilt along tutorials:

Viewer's Choice

Charming Chevrons, awarded Viewer’s Choice Spring 2013

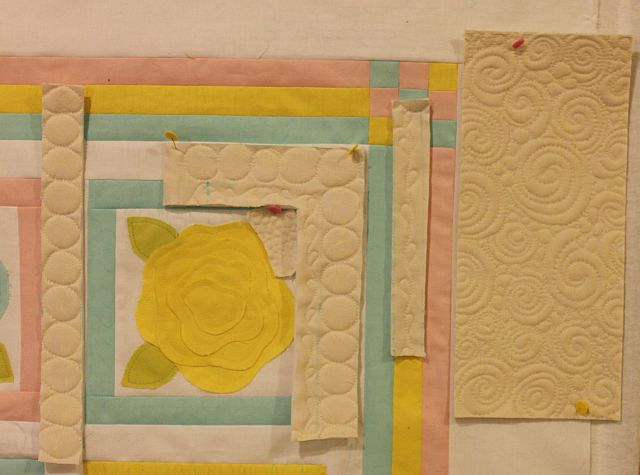
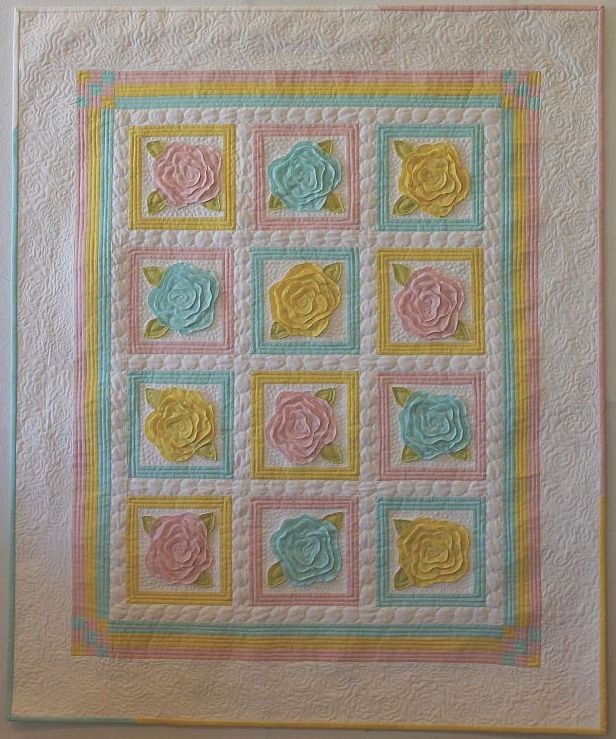
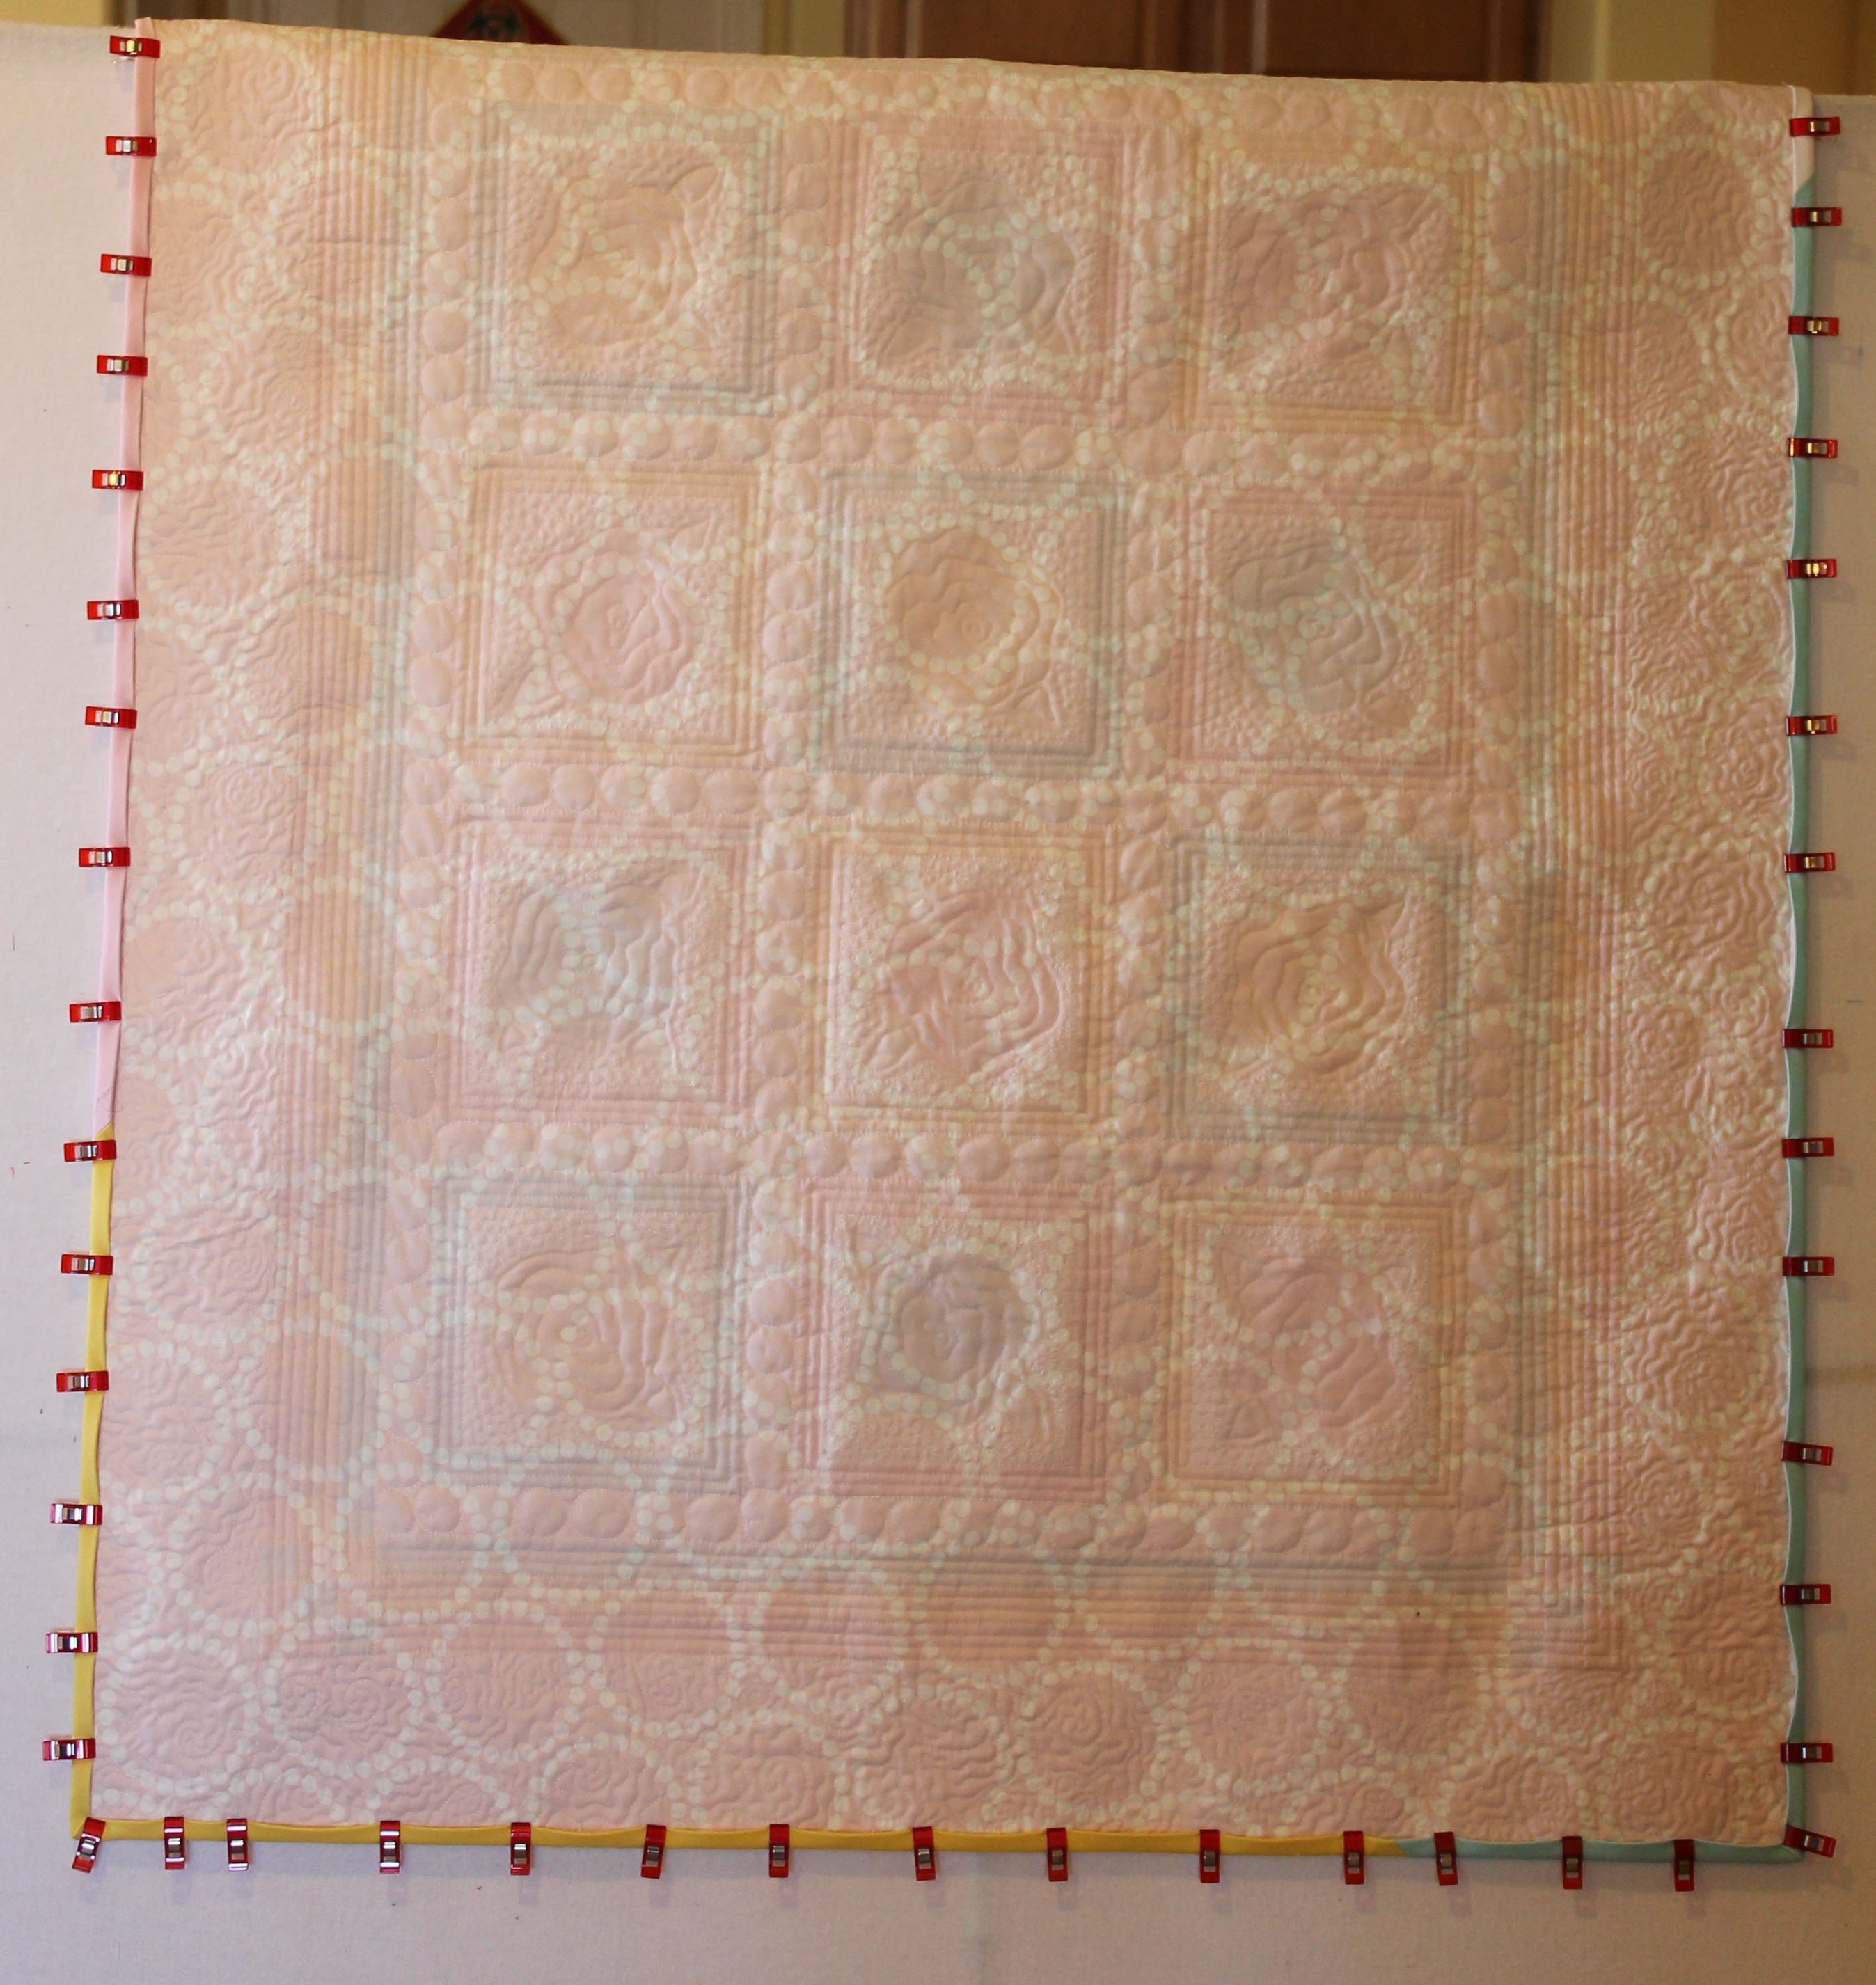
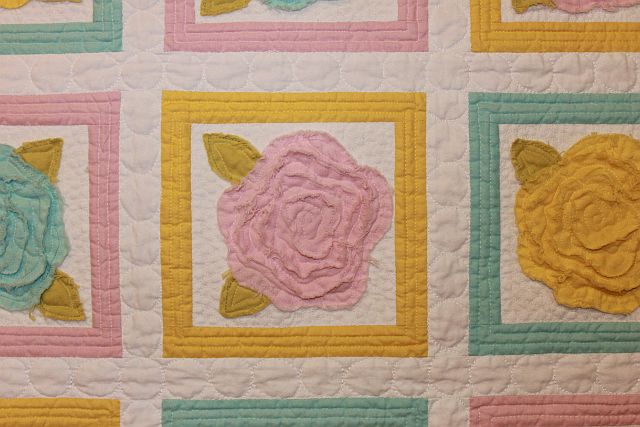
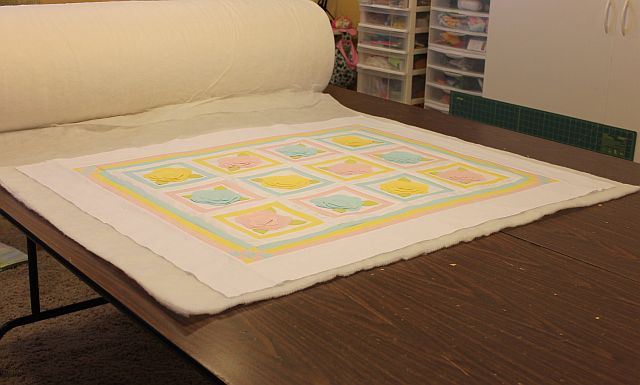
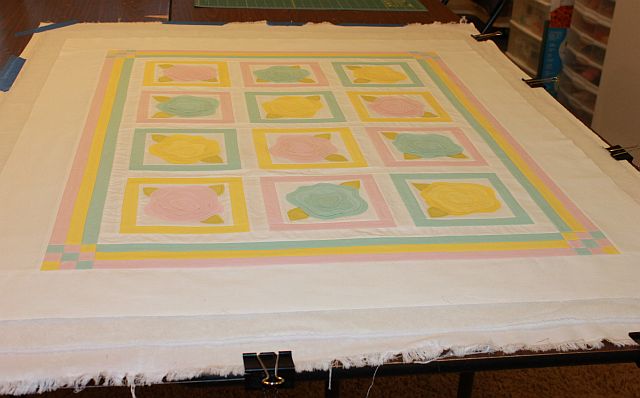
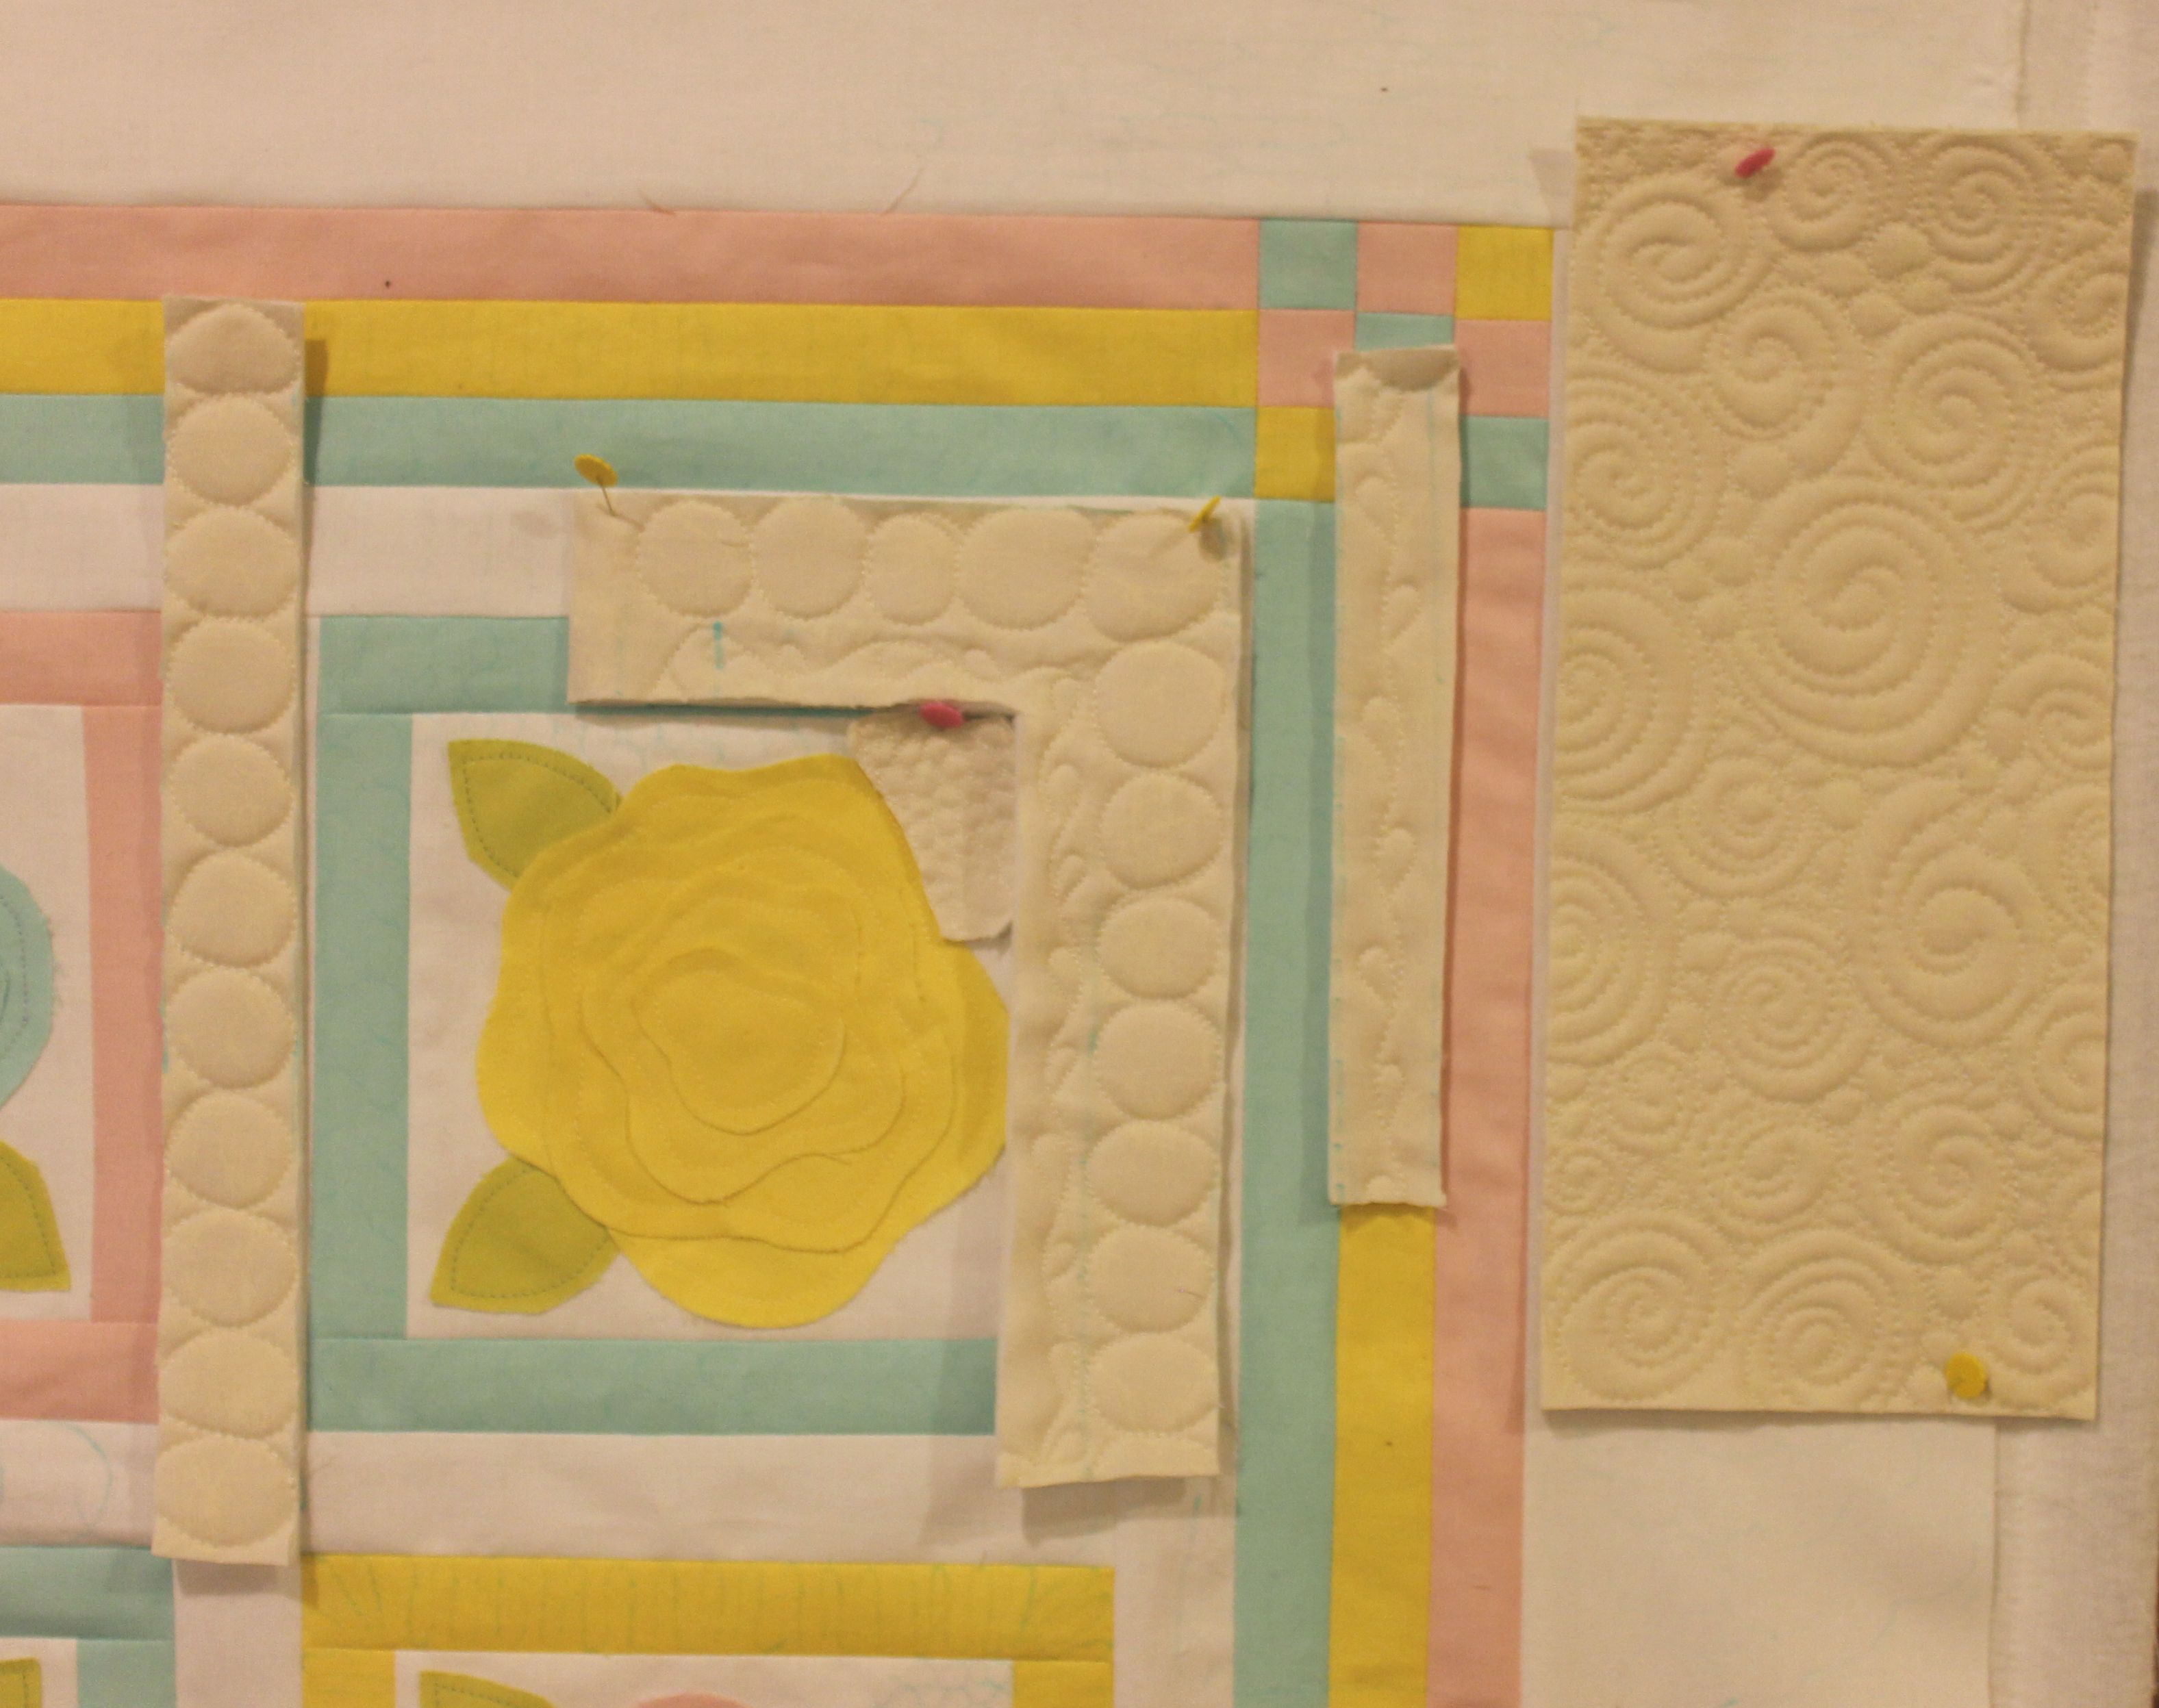
Roses for Katelyn, made for my sweet sister’s baby girl:

Roses for Katelyn

French Rose Buds Pattern, Blogger’s Quilt Festival Spring 2013


If you have a recent finish, I encourage you to enter. It’s a great way to find new blog followers and fantastic blogs to follow! Plus it’s pretty fun to get positive feedback on your quilts. And you might even win a prize, either for entering your own quilt, or nominating your favorites. You just can’t go wrong by participating in this fun event.

Here’s an idea – show off one of your quilt along quilts, or finish up a current WIP!

For complete details including the festival schedule and rules, be sure to visit the Blogger’s Quilt Festival Main Page.

Be sure to check out last spring’s winners. You may even recognize some of the quilts from people you know (wink, wink)!

Charming Chevrons Nominated for Viewer’s Choice – Please Vote

Charming ChevronsI just found out Charming Chevrons was nominated for viewer’s choice for the Blogger’s Quilt Festival!

Out of 670 entries, only 24 were selected as viewer’s choice finalists and voting ends May 30th!

You can vote for Viewer’s Choice here.

I am beyond excited for this unexpected honor.

Just entering was thrilling enough and all of the kind words from those who have participated so far have really given me a boost of confidence!

There are a total of 15 different categories in the festival and there will be a winner from each category along with 3 overall viewer’s choice winners.

You can also vote for both of my quilts in their respective categories here:

Charming Chevrons #7 in the Home Machine Category

Roses for Katelyn #3 in the Applique Category

Charming ChevronsRoses for Katelyn

Thanks to all of those that have voted so far. It’s been such a blast to participate myself and see all of the gorgeous inspiring quilts!

Blogger’s Quilt Festival – Vote Now Through May 30, 2013

Bloggers Quilt FestivalHave you had a chance to visit the Blogger’s Quilt Festival yet?

Hosted by Amy Ellis of Amy’s Creative Side, it’s a semi-annual celebration of blogging and quilting.

Here are my two entries, Charming Chevrons and Roses for Katelyn.

Charming ChevronsRoses for Katelyn

I’ve already blogged about each one separately and they are entered into the Home Machine Quilted category and the Applique category, respectively. You can click the underlined links to vote for each one.

In fact, you can vote for your favorite quilts in a total of 15 different categories. Not only can the bloggers who entered win prizes, those who participate and leave comments during the festival can win prizes as well, so it’s a win-win!

But prizes aside, the best reason for participating is viewing all of the wonderful quilts and reading the stories behind the quilts. I’m off to vote!

Blogger’s Quilt Festival Spring 2013 – Roses for Katelyn

I am entering my quilt, Roses for Katelyn, into the bloggers’ quilt festival this spring. I was excited to read that you can enter two categories! (See my other entry here.)

Roses for Katelyn was completely made by me and it measures 36″ x 43″. I used soft edge applique techniques and machine quilted it on my old Bernina 1630.

I am entering it into the applique quilt category and would love your vote!

Roses for KatelynThis is my first time entering something into the festival but after reading more about it in the latest issue of Modern Patchwork magazine I decided to give it a try.

This quilt is very special to me because I made it for my brand-new niece Katelyn.

Roses for Katelyn

Roses for Katelyn

My older sister and I have always been very close. When I had children she was such a terrific aunt and I felt so sad for her when she was not able to have children. After several years of trying she finally adopted her first baby boy, who’s now almost 8!

Alphabet Applique Quilt

Ethan’s Alphabet Applique

Monkeys Quilt

Jacob’s Monkeys

Then she adopted her second sweet son who’s nearly two. Finally, she adopted her little girl just two months ago.  I’ve made quilts for all of 3 them and it makes me very happy to visit and watch these little quilts get used and loved. 🙂

Quilting Plan

Original Quilting Plan

I blogged about Roses for Katelyn as I was making it, so I was able to show a lot of the in-progress work while I appliqued the blocks and decided how to machine quilt it. You can read the last blog entry here which gives links to all of the previous WIP posts.

Actual Quilting

Actual Quilting

I loved every stitch that went into this quilt and I’m especially pleased that both mom and baby are happy with the quilt and are doing well. 🙂

Roses for Katelyn

Roses for Katelyn, by Christa Watson

Bloggers Quilt FestivalBlogger’s Quilt Festival hosted by Amy Ellis

May 17 – 24 – Linkys Open & Nominate for Viewer’s Choice

May 24 – 30 – Vote for favorites in each of the categories

May 31 – Winners announced

Sew and Tell Baby French Roses #7 – Finished!

I am excited to share a finish with you today! I actually finished it last week just in time for it to win a ribbon in my guild’s quilt show. But with all of the quilt show excitement, I didn’t have time to share a little bit about the binding process plus a few in-process shots.

Roses for Katelyn

As you can see, the binding is made from leftovers of the pastel pink, yellow and blue plus some of the white. Scrappy bindings are really starting to grow on me! I stitched the binding finish by hand,  switching thread colors as needed. For detailed steps, you can read my hand binding tutorial here and my machine binding tutorial here.

Clover Wonder ClipsI used Clover Wonder Clips to keep the binding in place. These are my new favorite tool! With one box of 50 I was able to go completely around the quilt. These work way better than pins or hairclips and the hold the corners nice and tight, too.

I used Pearl Bracelets in Cotton Candy for the backing.

Quilting Plan

Actual Quilting

Here’s a side by side comparison of what I thought I would do for the quilting, and then what I ended up actually quilting. Sometimes I change things on the fly, or I get better ideas as I go along.

Christa's Bernina

I’m starting to get asked more often about what machine I use to make my quilts. I have a a 17 year old Bernina 1630 with a nice big drop-in table. I always practice a bit before I start quilting and use the queen-size Supreme Slider whenever I do any FMQ.

Here’s what Baby French Roses looked like after washing. It’s starting to shrink up a bit and the raw edges are getting nice and fuzzy:

French Roses WashedIt’s such a cozy quilt and I hope my sister loves it! It’s going to her new baby girl.

Cuddly RosesFrench Roses Finished Facts:

  • Quilt Name: Roses for Katelyn
  • Pattern Name: French Rose Buds by Heather French
  • Finished Size: 35″ x 42″
  • Materials: Kona Cotton Solids, Wool Batting
  • Thread: Glide Polyester and Bottom Line Polyester
  • Finished April, 2013
  • Patterns and Kits are available in my shop while supplies last.
Jenna with cousin Katelyn

Made for baby Katelyn

You can read my previous WIP on this quilt here:

  1. Baby French Roses #1- Cutting the Fabrics
  2. Baby French Roses #2- Machine Applique
  3. Baby French Roses #3 – Finished Top
  4. Baby French Roses #4 – FMQ Practice
  5. Baby French Roses #5 – Basting
  6. Baby French Roses #6 – Quilting

Las Vegas Quilt Show This Weekend!

If you are in the Las Vegas area this weekend, please come check out the Desert Quilters of Nevada‘s annual quilt show at the Henderson Convention Center. See the flyer below for complete details:

DQN Quilt Show

I am very excited for this show. My guild just celebrated their 26th anniversary and they’ve been putting on a quilt show for nearly as long.

I’ve entered my 5 quilts below as part of the show. Quilting really is such good therapy for me so I’m excited to be a part of this, especially this week!

Detail of my Hugs ‘n Kisses quilt. It’s finished, but in my haste to get it delivered by the check-in deadline, I forgot to snap a completed picture. I’ll take one later this week at the show. (Read more about the quilting during tomorrow’s quilt along lesson). This one is going to my daughter after the show and she’s very excited about that.

Hugs 'n Kisses

French Roses for Katelyn is going to my sister for her brand new little baby girl that she just adopted in February. Now she has 3 kids like me, so when we go to Utah for a visit next month, it will be quite the noisy (but fun) house!

Roses for Katelyn

My Charming Chevrons Quilt will be included in my guild’s first-ever modern quilt category. I can’t wait to see the other entries in this category!

Charming Chevrons

Baby Bricks in Pink was one of my early a quilt alongs and is still a favorite of mine.

Baby Bricks in Pink

I like the low volume look of Baby Bricks in Blue. It’s fun to see how a pattern can look so completely different depending on the fabrics.

Baby Bricks in Blue

Whenever I enter anything in a show I never set any expectations of winning. It’s just fun for me to hear what the judges have to say, and learn from them on how to improve my techniques. Plus it’s pretty awesome to stand back and watch the reactions of others as they view my quilts in person. 🙂

Sew and Tell Baby French Roses #6 – Quilting

I am really pleased with how my Baby French Roses quilt is turning out. All I have left to finish is the binding. If I can knock that out this week, I  can enter into my guild’s annual quilt show next week. 🙂

French Rose Buds

It took me awhile to figure out how I wanted to quilt it. You can read about some of my previous FMQ auditions here.

I knew I wanted to quilt small pebbles surrounding the roses, and larger circles in the sashing, so that’s where I began. I quilted a concentric circle around each flower to give it more texture while allowing the raw edges to show. You can see the difference that the quilting in the yellow rose makes compared to the un-quilted pink one. It really defines it!

Quilting the Petals

It was a big stretch for me to quilt all of those circles free-hand with no marking or measuring. I eyeballed it the whole way. In fact, none of the quilting was marked, it was all free-form, a very big step for me!

Quilting the Frames

I had a hard time coming up with an idea for the frames around the flowers until I settled on simple straight lines. I used the edge of my walking foot as a guide and quilted two straight rows around each block. One quilted, the frames had sort of a wood-grain texture, reminding me of planter boxes that the roses could grow in.

I then repeated the straight line quilting in the inner borders to unify the design.

Detail Quilting

Practice DrawingFinally I added a sort of floral motif for the borders that roughly matched the quilting in the petals. I used Glide thread in the top and bobbin for most of the quilting and switched out thread colors to match the fabrics.

It took me pages and pages of practice drawing with pen and paper until I got the feel for how to form wobbly concentric rose petals continuously.

I’ve been keeping track of how long it takes me to machine quilt to get an idea of the complexity. It took me 13.5  hours to quilt this over a 3 day time-span.

After it’s trimmed and  bound I’ll wash the quilt few times (with color catcher sheets) to fray up the edges, and then she’s good to go!

French Rose Buds Quilt

French Roses kits are available in my store for a limited time. You can see my progress and read my previous post here.

2013 Finish Along Quarter 2

Finish AlongI’m participating in the 2013 2nd Quarter Finish Along hosted by Leanne at She Can Quilt.

I first met Leanne when her mini quilt Shattered was entered into QuiltCon (and won a ribbon I might add). I saw it on her blog weeks before and knew it was something special!

I am actually wearing two hats for the FAL – that of sponsor and participant. I’m sponsoring one of the giveaway prizes because that’s just what I do, LOL!!

Also, I’m linking up my UFO’s as motivation to get them finished on time. So without further ado, here are the quilts I hope to finish this quarter (keeping it simple and manageable):

Girl Baby Bricks

Baby Bricks in Pink and Green

#1 Pink Baby Bricks – this quilt was one of my early quilt alongs and is technically finished. However, it’s just begging for more quilting to be added in the “bricks” so that’s just what I intend to do.

French Rose Buds Top

French Rose Buds Baby Quilt

#2 Baby French Roses is my version of Heather French’s fantastic French Rose Buds pattern. I tweaked the design a bit and made it slightly bigger. I basted it last week so now all I have to do is quilt it and bind it. Easy peasy, right? It’s going to my sister’s brand new baby when I visit next month so now I have double motivation to finish!

Hugs 'n Kisses Quilt Top

Hugs ‘n Kisses Quilt Top

#3 Hugs ‘n Kisses – an updated version of a quilt I designed and made over 10 years ago. This quilt serves double duty – It’s my current quilt along project and I plan on using it for some intense FMQ practice. Also, my daughter has claimed it so it’s going straight on her bed when done.  It will definitely be out of my sewing room then!

Sew and Tell Baby French Roses #5 – Basting

I have been basting up a storm this week! I finished basting my Hugs ‘n Kisses Quilt Along as well as my French Rose Buds quilt. I am itching to start stitching both of them this weekend as soon as I get all of my other “quilty chores” done. 🙂

French Rose Buds Basted

Basting as you know is probably one of the least fun tasks of making a quilt. But whenever it’s time to baste, I set aside a whole day, put on some relaxing music and try to keep my distractions to a minimum. No, it doesn’t take me a whole day to baste (usually just an hour or two), but it does take a while to get in the mood to baste.

Bolt of Wool Batting

I start off by pulling down my big ol’ bolt of batting and laying the quilt on top of it so I know how much batting to cut. I leave a couple extra inches on all four sides which I will trim down later. My favorite batting to use is wool because it shows off the quilting and helps my quilts to hang flat nice and flat.

Binder ClipsPearl Bracelets backing


I use a couple of long banquet tables and random binder clips to secure my quilt backing. If the quilt doesn’t stretch across the whole table, I secure the loose ends with painter’s tape. I also starch my backing first as well as my quilt top.

Quilt Sandwich

I love the soft look of the Kona pastels on the front of my Baby French Roses. So I chose a low-volume fabric to go on the back: Pearl Bracelets in Cotton Candy Pink.

I’ve tried several different ways to baste such as thread basting (no thanks), spray basting (too hard to ventilate properly) and using all sorts of gizmos to help close the safety pins (too clumsy to figure out).  I even used plastic pinmoors to cap off my straight pins and while they are terrific to take out, I’m not sure they hold as well as I’d like.

Safety Pin Basting

So I’m back to using plain jane regular old safety pins, and quite a lot of them! I do have the fancy schmancy quilter’s curved pins, but this week I was scrambling to find as many safety pins around the house as I could so I’d have enough to baste two quilts at the same time. I ended up using a variety of pins in my quilt and they all work just fine.

Here are a few tips I’ve learned from basting scores of quilt tops:

  1. When using a lot of white fabric on the front, use a clean white polyster or wool batting, or a bleached cotton batting or a blend. Regular cream cotton may have little flecks or seeds that will show through to the top of the quilt.
  2. Use a backing that will not show through (shadow) through to the front of your quilt.
  3. Take the time press both the quilt top and back of your quilt before basting – and don’t be afraid to use starch. The flatter your pieces, the easier it will be to baste and quilt.
  4. Use lots of pins! The more pins you have in your quilt, the less it will shift while quilting. Sad, but true. Ask me how I know!

French Roses kits are available in my store for a limited time. You can see my progress and read my previous post here.

Sew and Tell Baby French Roses #4 – FMQ Practice

I am moving right along on my French Rose Buds quilt. This week I practiced some free-motion quilting designs which I will finalize shortly. I decided to enter the quilt top into the weekly Quilting Gallery contest so I’d love for you to vote for it!

Vote here and you can be entered to win the Quilting Gallery’s weekly giveaway!

French Rose Buds Top

French Rose Buds Quilt Top 36″ x 43.5″

Before I jump right into quilting this puppy, I decided to take some time and plan out my quilting. Since this quilt is for my brand new niece, I want to make it extra special. I also think it’s a great quilt to show off some fun free-motion quilting texture.

Swirls Quilting

I started by drawing out some quilting designs on paper and then making up a few practice sandwiches to test it out. I’ve always wanted to try swirls ever since taking Angela Walters’ quilting negative space class at QuiltCon and on Craftsy. (Even though she quilts on a long-arm I was able to adapt her techniques to my domestic machine.)

Quilt DoodlingQuilting Audition

Next I tried starting sketching out possible designs directly onto the quilt top.

That didn’t give me enough of an idea so I pinned my quilted practice piece onto the quilt top for a better perspective. So far so good. Now I want to try swirls and pebbles.

Swirls and Pebbles

I really like this! I think combining two designs makes it more fun and whimsical. I stitched out a couple more practice sandwiches, cut them to size and pinned them to the top so I could see how they would really work in the quilt.

Quilting AuditionMy plan is to quilt each section in matching thread so all you see is the quilting texture, not the thread. Hopefully I will have time to baste and start quilting this weekend. I will post more of my progress next week.

By slowing down and only working on this quilt a little each week, I am able to get all of my other projects accomplished without feeling overwhelmed!

You can read about my previous Baby French Roses progress here.