This week it’s time to finish sewing the Sea of Squares quilt top. If you are just joining me, please scroll down to the end for links to each step of this do-it-yourself quilt tutorial. It took me a total of 2.5 hours to complete the steps shown below.
Step 1 – Quilt Layout (30 minutes)
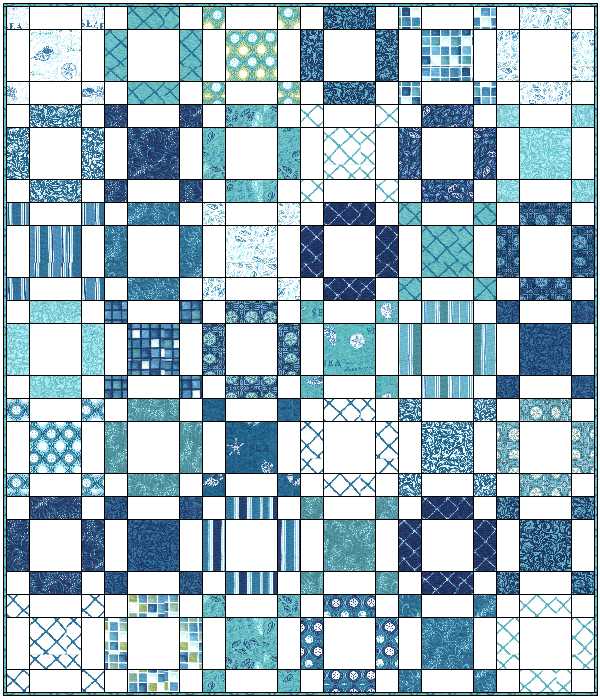
Lay out all 42 of your blocks on a design wall or other large flat surface, or even the floor. Play around with your block arrangement until you find a pleasing composition. Take pictures of any arrangements you like as you “play.”

Arrange your blocks in a 6 x 7 grid – 7 rows of 6 blocks each. Be sure to alternate between your X and O blocks and distribute your values and colors evenly.
Step 2 – Sewing the Rows (1 Hour)
For this quilt layout, it’s easiest to sew the top together in rows. I numbered them 1 through 7. You can press all of the odd blocks in one direction, and all of the even rows in the opposite direction so that seams will nestle together when sewing.
If the darker fabric shows through the white, you may choose to press your seams open.

For a speedy sewing tip, I stacked up all of my blocks into pairs of two next to my sewing machine. I added a pin to the right had side to indicate this is the side I will be sewing.
Before sewing, I took a photo of my layout with camera’s phone. I referred to the layout as I sewed the rows together and was able to keep the blocks lined up in order. I continued joining the blocks together in order until I had 7 rows of sewn blocks.

Since my design wall was too small for all of the rows, I used part of the floor, too!
Step 3 – Completing the Quilt Top (1 Hour)

 First, sew the top two rows together.
Pin at all of the intersections (I like using flat-head flower pins).
Be sure to remove your pins just before you get to them so you don’t accidentally break a needle. (Ask me how I know?!)
Next, sew together rows 3-4 and 5-6 together in the same manner.
Row 7 will be on it’s own. Next, you can join each of these segments into larger “chunks”.
Join rows 1-4 and rows 5-7.
Add these two “chunks” together to complete the quilt top.
Give your top a final pressing and set aside. Or do what I do: leave it up on your design wall for awhile to admire it until it’s time to baste and quilt!

I have decided to split apart the backing and basting into two separate tutorials so I can go more in-depth with each. Next week I will show how to sew a pieced quilt backing, either all from the same fabric, or from bits and pieces from your stash (my favorite). You need a total of 3 1/2 yards for the backing (perhaps a little more if piecing lots of chunks together).
Due to the popularity of this quilt kit, I have put together a limited number of kits in an alternate colorway. This one is called Apple Jacks and would be perfect for a little boy!

Quilt-Along Schedule – Links are Active at the Completion of Each Step:
- Week 1 – Supply List

- Week 2 – Sorting and Cutting the Charms
- Week 3 – Sewing the Blocks
- Week 4 – Completing the Quilt Top
- Week 5 – Piecing the Backing
- Week 6 – Basting
- Week 7 – Machine Quilting
- Week 8 – Optional Extra Quilting
- Week 9 – Machine Binding to Finish
Be sure to post pictures of your progress on my flickr group: Christa’s Quilt Along.
Quilt Kits are available for a limited time.

Looks great!
I just love the blue and white combination!
This is just luscious! Thank you for all the work you have put into this to help us all out!
I love the colors of Apple Jacks quilt top too. Do you use any software to generate the quilt top design?
Thanks Malini! I use EQ7 to design all of my quilt layouts. It took awhile to get the hang of it, but I can pretty much design whatever I want to now. I can import actual fabric images into the program so I know exactly how the quilt will turn out before I sew.
I started sewing the 3 parts of each block. I have part of the pattern laid out already and return the block back to it’s spot. I will have to trim each block before I sew them into rows. It’s looking nice. It’s browns and whites. I will try to post a picture on your Flickr as soon as I can.
I was thinking about this pattern when I bought a charm pack of Indigo Crossing. I have enough CW blues and whites here to go with it. I think this will be on my February NewFO list!
I think that will be lovely!
oh I love this!! I’ve just added a note about those kits on my blog 🙂
Thank you – thank you!!