Welcome to Day 24 of the Back to School Blog Hop organized by Sam Hunter of Hunters Design Studio. If you are new to the hop, check out the end of the post for links to all of the “back to school” sewing tips!

Top 10 Domestic Machine Quilting Tips
1. Baste Well
This is the least fun part of the quilt-making process but probably the most important. All three layers of the quilt (top, batting, backing) should be flat and smooth. I press seams open so they lie flat, and I also take the time to iron my batting. Spray basters can press the quilt after basting to set the glue and iron out any wrinkles; pin basters should double the amount of pins they would normally use.
- Click here for my spray basting tutorial on a table
- Click here for my spray basting tutorial using a design wall
- Click here for my pin basting tutorial
- Click here for Sam Hunter’s spray basting video tutorial (36 min)
2. Use a Large Work Surface

Buy a large sewing desk with a drop in table if you can. If not, put up an extra table behind your sewing machine and off to the left to hold the weight of the quilt. In my table above (which I bought 20 years ago from a company no longer in business) I added a couple of books under the machine to get it to the right height. You can also get a custom insert made to fit your machine. (Just google “custom sewing machine insert). Some companies also make large extension beds that go around your machine, giving you extra surface on any table.
3. Get tools that will help you grip and slip!

Machingers quilting gloves help grip the quilt, and a supreme slider will make the bottom of the quilt slip and slide more easily under the machine.

Two sizes of Supreme Slider are shown above, on my older sewing machine: the regular size (that I accidentally stitched through years ago) and the larger, queen size.
A word of caution – the Supreme Slider is only for free-motion quilting, NOT walking foot quilting. If you use a walking foot, you may stitch through the slider (ask me how I know….)!
4. Choose the Proper Needle and Thread
Here’s a general rule of thumb for matching thread weight and needle size: use a size 80/12 needle with a size 40-50 weight thread, and a size 90 needle with a 28-30 weight thread. Sharp or topstitch needles will have a sharper point, which will allow better penetration of the layers. A “machine quilting” needle is fine, too, but it’s usually more expensive and I don’t notice a difference. A “universal” needle is ok, but it’s not as sharp as the others and is better meant for all purpose applications.

My Piece and Quilt Collection is available at The Precut Store, or your favorite retailer!
You can use nearly any thread you like for machine quilting, but I my favorite is Aurifil 50 weight cotton. You can use it for BOTH piecing and quilting, and it’s strong yet lightweight so it really blends in nicely. Rather than owning ALL the threads in ALL the different weights, I like simplicty – 50 weight cotton for EVERYTHING I do: piecing, quilting, and binding.
5. Match the top and bobbin threads
When quilting on a domestic machine, I also prefer to use the same color thread in the top and bobbin. It will hide any tension issues, and avoid the problem with a contrasting thread color poking through on the top or back of the quilt. This means you need to think about which fabric you are choosing for the backing of your quilt.

Current quilt in progress – this is the back using the same thread in top and bobbin.
If you are are a beginner, choose a busy back that will hide mistakes and allow different thread colors to blend in. If you want to show off your quilting, use a solid colored back so you can really see the stitches.
6. Practice Sketching
Warm up before you quilt by sketching your quilting design on a piece of paper or on a photo or printout of the quilt top. If you understand the flow of the quilting path, you can mimic that motion on your actual quilt. I like to develop a quilting plan for every quilt so that I’m not stuck wondering what to quilt next.
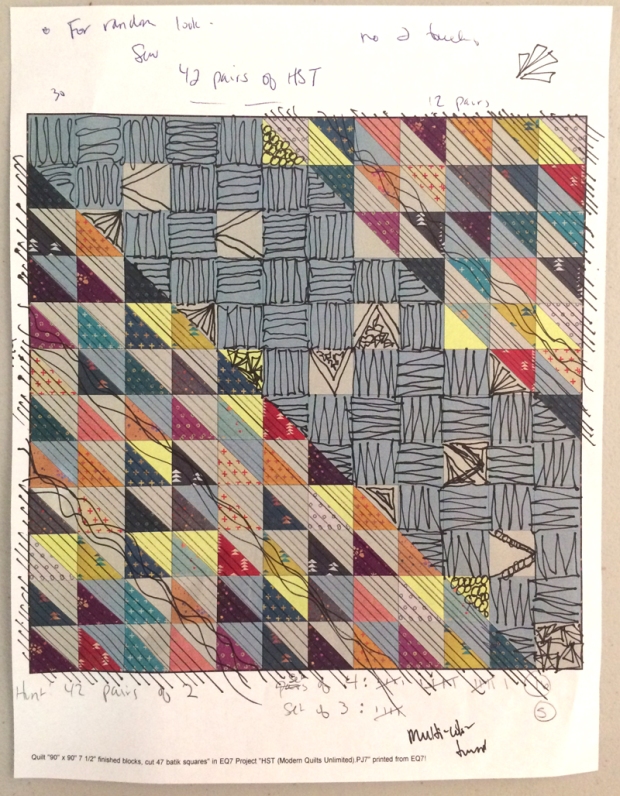
Here’s a real life quilting plan for a quilt I’m in the process of remaking. It’s pretty messy with notes and thoughts as I figure things out, but I can print off multiple copies if needed until I’m satisfied and ready to quilt. Sometimes I will sketch out an entire quilting plan, while other times, I’ll just dooddle the quilting design to get the flow for how I’ll stitch it.
Check out my Craftsy Class – The Quilter’s Path to learn more about this method!

Practice diagrams for “swirls and pearls” – one of my favorite designs to quilt!
7. Practice Stitching
If you practice your “daily quilting exercise,” you’ll be a pro in no time! I always give my students homework when I teach – they are to make up a stack of quilt sandwiches (scrap fabric and batting) to practice on for 10 minutes a day for a week. After about 3-4 days of practice, they can see a noticeable improvement!

Fill up a scrap practice piece each day until you get the hang of the design!
Although I’ve been quilting for over 20 years, I still warm up every quilting session with a practice sandwich to test my tension for the day. I’d rather mess up on a scrap then on the real quilt!
8. Embrace both walking foot and free-motion techniques
In all of my books, I include ideas for BOTH walking foot AND free-motion quilting!
Many quilters think they’ll never be able to quilt because they expect to free-motion quilt perfectly the first time! In my books, video classes and live classes, I always have the students start off with walking-foot quilting first because it’s hard to mess up! Once they are confident that yest they CAN quilt, then we move onto free-motion. By using both techniques in the same quilt you can really achieve some interesting designs. Some students prefer to use the walking foot exclusively while others are more comfortable with free-motion work. Many times, you don’t know what you like (and don’t like) until you try!
9. Quilt on Real Quilts and Give Them Away
Practice may not make perfect, but it does make progress! What better way to learn than by practicing on a “real” quilt as a gift for someone else? The recipient won’t notice your imperfections and you won’t have to be constantly reminded of how far you’ve come! I’ve given away dozens and dozens of “perfectly imperfect” quilts over the years and never would have gained the level of experience I have now, if not for tons of gift-giving!
10. Your Most Important Tool: A Can Do Attitude!

Yes – you CAN quilt it! And I’m here to help!
Image is from my comprehensive start-to-finish quilting class on Craftsy.
I started teaching others to quilt in the late 90’s and I noticed that the students who had the most success, weren’t necessarily those with the most expensive sewing machines and tools. (Shhh! don’t let my industry partners know I said that!!) What they lacked for in experience or top of the line equipment, they more than made up for with their determination to get ‘er done!
You know the old saying “whether you think you can or can’t, you are right”? That applies to quilting as well. My goal since becoming a professional teacher, author and designer just a few short years ago (with 20 years of “practice” under my belt) has been to get others to realize that quilting on a domestic machine can be both fun and rewarding if you stick to it and just take it one step, (or stitch) at a time!
Check out These “Back to School” Basics:
Check out each of these stops on the back to school sewing blog hop. There’s so much information contained in these posts that you are well on your way to learn everything you need to know to make your sewing and quilting experience more enjoyable. Happy reading!!
- Day 1 – August 15 – Sam Hunter: How to spray baste a BIG quilt
www.huntersdesignstudio.com - Day 2 – August 16 – Mandy Leins: Thread Dread: removing stray bits after quilting
www.mandalei.com - Day 3 – August 17 – Nancy Stovall: Batting – The Sweet Creamy Filling
www.justquiltingpdx.com - Day 4 – August 18 – Ebony Love: 7 Indispensable feet for your sewing machine
www.LoveBugStudios.com - Day 5 – August 19 – Michelle Freedman: Machine throat plates
www.designcamppdx.blogspot.com - Day 6 – August 20 – Teresa Coates: Edge/Under/Top stitching
www.crinkledreams.com - Day 7 – August 21 – Kelly Cole: Ten ways to regain your sew-jo
www.vintagefabricstudio.com - Day 8 – August 22 – Megan Dougherty: Tips for working with fusibles for applique
www.thebitchystitcher.com - Day 9 – August 23 – Kim Lapacek: Tricks to being productive with kids
www.persimondreams.blogspot.com - Day 10 – August 24 – Yvonne Fuchs: Circuitboard quilting on Domestic and Longarm
www.quiltingjetgirl.com - Day 11 – August 25 – Sandi Hazlewood: Chain Piecing Quilt Blocks Tips
www.craftyplanner.com - Day 12 – August 26 – Juliet van der Heijden: Paper-piecing with children
www.thetartankiwi.com - Day 13 – August 27 – Maddie Kertay: Fabric folding for any storage solution
www.badassquilterssociety.com - Day 14 – August 28 – Cath Hall: Working with Lawn fabric
www.wombatquilts.com - Day 15 – August 29 – Tracy Mooney: Tips for the perfect seam
www.sewmuchcosplay.com - Day 16 – August 30 – Teri Lucas: How to bury thread
www.terificreations.com - Day 17 – August 31 – Debby Brown: Securing machine quilting knots
www. higheredhands.blogspot.com - Day 18 – September 1 – Flaun Cline: How to put some sparkle in your fabric pull (part 1) www.ipleadquilty.com
- Day 19 – September 2 – Jessica Darling: How to put some sparkle in your fabric pull (part 2) www.jessicakdarling.com
- Day 20 – September 3 – Trish Frankland: A bigger blade really IS better?!
www.persimondreams.blogspot.com - Day 21 – September 4 – Robin Koehler: Tips on how to travel with handwork – www.nestlingsbyrobin.blogspot.com
- Day 22 – September 5 – Jane Davidson: How to make scrappy HSTs
www.quiltjane.com - Day 23 – September 6 – Linda Pearl: Low cost tips for organizing your sewing room www.onequiltingcircle.com
- Day 24 – September 7 – Christa Watson – Top 10 tips for quilting on a domestic machine
www.christaquilts.com <—- you are here! - Day 25 – September 8 – Sarah Nunes: To Starch or Not to Starch
www.berrybarndesigns.com - Day 26 – September 9 – Suzy Webster: Testing fabric for bleeding
www.websterquilt.blogspot.com - Day 27 – September 10 – Sarah Goer: Machine bind your quilts like a pro
www.sarahgoerquilts.com - Day 28 – September 11 – Vanda Chittenden: Beginner paper-piecing tips
www.chittenden.co.za - Day 29 – September 12 – Cheryl Sleboda: Needle threading tips
www.muppin.com - Day 30 – September 13 – Kim Niedzwiecki – Different thread weights and when to use them
www.gogokim.com - Day 31 – September 14 – Sandra Healy: Conquer Your Fear of Machine Appliqué
www.sandrahealydesigns.com - Day 32 – September 15 – Sandra Starley: The Basics of Antique Quilt Collecting
www.utahquiltappraiser.blogspot.com

Christa, Thank you for these tips. I do most of my own quilting and each one of these tips are spot on. I bought 2 of your books at Panguitch Quilt Walk and am trying to free up some money so that I can purchase the latest. I love your patterns. Thanks for all you do for us quilters!!
Very helpful information. I was surprised to hear your tip that you warm up with a practice sandwich, a person with all your expertise. Please keep sharing with your ‘Can do’ attitude!
This is an excellent list of tips, Christa! I especially love the gloves suggestion. It’s such a small piece to the process, but makes a huge difference. I don’t FMQ on my domestic, but I find them indispensable for even walking foot quilting. Thanks for sharing on the blog hop!
I especially love and appreciate tip #10, Christa! Great post. 🙂
Those are great ideas. Thanks
Great list to help anyone that wants to learn or polish up on their machine quilting skills!