Blogger’s Quilt Fest Entry – Modern Trees (Home Machine Quilted)

I’m excited to share another entry into the online Blogger’s Quilt Festival. It’s called Modern Trees. I finished it in December of 2013, and I’ve entered it into the Home Machine Quilted category.

You can view my other entry here.

Modern Trees
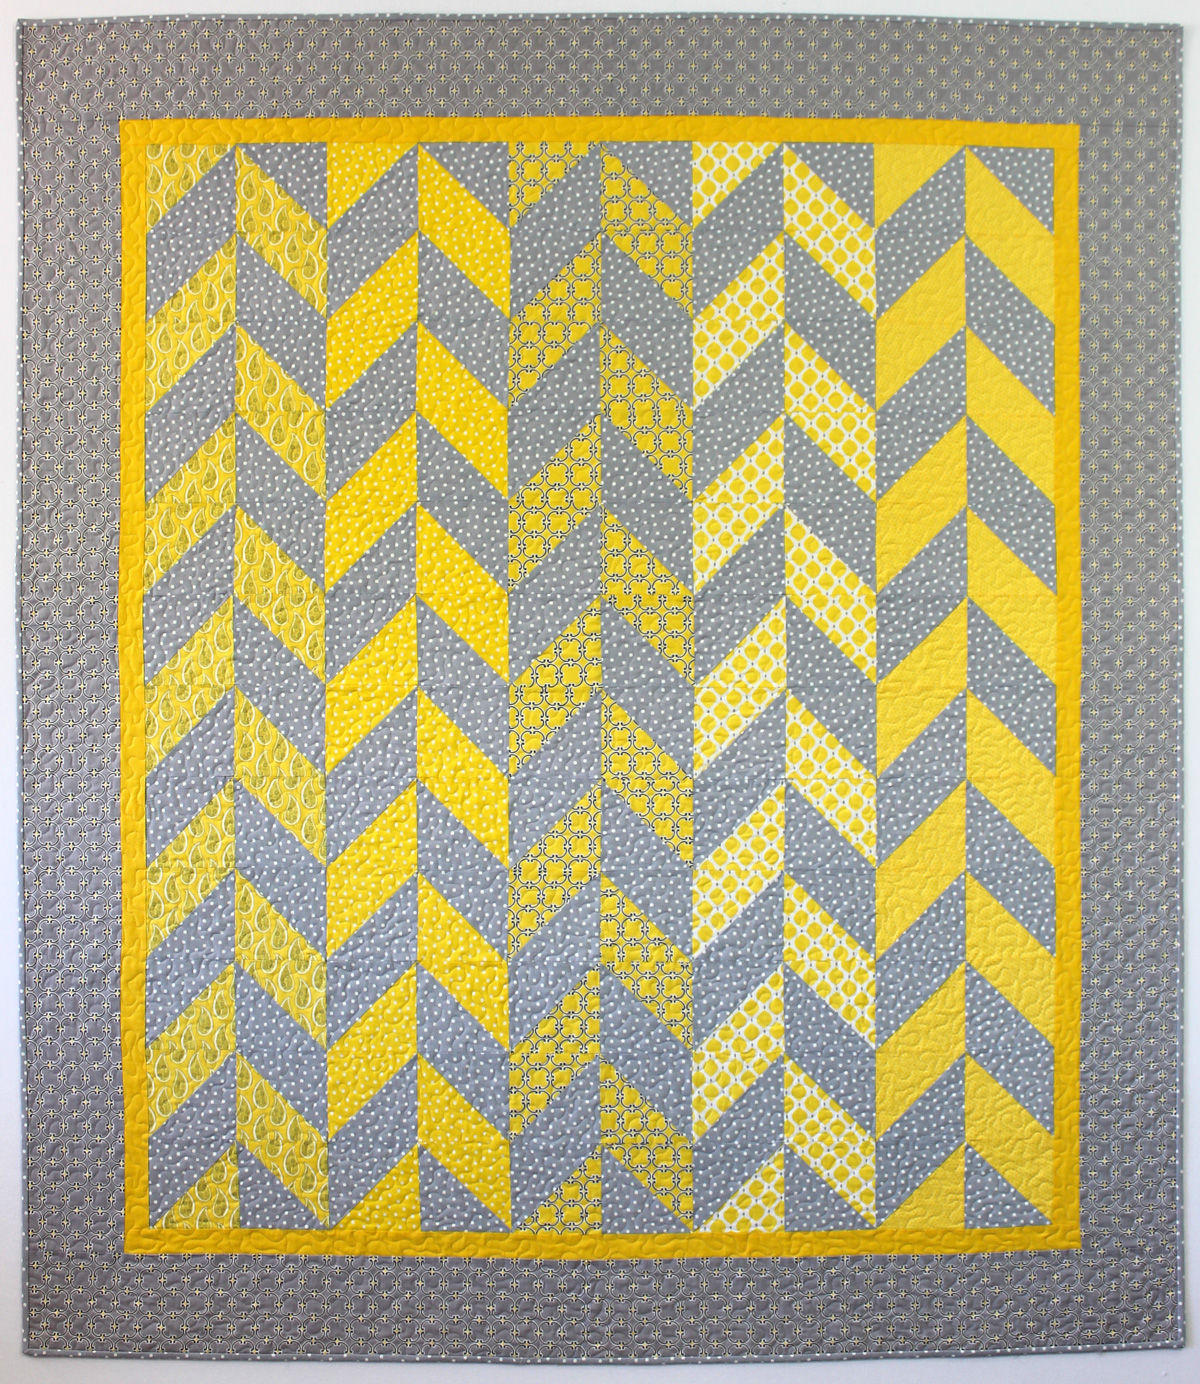
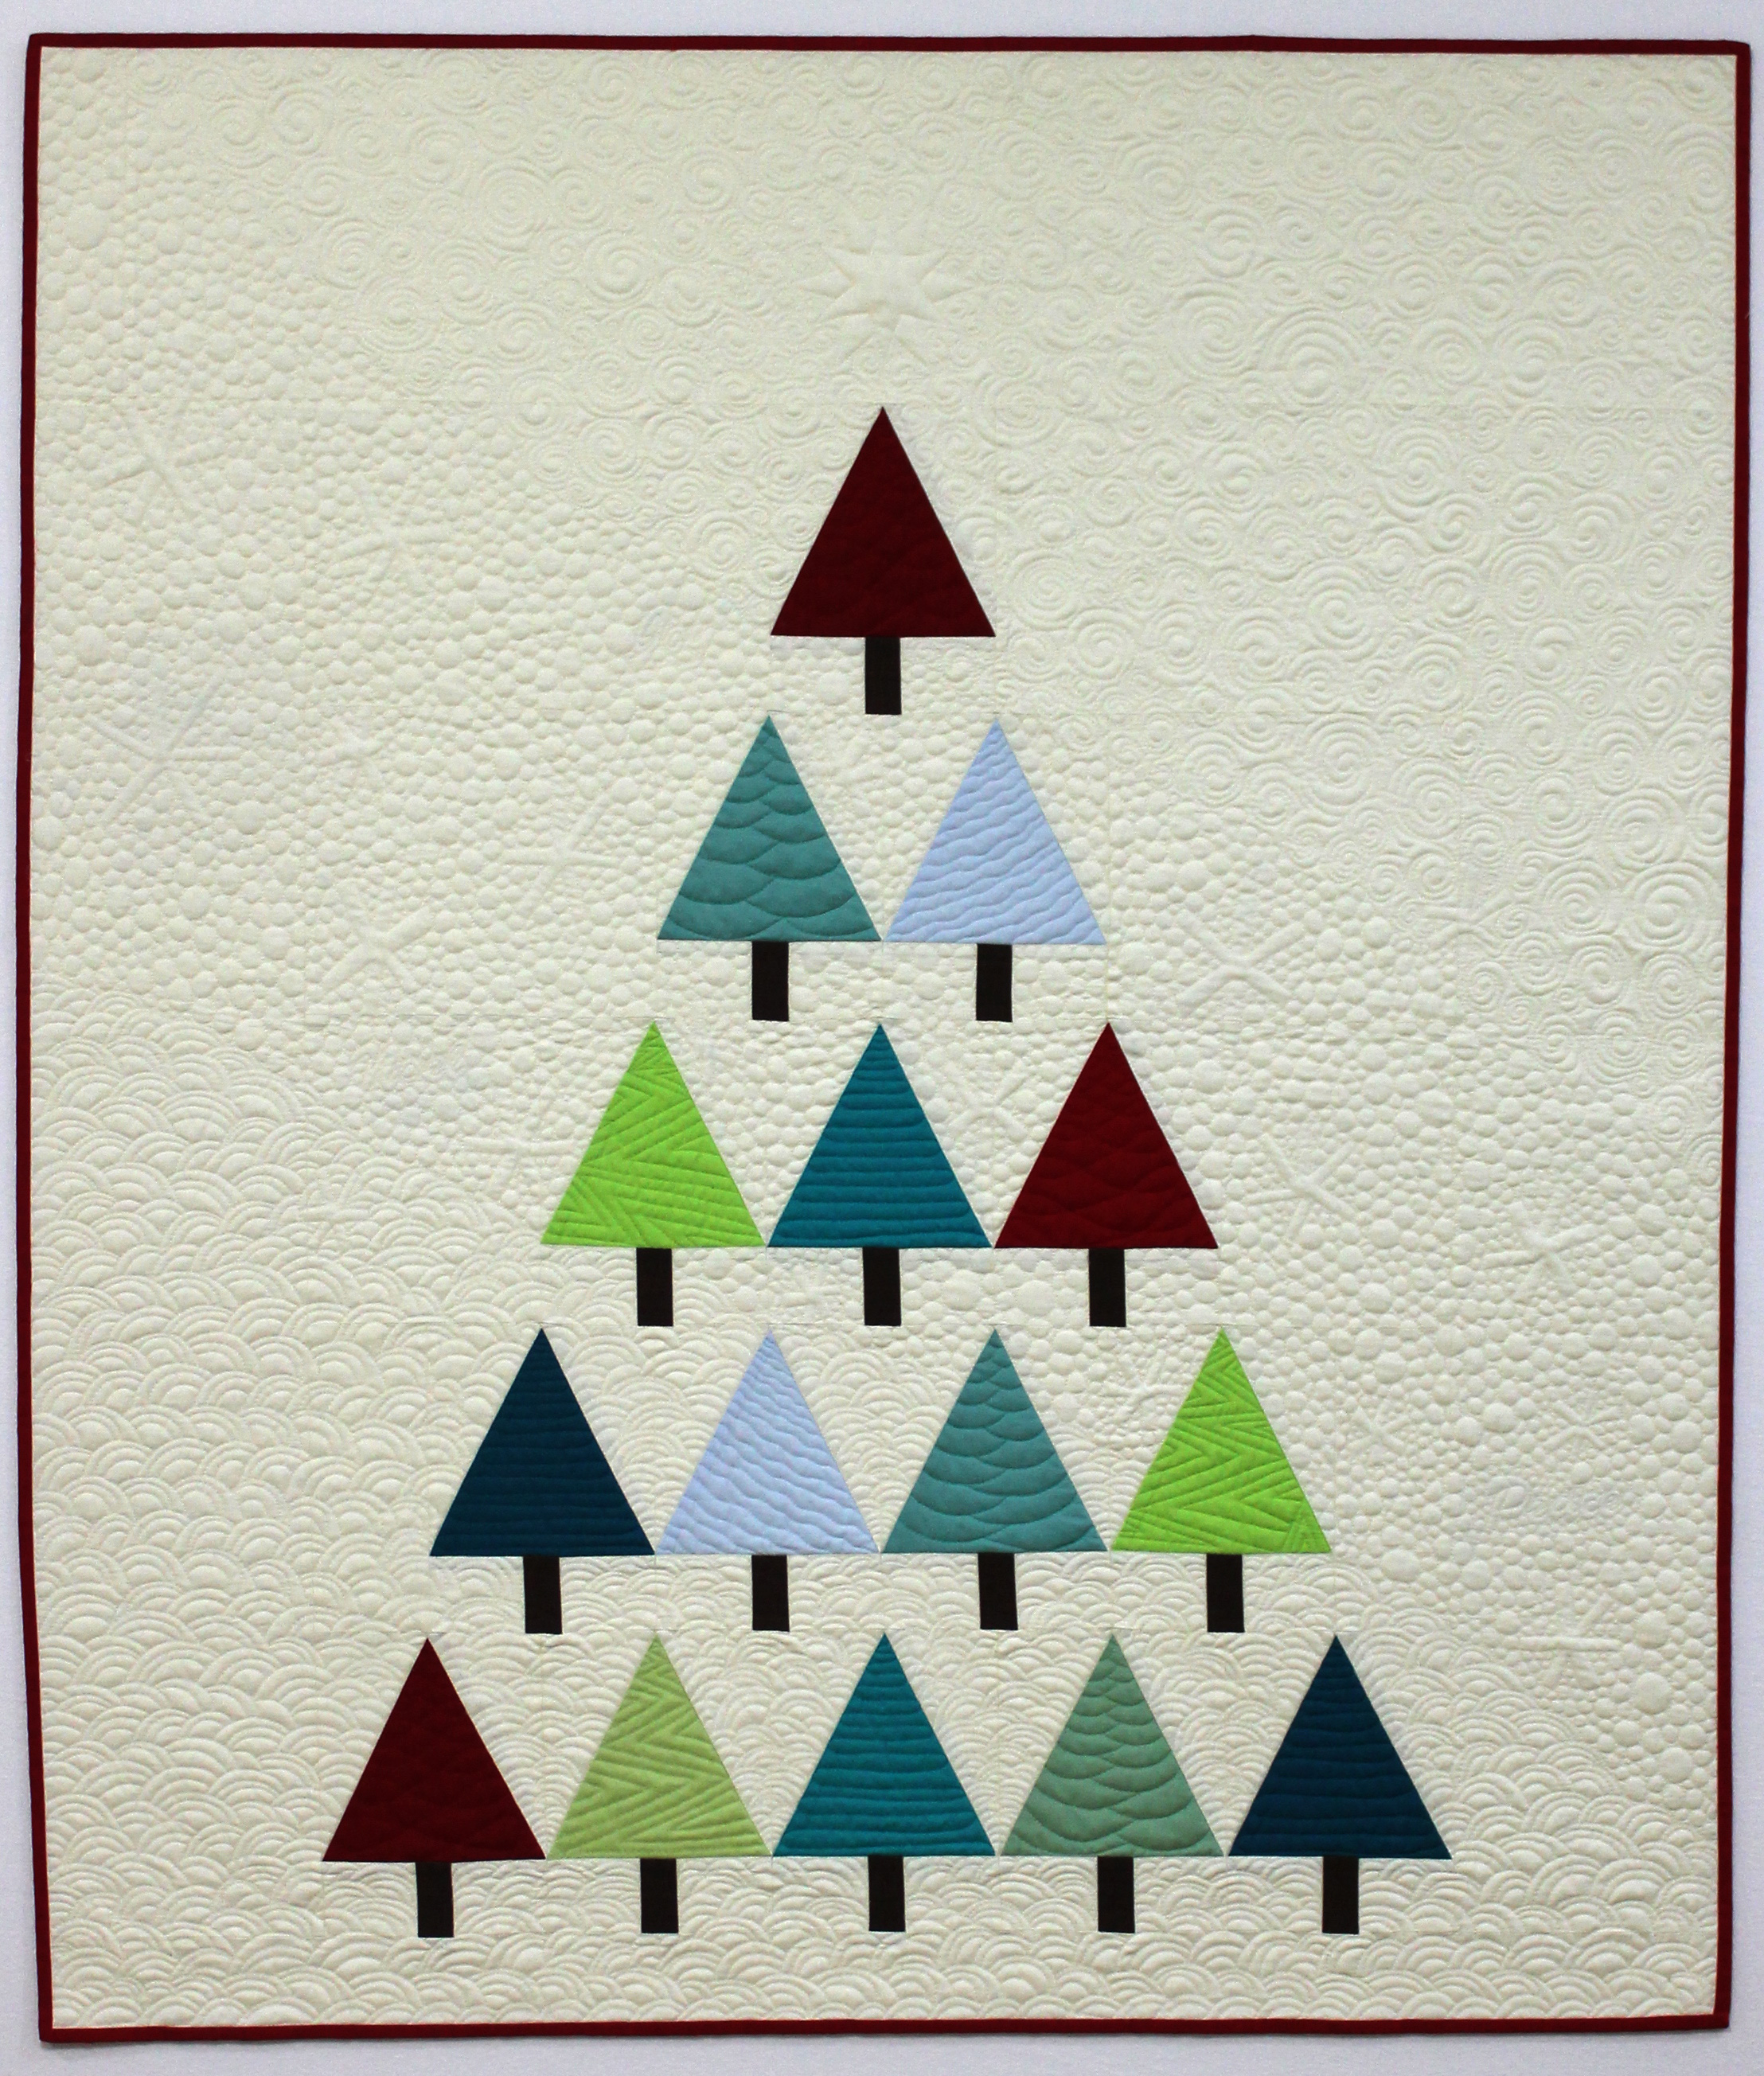
Modern Trees, 43″ x 50″ by Christa Watson, Home Machine Quilted

Modern Trees was made as one of my free quilt alongs and you can still access all of the tutorials to make your own version of this quilt here.

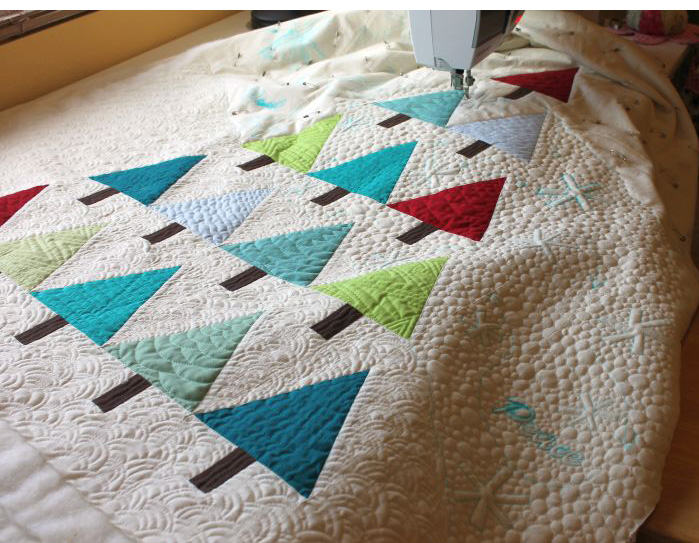
Because I love to encourage and teach others how to free-motion quilt on their home machines, I’ll tell you a little bit more about the machine quilting on this quilt.

Quilting Modern TreesI think free-motion quilting on a domestic machine is super fun and relaxing!

I knew that I wanted to evoke the feeling of snow, but wanted to mix up the background quilting to make it a little more modern. I usually have better results if I plan out my quilting first. Rather than sticking with one motif, I roughly divided the quilt into 3 sections as shown in my diagram below:

20131022_trees_quilt_sketchThe swirls in the top section represent the sky full of billowing clouds ready to burst! The middle section shows snowflakes and snow clusters gently falling to the ground; and the bottom section evokes snowdrifts piling up on the ground. I also decided to throw in a few words just for a touch of holiday whimsy – it’s fun to doodle!

I don’t always stick exactly to the plan, but sketching out my quilting designs gives me a rough guideline to follow.

20131120_quilting_modern_trAs you can see, I used a washable blue marker to write the words, and to draw the larger snowflakes and the star. I quilted the rest of it without marking, adding lots of yummy texture and varying the size of the motifs for interest.

Quilting Swirls
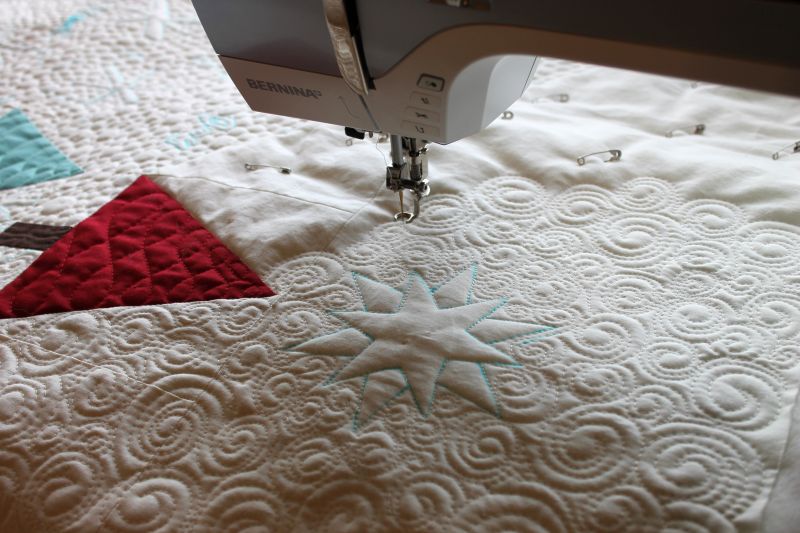
Quilting the swirls was definitely my favorite partΒ  – they are so fun and forgiving! It’s interesting to see how much “poof” is created when quilting so densely.

20131105_aurifil_threads
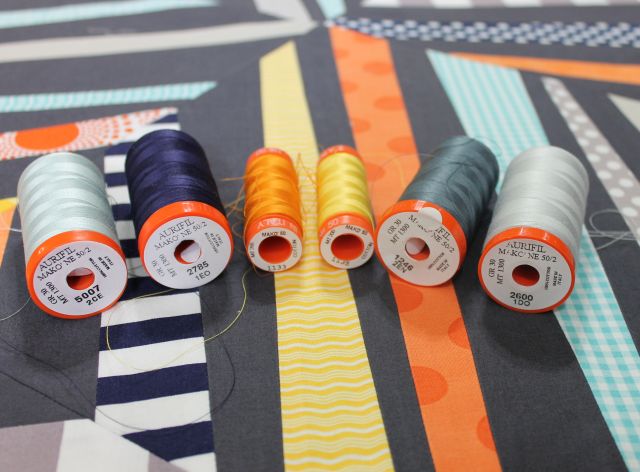
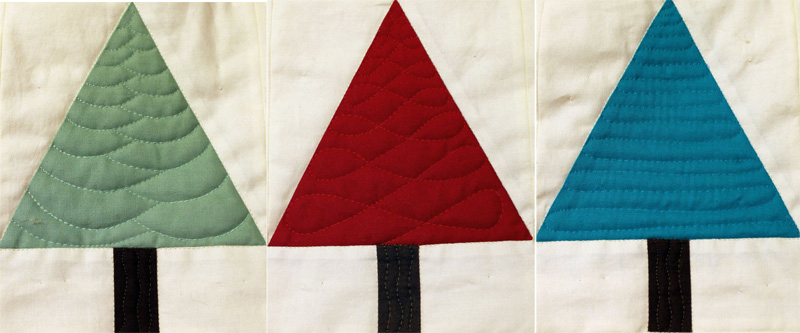
Another fun part of any quilt is picking out matching threads for each section. After a couple of years of trial and error and testing on numerous quilts, Aurifil has become my go-to thread for piecing and quilting.

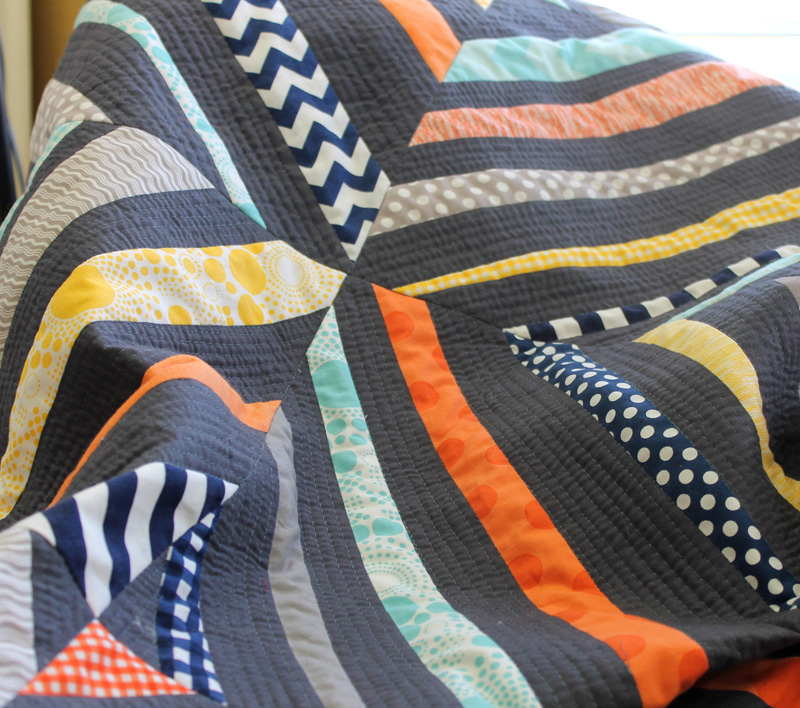
I like to match my threads as closely as possible so you see the texture of the quilting rather than the thread. πŸ™‚ I tried to quilt each tree with a different motif to “decorate” it.

tree_details

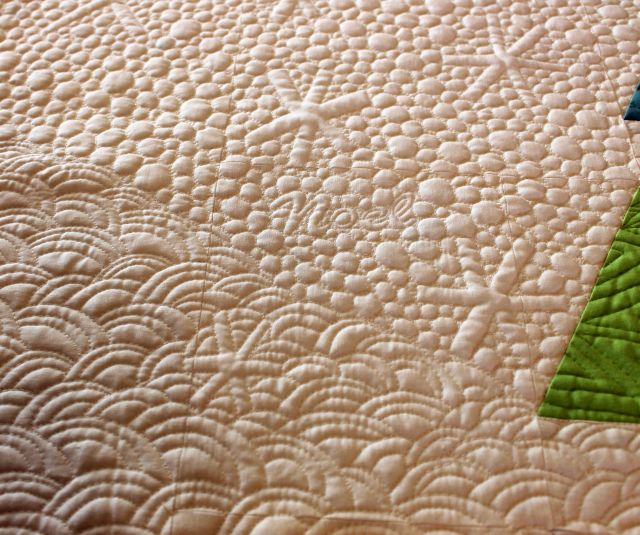
Here’s a closeup of the quilting after the blue marks have been removed – so yummy! (Forgive the lighting – this was taken before I got better lighting in my sewing room!)

20131120_fmq_detail_1And one more, just for fun… (with more bad lighting….)

FMQ Trees Detail
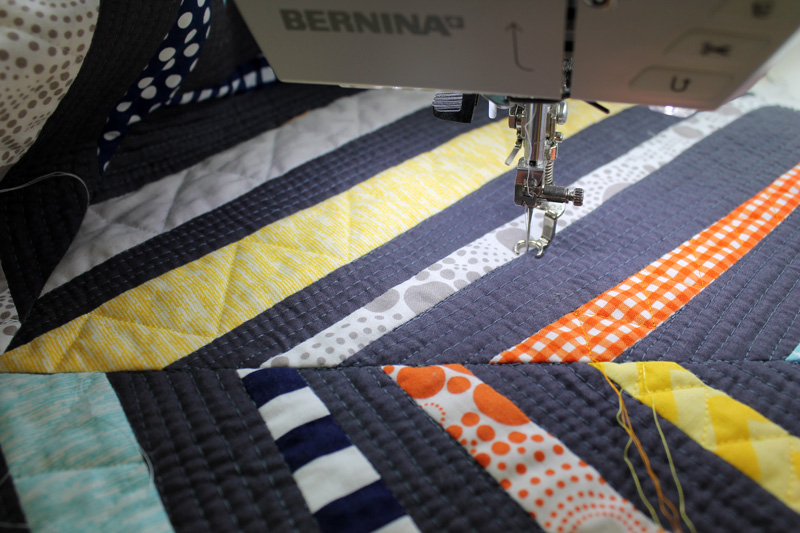
The quilting on this piece actually went very quickly. It took a total of 13 hours and I only worked on it for a couple of hours a day. I think that’s a reasonable amount of time, considering the density of the quilting and customization of the designs. Can’t you just imagine how tactile all this texture feels?

If you like Modern Trees, you can vote for it in the Home Machine Quilted category, starting May 23rd. Entries will appear randomly each time, so you may need to scroll through to find the picture of Modern Trees.

You can also click here to get all the free tutorials to make your own version! πŸ™‚

Modern Trees

Modern Trees by Christa Watson 43″ x 50″

Thanks for stopping by!

Blogger’s Quilt Fest Entry – Spiraling Out of Control (Original Design)

I’m excited to participate in the Blogger’s Online Quilt Festival with my first of two entries, Spiraling Out of Control. I am entering it into the Original Design category and voting begins May 23rd.

You can view my other entry here.

Modern Quilt

Spiraling Out of Control, 70″ x 70″ by Christa Watson, Original Design

Those of you who follow my blog on a regular basis will have seen this quilt before. However since I’m entering it into the Original Design category, I thought I’d share with you a little bit about the design process that went into making this quilt.

Parallel Lines

I started with this block I had created in EQ7 for a modern design competition. After being selected as a finalist, I held onto the design for a bit, thinking I might do something more with it later. When the MQG’s first fabric challenge of 2014 was announced, I started playing around with my design again, seeing how it could evolve by changing a few lines.

Improv String Block
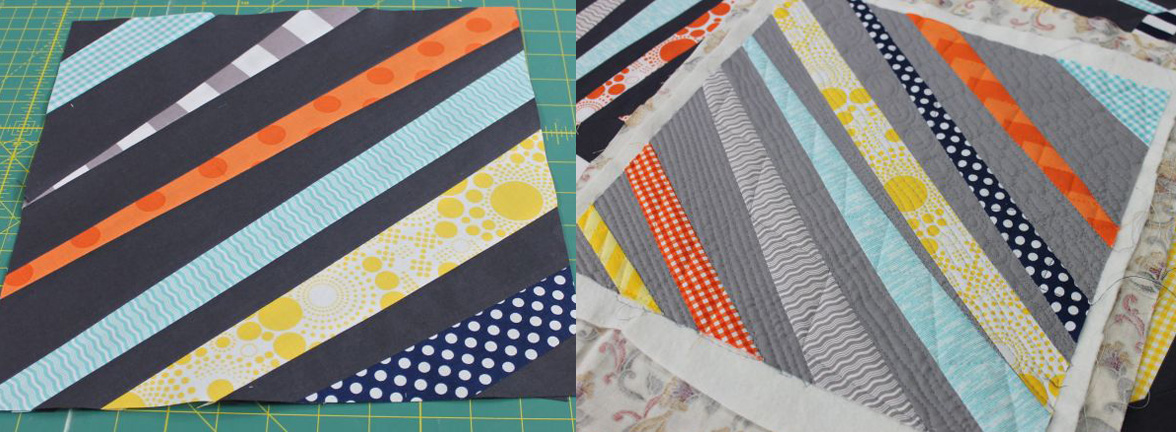
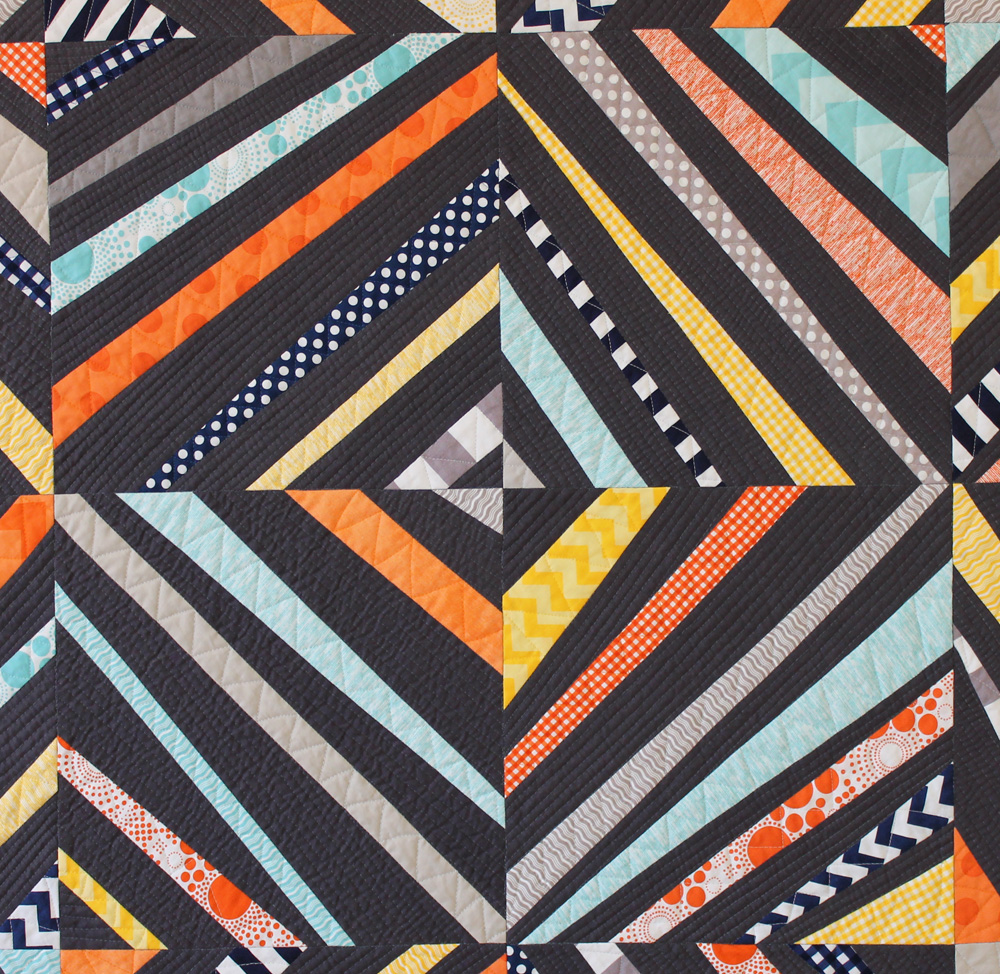
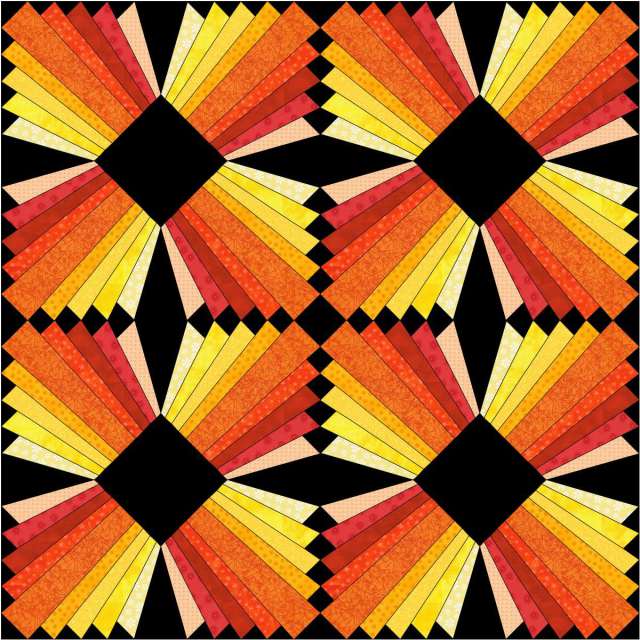
I kept the light background, added more lines, and drew them at odd angles rather than parallel. I digitally colored the strips using the challenge fabric we were to work with. I liked where this was going, but thought it needed something more dramatic.

So I pieced two sample blocks using two different backgrounds – dark and medium grey. I wanted to see which colorway would provide the most visual impact.

spiral_blocks_2

I used the lighter grey block as a sample to test various machine quilting designs.

At this point my gut was telling me to go with the darker background fabric, but just to be sure, I started recoloring my original digital layout. Once I got this far with the coloring, I knew the darker fabric was the right choice. πŸ™‚

spiraling_color_choicesSince I knew I wanted each block to be different, I had to figure out a way to sew the blocks without using traditional paper-foundation piecing methods. I solved the problem by cutting long strips of fabric in various widths and lengths, and sewing them together improvisationally, keeping the overall diagonal line intact. I then trimmed up the blocks using a large square ruler so they were all the same size.

spiraling_square

The hardest part was making sure the shorter strips were longer than the ruler!

So that’s how this quilt design came to be. In addition to design, machine quilting is one of my favorite steps of the quilt-making process. Here are some detailed shots of the machine quilting and thread choices:

aurifilYummy Aurifil threads in matching colors!

straight_line_quiltingStraight-Line Quilting in the Negative Space

Β quilting_zig_zagsQuilting zig-zags in matching thread colors – lots of threads to tie off later!

color_backColorful Thread-play on the Back

spiraling_detailQuilting Detail – Front

Spiraling Out of Control measures 70″ x 70″ and it has been one of my most fun quilts to make! You can vote for it as your favorite in the Original Design category of the Blogger’s Quilt Festival starting May 23, 2014.

Please note: quilts will show up randomly in each festival category, and they will not be numbered or named. You may need to scroll through to find my quilt on the category page. πŸ™‚

As always, thanks for your support!

Herringbone Finish and Tips for Better Binding

Today I get to share the big reveal: Herringbone is finished!

herringbone_finishedHerringbone, 63″ x 73″ designed and made by Christa Watson for Camelot Fabrics

You can click the links below to read my WIP process posts as I worked on this quilt:

Herringbone took a total of 25 hours to complete (13 hours to cut, sew and press the top; 12 hours to baste, quilt and bind by hand.)

I wanted to share a few tips for better binding that I practiced while finishing this quilt:

binding_cornerWhen attaching the binding, I marked my stopping point with a water soluble pen so that I know exactly where to stop stitching at the corners. Whenever I “fudge” this part of the process, it always gives me problems.

binding_ironAfter the binding is attached by machine, I will iron it away from the quilt so that it’s easier to pull over to the back for hand sewing. (By the way, this is another reason I prefer to quilt with cotton thread and natural fiber batting, so I don’t have to worry about melting anything with the iron!)

binding_clips1When I get to the corners, I fold them so that they match up evenly and use Clover Wonder Clips to secure the binding in place. I fold over the corners opposite from how they are folded on the front to reduce bulk. I also prefer to add clips so that the clear side of the clip is showing on the back. It seems less bumpy that way.

binding_clips2I use a liberal amount of clips and space them pretty close together. So far, I’ve invested in two 100 clip packs and am ready to order another set. I prefer to clip all the way around the perimeter of my quilt so that I can sew continuously without having to adjust the clips!

For more step by step pictures, click here for my indepth tutorial on binding by hand.

Herringbone is on it’s way to the Camelot Fabrics quilt booth at Spring Market. I won’t be there, so if any of you go – be sure to snap a picture of it for me, will you?


Modern Logs Quilt Finish

Presenting my latest finish: Modern Logs!

Modern-Logs-FinishedModern Logs by Christa Watson, 48″ x 54″

Modern Logs was one of my fastest finishes ever! From picking out the fabrics, to stitching down the binding, I finished in just under a week. The folks at Quiltique were kind enough to order the Petal Pinwheels line from Michael Miller for this quilt. It’s the same fabric being used in the Modern Quilt Guild’s fabric challenge. I chose coordinating solids and I was off and running (or should I say sewing)!

stripsProbably the hardest part of the whole quilt was deciding on which fabrics to put together, but of course, that’s also the most rewarding part when it all comes together. I made test blocks, wrote copious pattern notes, and practiced quilting on a sample block so that I could test the thread and batting.

test_blockI prefer natural batting when quilting on my home machine – it doesn’t pucker!

I went with Aurifil Dove grey 50Wt. cotton for the quilting (in both top and bobbin) with Quilter’s Dream Cotton in the select loft thickness. I used an elongated ziz-zag stitch – #16 on my Bernina model 710. I adjusted the length and width of the stitch until I was happy with the result.

basting_sprayThis is the fourth quilt I’ve made using 505 basting spray and I’m just in love with it! It sticks every square inch of the top to every square inch of the batting and backing – so important to keep things from shifting and bunching while quilting!

This time I put a sheet under my layers as I sprayed and did it indoors with the windows open. My room is large and well ventilated so fumes were not a problem. I sprayed the backing and top, rather than the batting. I also ironed the whole thing when finished to set the adhesive, a tip I learned from machine quilter extraordinaire Ann Petersen.

back_design_wallI created the backing on my design wall by covering up the top with yardage and leftover scraps. I kept going until the backing was big enough. I love fun pieced backs, don’t you?

Here’s a nice angled shot where you can really see the quilting:

quilting_detailZig zag quilting was super easy and fast to do!

And the back:

finishsed_backingI think quilt backs should be as interesting as the fronts!

Modern Logs finishes at 48″ x 54″ and took a total of 24 hours to complete, including binding by hand. Not bad for a week’s work, and much faster than my last MQG challenge!

Modern-Logs-FinishedModern Logs – designed, pieced and quilted by Christa Watson, 2014

For those of you outside the local area, I will be teaching this quilt as a week-long retreat class at the John C. Campbell Folk School in Brasstown, North Carolina, March 8-14, 2015.

I’ll update my teaching schedule when Folk School registration opens later this spring.


Project Linus Charity Drive and Free Quilt Tutorials

I’d like to help spread the word about the the Project Linus Charity Drive being coordinated by Fave Quilts and Leisure Arts. They are requesting quilts and blankets to be donated to the Chicago, Illinois chapter of Project Linus.

2014 Project Linus Drive

If you are able to send in a quilt or blanket, they are giving away some pretty nice prize packs sponsored by Leisure Arts books. The drive runs through June 23rd, 2014. For complete details and where to send, please click here.

Fave Quilts has been very supportive of my efforts to share my love of quilting with as many people as possible. They routinely feature my free quilt alongs on their website, along with hundreds (possibly thousands) of other free patterns and tutorials. You can check out my profile here and literally spend hours on their site, combing through all the inspiration!

Baby BricksBaby Bricks Quilts by Christa Watson

For the charity drive, I’m sending them the Baby Boy Blue version of my Baby Bricks quilts shown above. I made two versions of Baby Bricks to illustrate how different a pattern can look, depending on the fabrics. I knew I wanted to donate them both, and I was able to give away the pink version to a brand new mom earlier this year. However, I held onto the blue one until just the right opportunity came along. Now I’m glad it’s going to the right place! πŸ™‚

Here’s a full shot of just the blue version:

babybricksblue_finishedAs you can see, I added more straight line quilting to the original quilt. Here’s a closeup so that you can see that straight lines don’t need to be perfectly straight or evenly spaced! The trick is to add enough lines so that your eye takes in the overall effect of the added texture.

straight_line_quilting_detaWhen I quilted this quilt, I marked all of the original straight lines, about 2″ apart. Then I filled in the rows of quilting between the lines using the edge of my foot as a guide. It’s totally not perfect, but I love it and hope it will go to a good home. πŸ™‚

Click here to get the free tutorials for Baby Bricks and whip up your own version for someone you love, or for someone in need!

And remember, pieced quilt backs are a great place to use up all those leftovers, whether they match perfectly or not. πŸ™‚

baby_bricks_backI love the yummy crinkly texture all that straight line quilting provides!

My Cup Runneth Over…

I just found out two very exciting pieces of news today, and forgive me if I can’t help but put them out there for all the world to see!

Excitement #1 – Colorful Chevrons Takes 3rd at Paducah!

Thanks to my friend Linda H. for sending me this phone pic. She just happens to be there covering the story for AQ magazine and was able to show me the good news. The funny thing is, I couldn’t remember when QuiltWeek started and had my dates confused. I was thinking I wouldn’t hear anything about it until at least next week!

AQS Paducah Modern 3rd PlaceColorful Chevrons won 3rd place in the Large Wall Quilts – Modern category.
Click here for a list of all the winners.

Excitement #2 – I’ve Been Nominated for Teacher of the Year!

I’ve been nominated for 2014 Teacher of The Year, presented by the International Association of Creative Arts Professionals. Although I didn’t win, I’m in total agreement with who was chosen. In fact, after reading the email announcing the 8 nominees and the winner, I’m completely awed and humbled to be among those who made the final list.

teacher of the year image

No, I’m not going to spill the beans and spoil any surprises yet. The winner and all of the finalists will be given coverage in the Spring Issue of The Professional Quilter, and it will be up to any of them if they want to announce it publicly first. πŸ™‚

My cup truly runneth over….

Free EQ7 Downloads – Including Many of My Designs

One of the things I love about Electric Quilt software is being able to share some of my designs with others that use the program. Recently, I added two more of my designs to EQ’s Projects Download page.

Be sure to check out my Jolly Jelly Roll quilt (which was my first-ever quilt along):

Sugar Sweet Jolly Jelly Roll Quiltand my Ultra Modern Dresden paper pieced block: (which I haven’t made… yet!)

20140411_modern_dresdenFor more free EQ7 downloads, click here. My projects are all listed most recently, but there are literally hundreds of free designs for you to try.

While you are there, be sure to check out the bio’s of all of the other EQ7 artists!

Herringbone WIP – Simple Stipples and FMQ Tips

Today I’ll share with you how I’m quilting my Herringbone quilt. Just call me the stipple queen. πŸ™‚ I did all piecing and quilting on my Bernina 710 without a stitch regulator.

stipplingHerringbone by Christa Watson; free quilt pattern designed for Camelot Fabrics

I spent the first 10 years of my quilting career stippling everything I could get my hands and needle on! Then I took a break due to stipple burnout and starting spending way too much time quilting more labor intensive custom designs on my quilts. However, for Herringbone, I returned to my favorite go-to allover motif: stippling!

Since I wanted the quilting to enhance the graphic nature of the design rather than steal the show, I chose to go with a thin, 50 weight Aurifil thread in both top and bobbin. I tried out several colors to see which would blend in the most with both the yellow and grey fabrics.

aurifil_thread_choicesTip: audition thread colors before you begin quilting. The grey blends best!

I ended up going with Aurifil #2600-Dove which I think is just the perfect shade of light grey! It surprised me how well it seemed to disappear into the yellow fabric – providing scrumptious texture, rather than a heavy, “thready” appearance.

For this quilt, I practiced on a few scraps first (like I always do) and tested my machine’s tension. Here’s a quick tip: if your machine has really nice tension when you are sewing regular seams, it shouldn’t need to be adjusted too much for free-motion quilting.

herrinbone_quilting_glovesI usually quilt with flat hands forming a hoop – gotta love those Machingers!

Don’t be afraid to experiment a little until you get a pretty stitch! For some reason, the day I quilted it, I was able to achieve more consistent stitches with the feed dogs engaged, but covered with a Supreme Slider. I didn’t fret about why, I just went for it. I’m very pleased with the consistency of my stitching on this quilt and I think slowing down just a little helped, too.

I made a label ahead of time and ironed it to the backing fabric with fusible web before I quilted it. Because I am using a thin blending thread, the quilting stitches will hold the label in place nicely without too much distortion of the writing.

herringbone_label

I chose to use a coordinating chevron print from the line for the backing – “sew” fun!

I also tried Soy batting for the first time with this quilt and I really like it. It stuck really well to the quilt while spray basting, and I like the drape and heft of it. I reminds me most of quilting with a nice cotton batting (like Warm ‘N Natural) but with a little more loft to it. Now I need to see how it washes up!

bamboo_battingSoy Blend batting given to me by my friend Cory. It was fun to try!

I timed myself like I usually do, and it took less than 4 hours to completely stipple this baby. After spending over 40 hours intricately quilting my last quilt, that was like a speed record for me! (Hmm – I need to seriously quilt more quick and fun allover motifs for the next few quilts….)

Now I’ll go get the binding put on and share the final reveal next time!

Roundup of Machine Quilting Blog Posts I’ve Written:

I’d like to leave you with links to several blog posts I’ve written about machine quilting, both here on my blog and for Craftsy. Some of my tools and techniques have changed slightly and a few things may be repeated, but I’ve covered a lot of basics:


Christa’s Soap Box – Learning a New Skill

I think it’s great to learn new skills, especially when it comes to quilting. After all, how do you know whether you will like something or not unless you give it a try? I recently had the chance to try painting on fabric, and even though I ultimately decided it wasn’t my “style,” it was still fun to learn a new technique!

20140401_cory_paintingChrista and Cory painting away!

My friend Cory came over recently and showed me how to use Setacolor paints to add a little life to this wallhanging I made a couple of years back (before I found modern quilting).

hearts_feathers_wholeclothHearts and Feathers Wholecloth. Free pattern courtesy of Leah Day.

It’s a gorgeous free-motion quilting design from Leah Day. As you can see in the “before” picture above, you can hardly see the quilting. This is where my “matching threads” philosophy perhaps went a little too far.

The mottled batik fabric I used was so busy that you can’t really see the stitching. I thought about going over the quilting again with a contrasting metallic thread to make it stand out, but Cory suggested paint instead. So I figured, what they heck, I’ll give it a try. πŸ™‚

hearts_paintingFabric Painting in Progress

It took a few coats to get a nice even application of color and it about drove me crazy trying to keep the painting inside the stitching lines, but overall, I’m pleased with how it turned out. The only thing I don’t like about fabric painting is how it makes the surface rough and scratchy rather than soft and supple (leading to my preference for modern utility quilts).

hearts_feathers_finishedAnd not to be outdone, here’s a shot of a gorgeous piece that Cory’s currently working on:

20140331_cory_paintingHave you ever tried painting on fabric? If so, what are your thoughts about it?


Herringbone WIP – Tips on Working With Directional Fabric

I finished sewing my Herringbone quilt top this week and I wanted to share with you a few new things that I tried while making it.

herringbone_top_closeupHerringbone quilt top, using the free pattern I designed for Camelot Fabrics.

Herringbone is made from a plethora of HST’s (half-square triangles). Usually, the fabric direction doesn’t matter, but in this case, I wanted to figure out how to line up the directional fabrics I was using so that they all went the same way.

herringbone_cut_fabric_squaresI used Gray Matters More fabrics in yellow and gray – so yummy!

I started out by cutting all of the squares like I normally do. My favorite method of making HST’s is to draw a line down the middle on the wrong side of my background fabric, match it up right sides together with the main print, and sew on either side of the line. Cutting the squares apart on the lines will then yield 2 half-square triangles each.

herringbone_hst_stackDon’t you just love a stack of yummy HST’s? They look like little triangle sandwiches!

For my “experiment,” I flipped the background squares so that half of the lines were left-diagonals, and half were right-diagonals. I then matched up each background square with a print square, keeping the print squares oriented in the same direction.

herringbone_diagonal_lines

After sewing and cutting apart, I ended up with 4 stacks of HST’s with the prints running in 4 different directions, exactly what I wanted for this pattern. Each half of the squares shown above produced two different orientations below.

hst_paisleyI’m very visual, so I had to constantly refer back to my pattern to line up all the pieces in the correct block position. (I’m not sure how the directional shift will look with other HST configurations, but you can test it out and see.)

herringbone_block_diagramThe fabric shown below is one-way directional rather than two, so I just needed to separate them into 2 different directional stacks, rather than 4. Do any of you math geniuses out there remember what type of asymmetry that’s called? I forget!

hst_directional_fabricI still had to mark and sew diagonal lines going left and right for these 2 piles!

Since I decided to get carried away with lining up the prints in my blocks, I decided to match up my border seams as well. To do this, I cut out strips that were the exact same width, following the same design repeat. I then sewed a seam between the motifs, trying to match up the design as best I could. I trimmed the seam allowance down later.

border_match_seamsThe picture below is how it looks on the front. The key is to match the print where it will be less noticeable, like in between rows of design motifs.

border_motifMy final top tip is for joining seams that cross over your triangle points. Sew on the side where you can see the tiny triangle in the seam below. This will help you achieve nice, crisp triangle points. πŸ™‚

seam_intersectionIt feels great to have a finished top – or as some would call it, a “flimsy.” I love how it looks exactly like my original EQ7 design (minus the design wall wrinkles and bad lighting). Next time I will share with you how I quilted it.

herringbone_combinedOn the left is my finished top. On the right is my EQ7 sketch. I love it when they match!