I finished sewing my Herringbone quilt top this week and I wanted to share with you a few new things that I tried while making it.
 Herringbone quilt top, using the free pattern I designed for Camelot Fabrics.
Herringbone is made from a plethora of HST’s (half-square triangles). Usually, the fabric direction doesn’t matter, but in this case, I wanted to figure out how to line up the directional fabrics I was using so that they all went the same way.
 I used Gray Matters More fabrics in yellow and gray – so yummy!
I started out by cutting all of the squares like I normally do. My favorite method of making HST’s is to draw a line down the middle on the wrong side of my background fabric, match it up right sides together with the main print, and sew on either side of the line. Cutting the squares apart on the lines will then yield 2 half-square triangles each.
 Don’t you just love a stack of yummy HST’s? They look like little triangle sandwiches!
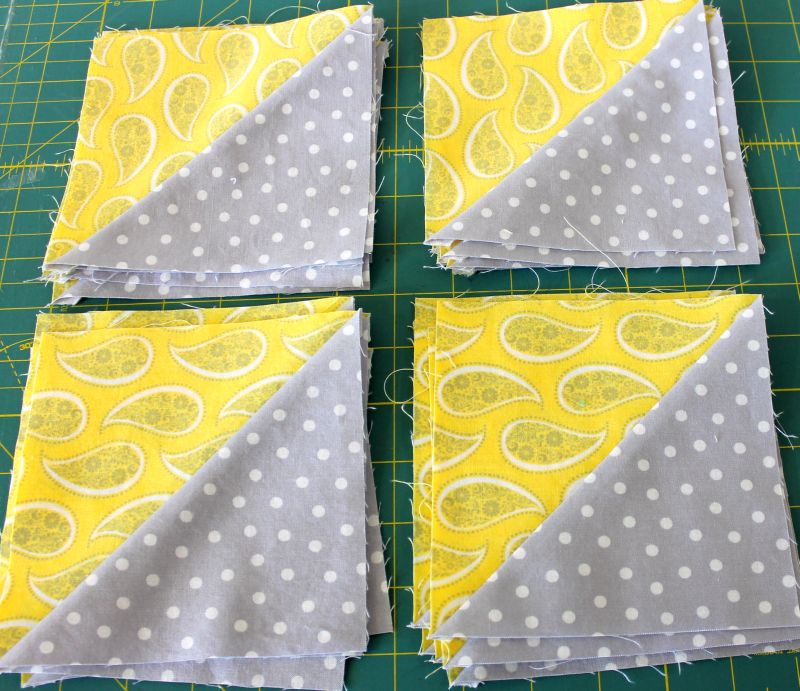
For my “experiment,” I flipped the background squares so that half of the lines were left-diagonals, and half were right-diagonals. I then matched up each background square with a print square, keeping the print squares oriented in the same direction.

After sewing and cutting apart, I ended up with 4 stacks of HST’s with the prints running in 4 different directions, exactly what I wanted for this pattern. Each half of the squares shown above produced two different orientations below.
 I’m very visual, so I had to constantly refer back to my pattern to line up all the pieces in the correct block position. (I’m not sure how the directional shift will look with other HST configurations, but you can test it out and see.)
 The fabric shown below is one-way directional rather than two, so I just needed to separate them into 2 different directional stacks, rather than 4. Do any of you math geniuses out there remember what type of asymmetry that’s called? I forget!
 I still had to mark and sew diagonal lines going left and right for these 2 piles!
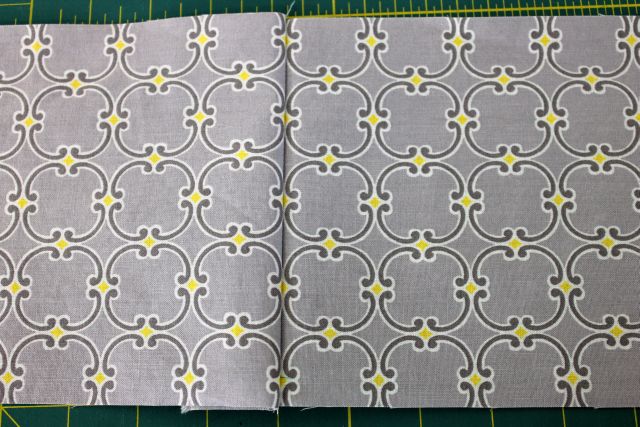
Since I decided to get carried away with lining up the prints in my blocks, I decided to match up my border seams as well. To do this, I cut out strips that were the exact same width, following the same design repeat. I then sewed a seam between the motifs, trying to match up the design as best I could. I trimmed the seam allowance down later.
 The picture below is how it looks on the front. The key is to match the print where it will be less noticeable, like in between rows of design motifs.
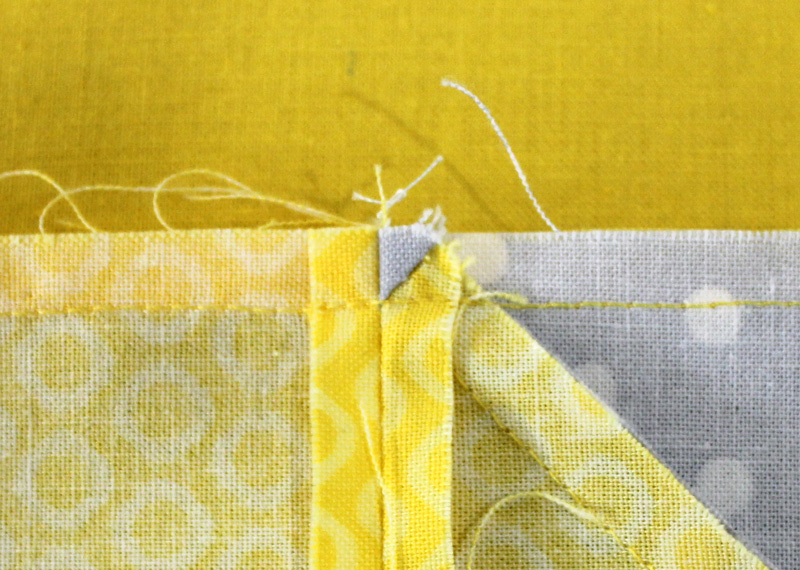
 My final top tip is for joining seams that cross over your triangle points. Sew on the side where you can see the tiny triangle in the seam below. This will help you achieve nice, crisp triangle points. 🙂
 It feels great to have a finished top – or as some would call it, a “flimsy.” I love how it looks exactly like my original EQ7 design (minus the design wall wrinkles and bad lighting). Next time I will share with you how I quilted it.
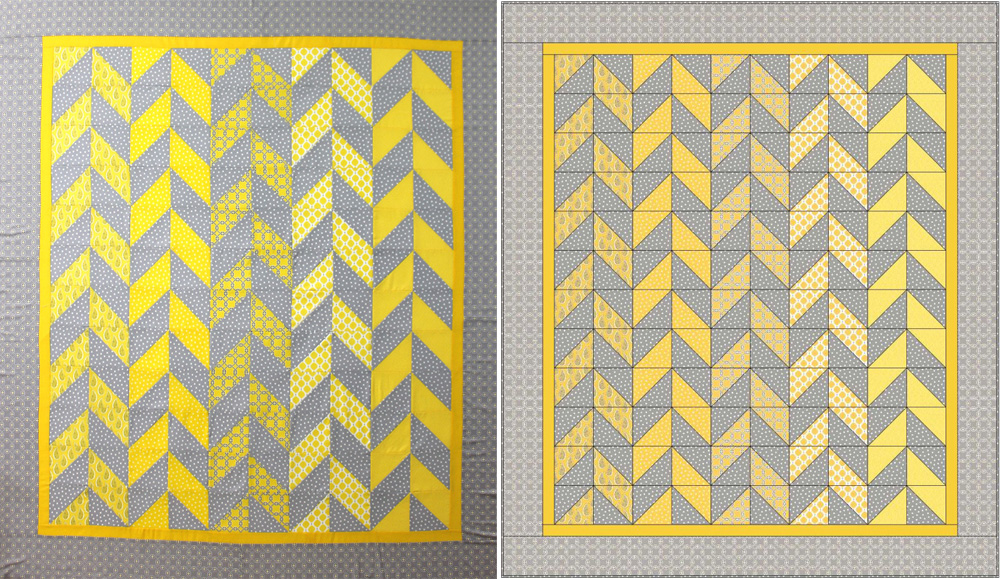 On the left is my finished top. On the right is my EQ7 sketch. I love it when they match!

I’m so thankful you posted how to do the HSTs for directional fabric. I’m making this quilt and my husband picked some fun fabrics, but are directional. I did the opposing diagonal lines for the ones that aren’t directional, but wasn’t sure if it would work for the directional ones. So, instead of really trying it, I just put the project aside. It just now occurred to me to check and see how you did it and I’m thrilled to know I can continue on! Thank you!
Amazing and beautiful quilt…I want (to make) one!!
Hi Christa! Thank you for this great tutorial. Nice idea for matching up those border prints too. I am sure lots of quilters are appreciating that tip. This quilt is beautiful! I love yellow and gray too. I made some Marimekko curtains using those colors.
You are so good at explaining. It makes me want to take on the challenge
Love me some tips! Thank you so much for linking up to SEWjo Saturday!
Well done, great tips. Such a pretty, pretty quilt.
These are great tips–thank you! I am seeing a lot of the EQ7 design mock-ups lately, and really liking them. I am currently using Inkscape to design patterns since it’s free, but I’m leaning more and more toward EQ. Love your design, too!
Love the colors in this quilt. Thanks for the tips.
Thank you for sharing your tip!! Love your Quilt!!!
Wonderful job on the quilt, Christa! Thanks for the great tips too!
Thanks! Now I get to start on the most fun part – quilting!!
Your quilt looks great. I love it that the construction is so easy. Thanks for the tips.
Love the yellow. What a fun project. 🙂
What a neat quilt! I love how your pattern turned out!
That is awesome! I didn’t see the HSTs at first. Wonderful!!
Emily at backtothecraft.blogspot.ca
Your tutorials are amazing and so much help for newbies like me. Thank you.
ohhh so pretty, love the grey and yellow
Awesome quilt!! Thanks for the tips…now why haven’t i ever thought of sewing the line in the opposite direction?!? This is on my want to make list.
Gorgeous! You always inspire me! Wonderful information too!
Great job on the quilt!!!!
Nice! I love to see quilts where all the directional fabric lines up. Also, great colors – yellow and gray are quickly becoming one of my favorite color combinations.
Hi Christa, thanks for the mini lesson. Very helpful.
A lovely design executed perfectly.
Your quilt is gorgeous! Thanks for the information. Hugs,
I love everything about it- the color, the fabric, the pattern!
Great example of “right brain” thought meeting “left brain” thought!!!!!! LOL!!!!!
Wow – Great quilt Christa! Love the way you lined all the directional prints too.
Seriously cool, Christa! Great tips, too.
Great post, thanks!
Wow, love herringbone. Great job, I will enjoy yours.
Boy! This is a post to bookmark and share. Thank you for sharing so clearly.