Finished Quilt: Color Weave, QuiltCon Entry + Quilting Tips

Today I have another quilt finish to share! Now that I’m not inundated with too many projects and too little time (yay for balance!), I can actually blog more about quilts I’ve recently finished, and I love sharing my virtual show and tell with you!

Color Weave by Christa Watson

Color Weave was published in issue 21 of Modern Quilts Unlimited. Photo Credit MQU.

Modern Quilts Unlimited is one of my all-time favorite magazines and it’s such a thrill when my work appears in their pages. Fun fact: the editor, Laurie Baker and I met backin 2014 when she helped edit my first book, Machine Quilting with Style, and we’ve been friends ever since!

Color Weave Backstory

I originally made Color Weave to be included in my most recent book, Piece and Quilt with Precuts, since it’s completely sewn from 2 1/2″ strips. While the book was in the layout and editing stage, the editors realized it was going to be too long (what? Me wordy???) and we had to make the agonizing decision to cut this project.

Quilting Detail on Color Weave

I love quilts with simple color schemes. Pick any 3 colors to make this quilt!

This happens with craft books more often than you realize, because book publishers would rather have too much content to choose from than not enough. For budgeting purposes, they have to stick to a strict page limit that’s agreed ahead of time in the book contract, and there’s only so many ways you can lay things out with a limited number of pages.

Precut Pieces for Color Weave

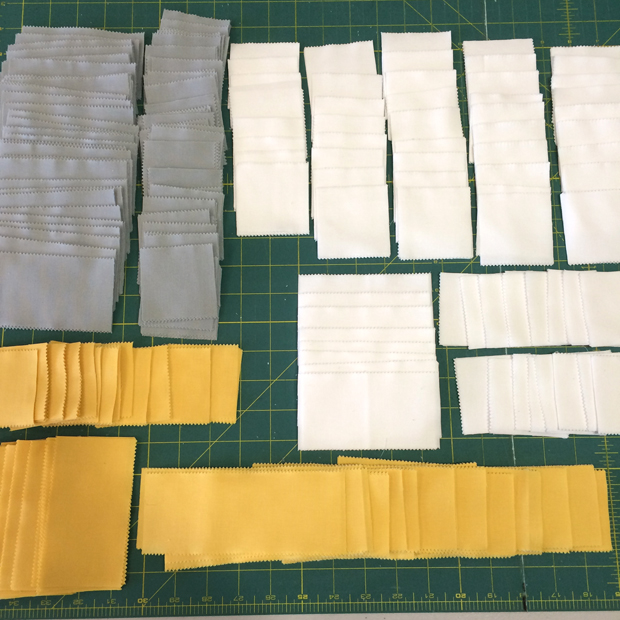
I love it when all of the pieces of a quilt are cut and ready to sew!

So after I held my 5 minute pity party, I contacted MQU and asked if they’d be interested in publishing this pattern in their magazine and they said yes! FYI – if you are interested in getting into magazines, editors are always on the lookout for great content and the fact that my quilt was ready to go meant they could schedule it for any issue where they needed to fill pages.

Machine Quilting Details

Needless to say I was thrilled that Modern Quilts Unlimited was excited to publish the pattern for Color Weave, and I was even more pleased that they included the instructions on how to quilt it as a free “web extra” on their blog. (See below image for link.)

Color Weave Web ExtraPhoto Credit – Modern Quilts Unlimited Magazine

Click here to get my machine quilting instructions for Color Weave, courtesy of MQU magazine.

Random crosshatch is actually one of my favorite ways to quilt a quilt with your walking foot (or dual feed) and it is so easy to do! Rather than painstakingly trying to mark and create a perfectly symmetrical grid, I use the piecing seams as a guideline for my lines.

Machine Quilting Random Crosshatch

I started off by quilting in the ditch between all the seams to stabilize and anchor the quilt. Then I filled in between the grid with straight lines at random intervals. I used the edge of my walking foot as a guideline for spacing, moving the needle position to create narrower or wider lines.

QuiltCon Acceptance

I knew right away when I received this quilt back from the magazine that I wanted to enter it into QuiltCon for their 2018 show. I haven’t really seen a design like this before, so I thought it had a good shot of getting into the innovative “Piecing” category.  I’m pleased that others will be able to see it at next years’ show because one of the reasons I enter shows is to share my work with a wider audience who might not have discovered me yet.

Quilting Detail on Color Weave

Quilting detail from Color Weave. Just remember: the best way to hide an imperfectly straight line is to surround it with more imperfectly straight lines!!

It took me awhile to figure out how to create the woven effect in the piecing. It’s like an optical illusion, and I’m sure the quilt would look totally different using scrappy prints, but I was pleased with how it turned out.

When trying to quilt parallel lines, just remember that “straight-ish” lines are perfectly ok! When you are two inches away from the quilt, you’ll notice all the imperfections. But once you back away from the quilt, all of a sudden your eye sees the overall texture rather than the individual stitches.

Random Crosshatch Grid by Christa Watson

Quilting Tip:  If you want your quilting to show, use a solid back. If you want to hide your quilting, using a busy back. I always use the same color thread in top and bobbin because I’d rather see the quilting show up on the back, than little dots of bobbin color on the top!

color Weave Stats:

Color Weave by Christa Watson

Photo Credit: Jason Watson

Modern quilts are my favorite. Now I just need to make more of them!!

Piece and Quilt with Precuts Quilt 5: Starstruck

In my book, Piece and Quilt with Precuts, I teach how to quilt fun motifs using a walking foot, free-motion, or both! Today’s quilt, Starstruck is the first in the free-motion section. Just as in the previous walking foot section, the quilting designs build in complexity allowing you to gain confidence as you go!

Starstruck by Christa Watson from Piece and Quilt with Precuts

Starstruck Photography courtesy of Martingale/That Patchwork Place and Brent Kane.

Design It

All of the quilts in the book were designed using EQ7 software from The Electric Quilt Company. I’m the type of person who needs to have everything all planned out before I start cutting because I want to know what the final design will look like before I begin. I’ve tried designing on the fly as I create, but my brain just doesn’t work that way, LOL!! So take a look at what I was able to create in EQ7 before I made the quilt:

Starstruck Design in EQ7

Although I didn’t worry about putting the fabrics in the exact same position or rotating the stars the exact same way, I did use the same fabric swatches that were in the quilt. This allows me to really see if the design will work the way I want it to! Of course I could always go back into my EQ7 design and change it to match the finished quilt, but this was good enough for me!

Check out what the same design looks like when I switch out the fabrics for a more colorful palette! I love how easy it is to virtually recolor my quilts in EQ7. You may recognize this as my fabric collection that comes out this fall. Last week on my blog I shared my work in progress, and of course I’ll share the final finish once the fabric is available (in November.)

Starstruck using Modern Marks

The colors for Modern Marks are a little more vibrant on screen than they are in person.

Piece It

Starstruck is made from 24 fat quarters that can be separated into lights and darks like my neutrals version shown below. Or if you want it to be bright and cheerful like the one shown above, you can pair up fat quarters from your favorite colorful bundle to create contrast. Each fat quarter will make one center star, one background of another star, and part of the pieced border, so it’s fun to mix and match the prints!

Quilting Loops on Starstruck from Piece and Quilt with Precuts

An allover edge to edge design is the easiest way to practice free-motion quilting

Quilt It

When you want to learn a new free motion design, the best way to practice is on a real quilt. Start on one side of the quilt and meander your way across the quilt until you’ve covered every inch of it with your free-motion design. You’ll be a pro at that motif by the time you finish!

Machine quilting closeup on Starstruck

I chose Aurifil cotton 50 weight 2326 Sand for the machine quilting. It works well with neutrals.

I quilted a fun loop and star design on Starstruck but you could easily throw in other motifs like hearts, flowers and more. And if your stitches aren’t perfect, that’s ok. The best way to hide imperfect quilting is to surround it with more imperfect quilting, so all you see is the overall texture rather than the individual stitches.

More Starstruck inspiration

Isn’t it great to see the designs presented in different fabrics? Check out these three alternate versions below and be sure and visit each bloggers’ site for more about their process and more giveaways!!

Sherri Noel – Rebecca Mae Designs

Star Struck by Sherri Noel

Sherri Noel of Rebecca Mae Designs chose to go full color with a sprinkling of gold and gray. She was able to create good contrast with the bold busy fabrics, and her pretty picture makes me want to cuddle up on that comfy porch!!

Head over to Sherri’s blog to see more of her process including some closeups of her awesome quilting.

Lissa LaGreca – Lovingly Lissa

Starstruck by Lissa LaGreca

Here’s a view of Lissa’s gorgeous quilt top. I love the soft tan, brown, and gray neutrals she chose. I once heard that the hallmark of a great quilt design is that it will look good, no matter which fabrics you choose!

Hop on over to her blog at Lovingly Lissa to see how she quilted it. It’s a lovely finish!

Sandra Healy Designs

Sandra Healey Starstruck

Sandra of Sandra Healy Designs is working on two different projects using the Starstruck blocks. She’s working on a table runner using the fabrics with a white background above, and a pillow with a pretty pink background below.

In the book I recommend chain piecing all of the blocks at once and then lay them out into a pleasing arrangement. This allows you to finish your tops faster which leaves you more time for fun machine quilting.

Starstruck Pillow

Didn’t she do a fantastic job with the quilting on her cushion? She was able to get over her “fear of free-motion” with a little practice and I think she did an amazing job! Head over to Sandra’s blog to read more about her progress with the book!

Today’s Gift: EQ7 Education + Win Your Own Copy!

Because I’m so busy traveling and teaching machine quilting, I’m not able to share my knowledge of EQ7 in person as much as I’d like. So here’s the next best thing – click the links below to download  two PDF class outlines from my previous live classes.

EQ7

You can also click this link to peruse the EQ site for tons of self-study tutorials. I have to say, the folks at Electric Quilt give the greatest customer support I’ve seen. They’ll help you answer any and all questions you may have.

Then be sure and pop over to the EQ blog for your chance to win your very own copy of EQ7. I have to warn you though – you may spend more time designing than you actually do quilting!

Signed copy of Piece and Quilt with Precuts

If you’ve been inspired so far, don’t forget to grab a signed copy of Piece and Quilt with Precuts.
I’m here to cheer you on in your quilt making journey, every step of the way!

Click here to view the blog hop schedule

Save

Save

Save

Save

Save

Save

Save

Save

Save

Save

Save

Save

Save

Save

Save

Save

Save

Save

Save

Save

Save

Save

Save

Save

Save

Your Chance to Win the Kit from my Craftsy Class – Startup Library: Quilting!

It’s just been a month since the launch of my new Craftsy class, Startup Library: Quilting, and already I’ve taught hundreds of students how to make a complete quilt from start to finish!! I love how the Craftsy platform allows me to interact with my students and see their progress, even though we might be thousands of miles apart! For those of you who are new to the blog, or Craftsy, let me tell you a little more about this class. Then see the end of this post for a giveaway to get you started!!

Christa Watson Startup Library Quilting

Click here to get 50% off Startup Library: Quilting (valid thru 10/8/17)

In class, you’ll explore a range of key tools and techniques as you learn to make a quilt from start to finish. I’ll guide you step-by-step through preparing your fabric, cutting out the pieces and sewing them into blocks, as well as basting, machine quilting, and binding to help you finish your quilt with ease. Plus, when you learn with Craftsy you can work at your own pace and ask me questions as you go. By the end of my class, you’ll be quilting with confidence in no time!

WHAT YOU NEED

Lesson 1: Fabrics & Tools (28 min)
It’s every quilter’s favorite part of project prep: shopping! In this first lesson, I’ll explain the fundamentals of quilting and what to keep in mind when shopping for supplies.

Startup Library Quilting

Lesson 2: Know Your Machine (24 min)
Understand what type of sewing machine best suits your needs, including the features worth splurging on (or not!). Then, get familiar with your machine as you learn to thread it, wind a bobbin and keep an accurate seam allowance.

SETUP

Lesson 3: Working with Patterns (9 min)
Follow along as I go over the information included in your quilting patterns. Find out how to work with patterns as you piece your tops, plus get tips for successfully choosing projects.

MAKE IT

Lesson 4: Cutting the Pieces (38 min)
Before you begin sewing, you’ll need to cut the pieces for your blocks. Learn to work with a rotary cutter and mat as you cut yardage, fat quarters and more.

Christa Watson Craftsy Class

Lesson 5: Chain Blocks (24 min)
Get right into action by sewing up your first quilt block, the Chain! Find out how to keep track of all nine pieces as you sew and press the first block, then make quick work of the piecing by sewing several blocks together at once.

Lesson 6: Star Blocks (32 min)
Ready to throw some half-square triangle units into the mix? Here, you’ll sew the second block of your quilt. Find out how to tame stretchy edges and ensure all of your star points face the right direction.

Christa Watson Craftsy Class

Lesson 7: Assembling the Quilt Top (27 min)
Now, it’s time to have some fun! Arrange and organize your quilt blocks before you sew them together. Then, sew blocks into rows and rows into the inner top – you’ll love my method for keeping blocks in order as you sew!

Lesson 8: Borders (27 min)
Your quilt top is almost done! All you need to do is add the solid and scrappy borders to set off the design. Learn how to piece and add each border, and fix it if it’s slightly too long for your quilt.

Lesson 9: Backing & Batting (11 min)
In this lesson, you’ll prepare the remaining layers for your quilt. Learn how to choose and prepare batting — the center layer of the quilt — and piece the backing fabric.

Christa Watson Craftsy Class

Lesson 10: Basting (8 min)
The secret to quality quilting? Basting, which holds all of the layers together securely. I’ll teach you how to spray-baste the layers and assemble your quilt, explaining why pressing helps you ensure solid results.

Lesson 11: Find Your Quilting Path (38 min)
Quilting — the stitching that holds layers together — can really accentuate your piecing work. Discover different ways to accomplish this, from working with a long-arm quilter to using your domestic machine. And, see how to stitch-in-the-ditch and apply decorative wavy lines using your walking foot.

Lesson 12: Free-Motion Quilting (23 min)
Ready to dip your toes into free-motion quilting? This method allows you to move your needle in any direction. If you’d like, stitch a stipple and continuous curve design on your quilt, or practice for your next quilt project.

Christa Watson Machine Quilting Craftsy Class

Lesson 13: Binding (13 min)
Finish the edges of your quilt by applying a binding. I’ll show you how to prepare for this step. Learn to cut and piece the strips to create the binding, calculate the length you need for any quilt, and square up — or trim — your quilt.

Lesson 14: Binding the Quilt (37 min)
You’re almost there! In this final lesson, find out how to sew the binding to the quilt and finish it by hand. Easily turn with the corners and join the tails with my expert instruction, then get ready to enjoy your quilt!

Christa Watson Craftsy Class

For a limited time, you can get 50% off the regular price of my class when you use this link. The regular price will show on the home screen, but once you click “add to cart” you’ll see the discount. Just for comparison, this class is approximately 2-3 times longer than a “regular” Craftsy class, so it’s a tremendous value, especially when you get it on sale!

GIVEAWAY TIME!
Here’s a behind the scenes secret to share: as I was making the quilt, Craftsy sent me extra fabrics just in case. I ended up with enough fabric for an extra kit. Since I’ve already made the quilt twice (once ahead of time to test it, and a second time on video) – I don’t need to make a third, so I’d rather pass the extra fabric along to you! The kit includes one fat quarter bundle + background to make the quilt top and binding as shown in the class.

Lily and Loom Fabric

This giveaway is open to all (int’l winner just pays shipping). To enter, leave me a comment letting me know how many UFO’s (Unfinished Fabric Objects) you currently have! Once you take my class, you’ll be armed with the skills to finish them up! The giveaway will remain open through Sunday night, Aug 13, 2017 and I’ll choose a winner first thing Monday morning.

Click here to learn more and watch a preview video for Startup Library: Quilting

Update: Winner Selected and Comments Closed

Congrats to Susan M. who has been contacted via email.

Save

Save

Pre-Order Piece and Quilt with Precuts – My Next Book!

You guys! I wrote another book!! Piece and Quilt with Precuts will be published this August and I’m now taking pre-orders for signed copies through my site at shop.christaquilts.com.

Piece and Quilt with Precuts by Christa WatsonYou can see lots of sneak peeks here on the cover!! But wait, there’s more…

Now first things first. I’m totally happy for you to purchase the book where you like. However, when you purchase it directly from me, I earn more on each book since I’m the one selling them. Also, when you order from me, you’ll be guaranteed to get them as soon as they ship! The estimated shipping date is August 17, which just happens to be my birthday so that’s super exciting!! I’ll have a grand time, eating cake and signing your books! But don’t worry, I’ll be careful not to spill any, LOL!!

Sneak Peek of Piece and Quilt with PrecutsSneak Peek #1 from Piece and Quilt with Precuts – are you excited?

So FYI, another reason I’m pushing preorders this time around is based on the demand of my last two books. When people preordered them on Amazon, there was a delay in customers getting them because Amazon had to first get them from the publisher, and then fulfill the orders.

Although the publisher knows how many to ship to Amazon, it always takes Amazon several days to process and they get a little bogged down. So when you pre-order your signed copy from me, it’s a win-win for us both and you don’t have to wait!! (Ahem.. plus my preorder price is actually lower than the current price on Amazon as of this writing…)

Sneak Peek of Piece and Quilt with PrecutsSneak Peek #2  from Piece and Quilt with Precuts – one of my favorite motifs to quilt!!

And just to sweeten the deal, with every pre-order of Piece and Quilt with Precuts placed directly through me  before June 30th, I’m going to throw in a bonus pattern from my pattern shop for free!! When you check out, you can let me know which pattern you prefer in the comments. Or just leave it blank and I’ll surprise you. (For anyone who has already pre-ordered, you’ll get a free pattern too – but it will be a surprise!! I don’t want you to feel left out!!)

And did I mention the books will be personally signed by me??? (Wink wink!)

Sneak Peek #1 from Piece and Quilt with Precut

Sneak Peek #3 from Piece and Quilt with Precuts – Alison Glass fabric is so good, it’s in here twice!

Writing this book was such a joy but there’s a crazy story to go along with it. Just after I had turned in my manuscript for my first book, Machine Quilting with Style, I immediately came up with the idea for Piece and Quilt with Precuts – easy to piece patterns made from precuts along with step-by-step machine quilting instructions for each quilt.

So I set to work designing the patterns, fleshing out the details, and submitting a detailed proposal to the publisher. No sooner had I begun work on the book when the folks at Martingale contacted me and said “we love this book and want you to write it. However, can you wait just a bit? We have another idea we’d like you to do instead.” And then I proceeded to write my second book, The Ultimate Guide to Machine Quilting with Angela Walters.  So needless to say once that book was finished, it was time to get back to this one! So in essence, I wrote three books in 3 years, one right after another. Crazy huh??

Sneak Peek #1 from Piece and Quilt with Precuts

Sneak Peek #4 from Piece and Quilt with Precuts – Improv piecing AND quilting in the same quilt!!

Martingale was sooo awesome and supportive during this crazy time. They even offered to help me piece or bind the quilts if needed. But being the control freak that I am, I politely declined. I have this crazy obsession that when it comes to quilting, I must do all my own “stunts”, LOL!! For me, there’s something personally satisfying in taking ownership of every stitch. 🙂

So later on this summer once the book publishes, I’ll share details of all 11 quilts and 18 machine quilting motifs that are included in the book. I’ll also do a blog hop with some friends who will be trying out their own versions of some of the designs.

Sneak Peek #3 from Piece and Quilt with Precuts - Alison Glass fabric is so good, it's in here twice!

Sneak Peek #5 from Piece and Quilt with Precuts – Why quilt straight lines when you can go wavy?

One other thing I wanted to tell you that’s special about Piece and Quilt with Precuts is that the name is all mine. For those that don’t know, whenever you publish a book or magazine pattern, the editor reserves the right to re-name it, or work with you to come up with a name they think they will sell. The first 2 book names came straight from Martingale, and I think they did a fantastic job, since I was totally clueless as to what to choose LOL!! However, when writing this book, the name was all me, baby and I’m so proud that they chose to keep it!!

And now, I know what you are wondering…. have I already started on book #4?? No, not quite yet. I decided I needed a little breather before jumping into my next book idea or 3. And some other big opportunites have come my way that I’ll get to tell you about just after this book launches. So stay tuned, it’s never a dull moment around here!

Click here to preorder your copy of Piece and Quilt with Precuts.

As always, thanks for your support that allows me to do this crazy quilting thing full time!!

Save

Save

Save

Save

Save

Save

Save

Save

Save

Save

Save

Save

Save

The Ultimate Guide to Machine Quilting – 1 Year Anniversary!

Today is a very special day. It marks the one year anniversary of the book that changed my life!
Writing The Ultimate Guide to Machine Quilting with Angela Walters was not only an amazing experience, but it has led to so many more life changing events! Since the book came out, I’ve taught at QuiltCon, released my first Craftsy class, won awards on 3 quilts from the book, traveled around the country meeting so many of you, and I’ll be sharing a couple new huge things, later on this year.

If you’ll indulge me, I thought it would be fun to share a little yearbook recap of mine and Angela’s encounters since we first met at QuiltCon in 2013.

Christa Watson and Angela Walters

First time we met, in her class at QuiltCon in 2013. We bonded over machine quilting!

Angela Walters and Christa Watson, Spring 2015

Meeting up at Spring Quilt Market 2015 to finalize the details of our book. We had to be stealthy so no one would know what was going on!!

Christa Watson, Jennifer Keltner, Angela Walters

Jennifer Keltner, CVO of Martingale/That Patchwork Place met us at QuiltCon 2016 to give us the first copies of our book before it published that spring. We were so thrilled!!

Angela and Christa at Schoolhouse

Presenting our book to shop owners at Quilt Market in Spring 2016. It was a packed room!

We also collaborated with Patchwork Threads to produce T-Shirts to go along with the book!
Click here to get Angela’s shirt.
Click here to get my shirt.

To help promote the book, our publisher hosted meet and greets and quilting demos at both spring and fall market in 2016. Everyone we met was sooo kind!!

At fall market 2016. We planned out more book publicity and joked about how she had written 6 books by the time I had written 2. I don’t think I can keep up LOL!!

Angela Walters and Christa Watson

Angela paid a visit to my hometown guild in Jan 2017 which happened just after I had injured my arm. Although busy with teaching and lecturing, she made sure I was well taken care of!!

Angela Walters, Christa Watson, Tula Pink at QuiltCon 2017

Most fun photo bomb ever: during our QuiltCon 2017 booksigning, Tula Pink joined in the fun! After all, the “I wrote a  book with Angela” club is pretty small so far!

It’s been an amazing ride and neither one of us is ready to slow down yet! We’ve been very pleased with the reception that The Ultimate Guide to Machine Quilting has been getting. We each made the same 10 quilts from start to finish, showing different fabrics and quilting designs. So it’s really like 2 books in one. Whether you like to piece, or quilt, or both – we’ve got you covered!!

Ultimate Guide to Machine Quilting

Click here to view all of the quilts from The Ultimate Guide to Machine Quilting

Upcoming Machine Quilting Blog Hop Starts May 1

A fun group of bloggers recently hatched together an idea to do a 10 week-long blog hop, working their way through the book one chapter at a time.

The group consists of HollyAnne, Vicki, Kristin, and Jen. Starting May 1, you can follow them on their blogs (click each of their names) and follow the instagram hashtag #machinequiltingbloghop as they share their real world experiences while improving their machine quilting skills. The best part is, they’ve invited you to join their journey.

Christa HollyAnne Angela

HollyAnne telling us all about their plans for the Machine Quilting Blog Hop at QuiltCon 2017

So grab a signed copy of the book (if you don’t have it already) and join the fun. I I can’t wait to see everyone’s progress! You can check out HollyAnne’s blog here for more complete info.

One more thing, if you’ve made a quilt from the book, or if you’ve tried some of the quilting motifs on your own quilts, please share pics with me in my Facebook Group: Quilt with Christa. I’d love to see how you are doing!

Now it’s time to go put the finishing touches on my next book. Watch for pre-order details about that later this week!!

Save

Save

Save

Save

Save

Save

Save

Save

Save

Save

Save

Save

Save

Quilt Las Vegas 2017 is this weekend: come watch me quilt!

If you will be in or near the Las Vegas area March 30-April 1, be sure and check out Quilt Las Vegas, put on by the Desert Quilters of Nevada, my local quilt guild.

Quilt Las Vegas 2017

Quilt Las Vegas

I will be at the show on Saturday, April 1 from 10-1 in the Sew Yeah Quilting booth, signing books and machine quilting live and “in the cloth!” Be sure to stop by for a chat and watch me demo some free-motion quilting on a beautiful new BERNINA!

Christa Quilts Show Entries

I will also have 4 quilts hanging in the show. Clockwise from top: Fractured Puzzle, Churn Dash Slide, Quatrefoil Applique and Swirling Butterflies. (Click on each of the names for more detail about each quilt.)

It’s always exciting to see if any of them will pick up a ribbon. But even if they don’t, this show gives some of the best feedback which always helps me improv my quilts for next time. 🙂

Christa Quilts Machine Quilting Demo

If you don’t already have my books, you can grab a copy of either at the show and I’ll be glad to personalize it for you. If you plan on attending, please let me know – I’d love to see you there!

Save

Save

Save

Save

Save

Save

Save

Save

Save

Save

Save

Two Fun New Books To Share – I Have Quilts in Both

Like many of you I love making quilts! But what you may not know is that one of the reasons I love writing patterns and books is that the deadlines for completion motivate me to finish things! I’m excited to be part of two brand new books coming out in June, published by my favorite publisher, Martingale/That Patchwork Place.

I Love House Blocks from Martingale/That Patchwork Place

The first is called I Love House Blocks, and it’s part of Martingale’s “Block Buster Quilts” series where a ton of different designers each make their own interpretation of a quilt based on a traditional block. (Click here to see the last one I was a part of – I Love Churn Dashes.”)

I’m thrilled to have my house quilt shown on the cover! It’s the one on the left and it’s called “My Hometown.” I used bright and cheery by Moda fabric from Pat Sloan in my version, but think it would be just as cute your favorite fabric collection!

Click here to preorder I Love House Blocks.

Rock Solid book using Kona Solids

The second book I am thrilled about is called Rock Solid and it’s a collaboration between Martingale and Robert Kaufman. All 13 quilts in the book are made from Kona Cotton solids. I haven’t even seen the rest of them yet, but I can already tell I’m gonna love this book!

I’m excited to be a cover girl on this one, too. My quilt “Lanterns” is shown on the left, using my exclusive Christa Watson designer palette in 28 vivid shades of red, orange, yellow and green. My quilt is made from just two jelly rolls – My designer palette and Kona Coal.

Click here to preorder Rock Solid.

Save

Save

Save

Save

Save

New Pattern Release – Positive Direction

I’m excited to announce after a long hiatus that I am releasing individual patterns once again! The first one of the new batch is called Positive Direction, and it’s now available as a downloadable PDF through my Etsy shop.

Positive Direction quilt pattern by Christa Quilts

Positive Direction was originally featured in Modern Quilts Unlimited magazine and available in one size only. But whenever I re-release a pattern on my own, I offer it in four sizes which gives you a lot more options to customize it.

Positive Direction Pattern Cover by Christa Quilts

Positive Direction includes patterns for four sizes: Crib, Lap, Throw, and Full.

Positive Direction Quilt Pattern Requirements

Use up strips or scraps to make this fun, modern quilt!

Because I think machine quilting suggestions are just as important as piecing instructions, in the pattern, I’ve included a quilting plan along with directions on how I quilted it. I’ve also included several detailed photographs to inspire you on your quilting journey. In my patterns, I never include the words “quilt as desired.” I want you to have just as much confidence quilting it as you do piecing it, so I try to make it clear and easy to understand, if you want to re-create what I did.

Machine Quilting Straight Lines and Pebbles

I combined straight lines and pebble quilting to highlight the pieced design. I used Moda Scraps in shades of red, aqua and navy to create a modern Americana themed color scheme that looks great year-round. I quilted it using a light gray thread from my Aurifil Piece and Quilt Neutrals collection.

Positive Direction Quilt Pattern by Christa Quilts

Choose your favorite colors and prints to make this quilt uniquely your own! The key to effective contrast in this design is choosing a light background such as white, a medium neutral such as gray, and then three of your favorite colors in strong solids or prints.

Click here to purchase a PDF of Positive Direction.

Positive Direction Quilt Pattern by Christa Quilts

All photography taken by my talented husband Jason in the desert behind our home.

If you have any questions or want to share your progress while making this quilt, please share them in my Facebook Group: Quilt with Christa. I’d love to see!

Save

Save

Save

Save

Save

Save

Save

Save

Save

Save

Save

Save

Save

Save

Save

Save

Save

My Quilting Stencils in Love Patchwork and Quilting

Today I have fun news to share! I worked with the lovely folks oversees to include a fun freebie in the latest issue (#44) of Love Patchwork and Quilting!

Love Patchwork and Quilting Cover Issue 44

Love Patchwork and Quilting likes to include a special gift to go along with each issue. They contacted me about 6 months ago, asking if we could collaborate to create some quilting stencils based on quilting motifs from my books, Machine Quilting with Style and The Ultimate Guide to Machine Quilting.

Christa Watson Stencil

I’ve never had my own stencils before, so this was a fun opportunity!

Christa Watson Books

Click here to get signed copies of my books.

That was an easy “yes” for me to say! I chose 5 of the most versatile designs from both books: Swirls and Pearls (shown below), Boxes, Double Loops, Continuous Spiral and Square Spiral.

Stencils Deisgned by Christa Watson

Although you don’t need stencils to quilt the designs in my books, they are a fun way to see if you like quilting on marked lines. The issue also includes a short profile of me and my books along with some bonus quilting tips.

Love Patchwork and Quilting is produced overseas, but is available locally at Joann, Barnes & Noble, or your local quilt shop. It’s also available by subscription. Click here for more information on where to buy.

Save

Save

Save

Save

Save

Save

Save

My Books on Sale – Just in Time for Holiday Gift Giving

I’m a numbers gal so it’s always fun for me to check and see how well my books are selling and what their ranking is online. Today when I checked, I was pleasantly surprised to see that the price of both of my books have been reduced on Amazon, just in time for holiday shopping! Now, don’t worry, the price that is charged has nothing to do with the royalties I receive once they are sold. In fact, it’s a win for me because they more that are sold, the happier I am!

amazon-sale

So if you’ve been eyeing either of my books, head over to Amazon now to pick them up. And if you already own one or both, grab a copy for a friend and give them the gift of machine quilting!

Click here to purchase Machine Quilting with Style or The Ultimate Guide to Machine Quilting

***Disclaimer*** This screen shot was taken this morning and prices may fluctuate due to demand. But they are still going for less than retail. Also, by purchasing from the links in this post, I’ll receive a small commission for each one sold.. As always, thanks for your support!!