Fun news to share: you can now catch my episode of the quilt show #2409 for free, through May 5, 2019. Click here to watch it.

Fun news to share: you can now catch my episode of the quilt show #2409 for free, through May 5, 2019. Click here to watch it.
Welcome to my new series where I explain a little more in depth about how I made a recent quilt and share tips to make your sewing and quilting faster and more fun! Today we’ll focus on my Geese in the Garden Quilts made from my Abstract Garden line with Benartex/Contempo.

Click here to get the print version of Geese in the Garden pattern.
Click here to get the PDF version of Geese in the Garden pattern.
When I designed Geese in the Garden with it’s radiating diamond-like shapes, my first instinct was to write the pattern by making all of the blocks from Half Square Triangles. However, that would have left a seam in the middle of each block which would have disrupted the fabric print.
I knew I could eliminate some of the seams using the “flip and sew” method but there would still be some seams I didn’t like, and it would have created a lot of waste. Here’s an early sketch of it in Electric Quilt with those unsightly seams (in the yellow seeds fabric and the pink roses fabric).

So then I researched how to sew diamond shapes and discovered that these shapes are NOT true diamonds, but are rather “squished” or “elongated” diamonds. However, the traditional technique to make the diamonds would still work, but I’d have to recalculate the math.

Diamond cutting in process.
After a bit of testing I figured out an easy way to cut these elongated diamonds with a simple acrylic ruler that has a 45 degree line – no specialty ruler required! It’s all about the width that you cut them, and that information is included in detail in the pattern.

You’ll get a chance to use the 45 degree line on your ruler when cutting these diamonds.
Because these are not true diamonds, they have a definite left and right side. You can create some really cool designs with “mirror image” units. Here’s a tip to cut them correctly: Cut at least 2 stacked strips at a time. Make sure one strip is right side up, while the other is wrong side up. Or fold the strip in half and you’ll automatically get mirror image pairs.

Mirror image units – and no pesky seams in the middle of the fabric!
My Abstract Garden collection includes a total of 20 fabrics arranged into warm and cool colorways. However, I wanted fabric selection to be easy for this quilt pattern, so that you could use any fabrics you like. So it only takes a total of 5 prints to create the design.
Since I was making two quilts (warm and cool), I decided to cut and piece them both at the same time. I starched the fabrics ahead of time before I cut, to help control the diagonal bias edges.
 Click here to get the Geese in the Garden Kit – in warm or cool.
The fun part about choosing fabrics is creating a radiating, glowing look with your color choices. Because the center diamonds of the design are interchangeable, I played around with them to make sure I was happy with the color arrangement.

I love pretty stacks of cut units – don’t you?
Technically, this is a “row” quilt, meaning it’s sewn together into rows, rather than blocks. The super easy thing about this pattern is that each row is exactly the same! To make sewing go even easier, I recommend laying out all of the units, and sewing them into pairs on either side of the center triangle.

Although these are for 2 separate quilts, how fun would it be to alternate the rows?
My tip for sewing units with a 45 degree angle is that you need to offset the triangle tips by the same amount on both sides as you sew. The triangle tip will stick out about 1/4″ inch on either side. Notice the tips sticking out in the image below when the fabrics are matched up, right sides together:

Sew an accurate 1/4″ seam, using the point where the two fabrics intersect in the corner. This detail image below shows the sewn seam (stitched with my favorite 50 weight Aurifil thread). Notice it’s been rotated to show the angle at which I sew each unit under the machine. (Make sure to chain piece all the units at once for speed and efficiency.)

You’ll know you’ve sewn them correctly when you’ve created a nice smooth edge along both pieces. Don’t forget to trim the triangle tips! I also press all of my seams open so that my blocks will lie nice and flat.

Remember, this technique works for ANY units with a 45 degree angle. Below is what the center triangle looks like when I lined it up with the rest of the sewn pairs. It looks a little awkward, but notice how both tips are sticking out about 1/4″. Once the pieces are flipped over right sides together and sewn, everything will come out even, just like the diamond pairs.

I often get asked how I press seams open without burning my fingers. The answer is that I open them up with my fingers ahead of the iron, and I never use steam. Here’s a 20 second video clip showing how I press my seam open, once I’ve sewn my rows:
Here’s the backside of the cool version with all of the rows sewn and those nice, flat, pressed open seams. Doesn’t it look just as pretty as the front??

Although the pattern comes in 3 sizes, I chose to make the smallest size. But the best thing about this pattern is that it’s the same number of pieces to cut and sew, no matter which size you make. They just get larger as the quilt gets bigger. It only took me a few hours to piece each quit top, so it’s a great design to make when you are in a hurry, and it’s fun to show off your favorite fabrics in the diamonds.
One final tip to share today: don’t stress too much about perfection. Do your best to line up the seams as you sew the quilt, but notice the lower left corner of the image below. The turquoise and blue corners don’t match up perfectly in all the rows, but that’s ok. Once the quilt is quilted – you won’t even notice it!!

Very few of my points line up perfectly – but it still looks great!!
If you found this post helpful, you can help support my blogging efforts by purchasing my Geese in the Garden pattern or any of my other quilt patterns or fabrics at shop.ChristaQuilts.com. They’ll come infused with a little “Christa Quilts” magic, ensuring your success while I cheer you on!
In the next post, I’ll share tips on how I quilted each quilt with two quick and easy walking foot designs, so stay tuned!
I love podcasts! And I especially love to listen to quilting podcasts while I sew. It’s like having a fun chat with a friend, but I don’t have to stop what I’m doing to respond, LOL! Well, recently I was interviewed on the Make and Decorate podcast, hosted by amazing interior designer and all-around fun quilter, Stephanie Socha of Stephanie Socha Design.

I first met Stephanie online when she started giving me some fabulous tips about decorating my new home. So she’s fun to chat with about decorating AND quilting!
It was fun to be one of her “milestone” podcasts – 25 episodes since she began less than a year ago – and she’s interviewed some really great guests, too. Some of her most recent interview guests include Matthew Boudreaux, aka “Mister Domestic” as well as bag-maker extraordinaire Sara Lawson of Sew Sweetness.

To listen to the podcast, you can click the player on Stephanie’s website (here). Or you can search for “Make and Decorate podcast” on I-tunes or your favorite podcast player. So give it a listen, and I’m sure you’ll become addicted, too!
Oh, and I know some of you will ask what some of my favorite podcasts are, so click here for a list of my favorites podcasts I created a few years ago. Although some have come and gone, it’s still a great place to get started listening.
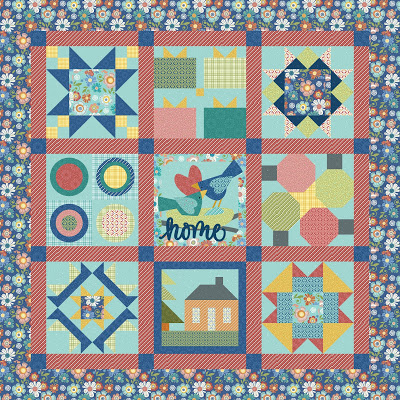
One of the fun things I love about designing fabric for Benartex is being able to express myself creatively through fabric. I also love getting to know their other fabric designers and see the amazing things they make! Recently Benartex pulled together a fun collaboration to create this fun sampler quilt. Each block was designed by one of nine current fabric designers who participated, and there are instructions to make each block as well as the full quilt over on the Benartex blog.

Designer Sampler in Solids
Click here for the Sampler introduction
Click here for finishing instructions
As an inspiring bonus, the folks over at Benartex recolored the sampler quilt using each designers’ latest fabric line. Links to each block and fabric collection are below each image:

Click here to see Jackie Robinson’s “A Festival of Roses” collection
Click here for instructions to make Jackie’s Rose block

Click here to see Amanda Murphy’s “Thankful” collection
Click here for instructions to make Amanda’s Octablock
Click here to see Nancy Halvorsen’s “Home Grown” collection
Click here for instructions to make Nancy’s Home block
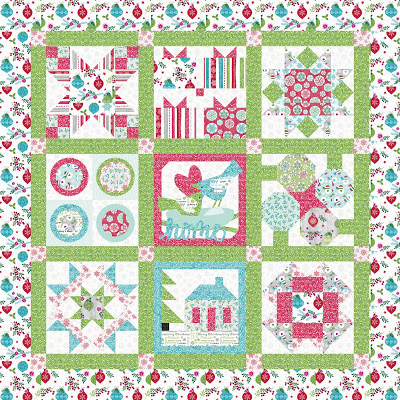
Click here to see Cherry Guidry’s “Hearty the Snowman” collection
Click here for instructions to make Cherry’s Hearty Gifts block

Click here to see Modern Quilt Studio’s “Warp and Waft” collection
Click here for instructions to make Bill & Weeks’ Jawbreaker block

Click here to see Ann Lauer’s “Catitude Christmas” collection
Click here for instructions to make Ann’s 8-Pointed Star block
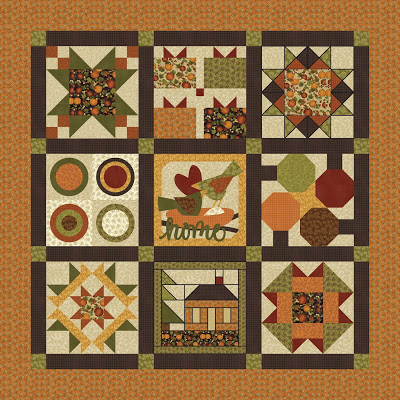
Click here to see Cheryl Haynes’ “Harvest Berry” collection
Click here for instructions to make Cheryl’s Pumpkin House block

Click here to see Paula Nadelstern’s “Piece & Joy” collection
Click here for instructions to make The Big T block designed by Stephanie Sheridan

Click here to see Christa Watsons “Abstract Garden” collection
Click here for instructions to make my Sunshine block
Isn’t it fun to see how unique a quilt looks made up in different fabrics? This is a great way to experience the variety of colors and styles that Benartex offers. Now I want to make them all!!
When we moved into our new home, the highest priority for me was getting my quilting studio up and running since quilting is my full-time job. I’ve had many people asking me how I built my design wall in my old house, so when we created it again in the new place, I took step by step pictures so I could tell you all about it in detail. So here goes:
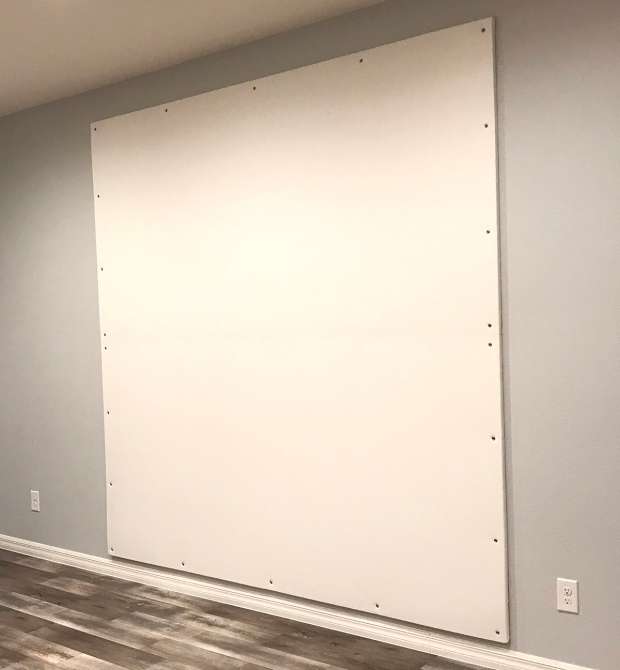
My design wall does double duty – I also use it for flat quilt photography.
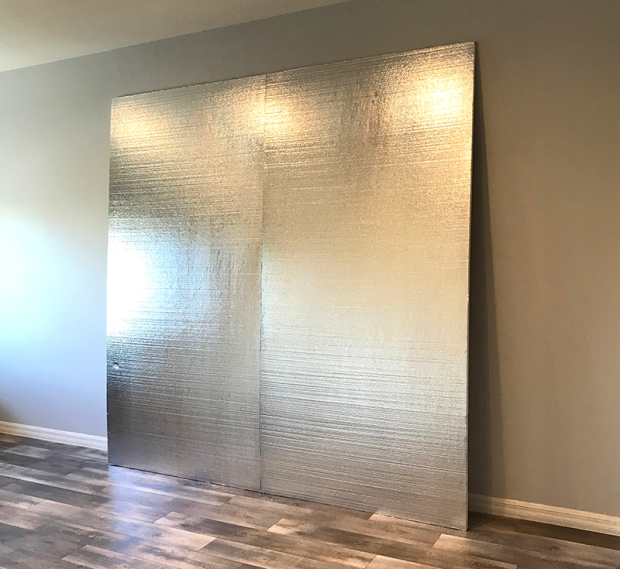
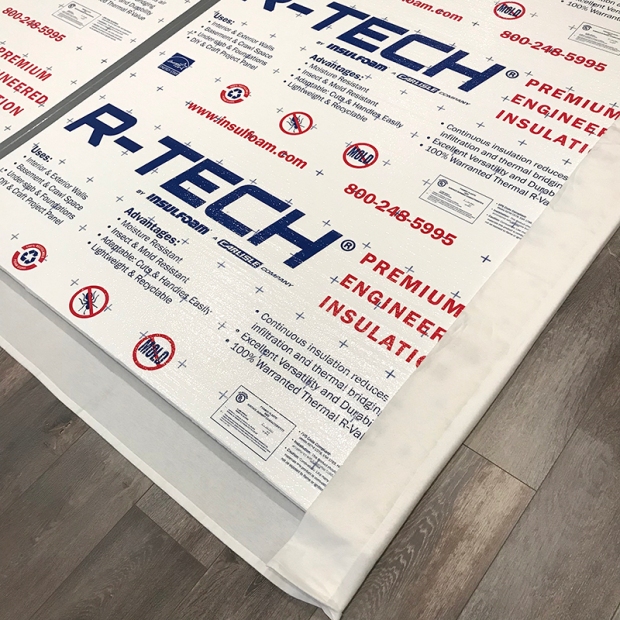
Two Foam Core Insulation boards, 4′ x 8′ each. You can always cut them down if it’s too big. These are available from Home Depot or other home improvement stores. Be careful handling them as they are very fragile and can dent and break easily. When Jason and I purchased them, we had to look through all of them on display to find the nicest, newest looking boards.

Getting the boards home in our SUV was the hardest part of the job! Fortunately they just barely fit in the back of the car with the seats down.
California King Size White flannel flat sheet. Because the design wall is square, you want as much extra room as possible to wrap around the edges. I found a 108″ x 108″ sheet set from Bed, Bath and Beyond. It was easier to purchase the whole sheet set rather than just the top sheet, so I just donated the fitted sheet and pillowcases. You’ll want to iron it ahead of time to get out all of the wrinkles. I did not prewash because I didn’t want it to shrink up.
Be sure to iron out the wrinkles as much as you can.
Supplies: washers, screws, duct tape, screwdriver, level and a staple gun. This design wall is very light weight and attached directly to the wall so no crazy equipment is needed. We used regular 2″ long screws with washers to hold them in place. A level comes in handy, too.

Not pictured: duct tape, level, and a hand-held screwdriver.
The boards we bought have writing on one side, and a silver reflective surface on the other side. We chose the silver side to be the front so that none of the writing would show through on the front. It’s also easy to pin into.
One of the boards had a small dent on the front which we didn’t see. Fortunately, it didn’t show up at all, once we covered them in flannel and attached to the wall.
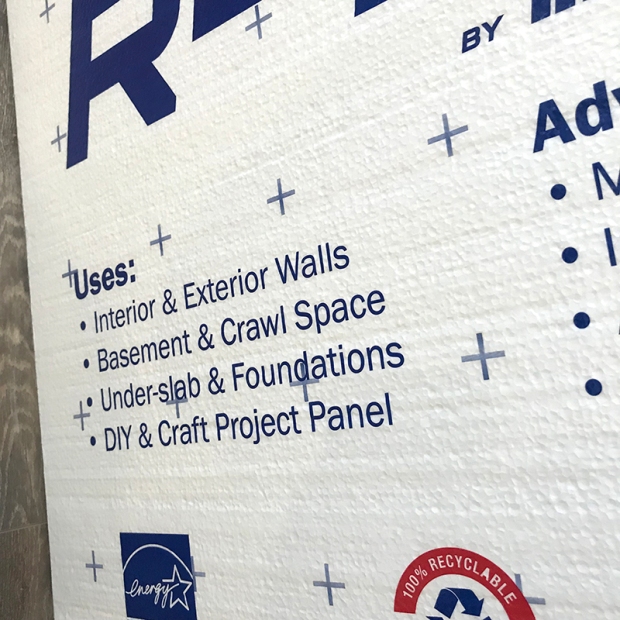
I thought it was funny that the boards say they are specifically for craft projects. I don’t remember that writing the last time I made a design wall for my other house over 5 years ago.
We started off by taping the boards together on top of a couple of tables and barstools pushed together at the right height. But then we realized you could do this on a hard floor as well. My previous studio was carpeted so we needed to do everything on a flat table. This time around, the studio floor worked well for all of the other steps.
Jason taped the back middle seam with duct tape as far as he could reach. We had to be careful handling it because it wanted to fold along the seam. At this point, it’s not very stable, but big and awkward.

The reason I chose a flannel sheet is that it’s lightweight, gives an even surface, and fabric and quilts will stick to it. I also think it looks much nicer and cleaner than batting and I can still pin into it if needed. We laid the flannel sheet on the floor first, and then gently laid the taped boards wrong side up on top of it.
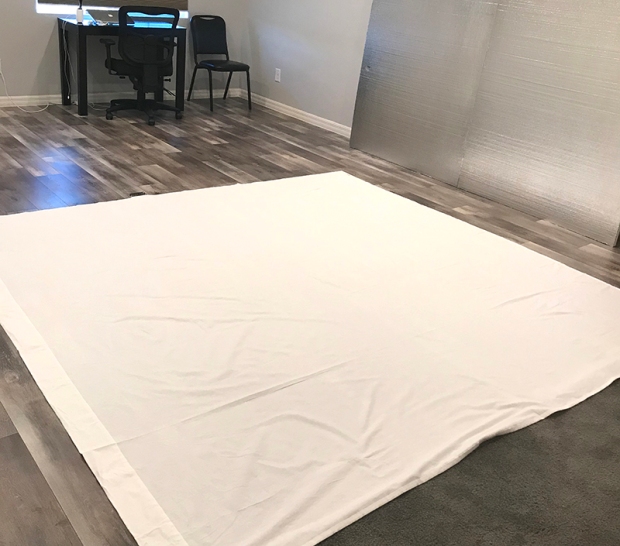
There was just barely enough width on the floor for the sheet and boards because we installed a floor plug in the middle of the room where my sewing machine goes. It’s important to have a flat work surface when doing this part so it doesn’t dent the foam. I didn’t worry about the top seam in the sheet since it would be wrapped around to the back side.
When this is hung, the seam will be horizontally in the middle so that one board basically sits on top of the other. That will make the seam on the front side less noticeable and will give the whole structure more stability once it’s attached to the wall.

Very smoothly and carefully, we wrapped the excess flannel around the boards, 2 sides at a time.
First we stapled the “top” and “bottom” sides and then the edges, very close together. Jason discovered that he had to put a little bit of pressure while using the gun and staple straight down, otherwise the staples would come out easily.

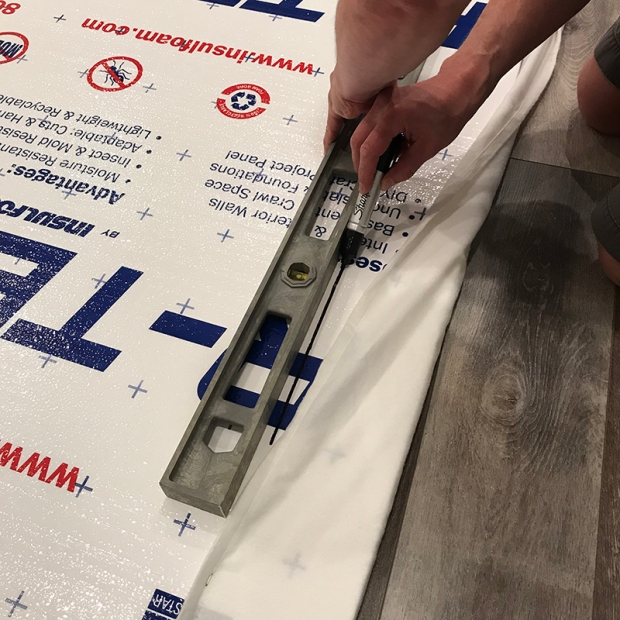
After a few staples, Jason drew a straight line so that he could pull the edges taught and even and line up the staples about 5″ or so from the edge. Keeping a little tension on the sheet was important so that it would be smooth and tight across the surface and not sag.
The corners were a bit bulky so I tried to fold them over as best as I could so that it was smooth and tight around the corners. We used lots more staples here. I probably could have cut some of the bulk from the corners, but didn’t want to risk it in case we had to redo something. Fortunately we didn’t and the bulk of the flannel was smooshed flat against the wall, once everything was attached.
On the sides with corners, Jason stapled a few in the middle, then the corners, then worked his way in sections to even out any of the stretch in the flannel.

We added lots and lots of staples to secure the flannel.
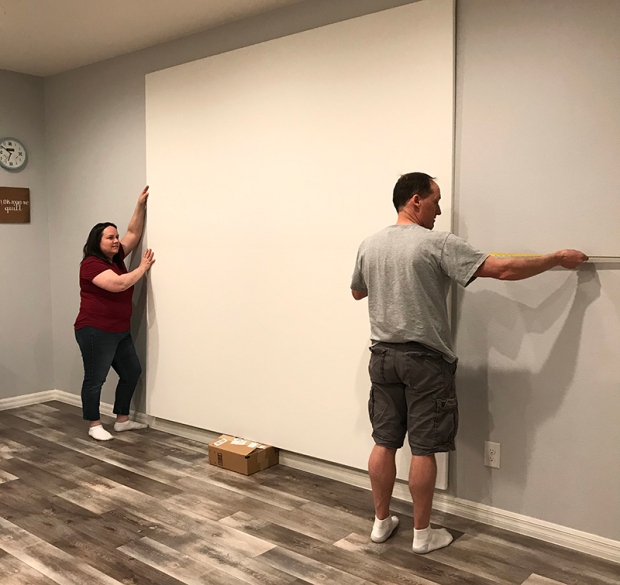
We measured where we wanted to hang the design wall – centered halfway across the room and in between two plugs on the wall. We wanted it 5″ from the floor so we found a box that height that we used to rest the design wall on while we gently nudged it into place.
My job was to carefully hold the design wall against the wall while Jason attached it into place with screws. He used a measuring tape and level to ensure that it stayed straight and square while attaching.
Jason measured 1 1/2″ away from the edges using a washable marking pen. Then he screwed the screws directly into the wall with a regular screwdriver, making a hole in the flannel that was covered by the washer. The washer gives a decorative element and also prevents the screw from digging into the foam.
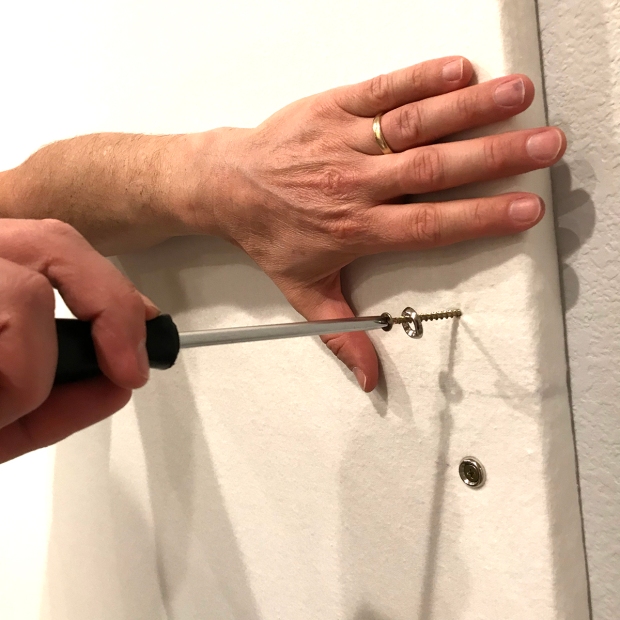
First Jason attached two screws on either side, where the boards meet up in the middle. This would be the two top corners of the bottom foam board. Then he attached screws in the upper corner of the design wall, and then in the lower corners.

Then he attached 2 more screws in the lower corners of the first design board – so 8 screws and washers to secure the boards to the wall, holding down all 4 corners of each foam board.

We attached a total of 14 screws and washers, evenly across the top and side edges. Here’s what it looks like with all screws attached. You can see the faint line where the boards meet up in the middle, but that softens up over time and will be mostly covered by quilts anyway.
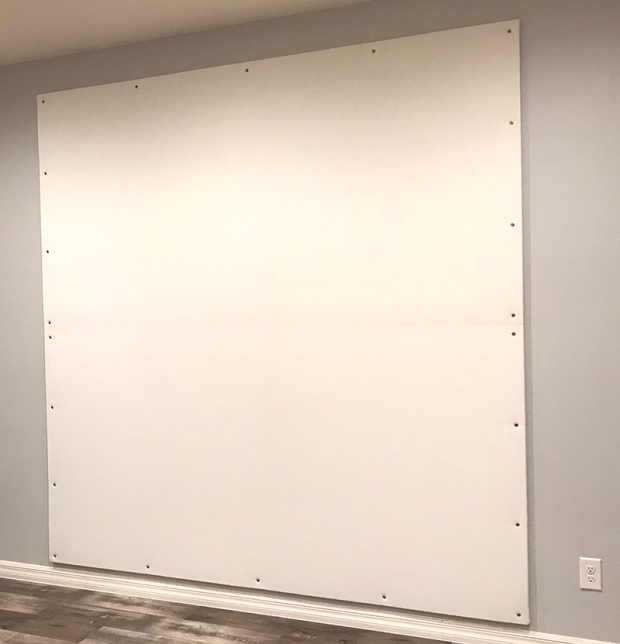
I added a recent quilt finish to the wall to give my room a pop of color that I really love! Now I’m ready to make and photograph more quilts for your viewing pleasure!!

The quilt on the wall is my Color Weave Quilt Pattern
I hope you enjoyed this tutorial and peek into my sewing room. Because I know you’ll ask – my sewing table is one I purchased from a dealer over 20 years ago. Sadly the dealer is no longer in business and I can’t remember the brand of table it was! But I’m in the process of finding a new table with a built-in side section that forms an L shape – giving me more room to hold up the quilt. So be on the lookout for more sewing room updates, and more fabulous quilts!
Can you believe we’ve come to the end of the Blooming Wallflowers quilt along? I’m so excited to see all of your finishes and encourage you to continue working at your own pace, even if you finish weeks (or months) later.

I was literally finishing the hand binding of this quilt on the way to quilt market last fall, so I didn’t get any pics of my binding in progress. However, I’ve written several other binding tutorials, and my process is exactly the same, no matter which quilt I’m making. So choose your favorite method – hand or machine, and enjoy this last step of the process!

I cut matching binding strips from my Modern Marks Navy Herringbone print.
Here’s a bonus tip for binding: I like to cut my strips out at 2″ wide and attach them with an exact 1/4″ seam using my BERNINA dual feed (which acts like a walking foot but I can use skinnier feet on it). This gives me a precise finished binding of 1/4″ and it’s even on both the front and back. Many times, I like to use the same background fabric as the binding so that it looks like the design is floating on the surface, rather than being interrupted by a contrasting fabric.
Here’s Blooming Wallflowers hanging in my booth at quilt market last November, along with the other quilt patterns I made to showcase my Abstract Garden fabric.

My booth with Benartex at fall quilt market in Houston, November 2018
Other quilts shown are LatticeWork and Geese in the Garden.
And just for fun, below the is the original Blooming Wallflowers quilt I made a couple of years earlier for a quilt magazine to promote my first line, Modern Marks. As you can see, this quilt is fun to make no matter which fabrics you choose!

The Modern Marks Navy Herringbone print is one of my all-time faves!
I hope you’ve enjoyed making this quilt with me. And if you are worried about having quilt-along withdrawal, stay tuned for the next quilt along, coming soon!! It features a brand new quilt that I haven’t shared on the blog yet, and I’m sure you’ll love it just as much!
It’s been awhile since I’ve shared a home update because I’ve been working on some other behind the scenes quilting projects (new fabric, new patterns, new book, etc…) But I was able to catch my breath this weekend, get organized and take a few pics of my new sewing studio. It’s not completely finished as it still needs a few quilts on the walls for decoration, but it’s fully functional and is the dream space I’ve always wanted. So let’s take a virtual tour, shall we?

The cabinets are from the Ikea kitchen department.
The floor is laminate from a local flooring center.
The most important part of my space is storage. I am definitely not a pack rack, but I still prefer to keep my messes behind closed doors so that the rest of the space appears nice and tidy. I was thrilled to be able to get wall-to-wall cabinets installed at a price that didn’t break my budget. I used Ikea’s kitchen services to plan and purchase stock cabinets in various sizes to fit the space. I was able to customize them with snazzy door fronts and handles, and I spent hours upon hours figuring out the right configuration of shelves, bins and drawers to hold everything I needed.

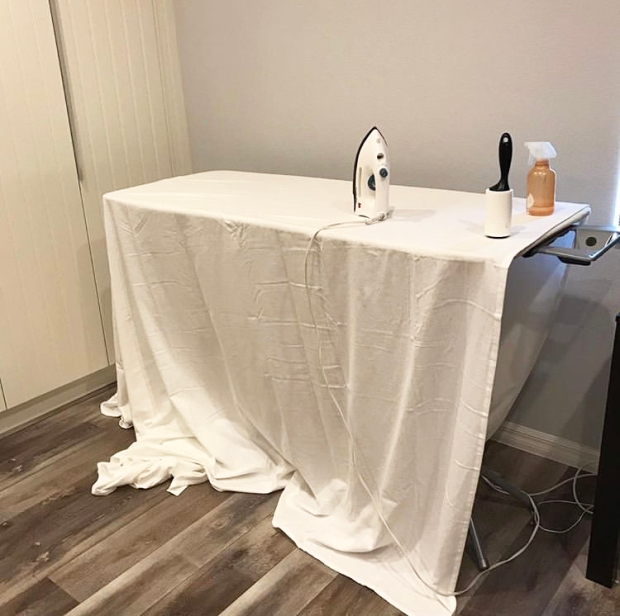
Starting on the far right of the tall cabinets, I knew it would be super important to keep a step ladder to reach the upper cabinets. I was thrilled that they were able to install the cabinets so that the one “permanent” shelf was above the door line in this cabinet. This allows the space under the shelf to be long enough for my ironing board and big board to fit. Inside the rest of the unit is a combination of shelves at different heights, with plenty of storage drawers and bins.

I keep my thread and other supplies in hidden pull out drawers that I could customize for height. This area works perfect to store all of my thread. The cabinets are 24″ deep so I wanted to ensure I could maximize the space and reach everything. It took a quite awhile for me to come up with the right configuration, but I’m pleased with the results.

The center section is for fabric storage and quilts in progress. As you can see, there’s quite a bit of empty space which means I have plenty of room for growth! I honestly don’t keep a lot of UFO’s and I recently gave away a lot of my stash that I realized I simply don’t use. Because the cabinets are so deep, I found thin cardboard sheets that I could cut in half to measure 9″ x 22″.

It took me many hours to refold all of my fabric onto thin pieces of cardboard.
These thin “bolts” are basically twice the length of the popular comic book boards that many quilters use for stash storage. I’ve kept about 5 yards of every fabric I’ve designed for my own personal stash and it’s exciting to watch it grow!

I’ve organized my scraps into smaller bins by color, which is how I’ll most likely use them. The other drawers hold other misc. stuff so that everything has a place to go!

This is one of my favorite drawers – I configured it so that there was enough room to hold my biggest rulers standing straight up. They are held in place by several wooden ruler racks that line the bottom of the drawer. They key is to maximize every inch of this space!!

The very left cabinets hold fat quarter bundles and kits for sale along with my patterns and books for sale. I even wanted the trash tucked away behind closed doors so that the entire space stays tidy. To the left is the hallway and a half-wall that leads to the downstairs on the other side. My husband’s office is the open door on the left and the 2 kids’ rooms are to the right, (not shown) behind my sewing room.
I’m happy to still have a pony wall to drape large pieces of fabric that I’m working with!! Eventually we’d like to replace the half-wall with a decorative stair railing to open up the hallway a bit more. The king sized white flannel sheet is waiting to be used in my design wall, and the pink Modern Marks fabric has been washed and will be an experiment in sewing clothing made from my fabric. (I’ll post more about that later if all goes well!)

You can just barely see the corner nook area peeking out in the far right of this photo.
Here’s what the space looks like on the wall opposite the cabinets. Those big foam core insulation sheets will become my design wall and I have a nice window to look out of while I’m working at the computer. We installed a floor plug in the middle of the room so that I could set up my sewing table without having cords running across the room.
I still need to purchase a nicer office desk and I’m looking to replace the sewing table with one that’s a bit larger with an attached side table. I also need to add color to those walls in the form of quilts, but one step and one project at a time, right??

Now I just need to add quilts on the walls and a cozy side chair to this area.
My space has a bonus corner nook which serves as my cutting and packaging station. I was able to pull the cabinets a few inches away from the wall, and get a custom width counter top that extends to 30″ (rather than the standard 26″) to give me enough room for cutting. I was also able to lower the cabinets by an inch since I’ve very short. This space is much more ergonomic compared to the table top height I was using before.

My shipping materials fit in the shelves underneath so that whenever someone orders some of my fabric, or one of my patterns, it’s super quick and easy to fulfill their order! I love having plenty of room to roll out a bolt of fabric and cut yardage quickly and easily as well as cutting smaller pieces for my own quilts.
I hope you’ve enjoyed this tour of my new workspace and I can’t wait for the exciting new things I’ll be creating here!!

My mom got me a cute wooden plaque that says “In this room we quilt.”
The quilt themed clock was a Christmas gift from Moda.
Can you believe that we are almost at the end of the Blooming Wallflowers quilt along? But not to worry, I have more inspiration coming your way! Next week we will bind our quilts to finish. But in the meantime, check out the fabulous quilts being made and shared in my Facebook group. Everyone featured today wins a free PDF pattern of their choice for sharing!
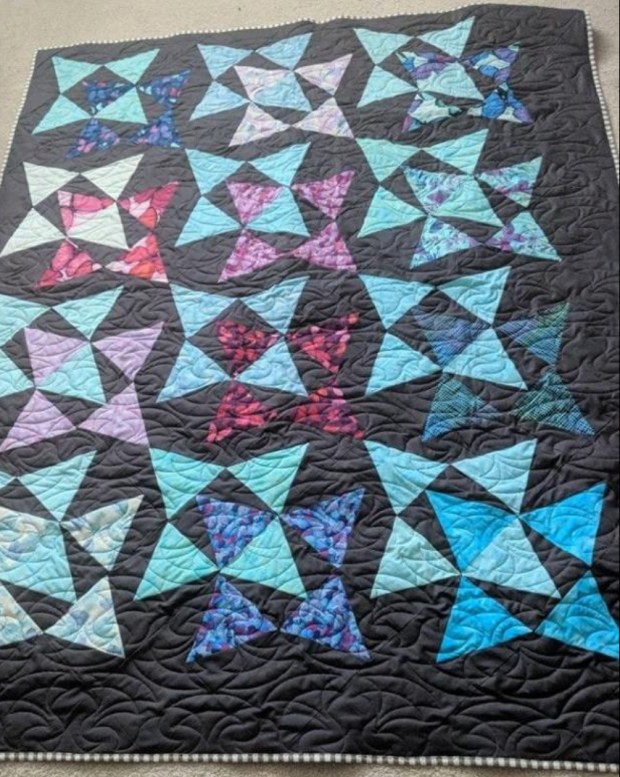
I love how Gina S. Chose soft watery batiks for her version and paired it with a black background. She finished it off with a textural allover quilting design and that binding is to die for!!

Abbie B. recently finished her quilt top and I love her yellow background, don’t you? Remember, you can work on any of my quilt alongs at your own pace, and on your own schedule. 🙂

Lynn L. gets bonus points for practicing her free motion quilting on a test piece before diving into her quilt. This is one of the recommendations I make in all of my classes.
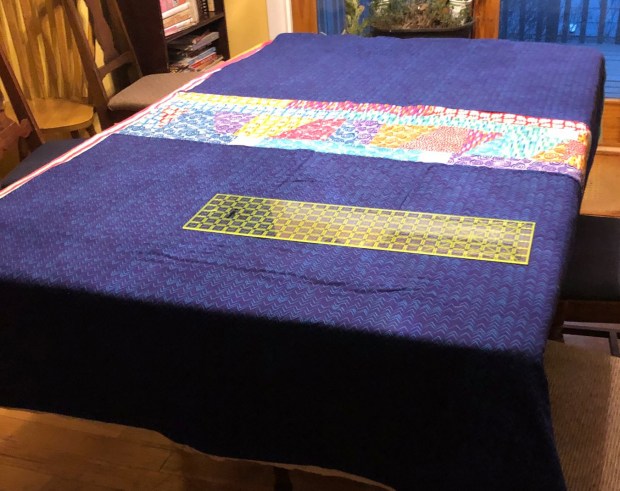
Above is Lynn’s fun pieced quilt backing, made from yardage of Modern Marks Navy Herringbone plus Abstract Garden leftovers. I love it!!

Laina L. is following the quilting plan as shown in the Blooming Wallflowers quilt pattern. Isn’t she doing a fantastic job on her pebble quilting??
I don’t know about you, but seeing everyone’s progress inspires me to want to quilt today!!!
Hi all – I’ve been super quiet on the blog this week because getting my new sewing room up and running has been an all-consuming process! For those following the Blooming Wallflowers Quilt Along, the next post will be up soon, I promise!!

In the meantime, be sure to check out this informative post about planning your quilting. I shared it over on my buddy Amy Smart’s blog at Diary of a Quilter. It’s an inside look to how I plan my quilting. This will be helpful for those of you quilting along with me, or wishing to figure out how to plan your own quilts!
This week I’m getting my Ikea Sewing room cabinets installed and I can’t wait until they are finished! They are actually from their custom kitchen department but they will work wonderfully for my space! The whole unit will have covered doors with sleek handles so that I can keep the mess out of sight.

Once the cabinets are finished, the flooring will be installed and then I can start moving my sewing stuff into the space. I can’t wait to share the final reveal! I have to say that working with Ikea, and their authorized partner Traemand installation has been wonderful. There have certainly been hiccups along the way, but they’ve handled everything with such professionalism that I would highly recommend them! Here’s hoping I have room for all my stuff, LOL!
We are continuing to make great progress on settling into our new home. Most of the big stuff has been moved, except for my sewing room. But this week, I started designing how I want it to look, and I had someone from Ikea come and measure the space so we can plan out a very functional working studio. Here are a rough floor-plan so far:

I basically have two areas – a big open loft and a small corner nook. (The lines in the upper left corner represent open hallways so that’s not actually part of the space.) My plan is to have wall-to-wall cabinets on one wall (#’s 1-8) and the opposite blank wall will be for my design wall. The lower left (#’s 9-11) will be base cabinets with a smooth surface on top for cutting, and I want to add a cozy chair for hand sewing.
The rectangles in the center and the right side wall represent rough placement of my sewing table and computer desk. I never had a work desk in my old studio so I’m excited for the change.
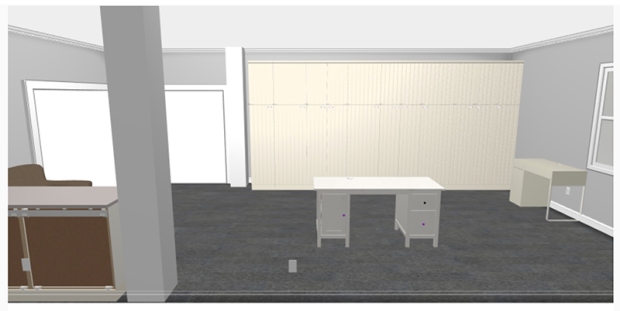
Here’s the rough rendering of the space in 3-D (with the left rectangle and clear rectangle representing room openings):
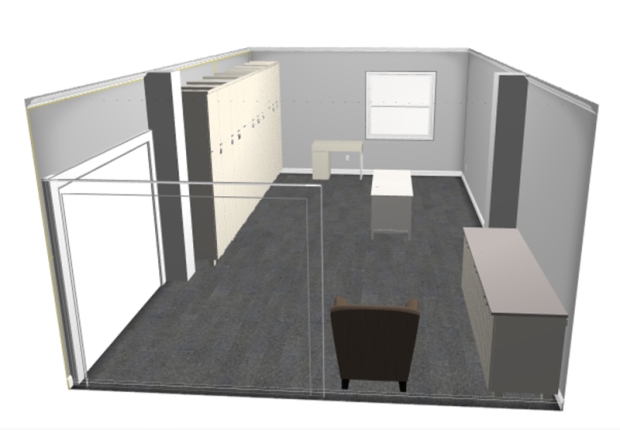
For so long, most of my furniture has been a mis-match of hand-me downs and ugly plastic storage bins. I’m sooo excited that in the new studio, everything will be behind closed doors in nice, pretty built-in cabinets.
Designing my space is like designing a quilt – I need to see what it will look like before I start!
Here are the accessories I’ve picked out so far – off white cabinet fronts with interesting texture, silver handles, and a gray counter top.

Things may change as I finalize the design this weekend, but hopefully everything will be ready by the end of February. Fortunately I’m in a lull with my quilting until the end of March, when new sample fabrics start arriving for spring quilt market. (More about that later!) So hopefully that will give me the time and headspace I need to get it all set up how I want.
So let’s celebrate another weekly milestone with a sale!! From now through next Tuesday, when you spend at least $25 from my designer shop at Shop.ChristaQuilts.com you’ll get Free Shipping!!
You must use code MOVE7 in the coupon box at checkout to get the deal. So stock up on some of your faves guilt-free (and that means less stuff for me to put on my shelves, LOL!!!)

One of my earlier sketches as I was planning things out.
And now, I’ll pretend like I’m sitting in my cozy chair in one corner of my studio, enjoying some relaxing hand binding in a clean, organized and finished home… stay tuned for the next update!!
