To Mom With Love on Mother’s Day

The following is an essay I submitted to Quilter’s Newsletter’s writing contest, “300 Words about Quilting – The Person I Taught to Love Quilting”. They have selected it for publication on their website coming up in August/September as part of their “Web Extras”. (You can see my previously published essay here.)

I’ve chosen to dedicate this post to my mom for Mother’s Day – Love ya Mom!

Mom and Me

Mom and Me

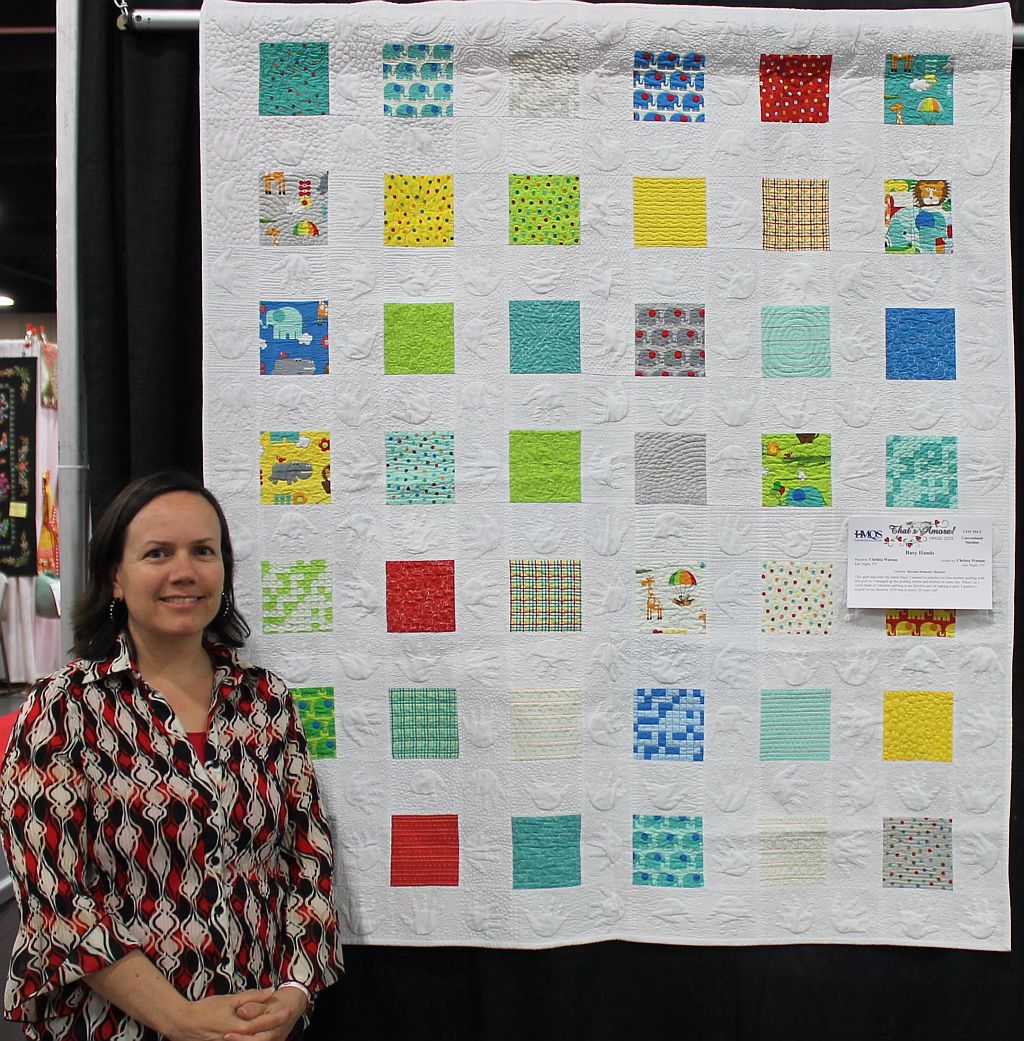
Quilting Bridges The Generations, by Christa Watson

When I was little, my mom taught me to sew. When I became an adult, I taught her to quilt. As a child, Mom fueled my desire to be an artist. Growing up, we participated in all sorts of community crafts classes together like candy making, chocolate molding, needlepoint, and even a short stint with ceramics. One of my fondest memories was picking out brightly colored cloth bands and making piles of woven potholders. (You can guess what everyone got for Christmas that year.) Mom taught me how to make clothes for my Barbie dolls and how to stuff a pincushion. To this day, she has kept my very first project.

As I grew older and life got in the way, I buried my inner artist. Mom divorced, I survived my teenage years, and we really didn’t have that much to talk about for awhile. Then, about a year after I married, Mom decided to give me a sewing machine for Christmas, thinking I could put it to good use. Before long, I stumbled upon quilting. (How did we miss that before?) All of a sudden, I could create again.

Three Generations of Fabric Lovers

Three Generations of Fabric-Lovers

Soon after, I became the teacher, and Mom signed up for every one of my quilting classes. She was my number one fan, and I don’t know which she loved more: learning how to quilt, or spending time with me. We joined a guild, started attending quilting retreats, and drooled over colorful new fabrics together. We found something in common once again. The joy I felt in teaching this exciting craft was even more meaningful with Mom as one of my students.

Now that we are both a little older with quite a few quilts under our belts, Mom spends a lot of time these days taking care of her mom and keeping her warm and cozy with quilts we’ve made together. I now have my own young daughter who’s old enough to sew and has just completed her first quilt. I’m beginning to see that spark of desire that my mom first kindled in me, and I look forward to the time my daughter is old enough to attend her first quilting retreat with Mom and me!

My Mother's Day Shirt

My Mother’s Day Shirt From My Daughter

HMQS 2013 Part 1 – Overview

This weekend Jason and I are in Utah, checking out HMQS – the Home Machine Quilting Show, and it is simply amazing! I took the plunge and entered my Busy Hands quilt into the show. After much trial and error, I was able to get most of the bleeding out, and I enjoyed seeing it hang in the show.

Busy Hands Quilt

Christa at HMQS

I eagerly await the judges critiques! (I’ve definitely decided I like entering my quilts into shows – it’s the best way for me to learn what quiltmaking skills need improvement.)

I also happened to catch a glimpse of my friend Melissa Corry‘s adorable Read With Me Quilt. Isn’t it the cutest?? In fact, there’s even a Moda Bakeshop tutorial for it!

Read With Me Quilt

Read With Me by Melissa Corry

While browsing around, I bumped into the fabulous Lisa Sipes giving demos at the Gammill booth. Her quilting helped win both the best of show quilts and viewer’s choice at Quiltcon.

Christa QuiltingLisa Sipes Quilting


She showed her stuff on the long-arm and I tried out the sit-down version. Almost it persuadeth me to become a long-armer, LOL!! You can read more indepth about Lisa and her amazing quilting in my previous post here.

Near the end of the day, I ran into Vicki Anderson, CEO & publisher of Modern Quilts Unlimited. She was nice enough to pose for a photo with me, next to this gorgeous quilt.

Christa and VIcki at HMQS

Christa and Vicki at HMQS, in front of “Andrew”, pieced and quilted by Kathi Carter of Vineyard, Utah.
Teacher’s Choice Award

It was fun seeing her again after meeting her for the first time at QuiltCon.

I shot so many pictures it will take me all weekend to sort them out. I’ll share more on Monday, including some beautiful award winners and a few fabulous modern quilts.  For now, I will end with the amazing Best of Show quilt by Marilyn Badger, called Super Star.

Best of Show

Super Star by Marilyn Badger of St. George, Utah
HMQS Best of Show Winner

What a wonderful day!

You can read my followup posts: HMQS Part 2 and HMQS Part 3.

Christa’s Quilt Along 5.11 Hugs ‘n Kisses Binding – It’s Finished!

Free Quilt Pattern

New to my blog? Be sure to sign up for my email newsletter to get a free pattern!

I love a good finish! Today I will share with you my favorite hand binding techniques to finish up Hugs ‘n Kisses. It took me a total of 3.5 hours to prep and bind.

Hugs 'n Kisses

Hugs ‘n Kisses 48″ x 64″

Step 1 – Prepping the Binding (1 Hour)

First, square up your quilt and trim off the excess batting and backing fabric.

Square up the quilt.

Next, cut out 6 binding strips that measure 2.25 inches by the width of your fabric. Using a blending thread helps to hide the seams.

Binding Strips

Join them together into one continuous length and press in half wrong sides together. If using solids with no right or wrong side, be careful when joining seams.

Sew Continuous Binding

Be sure to trim one end to a 45 degree angle before pressing in half and sewing to the quilt. Press all of your seams open to reduce the bulk.

Press the Binding in HalfNext, measure around the length of your quilt to make sure the binding is long enough. You can adjust where you start sewing the binding so you do not end up with any bulky seams in your corners. Leave a few inches of overlap, but trim some of the excess length.

Measure the Binding

Starting away from the corners and leaving a few inches of tail at the beginning, attach the binding to your quilt on the front using 1/4 inch seams. The edge of your walking foot may be a good guide.

When you get to a corner, stop 1/4 inch away from the end, turn your quilt and sew off at the corner. This will help make a 45 degree miter.

Sew off the corner.Remove the quilt from the machine and pull the unsewn binding up in a continuous line.

Remove the quilt.

Tuck the strip of binding back on top of itself. This excess binding fabric will fold over and create a nice mitered corner.

Tuck the corners.

Continue sewing from the corner and sew all the way around the quilt, leaving a few inches of space in between the start and end of your continuous binding strip. Mark the angle where the two binding stripes meet.

Ending Angle

Cut your ending piece 1/2 inch away from your mark, then join the two ends to finish the continuous strip and finish attaching it to the front.

Join the ends.

Step 2 – Finish by Hand (2.5 Hours)

Clover Wonder Clips

My new favorite notion is a package of 50 Clover Wonder Clips. They hold the binding in place much more securely than pins or clips. They are easy to add and remove as needed.

Finish by hand.

Finish stitching the binding on the backside by hand using small hidden stitches in a thread color that matches the binding fabric. If you want a quicker finish, please see my machine binding tutorial here.

Now you have a finished quilt! Pat yourself on the back and congratulate yourself on a job well done. Be sure to visit my Quilt Along page for upcoming announcements about the next one.

Jenna's Hugs'n Kisses

My daughter claimed this quilt early on and she’s happy that it’s finally finished!

Hugs and Kisses Quilt Stats

  • Name: Hugs ‘n Kisses for Jenna
  • Finished Size: 48″ x 64″
  • Materials Used: Kissing Booth Fabric, Scraps, Kona Snow, Wool Batting
  • Thread: Glide Polyester
  • Total Time:  47 Hours from Start to Finish

Quilt Along Kits are available for purchase while supplies last. If you have any questions about this week’s homework, please be sure to join my flickr discussion, leave a comment, or email me directly at christa@christaquilts.com.

Quilt Along Schedule – Links will go to each active post when published.

Hugs 'N Kisses

Hugs ‘N Kisses 48″ x 64″


Sharing is Caring

Please share your work in progress in my facebook group: Quilt With Christa . 🙂

Hey Quilty! New Project Start with Cotton Couture Solids

I am so thrilled I could hardly keep this to myself!

This bundle of gorgeous Cotton Couture solids just arrived in the mail from Michael Miller. I am going to turn them into an original quilt which will be featured in an upcoming issue of Quilty magazine!

Michael Miller Couture Solids

Michael Miller Cotton Couture Solids

Have you seen Quilty yet? Edited by Mary Fons, it’s an amazing new magazine geared toward beginning contemporary and modern quilters which has quickly become one of my favorites. (Be sure to catch her fabulous QuiltCon lecture for free on Craftsy!)

Quilty May/June 2013Quilty Winter 2012Quilty March/April 2013


When I first met New Track Media publisher Kristi Loeffelholz at QuiltCon back in February, I immediately knew I wanted to work with them. While I’m chatting with Kristi, who walks up to us but none other than Mary Fons? So of course I quickly got a picture with my camera phone, even though it was pretty dark in the room. (Sorry for the fuzzy pics!)

Quilty

Mary Fons, Christa Watson, Kristi Loeffelholz (New Track Media Publisher)

The next day at QuiltCon, I ran into Mary’s mom Marianne Fons checking out the quilts! We had a fun little conversation where I was able to tell her what an influence she and Liz Porter have been on my quilting over the years. Their book, The Quilter’s Complete Guide was the first quilting book I ever purchased way back in 1995!

Marianne Fons

Marianne Fons and Christa Watson at QuiltCon

Now, some 18 years later as I am ready to take my quilting to the next level, I think it’s wonderful kharma that it’s Marianne’s daughter’s magazine that will have my first published quilt. Hmmm, I wonder if it’s too late to be adopted into the Fons quilt mafia family???

Stay tuned for updates on this quilt!

Michael Miller Couture Solids

Michael Miller Cotton Couture Solids

Sew and Tell Baby French Roses #7 – Finished!

I am excited to share a finish with you today! I actually finished it last week just in time for it to win a ribbon in my guild’s quilt show. But with all of the quilt show excitement, I didn’t have time to share a little bit about the binding process plus a few in-process shots.

Roses for Katelyn

As you can see, the binding is made from leftovers of the pastel pink, yellow and blue plus some of the white. Scrappy bindings are really starting to grow on me! I stitched the binding finish by hand,  switching thread colors as needed. For detailed steps, you can read my hand binding tutorial here and my machine binding tutorial here.

Clover Wonder ClipsI used Clover Wonder Clips to keep the binding in place. These are my new favorite tool! With one box of 50 I was able to go completely around the quilt. These work way better than pins or hairclips and the hold the corners nice and tight, too.

I used Pearl Bracelets in Cotton Candy for the backing.

Quilting Plan

Actual Quilting

Here’s a side by side comparison of what I thought I would do for the quilting, and then what I ended up actually quilting. Sometimes I change things on the fly, or I get better ideas as I go along.

Christa's Bernina

I’m starting to get asked more often about what machine I use to make my quilts. I have a a 17 year old Bernina 1630 with a nice big drop-in table. I always practice a bit before I start quilting and use the queen-size Supreme Slider whenever I do any FMQ.

Here’s what Baby French Roses looked like after washing. It’s starting to shrink up a bit and the raw edges are getting nice and fuzzy:

French Roses WashedIt’s such a cozy quilt and I hope my sister loves it! It’s going to her new baby girl.

Cuddly RosesFrench Roses Finished Facts:

  • Quilt Name: Roses for Katelyn
  • Pattern Name: French Rose Buds by Heather French
  • Finished Size: 35″ x 42″
  • Materials: Kona Cotton Solids, Wool Batting
  • Thread: Glide Polyester and Bottom Line Polyester
  • Finished April, 2013
  • Patterns and Kits are available in my shop while supplies last.
Jenna with cousin Katelyn

Made for baby Katelyn

You can read my previous WIP on this quilt here:

  1. Baby French Roses #1- Cutting the Fabrics
  2. Baby French Roses #2- Machine Applique
  3. Baby French Roses #3 – Finished Top
  4. Baby French Roses #4 – FMQ Practice
  5. Baby French Roses #5 – Basting
  6. Baby French Roses #6 – Quilting

Sewing Summit Anyone?

I’m way excited – I just found out there is going to be another Sewing Summit for 2013.

Sewing Summit 2013

For anyone who hasn’t heard, this is a weekend long modern sewing retreat. After attending QuiltCon earlier in the year but being too far away to attend Sew South, I’m thrilled to join up with other modern sewists for Sewing Summit later this year.

Here’s what I know so far – it runs from September 19th-21st in Salt Lake City, Utah and as of today, registration is still open. I didn’t attend the previous 2 years but I’ve heard from a few other blogger friends that it was a blast, so this year I signed up right away!

Angela Pingel, Cut to Pieces

Angela Pingel, Cut to Pieces

Jeni Baker, In Color Order

Jeni Baker, In Color Order


Two of the blogs that I sponsor, Angela Pingel from Cut to Pieces, and Jeni Baker from In Color Order are going to be among many of the amazing teachers! Whoo-hoo this is going to be fun! So, who else is going??

Christa’s Quilt Along 5.10 – Hugs ‘n Kisses Extra Quilting

For today’s lesson, I will show you how I used a simple serpentine stitch to quickly quilt through all the centers of my X’s. It only took about 2 hours and gave a really nice finish.

Because the flower quilting I did in the “O” spaces is really the star of the show in this quilt, I didn’t want to overwhelm the quilt with much more quilting.

Extra Quilting

Therefore I chose a simple wiggly line that is one of the decorative stitch options on my sewing machine.  I just eyeballed the quilting as I went and didn’t mark anything.

Wiggly Quilting

I used a light pink thread that blended with most of the fabrics and gave a nice texture even on the darker prints.  I went all the way across the X’s in one direction, then turned the quilt and crossed over in the opposite direction.

Quilting the X'sI like the little bit of “poof” it gives to the quilt in the un-quilted areas. I use this wiggly stitch quite a bit. It’s more forgiving that trying to stitch perfectly straight lines, and I can cover a lot of area quickly!

For the borders, I quilted 3 lines of wiggles which finished it off nicely.

Wiggly Quilting

For another idea on how to quilt the blocks, here’s a picture of my original Hugs and Kisses quilt in yellow and orange. I used a stencil to mark motifs in the O blocks and I quilted straight lines through the X blocks. Then I stippled the rest of the background spaces.

Alternate Quilting IdeaYou’ll notice the original Hugs and Kisses is flatter than the updated version. That’s because I used cotton batting. In the pink version, I used wool batting which gives more of a trapunto look to the quilting. Both are great – it just depends on the look you prefer!


Hugs ‘n Kisses Quilt Kits are available for purchase while supplies last. If you have any questions about this week’s homework, please be sure to join my flickr discussion, leave a comment, or email me directly at christa@christaquilts.com.

Quilt Along Schedule – Links will go to each active post when published.

Hugs 'N Kisses

Hugs ‘N Kisses 48″ x 64″


Grab my Quilt Along button!

<div align="center"><a href="http://christasquiltalong.com" title="Christa's Quilt Along" target="_blank"><img src="https://christaquilts.com/wp-content/uploads/2013/03/christas-quilt-along-175-2.png" alt="Christa's Quilt Along" style="border:none;" /></a></div>

DQN Quilt Show 2013 Modern Quilts

After attending my local guild’s quilt show this past weekend, my daughter is thrilled that I am giving her my Hugs ‘n Kisses quilt.

Hugs 'n Kisses

Jenna’s Hugs ‘n Kisses by Christa Watson

While there was a “modern” category at the show for the first time ever, there were quite a few quilts entered into other categories that I would also classify as modern. Here they are for you to enjoy (and you will notice many of them won ribbons as well):

Cranes in Octagon

Cranes in Octagon by Ruthie Kerr
3rd Place, Hand Quilted

Heat

Heat by Lorraine Allers, Quilted by Sheilah Crum
1st Place Wall Quilt, Professionally Quilted

Enso

Enso by Rickie Seifreid, Quilted by Linda Natale
2nd Place Mixed Technique, Professionally Quilted

Fast Triad

Fast Triad by Bobbie Stoner
1st Place, Modern Quilt, Small

A Little Bit Modern

A Little Bit Modern by Marcella Peek
1st Place, Modern Quilt, Large

X Marks the Spot

X Marks the Spot by Michael Coughran, Quilted by Lin Zhao

A-maze-ing

A-maze-ing by Karen Atkinson
2nd Place, Machine Quilted Wall Quilt

Optical Illusion

Optical Illusion by Kathy Williamson, Quilted by Dana Stauffer
2nd Place, Large Quilt Professionally Quilted

Modern Circles

Modern Circles by Ann Pugh
3rd Place, Modern Quilt, Small

Aboriginal Suns

Aboriginal Suns by Lorraine Allers, Quilted by Brenda Alcorn
3rd Place, Mixed Techniques

Baby Bricks

Baby Bricks by Christa Watson, Baby Quilt

Charming Chevrons

Charming Chevrons by Christa Watson
2nd Place, Modern Quilt, Small

You can read some excerpts from last year’s quilt show here, here, and here.

Happy Quilting!

Desert Quilters of Nevada Award Winning Quilts 2013

My daughter and I attended my traditional guild’s show today and it was great to see so many beautiful quilts. I was thrilled to find a second place ribbon on my Charming Chevrons quilt and a third place on my Baby French Roses.

Charming Chevrons

Charming Chevrons by Christa Watson
2nd Place, Modern Quilt Movement

They gave us cute little buttons to wear that matched our awards. I am not a ribbon-chaser, but earning some sure does give me validation as a quilter!

Roses for Katelyn

Roses for Katelyn by Christa Watson
3rd Place, Mixed Techniques

Here are more award-winning quilts for you to enjoy. I wish I had room to show them all!

Lest We Forget

Lest We Forget by J. Lee Bagan
Best of Show, Small

Flower Penny Garden

Flower Penny Garden by Jean Bailey, quilted by Valerie Krueger
Best of Show, Large

Lotus Blossom

Lotus Blossom by Cory Allender
Judge’s Choice

Round and Round

Round and Round by Elwyn McGaugh
1st Place, Hand Quilted

Fire Dancers

Fire Dancers by Helen Prosser and Karen Garth
1st Place, Collaboration Quilt

Happy Hour

Happy Hour by Cynthia Anderson
1st Place, Pieced Wall Quilt

Churn Dash Crazy

Churn Dash Crazy by Cher Chu, Quilted by Diane Chipman
President’s Choice

Migration

Migration by Karen Garth
Show Chair’s Choice

DQN

Desert Quilters of Nevada by Guild President Karen Garth
2013 Challenge Winner

The next time I post, I’ll show pictures of many outstanding modern quilts seen at the show!

DQN Quilt Show 2013 Behind The Scenes

Today I will be heading out to my traditional guild’s quilt show to check out all of the gorgeous quilts. Be sure to check back later this weekend when I post pictures of some of the ribbon winners, including a couple of mine. 🙂

For now I thought it would be fun to show a little behind the scenes, since I was involved in the setup. It’s a lot of work to put on a show!

Show Check-In

Monday was check in day for the 200+ quilts, wallhangings, wearables, dolls and more that will be seen this weekend. Our guild is an “educational organization” which promotes the art of quilting and therefore run by all volunteers. These ladies work tirelessly to put on a good event!

Quilt Photography

Tuesday was photography and most of the quilt judging. Each quilt was loaded onto a quilt rack or pinned to the wall before being judged.

An NQA certified judge, Edie Richmond Dyke, carefully evaluated each and every quilt.

JudgingThe volunteer quilt handlers would take a stack of quits per category, lay them out onto a table so the judge could go over them in detail. Those of us in the room were not to breathe a word or let her know in anyway if she happened to be looking at our quilts, or those of anyone we knew.

Judging

It was such a wonderful experience to listen to her thoughtful comments on how to improve and even more exciting when she liked one of my quilts! Volunteer scribes would right down her comments on an evaluation form for the owner to read later.

Scribes

Wednesday and Thursday were set up and quilt hanging. Most of the large quilts were hung on pvc pipe frames that were assembled mostly by volunteer husbands and sons.

Show Setup

My son Ryan was earning some community service ours for a scouting merit badge so they were happy to have some extra help!

Hanging the Quilts

Probably the thing I liked best about helping out was being able to see many of the quilts up close and personal. This weekend I will take my time, look at all of the quilts in detail, read the artists’ statements and bask in the fun of it all!

If you are in the Las Vegas area this weekend, see the flyer below for complete quilt show details:

DQN Quilt Show