Project Linus Charity Drive and Free Quilt Tutorials

I’d like to help spread the word about the the Project Linus Charity Drive being coordinated by Fave Quilts and Leisure Arts. They are requesting quilts and blankets to be donated to the Chicago, Illinois chapter of Project Linus.

2014 Project Linus Drive

If you are able to send in a quilt or blanket, they are giving away some pretty nice prize packs sponsored by Leisure Arts books. The drive runs through June 23rd, 2014. For complete details and where to send, please click here.

Fave Quilts has been very supportive of my efforts to share my love of quilting with as many people as possible. They routinely feature my free quilt alongs on their website, along with hundreds (possibly thousands) of other free patterns and tutorials. You can check out my profile here and literally spend hours on their site, combing through all the inspiration!

Baby BricksBaby Bricks Quilts by Christa Watson

For the charity drive, I’m sending them the Baby Boy Blue version of my Baby Bricks quilts shown above. I made two versions of Baby Bricks to illustrate how different a pattern can look, depending on the fabrics. I knew I wanted to donate them both, and I was able to give away the pink version to a brand new mom earlier this year. However, I held onto the blue one until just the right opportunity came along. Now I’m glad it’s going to the right place! πŸ™‚

Here’s a full shot of just the blue version:

babybricksblue_finished
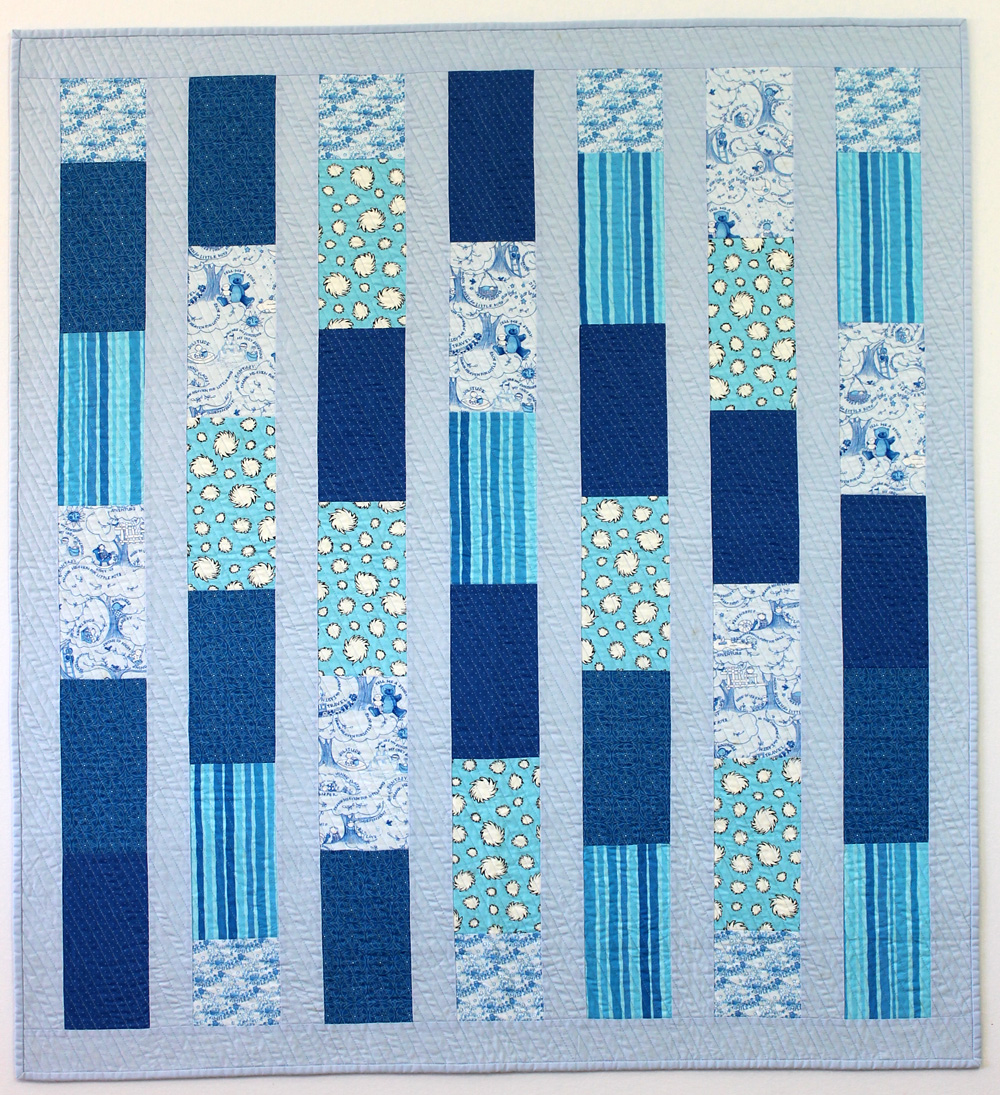
As you can see, I added more straight line quilting to the original quilt. Here’s a closeup so that you can see that straight lines don’t need to be perfectly straight or evenly spaced! The trick is to add enough lines so that your eye takes in the overall effect of the added texture.

straight_line_quilting_detaWhen I quilted this quilt, I marked all of the original straight lines, about 2″ apart. Then I filled in the rows of quilting between the lines using the edge of my foot as a guide. It’s totally not perfect, but I love it and hope it will go to a good home. πŸ™‚

Click here to get the free tutorials for Baby Bricks and whip up your own version for someone you love, or for someone in need!

And remember, pieced quilt backs are a great place to use up all those leftovers, whether they match perfectly or not. πŸ™‚

baby_bricks_backI love the yummy crinkly texture all that straight line quilting provides!

Las Vegas Quilt Show This Weekend!

If you are in the Las Vegas area this weekend, please come check out the Desert Quilters of Nevada‘s annual quilt show at the Henderson Convention Center. See the flyer below for complete details:

DQN Quilt Show

I am very excited for this show. My guild just celebrated their 26th anniversary and they’ve been putting on a quilt show for nearly as long.

I’ve entered my 5 quilts below as part of the show. Quilting really is such good therapy for me so I’m excited to be a part of this, especially this week!

Detail of my Hugs ‘n Kisses quilt. It’s finished, but in my haste to get it delivered by the check-in deadline, I forgot to snap a completed picture. I’ll take one later this week at the show. (Read more about the quilting during tomorrow’s quilt along lesson). This one is going to my daughter after the show and she’s very excited about that.

Hugs 'n Kisses

French Roses for Katelyn is going to my sister for her brand new little baby girl that she just adopted in February. Now she has 3 kids like me, so when we go to Utah for a visit next month, it will be quite the noisy (but fun) house!

Roses for Katelyn

My Charming Chevrons Quilt will be included in my guild’s first-ever modern quilt category. I can’t wait to see the other entries in this category!

Charming Chevrons

Baby Bricks in Pink was one of my early a quilt alongs and is still a favorite of mine.

Baby Bricks in Pink

I like the low volume look of Baby Bricks in Blue. It’s fun to see how a pattern can look so completely different depending on the fabrics.

Baby Bricks in Blue

Whenever I enter anything in a show I never set any expectations of winning. It’s just fun for me to hear what the judges have to say, and learn from them on how to improve my techniques. Plus it’s pretty awesome to stand back and watch the reactions of others as they view my quilts in person. πŸ™‚

2013 Finish Along Quarter 2

Finish AlongI’m participating in the 2013 2nd Quarter Finish Along hosted by Leanne at She Can Quilt.

I first met Leanne when her mini quilt Shattered was entered into QuiltCon (and won a ribbon I might add). I saw it on her blog weeks before and knew it was something special!

I am actually wearing two hats for the FAL – that of sponsor and participant. I’m sponsoring one of the giveaway prizes because that’s just what I do, LOL!!

Also, I’m linking up my UFO’s as motivation to get them finished on time. So without further ado, here are the quilts I hope to finish this quarter (keeping it simple and manageable):

Girl Baby Bricks

Baby Bricks in Pink and Green

#1 Pink Baby Bricks – this quilt was one of my early quilt alongs and is technically finished. However, it’s just begging for more quilting to be added in the “bricks” so that’s just what I intend to do.

French Rose Buds Top

French Rose Buds Baby Quilt

#2 Baby French Roses is my version of Heather French’s fantastic French Rose Buds pattern. I tweaked the design a bit and made it slightly bigger. I basted it last week so now all I have to do is quilt it and bind it. Easy peasy, right? It’s going to my sister’s brand new baby when I visit next month so now I have double motivation to finish!

Hugs 'n Kisses Quilt Top

Hugs ‘n Kisses Quilt Top

#3 Hugs ‘n Kisses – an updated version of a quilt I designed and made over 10 years ago. This quilt serves double duty – It’s my current quilt along project and I plan on using it for some intense FMQ practice. Also, my daughter has claimed it so it’s going straight on her bed when done.Β  It will definitely be out of my sewing room then!

Christa’s Quilt Along 2.8 – Blocking and Labeling Baby Bricks

Free Quilt Pattern

Be sure to sign up for my email newsletter to get a free pattern!

I have finally finished two Baby Bricks quilts, my Pretty Pink Version and my Boy Blue version. I am very pleased with both and wanted to share a little bit about blocking and labeling in this last tutorial. My next series, Charming Chevrons, will start tomorrow.

Baby Girl Bricks

Baby Boy Bricks


Here are the last steps I took to completely finish my quilts:

Step 1 – Spray Blocking

The blue quilt turned out pretty straight and flat so it did not need to be blocked. However, the pink/green version had a little ruffle in the borders.

Wavy Border

I got all the edges wet with a spray bottle, patted them into place, then let them dry.

Spray BlockingPat in PlaceLay Flat To DryI laid the quilt out on my basting tables so it could dry flat. You can also pin your quilts in place using a large piece of foam core board. I will try that method sometime in the future.

Here is a link to a previous post where I used rulers to make sure everything was straight.

Step 2 – Adding the Label

I must say, I really dislike adding labels to my quilts. Usually it’s because I’m in a rush to finish and I don’t want to think about that step. But I decided I really want to document my quilts better and include important information like what materials and techniques I used.

Iron Freezer Paper

Press The Edges

Add Text

I Using a scrap from the quilt top, I ironed a small piece of freezer paper to the back side of the fabric. (I used the wrong side of the fabric as the front because it was lighter.)

Cut the paper 1/4 inch smaller than the label fabric. Press the edges of fabric over the paper to make a crisp edge around the label. Flip the label over and add your text with a permanent marker. Be sure to remove the paper before attaching to the quilt.

Pin The Label

I pin basted the labels to the back corner of the quilt. Because my backings were pieced from scraps, this helped the labels to blend in a little better with the backing. I think I will try to print my label info on fabric for next time since my handwriting is not very pretty!

Hand Stitch the LabelAttach the label to the back of the quilt by hand using a matching thread.

This is the same stitching I used to finish the binding by hand.

It only took 10 minutes of sewing so I guess I will quilt complaining about what a hassle labels are.

Yay – both of my Baby Bricks quilts are finished. Now, onto the next quilt!

In case you missed it, or have just discovered this blog post, here is the complete schedule of tutorial posts for my Baby Bricks do-it-yourself quilt along:

Sharing is Caring

Please share your work in progress in my facebook group: Quilt With Christa . πŸ™‚

Christa’s Quilt Along 2.7 – Binding Baby Bricks

To finish off both the girl and boy versions of Baby Bricks, I am finishing my bindings by hand. I’m always needing a hand project that I can stitch while watching TV with the family!

A limited number of Baby Bricks Quilt Kits are available, using these exact fabrics shown.

Girl Baby Bricks My quilts are trimmed and ready for binding. I think that binding by hand gives a tidy finish which helps the quilt to lie flat and straight; very important when being hung in a show!

Boy Baby Bricks

Step 1 – Securing the Binding to the Front of the Quilt by Machine

Please review my Jolly Jelly Roll quilt tutorial for step-by-step photos of this process. I show how to sew continuous binding strips using my favorite method called double fold, French binding. I also demonstrate how to complete it by machine, for a faster finish.

Step 2 – Pin Basting and Preparing Needles and Thread

I enjoy binding by hand if I am not rushed and everything is prepared ahead of time. I chose a heavier weight cotton thread that matches the binding. I like to thread several needles onto my spool so I can cut off a new length of thread and not have to worry about re-threading so many needles.

Thread Several Needles

Next, I use pins and Pinmoors to secure the edges while sewing. I usually pin one large section at a time (enough for one length of sewing thread). Then I repin and move onto the next section as I go.

Pinmoor Basting

Step 3 – Sewing by Hand

Cut off about 18 inches of thread and knot it on one end. Then slip the needle between the backing fabric and the binding. The knot will be hidden under the binding.

Beginning StitchHand SewingMake one stitch at a time, backtracking slightly as you enter the needle for each new stitch.

This is very similar to hand applique or a blind hem stitch.

Be sure to stitch the corners closed on front and back.

Corner FrontCorner BackYou can click on any of the smaller photos to see more detailed closeups of the sewing.

It takes longer to sew by hand, but it’s a very relaxing and enjoyable process!

Smaller needles make a tiny stitch.

When I get near the end of my thread, I simply make a knot, take a last stitch and pop the knot into the binding. Then I start the process again until the entire binding is finished.

Knot the Thread

I will finish up the binding on both of my quilts, then post photos of the finished quilts next week. I have decided to add on a bonus week to this project so that I can talk about blocking and labeling your quilt.

Here is the complete tutorial schedule below:

If you enjoyed these tutorials, please join me when I begin the next quilt-along series, called Charming Chevrons! I will post the supply list next week. Here’s a hint: it’s made from charm packs! (4 charm packs total – 2 of the same light/background and 2 of the same dark/print)

Christa’s Quilt Along 2.6 – Baby Bricks Option 2 FMQ

I love adding free-motion quilting to my quilts whenever I can. That is why I chose to enhance my girl version of Baby Bricks with some decorative double loops.

Baby Bricks - Girl VersionStep 1 – Securing the Blocks

Before getting to the fun part, the quilt needs to be secured with a little stitching in the ditch between all of the rows. This anchors the piece for more decorative quilting later.

Beginning the RowsStitch in the DitchWhen stitching to the end of a row, pivot and sew along the side to get to the start of the next row. I used my walking foot with an “open” toe so that I could clearly see where I was quilting.

Step 2 – Quilting the Loops

I quilted all of the white “negative space” with random double loops. To do this design, first quilt a row of single loops. I changed the direction of each loop for interest – think of stitching e’s & o’s in an alternating fashion.

Single LoopsWhen I reached the end of the row, without stopping, I went back the other direction, echoing the flowing lines between the loops and filling the inside of the circles with another loop. This created a ribbon look which I really like.

Double LoopsFor the FMQ, I used Isacord polyester thread in a Vanilla color which I bought from Leah Day. This was the first time trying that thread and I really like it. I need to get more colors!

Step 3 – Quilting the Blocks

At first I had planned on adding more free-motion quilting to the rectangular blocks, but then decided the quilt needed some geometric looking quilting instead. So I got out my ruler and washable marking pen and added registration marks, crisscrossing the blocks.

Add Registration MarksHad I planned this out more, I would have marked the quilt before I basted and probably quilted the straight lines first. But it just goes to show it’s ok to change your plans during quilting and it will still turn out great!

Straight Line Echo

With my walking foot and pink thread, I quilted lines 1/4″ away from either side of the marked lines. Then I spritzed the lines with water. (I will completely soak the quilt later.)

I marked an “x” design going in both directions on the center row of the quilt. Then each of the rows to the left and right accentuated the direction of the straight line quilting.

Quilting Detail

I pieced the back using some pink and green scraps from my stash. I like how much the quilting shows up on the back. (I used wool batting to give the quilting some body.)

Pieced Back

Here is the schedule of tutorial posts for my Baby Bricks do-it-yourself quilt along:

Christa’s Quilt Along 2.5 – Baby Bricks Option 1 Straight Line Quilting

I finished up the quilting on my boy version of Baby Bricks while I was at a quilting retreat last weekend.Β  I brought along a few items to sell so the weekend paid for itself!

Christa Quilts!

Step 1 – Quilt the Marked Lines

This quilt was so easy to machine quilt. It was just a matter of following the marked lines! I timed myself and it took less than 2 hours to machine quilt the top. Start with a large area for quilting so you have room for the quilt. A drop in table is best but as you can see here, I quilted this just using the surface available on the bed of my machine.

Gripping the Quilt SandwichI started on the very edge of the quilt with the first marked line. I scrunched up the quilt under the arm of the machine and used Machingers quilting gloves to grip the quilt making it easier to push through the machine.

I used a walking foot to quilt the straight lines with my feed dogs engaged. I set my stitch to a longer length (4 out of a max of 5), and quilted with 50 weight variegated light blue cotton thread on both top and bobbin. I used a new Topstitch needle, size 80/12 for the quilting.

Quilting Straight LinesI quilted about half of the quilt from one direction, turned it around and then quilted the other half. Because my marked lines ran from one edge to the other, I did not have to tie off or bury my threads. The ends will be covered by the binding so they will be secure. I left the basting pins and Pinmoors in the quilt and removed them one at a time as I quilted.

Step 2 – Remove the Markings

I used a spray bottle to remove all of the marked lines. I will soak the quilt after binding to block it and remove any excess marks. (I advocate prewashing all the fabrics first to be sure they don’t bleed. This gives me piece of mind when I completely soak it later.)

Spritzing the Quilt

It’s all quilted now and ready for binding. Next week I will show how I quilted the pink and green girl version using more advanced free-motion quilting techniques. You can use either option on your quilt, or combine them!

Finished Quilting

Here is the schedule of tutorial posts for my Baby Bricks do-it-yourself quilt along:

Christa’s Quilt Along 2.4 – Marking and Basting Baby Bricks

I finished the pretty pink version of Baby Bricks this week to go along with the baby blue top that I will be basting today.Β  (Kits are available for both colors for a limited time.)

Before I get to the most fun part of making a quilt in my opinion – the machine quilting – I’ve got to get them marked and basted! Today’s demo will be shown on the blue version.

Girl Baby Bricks

Step 1 – Marking Diagonal Lines

For the boy version of Baby Bricks I am going to quilt straight lines with a walking foot.Β  I used a water soluble blue marking pen to draw the quiltingΒ  lines. (If you are afraid of fabric bleeding or do not want to mark your quilt, you can use low-adhesive painter’s tape instead.)

Straight Lines

Using my longest ruler, I marked straight lines across the surface of the quilt. I started in one corner and drew a line from corner to corner of a rectangle brick. I extended the line so that it goes across the entire quilt including the borders. I spaced them 3 1/2 inches apart.

Additional Marked Lines

I added an additional line half-way in between so that the spacing of the lines is now 1 3/4″.Β  It took a total of 45 minutes to completely mark the top. Now the quilt is ready to baste.

Step 2 – Piecing the Backing

I enjoy pieced backs much more than plain ones. This satisfies my urge to go a little “wonky” with some improvisational piecing on the back. It took about 1/2 hour to sew together.

Pieced Backing

I put the back together sort of like a puzzle, adding chunks of fabric until I had a large enough piece. For this quilt I used up my the rest of my light blue solid, a few leftover bricks, and some pieces from my stash. It took about 2 yards total.

For more detail on sewing a pieced back, refer to my previous tutorial here.

Step 3 – Basting With Pinmoors

My preferred basting tools are Pinmoors and straight pins. It took about 1 hour and 100 Pinmoors to baste this baby sized quilt. You can read my previous basting tutorial here.

Basted with Pinmoors

I get better results when I use lots of pins and am careful not to pin through any quilting lines. It’s easier to stick the pin in the quilt and cap it with a Pinmoor, than it is to open and close lots ofΒ  safety pins. The Pinmoors are easy take out while quilting, but they stay in place until I’m ready to remove them.

I am going to take this quilt with me to my guild’s quilting retreat this weekend. With any luck, I’ll get it finished quickly and can start on the pink one.

Here is the schedule of tutorial posts for my Baby Bricks do-it-yourself quilt along:

Christa’s Quilt Along 2.3 – Sewing Your Baby Bricks Together

This week we will sew together the complete Baby Bricks quilt top. Kits are available if you would like to quilt-along, or scroll down to the end for a link to the supply list.

I am making two quilts at the same time so it’s double the fun! I finished the boy version just before we left on our vacation and it literally took me 2 hours to sew the whole top. We were just in time to catch our flight! (I’ll finish the girl version when I get back!)

Baby Bricks Quilt Top

Step 1 – Sewing the Rows

The quilt consists of 7 rows of bricks with alternating 1/2 bricks at either end. There are solid strips in between each of the rows. Watch your fabric placement if you are using directional fabrics. I used cotton thread, size 50 and a new needle, size 80/12 for piecing.

It’s easiest to sew together 14 pairs of two bricks first. I grabbed them at random.

Brick PairsNext, double up your pairs so that you have 7 rows of 4 bricks each.

Sets of 4 BricksAdd 1 full brick and 1/2 brick to the top and bottom of each row, alternating placement. (The half bricks are slightly longer than 1/2 of a brick to account for seam allowances.)

Finished RowsEach row has a total of 6 pieces.

Step 2 – Adding the Background Strips

Measure the length of your rows. Mathematically they should measure 44 1/2″ at this point.
Fold a row in half to make it easier to measure. The half-measurement is 22 1/4.”

Measure Each RowTrim up 8 of your background strips to this measurement. Pin one strip to the right side of each row and sew. The first row will have a strip on the left side, too. Because the strips were cut parallel to the selvedge, they will have less give and there is less chance for distortion.

Pin the Background StripsAfter the background strips are sewn on, sew the top into wider rows, joining 2 at a time. This time, sew with the bricks on the top side and the background strips underneath. This will help ease any distortion that occurs when sewing long strips together. Again, pin well.

Bricks and BackgroundOnce all the rows are joined, measure across the width of your quilt.Β  Finished Quilt Top

Mathematically it should be around 44 1/2″ wide (the same as the length of each row).

Trim your last two background strips this length and join to the top and bottom.

Give it a nice press and your top is done! This quilt will be a nice canvas for some fun geometric machine quilting. I can’t wait to get to that step in 2 weeks.

Be sure to email me pictures of your progress and any questions you have!

The full tutorial schedule is shown below, with links to each completed step as I finish:

Christa’s Quilt Along 2.2 – Cutting the Baby Bricks

I’m so excited to start on a new quilt! Perhaps the best thing I love about creating these tutorials is that it forces me to quilt. I work well with deadlines. πŸ™‚ It was also very fun to put together quilt kits for this project and even more gratifying that they are selling!

This week we will cut out all of the pieces for our Baby Bricks Quilt. Scroll to the end of this post for the complete schedule. For those of you needing a quick refresher on rotary cutting, Alyssa from Pile O’Fabric has an excellent rotary cutting tutorial on her blog.

Before you begin, make sure to read the instructions thoroughly and heed this advice: measure twice, cut once! You need 17″ x 18″ of useable fabric from each fat quarter.

Step 1 – Cutting the Bricks

Start with a sharp rotary cutting blade, and stack 5 of your 6 fat quarters together.

Stack of Fat Quarters

Cut each fat quarter into two 8 1/2″ x 21″ strips. Then subcut them into 4 1/2″ x 8 1/2″ bricks. With careful cutting, you can get 8 bricks per block. Repeat for a total of 40 bricks.

Two 8.5 Inch Strips

8 Bricks Per Fat Quarter

For this quilt, You only need 35 bricks, so 5 of them will be extra.

You can use the leftovers either on the back of the quilt, or use them to make a quilt label, or small throw pillow. Or swap some of them out with your 1/2 bricks shown below for variety.

Step 2 – Cutting the “Half”-Bricks

With your remaining fat quarter, cut out three 4 1/2″ strips. It doesn’t matter which direction this fat quarter is going because you will subcut them into squares.

Cut 3 Strips for Half Bricks

Cut the 3 strips into nine 4 1/2″ squares. These squares are actually a little longer than half of one brick so cut carefully! You only need 7 “half”-bricks, so 2 of these will be extra.

Cut Nine 4.5 Inch Squares

Step 3 – Cutting the Background and Binding Strips

Fold your background fabric “the long way” as I call it, parallel to the selvedge. Fold the fabric into 4 layers and use a longer acrylic ruler for cutting.

Fold Parallel to Selvedge

Trim the selvedge and cut ten strips that measure 2 1/2″ wide by the length of the fabric (about 54 inches).Β  These are for your background strips and your borders.

Cut 10 long strips by 2.5 Inches

Cut 4 moreΒ  strips 2 1/4″ x 54″. These will be your binding strips. Set them aside for now.

Cut 4 Binding Strips 2.25 Inches

That’s it for this week! Wasn’t that easy? It was so easy that I am actually making two quilts at the same time. You can see both my boy version and girl version below.

Boy BricksGirl Bricks

If you have any questions about this tutorial you can post them here on the blog. If you want to share pictures of your quilts in progress from any of my tutorials, just email me at Christa@ChristaQuilts.com. I’ll share pictures and answers next Friday.

Here is the complete tutorial schedule. Each link will be active once I’ve finished that step: