Today I get to share the big reveal: Herringbone is finished!
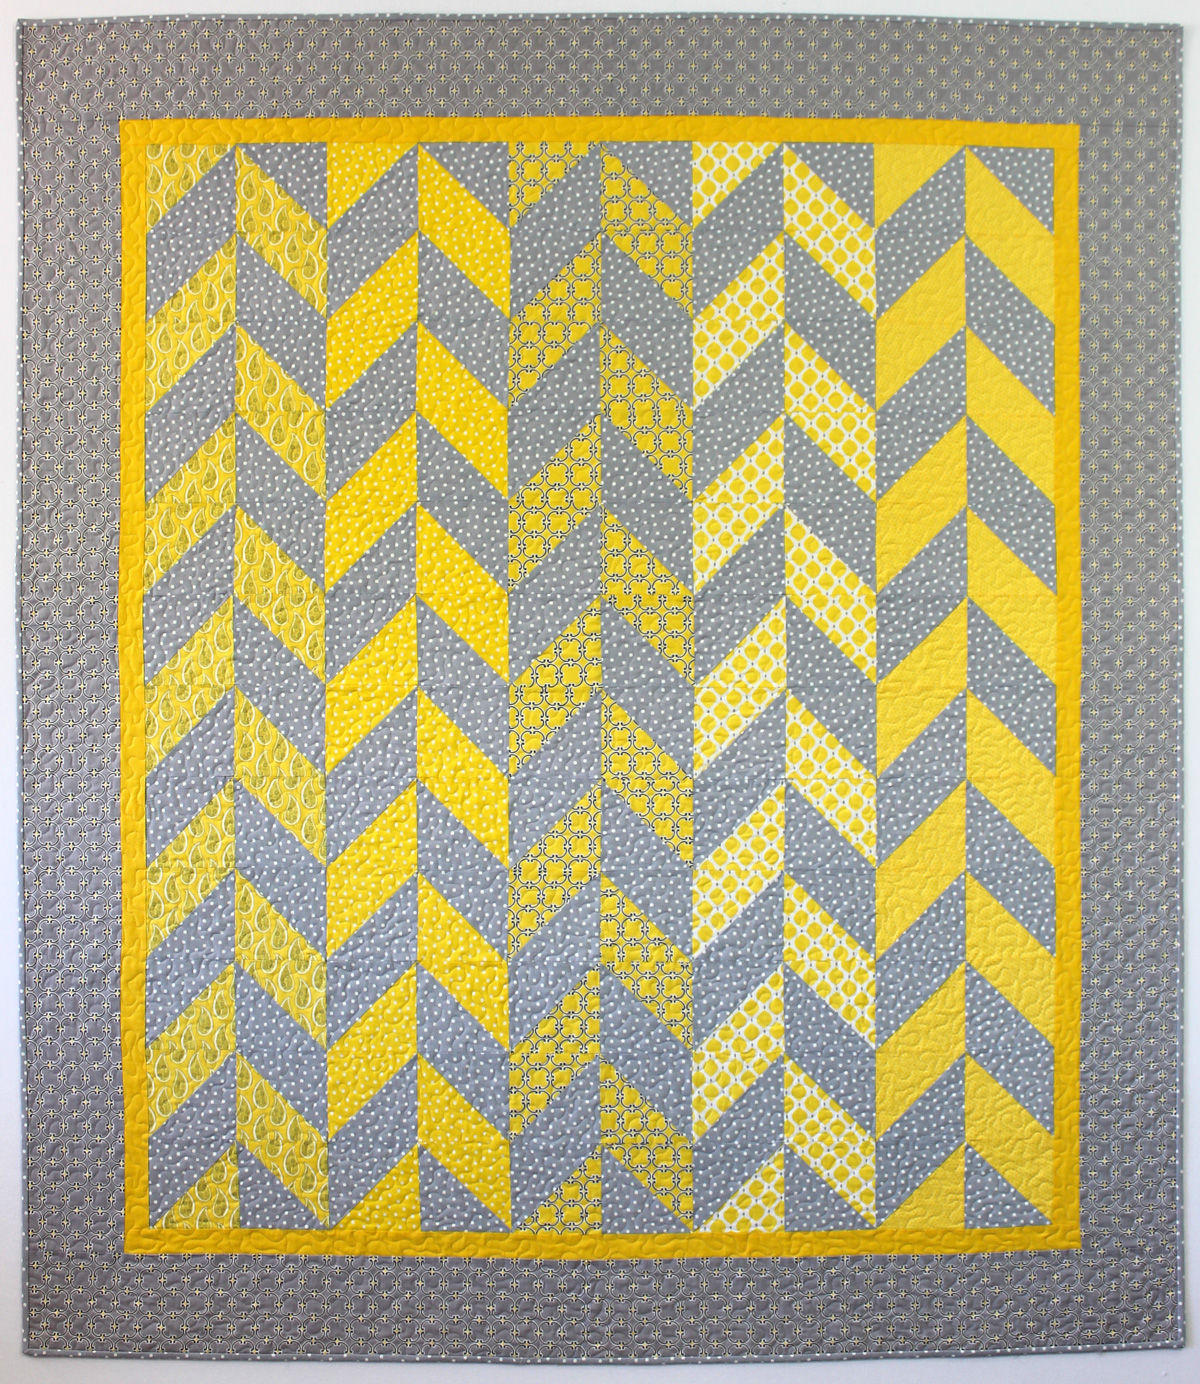 Herringbone, 63″ x 73″ designed and made by Christa Watson for Camelot Fabrics
You can click the links below to read my WIP process posts as I worked on this quilt:
Herringbone took a total of 25 hours to complete (13 hours to cut, sew and press the top; 12 hours to baste, quilt and bind by hand.)
I wanted to share a few tips for better binding that I practiced while finishing this quilt:
 When attaching the binding, I marked my stopping point with a water soluble pen so that I know exactly where to stop stitching at the corners. Whenever I “fudge” this part of the process, it always gives me problems.
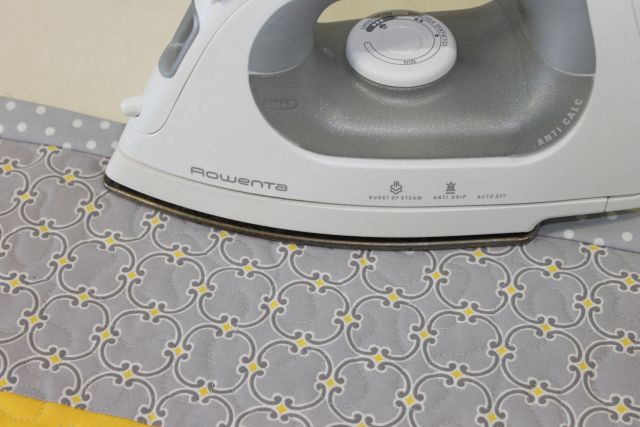 After the binding is attached by machine, I will iron it away from the quilt so that it’s easier to pull over to the back for hand sewing. (By the way, this is another reason I prefer to quilt with cotton thread and natural fiber batting, so I don’t have to worry about melting anything with the iron!)
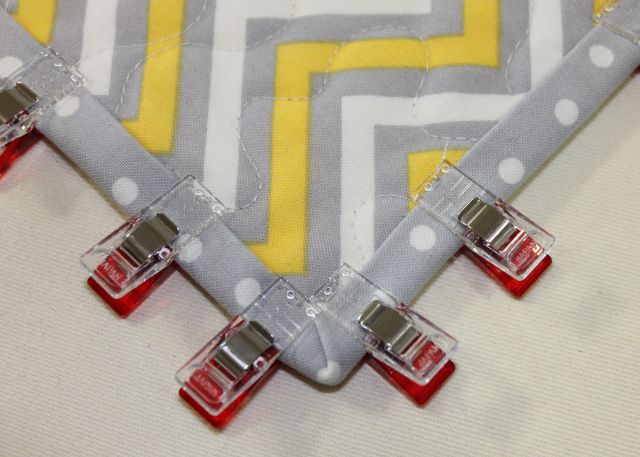 When I get to the corners, I fold them so that they match up evenly and use Clover Wonder Clips to secure the binding in place. I fold over the corners opposite from how they are folded on the front to reduce bulk. I also prefer to add clips so that the clear side of the clip is showing on the back. It seems less bumpy that way.
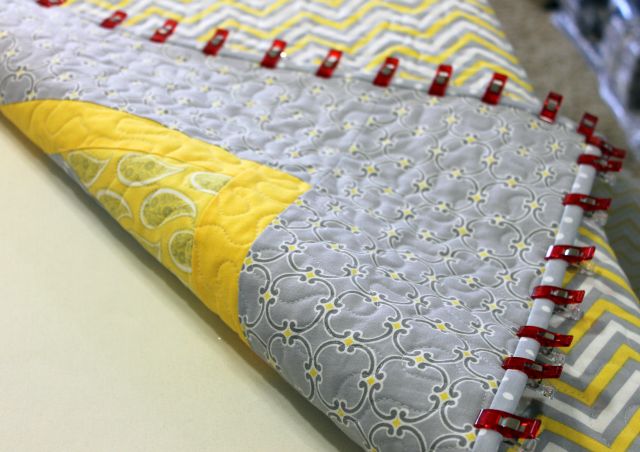 I use a liberal amount of clips and space them pretty close together. So far, I’ve invested in two 100 clip packs and am ready to order another set. I prefer to clip all the way around the perimeter of my quilt so that I can sew continuously without having to adjust the clips!
For more step by step pictures, click here for my indepth tutorial on binding by hand.
Herringbone is on it’s way to the Camelot Fabrics quilt booth at Spring Market. I won’t be there, so if any of you go – be sure to snap a picture of it for me, will you?

Thanks for your tip about pressing the binding away from the quilt. I have never done this but will next time. Lovely quilt, the grey & yellow look so pretty together.
Beautiful quilt Christa! I’d love to feature you this week for iquilt. Can you please let me know if you’re ok with me using three photos from your blog? Thank you xx
Sure – just grab whatever you need. Thanks! By the way it was fun to hear you on mark lipinskis show 🙂
On Wednesday, May 14, 2014, Christa Quilts! wrote:
>
Love the border fabric and I never thought to press my binding away like this to make it easier to pull down. Duh. Brilliant. I’m so gonna do this from now on. Thank you!!!
Thanks for the marking tip. I need to use that one from now on.
What a gorgeous finish! And a great pic! Thanks for sharing all your wonderfully helpful tips. I use the same method for binding except I finish by machine. Your quilt is sure to be a hit at market.
Another great quilt Christa! Thanks for sharing it and it’s journey with all of us. Seriously, those Clover Clips are the best quilting invention since the Rotary Cutter in my opinion. I bought a whole bunch more too, because like you…I hated having to re-adjust them when I was in the groove.
Love how this turned out!! Those colors together are really great! 🙂 Thanks for the great binding tips! I have started using those clips–and I really like them! 🙂
Wonderful finish! I love the combo of the yellow and gray.
Love this quilt! Great colors.
What a cheery quilt! All sunshiny and happy!
Beautifully done and the pattern/color combo are perfection!!!!!! Lovely as always!!!!!!!
I”m really loving this color combination right now. And Clover clips just rock for so many different reasons.
Good tips! Thank you for sharing them:-)
Another gorgeous quilt! Love the yellow with grey……….Thanks for the tip on pressing the binding …….I like to use a lot of binding clips too……
I really love this one. You do such fabulous work.
I don’t normally machine stitch my binding, but with these handy tips, I might be tempted! Especially pressing the binding before sewing… why did I never think of that? I think I’ll need some more Wonderclips though! 🙂
Fabuloso! That’s a great looking quilt and the yellow herringbone are nice and crisp against the neutral gray. Good tips on the quilting and clips, too. I mark my “turn” with a pin–as you are so right that it’s good to be accurate on that point. (You must have used some terrible thread before, as none of the polyesters I use have ever melted, and I am always pressing the binding with my iron as well. I use a good quality poly or cotton thread and generally I use a poly batt too, and have no problem either.)
This quilt should look great hanging in Camelot’s booth–woohoo!!
Elizabeth
Beautiful job, Christa!!
Your design is just perfect for those fabrics Christa!
Just wonderful colors and fabric in this quilt. I like the wonder clips as well but only had a small package of them for my first few hand stitched binding I’m waiting on an Amazon delivery today that includes the 100 pack and I’m excited to be clipping as liberally as you have here!!
It is beautiful 😉 I will be sure to get a pic for you 🙂
I love the stitch-in-the-ditch binding method, but I only have 50 clips, so I do one side at a time and I put them farther apart…and mine doesn’t look as good as yours 🙂 I’ll try this next time. Love the quilt btw, fresh and fun. I’m totally on the grey bandwagon at this point!
The quilt is stunning!!
I dont pre-mark the binding at the corner where I need to stop, what I do is lay a ruler on the quilt itself and insert a pin ONLY into the quilt top where I have to stop. This way if my pinning was off even a smidge it wont throw me off. I also realized with my last project to take care to fold opposite to reduce the bulk.
Love this quilt, pattern and fabric are fabulous! You give us such wonderful, concise instructions, thank you for making us better quilters!!
Awesome Quilt Christa!!! This is something I’m gonna try in the near future. At the moment I have at least 4 Quilt tops that need put together. Thank you for sharing your tips. Your clips sound like a good idea. I use pins to hold my binding together for hand stitching. Down fall is, I sometimes stick myself. Ouch!!
It is beautiful Christa. Thanks for sharing with us.
Hi-I do many of the same things when binding. I have also lately drawn the line with the marker, so no more guessing. At first I use to make it wider so the foot didn’t get in the way. Now I make it shorter like you. Love the quilt and will soon try it. Have a good day
Also watched your tutorial. This is exactly how I bind except I cut the little triangle out of the corner before I press (Fons and Porter Tip). It makes the corners lie even flatter with a perfect miter.
I am loving this pattern. The colors are awesome. Thanks for a few of the scraps.
I too am making your quilt! I worked on it at our quilt retreat last week and my quilting friends loved it. I am finished with the rows and hoping to get the top together this week. I am in love with this quilt! Thanks for the pattern.
Love your Herringbone quilt!! The polka dot binding is perfect and I appreciate the tips! I’ll be using your tips on my next quilt – my daughter’s wedding quilt!