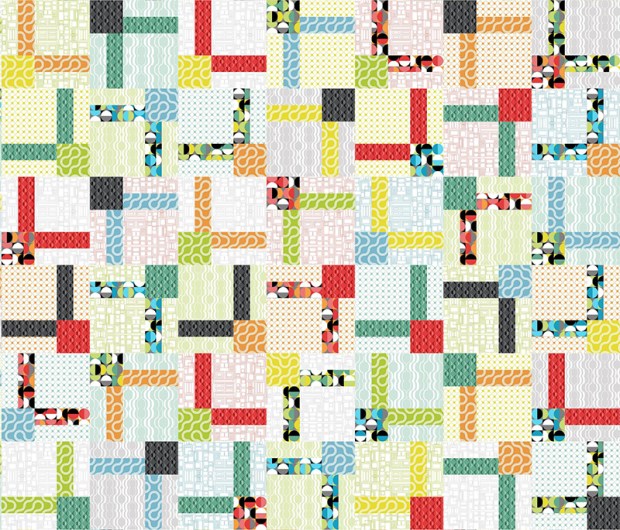
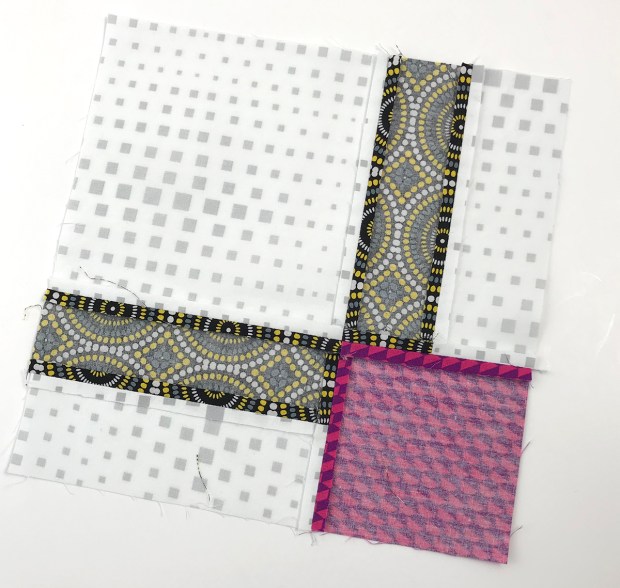
It’s Bling quilt along time – whoo hoo!! This quilt is so fun and fast to make you’ll want to sew more than 1! We will move through this quilt along quickly – but just remember, these posts will stay up indefinitely, so you can refer back to them anytime.

Bling on display in my Geo Pop quilt market booth a few seasons ago.
- Click here to get the Bling quilt pattern.
- Click here to get the optional Bling quilt kit in black or white.
Whether you want to follow along and make this quilt IRL (in real life) or just virtually in your head, I’m excited to share tips and tricks over the next 5 weeks that will help you make better quilts, no matter which quilt pattern you are sewing. So let’s get started!!!
Bling Cutting Options

Above is all of the cut units for Bling made from Geo Pop with Tiny Hex black background.
Start by cutting your fat quarters into subunits as listed in the Bling quilt pattern on page 2. I’m making the twin size, but follow along by cutting the number of units as indicate for your size (lap, twin, queen).
Below is all of the cut units for Bling made from Geo Pop with Op Squares white background.

You can use all of the same background fabric as shown in my pictures above, or you can go scrappy if you wish (see other color ideas here). Just remember to cut out the correct number of total pieces as listed in the pattern for your size.

For example, if you want a scrappy background version shown above, you can cut out each block background from a different low volume print. In my example, I used half yard bundles of Good Vibes in low volume and saturated prints to get this look, but you could use up lots of scraps this way, too.
Be sure to pair up the “legs” of your block units if you want them to match (but they certainly don’t have to). You can even mix up the backgrounds within each block to go “super” scrappy, too. Just remember – the choice is up to you because you are the boss of your quilt!
Thread Options
I prefer to sew with a shorter stitch length (2.0 instead of 2.5) and press ALL seams open so my blocks lie nice and flat. Sewing with a shorter stitch also prevents the seams from splitting open, and it makes it harder to see the thread in between the seams.

I used up lots of leftover thread in making these quilts. I prefer to piece and quilt with Aurifil 50 weight cotton, and I used up lots of leftover bobbins since this was such a colorful quilt!
I used lighter colored piecing threads for the version with the white background, and darker threads for the version with the black background. 
Whenever I’m making a scrappy, colorful quilt, I’l try to use up as many spools as possible that just have a little bit of thread left on them. Who says you have to use the same exact color of thread throughout? I love finishing up a spool of thread – don’t you??
Block Sewing Options
Follow the pattern instructions on pages 2-3 to create the basic Bling block below. I recommend sewing one block first, to make sure it turns out correctly, then chain piecing a whole bunch of units at once for speed and efficiency.

The fun part about making this block is mixing up the different fabric combinations. There’s no right or wrong way to pair them up. Just go for it and don’t over think it!!
Below is the back side of one of my blocks with those nice flat seams. This will make quilting sooooooo much easier, because the quilt top will be smooth and flat in the end.

If you’d like to be a bit adventurous, here are a couple of bonus ideas on how you can sew your block units:
In the option below, I’ve rotated the position of the rectangle units.

Here’s what the blocks above will look like (in the white version) if you repeat this option throughout the entire quilt. The math and number of blocks is all the same, but what a huge variation one small change will create!!

Here’s another option to try: go super scrappy by using 3 prints in each block, rather than 2. Again, there’s not much thinking involved in this change.
Sew all of the rectangle units first (see the Bling pattern, page 2) and then decide if you want to make coordinating or super scrappy blocks. Or maybe a mix of both!

You can also try the other extreme: using all of the same print for the main part of the block!
Isn’t it fun to have choices????

Whichever way you choose to sew your blocks – they will look fabulous!
Homework: Sew all of the Bling Blocks
Quilty “homework” is the best kind of homework!! Now that you have several options to try, work on sewing all of your Bling blocks this week. Don’t worry if you fall behind – just work on a few blocks a day, and you’ll have them done in no time!

Remember, I’m here to help and cheer you on – even after the quilt along is over. Check out the resources below to help enhance your quilt along experience:
Additional Resources
- Click here to ask questions, and share your progress in my ChristaQuilts group on Facebook
- Click here for the Bling quilt along supply list and schedule
- Click here to get the Bling quilt pattern – PDF download version
- Click here to get the Bling quilt pattern – printed paper version
- Click here to purchase fabrics to make this quilt
Thank you so much for the visual how to. Like a former co-worker use to say. She was from Missouri the “”show me”” state. I have been that way most of my adult life. Denise
Sent from Outlook
________________________________