MQWS Blog Hop Day 5 – Ripples

Are you enjoying the roundup of quilts from my new book? I’ve shared 5 so far, with 7 more to go! Be sure to order your signed copy of Machine Quilting With Style and I’ll pop it in the mail right away. I can’t wait to see how you make these designs your own. 🙂

Ripples – The Background Story

ripples
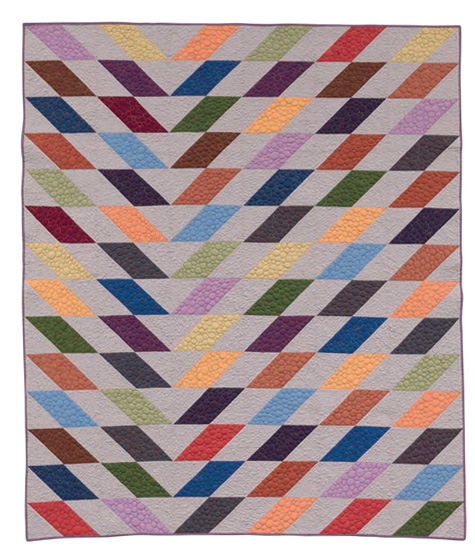
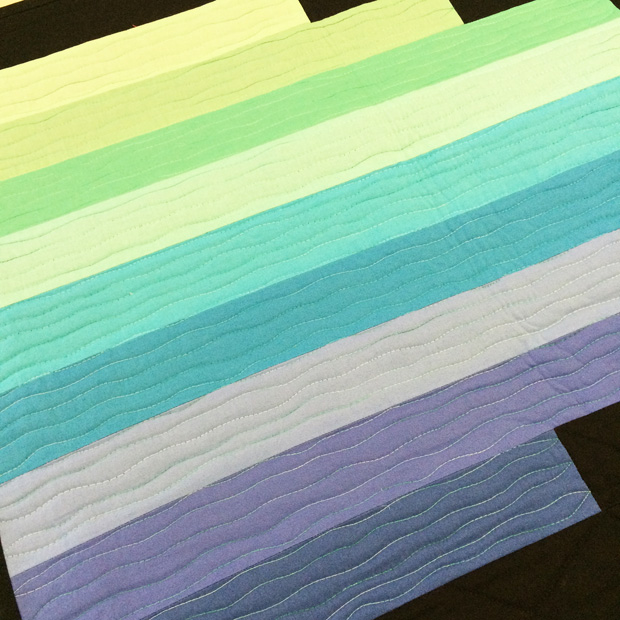
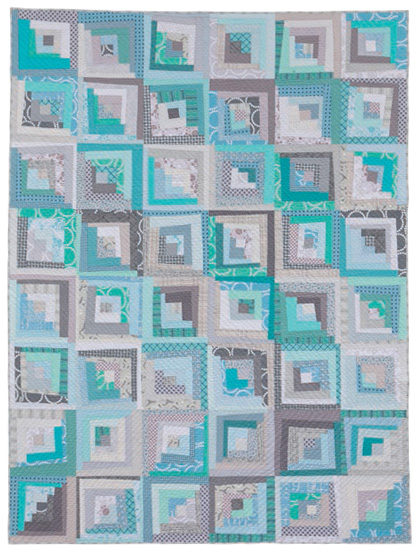
Ripples 66″ x 88″ by Christa Watson. Photography by Brent Kane.

Who doesn’t love a good Log Cabin design? When it comes to choosing fabrics for a quilt, my philosophy is “more is more.” I mean – why use just one or two fabrics when 20 will do? I had fun picking out tons of aqua and grey fabrics from my stash, and I think this quilt would look stunning in any color combination.

cutting_strips
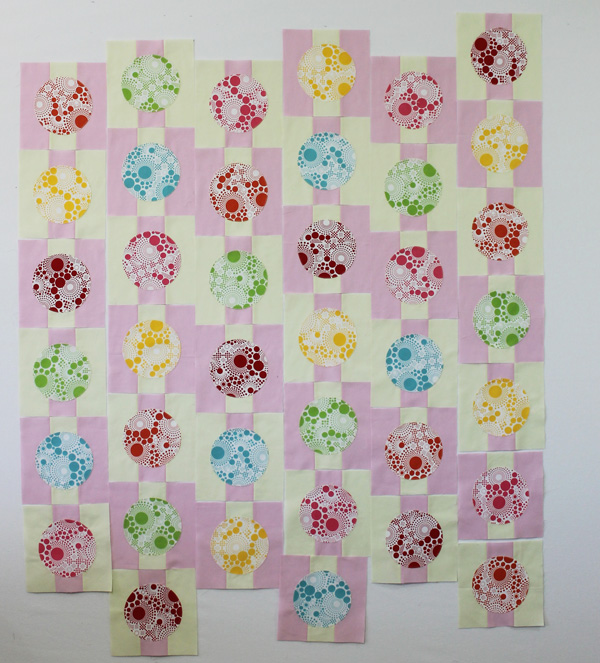
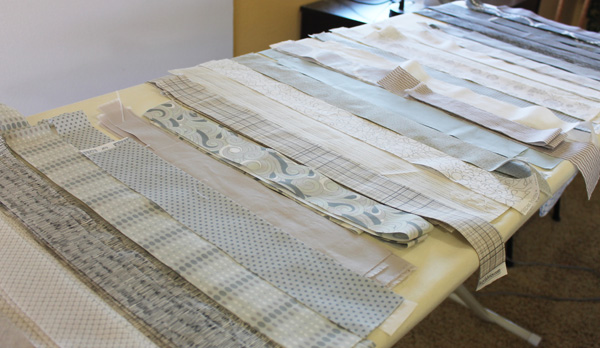
It was so much to choose fabrics and cut strips for this quilt!

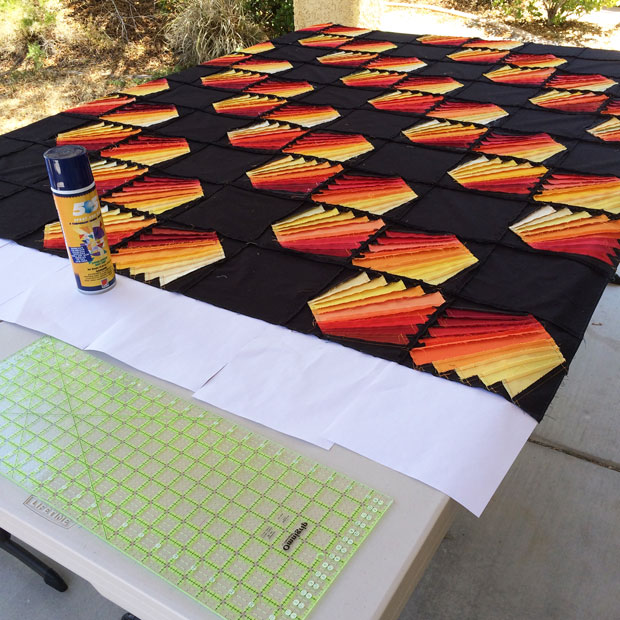
Although the structure of the quilt is easily recognizable as a Log Cabin variation, I used a technique I call “Structured Improv” on several quilts in the book. The basic idea is to liberate the piecing by using irregular shapes and fabric widths while constructing the blocks. I sew my blocks slightly oversized, then trim them down, making sure they all fit together in the end.

If you look closely at the wonky log cabin blocks, you will notice that the strip widths vary, and there aren’t always an even number of strips on either side of the block. Also, I didn’t strictly use all lights on one side and darks on the other like you would for a traditional log cabin quilt. This makes the whole design pop, and making these blocks was SO. MUCH. FUN!

quilting_textureI love adding lines of quilting texture with a decorative stitch. It was very a meditative process.

I quilted Ripples completely using the  IDF (integrated dual feed)on my BERNINA with a decorative stitch. This is liking having a walking foot built into the machine! Of the 12 quilts in the book, 5 use walking foot quilting exclusively, 4 have extensive free-motion quilting, and the other three combine both techniques in the same quilt. As people buy the book and start sharing their versions with me, it will be so fun to see how the machine quilting designs are used in different ways!

A Bit More

piecing_backing
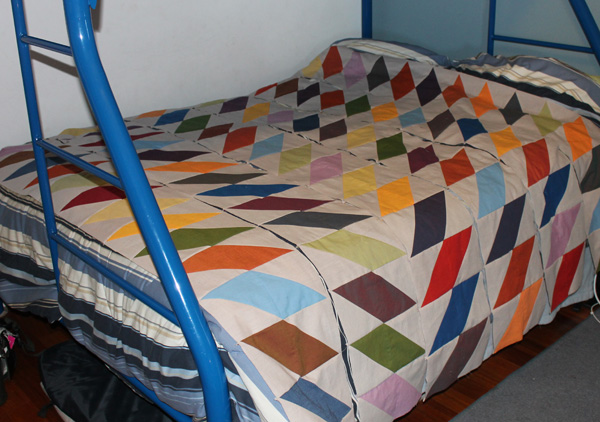
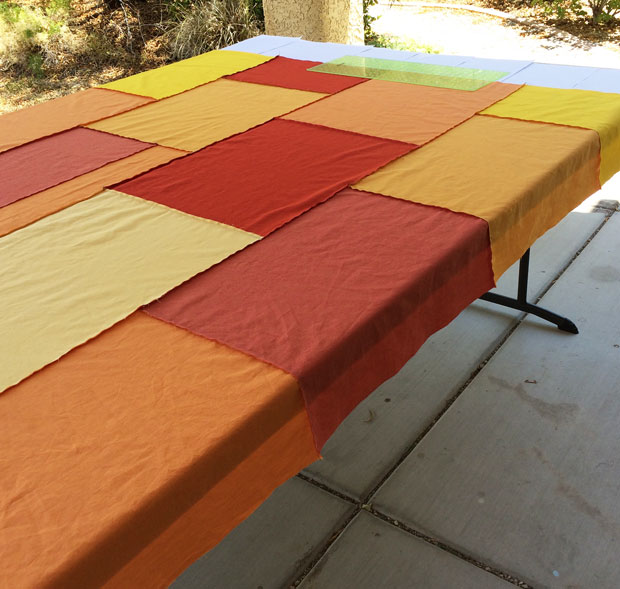
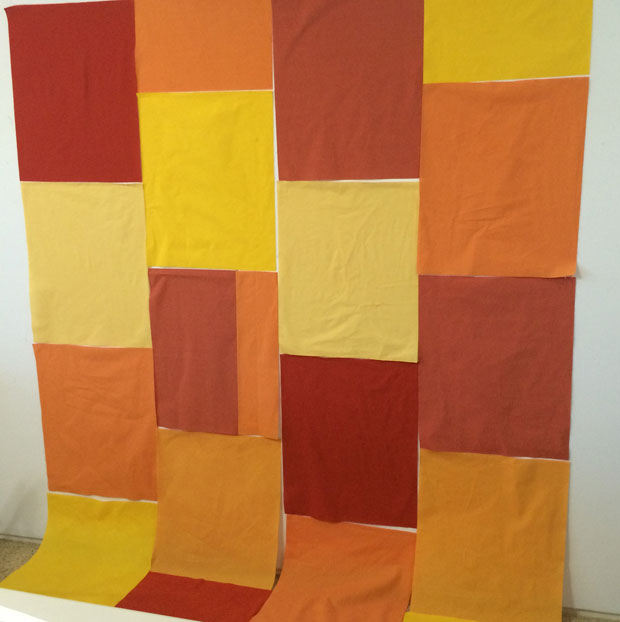
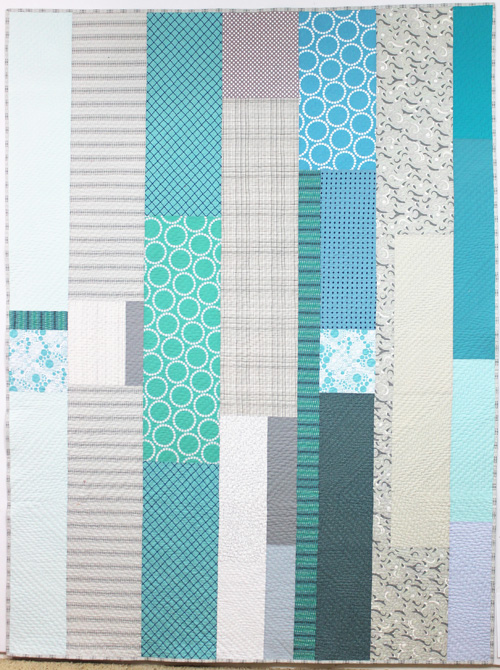
The pieced backing of Ripples – you could make this as scrappy improv front!

I was thrilled when the publisher agreed to included the pieced backing for Ripples as a bonus project in the book! I literally took all of my extra fabric chunks that I pulled for the quilt and used them up on the back. I love back art – don’t you?

Elements That Make This Quilt Modern: Low volume fabrics, on-trend color scheme, improvisational piecing, skewed block assembly, asymmetrical design, transparency, inspired by tradition.

Time to Complete: 47 hours from start to finish including the pieced backing. (It’s big!)

Quilting Inspiration from Melissa Corry

happy-quilting-blog-header
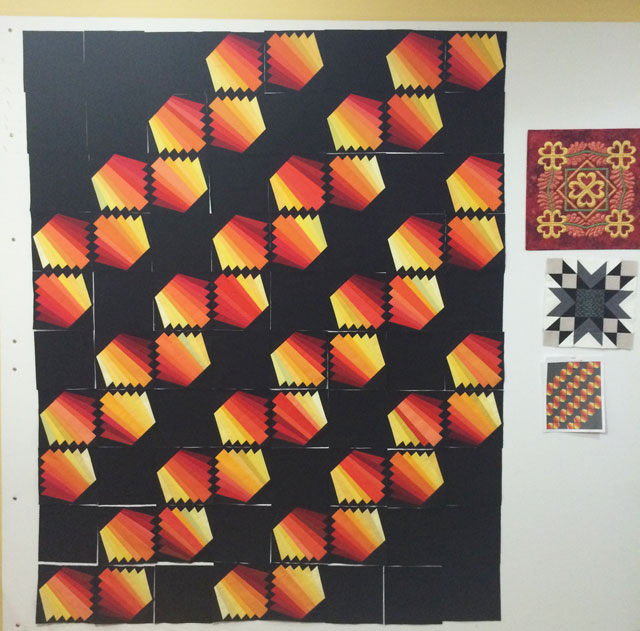
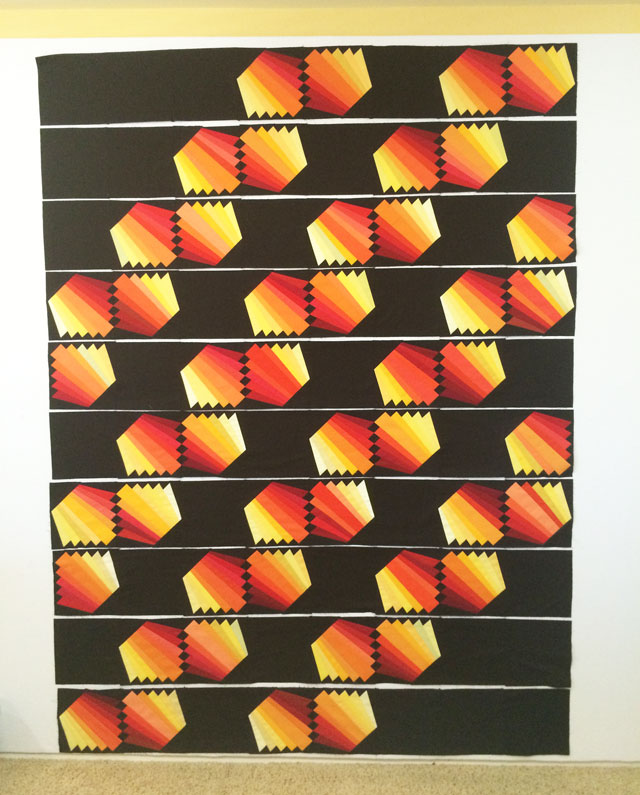
My dear friend Melissa from Happy Quilting is one of those prolific quilters that can bust out a quilt in no time. Can you believe that she made 52 quilts last year? And she loves the quilting part as much as I do – which gives her extra credit in my book. 🙂  She’s pretty great at keeping secrets, too. I didn’t get a chance to see the final reveal until today and it is so good I can hardly stand it. The color combo is fabulous and the arrangement she and her MIL chose is just divine! Be sure to pop on over to Melissa’s blog for some more quilty goodness!

Melissa is a fellow Martingale author who released her first book, Irish Chain Quilts, earlier this year. I had the pleasure of being on Melissa’s blog hop this past summer, and I’m so glad she returned the favor!

More from the Art of Home and Blue Nickel Studios

JStevesLogo150dpi

The very talented Jacquelynne Steves from The Art of Home crafts a beautiful e-magazine 4 times per year, once each season. She recently interviewed me for her next issue which will be published in October. And the best part? It’s completely free! Click here to sign up so you don’t miss a thing! Then hop on over to Jacquelynne’s blog for her stop on the tour. She wrote a very kind book review. 🙂

Jacquelynne is also hosting a sew-along day coming up pretty soon and I’m throwing in a prize for that. So be sure to check it out! Then for some bonus content be sure to check out her roundup of holiday sewing tutorials. 🙂

Scott Hansen from Blue Nickel Studios is not only a talented quilter, he’s a great writer as well. He writes the “I am Gen Q” profiles for the magazine of the same name and recently chose to interview me for the next issue. (You’ll hear more from Gen Q later in the hop.)

I thought it was amazing how he could turn my dry answers into an interesting and witty read! For Scott’s stop on the hop he decided to try out one of the free motion quilting designs from the book and I think he did a fantastic job.

Pop on over to Scott’s blog to check it out – and he has a fun little giveaway, too!

Click here for the complete blog hop schedule.

Click here purchase your autographed copy of Machine Quilting With Style.

MQWS Blog Hop Day 4 – Candy Pop

As you check out each of the quilts from Machine Quilting With Style, don’t forget to vote for your favorite quilt. The “winner” at the end of the hop will be the quilt I will feature in an upcoming quilt along in January, so stay tuned!

Candy Pop – The Background Story

Candy_PopCandy Pop 45″ x 45″ by  Christa Watson. Photography by Brent Kane.

Candy Pop explores my love affair with easy machine applique. Next to machine quilting, I would have to say it’s my next favorite technique. The reason I don’t do it more, though, is because I can’t draw very well to create the images I want to stitch. However, with the emphasis on bold geometric shapes in the modern movement, I may just have a few more ideas up my sleeve….

candypop_wipIn the book, I explain how to applique the blocks and trim down the edges for a perfect fit!

I am just in love with the Riley Blake Pop dots I used to create the circles. They remind me of candy treats like button dots or lollipops. Instead of laying out the blocks in a standard grid format, I chose to offset them to add a little interest to the design. Don’t you love the blocky diagonals that form in the background? I do, too!

candypop_blockYou can center the dots like I did, or you can make them wonky for a more spirited, whimsical look! In the book I show you how to prevent shadowing of background fabric through the circles.

I’ve told each of my children they get to choose a quilt from the book to keep, once they are done with publicity. My daughter chose this one and she can’t wait to get it!

A Bit More

I love creating pieced backs whenever I can, so I decided to make a few extra blocks and piece them into the backing. Now that I’m gaining confidence in my quilting skills, I love to put solids on the back so you can really see the machine quilting pop. There wasn’t room to include this picture in the book, but you can easily replicate this idea from your leftovers. I machine bound the quilt with leftover fabrics using a decorative stitch, and instructions on how to do that are included.

candypop_backingI love including fun details in my quilts, like pieced backings and bindings. Machine quilting motifs you can practice on this quilt are loops and spirals. It’s a continuous design which goes fast!

Modern Elements – Asymmetrical grid formation, bold colors, use of solids, irregular machine quilting, secondary composition, geometric fabric prints, repetitive use of large simple shapes.

Time for me to Complete – 22 hours from start to finish.

Quilting Inspiration from Linda

FlourishingPalmsHeader2013

Linda Hungerford (from Flourishing Palms) and I met online and immediately bonded over #domesticmachinequilting. (Search that hashtag on instagram and you’ll see what I mean!) Linda is an author herself and an excellent quilting instructor. Once you see it, her quilting will really knock your socks off! She shared sneak peaks while she was making the quilt, and I think she went above and beyond the call of duty!

Be sure to pop on over to Linda’s blog to see her amazing rendition of Candy Pop, and enter to win her giveaway. I love how she made it her own with her choice of rainbow colors, and slightly different applique method. I’m also honored that she has chosen to teach this pattern as an upcoming class, and I can’t wait to see her students’ finishes.

Visit Electric Quilt and Quilt Shop Gal For More Prizes

Hopefully you all know what a huge fan I am of Electric Quilt. I am a current EQ artist, and I designed 11 out of 12 of the quilts from the book using EQ7. (My husband Jason designed one of them on his iPad, but more on that later…) The EQ folks have been great partners and I can’t wait to meet many of them in person when I teach at EQ Academy next spring.

EQ7You can win this!!

My friends at EQ are offering a huge prize for the hop! Head on over to the EQ blog and enter for you chance to win copy of EQ7 for windows of Mac. You’ll also be able to see some of my EQ sketches, along-side the finished quilt. Then get started designing your own fabulous quilts!

quiltshopgal

Darlene from Quilt Shop Gal is super supportive of the quilting industry as a business, and especially of machine quilters. She’s offered fun challenges and inspiration over on her blog and I feel like we are great friends, even though we’ve never met in person. Head on over to Quilt Shop Gal for a nice review of the book, along with your chance to win a free -copy!

Click here for the complete blog hop schedule.

Click here purchase your autographed copy of Machine Quilting With Style.

MQWS Blog Hop Day 3 – Broken V

It’s day 3 of my Machine Quilting With Style blog hop. Are you having fun yet? I know I am! I knew it was a big favor to ask my friends to each remake an entire quilt from the book in their own way, but seeing their “big reveals” each day is such a thrill!

Broken V – The Background Story

BrokenVBroken V 60″ x 70″ by Christa Watson. Photography by Brent Kane

I can’t get over my love affair with half-square triangle blocks, lovingly known as HST’s. There’s something really calm and meditative about sewing colorful squares together, cutting them into triangles, and then assembling them into another shape as part of a larger design.

brokenv_designbedI pieced the quilt top while on vacation – a bed makes a great design wall in a pinch!

I chose to go with all solids, using this quilt as a canvas on which to add dense machine quilting texture. I love listening to quilting podcasts and audio books while I sew, and this quilt gave me hours of pleasure to do just that while I stitched!

brokenv_sitdThe is what the quilt looked like after stitching in the ditch and washing. I used a wool batting for loft and decided to add more quilting. What a huge difference that makes!

broken_v_scrunchandsmooshMy “scrunch and smoosh” method of machine quilting in action!

I love simple quilt patterns that are easy to execute in any fabrics. The key to the success of this quilt is the high contrast between the pieced blocks and the background. Although I chose solids, a favorite collection of prints would look just as great in this design!

A Bit More

Although the techniques in my book are written for all styles of quilts and quilters, I enjoyed playing around with modern aesthetics as I designed each quilt.  Here are a couple of extra tidbits:

What Makes this Quilt Modern – simple shapes that create a graphic impact, the use of “unmodulated” solid areas of color, asymmetrical design, geometric quilting designs.

Time for me to complete – 38 hours from start to finish, including all that dense pebbling!

Color and Design Option from Sharon

colorgirl

I met Sharon McConnell from Color Girl Quilts while attending Sewtopia retreat last fall. We became fast friends while we chatted and sewed the whole weekend. Sharon is prolific pattern designer and she can put together the most amazing print combinations in her quilts. In fact, she chose to remake Broken V using a majority of prints with just a sprinkling of solids. It’s such an effective design choice, that at first glance, you may not even realize it’s the same quilt!

Be sure to pop on over to Sharon’s blog to see her version. Her machine quilting is pretty amazing, too! And while you are there, be sure to enter her giveaway.

More Machine Quilting Goodness from Leah and Amy

The thing I love best about the online quilting community is getting to know so many great people! Two gals that admire immensely for their machine quilting skills are Leah Day from The Free Motion Quilting Project and Amy Johnson from Amy’s Free-Motion Quilting Adventures.

leah_dayBe sure to visit Leah’s blog for a behind-the-scenes interview with me, plus tons of inspiring quilting content! She has created literally hundreds of free videos that will help you improve your free-motion quilting skills on your home sewing machine. While you are visiting, be sure to sign up for Leah’s Newsletter! You can also find products to support your hobby at LeahDay.com.

amysfmqI recently did a review of Amy’s Craftsy class on domestic machine quilting with rulers. I love it when people I know really push the boundaries of what can be done with quilting on a home sewing machine. Amy will soon be opening up a store to sell her favorite rulers, and I can’t wait!

Be sure to pop on over to Amy’s blog to see what she has to say about my book. While you are there, be sure to enter Amy’s giveaway for a chance to win one of two prizes – her Craftsy class, and a set of quilting rulers. How fun is that??

Click here for the complete blog hop schedule.

Click here purchase your autographed copy of Machine Quilting With Style.

MQWS Blog Hop Day 2 – Pearl Gray

Ready for some more inspiring quilts from Machine Quilting with Style? I have to say, I’ve been working on planning this blog hop from the moment I finished writing the book and am so excited to share more with you today. I don’t consider a quilt “finished” until it has been blogged about so these posts have been a long time coming!

Pearl Gray – The Background Story

Finals B1324.inddPearl Gray 66″ x 77″ by Christa Watson. Photography by Brent Kane.

First of all, I have to consistently remind myself to spell it Gray rather than Grey. I guess the former spelling is the American way and the latter is the European way. It must be my ancestral roots sneaking in there…

Pearl Gray was inspired by an earlier version of this design, my String of Pearls quilt pattern. As soon as I made the first quilt, I immediately knew I wanted to explore more ideas with this concept. Although I usually work in brights, I wanted to see if I could pull off more of a low-volume quilt and still create the contrast in the blocks. I also enjoy creating secondary designs in the background and I really like the checkerboard that emerges when using two different background colors.

pearl_gray_quiltingMy String of Pearls quilting motif is a modern free-motion alternative to straight line quilting!

Because the quilt has a lot going on, I thought an interesting allover quilting design would be the perfect complement to the piecing. I quilted a series of lines and circles which I named String of Pearls – giving homage to my earlier quilt design. As one idea always leads to another, the String of Pearls motif is the first in a series of modern linear designs that I am developing as a free-motion alternative to straight line quilting. So stay tuned for more on that subject in future classes and books! 🙂

My favorite memory of working on this quilt was finishing the binding while on vacation at the beach. There’s nothing better than a little sea-side quilting in my opinion!

Binding at the BeachI wish I could bind next to the beach for all of my quilts!

A Bit More

I was very detailed about each of the quilts in the book. In addition to listing the sizes and materials requirements, I also included design notes and which threads and battings I used for each quilt. Below, I’ve shared some bonus info for you guys that is not in the book:

Modern elements – Low volume fabrics, hard edges with strong contrast and clean lines, simplicity of form, repetitive use of basic geometric shapes, scrappy pieced binding.

Time for me to complete – 40 hours from start to finish.

Turning lemons into lemonade – I originally made this quilt for a magazine pattern, but at the last minute (and before it had been seen in public), it was pulled from publication. Yes, I was a little heart-broken at the time, but I was simultaneously working on my book proposal and needed just one more design with a finished project to submit. Wouldn’t you know – this was the final piece I needed, and now Pearl Gray graces the cover of my book. Don’t you just love it when fate works that way?

Color Option and Fabric Giveaway from Alyce

Blossom-Heart-Quilts-header

I’ve been online friends with Alyce Blyth from Blossom Heart Quilts for awhile now and was so excited when we recently got to meet in person at QuiltCon earlier this year. I just love how Alyce has interpreted her version of Pearl Gray. She combined three different quilting motifs from the book and it is so effective. Her binding is to die for, too! But rather than spoil the surprise here, you’ll need to head on over to her blog to see what she’s done.

Alyce is also hosting a giveaway on a separate blog post. She has a bundle of fabrics to share from the same line she used for her version of Pearl Gray. Click here for Alyce’s giveaway!

Bonus from Andover Fabrics

andover

I can’t give enough hugs to the folks over at Andover fabrics. Daryl (aka fabrichick) and Guiseppe (aka giucy_giuce) have been super supportive of my work. Head on over the Andover blog and to check out what they have to say. If you follow Andover on Instagram, there’s a special bonus there, too!

Although Pearl Gray would look gorgeous in any fabric line, I’m really itching to make another one using Lizzy House’s Mini Pearl Bracelets. Aren’t they the cutest?

mini_pearlsMini Pearls by Lizzy House for Andover fabrics, a smaller version of Pearl Bracelets.

Click here for the complete blog hop schedule.

Click here purchase your autographed copy of Machine Quilting With Style.

MQWS Blog Hop Day 1 – Color Crystals

Welcome to day one of the star-studded, international blog hop for my newly released book Machine Quilting With Style!  You know what they say – quilting is good therapy, so I invite you to enjoy all of the beautiful eye-candy that will be shared over the next two weeks. Who knows – by following along, you may just be inspired to improve your (quilty) life and make some friends along the way! 🙂

Color Crystals – The Background Story

Finals B1324.inddColory Crystals 54″ x 62″ by Christa Watson. Photography by Brent Kane.

I love using precuts, I adore solid fabrics, and I’m head over heels for modern aesthetics, so I wanted to design an original quilt that incorporated all three. The first spark of this idea came from the backing of a quilt I made a few years ago. I played around with the stair step design and scaled it down so that it could incorporate precut strips to their best advantage. For my quilt I chose the Kona Solids New Bright roll up along with a Kona Solids Black roll up and I think they pair together quilt nicely – don’t you?

colorcrystals_wipHere’s my work in progress – using my design wall to lay out the colors in a pleasing arrangement. Wouldn’t this be fun using a white background, too?

For the machine quilting I wanted to try out Aurifil variegated cottons and I really like the effect it gives. I chose to be a little more subtle with the background quilting, allowing the colored sections to really pop!

colorcrystals_quiltingUsing variegated thread allowed me to add texture without switching thread colors.

Bonus Design – Technicolor Backing

After designing the front of Color Crystals, I knew I would have lots of leftover precut strips. Instead of letting them languish in my scrap basket, I decided to use them up on the back to create a secondary design.

technicolor_backingThe pattern to make the Technicolor Backing is included in the book!

A Bit More

Even though this book is written for all quilters, I do tend to gravitate more towards modern design. I thought it would be fun to explain why I think this design fits the definition of a modern quilt!

What Makes This Quilt Modern – Color Crystals incorporates bold colors, with sharply defined boundaries between the minimalist design and the background negative space. The piecing uses simple shapes to create graphic visual impact with highly contrasting solid fabrics.

Time for me to Complete – 22 hours from start to finish, including the pieced backing.

Color Options and Quilting Ideas from Vicki and Ida

Two of my local BQF’s (best quilting friends) Vicki Ruebel and Ida Ewing each took on the challenge of making this quilt in their own unique way. You may just decide you like their versions better, and that’s totally okay!!

Orchid-Owl-QuiltsVicki recreated a stunning version of Color Crystals using her favorite Tula Pink prints, and her quilting is just to die for. She told me she couldn’t wait to quilt all of that negative space! Vicki quilts on a longarm and it’s been so fun watching her share her sneak peeks. In fact, her quilting is so good that her quilt was recently accepted into the Pacific International Quilt Festival.  I love having talented friends, no matter what type of machine they use!

Visit Vicki’s blog at Orchid Owl Quilts to see her amazing show-quilt!

ida_headerIda decided to make the backing into a stand-alone quilt using gorgeous ombre solids. She also machine quilts on her home machine just like I do, so pop on over to her blog at Ida Rather Be Quilting to see her work her magic. You’ll be glad you did!

Bonus Inspiration

confessions_ofa_fabric_addict

Sarah Craig  wrote a very kind book review over on her blog at Confessions of a Fabric Addict and I didn’t even bribe her to do it! In fact, she went above and beyond by remaking the front and back of Color Crystals and finishing it off with some gorgeous quilting. Be sure to pop on over to check out what she had to say, and see how she made it her own.

Bonus Prize!!

Today over on the Craftsy blog, I shared a little bit about the blog hop with Craftsy readers. Not only does it include general information about the hop, I included a couple extra goodies that you just may want to win! Click on over to check it out.

patsloanYes, that is Pat in front of my quilt. 🙂 This was taken at Quilt Market in the Martingale booth.

Finally, I have to give a huge shout out to my good friend and adopted mentor, the one and only Pat Sloan! She’s interviewing me today on her podcast at American Patchwork and Quilting along with Gudrun Erla and Jessica Alexandrakis. It should be a fun show! Be sure to listen in live, at 1 PM Pacific Time or download the podcast later from Itunes or Stitchr.

American Patchwork Quilting Pocast episode 276 sept 14 2015

Click here for the complete blog hop schedule.

Click here purchase your autographed copy of Machine Quilting With Style.

New Work in Progress – Feathered Chevrons

I’m super excited to start working with my Kona Cotton designer palette from Robert Kaufman. I’m revisiting my Charming Chevrons design in a new way, something that has been on my to-do list for awhile.

feathered_chevrons_precutsChrista Watson designer palette plus Kona solids in Coal

I’m going to turn the precuts above into the quilt below and I can’t wait to get started! I’m using 4 charm packs of my designer palette along with 4 charm packs of Kona Coal to make a nice throw-sized quilt measuring 64″ x 80″.

chevrons6Feathered Chevrons Layout from my Charming Chevrons Pattern.

I just love how the bright citrus colors pop against the dark grey background – don’t you? My designer palette will be available this October in quilt shops everywhere. 🙂


Paper Pieced Quilt Along #8 – Spray Basting Tutorial

I have been a quilter for over 20 years, but I’ve only been using basting spray on my quilts for about the last 2 years and it’s now my favorite go-to method. Although there are a few drawbacks: it’s more expensive, you need to do it outside or in a well-ventilated area, the convenience of not having to remove pins while machine quilting more than makes up for it!

Be sure to share your progress in my facebook group: Quilt With Christa!

qal_basting_spray

I can usually baste about 2-3 throw sized quilts from one can of basting spray.

Tips before starting

  • My spray basting method works best for quilt batting that is mostly or all cotton.
  • I use 2 large plastic tables that fold up and out of the way for storage. You can also use just one table for this method.
  • Make sure your batting is at least 2″ all around all four sides of the top (4″ larger than the finished measurement).
  • Make sure your backing is at least 3″ bigger all around (6″ larger than the finished quilt top).
  • If using a lot of black like I did, consider using a black batting (I used an 80/20 blend).
  • Grab a helper and a long acrylic ruler to help smooth things out.
  • If the quilt top or backing sticks to itself, you can easily pull it apart to reposition as needed.

Step 1

Press all 3 layers – quilt top, quilt backing and batting with a dry iron. This works best for 100% cotton or a cotton blend, but yes, you can iron your quilt batting. If you are worried about the batting sticking to your iron, put a piece of clean fabric on top of the batting and iron on top of that. If you have stubborn wrinkles, lightly spray the batting with water before pressing.

Step 2

Cover your table or work surface with a clean bed sheet or cardboard to protect the table from overspray. If it’s not windy outside, you can place pieces of white paper around the edges of the fabric and then remove them easily once the top and backing have been sprayed.

qal_basting_top

Spray outside to let the fumes dissipate. I used sheets of paper to catch the overspray.

Lay out the quilt top, wrong side up on a large table outside. Gently and evenly spray the entire top with 505 basting spray. (This is the brand I recommend.) I will usually spray in sections, following the pieced design of the quilt. Set aside the quilt top.

qal_basting_top_detailYou want the adhesive to completely cover the back side of the quilt top – just don’t overdo it.

Step 3

Lay out the quilt backing wrong side up and repeat the process to spray the entire backing. If the backing hangs over the edges, spray the center first and then the sides. Remove the bed sheet or papers and leave the backing on the table.

quilt backingBy using paper to catch the overspray, it’s easy to remove and leave the backing in place.
Dead summer grass and dirty concrete patio optional!! 🙂

Step 4

With a helper, lay the batting on top of the quilt backing. It may help to fold the backing in half and then in quarters first. Lay it on the corner of the backing and then unfold it and smooth it out as you go.

With a long acrylic ruler, smooth the batting across the backing, working out any lumps and bumps.

Step 5

With a helper, lay the sticky top right side up on top of the batting and backing piece. Again, smooth it out with a long ruler if needed. Flip the quilt sandwich over to ensure there are no wrinkles on the back and that the entire top has batting and backing underneath. Trim the excess batting and backing with batting shears leaving only an inch or two all around.

basting a quiltSmooth the layers out the best you can with your hands and a ruler.

Step 6

Bring all 3 layers inside and iron it from the back of your quilt to set the glue. If you have an oversized board that fits on top of your regular ironing board, this comes in really handy! Once the backing is smooth, flip the quilt over and iron it again from the front side.

If spray basting isn’t your thing, here’s a link another quilt along with my pin-basting tutorial. 🙂

You are now ready to quilt! Start choosing  your thread colors and meet me back here August 26th to begin the quilting. Or get a jump start on it now if you can’t wait!

Click here for all of the Paper Pieced Quilt Along Tutorials

New to my blog? Be sure to sign up for Friendly Threads – my email newsletter!

Paper Pieced Quilt Along #7 – Pieced Backing

I love a good pieced backing! There’s something about creating a secondary composition on the back that makes me giddy. Of course, you don’t have to make a pieced backing, but what follows are brief instructions for how I made my backing for the Paper Pieced Quilt Along:

backingdiagramThe backing design is interesting to stand on it’s own as a quilt top, too!

This backing finishes at 68″ x 84″ which is exactly 4″ bigger all around than my quilt top. That’s cutting it close, so if you’d like a bigger backing, just add more rectangles or make them slightly bigger.

Yardage needed – 18 assorted fat quarters (18″ x 22″ each). Note: solids tend to be a slightly wider useable width so they are closer to a true 18″ x 22″. Print fat quarters may result in less useable yardage. To use up scraps, feel free to piece sections together to get the desired rectangle sizes.

Trim 14 of the fat quarters to 17 1/2″ x 21 1/2″. Trim the remaining 4 fat quarters to 17 1/2″ x 11″

backingsquares

Lay out the rectangles on a design wall or other large surface, into a pleasing color arrangement.

Sew 4 rectangles together on their short ends to make the first and third pieced columns. Sew 3 rectangles and two half-rectangles on either end to make the second and fourth pieced columns. To reduce bulk, press all seams open.

Join the columns to create the pieced backing. Once the quilt is basted, trim off some of the excess fabric and batting around the quilt top.

backingpiecedPieced backing after it has been spray basted and trimmed.

It’s ok if the sides don’t look even at this point. Once the quilt has been quilted, it will be squared up.

Once your backing is finished, you are ready to baste your quilt in preparation for machine quilting. Have fun creating your own unique backing!

Click here for all of the Paper Pieced Quilt Along tutorials.


Paper Pieced Quilt Along #6 – Sewing the Top

I have a simple method I employ when sewing nearly all of my quilt tops. I lay out my blocks on a design wall, join them into rows, and sew the rows together to complete the top. For this lesson, I’ll share a few tips on how I make that go more smoothly. (Visit my Paper Pieced QAL page for links to all previous tutorials.)

finished_blocks I chose to leave this picture uncropped so that you can see I usually have several things happening on my design wall at the same time.

Step 1

First I throw up the blocks on my design wall. Although I will place the blocks into position, I don’t care too much about the color balance yet. I constantly refer to a picture or printout of my design so I can lay the blocks out in the correct position.

Step 2 (not shown)

After I have laid out all the blocks and background squares, I will play around with the arrangement until it feels right. For this quilt, I had just a few pops of light green and a couple of darker colors purposely out of order to give a little interest. I made sure to balance those out a little when I chose my final layout.

Step 3

sewthexHere’s another thrifty hint: I tend to use up leftover colored cotton bobbins in my piecing.

I take a picture with my camera phone and then begin sewing individual rows, two blocks at a time. As I joined the blocks, I pressed all of the joining seams open. I also pressed each row of blocks open to reduce the bulk.

Tip: use the seam line intersections as a guideline when matching points. For the sides of the block, I sewed just a few thread widths narrow of the intersection between the two seams shown above. When matching up blocks point to point, I pinned generously and sewed through the “x’s” that were formed by intersecting seams.

Step 4

I sewed all of the block rows individually, pressed each open, and put it back into position on the design wall. Then I sewed together two rows, pressed them and put them back on the wall.

block_rowsI made 5 sets of 2 row pairs, then joined those into 2 sections of 4 rows and 6 rows. Finally I joined the rows together to complete the quilt top.

Step 5 – The “Victory Lap”

Once the top is complete, I will secure the perimeter edges by sewing 1/8″ in from the edge of the quilt top, around all 4 sides. Someone jokingly referred to this as the “victory lap” on instagram and I got a kick out of that!

edge_stitchingStay-stitch around the perimeter to secure the edges for basting and quilting.

Now, we are ready to baste! Remember to share your work-in-progress on my Facebook group: Quilt With Christa, or on Instagram #paperpiecedqal.

Copyright and Permission Granted

I am very happy to share my knowledge with you free of charge during this quilt along. However, this information is for your personal use as a loyal reader of my blog. Please do not make copies of any part of this quilt along to distribute it to your friends. If you’d like to tell them about it, simply share my QAL site link with them and encourage them to come on over and join us: ChristasQuiltAlong.com

If you’d like to share links to my site on Facebook or on your own blog, that is great, too!

At the conclusion of the quilt along, I will be happy to edit down all of the content and turn it into a pattern for sale, so that others can use my pattern as a teaching aid in the future. 🙂

Check Out Dear Quilty – and Some Pattern News

So this is kind of fun. Mary Fons has put together a new compilation book called Dear Quilty which is a collection of the best patterns from the now-defunct Quilty Magazine. She chose to include my Colorful Chevrons quilt in the book and they are even using it in their ad campaign.

Although I don’t get any royalties from the sale of this book, since they already paid me for the use of it when it was published in the magazine, it’s still pretty flattering to be included.

20150608_dear_quiltyColorful Chevrons, lower left, is featured in the ad campaign for Dear Quilty

I’ve had great success with this design, which was based on my original quilt of a similar name, Charming Chevrons. Once the rights to the design reverted back to me, I was able to create a PDF pattern for the quilt (in 4 sizes) and most recently I’ve started creating print versions, too!

I love it when I can get a lot of use out of my quilts and patterns and they can be shared with a wider audience!