Paper Pieced Quilt Along #7 – Pieced Backing

I love a good pieced backing! There’s something about creating a secondary composition on the back that makes me giddy. Of course, you don’t have to make a pieced backing, but what follows are brief instructions for how I made my backing for the Paper Pieced Quilt Along:

backingdiagram
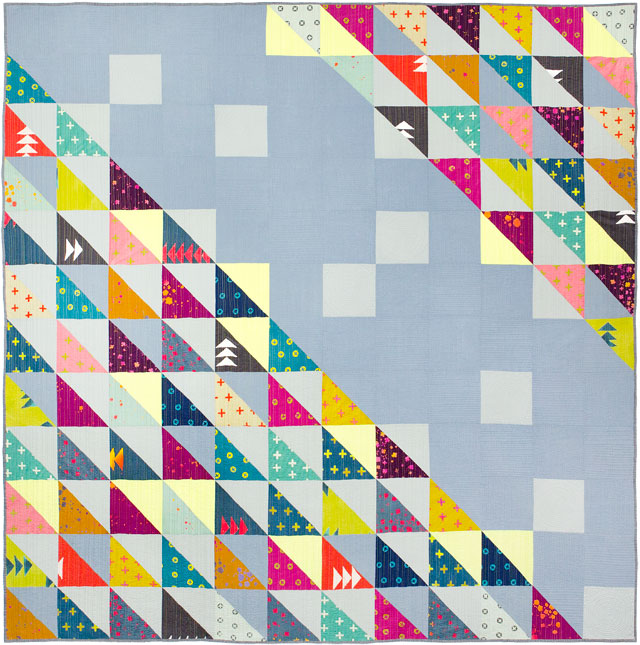
The backing design is interesting to stand on it’s own as a quilt top, too!

This backing finishes at 68″ x 84″ which is exactly 4″ bigger all around than my quilt top. That’s cutting it close, so if you’d like a bigger backing, just add more rectangles or make them slightly bigger.

Yardage needed – 18 assorted fat quarters (18″ x 22″ each). Note: solids tend to be a slightly wider useable width so they are closer to a true 18″ x 22″. Print fat quarters may result in less useable yardage. To use up scraps, feel free to piece sections together to get the desired rectangle sizes.

Trim 14 of the fat quarters to 17 1/2″ x 21 1/2″. Trim the remaining 4 fat quarters to 17 1/2″ x 11″

backingsquares

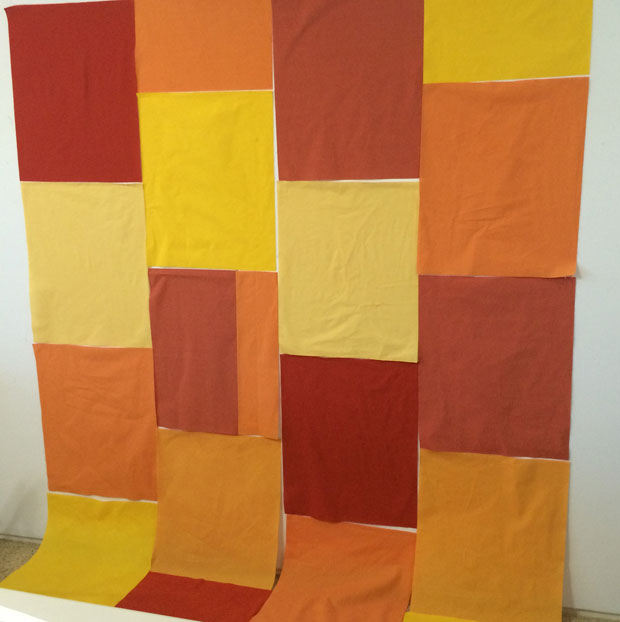
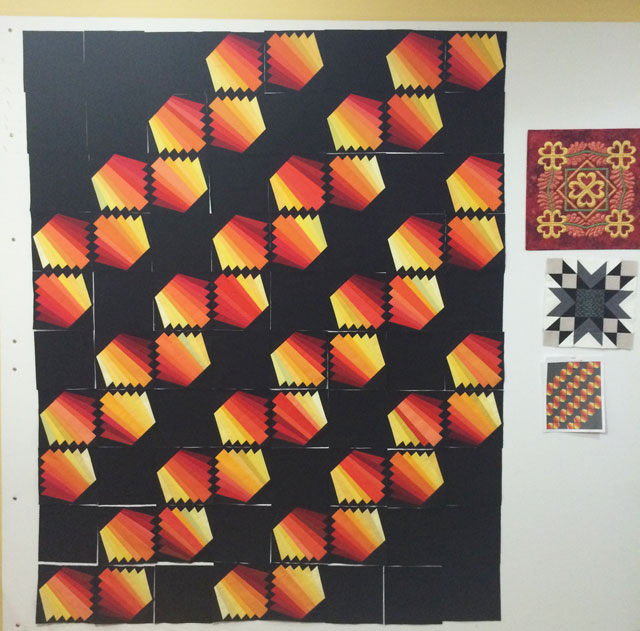
Lay out the rectangles on a design wall or other large surface, into a pleasing color arrangement.

Sew 4 rectangles together on their short ends to make the first and third pieced columns. Sew 3 rectangles and two half-rectangles on either end to make the second and fourth pieced columns. To reduce bulk, press all seams open.

Join the columns to create the pieced backing. Once the quilt is basted, trim off some of the excess fabric and batting around the quilt top.

backingpieced
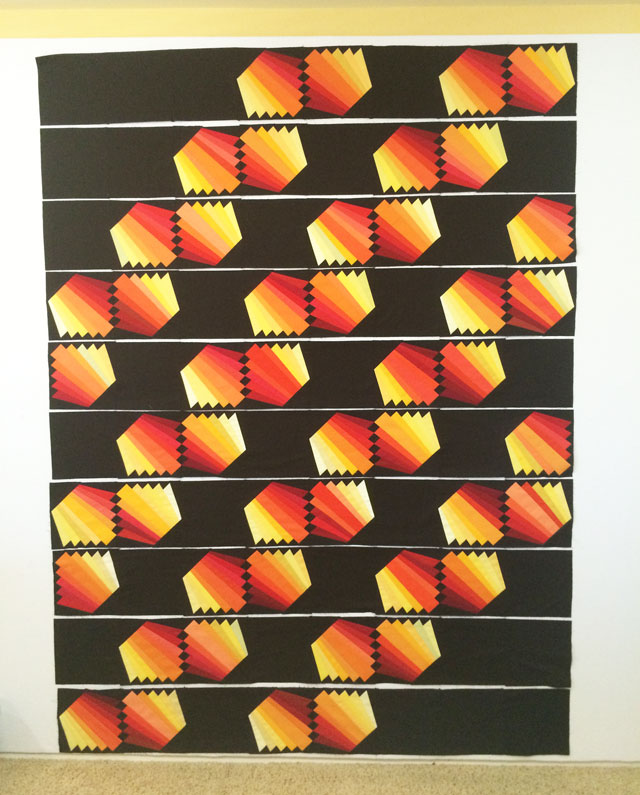
Pieced backing after it has been spray basted and trimmed.

It’s ok if the sides don’t look even at this point. Once the quilt has been quilted, it will be squared up.

Once your backing is finished, you are ready to baste your quilt in preparation for machine quilting. Have fun creating your own unique backing!

Click here for all of the Paper Pieced Quilt Along tutorials.


Paper Pieced Quilt Along #6 – Sewing the Top

I have a simple method I employ when sewing nearly all of my quilt tops. I lay out my blocks on a design wall, join them into rows, and sew the rows together to complete the top. For this lesson, I’ll share a few tips on how I make that go more smoothly. (Visit my Paper Pieced QAL page for links to all previous tutorials.)

finished_blocks I chose to leave this picture uncropped so that you can see I usually have several things happening on my design wall at the same time.

Step 1

First I throw up the blocks on my design wall. Although I will place the blocks into position, I don’t care too much about the color balance yet. I constantly refer to a picture or printout of my design so I can lay the blocks out in the correct position.

Step 2 (not shown)

After I have laid out all the blocks and background squares, I will play around with the arrangement until it feels right. For this quilt, I had just a few pops of light green and a couple of darker colors purposely out of order to give a little interest. I made sure to balance those out a little when I chose my final layout.

Step 3

sewthexHere’s another thrifty hint: I tend to use up leftover colored cotton bobbins in my piecing.

I take a picture with my camera phone and then begin sewing individual rows, two blocks at a time. As I joined the blocks, I pressed all of the joining seams open. I also pressed each row of blocks open to reduce the bulk.

Tip: use the seam line intersections as a guideline when matching points. For the sides of the block, I sewed just a few thread widths narrow of the intersection between the two seams shown above. When matching up blocks point to point, I pinned generously and sewed through the “x’s” that were formed by intersecting seams.

Step 4

I sewed all of the block rows individually, pressed each open, and put it back into position on the design wall. Then I sewed together two rows, pressed them and put them back on the wall.

block_rowsI made 5 sets of 2 row pairs, then joined those into 2 sections of 4 rows and 6 rows. Finally I joined the rows together to complete the quilt top.

Step 5 – The “Victory Lap”

Once the top is complete, I will secure the perimeter edges by sewing 1/8″ in from the edge of the quilt top, around all 4 sides. Someone jokingly referred to this as the “victory lap” on instagram and I got a kick out of that!

edge_stitchingStay-stitch around the perimeter to secure the edges for basting and quilting.

Now, we are ready to baste! Remember to share your work-in-progress on my Facebook group: Quilt With Christa, or on Instagram #paperpiecedqal.

Copyright and Permission Granted

I am very happy to share my knowledge with you free of charge during this quilt along. However, this information is for your personal use as a loyal reader of my blog. Please do not make copies of any part of this quilt along to distribute it to your friends. If you’d like to tell them about it, simply share my QAL site link with them and encourage them to come on over and join us: ChristasQuiltAlong.com

If you’d like to share links to my site on Facebook or on your own blog, that is great, too!

At the conclusion of the quilt along, I will be happy to edit down all of the content and turn it into a pattern for sale, so that others can use my pattern as a teaching aid in the future. 🙂

Check Out Dear Quilty – and Some Pattern News

So this is kind of fun. Mary Fons has put together a new compilation book called Dear Quilty which is a collection of the best patterns from the now-defunct Quilty Magazine. She chose to include my Colorful Chevrons quilt in the book and they are even using it in their ad campaign.

Although I don’t get any royalties from the sale of this book, since they already paid me for the use of it when it was published in the magazine, it’s still pretty flattering to be included.

20150608_dear_quiltyColorful Chevrons, lower left, is featured in the ad campaign for Dear Quilty

I’ve had great success with this design, which was based on my original quilt of a similar name, Charming Chevrons. Once the rights to the design reverted back to me, I was able to create a PDF pattern for the quilt (in 4 sizes) and most recently I’ve started creating print versions, too!

I love it when I can get a lot of use out of my quilts and patterns and they can be shared with a wider audience!

Fun Things Happening Around Here – Share Your Good News, Too!

I have two quick things I’d like to share!

First, I found out this week that my blog is one of the finalists in the National Quilter’s Circle blogger awards. Thanks you guys for nominating me – that makes a girl feel so great!! Click here to check out all of the finalists and vote for your favorites in all 4 categories. 🙂

20150321_blogger_awards

Second, I just got word that my quilt, Modern Logs won a 2nd place ribbon in the modern category at HMQS (the Home Machine Quilting Show in Salt Lake City, UT). It’s an amazing show full of very stiff competition!! I have entered quilts in that show now for the last three years and attended in person the last two times. Of course, it’s one of the ironies of life that the year I am unable to attend the awards ceremony is the year I receive recognition. 😉 I have a running joke around here that I only get ribbons at the big shows I don’t attend, LOL!!

Click here for a list of all of the HMQS 2015 winners.

HMQS_2ndThanks to Michelle Freedman (aka designcamppdx on Instagram) for the pic!

But enough about my good news – I’d like to hear about yours! What good things have happened to you or a loved one this week? (And if you are having a particularly bad week – here’s a virtual hug for ya!! XOXO!!)

Now it’s time to go sew!

Introducing HST in Make Modern Magazine

I’m excited to share one of my latest quilt finishes with you today. It’s called HST and the pattern can be found in the current issue (#5) of Make Modern Magazine.

HST

 HST designed, pieced and quilted by Christa Watson

When the gals at Make Modern invited me to submit a design, this idea literally popped into my head. I love making half square triangles and thought what a riot it would be to make a quilt from half square triangles that form one larger, modern HST.

HSTbed

HST on my bed – I’m not much of  decorator, but this quilt brightens up my room!

It turned out so well that I now use it on my bed and it is so comfy and snuggly! I used Alison Glass Handcrafted batiks from Andover fabrics along with textured solids in 2 shades of grey with a pop of yellow/green just for fun! For batting, I chose the highest loft of Quilter’s Dream cotton that I could and it is very warm. I just love this quilt!

Click here for my previous blog post showing sneak peeks of the quilting and the back.

Charming Chevrons Pattern Makeover – Now Available in 4 Sizes

Exciting news! I’m updating all of my patterns, and I just finished the first one! Charming Chevrons is now available in 4 sizes: Lap, Throw, Twin, and Queen.

CharmingChevronsCover

 Purchase the PDF version of Charming Chevrons here.

 Thanks to the fabulous graphic design work of Design by Lindsie, I’ve checked off something that has been on my to-do list for literally 10 years!!

Charming Chevrons is currently available as a PDF, but as we speak, I’m also getting them professionally printed so that quilt shops can carry them, too! (Just email me for wholesale pricing if you are a shop interested in carrying my patterns.)

I had a certain look I wanted for my patterns, and Lindsie knocked it out the park! She’s busy working on updating my other patterns, too, and I can’t wait! They will all be full-color with plenty of diagrams to help you out. After doing a little research on what others wanted in their patterns, I decided to offer each of my patterns in 4 different sizes. Where possible, I’ve also included extra tips for machine quilting or additional layouts.

Here’s the back cover with the fabric requirements for Charming Chevrons:

CharmingChevronsDigital_back

So, what do you think of the new look?

Just for fun-sies, you compare the new pattern with all of my older ones here.

My Book is Now Available for Pre-Order!!

It’s real – it’s really real! My book is now available for pre-order on Amazon! So before I faint with excitement, please allow me to tell you a little something about it… 🙂

MQWS_cover

My book is called Machine Quilting With Style: From Walking-Foot Wonders to Free-Motion Favorites. That’s quite a mouthful, but I couldn’t be more thrilled! As many others have said, it really is like birthing another child, complete with restlessness, anxiety and weight gain, LOL! 🙂 The “due” date is mid-September, about a month after my own birthday, so I really couldn’t ask for a better present.

It’s been a dream of mine to write a book since I began quilting many years ago, and the perfect opportunity came at just the right time. I had returned home from the first QuiltCon on fire with the desire to share my passion for quilting with a many people as possible. Coupled with my new-found love of the modern aesthetic, all the stars aligned in the best possible way to create this book.

BookPostcardBackSept

Promotional information by the incredibly talented marketing team at Martingale.

Machine Quilting With Style includes patterns for 12 quilts with step-by-step instructions on how to machine quilt them. It also includes a large section on setting yourself up for successful machine quilting, with plenty of motifs to practice. There are a total of 112 pages, and I’m so grateful to Martingale (aka That Patchwork Place) for believing in my vision and allowing me to write the book I was meant to write.

Now that the hurdle of writing and editing is over, I get to engage in the fun part: promoting the book, talking to shop owners about it, creating classes around it, and getting to share it with as many people as possible. I’m pretty sure I enjoy the “social” aspect of quilting just as much as the actual making. 🙂

book-editingThis is what book editing looks like!

Machine Quilting With Style is available for pre-order on Amazon at a discount off the cover price, which is always nice. You can also purchase it from your local quilt shop or favorite bookstore later this summer, or ask them to preorder you a copy when they attend quilt market this spring.

If you’d like to pre-order a signed copy directly from me, it’s just a few dollars more, and I’ll ship mid-September as soon as they come in.

Ok – I’d best get started on the next one, now! (Kidding-not-kidding!)

Teaching in Las Vegas – Come Take a Class With Me!

I’m excited to announce the next round of classes I will teaching here in my hometown of fabulous Las Vegas! They will take place at The Christmas Goose Quilt Shop and you can register for any of them by calling the shop at 702-877-1158.

Here’s the Schedule:

April 29 (Wednesday) 6-9 PM String of Pearls

20140404_stringofpearls_dqnChrista With String of Pearls (66″ x 66″) at the DQN Quilt Show in 2014

One of my favorite quilts of all-time, String of Pearls allows you to showcase a favorite set of fabrics all in the same quilt, with plenty of negative space to feature fun machine quilting. During this one session class, we will learn how to make the blocks and set them together. Cost is $20 plus pattern purchase from The Christmas Goose.

May 30 (Saturday) 10:30 – 5:30 Modern Machine Quilting

modern machine quilting samplesSamples of modern machine quilting on actual quilts!

Join me for a full day of quilting fun! Bring your practice sandwiches or orphan blocks and learn how to let go of perfection while you quilt fabulous walking foot wonders and free-motion favorites on your quilts! Cost is $50.

June 25 (Thursday) 10:30-1:30 Charming Chevrons

Charming Chevrons

Charming Chevrons by Christa Watson, 48″ x 56″

The one that started it all – Charming Chevrons was my first modern quilt, made in 2012. We will learn how to make the smaller version shown above, but you can easily make it in any size simply by adding more charms! Class will cover construction of half square triangles and possible setting ideas. Cost is $20 plus pattern purchase from The Christmas Goose.

Won’t you join me? I look forward to seeing you!

(For even more content and a peek into other things happening at Christa Quilts, be sure to sign up for Friendly Threads, my weekly email newsletter.)

Why I Love Electric Quilt

First things first, my friends at Electric Quilt did not sponsor this post in any way. 🙂 However, they recently featured me in an ad campaign for a couple of magazines (McCall’s Quilting May/June and American Patchwork & Quilting June issue) so I thought I would share a little bit more about why I enjoy using their software, plus show a few designs that are a blast from my past. I’ve come a long way!

ElectricQuilt_sm

I bought the first version of the program way back when it was EQ4. Back in the days when I was teaching a lot locally (before I discovered modern quilting and realized people would buy my patterns), I used EQ to draw diagrams which I would use as handouts for my classes. The user functionality was somewhat limited and I printed everything in black in white,  but I was able to do pretty much whatever I needed to for my class presentations.

20150320_eqsketch1An early EQ5 sketch where I took a commercial pattern, redrafted and resized it.

I have to admit that I’ve never used the calculate fabric function, because I prefer to do my own math. But, I use most of the other functionality and especially love to be able to import swatches of fabrics and print off full color images of my designs. I also save images of the quilt and individual blocks in photoshop, and then manipulate them to use when writing my patterns.

Over the years I’ve upgraded to EQ5, then EQ6, tried it for awhile on a Mac using parallels, upgraded to EQ7 on a regular PC, and am finally using the EQ7 Mac version natively and I love it. Although it’s still written for windows, there is no difference in functionality between the standard version and the Mac version that I can tell.

20150320_eqsketch2An EQ6 design I made for my oldest son once I learned how to import fabric swatches directly into the program. He sketched the space shuttle and I turned it into a quilt with wonky stars.

I have to tell you I am by no means an expert EQ user. However, I did force myself to sit down and go through the manual, page by page and try out all the tutorials. I’m a learn-as-needed sort of person, so now whenever I need to learn how a particular function works, I just go through their help system, and check out the tutorials and lessons on the EQ site. When all else fails, I google what I’m looking for and will usually run across someone’s step-by-step blog tutorial.

I also really like how many other EQ users will share some of their project download files for free to other users. I’ve also shared quite a few, and you can find my free downloads here.

20150320_eqsketchtempleOne of my early EQ7 experiments where I redrew a paper pieced block to f it inside of a larger frame and added applique lettering. This was a gift for a dear friend & church leader.

So far EQ7 has served me well, and I now use it to design every quilt I make. I will have to disappoint some of you though, and let you know I’ve decided not to pursue teaching classes on how to use it. I did think about this for awhile, but honestly, my time is limited and I’d rather spend it teaching piecing and quilting classes rather than software classes. But the good news is that there are tons of online classes at EQ University that you can check out.

Yes, purchasing EQ software is an investment in both money and time, but for me it was totally worth the cost!

Modern Quilts at My Local Guild’s Show

Quilt Las Vegas 2015

I’ve been a proud member of the Desert Quilters of Nevada for over 18 years now. I’ve participated in their quilt shows for nearly as long and was so pleased when they included a modern category in 2013 and 2014. They did the same thing again this year and I was really impressed with the quality of the quilts in all categories. For your viewing pleasure, I’ll share some of the modern quilts from the show and a few others that caught my eye. Enjoy!

bigstar_vickiBig Star by Vicki Ruebel 66″ x 66″ – 1st Place Modern

diamondback_karenDiamondback by Karen Eaton Garth 21″ x 35″ – 2nd Place Modern

eveningeditionEvening Edition by Suzanne Mayfield, 3rd Place Modern

modernlogsModern Logs by Christa Watson 48″ x 54″ – Honorable Mention Modern (Yay!)

memyshadowMe & My Shadow by Vicki Ruebel 51″ x 36″,  Art Category – Overall Judge’s Choice

lizards_openLizards in the Sunshine by Karen Atkinson 31″ x 31″ – 1st Place Open Category

southwestmedallion_karenSouthwest Medallion by Karen Eaton Garth 72″ x 90″ – 3rd Place Pieced, Machine Quilted, Large

colorfulchevronsColorful Chevrons by Christa Watson 64″ x 80″ – 3rd Place Pieced, Machine Quilted Small (Yay!)

moderncubism_kathy

 Modern Cubism by Kathy Melcic 47″ x 63, Modern Category (Her interpretation of my Charming Chevrons pattern from the DQN quilt retreat 2013 – Yay!)

selvagedSelvaged #2 by Wilhelmina Willis 63″ x 63″, Open Category

cathedralwindows

Cathedral Windows by Darrin Martin 76″ x 90″, Open Category

There were over 230 quilts, accessories, clothing and dolls in the show, and it was quite a fiber feast for the eyes! My only critique of the show is that I wished all items from the same category could have been hung together, but I know they were limited on space and had to make do. I just love attending and participating in quilt shows. 🙂

Now that we are full-swing into quilt show season, which shows will you be attending this year?