Bungle Jungle Charm Quilt Week 4 – Ditch Quilting

Bungle Jungle QuiltI didn’t make a ton of progress on my Bungle Jungle modern quilt this week, mostly because I was packing up to go on our family vacation and getting all my ducks in a row ahead of time.

(They are quacking nicely now!)

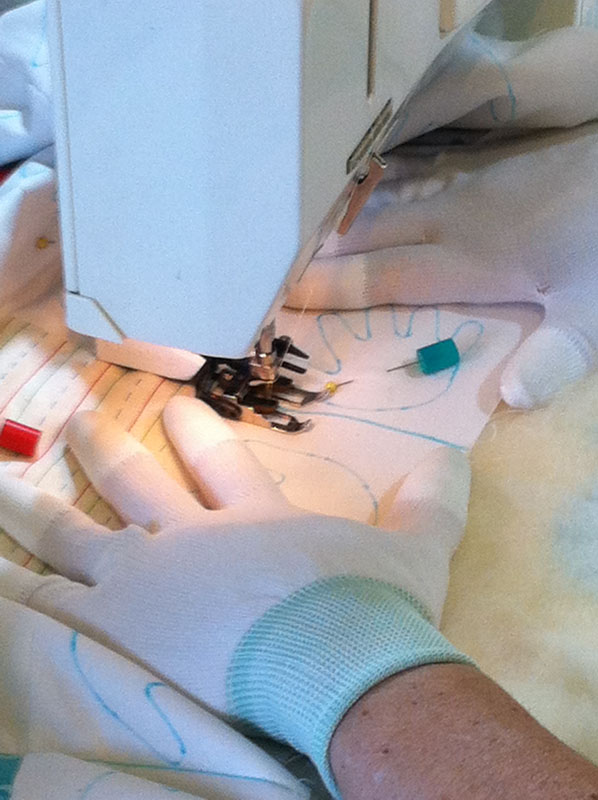
But, I did get all of my stitch in the ditch quilting done so I’m ready for the best part, the free motion quilting next week!

I think my plan will be to quilt a different motif in each charm square, to practice a bunch of free-motion quilting designs.

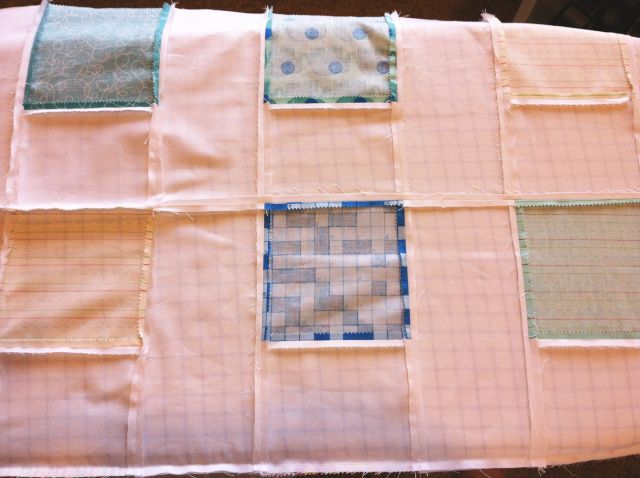
Stitch in the DitchI want to add tons more quilting. By pressing the Quilt Back with Grid Quiltingseams open, stitching in the ditch in between the charm squares was a breeze. It created a grid over the surface of the quilt which you can see on the back side of the quilt. Click for closeups.

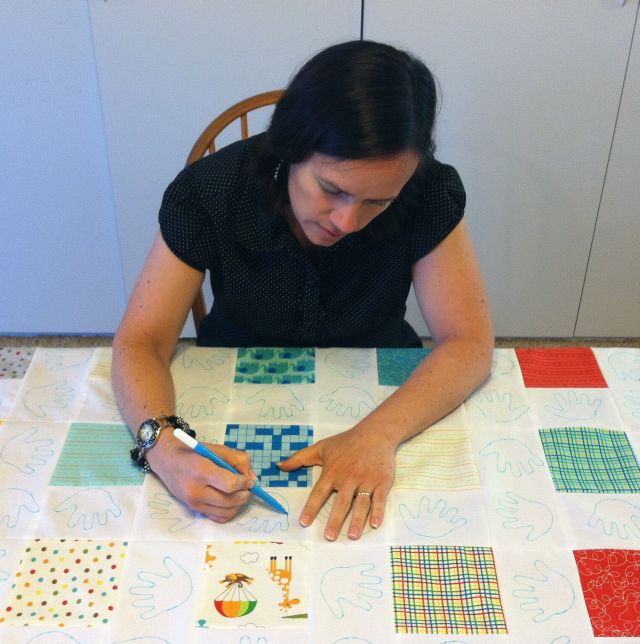
Sewing LineI used an acrylic ruler and a blue washout pen to mark straight lines where needed to complete the grid.

The quilt is now anchored so I can remove the rest of my basting pins and it’s ready for more quilting!

Be sure to join me tomorrow as I launch my new tutorial series: Do It Yourself Quilts!

Favorite Tools #2 – Shout Color Catchers

Shout Color CatchersOn my last soapbox, I blogged about how much I advocate pre-washing fabrics for quilts.

To make this job easier, I love using Shout Color Catchers. You can get them pretty inexpensively at Target or Wal-Mart and they work wonders with quilt fabrics.

They are rectangular sheets of material that almost look like dryer sheets.  You put them in with the fabric during the wash cycle. The extra color that comes off in the water adheres to the sheets, not other fabrics. I’ll use at least 2 per load when washing a bundle of fabric, and will throw in more if I’m washing a large quilt.

After discovering problems with some of my personal stash fabrics running, I used several sheets when washing my sister-in-law’s wedding quilt I recently finished (only 2 years late). I had sewn the blocks so long ago, I couldn’t remember if they had been pre-washed or not. I used 4 color catchers with the quilt and it came out fine. I breathed a huge sigh of relief!

Color CatchersI used this red batik fabric in a small wholecloth quilt I recently made. I wanted to make sure it didn’t run so I washed it twice – with one color catcher each time.

The first color catcher sheet came out orange after the first wash; by the second wash, the excess color was mostly gone so I knew it was now safe to use this fabric!

I’m still experimenting with pre-washing,  using color catchers in every load of cut yardage, and throwing a sheet in with quilts made from fabric that I can’t pre-wash like Moda Precuts.

During my previous post about pre-washing I got a really good comment about using Retayne, a dye fixative, with unwashed precuts. I forgot I even had some! So that will be my next experiment I think…..

Weight Loss Week 13 – Seeing R.E.D!

Jason and I have come up with a fun little acronym for our weight loss plan – R.E.D which stands for Rest, Exercise, and eat a healthy Diet.  We have learned that if we don’t implement R.E.D, we will see red! (As in anger and frustration!!)

We have learned by experience that sleep is most important for Jason, exercise keeps me balanced in more ways than one, and we both just feel better when we eat wholesome, nutritious food.

By the way, this week I lost another pound,  bringing my total weight loss to 17 pounds gone. That’s like a 6 month old baby! Here’s how I was doing last week.

So here are this week’s tips on how to implement R.E.D.

Rest – get at least 8 hours of sleep each night. I naturally wake up at about the same time each day – for some reason I can’t sleep in any more 😦 So it’s in my best interest to get to bed early if I want to feel good the next day.

Exercise – wherever and whenever I can fit it in. If I’m short on time, I’ll do little things like take the stairs instead of the escalator, and park further away in the grocery store parking lot.

Diet – not the latest “fad” diets, but instead, I like to choose good things to eat like fruits, vegetables, whole grains, lean proteins, milk, and healthy fats like olive oil, avocados and nuts. I do like treats, but try to eat them in moderation.

This week I’ll really try to stay focused as we head out for our annual beach trip. I already know what next week’s topic will be – eating well on vacation!

Christa’s Soapbox – To Prewash or Not?

To pre-wash your fabrics or not – that is the question. Whether ’tis nobler to dive in and start sewing or suffer the agony of a ruined quilt….

To pre-wash or not? That is the question! In a word – yes!

I am a big advocate of pre-washing my fabrics before, during, and after the quilting process. I pre-wash the fabrics before I use them in a quilt; I soak the quilt to block it and remove any marked quilting lines; and I wash my “utility” quilts after they are finished and have been well loved and used. I’ve just had too many accidents to not pre-wash, especially when working with batiks!

Now, I do have to make a disclaimer here – I sell a ton of Moda precuts and it’s not practical to pre-wash them since they are small cuts. However, so far (knock on wood) I have not had any accidents with them. But, I still want to do some more of my own testing, and research what others’ experience has been.

I washed and blocked my Lil Rascals charm quilt after quilting with no problems, and I plan on soaking my Bungle Jungle modern quilt to remove all the blue pen marks. I’ll keep my fingers crossed with that one because there is so much white in it!
Bleached Quilt BackRuined Jewel Box Quilt

Here is one of my ruined quilts – a jewel box made as a teaching sample over 10 years ago.

Much to my horror, the blue batik fabric ran all over the white background when I sprayed it with water to remove quilting lines. I had to bleach the blue spots with a toothbrush to remove the marks, which left a really light discoloration on the back. The saving grace was the light-colored quilt backing. Now I use this quilt as a teaching tool in a different way!

Need to Prewash FabricsHere’s another one of my ruined beauties, my Hugs & Kisses quilt I made which I was so proud of! It was my first machine quilted blue-ribbon quilt!

The reproduction red fabric bled like crazy when I washed the quilt. Interestingly enough, the two orange batik fabrics right next to it didn’t run at all!

So it just goes to show why my quilting mantra is to pre-wash my fabrics whenever possible, especially when using lots of white in a quilt!

It was tough to dig these pictures out for the world to see. Now, onto the next quilt with crossed fingers that I won’t have any more accidents like these in the future!

Sew and Tell – Scraps Galore!

Jill F. from Iowa shares her fun and scrappy geometric quilt with us this week:

Jill's Scrappy QuiltJill made this beauty by collecting assorted fat quarters and 1/2 yard cuts she got from me,  plus scraps from her stash. The strips are all 2 1/2 inches wide so it could be assembled from a jelly roll, too!

Here are some quilt vital statistics you may be interested in: the pattern is called Hugs and Kisses by Julie Herman for Jaybird Quilts, and the wonderful brown that pulls all of the scraps together is Moda Bella Solid in Hershey brown.

Jill used her Lazy Angle Ruler from Lazy Girl Designs to cut the wedges of assembled strips. Hey, I have that ruler but haven’t made anything from it yet; I guess I’ll give it a try!

Quilting CloseupJill  made this  quilt to go in her four-year old son’s room and is using extra blocks for a coordinating quilt for his little brother. It’s always amazing how many blocks you can get when you start pulling scraps from your stash – they seem to multiply!

She did a great job of making the quilt seam super scrappy, yet pulled-together.

Way to go Jill! How did you know my favorite colors are brown and green? That’s probably what attracted me to your quilt!

Of course I had to include a closeup picture of the gorgeous quilting, done by a friend of Jill’s that’s just getting started with her long-arm business. If this quilt is any indication, Jill’s friend is on the right track!

Share Your Project

If you would like to share a project you’ve made with at least one piece of fabric purchased from me, please email christa@christaquilts.com with your high quality photos and what makes your project interesting or special to you. If you are selected as my show and tell star of the week, you’ll get a $5 gift certificate as my way of saying thanks!

Bungle Jungle Week 3 – Layer Cake Back Art and Basting

This week I marked and basted my Bungle Jungle charm pack quilt. I will start quilting it next week. You can read about last week’s progress here.

Layer Cake Back ArtWhen I finished marking the top, I couldn’t decide on the backing. Then it hit me – why not use a Bungle Jungle layer cake and make back art for my modern quilt?

(The back is probably even more modern than the front since I threw the blocks together totally randomly!)

Each layer cake square is precut to 10 inches, so when you sew them together into 7 rows of 6 blocks each, the finished size is 57″ x 66.5″. My quilt top measures approximately 52″ x 60″ so that was perfect! It took me less than 2 hours to stitch all the backing squares together, including pinning and pressing the seams open.

Marking with Water Soluble PenUsing a stencil, I drew little hands in the white spaces randomly over the surface of the quilt.  This is going to be cute!

I marked all the hands before basting, using an inexpensive water soluble blue pen. I’m going to join the hands with loopy quilting so I can quilt them continuously.

I still haven’t decided what I’m going to quilt in the charm squares, so I left those unmarked for now. Any ideas??

Finally, I basted the quilt using about 150 Pinmoors. This is the 3rd quilt I’ve basted using Pinmoors and I’ve decided they are awesome! It’s a little spendy to buy enough of them for a big quilt, but they are totally worth it. It made basting a breeze and they are super easy to take out when quilting. I don’t even worry about pinning over my marked lines. The rule of thumb is to baste about a hand-width apart. That was easy for this quilt!

Basting With Pinmoors I’ve been following quilting blogs like The Free-Motion Quilting Project, WIP Wednesdays, Moda’s Bakeshop and the 2012 Free Motion Quilting Challenge for quite some time. I have so thoroughly enjoyed these projects that I have now been inspired to start my own sew along called Do-It-Yourself-Quilts!

I want to share step-by-step tutorials on how easy and fun it is to make your own quilts completely, including piecing and quilting. Then you can truly say you made it yourself!

Be sure to follow my blog for the official announcement about that on Thursday, July 19th, along with a sneak peak of my first project and a supply list if you’d like to join in!

Favorite Tools #1 – Seam Roller

Wooden Seam RollerI’m going to start a new series each week exploring some of my favorite tools, tips, and techniques for quilting.

As I’ve been sewing a lot more recently, I’ve realized it’s a much more enjoyable experience when I have the right tools.

I pressed all of the seams open in the latest quilting project I’m working on, my Bungle Jungle modern quilt.

Wooden Tool SetIt was “sew” much easier to press the seams open with an iron when I had first “finger-pressed” them with a wooden seam roller.

I got this fantastic tool at a quilt show I attended a few years ago.

The sad thing is that I asked the vendor if I could get them wholesale to carry in my shop and he said no, he just made them himself and sold them individually at shows. 😦

The next year I went back to the same show and bought a 3 piece set for myself which included a matching seam ripper, seam roller and sewing stiletto.

So if you are ever out and about and run into one of these gadgets, pick it up in a hurry! And if anyone out there has a source for these, please let me know!

Weight Loss Week 12 – Getting Over the Plateau

I’ve been pleased with my weight loss so far. Although I was slightly up this week, I’ve still lost a total of 16 pounds and survived a crazy eating week with family and friends in town.

It seems like it’s taken awhile to start getting to where I want to be, but the results have been worth it. Here’s how I was doing last week.

Other than my first week, I haven’t had any big weight-loss weeks. Rather, it’s been a slow and steady pound here and there, sometimes half a pound, sometimes nothing at all. But looking back after 12 weeks, the weight has come off and it’s staying off! My summer shorts are starting to fit and I’m not so embarrassed to be seen in a swimsuit!

My personal mantra for keeping up with my plan consistently is to remember that nothing tastes as good as being thin feels! I heard that at a weight-watchers meeting years ago and it’s stuck with me.

Probably the hardest thing to endure is hitting a plateau so here are my tips for getting over a plateau both physically and mentally.

1. Ramp it up a bit. If my weight loss stalls or is less than I’d like for the week, that means my body is too comfortable with what I’m doing. That means I need to shake things up a bit by having a lower calorie day, or increasing the intensity my workouts for a day or two.

2. Remember that nothing happens overnight. All of the quick fixes and fad diets out there just don’t work in the long-run. What works consistently over time is healthy eating, vigorous exercise, and a stick-to-it attitude. The plateaus will come and go but my weight-loss results will stay!

Christa’s Soapbox – Pressing Your Seams Open

In two words: do it!

The idea of pressing seams always to one side is pretty old school. It comes from when seams were hand pieced; the double seam pressed to one side gave strength. Also, when hand quilting, it was easier to stitch in the ditch if the bulk of the seams was out of the way.

Block With Seams Pressed OpenHowever, with so much modern quilting going on, using lots of solids and white background space, there’s more of a need to press seams open to prevent shadowing.

Moreover, it’s much easier to machine quilt if all of the seams are pressed open.

When I first began doing free motion quilting, I took a class from a teacher that recommended planning all of your quilting ahead of time so you would know which way to press your seams. (For machine quilting stitch-in-the-ditch, it was conventional wisdom to always quilt in the low side of the ditch.) My first thought was, what a pain!

Seams Pressed OpenI want the freedom to be able to quilt how I want when I want without being limited by piecing decisions. I also like how much flatter the quilt lies when all of the seams are pressed open. So yes, you have my permission to press ’em open as much as you want!

By the way, the quilt seams shown in this post are from my Bungle Jungle modern quilt I’m currently working on. You can read this week’s earlier post about making this quilt here.

Sew and Tell – The Very Hungry Caterpillar Quilt

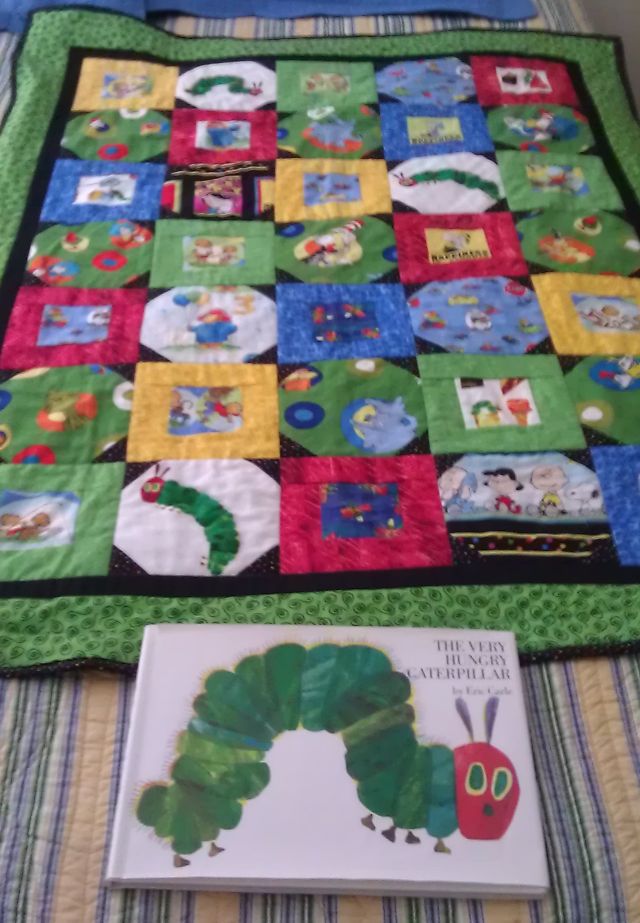
The Very Hungry Caterpillar QuiltThis week, Anita A. from Florida shares her adorable Hungry Caterpillar Quilt with us. Isn’t it great? She made it for her first grandchild and it’s only her second quilt!

I love how she mixed in lots of novelty prints and picture book fabrics! Some of them she got from me including Dr. Seuss and Peanuts fabrics. The Hungry Caterpillar fabric is from Andover. Hmm, I better see if I can get that one!

Anita said she found the pattern called “Stars through the Window” on About.com.

She likes the mix of large and small fussy cuts and she tweaked the design a bit, plus added additional  borders.

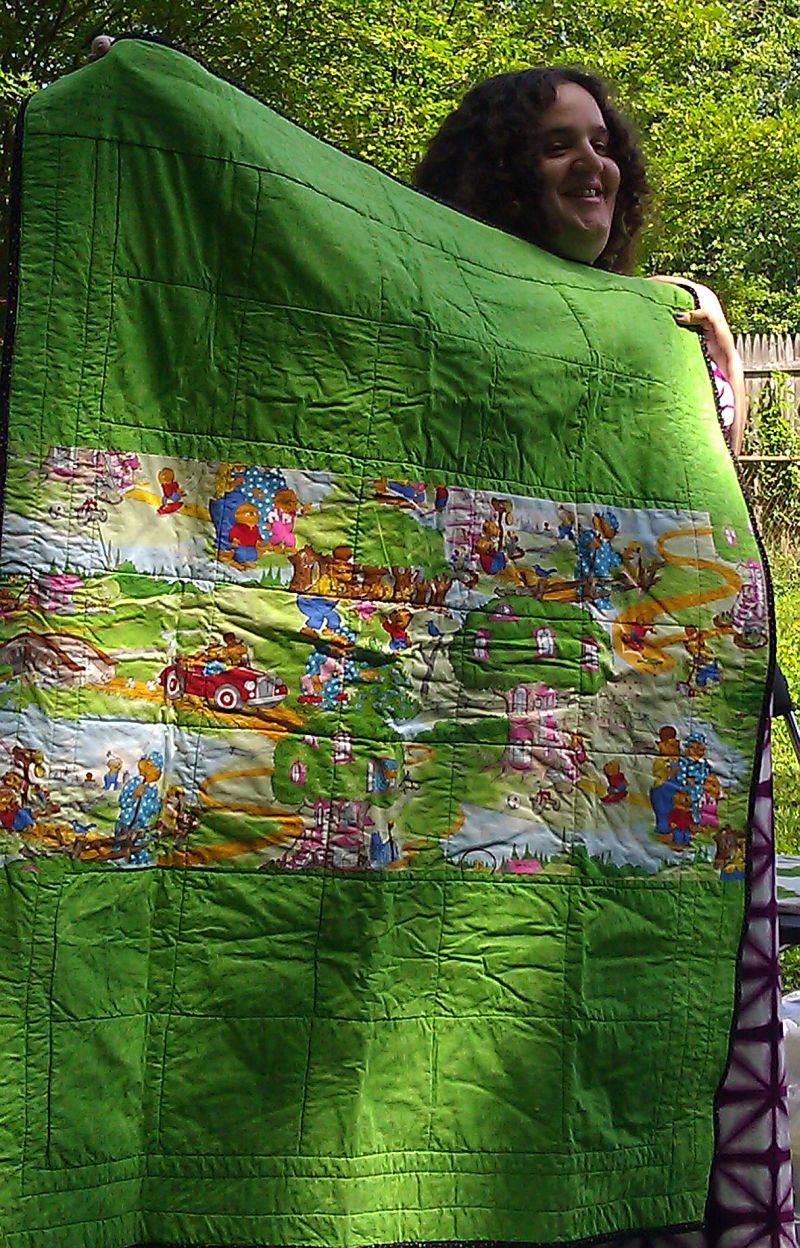
Berenstain Bears BackingIt looks like such an easy and fun quilt to make with fussy cut 3 1/2″ smaller squares for the square blocks and 6 1/2″ squares for the snowball blocks.

I absolutely love the pieced quilt backing she made with solid green fabric surrounding a length of Berenstain Bears fabric.

Anita included a lot of green fabric so that the quilt would be perfect for either a little boy or girl. Her daughter’s favorite color is spring green and she wants to be surprised when her baby is born.

I think Anita’s daughter will be pleased both with her new baby and with the adorable quilt.

Nice job, Anita!

Share Your Project

If you would like to share a project you’ve made with at least one piece of fabric purchased from me, please email christa@christaquilts.com with your high quality photos and what makes your project interesting or special to you. If you are selected as my show and tell star of the week, you’ll get a $5 gift certificate as my way of saying thanks!