Blooming Wallflowers Quilt Revisited – See 3 Different Versions

I wanted to do a quick throwback to my Blooming Wallflowers quilt because I’ve made it twice and digitally recolored it a third time, using 3 of my fabric lines. When I design a quilt, I love iterating to see what it will look like in different fabric/color combos!

Blooming Wallflowers in Modern Marks

Blooming Wallflowers Modern Marks

Click here to get the Blooming Wallflowers quilt pattern – PDF version.

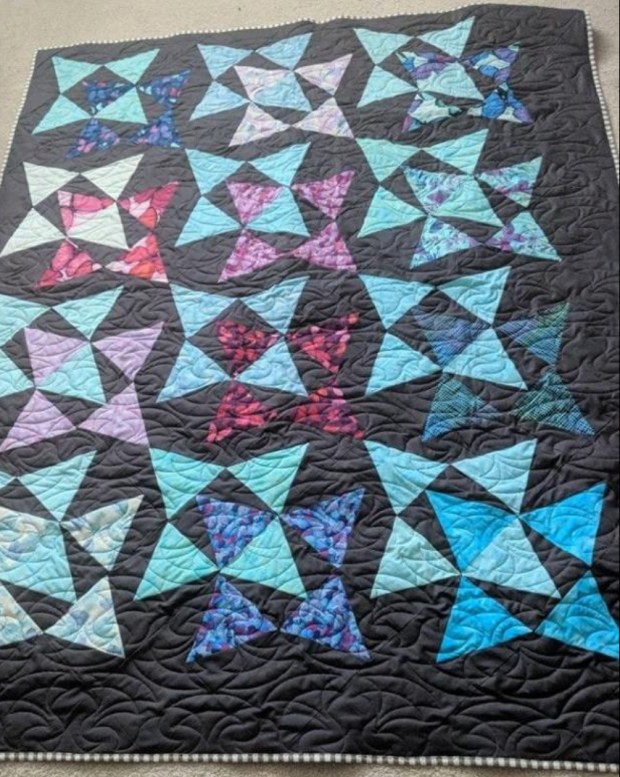
Above is the original version, made completely in Modern Marks fabric. I originally made it for a magazine to promote my first fabric line when it came out. I had fun selecting the 12 rainbow prints from the line and pairing them up the light blue accent and dark navy background.

Blooming Wallflowers in Abstract Garden

Blooming Wallflowers quilt

Click here to get the Blooming Wallflowers quilt pattern – print version.

Once the publishing rights reverted back to me,  I decided to self-publish the pattern with a new cover to show case my third line of fabric, Abstract Garden. Again, it was fun to mix and match the prints and arrange them in a pleasing order. I used the navy herringbone print from Modern Marks again because it really made the other prints pop!

Blooming Wallflowers in Geo Pop

Blooming Wallflowers Quilt in Geo Pop

Click here for the free Blooming Wallflowers quilt along.

Now that my fourth line of fabric, Geo Pop officially releases next month, I wanted to see what the quilt would look like in the new fabric, with a different colored background. Thanks to Electric Quilt, I can upload jpegs of my fabric swatches and easily recolor it. It was fun to play around with different fabric combinations and I was happily surprised with how good it looks when pairing it with the yellow/gray Diamond Pop print and the charcoal Op Squares print for background. I may have to add this one to my “to make” list!!

What do you think? Which colorway is YOUR favorite?

Get the Supplies!

If you are new to the blog and haven’t seen this quilt before, click the links below for more info about the quilt pattern, fabric, and a recent quilt along to make it:

Coming Up: More about the Making of My Latest Quilts from Abstract Garden

In between moving, hosting the Blooming Wallflowers quilt along, and planning out my next round of designs, I haven’t had a chance to tell you much about some of my latest finishes. So I thought I’d take some time over the next several weeks to share more in-depth about my process of making quilts from my latest fabric line, Abstract Garden.

Geese in the Garden

Geese in the Garden with Abstract Garden fabric

LatticeWork

LatticeWork Quilt Made from Abstract Garden

Pieced Primrose

Pieced Primrose Quilts Made from Abstract Garden

Just in Case you Missed it – Blooming Wallflowers

Blooming Wallflowers quilt

Abstract Garden Quilt Patterns

Click here to see my entire quilt pattern collection.

Think of the next several weeks as Do It Yourself quilt alongs. They won’t be as in-depth as my regular quilt alongs, but they’ll provide a little more insight into my quilt-making process and will help you have a smooth experience making your own version. I enjoy blogging about the process so that I can include some in-process photos, in addition to the full color diagrams and quilting plans I include in my patterns for sale.

It should be fun and inspiring, so stay tuned!

Blooming Wallflowers Week 10 – Binding to Finish

Can you believe we’ve come to the end of the Blooming Wallflowers quilt along? I’m so excited to see all of your finishes and encourage you to continue working at your own pace, even if you finish weeks (or months) later.

Blooming Wallflowers quilt

I was literally finishing the hand binding of this quilt on the way to quilt market last fall, so I didn’t get any pics of my binding in progress. However, I’ve written several other binding tutorials, and my process is exactly the same, no matter which quilt I’m making. So choose your favorite method – hand or machine, and enjoy this last step of the process!

Modern Marks binding strips

I cut matching binding strips from my Modern Marks Navy Herringbone print.

Here’s a bonus tip for binding: I like to cut my strips out at 2″ wide and attach them with an exact 1/4″ seam using my BERNINA dual feed (which acts like a walking foot but I can use skinnier feet on it). This gives me a precise finished binding of 1/4″ and it’s even on both the front and back. Many times, I like to use the same background fabric as the binding so that it looks like the design is floating on the surface, rather than being interrupted by a contrasting fabric.

Here’s Blooming Wallflowers hanging in my booth at quilt market last November, along with the other quilt patterns I made to showcase my Abstract Garden fabric.

Christa Watson Abstract Garden

My booth with Benartex at fall quilt market in Houston, November 2018
Other quilts shown are LatticeWork and Geese in the Garden.

And just for fun, below the is the original Blooming Wallflowers quilt I made a couple of years earlier for a quilt magazine to promote my first line, Modern Marks. As you can see, this quilt is fun to make no matter which fabrics you choose!

Blooming Wallflowers in Modern Marks

Blooming Wallflowers Modern Marks

The Modern Marks Navy Herringbone print is one of my all-time faves!

I hope you’ve enjoyed making this quilt with me. And if you are worried about having quilt-along withdrawal, stay tuned for the next quilt along, coming soon!! It features a brand new quilt that I haven’t shared on the blog yet, and I’m sure you’ll love it just as much!

IMPORTANT LINKS

Blooming Wallflowers Week 9 – Quilting Inspiration

Can you believe that we are almost at the end of the Blooming Wallflowers quilt along? But not to worry, I have more inspiration coming your way! Next week we will bind our quilts to finish. But in the meantime, check out the fabulous quilts being made and shared in my Facebook group. Everyone featured today wins a free PDF pattern of their choice for sharing!

Gina S Blooming Wallflowers Quilt

I love how Gina S. Chose soft watery batiks for her version and paired it with a black background. She finished it off with a textural allover quilting design and that binding is to die for!!

Abbie B Blooming Wallflowers

Abbie B. recently finished her quilt top and I love her yellow background, don’t you? Remember, you can work on any of my quilt alongs at your own pace, and on your own schedule. 🙂

Free Motion Quilting Practice Lynn L

Lynn L. gets bonus points for practicing her free motion quilting on a test piece before diving into her quilt. This is one of the recommendations I make in all of my classes.

Abstract Garden and Modern Marks pieced backing by Lynn L

Above is Lynn’s fun pieced quilt backing, made from yardage of Modern Marks Navy Herringbone plus Abstract Garden leftovers. I love it!!

Machine Quilting detail by Laina L on Blooming Wallflowers

Laina L. is following the quilting plan as shown in the Blooming Wallflowers quilt pattern. Isn’t she doing a fantastic job on her pebble quilting??

I don’t know about you, but seeing everyone’s progress inspires me to want to quilt today!!!

IMPORTANT LINKS

Blooming Wallflowers Week 8 – Machine Quilting Part 2

How is your Blooming Wallflowers quilt coming along? Some of you have completely finished while others are just getting started and that’s perfectly fine. I love to encourage everyone to participate at their own pace. In cased you missed it, click here for quilting part 1 including 4 short You-Tube videos showing exactly how I quilted the blocks.

Blooming Wallflowers made with Abstract Garden and Modern Marks

Today I’ll go over how I quilted the background using one of my favorite filler motifs – jagged stipple. In the quilting plan below, I quilted jagged stipple in the background areas after all of the blocks were quilted. I love filling in a quilt this way: as long as you can trace an unbroken line around your quilt, you can quilt the design continuously without any starts and stops.

Blooming Wallflowers Block Quilting Plan

Quilting all of the blocks first is what I call “anchor quilting” which means that the quilt is secure and won’t shift as I scrunch and smoosh it under the machine to finish up the rest.

I recommend practicing drawing out the design freehand on a blank sheet of paper, and even quilting a practice block to get a flow for the design. The jagged stipple is very forgiving and is basically a series of abrupt jaggedy lines going in every direction.

Machine Quilting Jagged Stipple

I quilted Jagged Stipple on a larger scale for my Improv Squares Quilt Pattern.

There’s really no wrong way to do it! In fact, I love the jagged stipple design so much, that it inspired one of the prints from my previous fabric line – the “Paper Cuts” print from Fandangle.

Fandangle Fabric Paper Cuts

Click here to get yardage of the paper cuts print from Fandangle.

Here’s another short video showing how I move back and forth and all around to quilt this design. I especially love the look of texture on texture when I quilted the jagged lines on top of the navy blue Herringbone print from Modern Marks.

Because I’m using a matching blue Aurifil thread (from my Piece and Quilt Collection – Colors), it’s hard to see the actual stitching, which is usually a good thing so you won’t see all of the wobbles and bobbles as I quilt.

Here’s a detail shot where you can just barely see the quilting. I like quilting textural designs on busy quilts because I want my quilting to enhance the quilt rather than being the star of the show!

Blooming Wallflowers quilting detail

So give this fun design a try – whether you quilt it on this quilt or another WIP (work in progress).

IMPORTANT LINKS

Blooming Wallflowers Week 7 – Machine Quilting Part 1

Now we get to my absolute favorite part of the quilt-making process – machine quilting!!! I’m breaking this section into 2 posts so you’ll have plenty of time to get ‘er done! And thanks to all of you who keep sharing your progress, no matter what step you are on. It’s so inspiring to see all of the fantastic Blooming Wallflowers out there!! Remember to scroll to the end of this post for links to all of the quilt along steps and other important info.

Blooming Wallflowers Quilting

Above is my sewing machine setup. I have a drop in table so that my sewing machine lies flush with the table. I’ve also put another table to my left, forming an “L” so that the quilt has plenty of room and won’t fall off the table. I’ll sit in the chair and scrunch and smoosh the quilt out of the way as I quilt.

Make a Quilting Plan

I always have a plan when I’m going to quilt a quilt. That way there are no surprises and I can enjoy the quilting process. Here’s my basic quilting plan that’s included in the Blooming Wallflowers quilt pattern:

Blooming Wallflowers Block Quilting Plan

I’m quilting 3 different designs: chevrons in the print triangles, pebbles in the light blue triangles, and jagged stipple in the background. I can quilt all of the triangles per block at once without stopping; then I’ll go back and quilt the navy blue background later. I used a light blue thread from my Aurifil Piece and Quilt collection Neutrals on the triangles, and will use a darker blue thread from my Colors collection for the background.

Free Motion Quilting Blooming Wallflowers

Here’s what the back side of the quilt looks like after quilting all of the triangles. I always use the same color thread in top and bobbin so that if there are any tension issues, it won’t show. I don’t mind seeing the quilting on the back of the quilt. In fact, I actually like how it shows up!

Notice how my actual quilting deviated slightly from the plan. I decided to quilt a few more lines in the chevrons, and I embellished the chevrons with an extra row of pebbles and some zig-zags to jazz it up a bit.

Step by Step Quilting Videos

Here are a few short videos of me quilting the blocks so you can see how I did it. Be sure to enlarge the screen for a better view:

First, I stitched in the ditch very carefully around one light blue triangle.

Then I filled in the light blue triangle with pebbles. I’m using a thicker ruler foot because I’m doing the pebbles and ruler work all at the same time.

Next, I used a special acrylic ruler to quilt straight line chevrons. I didn’t worry about the lines being equal in distance or hitting the points exactly. I don’t actually love doing ruler work because it’s a little too fussy for my taste. But I’ll use it to quilt straight lines as long as they don’t have to be exact.

Once the chevrons were quilted, I embellished one section with free-motion zig-zags. I quilted each section of triangles (the Abstract Garden prints and the light blue background) in one pass, with only one start and stop for the whole block.) In other words, I did all of the pebbles in one triangle and then went straight into the chevrons.

To start and a line of stitching, I take about 6-8 teeny tiny stitches and then start quilting normally. When I’m done, I end with 6-8 teeny tiny stitches to hold it in place and cut off the excess threads. Starting and stopping in a seam makes it less noticable.

Next week, we’ll quilt the background! I recommend trying out the quilting designs on a scrap of fabric and batting first, before applying them to your quilt.

IMPORTANT LINKS

Blooming Wallflowers Week 6 – Catch up Break & Inspiration

I’m adding in another “catch-up” break so that those of you following along will have plenty of time to work on your quilts. But just remember, you can work on Blooming Wallflowers on your own schedule, too! Scroll to the end for links to all of the previous QAL posts.

Blooming Wallflowers by Christa Watson QuiltCon 2019

Of course I had to match my shoes to my quilt!!
Click here to get a Blooming Wallflowers kit (while supplies last).

It was exciting for me to see Blooming Wallflowers hanging in the show at QuiltCon last week! The biggest comment I got was how much nicer it looked in person (probably due to my inadequate photography skills, LOL!)  and how much everyone loves the Navy Herringbone background from Modern Marks.

Now it’s your turn to show off what ya got so far! Take a look below at these fabulous works in progress being shared on Instagram #bloomingwallflowersquilt and in my Christa Quilts Facebook group. Then be sure to share your progress, too!

Student Work - Sandra C's version of Blooming Wallflowers

Sandra C aka @thebiasedge on Instragram shared her gorgeous quilt top that she’s getting ready to load on her long-arm. I can’t wait to see her quilting in progress!

Michelle H Blooming Wallflowers

I love how Michelle H made hers bigger by adding more blocks. Her print fabrics are fantastic!

Robin P's Blooming Wallflowers quilt

Robin P (aka Palm Beach Quilter) chose a light green background for her version. She made the baby size which is the exact same layout, except the blocks are smaller! I’ve included 3 different sizes in the quilt pattern so you can customize it to fit your needs.

Blooming Wallflowers top by Gayle S

Who says you have to use a dark background? Gayle S is creating a stunning version with white background and a fun polka dot accent fabric. Isn’t it so fun??

Next week I’ll start sharing tips for fun and interesting machine quilting – I can’t wait!

IMPORTANT LINKS

Blooming Wallflowers Week 5 – Basting

Welcome to everyone’s LEAST favorite part of making a quilt – basting! But hopefully with my methods and tips, it will be less painful of a chore for you. My #1 tip is to take your time with basting and don’t rush the process. If you have a nice and flat quilt while basting, it will make machine quilting sooo much easier!!

Spray Basting - smoothing the quilt

The key to successful basting is ensuring smooth, flat layers.

I use 505 Basting Spray to baste my quilts. It allows me to avoid pins while quilting and it ensures that every single inch of the quilt is sticking to every other inch. I have already created complete photo tutorials of my step by step process using either a design wall or a table. See the links below the image check them out:

Spray Baste

Below is a short 25 second video of me smoothing out the layers on the design wall, using a long acrylic ruler. Once I do this over the whole quilt, I take it to the ironing board and iron it, first from the back side and then from the front. The iron sets the glue and it’s ready to quilt!

If you would like to see the entire basting process on video (using a table), be sure to check out my Craftsy/Bluprint Class – Startup Library: Quilting. It walks you through the entire process of making a quilt from start to finish – over 6 hours of video content!!

Startup Library Craftsy Class by Christa WatsonClick here to enroll in my Startup Library Quilting Class

Hopefully between my videos and written tutorials, the entire basting process won’t seem so scary!

Next week will be another catch up break as I head to QuiltCon, so remember to share pics of your progress on Instagram #bloomingwallflowersquilt or in my ChristaQuilts Facebook Group. If I share your pic on my next blog post, you’ll win a free PDF pattern of your choice as my way of saying thanks for quilting along!

Blooming Wallflowers quilt

IMPORTANT LINKS

Blooming Wallflowers Week 4 – Sewing the Quilt Top

I love seeing everyone’s progress on their Blooming Wallflowers quilts! Whether you are making it from my fabrics, or something completely different, they are looking so fabulous! Check out the hashtag #bloomingwallflowersquilt on Instagram or in my Facebook group to see how everyone is doing. This week we will sew our completed blocks from last week to make the quilt top.

Blooming Wallflowers Quilt Pattern

Blooming Wallflowers Quilt Top – Throw Size

This quilt top is sewn together in diagonal rows, so it’s much easier to assemble than it looks. The trick in getting it right is to pay attention to the placement of each individual block. When I made mine, I constantly referred to the pattern cover and the quilt top assembly diagram on pages 8-9 of the pattern for proper color placement.

If you have the space, I recommend laying out the entire top on a design wall or large area and then working on sewing one diagonal row at a time. When you sew the blocks together, you’ll have little triangle tips sticking out that you’ll want to trim up once each row is complete.

Tips for Sewing the Top

My number 1 piecing tip for accuracy is to sew slowly and keep an accurate quarter inch seam. I also like to use a stiletto which allows me to get right up into the seam I’m sewing together. In the short video below, notice how I’m joining the blocks so that I get a perfectly crisp point. I sew with a shorter stitch length (2.0 instead of 2.5) and I’ve pressed my seams open so that everything lies flat and the intersections are easy to see. I also slow down and ensure that the ends will match. You can also use pins if needed.

Remember to chain piece for speed and efficiency. That means to start sewing two blocks together and then without clipping threads in between, add the next two pieces to be joined. Whenever I start and finish a section of sewing I use a scrap of fabric as a “leader” or “ender” to catch my threads and prevent things from become a big mess!

Your “homework” for this week is to complete the quilt top. But remember, if you are just starting, that’s ok.  This quilt along will stay up indefinitely so you can work at your own pace.

IMPORTANT LINKS

Blooming Wallflowers Week 3 – Continue Sewing the Blocks & Loads of Inspiration!

If you are new to the Blooming Wallflowers Quilt along, click here for links to all of the QAL posts.

Blooming Wallflowers Triangle in a Square Blocks

Click here to get the Blooming Wallflowers (printed) quilt pattern to join in the fun!
Click here to purchase the downloadable PDF version.

Welcome to Week 3 of Blooming Wallflowers Quilt Along! I’ve built in a few “catch-up” breaks so that you won’t feel overwhelmed with the process. After all, there are a LOT of blocks to sew! This week we are continuing to make the blocks as shown in the videos from last week.

Inspiration From Fellow Quilt Along Participants

Here’s some inspiration to motivate you as you start, or continue to work on your blocks. Each person featured will get a free PDF pattern of their choice as my thanks for sharing their progress!

Blooming Wallflowers Work in Pr

Patti B has picked out a lovely blue and and yellow combo that I think is going to be just fabulous!! She’s got her rulers and pattern ready to go and will make great progress in no time!

Blooming Wallflowers Quilt Along

Charald C. purchased a Blooming Wallflowers quilt kit and she’s finished cutting all her pieces; now they are ready to sew! I love how she lined them all up in yummy colorful stacks!

Blooming Wallflowers QAL

Caroline C. has chosen a rainbow of yummy goodness for her quilt. I’m in love with the aqua polka dot that she’s using for her background. I can’t wait to see it coming together!!

Blooming Wallflowers QAL

Kimberly W. took my advice about sewing all of one side of the triangle first and then all of the other side to make the sewing faster! I love her batik-y prints!!

Blooming Wallflowers QAL

Laina L. is about halfway through sewing her stack of blocks. Don’t they look great? She’s also using the Abstract Garden/Modern Marks fabric combo.

I hope this inspires you to make one of your own, and remember, you can join in anytime! Click the links below for supply lists and other important info. And continue to share your progress in my Facebook group, or on Instagram using the hashtag #bloomingwallflowersquilt.

IMPORTANT LINKS

Coming up next week will will start putting the top together so stay tuned!!

Blooming Wallflowers Quilt Pattern