Finished Quilt – Squiggles Made from Modern Marks Fabric

At long last, I’m excited to show you the finished version of Squiggles, made from my first fabric line with Benartex, Modern Marks that released late last year.

Squiggles by Christa Watson

Squiggles version made from Modern Marks with black background

You may remember that the original version, shown below was made from precut squares with a cream background and overlapping wavy line quilting using a walking foot. The step-by-step instructions for both piecing and machine quilting this version are included in my third book, Piece and Quilt with Precuts.

Squiggles Quilt from Piece and Quilt with Precuts

Squiggles, original version from Piece and Quilt with Precuts

When I got my fabric samples last year, this was the first (of many) quilts that I wanted to remake using my fabric. It just goes to show how different a quilt can look using the same pattern, but different fabrics.

Squiggles Quilt Top

I love the bold bright colors against the black!

With the updated version I really wanted the modern fabrics to pop, which is why I paired them with the deep black. I think it gives the quilt a more contemporary/modern vibe which I really like.

Aurifil Thread Squiggles

Choosing thread color was the hardest part of this quilt! I knew that any colorful thread would work, but I opted to go with the bolder Turquoise Aurifil to really give it some punch.

Quilting Random Crosshatch

Although I love to piece, machine quilting is still my favorite part of the process. I absolutely loved adding an extra layer of texture to this quilt using random crosshatch quilting, which is really just quilting parallel straight lines in random intervals across the quilt in both directions.

Machine Quilting Squiggles

Here are some pretty “scenic” shots, taken in the desert behind our house. My husband Jason really enjoys doing photography and capturing photos in interesting spots.

Squiggles Quilting Detail

I love how the bright colors contrast with the softer, muted desert background.

Squiggles in the Desert

This is my favorite picture: showing the Las Vegas skyline behind the quilt:

Squiggles by Christa Watson

Squiggles Finished Quilt Stats

Click here for a list of shops that carry Modern Marks fabric.

Squiggles Quilt Along Week 7 – Quilt Binding Tutorial

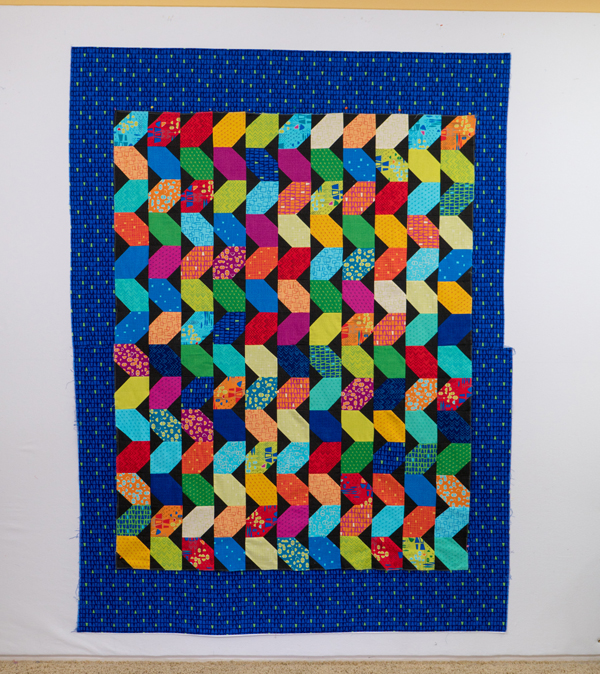
I’ve been thrilled to see all of the fabulous versions of Squiggles that you all are making. Some of you have already finished, others have made more than one version, while others are just beginning. Just remember – I’ll leave the blog posts up indefinitely, so you can make this fun quilt on your own schedule!

Piece and Quilt with Precuts

Step by Step Binding Tutorial

This is the same method I use for all of my quilts.

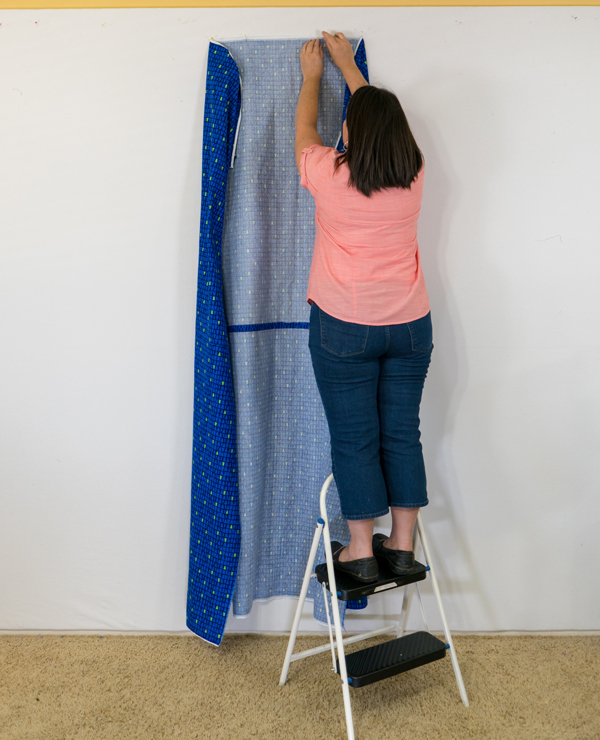
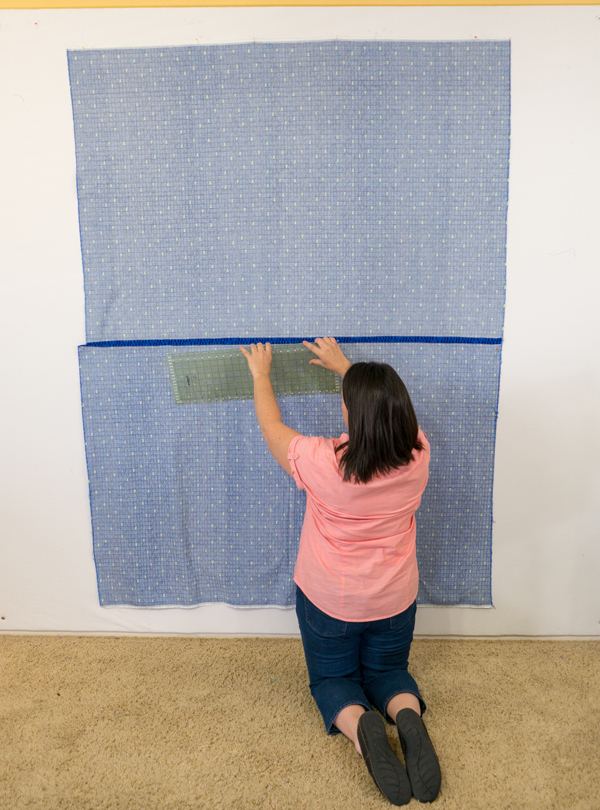
Step 1: Trim the Quilt

Trim the extra batting and backing flush with the edge of the quilt top.

Binding Square up the Corners

I like to use a large square ruler for the corners, and a long acrylic ruler for the sides.

Binding Trim the Sides

Step 2 – Make the Binding

Lay out two binding strips so that they overlap at a 90 degree angle. Mark a diagonal line on the top strip from corner to corner, where the corners overlap. Pin in place if needed.

To figure out how many binding strips you need to cut, add 10″ to the perimeter of the quilt (length of all 4 sides of the quilt). Then divide that number by 40″ to get the number of strips to cut. For the Squiggles quilt, the number of strips to cut is listed on page 15 of the book.

Tip: most patterns suggest to cut the binding strips 2 1/4″ to 2 1/2″ wide. However, I’ve recently began using 2″ strips and I like it much better. The narrower strips allow me to get a tighter finish, and both sides of the binding end up the same size.

Sewing the Binding

Sew on the drawn line and trim excess to 1/4″. Trim off the “dog ears” – the triangle tips, too. Join all of the strips the same way and press seams open. This will distribute the bulk of the seam when it’s attached to the quilt.

Join Binding Strips

Trim the beginning of the binding strip at a a 45 degree angle and press the entire length of binding in half, wrong sides together. Be sure to trim the starting edge first, before you press it in half.

Finished binding, ready to sew

If desired, fold up the binding, or roll it up until it’s ready to attach to the quilt.

Step 3 – Attach the Binding to the Quilt

Attaching the binding

Start attaching the binding on the side of the quilt, not at the corners. Line up the open edges of the binding to the trimmed edge of the quilt and leave about 8″-10″ of the tail hanging off. This will allow plenty of room for attaching the two ends later.

Place a pin in the binding and quickly “walk” it around the quilt’s perimeter to ensure that none of the pieced seams will land in the corners. Adjust the binding as needed and start sewing at the pin, using 1/4″ seams.

Binding 1/4" mark

When you reach the corner, stop sewing 1/4″ away from the corner. Mark a line if needed to get an exact measurement. Then sew off the side or corner of the quilt.

Folding the binding corner

To get a perfect miter in the corners, fold the binding up and away from the corner. Ensure that the right side of the binding aligns with the edge of the quilt.

Mitering the binding

Fold the binding back down, leaving the excess in the corner. Make sure the top of the fold lines up evenly with the top edge of the quilt. I called this the “funky fold.”

Grasp the top and bobbin threads and carefully sew down the next side of the binding. It will be thick at the corner where all of the bulk is.

Binding Corner

Once you sew a little ways, check the front of the quilt. It should form a nice crisp miter at the corner if you’ve lined everything up correctly.

Attaching the binding

Continue sewing down all 4 sides of the binding, taking care to get nice crisp miters at the corners. When you get close to the starting point, leave several inches between the starting and ending point of the binding, so you have room to attach the two ends of the binding.

Step 4 – Secure the Ends

Open up the end of the binding and place the start of the binding (the angled cut end) on top of it. Be careful that the strips don’t shift.

Matching up the binding

Open up the beginning binding “tail” (below), and notice that the angled end runs in the opposite diagonal direction in which it was folded. Mark a line on the uncut strip, following the direction of the cut end.

Matching up the binding ends

Measure and cut 1/2″ away from the marked line. This will add the amount needed for seam allowances on both ends of the binding.

Trimming the ending tail

Match up the binding right sides together and make sure it doesn’t get twisted. Pin the binding, offsetting the triangle tips by about 1/4″ and sew with 1/4″ seams to close the binding. This will create a hidden join that is smooth, with no bumps.

Join the binding ends.

Finger press this final seam open (it’s hard to get an iron in there at this point), and pin the un-sewn binding to the quilt, easing in any fullness. Attach this last bit of binding to the quilt, overlapping the starting and ending stitches.

Pin the binding in place

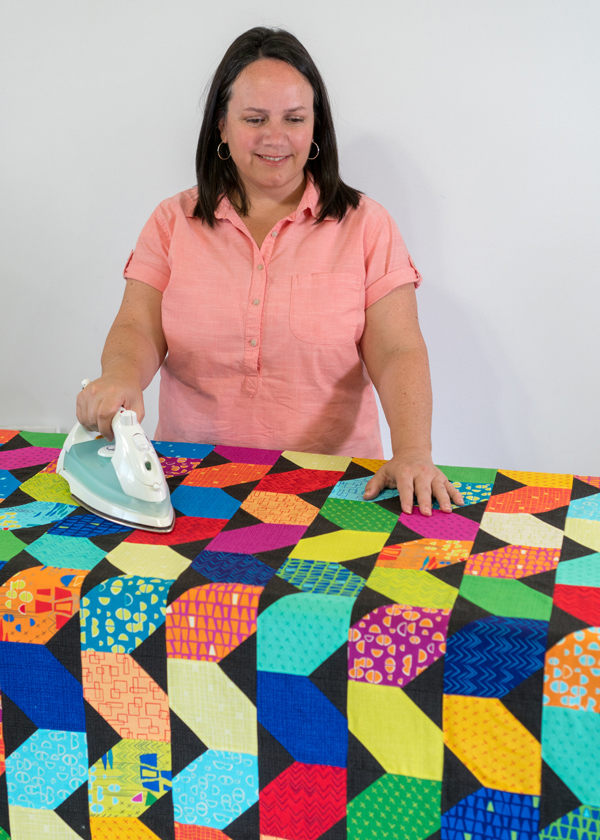
If desired, press the binding away from the quilt with a hot dry, iron. This will help the binding wrap around to the back of the quilt much easier.

Secure the binding to the back of the quilt with pins or binding clips. When you get to the corners, fold them in opposite directions and clip in place.

Secure the binding with Wonder Clips

Finish with small hand stitches on the back side. I use a single  16″ – 18″ length of Aurifil thread in a color that matches the binding. I use a thimble to push the needle through and sew from right to left, with the bulk of the quilt away from me. I’ve noticed that some quilters prefer to sew the oppoiste direction with the quilt toward them, and that’s okay, too – whatever works for you!

Of course, you can finish the binding by machine if you prefer, but I love the slow pace of hand stitching while I relax and cuddle with the quilt.

Binding by hand

Here’s a quick bonus video of me hand-stitching  the binding on another quilt:

Step 5 – Share, Share Share!

I hope you enjoyed this tutorial! You are welcome to share on pinterest or your favorite social media (with attribution). I hope that binding doesn’t seem so scary and feel free to mix it up with your favorite binding method.

This concludes the quilt along tutorials – next week I’ll share some finished pics of Squiggles, taken in the desert behind my neighborhood. Be sure and share your progress and finishes with me on instagram #squigglesqal or in my ChristaQuilts Facebook group. I love seeing them!!

Squiggles Quilt by Christa Watson

Click here to get an autographed copy of Piece and Quilt with Precuts.

Click here for links to all of the Squiggles Quilt Along blog posts.

Squiggles Quilt Along Week 6 – Machine Quilting Tips

This week we get to my favorite part of any quilt – the machine quilting!! For Squiggles, I quilted it with my walking foot. I always recommend starting off with walking foot quilting for beginners because it really is no-fail quilting. In the book, I show you how to quilt organic, squiggly lines with the walking foot, for the original version made from Pat Sloan’s The Sweet Life charm packs:

Machine Quilting Ideas

Squiggles Quilt from Piece and Quilt with Precuts

The original version of Squiggles: pattern & quilting instructions available in my latest book.
Click here to get your signed copy of Piece and Quilt with Precuts.
Click here to purchase The Sweet Life charm packs seen above, while they last.

If you’d like to quilt fun, fast and easy squiggle lines, follow along in the book on page 19 to see the instructions and quilting plan for Squiggles

Another quick and easy way to finish this would be to quilt a wavy grid, following the directions for “Gridwork” on pages 26-27. Check out a closeup of the wavy grid quilting below:

Gridwork quilting with a walking foot

For my Squiggles remake from Modern Marks fabric, I wanted to try out a different design that I mention briefly in the book on page 21 as a “make it your own” idea.  Rather than quilting wavy lines, try quilting irregularly spaced “straight-ish” parallel lines to create a random crosshatch grid.

Random crosshatch quilting

I chose a highly contrasting Aurifil thread in Jade so that it would show up on the busy prints.
The thread is from my Piece and Quilt Collection – Colors.

Random Crosshatch Quilting Tips

Here are a few tips on how I approached quilting the second version of Squiggles:

Machine Quilting Squiggles

I always start quilting on the right hand side of the quilt and “scrunch and smoosh” the bulk of the quilt as I go. First I make one pass across the quilt in both directions to anchor the quilt for more quilting later. This breaks up the quilting, secures it in place, and allows me flexibility on how densely I want to quilt it.

Start and end off the quilt

I try to choose designs that allow me to start and end each line of stitching off of the quilt in the batting. Then I don’t have to tie off all those pesky threads!! For best results when using walking foot/dual feed quilting, try to stitch in one direction rather than stitching the lines up and down or back and forth across the quilt.

It will help prevent puckers or “whiskering” that looks like little creases caused by the shifting of the fabric. I make one pass across the quilt from right to left, quilting “anchor” lines depending on how wide the blocks are. Then I rotate the quilt when I reach the middle, and keep on going to the other side.

Use gloves to move the quilt

I wear Machingers gloves to help grip the quilt and give me a little more power when I push the quilt through the machine. I also use my hands as a hoop and only focus on the area I’m quilting between my hands. It’s not a very larger area, so I re-position my hands and the quilt A LOT while quilting, and that’s ok!

For the random crosshatch, some of the “anchor” lines will be in the ditch, while some of them may be randomly to the side of the ditch. Below are three different ways that I mark or randomly quilt straight lines across the quilt:

Marking With a Washable Pen

Marking Straight Lines

Use an acrylic ruler and washable marking pen to mark guidelines if needed. I used a combination of marking and eyeballing when quilting my straight-ish lines. Mostly I changed it up so I could dry out several different methods. Hey, what I can I say? I’m always experimenting!

Painter’s Tape

Use Painter's Tape as a Guide

Painter’s tape is one of my favorite marking tools! I can place it at random intervals, using my long acrylic ruler to keep the lines straight. The best part about quilting random lines is that I can stitch along both sides of the tape to quilt 2 lines at a time!

Bonus tip: rather than putting the needle next to the tape, put the edge of your quilting foot next to the tape. It will space the lines out a little wider, and you won’t accidentally stitch through the tape!!

Walking Foot Guide Bar

Using a guide bar for quilting

You can also use a guide bar to follow along a seam line, or previously quilted line. Just decide how far apart you want your lines, and adjust the width of the guide bar appropriately.

Notice that I’m using the BERNINA dual feed rather than a walking foot. My machine has a built in mechanism that attaches to the back of a specialty “D” foot, giving me more options of which foot I can use. It acts just like a walking foot and performs the same function. I also like using an open toe so I can see exactly where the needle is stitching.

Machine Quilting Random Crosshatch

Here’s what Squiggles is looking like after a few random passes across the quilt in both directions.

Keep on Quilting!

Walking Foot Quilting

Continue quilting randomly spaced liens both horizontally and vertically across the quilt until you are happy with the spacing. The hardest part is knowing when to stop!!

Machine Quilting Random crosshatch

Click here to purchase a Squiggles Quilt Kit made from Modern Marks fabric.

And just remember, if you aren’t happy with the way it looks, just keep quilting. When I had only quilted a few lines on the quilt, I honestly wasn’t sure if I would like the end result, and the thread really stood out like a sore thumb. However, once I added more lines, all of the sudden, I couldn’t see any of the imperfections, and I love the amazing texture that was created!

Remember to share your progress!

Part of the fun of any quilt-along is seeing all of the variety everyone is making. Check out my ChristaQuilts group on Facebook to cheer on your fellow quilt-alongers and post pics of your WIP’s (works in progress). You can also tag me on instagram @christaquilts and #squigglesqal.

The next post will go up in 2 weeks, giving everyone a chance to catch up on their progress!
Click here for the previous Squiggles Quilt Along tutorials.

Squiggles Quilt Along Week 5 – Basting

Spray Basting the quilt

I prefer to use 505 basting spray for my quilts, but pin basting works, too. (Just be sure to use a LOT of pins so it doesn’t shift!) Although I’m going to show you how I basted Squiggles using my design wall, know that you can apply this method using a table, too. Just work from the center out and move the quilt as needed to secure the layers.

Step 1 – Spray the Backing

Spray basting a quilt by Christa Quilts

Use a large sheet as a drop cloth to catch any over-spray. It will also protect the quilt from the ground, too! Generously spray the wrong side of the quilt backing with basting stray, ensuring coverage in all areas. Work your way across the quilt from one side to the other. Your quilt will stick better and use less spray by spraying the top and backing separately, rather than spraying the batting as provided by the instructions on the can.

Although I’ve pressed both the backing and quilt top, some wrinkles and fold lines may reappear, but that’s okay. You’ll smooth everything out later.

Step 2 – Spray the Quilt Top

Spray basting a quilt by Christa Quilts

Spray the wrong side of the quilt top, just like you did for the backing. You can still use the same sheet as a ground cloth, and then wash it when you are finished. It’s easier to spray the top because you can use the blocks as a guide to help you remember which areas to spray. I usually spray row by row.

Step 3 – Fold up both layers and bring inside

Spray basting a quilt by Christa Quilts

Right now it will look like a bit of a sticky mess. But that’s okay – the layers are tacky to the touch but not stuck. You can easily peel them apart again. Your hands will get a little sticky during this process, but the glue easily washes off and won’t cause any problems while quilting. You don’t have to baste right away as it will still maintain its stickiness for awhile afterward.

Step 4 – Hang UP the Backing

Spray basting a quilt by Christa Quilts

Pin or stick the backing to the design wall, wrong side out. Start at the top and let gravity help you. I’m short so I use a step ladder to get up high enough and I’m not trying to center the backing perfectly. I’m just glad that this is a process I can do completely by myself, without help.  Notice how the backing might stick to itself and get a little scrunched up at the bottom. That’s perfectly fine for now – see the next step.

If you don’t have a design wall, you can use a table instead. Just smooth out the center of the backing, add the other layers and smooth out one section of the quilt at a time.

Step 5 – Smooth Out the Backing

Spray basting a quilt by Christa Quilts

Take about 10-15 minutes to completely spread and smooth out the backing. Work your way from top to bottom, smoothing it out as you go. Use a long acrylic ruler to help you. Think of it as an extension of your arm, giving you more coverage.

The acrylic ruler will get sticky over time, so I have an extra ruler that I use ONLY for basting. You want the backing nice and smooth before you add the batting.

Step 6 – Add the Batting

Spray basting a quilt by Christa Quilts

I’m using Hobbs 80/20 batting in black for this but natural is great, too!

Before I add the batting, I will actually iron it first to get out any wrinkles. If it’s cotton batting, you can iron right on the batting. If it has polyester or wool in it, you can protect it with a length of fabric. I use a hot, dry iron with no steam. You can iron wool batting with no problem – just use a lower setting and don’t press too hard. If you use steam, it might shrink or felt, so always test a small piece first.

Just like the backing, start at the top and place a few pins in the design wall if needed at the top to secure it. It’s okay to peel off part of the batting and re-position if needed.

Step 7 – Smooth the Batting

Spray basting a quilt by Christa Quilts

Take time to smooth out the batting, using your hands and the long acrylic ruler.  Notice how it’s getting a bit wonky. That’s okay as long as the batting and backing are larger than the quilt top – the excess will get cut away.

I like being generous in my batting and backing so I don’t have to try and line things up perfectly. That’s above my skill level for sure!! I guessed where the rough middle of the backing and batting are and like a good friend of mine says, “close enough is good enough!”

Step 8 – Add the Top

Spray basting a quilt by Christa Quilts

At this point, it looks a little bit like a hot mess, but don’t worry – it will all work out in the end! Fabric is flexible and it’s okay to smoosh things up a bit – your quilt can handle it. (Those that are familiar with my scrunch and smoosh method of machine quilting can relate!!)

Repeat the same process as before: add the quilt top layer and let it drop down the wall with gravity; take time to peel it apart, and smooth it out.

Step 9 – Smooth the Layers

Spray basting a quilt by Christa Quilts

Make sure there’s enough batting and backing sticking out on all sides and take plenty of time to smooth out the top. By smoothing each layer as you go, it will vastly eliminate the chances of puckers and wrinkles appearing on the back.

If you are too far off to one side or another, take off the top and try again.

Step 10 – Smooth Out Each Row

Spray basting a quilt by Christa Quilts

As you are smoothing out the quilt, use the long ruler to help ensure that each row is lined up vertically and horizontally. You can gently nudge the blocks into place if needed.

Step 11 – Roughly Trim off the Excess

Spray basting a quilt by Christa Quilts

Now it’s time to cut off all that extra bulk around the edges. I use these cutoffs for machine quilting practice later. Or you can wash the excess backing and throw it in your stash.

Notice that I trim it pretty close to the edge. You can leave more wiggle room if you like, by I usually only leave about an inch or two. This prevents the excess from getting flipped over underneath the quilt and accidentally stitched through while you are quilting.

I’m sure I’m not the only one who has done that, right??

Spray basting a quilt by Christa Quilts

I use batting shears to cut through the bulky layers quickly and easily! You can trim the quilt on the design wall, or take it off and do it on a table or the floor.

Step 12 – Press the Quilt

Spray basting a quilt by Christa Quilts

I just love the vibrant colors and geometric prints in Modern Marks!

This is where the magic happens! For the final step, iron the quilt on the back side and then on the front. Use a hot, dry iron – no steam. This is a final chance to smooth out any wrinkles and nudge things into place. The iron helps set the glue so that every single inch of the quilt is stuck to every other inch, making it a breeze to machine quilt!

I use a “Big Board” that goes on top of my ironing board to give me more work surface. Also, the basting spray will not gum up the needle or cause any problems while quilting. And it easily washes out once you are finished with the quilt.

Next week we’ll tackle my favorite part – machine quilting. I can’t wait!!

Relevant Links


Squiggles Quilt Along Week 4 – Batting and Backing

If you are just now joining the quilt along – click here for links to all of the previous posts.

Squiggles Quilt Top

I remade Squiggles from precut squares of Modern Marks, plus contrasting background.

Now that the Squiggles quilt top is finished, it’s time to prepare it for basting, which will be next week’s post. I decided to throw in an extra tutorial on backing since it’s the part that’s not talked about very much. This will also allow those of you just joining to catch up with your piecing. But remember – you can go at your own pace and quilt along at any time!

Calculating and Sewing the Backing

You want to ensure your backing is at least 4″ larger around the quilt on all for sides. For example, my version of Squiggles finishes at about 50″ x 63″. So my pieced backing should measure a minimum of 58″ x 71″.

Backing of Squiggles, Made from Modern Marks

When measuring backing, I put it up on m y design wall and make sure it’s wider than the quilt.

I always work with 40-42″ wide fabric so If I piece two lengths of fabric parallel to the selvage edges that will give me roughly 80″ of length. So that takes care of the 71″ measurement. More backing is fine because it can just get trimmed away later. For the other direction, 58/36 inches = 1.611 or approximately 1 3/8 yards of fabric. Since you need two of those, that’s a total of 3 1/4 yards of backing fabric, cut into two pieces.

Pieced Backing for Squiggles

It takes 2 lengths of fabric to completely cover the finished quilt top.

I chose to use the quirky triangles print in Navy for my backing. My recommendation is to use a busy backing with a colorful quilt so that whatever thread color you choose for quilting will blend in on the back of the quilt. Busy backs also help hide quilting imperfections, too!

Finished backing

Always double check that the pieced backing is bigger than the top on all four sides.

Tear or cut of the selvages and join the two pieces together with 1/2″ seam. Then press the seam open. It’s okay if the two pieces aren’t perfectly even because the excess will get trimmed away later.

A note about batting

I prefer to use natural fiber battings, like Hobbs cotton, wool or an 80/20 blend. Natural fiber batting will cling to the quilt better and reduce the chances that you’ll get tucks or puckers while you quit.

Hobbs 80/20 batting black

Bonus tip: take a picture of the batting with your quilt so you remember what’s in it!

I used black 80/20 batting for my quilt, because the colors were so bright and saturated, and the background is so dark. However, it slightly shadowed through the lighter fabrics. It’s not noticeable unless you get up really close. But each quilt I make is always an experiment!

Be sure to trim the batting down before you baste the quilt, but make sure it’s still an inch or two larger than the top on all sides. I use the floor for this and pair of specialty batting scissors. They cut through the batting like butter!

Squiggles - Trim the Batting

I’ll also take an extra step to iron m y batting so it’s nice and flat for basting. For natural fiber batting, I’ll spritz it with water and press with a hot, dry iron. For a more delicate batting, I recommend covering it with fabric while you press. As always, be sure and test a small piece first to see how it performs.

Share Your Progress

Click here to join my facebook group and share pics of your progress!
You can also share on instagram by tagging @christaquilts and #squigglesqal.

Click here for all of the Squiggles Quilt Along tutorials.
Click here to pick up a signed copy of my book to get the Squiggles quilt pattern.

Squiggles Quilt Along Week 3 – Assembling the quilt top

How are you doing on the Squiggles Quilt Along? Some of you may have just started while others of you have already finished the quilt top, and that’s totally fine. With all of my quilt alongs I encourage you to work at your own pace and share progress. Share on instagram with the hashtag #squigglesqal and see the other amazing versions everyone is creating. Or join my Christa Quilts facebook group to post pics and get additional support!

This week it’s time to assemble the quilt top!

See the diagram and instructions. page 18 of Piece and Quilt with Precuts for the quilt top assembly. Here’s a tip from one of the members of my facebook group who recently completed her top:

“Try sewing the rows together vertically instead of horizontally – it’s easier to line things up that way.”

And a bonus tip from me: notice that when you sew the rows together it looks like the background triangles don’t match up and that’s correct. This gives the design a slightly more interesting look and makes it faster and easier to go together. I also recommend pinning generously for best results.

Squiggles Blocks

The centers of the Squiggles blocks don’t intersect. That’s correct.

Once the quilt top is complete, take a “victory lap!” Sew approximately 1/8″ in from the edge of the quilt to keep the seams from splitting open as you handle the quilt. I usually do this with a longer stitch length so it goes faster.

My Work in Progress

My mom helped me put together the quilt top earlier this summer so that I could display it along with the fabric at a company trade show. I only had a few days to complete the top, so my in-progress pics aren’t great. But here are the rows going up on my design wall. The rows were sewn together randomly and then I spent time arranging them until I was happy with the overall composition

Squiggles work in Progress

I called in the reinforcements to help me put together 5 quilt tops in 4 days! You can see one of my quilting buddies pressing Squiggles amidst all of the sewing chaos!

Sewing Party at Christa's

(Notice the other quilt going up on the design wall? You can get that free pattern here.)

Bonus Inspiration

Here are a few quilt tops in progress shared by some members of my facebook group. I’m just blown away by the creativity!!

Yellow and Gray Squiggles

Karen T. is working on this lovely yellow and gray combo. She’s currently deciding on her final layout, so you can pop over to the Facebook group and lend your suggestions!

Squiggles Gradation

I love this fabulous color gradated design that Maritza F is working on. It’s so clever and a great way to use up some of her older charm pack stash!

Modern Marks Squiggles

Marcia D recently finished her quilt top from one of the Squiggles Modern Marks kits. Because of the color placement, even kitted versions of Squiggles will each be unique!

Kits and books still available

Pick up a signed copy of Piece and Quilt with Precuts from me book here.
Click here to grab a Squiggles quilt kit or Modern Marks Fat Quarter bundle.

(As of this writing I have 7 fat quarter bundles and 3 kits left – two with a white background/red binding, and one with a black background/blue binding. But of course you can use any fabric you like!)

Squiggles from Piece and Quilt with Precuts

Click here for the complete Quilt Along Schedule with links to all of the previous posts.

Squiggles Quilt Along Week 2 – Making the Blocks

I sure have enjoyed seeing pictures of the fabrics everyone is using so far to make their Squiggles quilts. (Check out my facebook group and #squigglesqal on Instragram.) One of my favorite parts of any Quilt Along is seeing how different fabric choices affect the look of a quilt made from the same pattern. Even those who purchased Squiggles quilt kits will end up looking different because of the fabric placement.

Squiggles from Piece and Quilt with Precuts

I’m remaking Squiggles from my book using my Modern Marks Fabric.
Click here to purchase a kit with black or white background.

Making the Quilt Blocks

This week it’s time to make the Squiggles blocks! Turn to page 16-17 of Piece and Quilt with Precuts for instructions on making the individual units and sewing them into quilt blocks.

Squiggles Unit – See the book for how many to make and what size squares to  use.

Once the units are complete, randomly sew them together to make pairs of “C” blocks:

Squiggles Block from Piece and Quilt with Precuts

C is for Christa, right?? Just kidding!!

Bonus Piecing Tips

In order to get my quilt top really flat for easier domestic machine quilting, I prefer to press all of my seams open while sewing the blocks. Contrary to popular myth this will not weaken the seams.

Because I’m using bold prints with a black background, I pieced them together using a darker thread – Aurifl 50 weight cotton #4241 Very Dark Gray. This makes it less likely that thread will show through the seams when they are pressed open.


I’m using very dark gray from my Aurifil Piece and Quilt Collection – Neutrals

I also used a shorter stitch length to help secure the seams. For example, the default stitch length on my BERNINA is set to 2.5. I turn it all the way down to 2.0 while piecing so that the seams ends don’t come apart. Smaller stitches also helps ensure that you don’t see the thread peaking through the seams. If you don’t want to use a shorter stitch length, you can instead back stitch each set of units at the start and end of each unit while chain piecing.

Sharing is Caring

Next week it will be time to sew the blocks into the quilt top! In the meantime be sure and post pictures of your progress in my facebook group, and share them on instagram using the hashtag #squigglesqal. (You can also tag me on instagram @christaquilts). I love it when we all cheer each other on!

In fact, check out this fun mini quilt that Leslie Frost made from the corners that are leftover when you make the blocks. Isn’t it cute??

Squiggles Leftovers

Use up the leftover corners in a mini quilt or throw them in your scrap pile.

For a limited time I have Modern Marks Squiggles Kits available with a black or white background. But once they’re gone – they’re gone!!

Suiggles with Modern Marks

If you are just joining the quilt along, click here for the complete schedule.


Squiggles Quilt Along Week 1 – Fabrics and Cutting

Are you excited to make Squiggles? It’s a super easy precut quilt made from your favorite 5″ charm packs. As mentioned previously, I’m making my version using my Modern Marks fabric line with Benartex, but it will look great with any fabrics you choose, as long as you have a very strong contrast for the background. I’m using black, but it would also look fabulous with white or gray!

Squiggles recolored in Modern Marks

As of this writing I have 3 Squiggles Kits left for sale. Click here to purchase.

If you are just hearing about the Quilt Along, not to worry. Just grab the fabrics you need as listed below and join in anytime! This Quilt Along is totally free to follow (you just need a copy of my latest book), and you can post your progress on social media with the hashtag #squigglesquilt. You can also join my Facebook Group: Christa Quilts to share as many photos as you like and get additional help!

Supply List

Piece and Quilt with Precuts

  • Copy of my book, Piece and Quilt with Precuts for the piecing instructions
  • Two – 5″ charm packs of background solid or tonal fabric (or a total of 77 squares)
  • Four – 5″ charm packs of print fabric (or a total of 154 squares)
    • (Note – you can also substitute one 10″ square pack if needed, and cut to size)
  • 1/2 yard of fabric for binding
  • 3 1/4 yards of fabric for backing
  • 56″ x 70″ piece of batting (I recommend Hobbs batting)
  • Approx. 1200 yards (or one large spool) of fabric for quilting (I recommend Aurifil)
  • Sewing Machine with new needle and basic sewing supplies
  • Rotary cutting equipment (6″ acrylic ruler, mat, standard cutter with new blade)

Cutting the Fabric

Modern Marks Charm Pack

Click here to purchase Modern Marks Charm packs and precuts.

The super easy thing about making this quilt from precuts is that most of the cutting has already been done for you! If you are using 10″ squares, cut them into 5″ squares. If you are using 5″ squares, you’ve already saved yourself a huge step!

Benartex Basics precuts
Click here to purchase Benartex Basics in black or white.

Then follow the cutting instructions in the book on page 15 to cut out the background squares and you’re ready to start piecing the blocks next week!

Click here for links to all of the Quilt Along blog posts and schedule.

Click here to share pictures of your fabrics + progress in my Facebook group.

Save

Save

Save

Save

Save

Save

Save

Save

Save

Save

Happy New Year 2018 – Word of the Year – Squiggles Quilt Along

Happy Quilty New Year 2018! My words for this year are “simplify and focus.” I got caught up in the social media rat race last year, and near the end of the year I decided to scale down my social media presence so I could simplify my life and focus on what’s important. You can read my about my decision on a previous blog post here.

My Pride and Joy – Watson Family, November 2017

My oldest heads off to college this week (at BYU Idaho), and I’ve got a full year of teaching and creating lined up. I’m also excited to be blogging on a regular basis again where I can share indepth tutorials and lots of inspiring quilt images.

After a couple year break, I’m super excited to be hosting my next quilt along, featuring Squiggles from my book, Piece and Quilt with Precuts.

Squiggles recolored in Modern Marks

I’m remaking Squiggles using my Modern Marks fabric line from Benartex.
Click here to get Modern Marks charm packs to make a similar version!

The Squiggles quilt along will run each Monday for 6 weeks, starting January 15.

Click here for the Squiggles Quilt Along Supply List and Schedule

I hope you’ll share pictures of your quilt along progress, so I can cheer you on! Use the hashtag #squigglesquilt on Instagram, and post pictures of your progress directly to my Christa Quilts Facebook Group. I’m excited to start the fun in 2 weeks!!

Squiggles Quilt Along Schedule – Grab Your Fabric and Get Ready!

Let’s kick off the next year in quilty style, with a Quilt Along!! If you remember the launch of my newest book last summer, I teased the idea of remaking one of the quilts from the book in my new fabric. Readers were able to vote on their favorite quilt, and when to start the Quilt Along.

Well guess what? We’re going to start the Quilt Along on Monday, January 15 and it will run for 6 weeks, going through every step you need to make the Squiggles quilt below, from start to finish!

Suiggles with Modern Marks

Squiggles Quilt Kits are available for a limited time, with black or white background.

I’ll be remaking my version of Squiggles using my Modern Marks fabric + black background, but of course, you can choose any fabrics you like!

Here’s the Quilt Along Schedule and Supply List. Each week as I write create each step, I’ll update the links below so that this post can serve as a landing page for the quilt along.

2018 Quilt Along Schedule

Click the hotlinks below to get to each blog post.

Modern Marks Fabric

Supply List

  • Copy of my book, Piece and Quilt with Precuts
  • Two – 5″ charm packs of background solid or tonal fabric (or a total of 77 squares)
  • Four – 5″ charm packs of print fabric (or a total of 154 squares)
    • (Note – you can also substitute one 10″ square pack if needed, and cut to size)Piece and Quilt with Precuts
  • 1/2 yard of fabric for binding
  • 3 1/4 yards of fabric for backing
  • 56″ x 70″ piece of batting (I recommend Hobbs batting)
  • Approx. 1200 yards (or one large spool) of thread for quilting (I recommend Aurifil)
  • Sewing Machine with new needle and basic sewing supplies
  • Rotary cutting equipment (6″ acrylic ruler, mat, standard cutter with new blade)

So gather your fabrics, your copy of Piece and Quilt with Precuts, and start sharing on social media (#squigglesquilt and Christa Quilts on Facebook).

The original version of Squiggles, as shown in the book:

Squiggles from Piece and Quilt with Precuts

We’re just a month away from a quiltin’ good time!!

Save

Save

Save

Save

Save

Save

Save

Save

Save

Save

Save

Save