If you are just now joining the quilt along – click here for links to all of the previous posts.

I remade Squiggles from precut squares of Modern Marks, plus contrasting background.
Now that the Squiggles quilt top is finished, it’s time to prepare it for basting, which will be next week’s post. I decided to throw in an extra tutorial on backing since it’s the part that’s not talked about very much. This will also allow those of you just joining to catch up with your piecing. But remember – you can go at your own pace and quilt along at any time!
Calculating and Sewing the Backing
You want to ensure your backing is at least 4″ larger around the quilt on all for sides. For example, my version of Squiggles finishes at about 50″ x 63″. So my pieced backing should measure a minimum of 58″ x 71″.

When measuring backing, I put it up on m y design wall and make sure it’s wider than the quilt.
I always work with 40-42″ wide fabric so If I piece two lengths of fabric parallel to the selvage edges that will give me roughly 80″ of length. So that takes care of the 71″ measurement. More backing is fine because it can just get trimmed away later. For the other direction, 58/36 inches = 1.611 or approximately 1 3/8 yards of fabric. Since you need two of those, that’s a total of 3 1/4 yards of backing fabric, cut into two pieces.

It takes 2 lengths of fabric to completely cover the finished quilt top.
I chose to use the quirky triangles print in Navy for my backing. My recommendation is to use a busy backing with a colorful quilt so that whatever thread color you choose for quilting will blend in on the back of the quilt. Busy backs also help hide quilting imperfections, too!
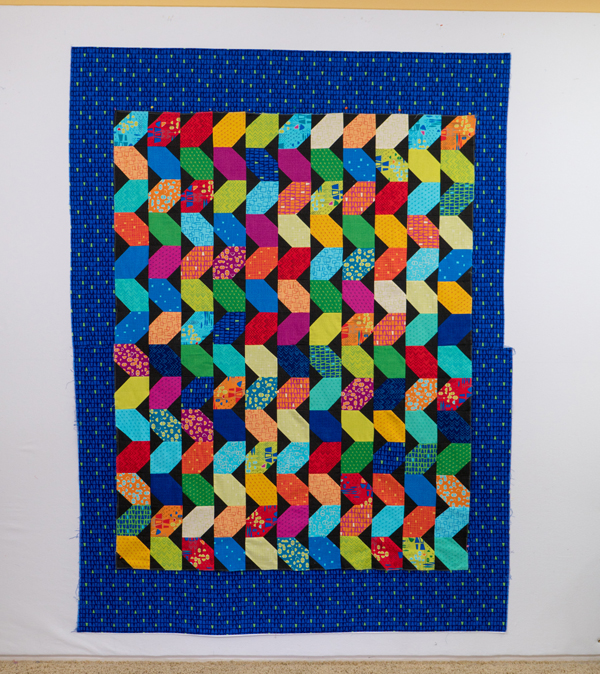
Always double check that the pieced backing is bigger than the top on all four sides.
Tear or cut of the selvages and join the two pieces together with 1/2″ seam. Then press the seam open. It’s okay if the two pieces aren’t perfectly even because the excess will get trimmed away later.
A note about batting
I prefer to use natural fiber battings, like Hobbs cotton, wool or an 80/20 blend. Natural fiber batting will cling to the quilt better and reduce the chances that you’ll get tucks or puckers while you quit.
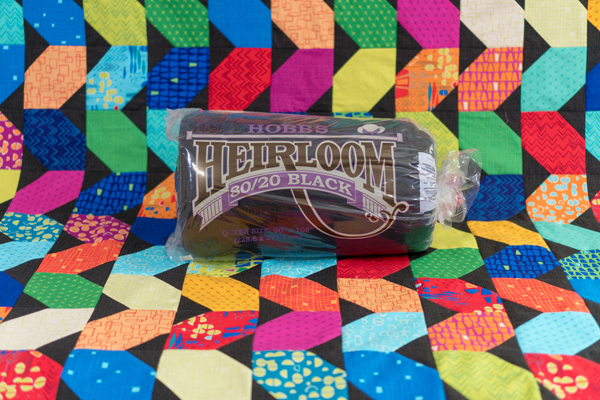
Bonus tip: take a picture of the batting with your quilt so you remember what’s in it!
I used black 80/20 batting for my quilt, because the colors were so bright and saturated, and the background is so dark. However, it slightly shadowed through the lighter fabrics. It’s not noticeable unless you get up really close. But each quilt I make is always an experiment!
Be sure to trim the batting down before you baste the quilt, but make sure it’s still an inch or two larger than the top on all sides. I use the floor for this and pair of specialty batting scissors. They cut through the batting like butter!

I’ll also take an extra step to iron m y batting so it’s nice and flat for basting. For natural fiber batting, I’ll spritz it with water and press with a hot, dry iron. For a more delicate batting, I recommend covering it with fabric while you press. As always, be sure and test a small piece first to see how it performs.
Share Your Progress
Click here to join my facebook group and share pics of your progress!
You can also share on instagram by tagging @christaquilts and #squigglesqal.
Click here for all of the Squiggles Quilt Along tutorials.
Click here to pick up a signed copy of my book to get the Squiggles quilt pattern.

Brilliant- take a picture of quilt with the batting! Ready to piece my back and may add a tiny border – also loving this project.
Thanks – otherwise I forget what I used!
Christa Watson Instagram @christaquilts website/blog: ChristaQuilts.com Click here to join my facebook group: Quilt with Christa
The dark background is so striking! What a great idea to take a photo of the quilt top with the batting.
I’ve never heard of black batting. How awesome! When do you use black compared to white or the natural color???
I’ll use black when working with very bright or dark fabrics.
Tnx so much for all these details on backing & batting. Your batting tips ie to press first especially helpful.