Spray Basting the quilt
I prefer to use 505 basting spray for my quilts, but pin basting works, too. (Just be sure to use a LOT of pins so it doesn’t shift!) Although I’m going to show you how I basted Squiggles using my design wall, know that you can apply this method using a table, too. Just work from the center out and move the quilt as needed to secure the layers.
Step 1 – Spray the Backing

Use a large sheet as a drop cloth to catch any over-spray. It will also protect the quilt from the ground, too! Generously spray the wrong side of the quilt backing with basting stray, ensuring coverage in all areas. Work your way across the quilt from one side to the other. Your quilt will stick better and use less spray by spraying the top and backing separately, rather than spraying the batting as provided by the instructions on the can.
Although I’ve pressed both the backing and quilt top, some wrinkles and fold lines may reappear, but that’s okay. You’ll smooth everything out later.
Step 2 – Spray the Quilt Top

Spray the wrong side of the quilt top, just like you did for the backing. You can still use the same sheet as a ground cloth, and then wash it when you are finished. It’s easier to spray the top because you can use the blocks as a guide to help you remember which areas to spray. I usually spray row by row.
Step 3 – Fold up both layers and bring inside

Right now it will look like a bit of a sticky mess. But that’s okay – the layers are tacky to the touch but not stuck. You can easily peel them apart again. Your hands will get a little sticky during this process, but the glue easily washes off and won’t cause any problems while quilting. You don’t have to baste right away as it will still maintain its stickiness for awhile afterward.
Step 4 – Hang UP the Backing
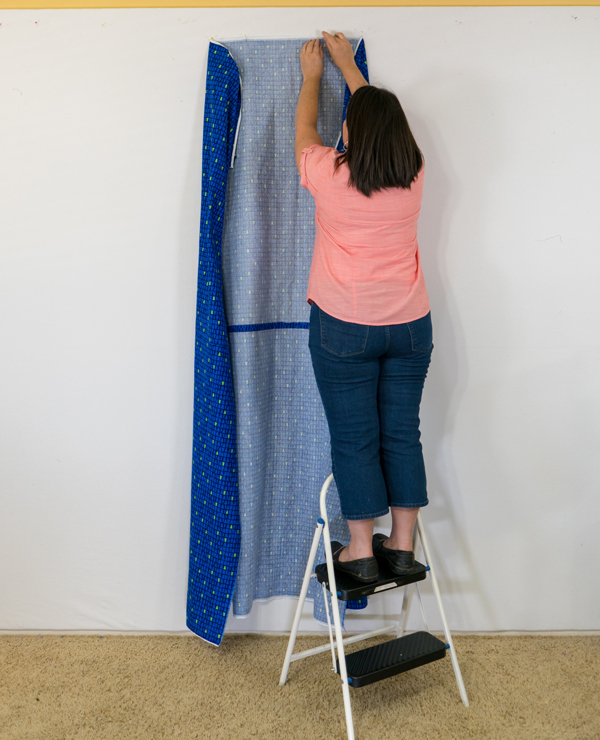
Pin or stick the backing to the design wall, wrong side out. Start at the top and let gravity help you. I’m short so I use a step ladder to get up high enough and I’m not trying to center the backing perfectly. I’m just glad that this is a process I can do completely by myself, without help. Notice how the backing might stick to itself and get a little scrunched up at the bottom. That’s perfectly fine for now – see the next step.
If you don’t have a design wall, you can use a table instead. Just smooth out the center of the backing, add the other layers and smooth out one section of the quilt at a time.
Step 5 – Smooth Out the Backing
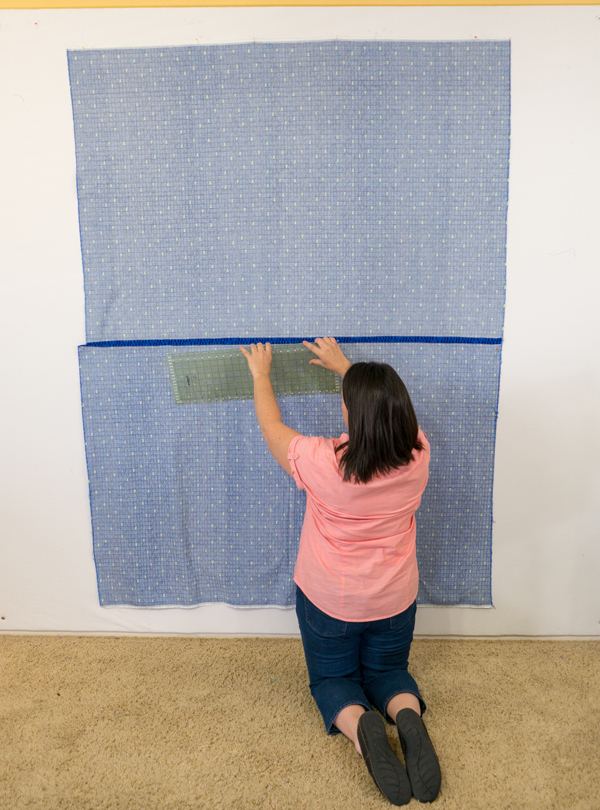
Take about 10-15 minutes to completely spread and smooth out the backing. Work your way from top to bottom, smoothing it out as you go. Use a long acrylic ruler to help you. Think of it as an extension of your arm, giving you more coverage.
The acrylic ruler will get sticky over time, so I have an extra ruler that I use ONLY for basting. You want the backing nice and smooth before you add the batting.
Step 6 – Add the Batting

I’m using Hobbs 80/20 batting in black for this but natural is great, too!
Before I add the batting, I will actually iron it first to get out any wrinkles. If it’s cotton batting, you can iron right on the batting. If it has polyester or wool in it, you can protect it with a length of fabric. I use a hot, dry iron with no steam. You can iron wool batting with no problem – just use a lower setting and don’t press too hard. If you use steam, it might shrink or felt, so always test a small piece first.
Just like the backing, start at the top and place a few pins in the design wall if needed at the top to secure it. It’s okay to peel off part of the batting and re-position if needed.
Step 7 – Smooth the Batting

Take time to smooth out the batting, using your hands and the long acrylic ruler. Notice how it’s getting a bit wonky. That’s okay as long as the batting and backing are larger than the quilt top – the excess will get cut away.
I like being generous in my batting and backing so I don’t have to try and line things up perfectly. That’s above my skill level for sure!! I guessed where the rough middle of the backing and batting are and like a good friend of mine says, “close enough is good enough!”
Step 8 – Add the Top
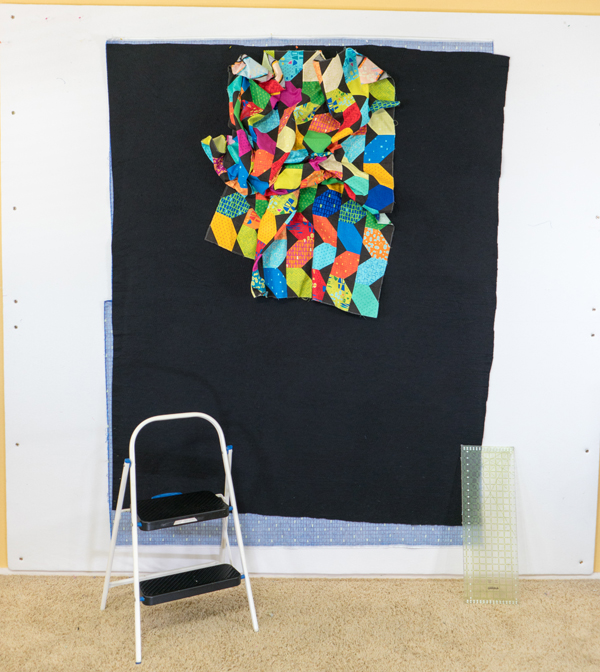
At this point, it looks a little bit like a hot mess, but don’t worry – it will all work out in the end! Fabric is flexible and it’s okay to smoosh things up a bit – your quilt can handle it. (Those that are familiar with my scrunch and smoosh method of machine quilting can relate!!)
Repeat the same process as before: add the quilt top layer and let it drop down the wall with gravity; take time to peel it apart, and smooth it out.
Step 9 – Smooth the Layers

Make sure there’s enough batting and backing sticking out on all sides and take plenty of time to smooth out the top. By smoothing each layer as you go, it will vastly eliminate the chances of puckers and wrinkles appearing on the back.
If you are too far off to one side or another, take off the top and try again.
Step 10 – Smooth Out Each Row

As you are smoothing out the quilt, use the long ruler to help ensure that each row is lined up vertically and horizontally. You can gently nudge the blocks into place if needed.
Step 11 – Roughly Trim off the Excess

Now it’s time to cut off all that extra bulk around the edges. I use these cutoffs for machine quilting practice later. Or you can wash the excess backing and throw it in your stash.
Notice that I trim it pretty close to the edge. You can leave more wiggle room if you like, by I usually only leave about an inch or two. This prevents the excess from getting flipped over underneath the quilt and accidentally stitched through while you are quilting.
I’m sure I’m not the only one who has done that, right??

I use batting shears to cut through the bulky layers quickly and easily! You can trim the quilt on the design wall, or take it off and do it on a table or the floor.
Step 12 – Press the Quilt
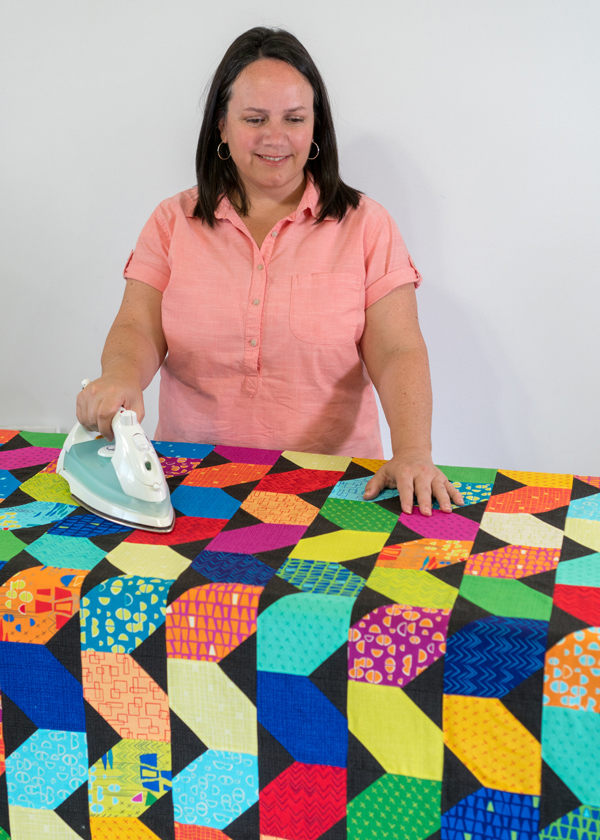
I just love the vibrant colors and geometric prints in Modern Marks!
This is where the magic happens! For the final step, iron the quilt on the back side and then on the front. Use a hot, dry iron – no steam. This is a final chance to smooth out any wrinkles and nudge things into place. The iron helps set the glue so that every single inch of the quilt is stuck to every other inch, making it a breeze to machine quilt!
I use a “Big Board” that goes on top of my ironing board to give me more work surface. Also, the basting spray will not gum up the needle or cause any problems while quilting. And it easily washes out once you are finished with the quilt.
Next week we’ll tackle my favorite part – machine quilting. I can’t wait!!
Relevant Links
- Click here for the previous Squiggles Quilt Along tutorials.
- Click here to purchase a Squiggles Kit or Modern Marks Fat Quarters.
- Click here to purchase my book Piece and Quilt with Precuts to get the Squiggles pattern.
- Click here to join my facebook group and share pics of your progress. Or use #squigglesqal

Thank you for the great idea. I don’t have a large space for sandwiching a quilt. I’ve using my dinner table with big difficult.
Hugs from Brazil!
Christa, Your basting instructions are Excellent! I love the way you think – there’s no pressure to be perfect and that works for me.
Hi Christa,
What a great post! Your detailed steps make this look like a breeze, and I have never thought of using the design wall to layer a quilt! What a fabulous idea. I can’t wait to see how you quilt this. I’m going to follow you so I don’t miss any update! ~smile~ Roseanne!
I have mine all basted, but haven’t ironed. Looking forward to beginning the quilting!
I can’t wait – that’s my favorite part!
Christa Watson Instagram @christaquilts website/blog: ChristaQuilts.com Click here to join my facebook group: Quilt with Christa
On Mon, Feb 12, 2018 at 7:42 AM, Christa Quilts wrote:
>
Thank you so much for showing this, I have your book and a quilt top that I am going to try this on. I hope mine comes out half as good as yours.
This is by far my favorite way of basting. Ever since I saw you demonstrate it on MQG I knew this had to be for me. I know you have shared it a couple of times since and I appreciate that. If people don’t have a design wall, maybe you could tell them how to do that also, or they could google it. Great investment.