This week we get to my favorite part of any quilt – the machine quilting!! For Squiggles, I quilted it with my walking foot. I always recommend starting off with walking foot quilting for beginners because it really is no-fail quilting. In the book, I show you how to quilt organic, squiggly lines with the walking foot, for the original version made from Pat Sloan’s The Sweet Life charm packs:
Machine Quilting Ideas
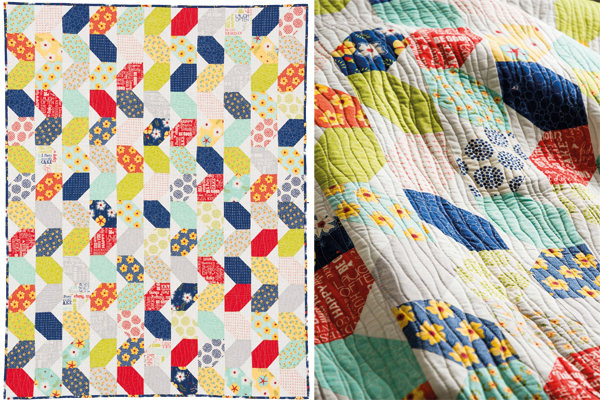
The original version of Squiggles: pattern & quilting instructions available in my latest book.
Click here to get your signed copy of Piece and Quilt with Precuts.
Click here to purchase The Sweet Life charm packs seen above, while they last.
If you’d like to quilt fun, fast and easy squiggle lines, follow along in the book on page 19 to see the instructions and quilting plan for Squiggles
Another quick and easy way to finish this would be to quilt a wavy grid, following the directions for “Gridwork” on pages 26-27. Check out a closeup of the wavy grid quilting below:

For my Squiggles remake from Modern Marks fabric, I wanted to try out a different design that I mention briefly in the book on page 21 as a “make it your own” idea. Rather than quilting wavy lines, try quilting irregularly spaced “straight-ish” parallel lines to create a random crosshatch grid.

I chose a highly contrasting Aurifil thread in Jade so that it would show up on the busy prints.
The thread is from my Piece and Quilt Collection – Colors.
Random Crosshatch Quilting Tips
Here are a few tips on how I approached quilting the second version of Squiggles:

I always start quilting on the right hand side of the quilt and “scrunch and smoosh” the bulk of the quilt as I go. First I make one pass across the quilt in both directions to anchor the quilt for more quilting later. This breaks up the quilting, secures it in place, and allows me flexibility on how densely I want to quilt it.

I try to choose designs that allow me to start and end each line of stitching off of the quilt in the batting. Then I don’t have to tie off all those pesky threads!! For best results when using walking foot/dual feed quilting, try to stitch in one direction rather than stitching the lines up and down or back and forth across the quilt.
It will help prevent puckers or “whiskering” that looks like little creases caused by the shifting of the fabric. I make one pass across the quilt from right to left, quilting “anchor” lines depending on how wide the blocks are. Then I rotate the quilt when I reach the middle, and keep on going to the other side.

I wear Machingers gloves to help grip the quilt and give me a little more power when I push the quilt through the machine. I also use my hands as a hoop and only focus on the area I’m quilting between my hands. It’s not a very larger area, so I re-position my hands and the quilt A LOT while quilting, and that’s ok!
For the random crosshatch, some of the “anchor” lines will be in the ditch, while some of them may be randomly to the side of the ditch. Below are three different ways that I mark or randomly quilt straight lines across the quilt:
Marking With a Washable Pen

Use an acrylic ruler and washable marking pen to mark guidelines if needed. I used a combination of marking and eyeballing when quilting my straight-ish lines. Mostly I changed it up so I could dry out several different methods. Hey, what I can I say? I’m always experimenting!
Painter’s Tape

Painter’s tape is one of my favorite marking tools! I can place it at random intervals, using my long acrylic ruler to keep the lines straight. The best part about quilting random lines is that I can stitch along both sides of the tape to quilt 2 lines at a time!
Bonus tip: rather than putting the needle next to the tape, put the edge of your quilting foot next to the tape. It will space the lines out a little wider, and you won’t accidentally stitch through the tape!!
Walking Foot Guide Bar

You can also use a guide bar to follow along a seam line, or previously quilted line. Just decide how far apart you want your lines, and adjust the width of the guide bar appropriately.
Notice that I’m using the BERNINA dual feed rather than a walking foot. My machine has a built in mechanism that attaches to the back of a specialty “D” foot, giving me more options of which foot I can use. It acts just like a walking foot and performs the same function. I also like using an open toe so I can see exactly where the needle is stitching.

Here’s what Squiggles is looking like after a few random passes across the quilt in both directions.
Keep on Quilting!

Continue quilting randomly spaced liens both horizontally and vertically across the quilt until you are happy with the spacing. The hardest part is knowing when to stop!!

Click here to purchase a Squiggles Quilt Kit made from Modern Marks fabric.
And just remember, if you aren’t happy with the way it looks, just keep quilting. When I had only quilted a few lines on the quilt, I honestly wasn’t sure if I would like the end result, and the thread really stood out like a sore thumb. However, once I added more lines, all of the sudden, I couldn’t see any of the imperfections, and I love the amazing texture that was created!
Remember to share your progress!
Part of the fun of any quilt-along is seeing all of the variety everyone is making. Check out my ChristaQuilts group on Facebook to cheer on your fellow quilt-alongers and post pics of your WIP’s (works in progress). You can also tag me on instagram @christaquilts and #squigglesqal.
The next post will go up in 2 weeks, giving everyone a chance to catch up on their progress!
Click here for the previous Squiggles Quilt Along tutorials.

2 thoughts on “Squiggles Quilt Along Week 6 – Machine Quilting Tips”