I love quilting pebbles! I have stippled my quilts like crazy for the last 10 years, but just recently got the hang of pebbling. Jut in time, too, as I was on stipple burnout!!
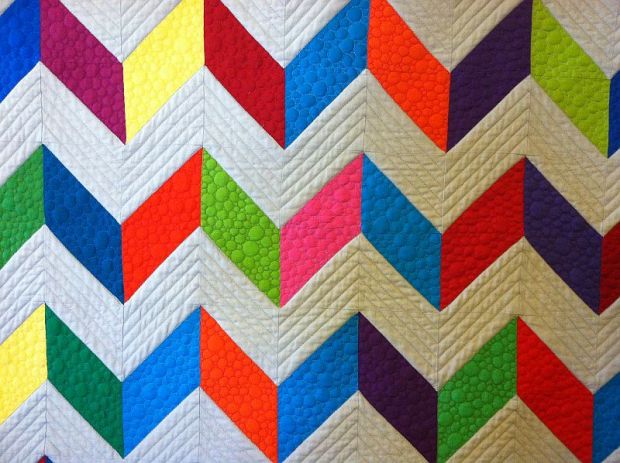
The time it took to finish the pebbling on my Charming Chevrons quilt was a little ridiculous though – it took 23 hours!! Yes, that’s right. The pebbling took more time to do than every other part of the quilt combined. It gives new meaning to the term Quilt-in-a -Day, LOL!!
Since I don’t really expect everyone to spend that much time quilting this quilt, I will first talk about pebbling in more detail, but then give you an alternative so that you can actually finish this quilt. (But by all means do the pebbling if your heart desires – mine did!)
Step 1 – Doodle on Paper First
Just like you had to learn your alphabet before you could write, so it is with quilting any FMQ (free-motion quilting) design. When I was in kindergarten my penmanship was terrible! (And it hasn’t really improved much since!) You need to practice your quilting “penmanship”, too!

If you doodle on scraps of paper every day before you begin quilting, it will help you develop muscle memory between what you are drawing with your hands and what you are stitching out on the quilt. This will form a mind body connection so that eventually you will be able quilt without thinking. Think of FMQ as drawing with your sewing needle.
Step 2 – Practice on Scraps Next
I took a few FMQ classes at Road to California 2 years ago. For most of the class, we just made practice samples. If you really want the feeling of completing FMQ on a quilt, practice on charity quilts. You will get great practice and the recipients will love your efforts!

When I began free-motion quilting, my first efforts looked pretty bad. It took a while for me to put together different combinations of fabric, thread, batting, needles and tension settings. A few quick things I learned while practicing FMQ on my Bernina:
- Select a needle with a large hole so that the thread doesn’t shred, like Superior Topstich needles. The size depends on the thickness of your thread (size 90 for the heavier polyster thread). Change every 8-12 hours of quilting. I used 3 of them on this quilt.
- Loosen the bobbin tension slightly.
- Use the same thread in top and bobbin for most quilts – it hides mistakes and makes for more even tension. I used Superior Highlights polyester in a rainbow of colors.
- Break your quilting up into sections and don’t rush the process. Although it took a long time to quilt my pebbles, it really worked out to about 33 minutes per chevron block. Quilting one block a day is not a bad goal.
- Use a free motion slider, quilting gloves, and bobbin washers for the best quilting combo.
- It’s Ok to “travel stitch” over your previous lines to get into all the nooks and crannies.
Step 3 – Apply your practice to your actual quilt
 For this quilt I changed threads with every fabric color. I never could find a neutral that blended in with everything so I used a total of 18 different colors.
When I didn’t have an exact match, I used something close. It gave the quilt some interest without being overpowering.
I quilted the pebbles in sections first.
I quilted a batch of greens, then oranges, then reds, then blues, etc. This helped me from getting too bored. Usually I like to off each my stitches between thread changes. However, because I stitched over many of my quilting lines to form the pebbles, it hid most of my stops and starts. Therefore, I cheated a little and used really small “anchor” stitches at the beginning and end of each color change to avoid tying off.

Step 4 – Alternative Quilting Motif – Loops
 If you are not crazy like me and don’t want to spend this much time quilting your chevrons, try a simple meandering loop instead.
This is my other “go-to” design and it covers your area pretty quickly. In fact, this motif would look great quilted all over the surface if you want to skip the straight line background quilting.
Here’s a little background quilting I did using loops on an earlier quilt. Click to enlarge.
Because I used so many threads, my quilt back turned out just as colorful as the front!

Other Resources
Please visit Leah Day at the Free Motion Quilting Project. Her blog has so many in-depth tutorials on stitching particular FMQ designs. She has a video tutorial showing how to do pebble quilting and loops.
Yes, it was a little crazy to quilt that much, but honestly, I loved every minute of it! Next week it will be time to finish the binding and then I’ll start on another brand new tutorial. Isn’t this fun?? Be sure to check out my other two quilt-alongs here and here.
And, please continue to email me pictures of your Charming Chevrons quilt. I love to see how you are doing, no matter how you quilt it!
Quilt Along Schedule (Links are active once each step has been completed.)
- Week 1 – Supply List and Introduction
- Week 2 – Marking and Sewing the Charms
- Week 3 – Cutting and Trimming the Triangle Squares
- Week 4 – Sewing the Chevron Blocks
- Week 5 – Assembling the Quilt Top
- Week 6 – Marking and Basting
- Week 7 – Machine Quilting Straight Lines
- Week 8 – Free Motion Pebble Quilting (today’s post above)
- Week 9 – Binding and Finishing Your Quilt

Like your site Christa, Can’t wait for retreat! Remember anyone can come, just a little more for non-members. Kathy Farris
I’m finally going to start my quilt so I’m looking at the tutorial. I love the way the back turned out! Gorgeous!
Love your quilting. Awesome work.
I’m so glad I found your blog! Or rather than you found me so I could find you. 🙂
Anyway, your chevron quilt is amazing. I’m planning to be at Road to California in January. Maybe we could meet?
That would be fun but this is the one year I’m not going to RdtoCA – we have other plans the same time that week. Bummer!
Wow! This is beautiful. My daughter loves chevron so I’m planning to start working on a quilt for her. Love the quilting you chose to do on it!
Wow, really doable, memorable tips–thanks!
Beautiful. I want to do some pebbles on mine but not that many. You must be an expert at them now.
I just tried pebble quilting for the first time this weekend. I only did a very small section of my quilt! Your quilting is beautiful!
Worth all the time it took the pebbling adds so much depth it’s beautiful. Whoever gets the quilt is going to be very lucky. I got my grid marker today for my chevron quilt which isn’t finished yet as its taken a back seat to last minute table runner Christmas gifts. You’re so inspiring I too get tired of stippling.