Today I’m excited to tell you about Mini Frequency – a fun collaboration I did with Leah Day, of The Free Motion Quilting Project fame. First, a picture of the finished mini:

A Mini Version of Frequency, Using 1 1/2″ Strips
Leah Day – Your Machine Quilting Friend
Next, a quick background about mine and Leah’s friendship: we met online somewhere around 2012-2013 when I discovered her blog and realized that you didn’t have to wait until you were at retirement age to make quilting a successful full-time job!
We first met in person at Spring Quilt Market back in 2015 and then collaborated on a presentation at Fall Market 2016. When we met up to for lunch at QuiltCon earlier this year, it was inspiring non-stop talk about the business of quilting which I just love! She’s got that “entrepreneur-on-fire” spirit that really motivates me, especially when I see it from women business owners.

Leah Day is as passionate about empowering others to quilt as I am!
Leah just published a brand new quilting book and she launched a new podcast just over a year ago which I will be a guest on soon, so stay tuned for more details about both!
Our Quilty Collaboration
When Leah approached me about working on a small project together, I immediately knew that I wanted to make a “mini” version of Frequency, one of the quilts from my book Piece and Quilt with Precuts. Here’s what the original pattern in the book looks like, made from 2 1/2″ strips.

I thought it would be fun to scale down the design, using 1 1/2″ strips instead. I had just received strikeoffs (sample swatches) of my Modern Marks fabric line earlier this year when I started on the mini, so I was able to cut small bits of fabric to make the mini.
Here are some in-progress pics of the piecing:

It’s amazing how much the blocks shrink up when you piece them together! I had a fun time deciding which fabrics I wanted to place next to each other.

Rather than making a full-scale version of the original, I chose to make 4 blocks from 1 1/2″ strips. That way I could incorporate every fabric without it being too big.
Behind the Scenes: Fabric Printing
I was able to use strikeoffs for my mini: samples that are printed before the entire line goes into full-scale production. This allows you to check for fabric quality and to determine if everything will print correctly. Check out that piece that’s circled in the top row below. On paper it printed out fine, but when the mill printed it on fabric, the lime x’s on turquoise created an effect called “trapping” which makes it look blurry. So we decided not to print that one.
Instead we changed it to be dark turquoise x’s instead of lime which worked much better. See the fabric circled in the bottom row below. I still thought it would be fun to use both pieces in my mini to preserve the history of this fabric collection, and a bit of a story to go with it!
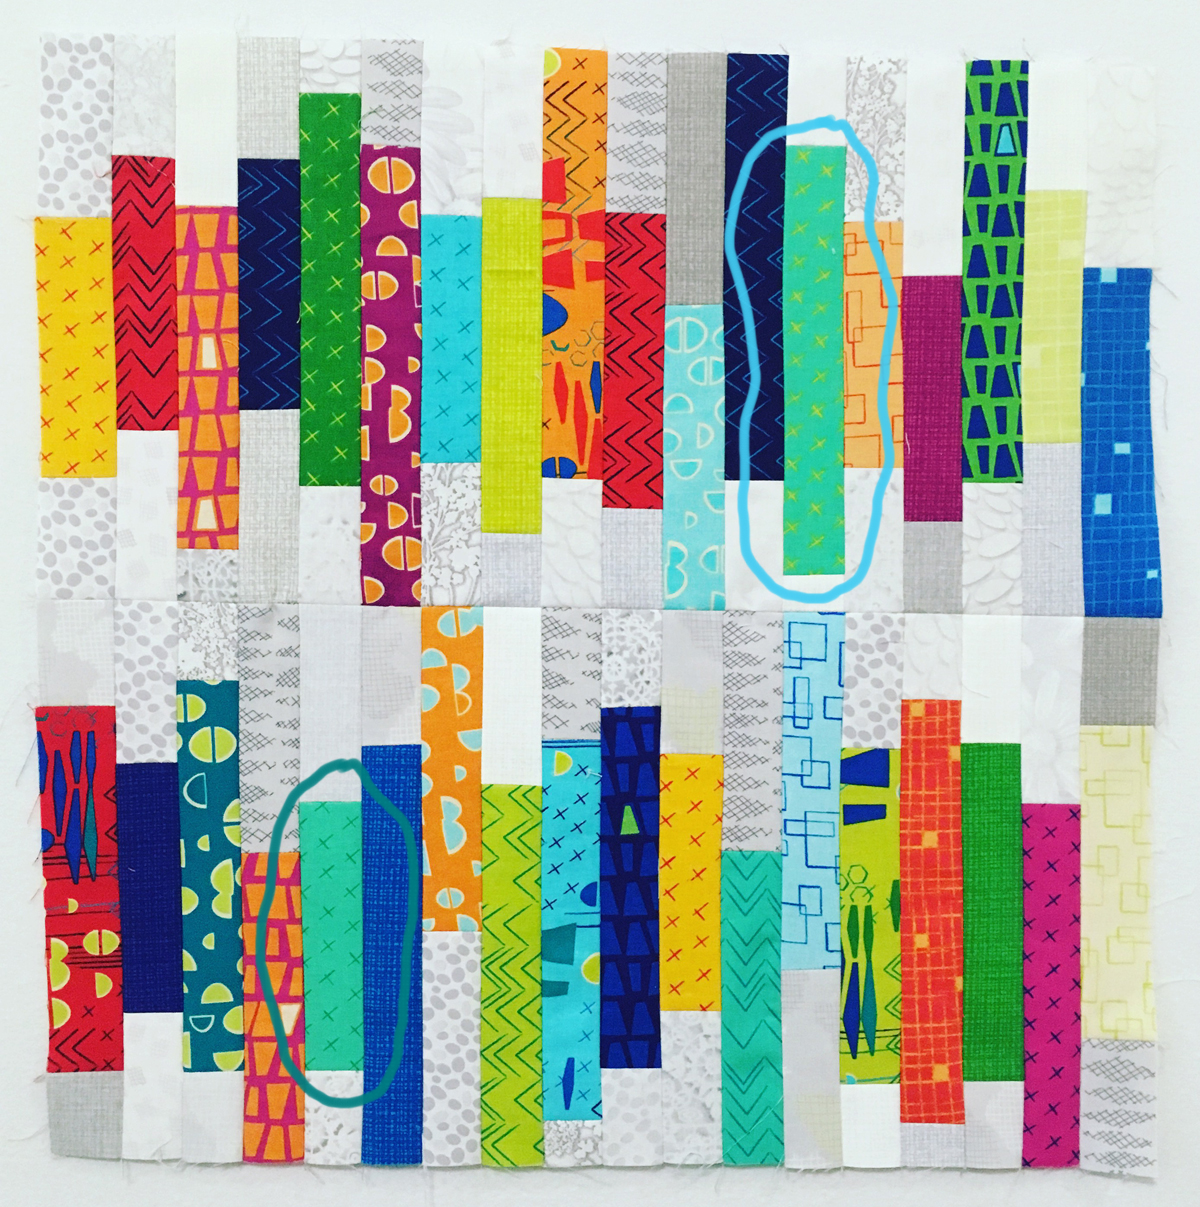
The fabric circled on top was replaced with the one on the bottom row for better printing.
Leah Works Her Magic
Once I had completed the top, I shipped it off to Leah to let her work her quilting magic. For anyone who knows me, they’ll understand what a big deal it is for anyone else to quilt for me. I’ve never had someone quilt a quilt for me so this was a fun stretch for me to give up a little bit of control over that process, LOL!! Needless to say, she did an amazing job!
Leah created a YouTube video sharing her thoughts on how and why she quilted it the way she did. It’s very informative and full of fabulous tips. Plus it’s always so fun and mesmerizing to watch someone quilt and see the way they move the quilt under the machine. Take a look below:
Click here to read Leah’s blog post about our collaboration.
I love how Leah decided to highlight the fabrics with her batting and quilting choices. This is a perfect example of what you can do when working with busy prints. My favorite part of the video is when she holds it up at the end and you can really see how the light hits her beautiful background quilting.
Of course, me being the crazy dense quilter that I am, I decided to add a little extra touch and went ahead and quilted right on top of the prints when I got it back, LOL!! So it just goes to show how different choices can affect the look of a quilt. 🙂

Press the binding for a nice, flat and tight finish.
I learned a great tip about binding from Leah a few years ago: after you attach your binding, give it a bit of a press with a hot dry iron. This will make a nicer crease and allow you to stitch it down nice and tight.

Click on the image above to enlarge it and see all the yummy quilting detail on the back.
Here’s the finished mini – I’m really happy with how it turned out, and it means even more that I was able to collaborate with a friend!


This is such a Happy Quilt. I’m not one for keeping these colors but I HAVE to buy a jelly roll now.. lol. I watched how Leah quilted it, perfect.. Yes have to make one for my Quilt Rm… Merry Christmas, Christa…….
My two favorite ‘online’ quilting friends! I am a relatively new machine quilter, I have learned so much from the both of you. I look forward to viewing Leah’s video.
My first attempt to do free motion was thru Leah Day when she quilted a project in Craftsy with Amy Gibson. She is a fantastic teacher. I look forward to seeing her video. What a stunning collaboration of your talents :).