Modern Logs QAL Part 3 – Sewing the Quilt Top

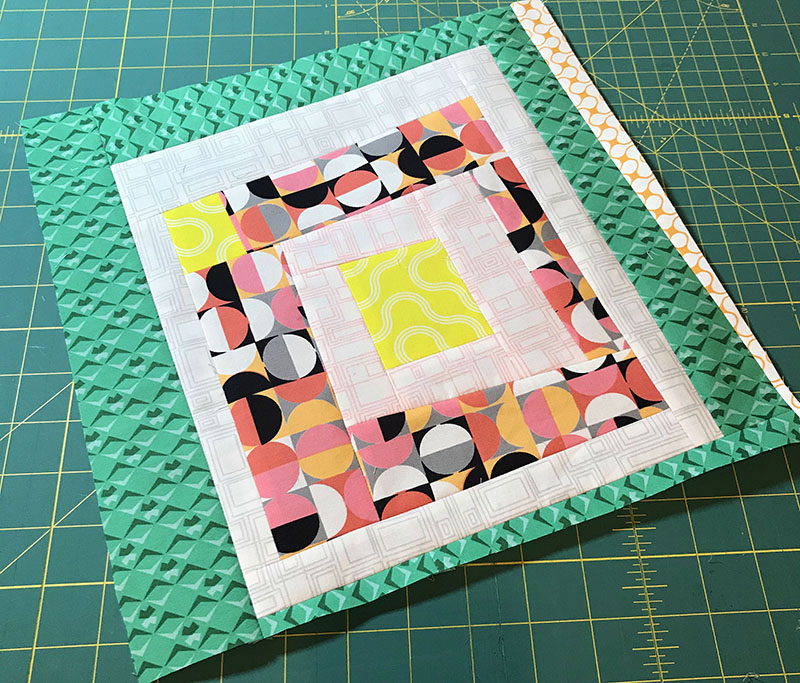
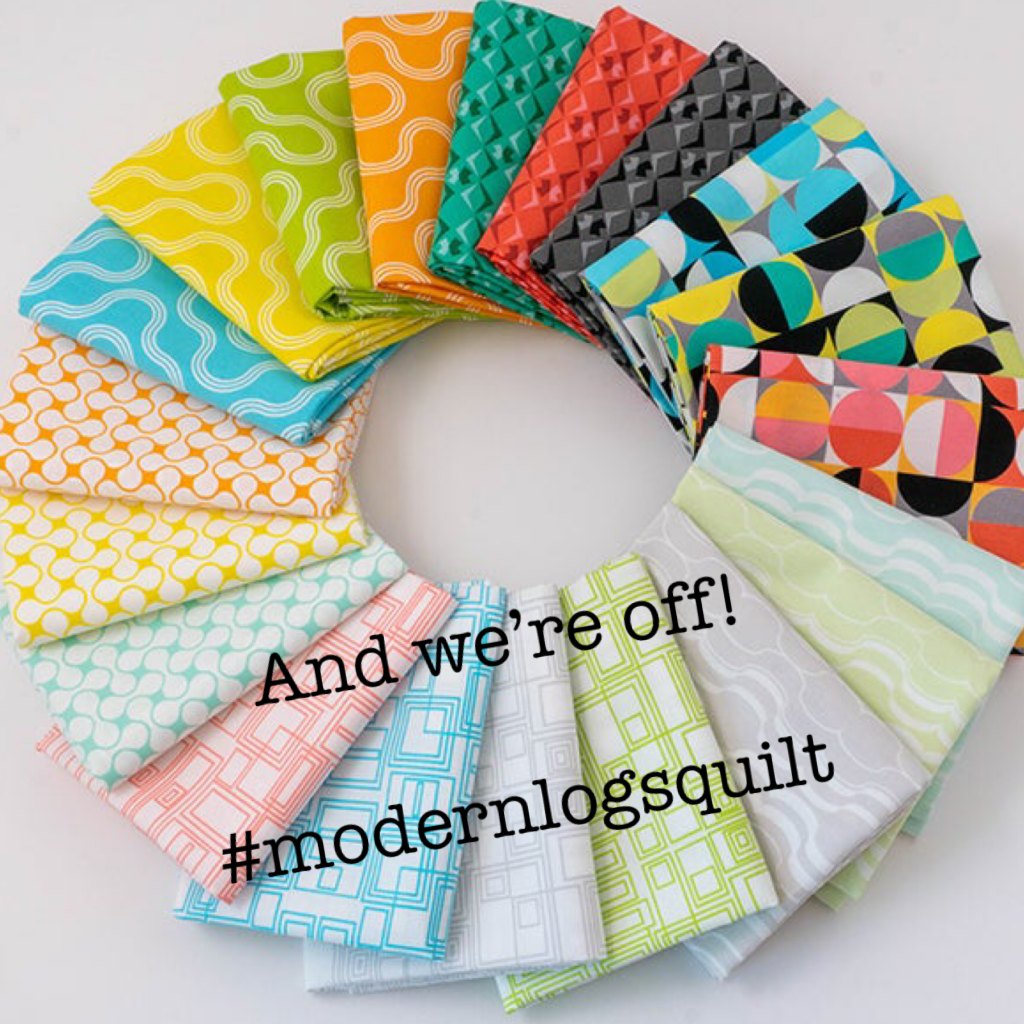
Did you have fun sewing your Modern Logs improv blocks from last week? If you are still working on your blocks, that’s totally ok! Take as much time as you need to make this quilt; these helpful hints will stay here on my blog indefinitely and you can scroll to the end of the post for links to all of the previous QAL posts.

Modern Logs Quilt Top

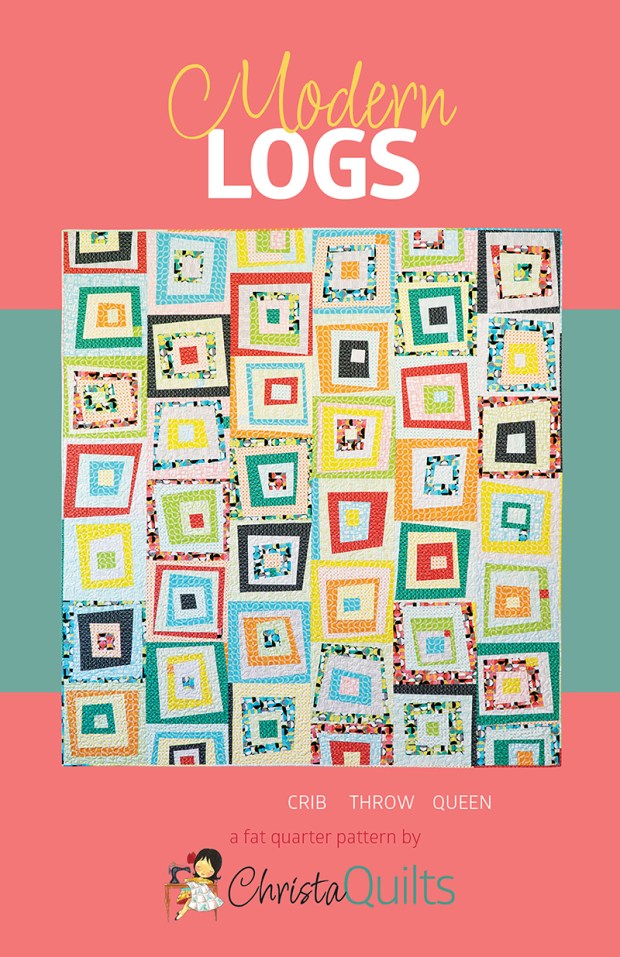
Click here to get the pattern, fabric, or optional kit to make Modern Logs (while supplies last).

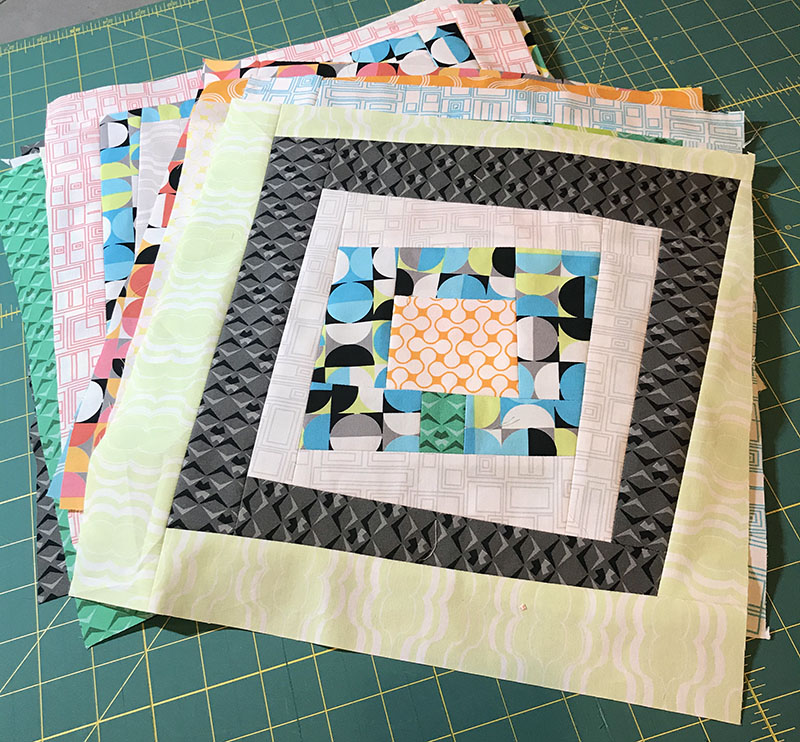
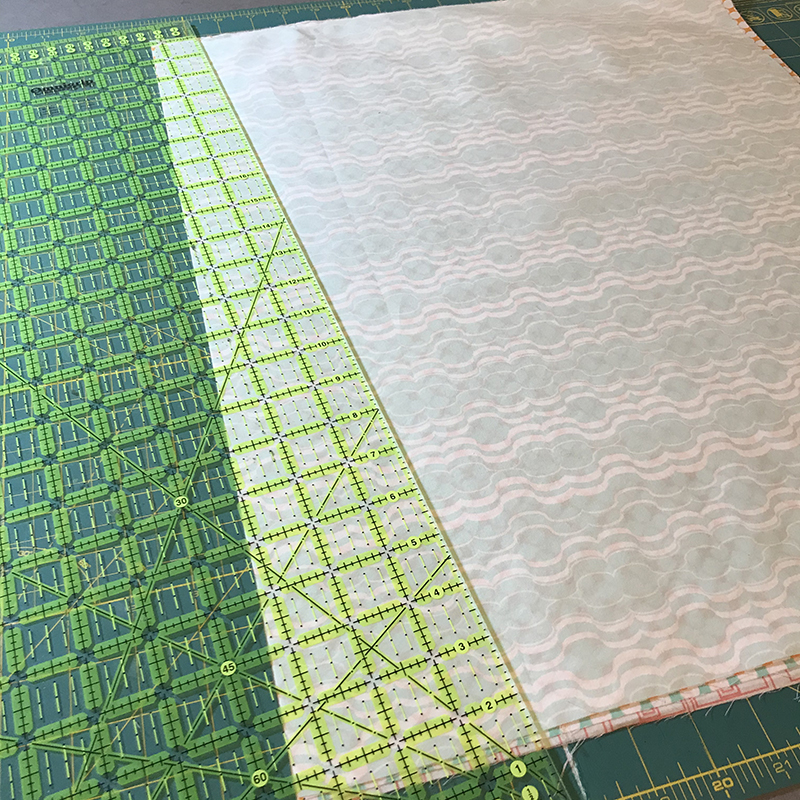
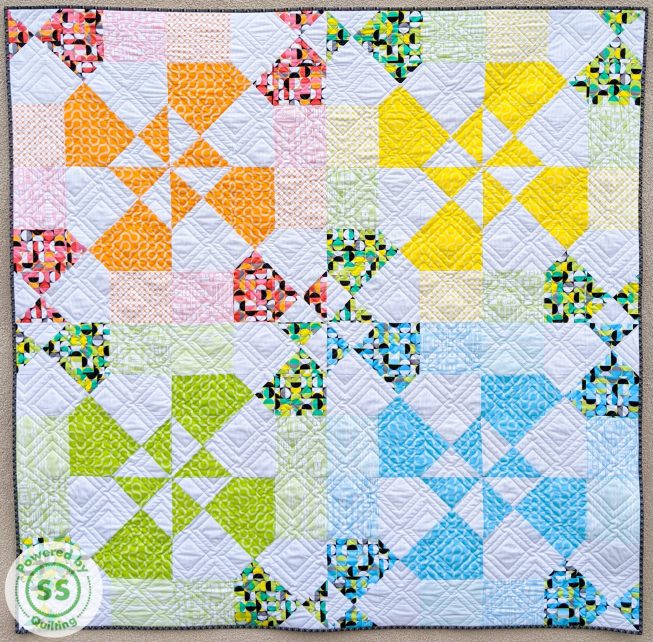
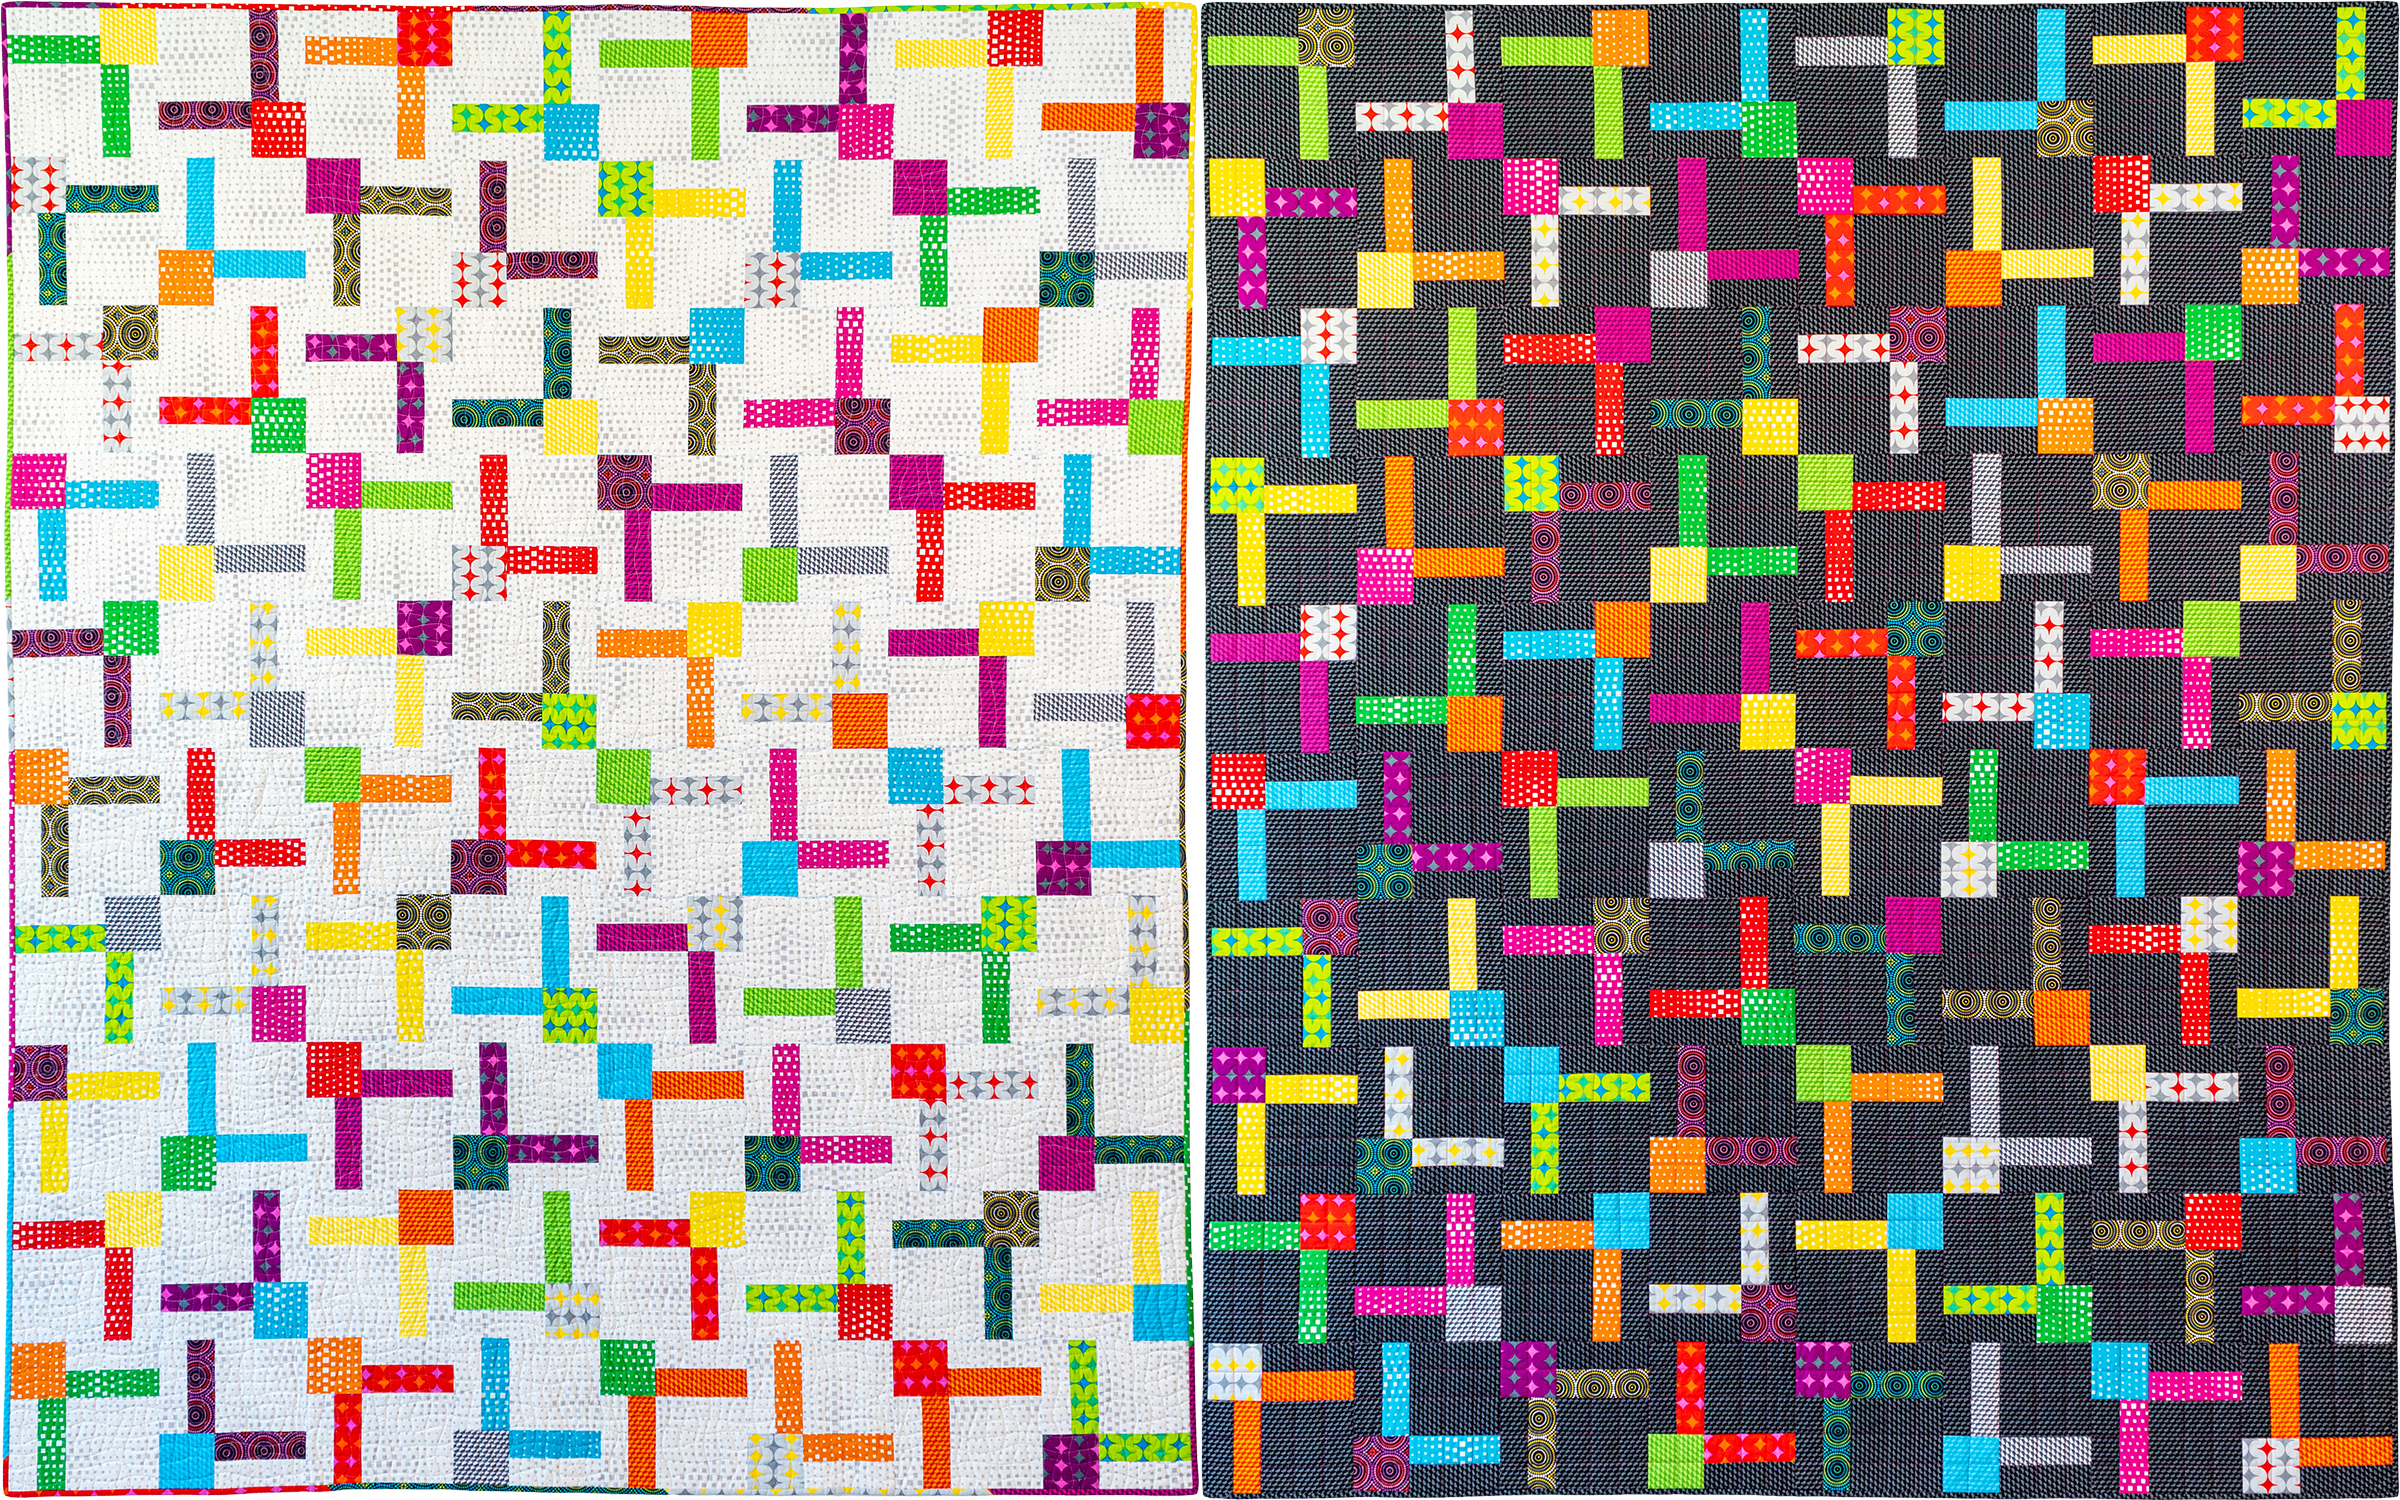
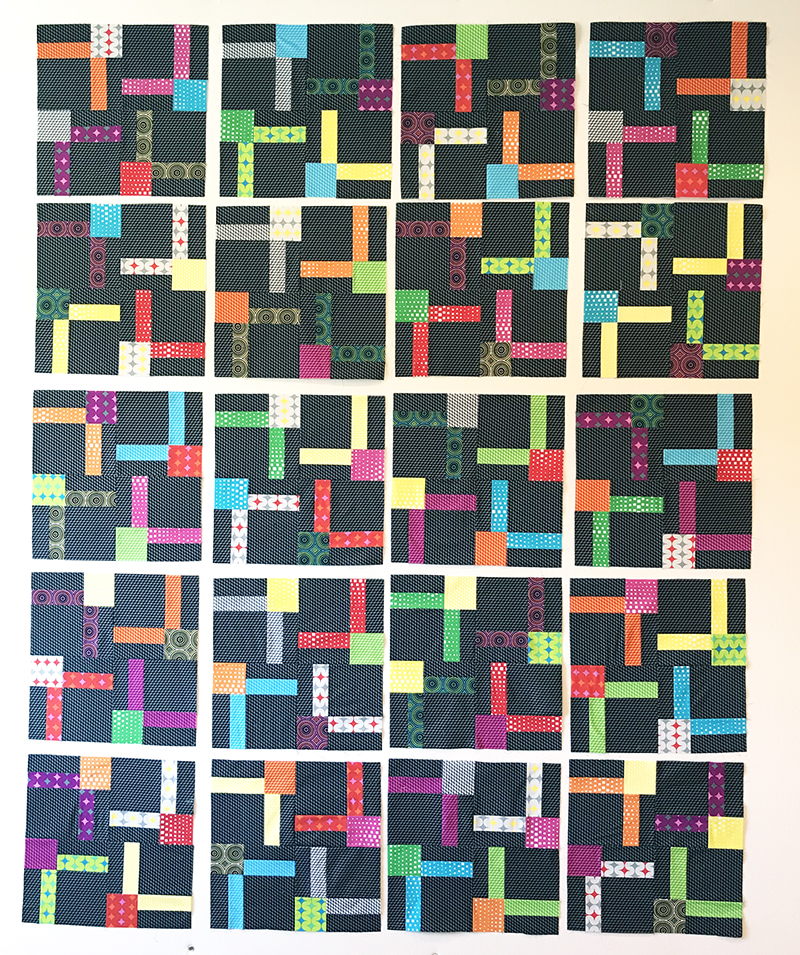
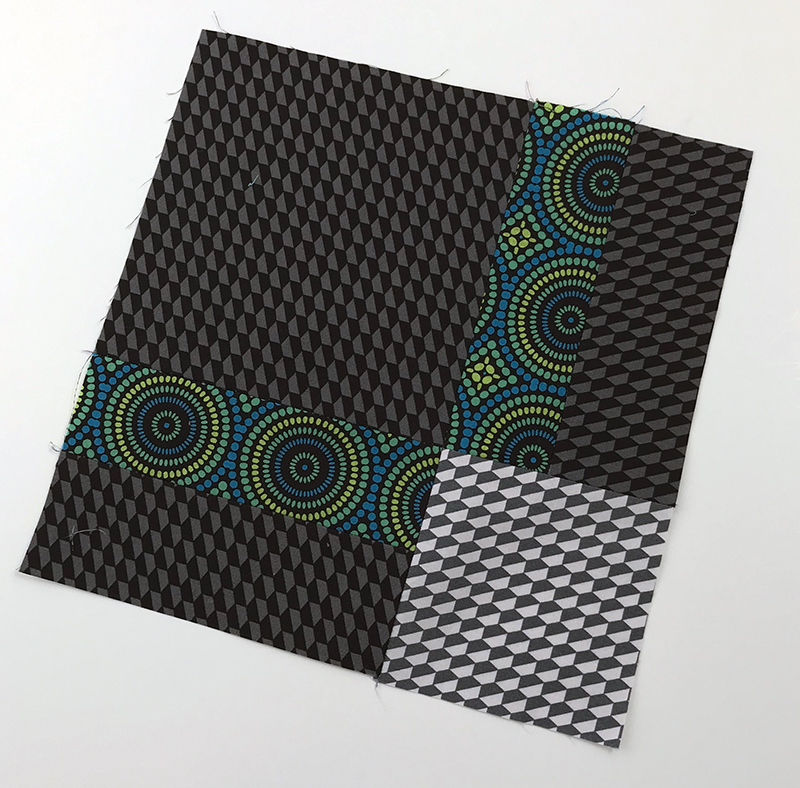
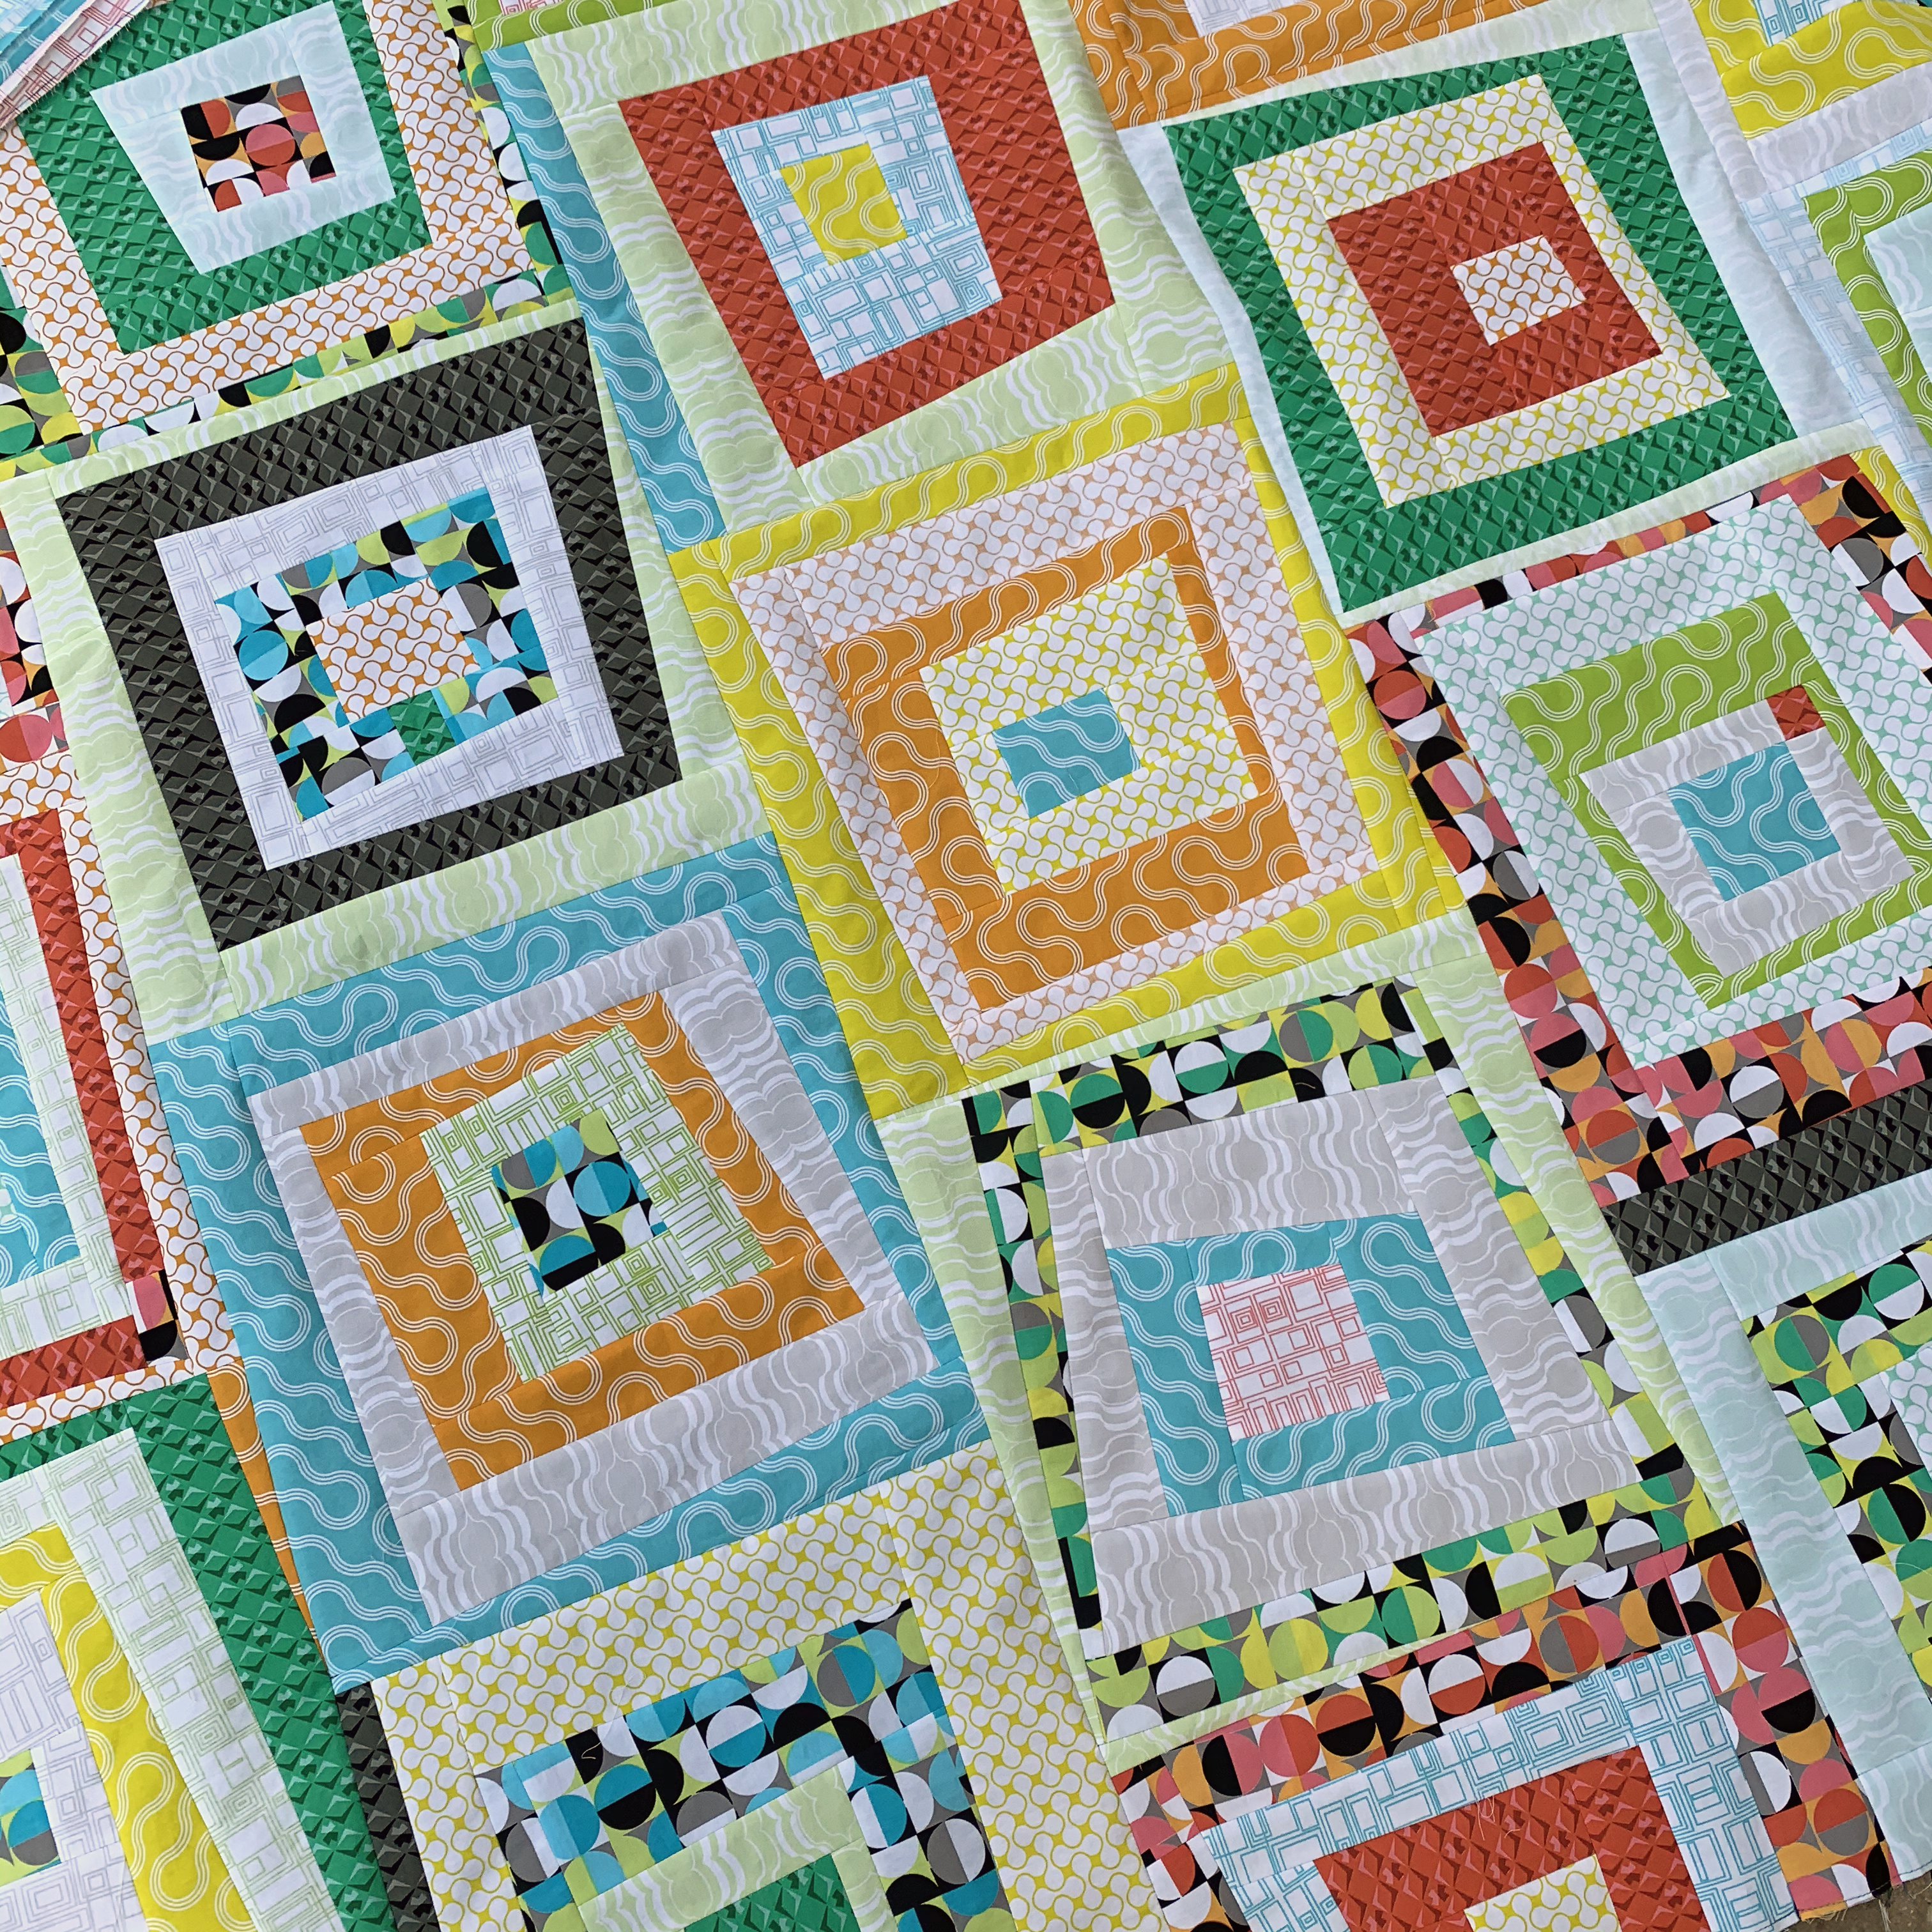
This week we are working on sewing the blocks together to complete the quilt top. In my image above, you can see how some light fabrics touch and some dark fabrics touch and that’s totally ok!! You won’t have an even number of blocks that end on a light or dark fabric and the more random it looks, the better! Just remember, you can rotate the blocks and lay them out however you like.

Sew the rows

Due to the offset nature of the design, the blocks will be joined together into vertical rows rather than horizontal rows. Notice that every row has a partial block added to it either on the top or the bottom of the row. Be sure to turn it the right way when sewing the blocks together.

Modern Logs Crib Size layout

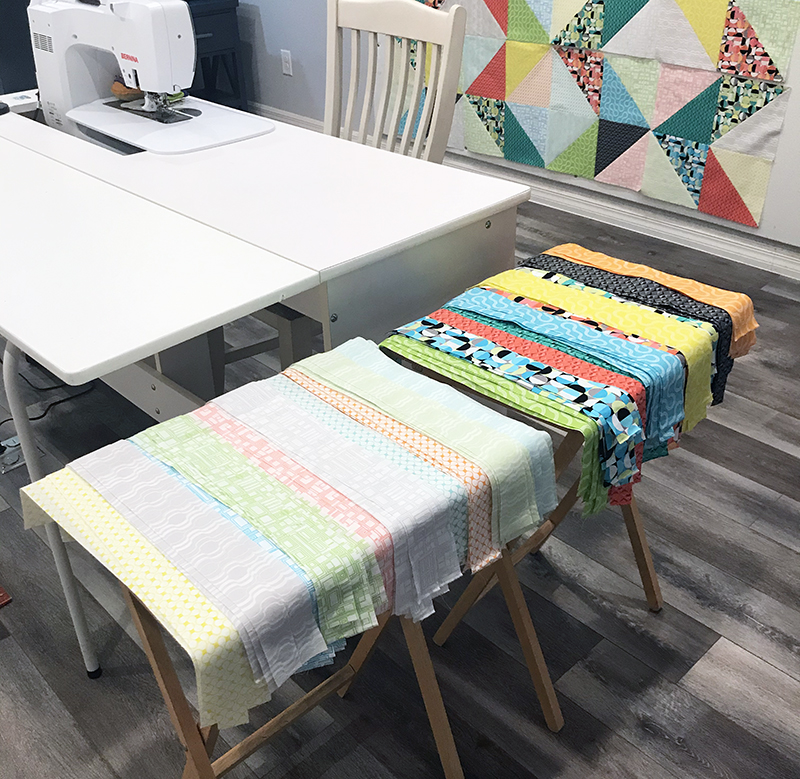
I made 20 blocks for the crib size layout shown above. Then I decided I wanted to make the bigger throw size. That’s the beauty about this design – you can always make more blocks at any time!

I spent a lot of time arranging the blocks on my design wall until I was happy with their placement. Take a picture with your camera phone to help you stay organized.

Modern Logs Quilt in Progress

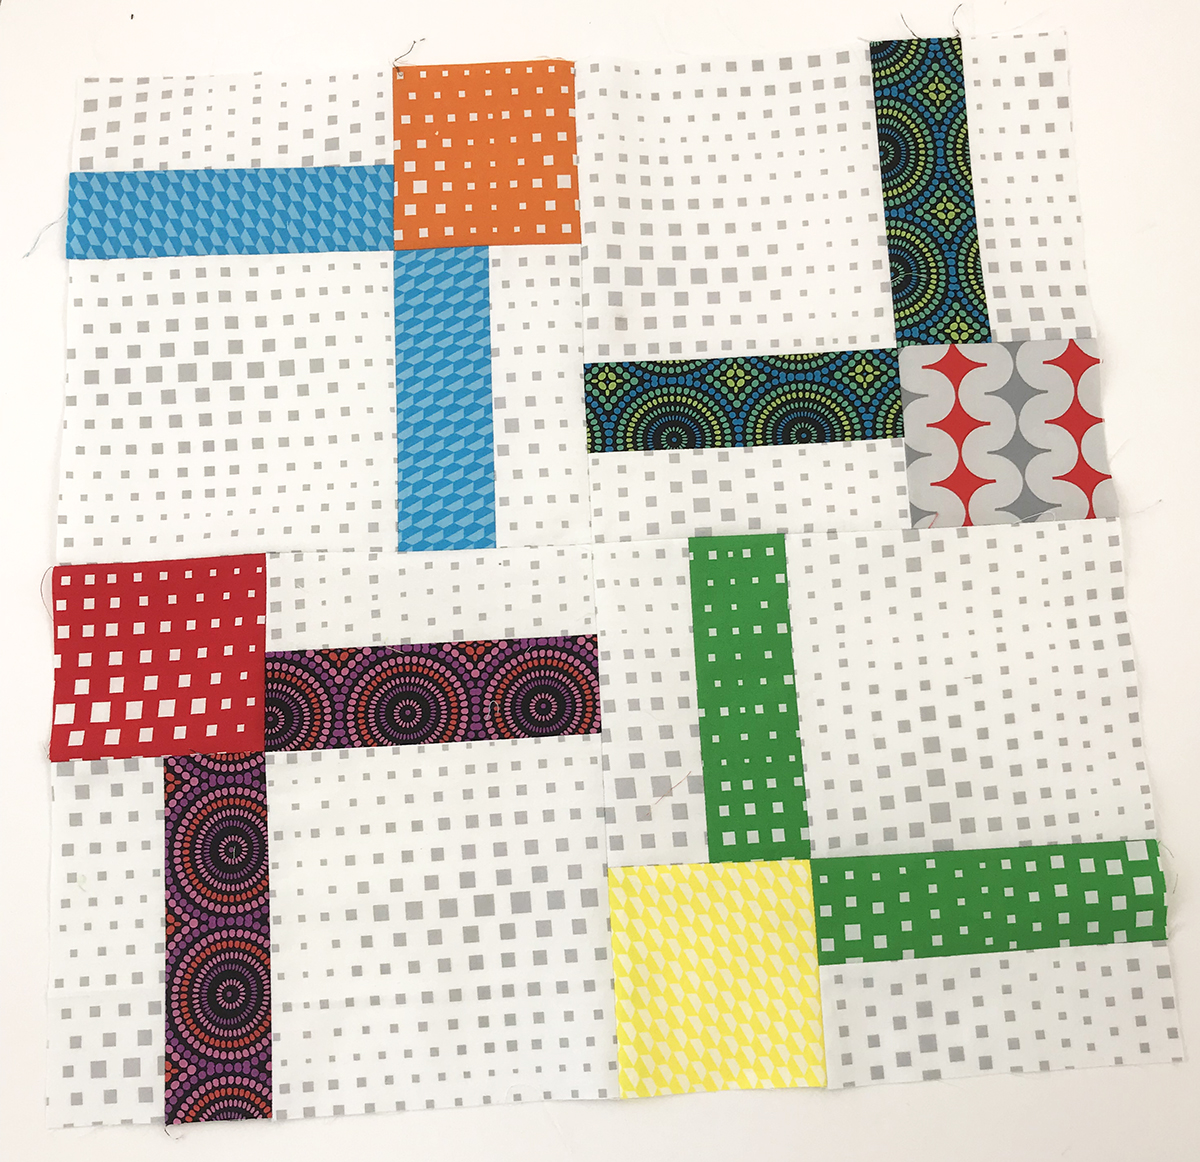
This quilt goes together super fast fast and easy because you don’t have to pin the individual blocks. As long as they are the same size everything will fit together nicely because there are no seams to match in each row!!

Just remember to use accurate 1/4 seams allowances, lower your stitch length, and press seams open to keep everything nice and flat:

Sewing in progress

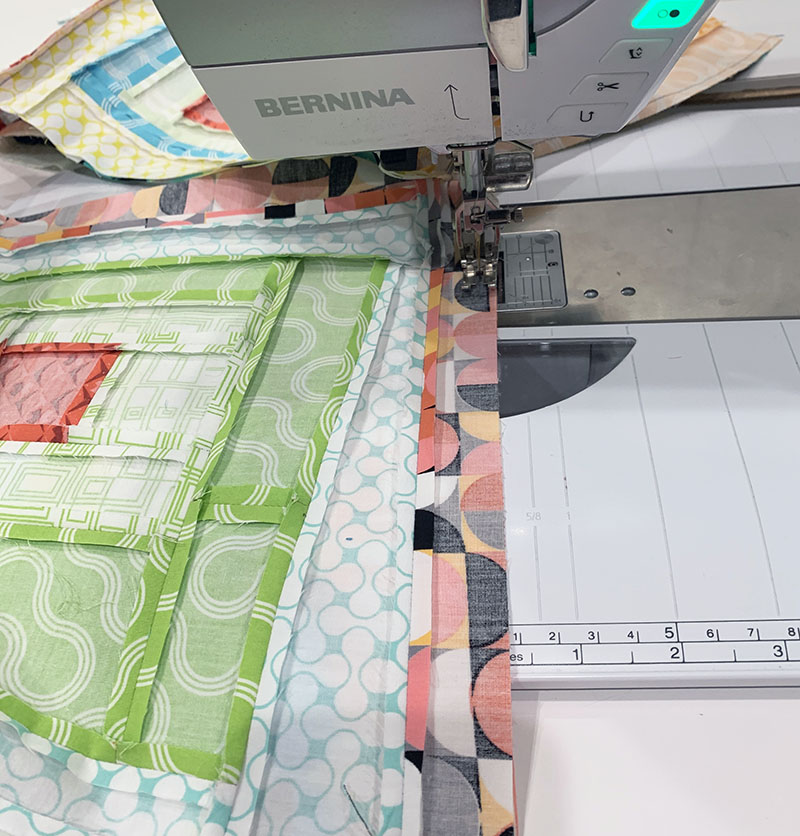
When joining the rows, be sure to sew them in opposite directions so that everything stays nice and flat. Refer to the Modern Logs quilt pattern on pages 8-9 for size layout and quilt top assembly diagrams.

Modern Logs by Christa Watson

It’s a lot easier to handle the bulk of the quilt if you press your blocks after each pair sewn. Then press each of the finished rows, then pairs of rows etc. In general I like to press my work after each seem is sewn as part of the process.

Once the entire quilt top is finished, take a “victory lap!” Sew around the edges of the quilt to keep them from stretching out of shape and to secure the edge seams from splitting open.

Modern Logs by Christa Watson

Before you know it you’ll have a finished quilt top!! Next week we will prep the backing. You can either purchase all new fabric, or use up the leftovers with some yardage chunks depending on the size you are making. The choice is up to you but it’s easier (and more fun) than you think!

HELPFUL LINKS

Modern Logs QAL Part 2 – Sewing the Blocks

Now it’s time to take our wonky strips and sew them together into improv Log cabin blocks!
Follow along with the Modern Logs quilt pattern on pages 4-7.

Thinking ahead: you can sew scraps together if you need more length for each of the logs. You can also use either side of the fabric to give your blocks more interest and sparkle. The key is that these blocks are wonky and improv so no two blocks will be exactly the same!

The block below is what I call “super improv”.  It has a couple places where I’ve added extra fabric to make the units large enough. I’ve also used both front and back of the low volume Good Vibes fabric.

Video Demo & Chat

As you sew it’s okay to have extra seams or bonus pops of color. Because the improv nature makes it hard to say EXACTLY how much fabric you’ll need, it’s ok to add filler pieces or sew shorter pieces together to get a loner piece. It all just adds to the charm! Notice that I used the same fabric for each round of blocks and all of the front or back, but you can even change that up too.

So now, let’s get to it! I share and indepth chat about making these blocks which you can click play below or watch over on my YouTube channel.

Follow the Modern Logs quilt pattern to sew as many rounds of logs as you need to get them to be slightly larger than the correct unfinished size. I recommend just making a few blocks at a time until you get the hang of it.

Bonus sewing tips:

When you are sewing the logs don’t overthink it! As long as the pattern goes light-dark-light or dark-light-dark it will look good, no matter which colors are in each block. Sew with shorter stitch length and press seams open for nice, flat blocks.

Match up a different light with a different dark for each block you are making for a scrappier look. Try to use different fabrics in each block

Remember to trim your edges even right before you sew it each time. That keeps the edges straight and keeps the chaos under control!

Unlike regular log cabins, you don’t have to sew the blocks in the same order or add strips to the same side of each block. Just remember, the more variety the better. It looks more interesting when the seams aren’t all in the same spot.

Show me your blocks!!

Modern Logs Blocks

Homework: Finish Sewing all of the Full Blocks and Partial Blocks

Make as many as you need according to the size you are making in the quilt pattern. Just remember: if your leftover strip pieces aren’t long enough to finish a round of logs, either save it for a shorter piece on another block, or sew part of another strip to make it long enough. Or fill in the extra with a leftover scrap from another strip.

Modern Logs Partial Blocks

Save YOur Leftover Strips!

For those of you who want to use up the leftovers on the back, set aside your leftover strips, hunks and chunks. We will put them to good use soon!

HELPFUL LINKS

Modern Logs Quilt Detail

Facebook Live Chats are Back: Tuesdays at 3 PM PST

To go along with the Modern Logs Quilt Along that just recently started, I’m hosting a weekly Facebook Live chat for the duration of the Quilt Along. This will allow me to share some bonus tips and tricks along with a chance for you to ask any questions you have while making this quilt!

Click here to get the Good Vibes fat quarters above

Bonus Tips and Tricks on YouTube

In case you missed it, I posted the first Modern Logs Q&A over on my YouTube channel. You can enjoy last week’s chat by clicking the play button below. Then join me live in my Facebook group for the next chat!


I’ve found that many people have questions around improvisational piecing and of course the whole quilting process. I’m excited to answer your questions about this quilt during the entire process, and I think you’ll feel confident about your skills by the end of the QAL! 

Click here to get the Modern Logs Quilt Pattern – paper version
Click here to get the Modern Logs Quilt Pattern – PDF version

Although the quilt along has just begun,  it’s not too late to follow along. Feel free to work at your own pace and access all steps of the quilt along indefinitely.

Modern Logs by Christa Watson

Click here to get the optional Modern Logs Kit

One of the things people like best about my FREE quilt alongs is the help I offer on machine quilting so that you can finish the quilt yourself.

It is the best feeling to make a quilt from the first stitch to the last! I really enjoy sharing the things I’ve learned about quilting on a home sewing machine so that you can be successful at it, too.

 If you already have questions for me, please leave them here in the comments and I’ll answer them live on the air tomorrow, September 8 at 3 pm Pacific/6 Eastern in the Christa Quilts Group on FB. I can hardly wait!

Modern Logs QAL Part 1: Cutting the Fat Quarters

Let’s dive in and cut out our Modern Logs fat quarters, shall we? I’m using Good Vibes fat quarters, but you can use anything with good contrast between light and dark. In case you missed it, click here for last week’s post on prepping your fabric and choosing colors.

Good Vibes Fat Quarters

Click here to grab Good Vibes fat quarters from my online shop.

Follow along in the Modern Logs quilt pattern on page 3 for the numbers and sizes of wonky strips to cut.

Fat Quarter Cutting Tips

Layer fabrics to cut them out faster! If you are cutting 4 layers at a time, cut each stack differently so no more than 4 strips are the same. Then when you are ready to sew, remember that each strip has a top and bottom, front and back so you’ll have more variety of angles and color intensity when you sew.

Next week when we start to sew the blocks we are doing what I call  “structured improv.” This means you want your strips to have straight edges, even though the angles themselves are wonky. Cut the wonky strips using a rotary cutter and ruler. This allows the blocks to lie flat when sewn, even if all the pieces are different shapes and sizes.

You can see above why it’s easiest to work with fat quarters and a long ruler for straight clean cuts.

After cutting, stack the same fabrics together.  Im going to use the front and back of the lights in this quilt to create more depth and sparkle. The number of strips you get per fat quarter will vary. You can cut a few strips to start, or go crazy and cut up the entire piece.

Don’t forget to cut the block centers. Each side will be straight but these may be more square in shape or more rectangular. The choice is up to you!

Once my strips and centers are all cut and sorted into lights and darks, I like to stack them up next to my machine so they are ready to sew. Warning: this will get a little messy as you sew! So give yourself plenty of room to spread out and work.

Do you see the Charming Chevrons quilt in progress on my design wall??
It’s made from Good Vibes precut squares.

Thinking ahead: it’s ok to cut some of your wider strips in half along the length if you need more pieces to go around the logs. Now it’s your turn – show me your wonky strips!! Share pics of your progress and feel free to ask questions in my ChristaQuilts Facebook Group.

HELPFUL LINKS

Good Vibes Quilts in the Wild – Quilts Made from by My Friends

It’s been exciting to see Good Vibes turning up in other people’s projects! One of the best parts of fabric design is discovering what others make with my prints from Benartex. I’m happy to feature several of those projects today.

Propeller by Sherry Shish of Powered by Quilting

Sherry Shish of Powered by Quilting  used the Slippin’ Slide print in all four colors for her propellers, nicely accented by the Gumballs prints in the corners. I like the secondary design formed by the Gumballs at the center—it’s another propeller!

Sherry took full advantage of the low-volume prints in Good Vibes and I could not love her background fabrics more. What a great soft look she achieved by using Circuit Board, Good Vibrations and Interconnected.

Click here to get Sherry’s Propeller pattern.

Groovy Chutes by Charisma Horton

Charisma Horton took full advantage of the Gumballs’ medium scale and graphic quality when she made her 80″ x 90″ Groovy Chutes quilt. This modern design shows off the saturated colors of Good Vibes beautifully! And didn’t she find the perfect spot for photography?

Click here to get Charisma’s Groovy Chutes pattern.

Dropping In by Sarah Vanderburgh of Sew Joy Creations

Dropping In by Sew Joy Creations

Sarah Vandenburgh of Sew Joy Creations designed this delightful quilt called Dropping In and ask if I’d offer kits for it. Of course I said yes and she’s also currently offering a quilt along for it.

Quilt Along in Progress!

Below is Sarah’s dropping in quilt in progress. Click here to join the quilt along fun!!

These are just a few of the fun projects I’ve seen online but I’m always on the lookout for more! If you make something with my fabrics, please let me know! You can use #goodvibesfabric on social media, or post pics in my ChristaQuilts Group on Facebook. I love to see them all!

Click here to shop my Good Vibes fabrics, bundles, precuts and kits.

Good Vibes by Christa Watson for Benartex

Bling Quilt Along Part 5 – Binding to Finish and Ta-Da It’s Done!!

Have you been enjoying following along to make Bling? Scroll to the end for links to the entire quilt along. This week we will be binding our Bling to finish it up!

Bling Quilts with Geo Pop

Roundup of binding tutorials

Because I pretty much bind my quilts all the same way (either by hand or machine), I have a LOT of binding tutorials that I’ve shared over the years. So here are 3 for you to try – use whichever method you like best!

Bonus Binding Tips

When I first began my binding adventures, I cut my strips 2 1/4″ wide. However, that meant that if I attached my binding with 1/4″ seams, it would be bigger on the back than the front. So over the last couple of years, I’ve started cutting my strips 2″ wide and that gives me a more even finish on both sides.

To avoid ending up with a seam in the corner, I will roughly “walk” my binding around the quilt and if any seams fall in the corners, I will adjust the whole binding by and inch or two before I start sewing. If worse comes to worse and I STILL get a seam on the corner, I’ll simply cut off part of the binding and sew a new seam to move it!

Homework

Finish quilting and binding your version of Bling and share it in my ChristaQuilts Facebook Group. I can’t wait to see your fabulous finish!

Bling Quilt Pattern by Christa Watson

QUILT ALONG LINKS

Bling Quilts White or Black

Bling Finished Stats

  • Finished size: 67″ x 83″
  • Designed using Electric Quilt 8 software
  • Pieced and quilted by Christa Watson on my Bernina 770QE
  • Fabric collection: Geo Pop by Christa Watson for Benartex
  • Pattern: Bling  by Christa Watson
  • Batting used: Hobbs Cotton/Wool
  • Thread used: Aurifil 50 weight cotton in black/white variegated and bright pink
  • Quilting designs: wavy grid (white) and straight line grid (black)
  • Completed: May of 2019

Modern Logs Quilt Along Schedule and Supply List

Modern Logs has been one of my most requested quilt alongs ever and I’m so excited for it to begin! To get you ready, I’m sharing the full supply list and schedule today; then next week I’ll include a bonus post on choosing fabrics. The QAL will kick off on Wednesday, September 2nd.

For a limited time, I’m offering Modern Logs Quilt kits in all 3 sizes including the pattern!

Click here to get the Modern Logs Quilt Kit while supplies last.

Modern Logs: Scrappy Improv Front and Back

As part of the quilt along, I’ll include bonus tips and tricks on how to make a pieced backing if you so desire. But I’ll include a tutorial on sewing a regular back if that’s your preference too. For my Throw size, I paired up a couple yards of the Good Vibes Gumballs print with my leftover strips plus a few other pieces from my scrap stash.

Pieced Quilt Backing

I love using up lots of leftover scraps on the back. It’s a unique piece of art every time!

Modern Logs is the perfect pattern to learn a little bit of improv piecing, but in a structured way. I continued that theme by using up as many scraps as I could on the back. Although it’s a bit of improv, there’s a method to my madness that keeps everything under control.

Modern Logs Pattern and Materials List

Modern Logs Quilt Pattern

Click the image above to enlarge for details.

This quilt is really easy to chose fabrics for. All you need is an equal number of lights and darks. You can select fat quarters as shown in the pattern above (10 of each light/dark for crib, 20 each light/dark for throw and 30 each light/dark for queen). Or you can use leftover precut strips and other scraps. Pretty much any cut of fabric will work, and no two quilts will end up looking exactly the same.

Good Vibes fat quartersClick here to view all Good Vibes fabrics.

I’m using Good Vibes fat quarters for my quilt shown above, and I’ll be using duplicates so that I have enough fabric for the larger size. But this pattern is extremely flexible in which fabrics you choose (more about color selections next week).

Other Recommended Supplies

  • Sewing machine in good working order. We will do an easy free-motion quilting design, so make sure you have a free-motion foot to fit your machine. Of course I love my BERNINA 770 QE with its wider throat space and lots of bells and whistles.

BERNINA 770QE

Click here to see all the features I love on my BERNINA 770QE

  • Brand new sewing needles. Always, clean, de-lint and oil your machine before starting a new project, and change the needle. My favorite needles are Superior Titanium Coated needles, size 80/12. I use these for both piecing and quilting:

Superior Threads Needles

  • Quality thread for both piecing and quilting. My preference is Aurifil 50 weight 100% cotton. This pairs well with my favorite needles above. And if you piece and quilt with quality cotton thread, your quilt will NOT get stiff when you quilt it. I’m using my Piece and Quilt Collection Colors for the entire quilt:

Piece and Quilt Aurifil thread by Christa Watson

Click here to view my favorite threads and supplies.

  • Acrylic rulers: 6″- 8″ wide by  24″ long ruler, and 12 1/2″ x 12 1/2″ square ruler. These rulers will really come in handy. I use the long ruler for cutting an entire length of a fat quarter. The square rulers are for squaring up your blocks so they are all a consistent size.

Modern Logs Quilt Along Schedule

The links below will go live as each part is posted. Bookmark this page and refer back to the schedule anytime in the future to work on this quilt at your own pace. So gather your supplies and get ready to sew!

Modern Logs by Christa Watson

Get your Modern Logs Pattern and Supplies below:

Modern Logs Quilt Detail

Bonus Help!

For any questions, sharing your progress, and bonus help and support of your fellow makers, be sure to join my ChristaQuilts Group on Facebook. You can also share your makes on social media using #modernlogsquilt.

Want to get notified each time the quilt along step is posted? Enter your email address in the sidebar to automatically follow my blog. This can be found either to the right of your screen on a computer or laptop. Or scroll allllll the way down to the bottom of this page to see it on your mobile device.

I can’t wait to see what YOU create!!!

Bling Quilt Along Part 4: Machine Quilting Option 2: Wavy Grid

This week I’m super excited to give you additional options for machine quilting your Bling quilt. I quilted both of my versions with two different walking foot quilting designs. Last week, I shared my basting tutorial along with option 1; and I wanted to add one more plug for pressing your seams open:

When you press your seams open, not only will the quilt lie flat and make it much easier to quilt, but you wan’t get any “shadowing” of the seams, which is when a darker fabric shows up under a lighter fabric seam. The darker fabric always goes to the darker side, and the lighter fabric always goes to the lighter side.

But here’s a bonus tip when working with lighter background fabrics such as in this version of Bling: be sure to clip off any excess darker threads underneath so you don’t see them from the front of the quilt. If this does happen, you can always use a needle or tiny crochet hook to grab any pesky threads that show underneath the quilt top.

Machine Quilting Wavy Grid

To recap both both machine quilting options mentioned in the Bling quilt pattern, check out this short video below which shows me quilting wavy lines on the white version and a straight-line grid on the black version:

Check out more fun tutorials on my YouTube channel.

The basic idea for either quilting plan is to “divide and conquer” – quilt one pass of lines in both directions all the way across the quilt. Then quilt additional passes across the quilt until you like the density. You can do this with straight lines, or irregular wavy lines. I’ve even used a decorative stitch on my sewing machine using the same process!

Choosing Thread

For the white version of Bling, I went with a more subtle thread than the hot pink I chose for the black version. I like to take a picture of the thread I’m using on the quilt so I can document it to know which one I used. This black/white/gray thread is included in my Variegated Thread Collection from Aurifil. 

I prefer to quilt with 50 weight, 100% cotton thread from Aurifil.

1st pass across the quilt

So let me break it down for you a little bit in photos. In the first pass across the quilt, you can barely see any quilting. I’m quilting an organic wavy line “near” the ditch rather than “in” the ditch and it really blends in. The lines are really widely spaced apart, in between each of the block rows.

Click the image above to enlarge. Can you spot the quilting lines?

To quilt wavy lines, my machine is set up for regular straight line stitching, but I gently move the quilt from side to side to form the organic looking wavy lines.

2nd pass across the quilt

The next quilting pass is roughly through the center of the blocks. I use the seam lines as a guide for where to quilt. The wavy lines are fast and easy to quilt because you can eyeball where you are going and the lines don’t have to be perfectly spaced.

It helps to have a large work surface and a drop in table to hold the weight of the quilt.

The wavy lines are actually must faster, and it’s my go-to design when I’m in a hurry! In fact, by quilting wavy lines “near” the ditch, instead of “in” the ditch, it’s a great choice when your ditches (seams) don’t line up perfectly.

Quilt in both directions

To keep the wavy grid as evenly spaced as possible, you will want to quilt in both directions – horizontally and vertically with each pass. Just rotate the quilt in the direction you need to go!

Now the yummy quilted texture is starting to appear!!
Just remember, the more lines you quilt, the less your imperfections will show!

use the seamlines as a guide

Here’s a really good example where you can see how I lined up the wavy lines with the pieced seams in both directions. The block design is a little off center so the lines aren’t all evenly spaced, but that’s hardly noticeable. This allows me to avoid marking because much easier to eyeball the wavy lines rather than straight ones.

Keep Quilting more lines!

By the time I’m finished, my lines will be quilted about 3/4″ to 1″ apart in both directions. This is completely a personal preference and it’s up to you how dense you’d like to quilt. Just remember, if you are using natural fiber materials (ie cotton fabric, cotton thread, cotton batting), the quilt will NOT get stiff the more you quilt it. And the more you love it, use it and wash it, the softer it will become!

I eventually lost track of how many passes I quilted, but I kept going until I liked the results!

Additional QAl resources for Bling

Bling Quilt Along Part 2: Sewing the Quilt Top

How are your Bling quilt blocks coming along? Be sure to see the end of this post for links to the introductory post and QAL schedule if you are just getting started!

Bling Blocks

I love a stack of freshly pressed blocks!!

If you are following along and arranging the blocks as shown on the pattern cover, you’ll want to sew your sets of bling blocks into 4’s like my pics below.

Geo Pop Bling

Geo Pop Bling blocks with Op Squares white background

At this point, don’t worry where each fabric goes. I think it’s more fun to let the blocks be random than trying to overthink it too much.

Geo Pop BlingGeo Pop Bling blocks with Tiny Hex Black background

In the Bling quilt pattern, I’ve given 4 more layout ideas for you to explore if you wish. There are plenty more iterations you can try depending on how much you rotate each block!

Bling Alternate layouts

Sewing “Homework”

Your homework this week is to finish your blocks and sew them into larger groupings of 2’s or 4’s, then sew those into rows. If you get that far and are feeling gung ho – go ahead and finish up your “flimsy” (aka unquilted top).

Bling Quilt Top in Progress

In the versions above and below, I’ve sewn my blocks into random groups of four according to the orientation on the front pattern cover. I’m using my design wall to lay out the larger blocks into a pleasing arrangement.

Black Bling Blocks

Bonus Tips!

I try to speed things up as efficiently as I can. I’ll chain piece by sewing pairs of blocks together without clipping threads in between, and I give myself plenty of room to work. I’ll also take a pic of my final layout with my phone so I can refer to it as I sew each row.

Bling Blocks in progress

I’m enjoying see the progress of those who share on instagram (#blingquilt) and in my ChristaQuilts facebook group!

Helpful Links

Bling Quilt Along Part 1: Cutting and Sewing the Blocks

It’s Bling quilt along time – whoo hoo!! This quilt is so fun and fast to make you’ll want to sew more than 1! We will move through this quilt along quickly – but just remember, these posts will stay up indefinitely, so you can refer back to them anytime.

Bling Quilts with Geo Pop

Bling on display in my Geo Pop quilt market booth a few seasons ago.

Whether you want to follow along and make this quilt IRL (in real life) or just virtually in your head, I’m excited to share tips and tricks over the next 5 weeks that will help you make better quilts, no matter which quilt pattern you are sewing. So let’s get started!!!

Bling Cutting Options

Geo Pop fabric for Bling quilt by Christa Watson of Christa Quilts

Above is all of the cut units for Bling made from Geo Pop with Tiny Hex black background.

Start by cutting your fat quarters into subunits as listed in the Bling quilt pattern on page 2. I’m making the twin size, but follow along by cutting the number of units as indicate for your size (lap, twin, queen).

Below is all of the cut units for Bling made from Geo Pop with Op Squares white background.

Geo Pop Fabric for Bling Quilt by Christa Watson

You can use all of the same background fabric as shown in my pictures above, or you can go scrappy if you wish (see other color ideas here). Just remember to cut out the correct number of total pieces as listed in the pattern for your size.

Bling in Good Vibes

For example, if you want a scrappy background version shown above, you can cut out each block background from a different low volume print. In my example, I used half yard bundles of Good Vibes in low volume and saturated prints to get this look, but you could use up lots of scraps this way, too.

Be sure to pair up the “legs” of your block units if you want them to match (but they certainly don’t have to). You can even mix up the backgrounds within each block to go “super” scrappy, too. Just remember – the choice is up to you because you are the boss of your quilt!

Thread Options

I prefer to sew with a shorter stitch length (2.0 instead of 2.5) and press ALL seams open so my blocks lie nice and flat. Sewing with a shorter stitch also prevents the seams from splitting open, and it makes it harder to see the thread in between the seams.

Aurifil Thread and Geo Pop fabric

I used up lots of leftover thread in making these quilts. I prefer to piece and quilt with Aurifil 50 weight cotton, and I used up lots of leftover bobbins since this was such a colorful quilt!

I used lighter colored piecing threads for the version with the white background, and darker threads for the version with the black background. Aurifil Thread and Geo Pop Fabric

Whenever I’m making a scrappy, colorful quilt, I’l try to use up as many spools as possible that just have a little bit of thread left on them.  Who says you have to use the same exact color of thread throughout? I love finishing up a spool of thread – don’t you??

Block Sewing Options

Follow the pattern instructions on pages 2-3 to create the basic Bling block below. I recommend sewing one block first, to make sure it turns out correctly, then chain piecing a whole bunch of units at once for speed and efficiency.

Bling Block

The fun part about making this block is mixing up the different fabric combinations. There’s no right or wrong way to pair them up. Just go for it and don’t over think it!!

Below is the back side of one of my blocks with those nice flat seams. This will make quilting sooooooo much easier, because the quilt top will be smooth and flat in the end.

Bling Block White

If you’d like to be a bit adventurous, here are a couple of bonus ideas on how you can sew your block units:

In the option below, I’ve rotated the position of the rectangle units.

Geo Pop Bling

Here’s what the blocks above will look like (in the white version) if you repeat this option throughout the entire quilt. The math and number of blocks is all the same, but what a huge variation one small change will create!!

Bling Alternate Blocks

Here’s another option to try: go super scrappy by using 3 prints in each block, rather than 2. Again, there’s not much thinking involved in this change.

Sew all of the rectangle units first (see the Bling pattern, page 2) and then decide if you want to make coordinating or super scrappy blocks. Or maybe a mix of both!

Geo Pop Bling

You can also try the other extreme: using all of the same print for the main part of the block!

Isn’t it fun to have choices????

Bling block same fabric

Whichever way you choose to sew your blocks – they will look fabulous!

Homework: Sew all of the Bling Blocks

Quilty “homework” is the best kind of homework!! Now that you have several options to try, work on sewing all of your Bling blocks this week. Don’t worry if you fall behind – just work on a few blocks a day, and you’ll have them done in no time!

Bling Blocks

Remember, I’m here to help and cheer you on – even after the quilt along is over. Check out the resources below to help enhance your quilt along experience:

Additional Resources